1
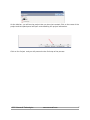
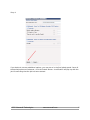
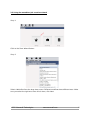
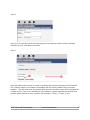
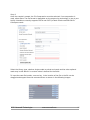
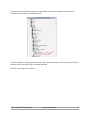
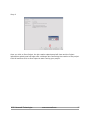
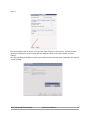
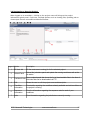
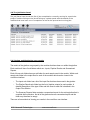
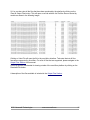
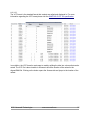
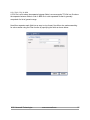
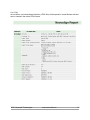
NovoWorx User Manual
Version 1.0
EXOME WORKFLOW
Table of Contents
1.0 Using the Multisample CSV file input................................................................................. 3
2.0 Starting your workflow ...................................................................................................... 5
2.1 Creating your Project......................................................................................................... 5
Step 1................................................................................................................................. 5
Step 2................................................................................................................................. 6
Step 3................................................................................................................................. 7
Step 4................................................................................................................................. 8
2.2 Using the novoWorx job creation wizard............................................................................ 9
Step 1................................................................................................................................. 9
Step 2................................................................................................................................. 9
Step 3............................................................................................................................... 10
Step 4............................................................................................................................... 10
Step 5............................................................................................................................... 11
Step 6............................................................................................................................... 13
Step 7............................................................................................................................... 14
3.0 Navigating a Running Project ......................................................................................... 15
4.0 The Job Status Panel...................................................................................................... 16
5.0 Viewing and Monitoring your results................................................................................ 16
6.0 Using the sidebar............................................................................................................ 17
7.0 Using the project job information view ............................................................................ 18
8.0 Output Files .................................................................................................................... 20
8.1 BAM............................................................................................................................ 21
8.2 VCF............................................................................................................................ 22
8.3 CSV & TSV & BED..................................................................................................... 23
8.4 HTML ......................................................................................................................... 24
8.5 TXT............................................................................................................................. 25
2015. Novocraft Technologies
www.novocraft.com
2
1.0 Using the Multisample CSV file input
The exome multisample project workflow is designed to enable users to design and run a
large set of data samples without having to input each sample individually. This is done
using a comma separated value file which holds all the necessary information to set up the
experiment
To create a Workflow, the csv file has to be populated with the following details.
sample_name,condition,format,type,file1,file2,mean,stddev
Field Name
Description
sample_name
The individual sample name. This is a
unique identifier for each sample.
condition
The sample condition . All samples with the
same condition will be merged and will
produce one BAM and one VCF per
condition.
format
The fomat of the file. This is either
fastq,csfastq, fasta or csfasta.
type
The type of read. This is either Mate-Pair,
Pair-End, or Fragment.
file1
The full path of the first read.
file2 (optional)
The full path of the second read. This may
be left blank if only one read is present.
mean (optional)
The mean of the read length in base pairs.
This field is optional and may be left empty
stddev (optional)
The Standard Deviation of the read length
in base pairs. This field is optional and may
be left empty.
2015. Novocraft Technologies
www.novocraft.com
3
An example of a line in the CSV file is as below:Example of a sample with 2 reads:
NFLE,6417,fastq,paired-end,/home/user/6417_R1.fastq.gz,/home/user/6417_R2.fastq.gz,0,0
Example of a sample with only 1 read including the mean and standard deviation:
NFLE,6417,fastq,paired-end,/home/user/6417_R1.fastq.gz,,0,0
Example of a sample with only 1 read and NOT inclusive of the mean and standard
deviation:
NFLE,6417,fastq,paired-end,/home/user/6417_R1.fastq.gz
Each line represents one sample in the experiment.
It should be noted that the novoWorx pipeline groups all the samples into the condition that
they are placed in. If separate BAM files are necessary, they should be named uniquely as
follows:
NFLE_6417,6417,fastq,pairedend,/home/user/6417_R1.fastq.gz,/home/user/6417_R2.fastq.gz,0,0
NFLE_6418,6418,fastq,pairedend,/home/user/6417_R1.fastq.gz,/home/user/6417_R2.fastq.gz,0,0
2015. Novocraft Technologies
www.novocraft.com
4
2.0 Starting your workflow
2.1 Creating your Project
Step 1
When logged on to novoWorx, click on the Create button and select Create Project
2015. Novocraft Technologies
www.novocraft.com
5
Step 2
Fill in the details of the project as desired. Click on the Direct Upload radio button and
browse for the CSV configuration file.
Once the CSV file is uploaded, click on the Save button at the bottom of the page. Click OK
on the project creation confirmation dialog pop up.
Step 3
2015. Novocraft Technologies
www.novocraft.com
6
On the side bar, you will see the project that you have just created. Click on the name of the
project and the splash panel will open a tab detailing the project information.
Click on Run Project and you will proceed to the final step of the process.
2015. Novocraft Technologies
www.novocraft.com
7
Step 4
If you desire to use any additional options, you may do so in the final splash panel. Once all
the desired options are selected, click the Submit button. A notification will pop up with the
Job ID confirming that the job has been started.
2015. Novocraft Technologies
www.novocraft.com
8
2.2 Using the novoWorx job creation wizard
Step 1
Click on the Start Wizard Button.
Step 2
Select a Workflow from the drop down menu. Different workflows have different uses. Make
sure you select the right one! Once this is done, click Next.
2015. Novocraft Technologies
www.novocraft.com
9
Step 3
Here you can input the name and description for the project as well as select a suitable
reference to use. Click Next to continue.
Step 4
Once the splash panel comes up, enter a condition name before clicking on Add a Sample.
The condition name is not unique and samples with the same condition will be merged
together. This will mean that the samples with the same condition name will be merged into
a single vcf file. If this is not desirable for your research, please separate the samples and
provide unique names for each condition (for example : Tumor_1, Tumor_2, etc).
2015. Novocraft Technologies
www.novocraft.com
10
Step 5
Once the sample is named, the File Compression must be selected. If no compression is
used, select None. The file format is dependent on the sequencing technology in use at your
facility. NovoWorx currently supports FASTA and FASTQ of both Illumina and ABI SOLiD
Colorspace reads.
Select the Library type, whether single-ended or paired-end reads and the other optional
reads may be left blank if no custom value is desired for the fields.
To input the read file location, one can key in the location of the file or the file can be
dragged and dropped from the mounted drives as shown in the following images:
2015. Novocraft Technologies
www.novocraft.com
11
Click on My Mounted Drives to get an expandable list of drives and files mounted and
navigate to the location of the desired file.
Click and drag the empty space next to the file name and drop it in the file location field. Do
the same with the second file for paired-end data.
Click on Save Project to continue.
2015. Novocraft Technologies
www.novocraft.com
12
Step 6
Once you click on Save Project, the job creation splash panel will close and the Project
information splash panel will open with a dialogue box confirming the creation of the project.
Click OK and then click on Run Project to start running your project.
2015. Novocraft Technologies
www.novocraft.com
13
Step 7
The final splash panel is where you input the final options for the project. If none of these
options are desired or you would prefer the default values, leave them blank and click
Submit.
You will get another dialog box letting you know that the job has been submitted and the job
is now running.
2015. Novocraft Technologies
www.novocraft.com
14
3.0 Navigating a Running Project
When logged on to novoWorx, clicking on the project name will bring up the project
information splash panel. From here, multiple options such as viewing jobs, updating jobs or
view output files are accessible as described below.
Legend Option
Description
1
Kill Last Job
Kill the most recent running job for the selected project.
2
Reload Panel
Reload the job status panel and update the running module as well as the
job status.
3
Published Links
Open a splash panel that shows the list of downloadable files in the form of
web links that can be downloaded via FTP.
4
Edit
Allows the user to edit the project name and description.
5
Condition
Information
View details regarding the conditions already available and add conditions as
the project is running.
6
Sequence
Information
View the information regarding the sequence sets for each of your
conditions.
7
Jobs
View information regarding the jobs that are currently running.
2015. Novocraft Technologies
www.novocraft.com
15
4.0 The Job Status Panel
The Job Status Panel shows the list of jobs completed or currently running for a particular
project. Double-clicking on the job will bring up a splash panel with the details of the
modules that have been run to completion as well as the queued and running jobs.
5.0 Viewing and Monitoring your results
The results of the pipeline are grouped by the modules that have been run within the pipeline.
Each module will have 3 sub-folders which are:- Inputs, Pipeline Results and Summarized
Reports .
Each of these sub-folders has one sub-folder for each sample used in the module. Within each
sample sub-folder is the output files for each of the modules which can be viewed in the
novoWorx interface.
–
The Inputs sub-folder has a list of the input files that have been used in the pipeline.
–
The Pipeline Results sub-folder has the list of pipeline outputs for each module. A
detailed Description of the type of files and the views for each file is detailed in the
Output Files Section.
–
The Summary Reports folder contains a summarized report for the entire pipeline that is
compiled after conclusion. Not all of the pipelines have a summarized report and the
folder may therefore be empty.
There are a few methods of viewing your results in the novoWorx user interface.
2015. Novocraft Technologies
www.novocraft.com
16
6.0 Using the sidebar
Expanding the side bar for each of the project folders reveals the results for each module in the
pipeline. Clicking the file name will open a new tab in the main panel which will show the files in
an easy to understand format.
The sidebar is repopulated every time a module finishes. New outputs will be revealed as the
modules are completed.
2015. Novocraft Technologies
www.novocraft.com
17
7.0 Using the project job information view
The project information job view shows a more comprehensive list of outputs for each job that
has been run.
Double clicking on the Job ID that you wish to view will bring up a list of the completed modules
or running modules as shown below:
Based on the image above:1) Clicking on the results you would like to view will bring up a list of associated documents
and/or files that can be viewed in novoWorx or downloaded for your reference as shown below:
2015. Novocraft Technologies
www.novocraft.com
18
2) You can also view all the files that have been produced by the pipeline by clicking on the
View All Output Files button. This will open a new tab with the list of all the files not sorted by
module as shown in the following image:-
Clicking on View File will open the file in the novoWorx interface. Take note that not all files
formats are supported by novoWorx. For a list of files that are supported, please navigate to the
Output Files Section of this manual.
Files may also be downloaded for viewing outside of the novoWorx platform by clicking on the
Download File button.
A description of the files available is included in the Output Files Section.
2015. Novocraft Technologies
www.novocraft.com
19
8.0 Output Files
NovoWorx is able to handle most standard bioinformatics file formats and is able to display
them in an easy to process manner. Among the file formats supported by novoWorx are :–
BAM
–
VCF
–
CSV
–
TSV
–
HTML
–
TXT
–
BED
The following sections of this manual show examples of how the files are displayed in
novoWorx.
2015. Novocraft Technologies
www.novocraft.com
20
8.1 BAM
A BAM file is a compressed file format that contains the alignments in a binary format. Further
information regarding the BAM and SAM formatting can be obtained at the SAMTOOLS format
specification page.
Double Clicking on the BAM file within the novoWorx interface will bring up the Jbrowse
Genome Browser as shown in the image below:-
Here the BAM file can be viewed in tandem with the reference files. The BAM file is also
downloadable for viewing in the Broad Institute Integrative Genomics Viewer (IGV). To
download the BAM file, navigate to the Alignment section on the sidebar and click the sample
file to view the aligned BAM file. Right click on the BAM file and select Download from the list of
options.
You can also download the file by navigating the Job Information panel.
2015. Novocraft Technologies
www.novocraft.com
21
8.2 VCF
The VCF format is the standard format that variants are called and displayed in. For more
information regarding the VCF format please visit the SAMTOOLS VCF 4.2 specification.
In novoWorx, the VCF format is made easy to read by splitting the tabs into columns that can be
sorted. The VCF file is also viewable in Jbrowse to show the location of the variant in the
aligned BAM file. Clicking on the button opens the Jbrowse tab and jumps to the location of the
variant.
2015. Novocraft Technologies
www.novocraft.com
22
8.3 CSV & TSV & BED
A CSV file is a file where the separator between fields is a comma and a TSV file is a file where
the separator between fields is a tab. A BED file is a tab separated file that is generally
comprised of a list of genomic range.
NovoWorx separates each field into an easy to view format. NovoWorx also makes searching
for values easier using the Filter function by specifying the fields as shown below:
2015. Novocraft Technologies
www.novocraft.com
23
8.4 HTML
As novoWorx is a browse-based interface, HTML files will be opened in a new Browser tab and
can be viewed in the native HTML format.
2015. Novocraft Technologies
www.novocraft.com
24
8.5 TXT
The TXT format is a basic non-formatted text file. In novoWorx, the txt. files are displayed in a
standard tab with no formatting and will look like you opened the file with any standard text
editor. NovoWorx does NOT allow editing for text files.
2015. Novocraft Technologies
www.novocraft.com
25