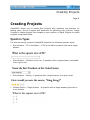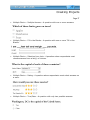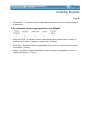
1
User Manual
March 23, 2006
Contents
Contents ..............................................................................................i
Welcome ............................................................................................. 1
Features.............................................................................................. 2
System Requirements ........................................................................... 3
Browser............................................................................................... 4
Creating Projects .................................................................................16
Question Types................................................................................................................16
Quiz Projects ....................................................................................................................19
Survey Projects ...............................................................................................................40
Inserting Slides ...................................................................................54
Question Slides............................................................................................................54
Blank Slides ..................................................................................................................55
Image Slides.................................................................................................................56
Messages ...........................................................................................59
Balloons..........................................................................................................................59
Notes...............................................................................................................................60
Text Box.........................................................................................................................62
Stylesheets.........................................................................................64
Audio .................................................................................................67
Search and Replace .............................................................................70
Format Painter ....................................................................................72
Text Options .......................................................................................74
Color Palette .......................................................................................77
File Export ..........................................................................................78
Project Properties ................................................................................80
Preview and Publish .............................................................................90
Previewing a Viewlet..................................................................................................90
Publishing a Viewlet ...................................................................................................91
Support Options ..................................................................................94
Training..............................................................................................95
Sales .................................................................................................96
Welcome
Page 1
Welcome
Welcome to ViewletACE 2006! ViewletACE provides the most efficient way to create
dynamic Flash quizzes and surveys.
With over ten different question types to choose from and its ability to import
images, audio, sound and even movies including Viewlets, ViewletACE allows you to
create stunning graphical quizzes and surveys in no time.
Other exciting features include Stylesheets that allow global settings of object
properties, a format painter which makes editing very efficient, an extensive list of
action types that empowers you with lots of creativity and full control over timing of
objects. There is of-course, a whole lot more!
With over three million presentations launched every month, Viewlets continue to
be one of the most popular ways of sharing information, providing technical
support, presenting products and training new employees. Now with ViewletACE,
you can get immediate access to valuable information that will enable you to make
the best-informed business decisions. Whether you need to conduct marketing
surveys, perform product concept testing, test the knowledge of your staff or
measure customer satisfaction, ViewletACE makes it easy.
This ViewletACE 2006 User Guide is designed to provide an overview of the
important features you will need to know to start creating your quizzes and
surveys.
Now, let’s get started!
Features
Page 2
Features
ViewletACE 2006 lets you create dynamic Flash quizzes and surveys in no time.
Please visit our website for an overview of its powerful but easy to use features:
http://www.qarbon.com
System Requirements
Page 3
System Requirements
System requirements for using ViewletACE 2006 will depend upon your operating
system. For current information and to achieve the best results possible when
creating quizzes or surveys using ViewletACE 2006, please visit our web site for
more information about the recommended system requirements:
http://www.qarbon.com/presentation-software/viewletace/
Browser
Page 4
Browser
When ViewletACE 2006 is first launched, a Browser side panel view will be opened.
The Browser allows you to easily organize, access and manage the resources that
are available to you while you author your Viewlets. You can add publishing targets,
delete files or folders, view a listing of your Viewlets published on ViewletCentral as
well as view statistics on them.
There is also a Library folder where Stylesheets can be stored for immediate recall.
Another exciting feature is the ability to drag and drop images and SWF files from
the library directly into a project in slide view.
Let’s take a look at all the available features under the Browser.
Browser
Page 5
Adding Publishing Targets
To add a new folder, publish Viewlets to an FTP site, or add your projects to
Corporate ViewletCentral, click on the “Add a Folder, FTP Server or ViewletCentral
Server” icon (green “+” symbol) on the Browser toolbar.
!
The following drop-down menu will open with three options to “Add to a Local or
Network Folder”, “Add to an FTP Server”, or “Add to Corporate ViewletCentral”.
!
Click on the “yellow folder” icon and browse to where you want your new folder
stored.
!
Under “File Name” give the folder an appropriate name and click on “Select
Folder” to add the new folder.
!
Or, click on “Add FTP Server” to open the “FTP Server” screen. Fill in the fields
provided and click on “OK”.
Browser
Page 6
!
And, to add Viewlets to the Corporate ViewletCentral Server, click on the “Add
Corporate ViewletCentral” icon.
!
The following “Corporate ViewletCentral” screen will open prompting you to fill in
the Corporation Central Server information. This information will be sent when
your company subscribes for Self-Hosted ViewletCentral.
!
After the information has been entered in all the fields, select “OK”.
Browser
Page 7
Deleting Folders/Files from the Browser
!
Select the folder by clicking on it and then click on the “Delete” icon on the
Browser toolbar.
!
A warning screen will open asking if you’re sure you want to delete the folder.
!
Click on “yes” to delete.
Navigating Through the Browser Files
!
To quickly navigate up the “ladder” to the main folders in your Browser (if you
are down several levels) continue to click on the “green + folder” icon to take
you back to the top of the list.
Refreshing Folders
!
To display the latest contents in the selected folder, click on the “refresh the
current folder” icon in the toolbar.
Checking Files into ViewletCentral (Self-Hosted ViewletCentral Only)
!
Expand the folders under the ViewletCentral icon by clicking on the ‘+”.
!
Select the folder where you want the new project to be stored.
Browser
Page 8
!
Next, click the “Add” icon in the toolbar, to open the following the “Add a file to
ViewletCentral” screen:
!
Select the “Browse…” button (yellow folder) to locate your project, and, if
needed, type in a new “Title” and “Description”.
!
Select “OK” and the project will be added to your ViewletCentral account and will
now appear in the lower panel of the Browser.
Checking Files out of ViewletCentral (Self-Hosted ViewletCentral Only)
!
Select the folder containing the file you want to access.
!
Click on the “Check Out” icon on the tool bar.
Browser
Page 9
!
Click on the “Check the selected files out of ViewletCentral” icon (the down
arrow). Note: This same option can be accessed while inside a ViewletACE 2006
project.
!
!
After selecting the “Check Out” icon the following screen will open allowing you
to choose a location where you want the Viewlet stored by selecting the
“Browse” button. Note: The default folder is “My Viewlets” under documents
and settings on your local machine.
Browser
Page 10
!
After the file is “checked out” a “padlock” symbol will appear at the lower right
hand corner of the file icon indicating the project is unavailable to other users
until you check it back in.
Undo Checking out Files (Self-Hosted ViewletCentral Only)
!
To undo checking out files, simply click on the “Undo the check out of the
selected files” icon in the toolbar.
Changing Views
!
Click on the “Views” icon to open the drop-down menu.
!
Work in “Icon View” to easily see the name of each file in it’s prospective folder.
!
Work in “Details View” to see the dimensions of your Viewlet, the number of
slides in your project, the last date the project was modified and file size.
!
Work in “Thumbnail View” to easily view each individual slide.
Browser
Page 11
Expanding the Browser
!
Select a file folder by clicking on it.
!
The files contained in that folder will appear in the lower half of the panel.
!
Click on the “slide” icon (see red box below) to open the bottom panel to a full
screen view.
Browser
Page 12
Details View
In “Details View”, you can view file properties such as dimension, size, date last
modified, etc.
!
Click on “Views-Details View” from the Browser toolbar.
!
The detailed information will be revealed in the bottom panel, with scroll bars to
help navigate the files.
Browser
Page 13
!
To reveal the information in full view, for ease of reading, click on the “Slide”
icon on the Browser panel.
!
The expanded Browser will open.
!
The columns can be sorted in ascending or descending order by clicking on the
column headings.
!
To preview any of the Viewlets, double click on one of them and it will be
opened in your Browser window.
Viewlet Properties
!
Right click on any of your Viewlet files to reveal the drop-down menu.
!
Select “Properties” by clicking on it.
Browser
Page 14
!
The following “Properties” screen will open revealing “General Attributes” and
“Project Attributes”.
!
Anytime you need to exit the expanded view, click the “minimize” icon to close
the full screen and return to the side panel.
Closing/Opening the Browser
!
Click on the “X” by the word Browser to close the Browser panel.
Browser
Page 15
!
To reopen the Browser, click on “View” on the menu bar and select Browser
from the drop-down menu.
Creating Projects
Page 16
Creating Projects
ViewletACE allows you to create Quiz Projects with questions and answers for
testing users, Survey Projects with questions for gathering user opinions, Image
Projects to create projects from images on your system, or Blank Projects to create
projects using blank slides.
Question Types
For quiz and survey projects ViewletACE supports the following question types:
!
Short Answer – Fill in the Blank : A ‘Fill in the Blank’ question that has a single
answer.
!
Short Answer – Selection from List : A question with a single answer, selectable
from a given list.
!
Short Answer – Rating : A question with a single answer on a given scale.
!
Multiple Choice – Single Answer : A question with a single answer given two or
more choices.
Creating Projects
Page 17
!
Multiple Choice – Multiple Answers : A question with one or more answers.
!
Multiple Choice – Fill in the Blanks : A question with one or more ‘Fill in the
Blanks.’
!
Multiple Choice – Selection from Lists : A question where respondents must
choose answers from a list(s) of choices.
!
Multiple Choice – Rating : A question where respondents must select answers on
a scale.
!
Multiple Choice – True/False : A question with only two possible answers.
Creating Projects
Page 18
!
Likert Scale : A question where respondents specify their level of agreement to
a statement.
!
Drag and Drop : A question where respondents must match text or images in
column one to text or images in column two. (Future)
!
Click Map : A question where respondents click on one or more areas to specify
the answer. (Future)
!
Essay : A question where respondents must compose a paragraph or more to
specify the answer. (Future)
Creating Projects
Page 19
Quiz Projects
!
Launch ViewletACE 2006.
!
Select the “Create Project” button to launch the “Create New Project” wizard.
!
“Quiz Project” is selected by default allowing you to create a project with
questions and answers for testing your audience.
Creating Projects
Page 20
Slide Size
!
Next, you need to choose the Slide Size for your project.
!
To use the “Standards” window size, click on the down arrow to reveal the dropdown menu. Click on the size to select it. The recommended size is 640 x 600
SVGA (selected by default), but you can choose from any of the sizes listed.
!
To create a “Custom” slide size, click on the “up” and “down” arrows (Width and
Height), or highlight the current size and type in the desired size.
Creating Projects
Page 21
Adding Questions
!
After selecting the “Standard” or “Custom” slide size, click on the green “+” icon
(see red highlight box below) to begin adding questions for your “Quiz” project.
!
After clicking on the green “+” icon, the following “Question” screen will open.
(See next page).
Creating Projects
Page 22
Choosing Question Types
!
Select the question type by clicking on it (use the scroll bar to view all question
types).
!
Under “Question:” type in a question that will require the user to input an
answer.
!
Also, since this quiz requires the correct answer, we’ll keep “Quiz – Requires the
user to provide a correct answer” selected.
Creating Projects
Page 23
!
After typing in your question, click on “OK” and the “Create New Project Screen”
will reopen revealing your question and the type of question.
!
To add additional questions to your project, click on the green “+” icon.
!
To modify/change the highlighted question, click on the “pencil” icon.
!
To delete the highlighted question, click on the red “X”.
!
When two or more questions are inserted, the “up” and “down” arrows will
become functional, allowing you to reorganize your questions.
!
When you have finished inputting your questions, click on “OK”.
Creating Projects
Page 24
!
Your question, along with a “white box” (for typing in the correct answer) will
appear on your screen with a “Success”, “Try Again” and an “Error” message.
!
Type in the correct answer by double clicking on the “white box”. The Text Field
screen will open and you’re ready to type in your answer. Note: There can only
be one answer per line.
!
Also, while in the Text Field screen you have the option to make the correct
answer “Case Sensitive.”
!
Remember, when you Preview and/or Publish your Viewlet, the answer in the
“white box” will be invisible.
Creating Projects
Page 25
Text Field Properties
!
With the “white box” selected, click on the “Properties” icon on the Context
Sensitive Toolbar to make changes to the Text Field (white box).
!
The Text Field Properties screen will open with options to:
!
Change the name of the Text Field
!
When the Text Field will be displayed
!
How long it will appear on the screen.
!
After making your selections click on “OK” to apply.
Creating Projects
Page 26
Hiding Slides
!
To hide a slide, (with it selected in Thumbnail or Slide view), click the “Closed
Eye” icon. The slide will be “grayed out” indicating that the slide is now hidden.
!
Hidden slides will not play back while previewing the project in Slide View, in
play mode, nor will it appear in the final published Viewlet.
!
To unhide a slide, click the “Open Eye” icon.
Modify Choice
!
To make changes to the answer in the Text Field click on the “Modify Choice”
(pencil icon) on the Context Sensitive Toolbar.
!
The following “Text Field” screen will appear allowing you to change the answer
and/or make the answer Case Sensitive
Creating Projects
Page 27
Setting On Correct/On Incomplete/On Incorrect Attempt/On Incorrect Actions for
Quiz Projects
ViewletACE allows you to set a sequence of actions to be performed based on
certain events. For quiz questions, events include On Correct, On Incomplete, On
Incorrect Attempt and On Incorrect. Actions that can be performed include :
Go to Slide
Move to slide
Display URL
Email to
JavaScript
Display Object
Play Sound
Play Movie
Show Score
!
To set actions, click on the Events (lightening bolt) icon on the Context Sensitive
Toolbar.
!
The “Question Events” screen will open.
!
Click on the green “+” icon to open the “Action” screen to set the options for the
action to occur when the respondent is successful, incomplete, or unsuccessful
in answering the question.
Creating Projects
Page 28
!
Click on the down arrow to open the drop down menu to reveal the choices.
Creating Projects
Page 29
!
Select an option by clicking on it and then click on “OK” to return to the “Events”
screen. Your choices will be displayed under “Action”.
!
To return to the “Action Type” screen to select more actions, click on the “green
“+” icon.
!
The “pencil” icon can also be used to return to the “Action Type” screen.
!
To delete an “Action” from the list, click on the red “X” (delete) icon.
!
You can arrange the actions to take place in a particular order by using the “up”
and “down” arrows.
The Submit Button
When a question is first placed in a slide, a “submit” button will automatically be
inserted. When the Viewlet is played, the respondent should click on the submit
button after specifying his answer choice. The respondent’s answer is then
“registered” as an attempt to answer the question and an action is triggered based
on whether his attempted answer is correct, incorrect or incomplete.
Creating Projects
Page 30
!
To change the text on the submit button, click on the button and then select
“button properties” in the Context Sensitive Toolbar.
!
A “Button Properties” window will open. Replace the text “submit” with any text
of your choice (such as “continue”, “next”, “next question”, etc.) in the field
provided.
!
To change the button “style”, select “button style” from the Context Sensitive
Toolbar.
Creating Projects
Page 31
!
The following “Button Properties” screen will open.
!
Next, choose from one of the four button styles (Classic, Mac, Windows 2000,
Windows XP) and click “OK”.
!
To set button events, click on the submit button and select the “Events” icon
(the lightning bolt) in the Context Sensitive Toolbar.
!
In the “Button Events” screen, use the “+” button to modify or add actions to
the “On Click” event. Note : For each slide, actions listed under Button Events
will perform first (sequentially), followed by actions listed under “Question
Events” for that slide.
Creating Projects
Page 32
Scoring Quiz Projects
!
Click on the “Scoring” icon on the Context Sensitive Toolbar to open the “Score”
window.
!
You can set the “Total points for the question” by using the “up” and “down”
arrows to change the number in the field under “Points”.
!
You can set the maximum number of “Attempts” the respondent is allowed to
answer the question correctly. Use the “up” and “down” arrows to change the
number in the field under “Attempts”.
Creating Projects
Page 33
!
You can set a time limit for the question (in hours, minutes, and seconds) before
the Viewlet moves on to the next question by checking the box next to “Enable a
time limit for the question”. Then use the “up” and “down” arrows to change the
number in the fields under “Time”.
Creating Projects
Page 34
Moving the Answer Box or Message Boxes
!
To move the “message boxes” or “white answer box”, click on the box (or, to
move them all together, click on the first box, and while holding down the
“Shift” click on the other boxes. Then, while holding down your left mouse
button, drag the box/boxes to a new location.
!
Let go of the left mouse button to drop it into place.
!
To resize the “message boxes” or “white answer box”, click on the box to reveal
the grab handles. Then, point your mouse over a grab handle and, while holding
down your left mouse button, drag the grab handle to resize the box.
Message Properties
!
Click on the “Properties” icon on the Context Sensitive Toolbar to open the
Message Properties screen.
!
From the Message Properties screen you can change the name of the message
(i.e., from “Correct Answer” to “Correct Response”).
!
Choose a number of seconds to have the message begin, or have it display
when an action is taken.
!
Also, choose how many seconds the message will display, or have it display for
the duration of the slide.
!
After making your selections, select either “OK” or “Cancel” to close the Message
Properties screen.
Message Type
!
Click on one of the “Success/Try Again/Error” message boxes to select it.
!
Then, click on the “Message Type” icon on the Context Sensitive Toolbar to open
the “Message Type” screen.
Creating Projects
Page 35
!
Select the “Message Type” by clicking on the down arrow to open the drop down
menu and choose from Classic (the default setting), Bubbles, Curvy, Simple, or
Standard message styles. Note: The “message type” will change with each
different message style.
!
After selecting the style, select the message type.
!
Click on “OK” to return to the project slide, “Cancel” to close the screen without
making any changes or “Apply” to view the changes before closing the screen.
Changing Message Box Colors
!
To change the color background of the “Success/Try Again/Error” messages,
click on the box to select it.
!
Click the “Background Color…” button in the Context Sensitive Toolbar to reveal
the color palette.
!
Select a color from the color palette or use the “up” and “down” arrows to set
Creating Projects
Page 36
the RGB code, or type in the hexadecimal number code.
!
Once you’ve chosen a color, you can drag it to the custom palette for future use.
!
Select “OK” to apply the color and close the color palette.
!
Or, select “Cancel” to simply close the color palette without changing the color.
!
Or, select “Apply” to view the new color before closing the color palette.
Message Text Properties
!
Click on the “Text Properties” icon on the Context Sensitive Toolbar.
!
Select the text you want to edit by highlighting it.
!
From the Text Properties screen you can choose to have the text italicized,
underlined, and/or bold.
!
You can change the font style, font color, and font size.
!
Also, you can have the text be left aligned, centered, or right aligned.
Creating Projects
Page 37
Click on “OK” to return to the project slide, “Cancel” to close the screen without
making any changes or “Apply” to view the changes before closing the screen.
!
The Text Properties toolbar can also be accessed by double clicking on any of
the message boxes.
!
Or, select one of the message boxes by clicking on it and then right click to
reveal the drop-down menu and select Text Properties.
Create Rollover Area
A rollover area is a section in a slide that “responds” with an action when the
respondent either clicks on or places the mouse over that area. Action types include
Goto Slide, Move to Slide, Repeat Slide, Display URL, Email to, Javascript, Display
Object, Play Sound, Play Movie and Show Score.
!
To create a rollover area, select an object in a slide to load the Context Sensitive
Toolbar.
!
Next, click on the “Create Rollover Area” icon in the toolbar.
!
The cursor will change to a cross-hair shape.
!
Position the cross-hair where you want the rollover area to start. Press the
mouse and drag it to define the rollover area. Release the mouse.
!
The rollover area will be highlighted with a lightning bolt.
!
To insert an action for “OnClick” or “On Rollover”, select the “Events” icon in the
Context Sensitive Toolbar. This will open the “Shape Events” dialog screen.
Creating Projects
Page 38
Attaching Sound to Objects
In ViewletACE, you can attach sounds to objects including slides, messages, images
and shapes.
!
To attach sound to a slide, select the slide.
!
Then click on the “Attach Sound” icon from the Context Sensitive Toolbar.
!
The “Sound” screen will open with options to insert sound from your sound files
or record new sound.
Creating Projects
Page 39
!
To Import the audio, click on “Load Sound” (yellow folder icon).
!
Browse to find your sound file and select it.
!
To record new audio, click on the “Record” button (red circle) and start
recording.
Listening to Sound
!
After you record sound or import a sound file, you can listen to it by clicking the
“Play” button (green arrow).
Removing Sound from a Slide
!
To remove sound from a slide, click the “Delete Sound” button (red “X”).
See the Audio section of this guide for more information on this topic.
Creating Projects
Page 40
Survey Projects
!
Launch ViewletACE 2006.
!
Select the “Create Project” button to launch the “Create New Project” wizard.
!
Select “Survey Project” to create a project with questions to gather user
opinions.
Slide Size
!
Next, you need to choose the Slide Size for your project.
Creating Projects
Page 41
!
To create a “Custom” slide size, click on the “up” and “down” arrows (Width and
Height), or highlight the current size and type in the desired size.
!
To use the “Standards” window size, click on the down arrow to reveal the dropdown menu. Click on the size to select it. The recommended size is 640 x 600
SVGA (selected by default), but you can choose from any of the sizes listed.
Creating Projects
Page 42
Adding Questions
!
After selecting the “Standard” or “Custom” slide size for your Survey project,
click on the green “+” icon to begin adding questions.
!
Click on the green “+” icon to open the “Question” screen.
Creating Projects
Page 43
Choosing Question Types
!
Choose Select the question type by clicking on it (use the scroll bar to view all
question types).
!
Under “Question:” type in a question that will require the user to input an
answer.
!
Also, since surveys don’t require correct answers, keep “Survey – Does not
require a correct answer” selected.
!
Click on “OK” and the “Create New Project Screen” will reopen revealing your
question and the question type.
Creating Projects
Page 44
!
To add additional questions to your project, click on the green “+” icon.
!
To modify/change the highlighted question, click on the “pencil” icon.
!
To delete the highlighted question, click on the red “X”.
!
When two or more questions are inserted, the “up” and “down” arrows will
become functional, allowing you to re-arrange your questions.
!
When you are through inputting your questions, click on “OK”.
Creating Projects
Page 45
!
Your question, along with answer choice fields will appear on your slide.
Slide Properties
!
To set the timing of the slide and it’s display duration, click on the “Properties”
icon on the Context Sensitive Toolbar to open the properties dialog screen.
!
You can choose to include the slide in the ‘Table of Contents’ by checking the
box next to “Included in Table of Contents”.
!
After making your selections click “OK” to apply.
Creating Projects
Page 46
Hiding Slides
!
To hide a slide, (with it selected in Thumbnail view), click the “Closed Eye” icon.
The slide will be “grayed out” indicating that the slide is now hidden.
!
To unhide a slide, click the “Open Eye” icon.
!
To hide a slide, (with it selected in Thumbnail or Slide view), click the “Closed
Eye” icon. The slide will be “grayed out” indicating that the slide is now hidden.
!
Hidden slides will not play back while previewing the project in Slide View, in
play mode, nor will it appear in the final published Viewlet.
!
To unhide a slide, click the “Open Eye” icon.
Adding Sound
!
To add sound to a slide, click on the sound icon in the Context Sensitive Toolbar.
Creating Projects
Page 47
!
The “Sound” screen will open with options to insert sound from your sound files
or record new sound.
!
To Import audio, click on “Load Sound” (yellow folder icon).
!
Browse to find your sound file and select it.
!
To record new audio, click on the “Record” button (red circle) and start
recording.
Listening to Sound
!
After you record sound or import a sound file, you can listen to it by clicking the
“Play” button (green arrow).
Creating Projects
Page 48
Removing Sound from a Slide
!
To remove sound from a slide, click the “Delete Sound” button (red “X”). See
the Audio section of this guide for more information on this topic.
Changing the Style of the Text Field
!
To change the style of check boxes, radio button, ratings or combo boxes, select
the “choice type” icon in the Context Sensitive Toolbar and select the choice
type.
!
For this example, choose “Rating” from the drop-down menu to open the
following screen.
!
Choose the style you want and click OK.
Creating Projects
Page 49
Modify Choice
!
To make changes to the list of possible choices in the Text Field click on the
“Modify Choice” (pencil icon) on the Context Sensitive Toolbar.
Setting On Complete/On Incomplete Actions for Survey Projects
ViewletACE allows you to set a sequence of actions to be performed based on
certain events. For survey questions, events include “On Complete” and “On
Incomplete”. An “On Complete” event occurs when the respondent inputs an
answer to the question. An “On Incomplete” action occurs when the respondent
tries to move on to the next question without answering the question.
!
Actions that can be performed include :
Go to Slide
Move to slide
Display URL
Email to
JavaScript
Display Object
Play Sound
Play Movie
Show Score
!
To set actions, click on the Events (lightening bolt) icon on the Context Sensitive
Toolbar.
!
The “Question Events” screen will open.
Creating Projects
Page 50
!
Click on the green “+” icon to open the “Action” screen to set the options for the
action to occur when the respondent completes or fails to complete the
question.
Creating Projects
Page 51
!
Click on the down arrow to open the drop down menu to reveal the choices.
!
Select an option by clicking on it and then click on “OK” to return to the “Events”
screen.
Creating Projects
Page 52
!
Your choices will be displayed under “Action”.
!
To return to the “Action Type” screen to select more actions, click on the “green
“+” icon.
!
The “pencil” icon can also be used to return to the “Action Type” screen.
!
To delete an “Action” from the list, click on the red “X” (delete) icon.
!
You can arrange the actions to take place in a particular order by using the “up”
and “down” arrows.\
The Submit Button
Please refer to “The Submit Button” section under “Quiz Projects.”
Creating Projects
Page 53
Scoring Survey Projects
!
Click on the “Scoring” icon on the Context Sensitive Toolbar to open the “Score”
window.
!
You can set the “Total points for the question” by using the “up” and “down”
arrows to change the number in the field under “Points”.
!
You can set the number of “Attempts” a respondent has to try to get the right
answer by using the “up” and “down” arrows to change the number in the field
under “Attempts”.
!
You can set the maximum time allowed for the respondent to answer the
question (in hours, minutes, and seconds) by checking the box next to “Enable a
time limit for the question”. Then use the “up” and “down” arrows to change the
number in the fields under “Time”.
Inserting Slides
Page 54
Inserting Slides
Question Slides
To insert question slides into an existing project, do the following:
!
In Thumbnails, select the place where you want to insert your new question
slide. You can do this by selecting a slide which will serve as a “marker.”
!
Choose “Insert”, then “Question Slides” from the menu bar. The following screen
will open:
!
Use the + button to choose the question type(s) you wish to add. Click OK. The
question slides will be placed after the slide that served as the marker.
Inserting Slides
Page 55
Blank Slides
You can insert blank slides into existing projects. To do this:
!
In “Thumbnails” select an insertion point for the blank slides by clicking on a
slide. Blank slides are always placed after the selected slide.
!
Select “Insert” then “Blank Slide…” from the menu options.
!
Or you can choose the appropriate icon from the standard toolbar.
Inserting Slides
Page 56
Image Slides
ViewletACE lets you create projects made entirely of imported images. You can
also insert images into existing projects in several ways; by creating slides using
imported images directly in the Thumbnails or by inserting individual images onto a
slide using the tools toolbar. You can also drag and drop an image onto a slide
directly from the Browser.
Insert Image Slides Directly into Thumbnails
!
Select a slide in Thumbnails by clicking it to highlight it. New slides will be
inserted to the right of the selected slide.
!
Select “Insert” then “Image Slides…” from the menu options (or you can choose
the appropriate button from the context sensitive toolbar).
!
In the screen that opens, click the + button to insert images.
!
The images will then appear in the preview screen in the order they were
selected. Use the up and down arrows to re-order the slides, if necessary.
!
Place a check mark on ‘stretch’ to enlarge the image(s) if desired.
!
Click “OK.” This will insert the new slides into your project, embedding the
imported images as slide backgrounds.
!
The layout of the image can also be changed after inserting them as slides first.
To do this, first select the image slide then select the ‘Background Image’ icon in
the context sensitive toolbar. Next, choose the appropriate layout.
Inserting Slides
Page 57
Insert Image Slides Using the Toolbar
!
First, insert a blank slide by selecting “Insert” then “Blank Slide” from the menu
option.
!
Select ‘Insert Image’ from the tools toolbar and browse for the image you wish
to insert. Click OK.
Inserting Slides
Page 58
Use ‘Drag and Drop’ to Insert Images Directly from Browser
!
First, insert a blank slide by selecting “Insert” then “Blank Slide” from the menu
option.
!
Load the Browser by clicking on the Browser tab. If you cannot see the Browser
tab, make sure that there is a check mark next to “Browser” in the View menu.
!
Using the Browser, locate the image you wish to place on the blank slide. Click
on the image once and without releasing your finger from the mouse, drag and
drop the image onto the slide.
Messages
Page 59
Messages
You can add impact to your project by adding messages to your slides in the form
of Balloons, Notes and Text Boxes. Balloons can be used to “point” at a specific part
of a slide, providing text information in it. Notes can be used to remind the
respondent of some important information without calling attention to a particular
area of the slide. For example, you can have a Note displayed at a specific point in
time to remind the respondent how many more questions are left to complete the
quiz or survey. You can also easily change the form of a message into another. So
for example, a Balloon can be changed to a Note and vice versa.
Balloons
Inserting a Balloon
!
Click the “Insert Balloon” icon in the Tools Toolbar.
!
As you move your mouse over the slide, the cursor will change to a cross-hair
shape. Position the cross hair where you want to position the Balloon and single
click.
!
A Balloon will appear on your slide.
Removing a Balloon from a Slide
!
Click on the Balloon then select Edit-delete or choose “delete” from the rightclick menu options.
Resizing a Balloon
!
Select the Balloon by clicking it.
!
When the grab handles appear, point your cursor over the applicable grab
handle.
!
Hold down your left mouse button and drag the grab handle to resize the
Balloon.
Moving a Balloon on a Slide
!
Click the Balloon to select it.
!
Mouse over the Balloon so your cursor changes to a hand shape.
!
Hold down your left mouse button and drag the Balloon.
!
Once you've repositioned the Balloon, let go of the left mouse button to drop it
into place.
Messages
Page 60
Changing the Background Color of a Balloon
!
Select the Balloon by clicking it.
!
Click the “Background Color…” button in the context sensitive toolbar to reveal
the color palette.
!
Select a color from the palette, or by using an RGB or hexadecimal code.
!
To close the color palette, click back on the slide.
Adding Text to a Balloon
!
Double click inside the Balloon to go into text edit mode.
!
Once your cursor starts flashing inside the Balloon, you are ready to input text.
!
Use the options on the context sensitive toolbar to italicize, underline and bold
your text. You can also change your font, font color, font size, and alignment
while in text edit mode.
!
To globally change the color of all the text in the Balloons throughout your
project, highlight the text, select a color and check the Box “Apply to all
Balloons.”
!
To keep specific job-related colors, type in the RGB numbers or select a color,
mouse over the preview screen until the hand appears, click and drag the color
to the “Custom” row.
Notes
Inserting a Note on a Slide
!
Click the “Insert Note” icon in the Tools Toolbar.
!
This action will insert a Note on the current slide.
Removing a Note from a Slide
!
Click on the Note then select Edit-delete or choose “delete” from the right-click
menu options.
Resizing a Note
!
Select the Note by clicking it.
!
When the grab handles appear, point your cursor over the applicable grab
handle.
!
Hold down your left mouse button and drag the grab handle to resize the Note.
Messages
Page 61
Moving a Note on a Slide
!
Click the Note to select it.
!
Mouse over the Note so your cursor changes to a hand shape.
!
Hold down your left mouse button and drag the Note.
!
Once you've repositioned the Note, let go of the left mouse button to drop it into
place.
Changing the Background Color of a Note
!
Select the Note by clicking it.
!
Click the “Background Color…” button in the context sensitive toolbar to reveal
the color palette.
!
Select a color from the palette or by using an RGB or hexadecimal code.
!
To close the color palette, click back on the slide.
Adding Text to a Note
!
Double click inside the Note to go into text edit mode.
!
Once your cursor starts flashing inside the Note, you are ready to input text.
!
Use the options on the context sensitive toolbar to italicize, underline, and bold
your text. You can also change your font, font color, font size, and alignment
while in text edit mode.
!
To keep specific job-related colors, type in the RGB numbers or select a color,
mouse over the preview screen until the hand appears, click and drag the color
to the “Custom” row.
Messages
Page 62
Text Box
Inserting Text Box to a Slide
!
Select the “Insert Text Box” icon in the Tools Toolbar.
!
As you move your mouse over the slide, your cursor will change to a cross-hair
shape. Click the slide to insert the Text Box object.
!
A Text Box with grab handles will appear, ready for you to start inputting text.
Removing Text Box from a Slide
!
Select the Text Box you want to delete by clicking it.
!
When you see the Text Box object surrounded by grab handles, press the delete
button on your keyboard to delete it.
Moving Text Box on a Slide
!
Select the Text Box by clicking it so the grab handles appear.
!
Mouse over the Text Box until your cursor changes to a hand shape.
!
Hold down your left mouse button and drag the Text Box to a new position.
!
When repositioned, let go of the left mouse button to drop it into place.
Resizing Text Box Object
!
Select the Text Box by clicking it.
Messages
Page 63
!
When the grab handles appear, point your cursor over the applicable grab
handle.
!
Hold down your left mouse button and drag the grab handle to resize the Text
Box Box.
Adding/Editing Text in Text Box
!
Double click the Text Box object to enter text edit mode.
!
A flashing cursor will appear, indicating that you are ready to input or edit the
text.
!
To exit from edit mode, click somewhere on the slide away from the Text Box
object.
Changing the Message Form and Style
No matter what message object you insert, Balloon, Note or Text Box, ViewletACE
allows you to easily change its form and style once inserted. To do this
!
Click the message object to select it.
!
Select the “Message Type” button from the context sensitive toolbar.
!
Select the desired message style from the drop down menu. Style includes
Classic, Bubbles, Curvy, Simple and Standard.
!
Select the message type by clicking on one of the forms under “Message Type.”
Click OK.
Stylesheets
Page 64
Stylesheets
ViewletACE allows you to set properties of multiple objects using a template called
a “Stylesheet”. You can define several Stylesheets and then choose one to apply to
all slides in a project or to a selected slide only. The table below lists all objects
whose properties can be defined using Stylesheets.
Table 1 Objects and Properties
Object
Properties
Slide
Background Color, Background Image
Balloon
Note
Correct Message
Incorrect Message
Incomplete Message
Message Style, Background Color,
Question Text
Text Properties (Font, Size, Style,
Alignment, Color)
Question Choice Text
Question Row Text
Question Column Text
Text Box
Text Properties (Font, Size, Style,
Alignment, Color)
Question Choice
Radio Button Style, Check Box Style,
Rating Style
Creating a New Stylesheet
!
Select the Stylesheet icon in the Standard Toolbar to view the Stylesheet tab
panel. A default Stylesheet will be shown in the Stylesheet drop-down list.
Stylesheets
Page 65
!
To create a new Stylesheet, select the “New Stylesheet” icon in the toolbar.
Type a name for the Stylesheet in the screen and click “OK.” You will see the
new Stylesheet added to the drop-down list.
!
To change a property of an object from its default settings, click once on the
name of the object you wish to modify.
!
Next, click on the icon for the property type you wish to change. A screen will
appear and provide you with the setting options to choose from for that property
type. Select a setting and click “OK.”
!
Repeat with each property type you wish to modify.
Changing the Name of a Stylesheet
!
To change the name of a Stylesheet, click on the ‘Modify Stylesheet’ icon in the
toolbar. Type in a new name for the stylesheet and click “OK”. Note: You cannot
modify the default stylesheet.
!
The new name will appear in the Stylesheet drop-down list.
Deleting Stylesheets
!
Select the Stylesheet you wish to delete from the drop-down list.
!
Click on the “Delete Stylesheet” icon in the toolbar.
Applying Stylesheets
!
To apply a Stylesheet to all slides in the project, first select the Stylesheet from
the drop-down list.
!
Next, select the “Apply Stylesheet to Project” icon in the toolbar. A screen
asking you for confirmation will appear. Click “OK.”
!
This will format all slides with the new Stylesheet.
!
To apply a Stylesheet to a selected slide only, first select the Stylesheet from
the drop-down list.
Stylesheets
Page 66
!
Next, select the slide you wish to update by navigating to the slide using the
slide bar or by viewing the Thumbnails panel and locating the slide.
!
Click on the “Apply Stylesheet to Selection” icon in the toolbar to update the
slide with the Stylesheet format.
Audio
Page 67
Audio
ViewletACE 2006 allows you to add audio, not only to slides, but also to any of the
objects throughout your Viewlet project.
!
To add audio, click on the slide or an object to select it and then click on the
“Attach Sound” icon from the Context Sensitive Toolbar.
!
The “Sound” screen will open with options to insert sound from your sound files
or record new sound.
Importing Sound
!
To Import sound, click on “Load Sound” (yellow folder icon).
!
Browse to the folder where your sound files are stored and select one by clicking
on it.
!
Click on the “Open” button to insert the sound file.
Audio
Page 68
Recording Audio
!
To record new audio, click on the “Record” button (red circle) to open the
following.
!
After you finish the recording, click on the “red” square to end the recording.
Listening to Sound
!
After you record sound or import a sound file, you can listen to it by clicking the
“Play” button (green arrow).
Audio
Page 69
Removing Sound from a Slide
!
To remove sound from a slide, click the “Delete Sound” button (red “X”).
Choosing Sound Output Quality for the Compiled Viewlet
What you hear while playing the Viewlet project back inside ViewletACE 2006 may
be different from what you hear in the compiled Viewlet. A lot will depend upon
what “Sound” options you select in the “Project Properties” screen prior to
compiling your Viewlet. See the “Project Properties” section of this guide for more
information on this topic.
Note: You must have speakers installed on your computer to play a sound file.
Search and Replace
Page 70
Search and Replace
Search and Replace is a new addition to ViewletACE 2006. This feature allows you
to quickly search for every instance of a specific word or phrase.
!
Click on the “Search and Replace” icon (magnifying glass) on the Standard
Toolbar.
!
The following “Search and Replace” screen will open.
!
In the “Text” field enter the text you want to search for.
!
To automatically replace the text, click on the “Replace” button and a new field
!
will open asking you to “Replace With.”
Search and Replace
Page 71
!
Enter the replacement text in the field provided.
!
To streamline the “find and replace” search, click on the “Case Sensitive” radio
button and only those instances would be found. For example if you had qarbon
and Qarbon, only one would be found.
!
You can choose to have the search run “Forwards” or Backwards” by clicking on
the appropriate button.
!
You have the option to search the current slide, a certain section of slides, or all
the slides in your project.
!
After entering the text you want to replace and the replacement text, select
“Replace All” to replace every occurance.
!
To “Replace” one word/phrase at a time, select “Replace” and then “Find Next”
to go to the next occurace of the word/phrase.
!
When your “search” or “search and replace” is completed, click on the “red X” or
Cancel to close the “Search and Replace” screen.
Format Painter
Page 72
Format Painter
Another exciting new feature in ViewletACE 2006 is the “Format Painter”. This
feature is used to quickly change text properties in Balloons, Notes, Text Boxes and
Message Boxes for consistency. Format Painter can also be applied to “Shapes”.
Applying Format Painter to Text Objects
!
First, make your changes to the text in any of the text objects (Balloons, Notes,
Text Boxes or Message Boxes).
!
Now, to change the text formatting in the other text objects, click on the text
object and then on the “Format Painter” icon on the Standard Toolbar. The
cursor will change to the “Abc cursor”.
!
Click on any of the other text objects and the formatting will be changed to
match the object you first clicked on.
!
Continue clicking on the objects (on the currect slide or any of the other slides in
your project to apply the changes).
!
When you have completed making the desired changes, click back on the
“Format Painter” icon to stop the action.
Applying Format Painter to Shapes
If your project includes shapes and you need to quickly change them to be
consistent in color, border color and/or border width, do the following steps.
!
Select one of the Shapes.
!
Make the necessary changes to the inside color, the border color, and/or the
border width.
!
After the changes are made, with the Shape will selected, click on the “Format
Painter” icon.
!
Now, click on the Shapes you want to change in your project.
Format Painter
Page 73
!
When you have completed making the desired changes, click back on the
“Format Painter” icon to stop the action.
Text Options
Page 74
Text Options
ViewletACE lets you enhance the style of your question text, question choice text
and text on balloons, notes, and textboxes. Text options include italics, underline,
bold, font type, color, size, alignment, a spell checker, and hyperlink feature. You
can access text options by right clicking on the text object and selecting an option
from the drop-down menu. Instructions for using text options are basically the
same whether you are working with text on question slides, balloons, notes or
textboxes.
Entering/Exiting Text Edit Mode
!
To enter text edit mode, double click on the question text, question choice text,
balloon, note or textbox.
!
A blinking cursor will appear in the object, indicating you are in text edit mode.
!
To exit text edit mode, click to the slide, off of the object you are working with.
Setting Text to Italics, Underline or Bold
!
Enter text edit mode by double clicking the question text, question choice text,
balloon, note or textbox.
!
Select the text you want to edit by holding down your left mouse button and
dragging it over the text to highlight it.
!
Choose the appropriate button icon on the context sensitive toolbar to set the
text to italics, to underline it, and/or to bold it.
Changing the Text Font Type
!
Enter text edit mode by double clicking the question text, question choice text,
balloon, note or textbox.
!
Select the text you want to edit by highlighting it.
!
Click the “Font” button icon on the context sensitive toolbar to reveal the drop
down list of available fonts.
Text Options
Page 75
!
Choose the new font by clicking it from the list to apply it to the selected text.
!
To view additional fonts, scroll to the bottom of the font list and select “Show All
Fonts”.
Changing the Text Color
!
Enter text edit mode by double clicking the question text, question choice text,
balloon, note or textbox.
!
Select the text you want to edit by highlighting it.
!
Click the “Text Color” button icon on the context sensitive toolbar to open the
color palette.
!
Select a color by clicking on it in the palette to apply it to the selected text.
!
To close the color palette, click another area of the slide away from the color
palette.
Changing the Text Size
!
Enter text edit mode by double clicking the question text, question choice text,
balloon, note or textbox.
!
Select the text you want to edit by highlighting it.
Text Options
Page 76
!
Click the “Font Size” button icon on the context sensitive toolbar to reveal the
drop down list of available text sizes.
!
Choose the text size from the list to apply it to the selected text.
Changing Text Alignment
!
Enter text edit mode by double clicking the balloon, note or slide text.
!
When the cursor flashes in the object, click the appropriate button on the
context sensitive toolbar to change the alignment to left, center, or right
justification.
Color Palette
Page 77
Color Palette
ViewletACE’s color palette features options that can be applied to slide
backgrounds, text, balloons, notes and more.
!
Select the color icon on the context sensitive toolbar in Slide and Thumbnail
View.
!
Type in an RGB code, use up/down arrows, pick a color from the palette, or type
in a hexadecimal code.
!
Once you’ve chosen a color, drag it to the custom palette for future use.
!
To apply the color to all slides in the project, you can use Stylesheets. Please
refer to the Stylesheet section of this manual.
File Export
Page 78
File Export
ViewletACE allows you to export the slides in your project as different image types
or as a PDF manual.
!
To export to PDF, selext “File” and then “PDF.” You will have the option to
include slide titles and page numbers.
!
To export your slides as images, select “File” and then “Export Slides to
Images.”
!
Select “Slide Title” if you want the slide title to appear.
File Export
Page 79
!
Select “Within A HTML Page” if you want a web page automatically generated
with your images embedded.
!
You also have the option to decide what slide or slides to include in the export.
!
Under “Prefix” field, you can change the name of the slides for the export. Your
.vie file name will not change.
Project Properties
Page 80
Project Properties
Before you Preview and/or Publish your Viewlet project, you should review all the
options in the “Project Properties” screen. The options you select here will be used
in your published Flash Viewlets.
Setting Preferences in the Project Properties Screen
!
In either Slide or Thumbnail View, select Project-Project Properties from the
drop-down menu bar (short cut keys Ctrl+M). Or, select the Project Properties
icon from the toolbar.
March 23, 2006
Project Properties
Page 81
Viewlet Profile
!
The Viewlet Profile section contains information about your Viewlet project. This
section allows you to embed titles, descriptions and keywords into your Viewlets
for fast and easy search and retrieval.
March 23, 2006
Project Properties
Page 82
Sound Quality
!
The “Sound Quality” is used to choose the quality output for sound in the
published Viewlet
March 23, 2006
Project Properties
Page 83
Image Quality
!
To change the image quality options for your Viewlet project, select the “Image
Quality” option from the list.
March 23, 2006
Project Properties
Page 84
Timing
!
To change the global timing for the amount of time your slide should display,
regardless of content, enter the number of seconds using the “up” and “down”
arrows under “Minimum Slide Duration”.
!
Adjust the reading speed according to the audience viewing your project.
March 23, 2006
Project Properties
Page 85
Packaging
!
Create executable files for Windows, Linux and Mac0S along with the option to
have the executable files play full screen.
!
Also, create a zip file for easy and effective file compression.
Language
!
You can select the publishing language by selecting it from the drop down menu.
You can choose from English, French, German, Hindi, Italian, Japanese, Korean
and Spanish.
!
If you decide to include a login panel in your Viewlet, the default name for the
login panel is “Login” and includes text fields for the respondent’s “username”,
“password” (if enabled) and a “OK” button. The language properties screen
March 23, 2006
Project Properties
Page 86
allows you to change these default labels. For example, “Username” can be
changed to “Your Name” or “OK” can be changed to “Submit”.
!
Similarly, you can change the labels for the ‘Table of Contents’ and results
panels.
Flash
!
The “Flash” screen allows you to reset the dimensions of the Viewlet for
playback. This will not affect the source (vie) file.
!
You can choose to have your project continually play (Loop mode), have your
balloons and notes fade out as the Viewlet continues, Reduce Flash contextual
menu items, and create an HTML popup launcher.
!
A “Preloader” option is available to play at the beginning of your Viewlet, which
allows the rest of the Viewlet to stream while the preloader is displayed.
March 23, 2006
Project Properties
Page 87
!
You can add your own animated Flash sequences to the beginning and/or end of
your Viewlet. The dimensions of the Flash object must be the same as the slide
size (or smaller) of your Viewlet project. If smaller, the intro/outro sequences
will be centered on the playback “stage”.
March 23, 2006
Project Properties
Page 88
ViewletSkin
!
ViewletSkins allow you to customize and/or personalize the look and feel of your
Viewlets. You have the option to include the Table of Contents and a status bar
in your Viewlet. By checking the “Display Table of Contents” option, a listing of
all your slides (by slide title) will be displayed while the Viewlet is being played.
!
If you create a quiz or survey, by default the question on the slide becomes the
slide title. As the respondent answers each question, the corresponding slide
title becomes “highlighted”. Note: You can also choose to include a particular
slide in the Table of Contents by checking this option while in the “Slide
Properties” dialog window.
March 23, 2006
Project Properties
Page 89
HTML Frame
!
The HTML Frame allows you to create HTML files and graphics that will be
published with your Viewlet.
!
Once you set all the options in the Project Properties screen, you can choose to
“Preview” or “Publish” your Viewlet. To save the settings click “OK” or click
“Cancel” to exit without applying changes. Note: The settings will also be saved
by selecting the “Preview” or “Publish” buttons.
March 23, 2006
Preview and Publish
Page 90
Preview and Publish
Once you are satisfied with the options set in the Project Properties screen it’s time
to decide whether you want to “Preview” or “Publish” your Viewlet.
Previewing a Viewlet
The preview option in ViewletACE 2006 allows you to view your completed Viewlet
without having to publish it.
!
While in either Slide/Thumbnail View, you can preview your Viewlet by selecting
Project-Preview Viewlet from the drop-down menu options. Or,you can select
the Project Properties icon on the main tool bar.
!
When the Project Properties screen opens select the “Preview” button. The
Viewlet will display in your computer’s default Browser, ready for immediate
viewing.
March 23, 2006
Preview and Publish
Page 91
Publishing a Viewlet
In order to create the final Flash Viewlet your audience will see, you must “Publish”
your Viewlet source file. To do this:
!
While in either Slide or Thumbnail View, you can publish your Viewlet by
selecting Project-Publish Viewlet from the drop-down menu options or you can
select the Publish Viewlet icon on the tool bar from either view. Note: You can
access the “Publish Viewlet” option anytime while you are in the “Project
Properties” screen.
!
In the “Publish Viewlet” screen that appears, select a “Location” to publish your
Viewlet and click “Next”.
March 23, 2006
Preview and Publish
Page 92
!
Specify your reporting option by choosing from the drop-down menu. If you
publish on ViewletCentral, you must use ViewletCentral reporting.
!
If you publish on your own ftp server or local drive, you have the option of
choosing the Qarbon email reporting system and specifying the email address
where reports should be sent to.
!
To include a login panel in your Viewlet, place a check mark on “Require Viewers
to login”. If you want your viewers to login with a password, place a check mark
next to “Viewlet Password” and type in a password.
!
For quiz Viewlets, you can specify a passing grade.
!
If you want to display the final score at the end of the Viewlet, place a check
mark next to “Display Score.”
!
For quiz or survey Viewlets, you can specify a time limit for the Viewlet, which
will be the maximum time allowed for the respondent to complete the survey or
quiz.
March 23, 2006
Preview and Publish
Page 93
!
Follow the instructions in the Wizard to complete the publishing process. Once
publication is complete (publishing locally, to your own web server, or to
ViewletCentral), a URL to where your final Viewlet is published will be displayed
for your reference.
March 23, 2006
Support Options
Page 94
Support Options
Qarbon offers a variety of support plans designed to fit your specific needs. Choose
from Standard, Premium, or Elite Support plans.
!
Standard Support is offered to all customers at no charge. For more information
on the Premium and Elite Support plans please visit our site at:
http://www.qarbon.com/help/support_plans.php
!
Qarbon also offers users online help in the form of Tutorials, User Guides, and
FAQs. For more information please visit our site at:
http://www.qarbon.com/help/
March 23, 2006
Training
Page 95
Training
Take advantage of all the features in ViewletACE4 by signing up for Qarbon's
training classes. Learn how to better utilize our software to create stunning Flash
quizzes and surveys in no time. For more information, please visit our site at:
http://www.qarbon.com/services/training/
March 23, 2006
Sales
Page 96
Sales
Please feel free to contact our Sales or Support staff at anytime if you have ANY
ViewletACE 2006 (or other product related) questions or concerns or for options to
discuss additional training needs.
For current contact information, visit our web site at:
http://www.qarbon.com/about_us/contact_us/
March 23, 2006