1
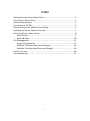
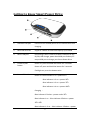
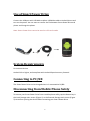
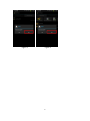
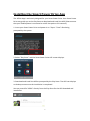
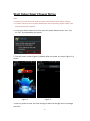
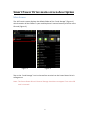
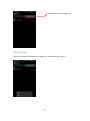
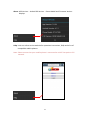
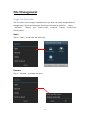
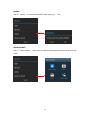
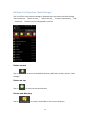
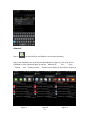
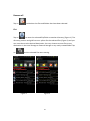
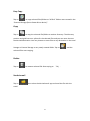
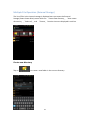
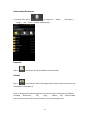
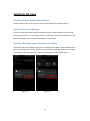
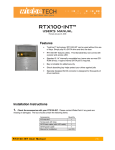
Smart Power Drive
User Manual
Version_010
1
Index
Getting to know Smart Power Drive ......................................................... 3
Use of Smart Power Drive ........................................................................ 5
System Requirements .............................................................................. 5
Connecting to PC/NB ............................................................................... 5
Disconnecting from Mobile Phone Safely................................................. 5
Installing the Smart Power Drive App....................................................... 7
Start Using Smart Power Drive ................................................................. 8
Main Screen ...................................................................................... 9
About & Help .................................................................................. 10
File Management ................................................................................... 12
Single File Operation ....................................................................... 12
Multiple File Operation (Local Storage) ........................................... 14
Multiple File Operation (External Storage) ...................................... 18
Limit on its uses ..................................................................................... 20
Troubleshooting ..................................................................................... 21
2
Getting to know Smart Power Drive
1
Standard USB port
Connect to an Android phone for file transmission and
charging.
2
Micro SD card slot
Supports a Micro SD card with capacity up to 32GB
3
Micro USB port
Connecting it with a cable at its Micro USB port to any
PC/NB, USB charger, power bank USB port and any 5V
output USB port to charge your Smart Power Drive
4
Power On/Off
button
Power on: press and hold the button for 3 seconds
Power off: press and hold the button for 3 seconds
Flashlight on: press the button twice
5
Power LED indicator
Power on: Blue indicator 1 on→power 25%
Blue indicator 1~2 on→power 50%
Blue indicator 1~3 on→power 75%
Blue indicator 1~4 on→power 100%
Charging:
Blue indicator 1 flashes→power under 25%
Blue indicator 1 on、Blue indicator 2 flashes→power
25%~50%
Blue indicator 1~2 on、Blue indicator 3 flashes→power
3
50%~75%
Blue indicator 1~3 on、Blue indicator 4 flashes→power
75%~99%
Fully charging:Blue indicator 1~4on
4
Use of Smart Power Drive
Connect the USB port with USB Male to Micro USB Male cable to Android phone and
turn on the power. You can start to transfer the file between Smart Power Drive and
phone and charge the phone.
Note: Smart Power Drive cannot be used as a PC-card reader.
System Requirements
For Android devices
Android 4.0 or higher, and compliant with Android Open Accessory Protocol.
Connecting to PC/NB
The Smart Power Drive can be charged when it’s connected to PC/NB.
Disconnecting from Mobile Phone Safely
To remove your Smart Power Drive from a mobile phone safely, tap the Return key in
the Local Storage main screen (Figure 1) or the External Storage main screen (Figure
2) to confirm ejecting the device before removing your Smart Power Drive.
5
Figure 1
Figure 2
6
Installing the Smart Power Drive App
The AFDisk App is exclusively designed for your Smart Power Drive. Your Smart Power
Drive may guide you to the Play Store to download and install the APP. (Please ensure
that your mobile phone is connected to a WiFi hot point or 3G network.)
1. Insert your Smart Power Drive and power it on. Tap on ”View” after being
prompted by the system.
2. Select ”Play Store” and the Smart Power Drive APP screen displays.
3. Download and install the APP as prompted by the Play Store. The APP icon displays
on desktop screen once the installation is completed.
You may search for”afdisk” directly from the Play Store for the APP download and
installation.
7
Start Using Smart Power Drive
Note:
1. Please insert the micro SD card into your Smart Power Drive before using it.
2. If Smart Power Drive cannot be identified or work normally, please restart your
phone to find the situation.
1. Insert your Smart Power Drive then press the power button to turn it on. Tap
on ”OK” as prompted by the system.
2. The APP's main screen (Figure 2) displays after the power on screen (Figure 1) is
shown.
Figure 1
Figure 2
3. You may select to enter the Local Storage or External Storage menu to manage
your files.
8
Smart Power Drive main screen description
Main Screen
The APP's main screen displays the default folder of the “Local Storage” (Figure 1)
which contains all the folders in your mobile phone's internal memory and the micro
SD card (Figure 2).
Figure 1
Figure 2
Tap on the “Local Storage” icon in the tool bar to switch to the Smart Power Drive's
storage area.
Note: The Smart Power Drive's External Storage icon does not appear if no micro SD
card is inserted.
9
Smart Power Drive storage area
About & Help
Press your phone's function key to display the “About and Help” menu.
10
About: APP Version、Android OS Version、Phone Model and Firmware Version
displays.
Help: Visit our online service website for operation instructions, FAQs and a list of
compatible mobile phones.
Note: Please ensure that your mobile phone is connected to a WiFi hot point or 3G
network.
11
File Management
Single File Operation
The list of files in the storage is displayed once you enter the Local Storage/External
Storage menu. Tap on and hold each file to open the function menu for 「Open」,
「Rename」, 「Delete」, and 「Send via mail」 or tap on 「Cancel」 to exit to the
file list screen.
Open
Tap on「Open」to start the APP of the file.
Rename
Tap on「Rename」to change file name.
12
Delete
Tap on「Delete」to remove selected file after taping on 「OK」.
Send via mail
Tap on「Send via mail」, then select the desired email app and send the file with the
email.
13
Multiple File Operation (Local Storage)
The list of files in the internal storage is displayed once you enter the Local Storage
menu while the 「Return to root」,「Return on top」,「Create new directory」, and
「Select all」 function icons are displayed in tool bar.
Return to root
Tap on
to return to the default directory (APP main screen) of your “Local
Storage”.
Return on top
Tap on
to return to the last directory.
Create new directory
Tap on
to create a new folder in the current directory.
14
Select all
Tap on
to select all files and folders in the current directory.
Tap on the file/folder icon to select the desired option (Figure 1). The circle of the
file/folder is then checked (Figure 2) and the「Remove all」, 「Cut」, 「Copy」,
「Delete」 and 「Send via email」 function icons display in the tool bar (Figure 3).
Figure 1
Figure 2
15
Figure 3
Remove all
Tap on
to deselect the files and folders that have been selected.
Cut
Tap on
to move the selected file/folder to another directory (Figure 1). The
directory position and grid lines turn yellow for the selected files (Figure 2) and you
can move them to the desired destination. You may choose to move files to any
destination in the Local Storage or External Storage or any newly created folder. Tap
on
and the selected files start moving.
Figure 1
Figure 2
16
Easy Copy
Tap on
to copy selected files/folders to “AFDisk” folders auto created in the
“External Storage (Smart Power Drive device)”.
Copy
Tap on
to copy the selected file/folder to another directory. The directory
position and grid lines turn yellow for the selected files and you can move them to
the desired destination. You may choose to move files to any destination in the Local
Storage or External Storage or any newly created folder. Tap on
and the
selected files start copying.
Delete
Tap on
to remove selected file after taping on 「OK」.
Send via mail
Tap on
, then select the desired email app and send the file with the
email.
17
Multiple File Operation (External Storage)
The list of files in the internal storage is displayed once you enter the External
Storage (Smart Power Drive) menu while the 「Create new directory」,「Auto create
directories」,「Select all」, and 「Format」 function icons are displayed in tool bar.
Create new directory
Tap on
to create a new folder in the current directory.
18
Auto create directories
To manage files, tap on
to create the 「Audio」, 「Document」,
「Image」 and「Video」folders automatically.
Select all
Tap on
, and select all files and folders of the directory.
Format
Tap on
to format the External Storage (Smart Power Drive) and remove any
files/folders contained in it.
Icons of advanced functions displayed in the tool bar after selecting any file/folder,
including 「Remove all」, 「Cut」, 「Copy」, 「Delete」, and 「Send via Mail」
can be used the same was as those found in the Local Storage menu.
19
Limit on its uses
Limits on Smart Power Drive device
Please insert the micro SD card into your Smart Power Drive before using it.
Limits on External Storage
Do not remove the Smart Power Drive device when a mobile phone is connecting
Smart Power Drive to run the Open, Copy, Cut, Delete, Send via mail functions in the
External storage as this may cause damage or loss of files!
Limits on Remove Smart Power Drive Safely
To remove your Smart Power Drive from a mobile phone safely, tap the Return key in
the Local Storage main screen (Figure 1) or the External Storage main screen (Figure
2) to confirm ejecting the device before removing your Smart Power Drive.
Figure 1
Figure 2
20
Troubleshooting
Do self checks as below in case of Smart Power Drive operation failure:
1. Is the micro SD / micro SDHC card inserted correctly?
2. In case you cannot connect to a mobile phone or play a video or file, please
remove your Smart Power Drive and plug in again for smooth operation.
21