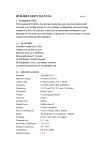
1
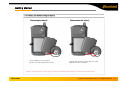
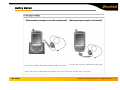
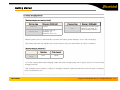
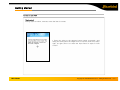
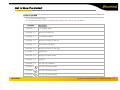
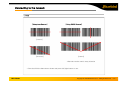
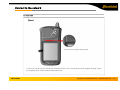
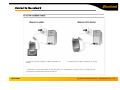
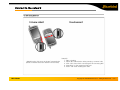
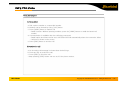
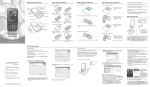
-Before starting, ensure that you read and follow the “Safety Warnings and Precautions” section of this manual.
Safety Warnings and Precautions
: Please follow the instructions to properly use the product and avoid accidents in advance.
1. Exercise precautions when using the battery
-
If the batteries are damaged, severely shocked, heated, exposed to moisture or high temperatures, or
bored by a gimlet, it may explode.
-
Keep batteries away from children and pets.
2. Do not use PDA phone in explosion areas.
3. Do not use PDA phone on an aircraft or inside a hospital.
4. Avoid using PDA phone or checking phone numbers while driving. Use hands free kit in unavoidable conditions
or use it after stopping the car
5. Product may deform or malfunction if exposed to direct sunlight
6. Prevent conductive objects such as necklaces and coins from making contact with the battery plug. Do not
shock battery with sharp objects or animals. Battery may explode.
7. Only use recommended batteries and do not use with other products. Do not use inferior quality battery as
doing so may shorten battery and PDA life span and cause explosion. (Warranty is void in this event)
8. Battery must be charged with the adapter or standard charger provided. Usage of unapproved adapter may
shorten battery life or cause explosion. (Warranty is void in this event)
9. If the PDA gets wet, never insert or place the terminal, battery, or charger into or near heating devices, such
as heaters or microwave ovens . This may cause production deformation, explosion or fire. (The label’s color
inside the PDA or battery will fade if immersed in water.) Please note that free repair service won’t be provided
in this condition.)
Contents
I. Safety and precautions – Warning and cautions
II. Contents
1. Product composition
2. Get to know the product
1) Left, front, right side of product
2) Button introduction
3) Specifications
3. Getting started
1) Connecting and disconnecting the battery
2) Charging battery
3) Using PDA
4. Start connecting network
1) Scan
2) ear jack (Converter)
3) Reset PDA
4) Host PC connecting
5) IrDA 사용 Using IrDA
6) Bluetooth
7) How to Use Wireless Manager
8) Using memory card
5. ActiveSync
1) Installing ActiveSync
2) Precaution for using ActiveSync
6. Using PDA phone functions
7. Using Wireless LAN features
8. Precautions
9. Appendix
1) Q&A
2) Accessories
Product Composition
The following illustrations may differ from actual products. Please contact our customer center to purchase
additional or optional products.
[BIP-5000 PDA 1 unit]
[Power cable]
BIP-5000
[BIP-5000 Cradle 1 unit]
[Adapter]
[Battery (standard)]
[USB cable]
[Stylus]
[User manual]
Copyright © 2005 Bluebird Soft, Inc. All Rights Reserved. < 2 >
Knowing the product
1. Front, left side, back, right side
Barcode
scanner
window
Antenna
Speaker
Camera
Flash
Power(LED)
Barcode/
Camera
Button
CDMA
(LED)
Barcode/
Camera
Button
Reset
ear jack
IrDA
Power button
Hand
Strap
Call button
Microphone
Alpha key
Function
key
[Front]
BIP-5000
Enter key
Battery Case
Fixed screw
[Right side]
[Back]
[Left side]
Copyright © 2005 Bluebird Soft, Inc. All Rights Reserved. < 3 >
Knowing the product
2. Button introduction
Use it to turn on/turn off the PDA
Laser(1D,2D) Barcode / Camera Type : Press left button to use barcode scanner
Press right button to use camera
CMOS Barcode Type : Use right and left button to activate barcode.
Execute after user input
Change character input mode. Default mode is numeric. Press once for lower case
English, press twice for capital English, press three times for special characters.
Execute program and make phone connection. Press once to execute phone program,
press twice to view recent calls, press three times to call the selected number.
Delete a character by moving the cursor one space to the left.
Move one space to the right.
Press 3 seconds to enable/disable silent mode
Press 3 seconds to lock the PDA. Password must be inserted to use the PDA.
BIP-5000
Copyright © 2005 Bluebird Soft, Inc. All Rights Reserved. < 4 >
Knowing the product
3. Specifications
Contents
CPU
Intel PXA270 520MHz
OS
Window Mobile 5.0
DISPLAY
3.5”, 240 x 320 / 260,000 color
INTERFACE
1 x USB 1.1 Client / Host
1 x RS-232C
Mini-SD slot
IrDA 1.2 (Option: Bluetooth class )
CAMERA
2.0M pixel camera
BATTERY
2000mAH
SIZE
79.5(width) x 150.3(length) x 34.9thickness) mm
WEIGHT
314 g
ADAPTER
BIP-5000
Description
5V 2.4A
Copyright © 2005 Bluebird Soft, Inc. All Rights Reserved. < 5 >
제품 알아두기
3. Specification
* FCC Compliance Statement:
This device complies with part 15 of the FCC Rules.
Operation is subject to the following two
conditions: (1) This device may not cause harmful interference,
and (2) this device must accept any interference received, including
interference that may cause undesired operation.
CAUTION: Changes or modifications not expressly
approved by the manufacturer responsible for compliance
could void the user’s authority to operate the equipment.
Important Note: To comply with FCC RF exposure compliance
requirements, the antenna used for this transmitter must be
installed to provide a separation distance of at least 20cm from al
persons and must not be co-located or operating in conjunction
with any other antenna or transmitter.
European Union Notice
This system has been tested for conformance with CE radio spectral,
EMC and safety requirements.
BIP-5000
Copyright © 2005 Bluebird Soft, Inc. All Rights Reserved. < 5 >
Getting started
1. Connecting and disconnecting the battery
[Connecting the battery]
• Sit the battery to the groove,
Put the cover and swivel the screw
[Disconnecting the battery]
• Swivel the screw in arrow direction until
detached, take off battery
* Battery must be taken off after turning off the PDA. Sudden power break may cause the PDA malfunction.
BIP-5000
Copyright © 2005 Bluebird Soft, Inc. All Rights Reserved. < 6 >
Getting started
2. Charging the battery
[While connecting the adapter to the table charging cradle]
*Connect the adapter with table charging cradle as showed
[While connecting the adapter to PDA directly]
* Connect the converter attached jack with PDA
• Note: Using the provided/approved adapter is the most safely and effective way to use PDA.
BIP-5000
Copyright © 2005 Bluebird Soft, Inc. All Rights Reserved. < 7 >
Getting started
2. Battery charging method
[Battery charging and working time]
Working time
Talk time
Standby time
Standard (2000mhA)
4 hours
Charging Time
Time
12 hours (LCD on,
backlight off),
200hours (LCD off)
Standard (2000mhA)
Less than 4 hours (main
battery), less than 72
hours (backup battery)
*Modem power turns off automatically to prevent the battery power damage. Use is after recharging.
*The battery talk time and standby time can be different from the specification in various conditions.
[Battery Charging condition]
Charging
Lamp
Charging
Fully charged
Red
Green
* It is fully charged when table charging cradle and PDA’s charging lamp turn to green, there is no harm if keep
charging the PDA.
*The Charging time is subject to change of charging condition, please purchase the new one when it’s working
time is shortened by 50%.
BIP-5000
Copyright © 2005 Bluebird Soft, Inc. All Rights Reserved. < 8 >
Getting started
3. Getting started
[Turn the PDA]
- Power Button
* Press power button to turn on the PDA
* Depress power button for 2 seconds in the condition
of PDA is turned on, the Front light will be turned on
or turned off.
BIP-5000
Copyright © 2005 Bluebird Soft, Inc. All Rights Reserved. < 9 >
Getting started
3. Getting started
Using Stylus (using method of stylus, dragging, pressing method)
* Using stylus to select, execute and move the items in the screen.
# Get stylus from PDA
# Tapping Stylus
: Tap the icon in the screen for once by using stylus to select or execute the item, like clicking the mouse
left button.
# Dragging Stylus
: Using dragging stylus to select several items, characters and images, like dragging the mouse.
# Tapping and Holding Stylus
: In order to view selected item’s function, taping and holding the stylus in the screen and it shows the pop
manual, like using mouse to select the item and click the right button.
BIP-5000
Copyright © 2005 Bluebird Soft, Inc. All Rights Reserved. < 10 >
Getting started
3. Start to use PDA
[Calibration]
*Using stylus to select, execute, move the item in screen.
▪ Press the stylus to the targeted center target accurately, and
doing the same when the target move to up left, down left, down
right, up right (This is to settle the input value of stylus in LCD
screen.
BIP-5000
Copyright © 2005 Bluebird Soft, Inc. All Rights Reserved. < 11 >
Getting started
3. Start to use PDA
[Starting Windows Mobile]
[Initialization the screen of Win CE]
▪ Click on the Start Button on the upper left
corner of the title bar and the Start Menu appears.
*The following figure is shown after the
initialization wizard finished.
Start Button
Title Bar
Start Menu
Today
Screen
Program
Execution and
Option Setting
BIP-5000
Copyright © 2005 Bluebird Soft, Inc. All Rights Reserved. < 12 >
Get to know the product
3. Start to use PDA
- To use the Function keypad
- The following functions will be executed after pressing the function key and button.
Contents
BIP-5000
Description
Function + 1
LCD getting darker
Function + 2
Moving one space up
Function + 3
LCD getting brighter
Function + 4
Moving one space to the left
Function + 5
Execute the sign input
Function + 6
Moving one space to the right
Function + 7
Page Down
Function + 8
Moving one space down
Function + 9
Page Up
Function + 0
Run the sign character
Function + 1
Run user defined program
Function + 1
Run user defined program
Function + 1
Run user defined program
Copyright © 2005 Bluebird Soft, Inc. All Rights Reserved. < 13 >
Connecting to the network
1. Scan
[Using laser Scanner]
[Using CMOS Scanner]
[correct]
[incorrect]
[correct]
-Barcode can be read in every direction
* Face the PDA the barcode as shown and press left/right button to use.
BIP-5000
Copyright © 2005 Bluebird Soft, Inc. All Rights Reserved. < 14 >
Connect to the network
1. Scan
[Basic test method of laser barcode]
1) Run notepad
2) Create new notepad file
3) Face the scanner to the barcode and press barcode button.
4) The captured barcode value is shown in the new notepad.
• Please consult the program’s manufacture for using the special barcode program.
BIP-5000
Copyright © 2005 Bluebird Soft, Inc. All Rights Reserved. < 15 >
Connect to the network
1. Scan
[Basic CMOS barcode test method]
1) Run notepad
2) Create the new notepad file
3) Face the scanner to the barcode and press barcode button.
4) The read barcode value is shown in the new notepad.
• Please consult the program’s manufacture for using the special barcode program.
BIP-5000
Copyright © 2005 Bluebird Soft, Inc. All Rights Reserved. < 15 >
Connect to the network
2. Using method of ear jack
[Using ear jack]
• Take off the ear jack cover and plug it straight into the PDA as shown.
BIP-5000
Copyright © 2005 Bluebird Soft, Inc. All Rights Reserved. < 17 >
Connect to the network
3. Reset PDA
[Reset]
Reset button
• Press reset softly by using stylus
* Soft reset can be used to restart the PDA when there is error occurred and PDA stopped working. Same
as computer reset, all the unsaved data will be lost.
BIP-5000
Copyright © 2005 Bluebird Soft, Inc. All Rights Reserved. < 18 >
Connect to the network
3. Reset the PDA
[Hard reset]
• Perform the hard reset using Stylus and buttons.
• Hard reset is used when the soft reset doesn’t work. The PDA will turn to the original condition after
being hard reset.
All the installed program in RAM, documents, settings will be lost after doing hard reset.
•Please backup the data and program before doing hard reset, we will not be responsible for any data
and data/program lost.
BIP-5000
Copyright © 2005 Bluebird Soft, Inc. All Rights Reserved. < 19 >
Connect to the network
3. Host PC connection method
[Connect the cradle]
* Connect the PDA (cradle) -cable-computer as
shown
[Connect to PDA directly]
* Connect PDA-cable-computer as shown
• ActiveSync can be used after connecting the PC or notebook to copy the files or install the new
program by synchronizing the PDA with PC.
BIP-5000
Copyright © 2005 Bluebird Soft, Inc. All Rights Reserved. < 20 >
Connect to the network
4. IrDA using method
[IrDA using method]
[Executing screen]
Sample)
1. Start->Setting
• Matching the IrDA port as shown (transmission
2. Select WL transmission after pressing “connect” tab.
speed is fastest when the distance at shortest)
3. Click “OK” after check “receiving all the incoming WL”
4. Searching for the opposite IrDA port
5. Press “OK” after sending the data
BIP-5000
Copyright © 2005 Bluebird Soft, Inc. All Rights Reserved. < 21 >
Connect to the network
5. Bluetooth using method
Activate the Bluetooth device such as Bluetooth printer and card reader.
▪ Example of Using the Bluetooth.
① Path: [Start] -> [Settings]
② Click on the [Connections] table and then Select [Bluetooth].
③ Under the [Mode] tab, check ‘Turn on Bluetooth’ and click on
[OK].
▪ Turn on Bluetooth
- Depending on checking the option, it is either In Use or Not in
Use Status.
※ When it is Not in Use, make sure to deactivate the function in
order to prevent battery loss.
▪ Make this device discoverable to other devices
- When checked In Use, it should allow other devices to search
BIP-1300.
BIP-5000
Copyright © 2005 Bluebird Soft, Inc. All Rights Reserved. < 22 >
Connect to the network
5. Bluetooth using method
Other Bluetooth devices are scanned and paired.
▪ Example of Using the Bluetooth
① Path: [Start] -> [Settings]
② Click on the [Connections] table and then Select [Bluetooth]
③ Under the [Devices] tab, select ‘New Partnership...
※ When other Bluetooth devices are recognized, the model name of the
product and an icon appears as shown in the Figure.
※ When nothing is recognized, an message to indicate that nothing was
found appears.
▪ See if PIN Number entry window pops up. (Contact the device
manufacturer for the original PIN No.
Each device has its own unique device PIN Number for authentication.)
▪ Make sure that the scanned device displays the same icon as bluetooth
device.
▪ Double-click the device icon > select trust menu > enter PIN No.
▪ The red mark of the found device icon will disappear if a correct PIN
code is input.
▪ Double-click the device icon and select ‘Activate.’
Make sure the red check mark is shown on the device icon.
※ For activating bluetooth device, please contact the device
manufacturers.
BIP-5000
Copyright © 2005 Bluebird Soft, Inc. All Rights Reserved. < 22 >
Connect to the network
6. How to Use Wireless Manager
With the Comprehensive Wireless Manager Function, it assists to use Bluetooth and Wi-Fi (Wireless LAN) in an
easy and simple way.
▪ Example of Using the Wireless Manager
① Path: [Start] -> [Setting]
② Click on the [Connections] table and then Select [Wireless Manager]
③ Select either ‘Wi-Fi’ or ‘Bluetooth’ button
※ Depending on the communication specification of the terminal, the
Support Items for Wireless Manager can vary.
※ By using the ‘All’ button, all functions can be set ON/OFF at once; and,
by using ‘Wi-Fi,’ ‘Bluetooth,’ or ‘전화’ buttons, a function can be set
ON/OFF individually.
※ When ‘Wi-Fi’ or ‘Bluetooth’ is set ON, other functions under this will be
activated so as to make sub-settings possible. Even when it is set OFF,
individual settings are possible by using the Menu button on the bottom.
BIP-5000
Copyright © 2005 Bluebird Soft, Inc. All Rights Reserved. < 22 >
Connect to the network
7. Memory card using method
[Insert Mini SD card]
Memory
Card
* Push the memory card into the slot as shown
until it’s plugged.
BIP-5000
[Take out Mini SD card]
Memory
Card
* Press the memory card down deeply as shown and
it will bounce out and get detached.
Copyright © 2005 Bluebird Soft, Inc. All Rights Reserved. < 23 >
ActiveSync connection
1. Install ActiveSync
▪ Download the installation file for ActiveSync from
http://www.microsoft.com/korea, and run the setup.exe
▪ When the following window appears, click “Install”.
▪ When the following window appears, click “Next”.
※ This is for Microsoft ActiveSync 4.1 - Korean. In using other versions, the Menu selections and functions
in the manual can be different.
BIP-5000
Copyright © 2005 Bluebird Soft, Inc. All Rights Reserved. < 24 >
ActiveSync connection
1. Install ActiveSync
▪ After installation is done, click “Finish”.
▪ Depending on your PC environment, the Wizard may ask you to restart your PC. In this case, restart your PC.
※ When you first connect BIP-1300 to PC, the New Hardware Search Wizard of the PC is activated.
※ If you have already installed Microsoft ActiveSync, you do not need to install an additional driver program.
※ During first installation, the terminal may not be able to connect to the PC. In this case, the
Communication Error dialog box appears on the terminal. Click “OK” in this dialog and retry connection.
BIP-5000
Copyright © 2005 Bluebird Soft, Inc. All Rights Reserved. < 25 >
ActiveSync connection
1. Install ActiveSync
▪ In order to use ActiveSync, connect PDA to PC or Laptop
by using the USB cable.
Or, after fitting PDA in a cradle, connect the cradle to PC
by using the USB cable.
▪ Open file finder of your PC, and copy files
you want.
After all files are copied, move the files to
PocketStore.
▪ If PDA is turned on when connected to PC,
PC will automatically detect it and execute ActiveSync.
▪ Press ActiveSync Search button and activate Mobile
installation window.
BIP-5000
Copyright © 2005 Bluebird Soft, Inc. All Rights Reserved. < 25 >
Using PDA phone
Using call program
1) Dial number
a. Dial a phone number or a speed dial number
b. Number can be cleared by using [CLR] button
c. Press [SEND] button to make a call
- Redail function: Without inputting numbers, press the [SEND] button to redail the lasted call
number
d. Communication is available after the call being connected
- Redail option and times can be set in SETTING-OPTION automatically when the connection failed.
- Call time is shown on the screen
e. Press [END] button to end the call
2) Receive the call
a. An incoming call message is shown when the bell rings.
b. Press any key to receive the call.
c. Press [END] to finish the call .
* Keep pressing [END] button can turn on/off the phone modem.
BIP-5000
Copyright © 2005 Bluebird Soft, Inc. All Rights Reserved. < 30 >
Using phone program
Phone program screen
[Send]
1)
Push and make a start the phone program.
2) Enter the phone number.
3) Edit the phone number with
.
4)
or
make you phone call.
• Re-send function: Automatically make a phone call which is the last number you input
5) Connecting.
• Talking time will show up on the screen.
[Receive]
1)
With ringing ‘Calling’ sign will be shown on the screen.
2) Push
and it will be connected.
3) Push the disconnect button
4) Push the disconnected button
will make you disconnected with line.
longer, then modem will be off.
longer, then modem will be off.
※ This mobile handheld device requires ear jack(headset) to make a phone call.
※ Ear jack is an accessory item.
BIP-5000
Copyright © 2005 Bluebird Soft, Inc. All Rights Reserved. < 31 >
Using Wireless LAN Features
Using Wireless LAN Features
1) The “WLAGS4681” menu window appears.
cf) If the “WLAGS4681” menu window does not appear, double click “
”in the tool bar.
2) Click “Wireless Information”, select the corresponding AP, and select “Connect”.
cf) If the AP information does not exist, enter it manually.
2-1) Double click “Add” in the AP list window.
2-2) When the wireless network properties window appears, enter the corresponding AP in “Network
Name (SSID)”. Check the corresponding settings for the AP.
2-3) Depress “OK”.
3) The window in (2) above appears again, and the AP name appears.
4) Depress “OK”.
4-1) Depress “Connect” on the window.
Cautions
: When you don’t follow below instructions, Injury or damage can be occur
Cautions
1. Use only the approved accessories and components provided by BluebirdSoft Inc. to insure user safety.
2. Do not turn on the PDA while it’s wet, and don’t touch the adapter or power cord with wet hands. This may
cause electric shock.
3. Never reconstruct, disassemble, or repair the product arbitrarily. Always contact a service center authorized
by BluebirdSoft Inc. Ensure that you adhere to the safety warnings and precautions. If these principles are
not adhered to, free repair service will not be offered.
4. Backup PDA phone’s data so that they won’t be lost while the PDA being repaired or upgraded. (Ringtone,
SMS/voice message will be initialized)
5. Do not use the PDA in the place with high humidity and temperature. High temperature and
humidity (Operation temperature: 4’ to 122’ F/ -20’ ~ 50’C; humidity: 5% to 90% relative humidity) may
cause PDA malfunction. Warranty will null and avoid in this event.
6. Do not put the PDA phone near any credit card, phone card, account book, ticket to avoid magnetic
interference. It will cause PDA phone’s data lost.
7. Avoid the shock and vibration, unplug the power cord if not use PDA phone and keep it in the safe place.
8. Do not keep it in the dusty place, and do not put the power cord close to the heated devices. Unplug the
power cord when cleaning, make sure to rub off the dusts around the power plug pin.
9. Fully charge the battery and keep it in the room temperature if it’s not going to be used for long time. Even
so, battery’s useful time can be shorten due to the low voltage.
10. Don’t paint on PDA, screen and case could be damaged and it can cause defectiveness.
Touch exposured area of PDA resin may cause allergy symptom, please stop using PDA phone
and take the advice from a doctor
BIP-5000
Copyright © 2005 Bluebird Soft, Inc. All Rights Reserved. < 32 >
Appendix
1. Q&A
Q. What should I do if the PDA is dropped into water?
A. Firstly detach the battery from PDA and dry them. If PDA doesn’t work properly after being dried, contact
A/S center for repairing main board and other components.
Q. Can’t turn on the PDA.
A. Program can be damaged. Reset the PDA, and if it doesn’t work properly after that, contact A/S center for repair.
Q. PDA can’t be charged.
A. Make sure that PDA and cradle are properly connected, and check if the lamp is turned on. Clearly clean the
charging board and try again. If the PDA still can’t be charged after that, then probably the batter’s life is ended or
it has defect. (The warranty period for battery is 6 months.)
Q. How to claim for A/S (after service)?
A. Fill in the RMA form and send the units to A/S center after being accepted. Repair cost should be paid
according to distributor agreement.
Q. How to check if the PDA is repaired and being returned?
A. An email includes the courier track number and device’s S/N will be sent right after the delivery. Detailed delivery
information can be checked by visiting the courier website.
Q. What should I do if the battery drains out very fast?
A. It can be happened while using the peripherals like barcode scanner and printer. If the battery’s useful time
keeps shortening, then it’s life is ended. Please purchase the new one for replace.
BIP-5000
Copyright © 2005 Bluebird Soft, Inc. All Rights Reserved. < 34 >