1
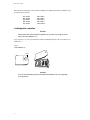
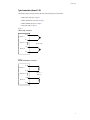
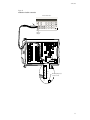
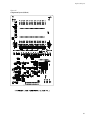
w w w. k e i t h l e y. c o m
Model 7706 Multiplexer Card
User’s Guide
PA-719 Rev. D / August 2010
The Model 7706 can be used with Keithley Models 2700, 2701, and 2750.
All references to the Model 2700 also apply to the Models 2701 and 2750.
A
G R E A T E R
M E A S U R E
O F
C O N F I D E N C E
Safety Precautions
The following safety precautions should be observed before using this product and any associated instrumentation. Although some
instruments and accessories would normally be used with non-hazardous voltages, there are situations where hazardous conditions may
be present.
This product is intended for use by qualified personnel who recognize shock hazards and are familiar with the safety precautions required
to avoid possible injury. Read and follow all installation, operation, and maintenance information carefully before using the product. Refer
to the user documentation for complete product specifications.
If the product is used in a manner not specified, the protection provided by the product warranty may be impaired.
The types of product users are:
Responsible body is the individual or group responsible for the use and maintenance of equipment, for ensuring that the equipment is
operated within its specifications and operating limits, and for ensuring that operators are adequately trained.
Operators use the product for its intended function. They must be trained in electrical safety procedures and proper use of the instrument.
They must be protected from electric shock and contact with hazardous live circuits.
Maintenance personnel perform routine procedures on the product to keep it operating properly, for example, setting the line voltage or
replacing consumable materials. Maintenance procedures are described in the user documentation. The procedures explicitly state if the
operator may perform them. Otherwise, they should be performed only by service personnel.
Service personnel are trained to work on live circuits, perform safe installations, and repair products. Only properly trained service
personnel may perform installation and service procedures.
Keithley Instruments products are designed for use with electrical signals that are rated Measurement Category I and Measurement
Category II, as described in the International Electrotechnical Commission (IEC) Standard IEC 60664. Most measurement, control, and
data I/O signals are Measurement Category I and must not be directly connected to mains voltage or to voltage sources with high transient
over-voltages. Measurement Category II connections require protection for high transient over-voltages often associated with local AC
mains connections. Assume all measurement, control, and data I/O connections are for connection to Category I sources unless otherwise
marked or described in the user documentation.
Exercise extreme caution when a shock hazard is present. Lethal voltage may be present on cable connector jacks or test fixtures. The
American National Standards Institute (ANSI) states that a shock hazard exists when voltage levels greater than 30V RMS, 42.4V peak,
or 60VDC are present. A good safety practice is to expect that hazardous voltage is present in any unknown circuit before measuring.
Operators of this product must be protected from electric shock at all times. The responsible body must ensure that operators are
prevented access and/or insulated from every connection point. In some cases, connections must be exposed to potential human contact.
Product operators in these circumstances must be trained to protect themselves from the risk of electric shock. If the circuit is capable of
operating at or above 1000V, no conductive part of the circuit may be exposed.
Do not connect switching cards directly to unlimited power circuits. They are intended to be used with impedance-limited sources. NEVER
connect switching cards directly to AC mains. When connecting sources to switching cards, install protective devices to limit fault current
and voltage to the card.
Before operating an instrument, ensure that the line cord is connected to a properly-grounded power receptacle. Inspect the connecting
cables, test leads, and jumpers for possible wear, cracks, or breaks before each use.
04/09
When installing equipment where access to the main power cord is restricted, such as rack mounting, a separate main input power
disconnect device must be provided in close proximity to the equipment and within easy reach of the operator.
For maximum safety, do not touch the product, test cables, or any other instruments while power is applied to the circuit under test.
ALWAYS remove power from the entire test system and discharge any capacitors before: connecting or disconnecting cables or jumpers,
installing or removing switching cards, or making internal changes, such as installing or removing jumpers.
Do not touch any object that could provide a current path to the common side of the circuit under test or power line (earth) ground. Always
make measurements with dry hands while standing on a dry, insulated surface capable of withstanding the voltage being measured.
The instrument and accessories must be used in accordance with its specifications and operating instructions, or the safety of the
equipment may be impaired.
Do not exceed the maximum signal levels of the instruments and accessories, as defined in the specifications and operating information,
and as shown on the instrument or test fixture panels, or switching card.
When fuses are used in a product, replace with the same type and rating for continued protection against fire hazard.
Chassis connections must only be used as shield connections for measuring circuits, NOT as safety earth ground connections.
If you are using a test fixture, keep the lid closed while power is applied to the device under test. Safe operation requires the use of a lid
interlock.
If a
screw is present, connect it to safety earth ground using the wire recommended in the user documentation.
The ! symbol on an instrument means caution, risk of danger. The user should refer to the operating instructions located in the user
documentation in all cases where the symbol is marked on the instrument.
The
symbol on an instrument means caution, risk of danger. Use standard safety precautions to avoid personal contact with these
voltages.
The
The
symbol on an instrument shows that the surface may be hot. Avoid personal contact to prevent burns.
symbol indicates a connection terminal to the equipment frame.
If this
symbol is on a product, it indicates that mercury is present in the display lamp. Please note that the lamp must be properly
disposed of according to federal, state, and local laws.
The WARNING heading in the user documentation explains dangers that might result in personal injury or death. Always read the
associated information very carefully before performing the indicated procedure.
The CAUTION heading in the user documentation explains hazards that could damage the instrument. Such damage may invalidate the
warranty.
Instrumentation and accessories shall not be connected to humans.
Before performing any maintenance, disconnect the line cord and all test cables.
To maintain protection from electric shock and fire, replacement components in mains circuits - including the power transformer, test leads,
and input jacks - must be purchased from Keithley Instruments. Standard fuses with applicable national safety approvals may be used if
the rating and type are the same. Other components that are not safety-related may be purchased from other suppliers as long as they
are equivalent to the original component (note that selected parts should be purchased only through Keithley Instruments to maintain
accuracy and functionality of the product). If you are unsure about the applicability of a replacement component, call a Keithley Instruments
office for information.
To clean an instrument, use a damp cloth or mild, water-based cleaner. Clean the exterior of the instrument only. Do not apply cleaner
directly to the instrument or allow liquids to enter or spill on the instrument. Products that consist of a circuit board with no case or chassis
(e.g., a data acquisition board for installation into a computer) should never require cleaning if handled according to instructions. If the
board becomes contaminated and operation is affected, the board should be returned to the factory for proper cleaning/servicing.
Model 7706 All-in-One module
Connection, operation, calibration, and parts information
Introduction
This packing sheet contains information specific to the Model 7706 module. If you have any questions after reviewing this information, please contact your local Keithley representative or call one of our Applications Engineers at 1-800-348-3735 (U.S.
and Canada only). This document is arranged as follows:
Description
Page
Connection
Card configuration—schematic ............................................................................................................................................ 2
Card configuration—connections ......................................................................................................................................... 4
Wiring procedure .................................................................................................................................................................. 5
Typical connections (channels 1–20).................................................................................................................................... 7
Digital outputs (channels 21–22) .......................................................................................................................................... 9
Analog outputs (channels 23–24) ....................................................................................................................................... 15
Totalizer .............................................................................................................................................................................. 18
Totalizer channel monitor scan example............................................................................................................................. 22
Specifications ...................................................................................................................................................................... 24
Connection log .................................................................................................................................................................... 24
Front panel operation
Card specific menu.............................................................................................................................................................. 26
Bus commands
Sending channel numbers ................................................................................................................................................... 27
OUTPut Subsystem............................................................................................................................................................. 28
SENSe[1] Subsystem .......................................................................................................................................................... 29
Unsupported SCPI commands ............................................................................................................................................ 30
Verification
Analog outputs .................................................................................................................................................................... 30
Totalizer .............................................................................................................................................................................. 32
Calibration
Recommended test equipment ............................................................................................................................................ 34
Extender board connections................................................................................................................................................ 34
Front panel Model 7706 temperature calibration................................................................................................................ 34
Remote Model 7706 temperature calibration ..................................................................................................................... 35
Front panel Model 7706 analog output (DAC) calibration ................................................................................................. 35
Remote Model 7706 analog output (DAC) calibration....................................................................................................... 36
Calibration commands ................................................................................................................................................................36
Remote error reporting................................................................................................................................................................42
Detecting calibration step completion.........................................................................................................................................44
Replaceable parts ........................................................................................................................................................................45
Specifications ..............................................................................................................................................................................50
Model 7706 module
Connection
The Model 7706 is a 20-channel differential multiplexer card with the following features:
• 20 channels of analog input with 300V, 1A capacity; 60W, 125VA maximum
• 16 channels of digital output for output control
• One event counter/Totalizer
• Two analog outputs (±12V @ 5mA with 16-bit programmability)
• 2-wire or 4-wire Ω measurement (automatically pairs switches for four wire measurements — n + 10)
• Temperature applications (RTD, thermistor, thermocouple)
• Built-in automatic cold junction reference (CJC)
• Screw terminal connections
• Designed specifically for use with Keithley’s Model 2700 Multimeter/Data Acquisition System
Card configuration—schematic
Figure 1 shows a simplified schematic diagram of the Model 7706 module. As shown, the Model 7706 has channels that are
grouped into two banks of ten channels (twenty channels total). Backplane isolation is provided for each bank. Each bank also
includes separate cold junction reference points. The first bank contains channels 1 through 10 while the second bank contains
channels 11 through 20. Each channel of the 20-channel multiplexer card is wired with separate inputs for HI/LO providing
fully isolated inputs.
NOTE
Although the Model 7706 relays are the latching type (relays hold their state even after power has been
removed), all relay states are set to open a few seconds after either a power cycle or an *RST command is
issued.
Connections to DMM functions are provided through the card backplane connector for the following:
INPUT connections
SENSE (Ω4-Wire) connections
Channels 21–22 (digital output), 23–24 (analog output), and 25 (Totalizer) are controlled either over the bus or from the front
panel. The grounds for these channels are non-isolated. Detailed information on each channel is contained later in this section.
Channel 26 (2W/4W Configuration), Channel 27 (Sense Isolation), and Channel 28 (Input Isolation) are normally automatically
configured by the 2700. However, by using the :ROUT:MULT: commands (refer to Section 2 of the 2700 User’s Manual), they
can be manually configured.
2
Connection
Figure 1
Simplified schematic for Model 7706
Input
NOTES Channels 26–28 in this schematic
refer to the designations used for
control and not actual available channels.
HI
LO
Channels 26, 27, and 28 can be individually
controlled using ROUTe:MULTiple if the
module is not to be connected to the
internal DMM.
Sense HI
LO
Cold junction
Ref x2
Channel 1
For more information, refer to the
ROUTe:MULTiple command section
in the Model 2700 User’s Manual.
HI
LO
Channel 28
(see Note)
Backplane
isolation
(Channels 2–9)
HI
HI
Input
LO
Channel 10
LO
Channel 26
2-Pole (Open)
4-Pole (Closed)
(see Note)
Cold junction
Ref x2
Channel 11
To Model 2700
Backplane
Channel 27
(see Note)
Backplane
isolation
HI
Sense
LO
HI
LO
(Channels 12–19)
HI
16
Channel 20
LO
Bit
16
Digital
Output
16
0
1
2
3
4
5
6
7
Channel 21
0
1
2
3
4
5
6
7
Channel 22
NOTE
Non-isolated
grounds ( )
are referenced to
chassis ground.
Channel 23
DAC
Channel 24
DAC
32
Totalizer
Channel 23
Channel 24
+IN
–IN
+GATE
–GATE
Channel 25
NOTES
Connect 4-wire sense leads using channels 11–20.
To disconnect channels 11–20 from channels 1–10, send:
:ROUT:MULT:CLOS (@126) (note opposite logic)
3
Model 7706 module
When automatically configured for 4-wire measurements (including 4-wire Ω, RTD temperature, Ratio, and Channel average)
the channels are paired as follows:
CH1 and CH11
CH2 and CH12
CH3 and CH13
CH4 and CH14
CH5 and CH15
CH6 and CH16
CH7 and CH17
CH8 and CH18
CH9 and CH19
CH10 and CH20
Card configuration—connections
WARNING
The information in this section is intended for qualified service personnel. Do not attempt to perform
this procedure unless qualified to do so.
Figure 2 shows how to access the screw terminals on the Model 7706. Channel designations for the screw terminals are contained in Figure 3.
Figure 2
Screw terminal access
TE7
TE5
TE6
TE4
J3
TE3
TE2
TE1
UNLOCK
LOCK
WARNING
Do not exceed the maximum specifications for the Model 7706 module. Refer to the end of this packing
list for specifications.
4
Connection
Figure 3
Model 7706 screw terminal channel designations
Digital output
CH21
Analog input
Analog input
CH11
CH12
CH13
Analog input
J2
H
CH6 L
H
CH7 L
H
CH8 L
H
CH9 L
H
CH10 L
TE3
J3
CH20
TE1
CH19
TE7
CH18
TE6
CH17
TE5
CH16
TE4
CH15
Digital output
CH22
Bit 0
Bit 1
Bit 2
Bit 3
GND
GND
Bit 4
Bit 5
Bit 6 Analog
Bit 7 outputs
TE2
CH14
H
L
H
L
H
L
H
L
H
L
H
L
H
L
H
L
H
L
H
L
Bit 0
Bit 1
Bit 2
Bit 3
GND
GND
Bit 4
Bit 5
Bit 6
Bit 7
CH1 H
L
H
CH2
L
H
CH3
L
CH4 H
L
H
CH5
L
CH23
GND
CH24
GND
G+
GININ+
Totalizer
H
L
Sense H
L
Source
Threshold jumper
(J2) position
1-2
TTL
Clear
Sine wave
Wiring procedure
WARNING
The information in this section is intended for qualified service personnel. Do not attempt to perform
this procedure unless qualified to do so.
Use the following procedure to wire the Model 7706 module. Make all connections using correct wire size (up to 22 AWG).
Also, make sure to add supplementary insulation around the harness for voltages above 42V peak (see Figure 4).
5
Model 7706 module
WARNING
All wiring must be rated for the maximum voltage in the system. For example, if 1000V is applied to the
front terminals of the Model 2700, the plug-in module wiring must be rated for 1000V.
1. Make sure all power is discharged from the Model 7706 module.
2. Access the screw terminals (see Figure 2).
3. Using a small flat-blade screwdriver, loosen terminal screws and install wires as desired. Figure 4 shows connections to all
channels).
4. Route wire along wire-path and secure with cable ties as shown (see Figure 4).
5. Fill in a copy of the connection log (Table 1) and affix it to the module cover.
6. Close and lock cover.
WARNING
The Model 7706 module provides connections for both high voltage analog measurements as well as digital earth based circuits. Make sure to install and maintain double insulation between the analog and
digital circuit wiring using supplementary insulation as required (see Figure 4).
Figure 4
Wire dressing—fully wired module
Note
Secure wiring to 7706 by using cable
ties through cable tie holes.
Cable tie
(8 places)
Channel 21
Channel 22
Analog input
Channels 1-20
TE2
TE6
TE5
TE7
TE1
TE4
iring
Digital wiring
sed
(Earth based
circuits)
and
analog
outputs
Analog
wiring
TE3
J3
Supplementary
entary
insulation
(2 places)
High voltage connection
6
Totalizer connection
Channel 23
Channel 24
Connection
Typical connections (channels 1–20)
The following examples show typical wiring connections for the following types of measurements:
• Thermocouple connections, see Figure 5
• Ω2-Wire and thermistor connections, see Figure 6
• Ω4-Wire and RTD connections, see Figure 7
• Voltage (AC or DC), see Figure 8
Figure 5
Thermocouple connections
HI
Channel 1
LO
(Channels 2–19)
Thermocouple
HI
Channel 20
LO
Figure 6
Ω2-Wire and thermistor connections
HI
Channel 1
LO
(Channels 2–19)
Resistor or
Thermistor
HI
Channel 20
LO
7
Model 7706 module
Figure 7
Ω4-Wire and RTD connections
HI
Ω4-Wire
<<
LO
<<
RTD
Channel 1
(Channels 2–9)
HI
<<
LO
<<
Channel 10
HI
Channel 11
LO
(Channels 12–19)
HI
Channel 20
LO
Figure 8
Voltage connections (DC or AC)
DC Voltage
HI
+
Channel 1
LO
(Channels 2–19)
HI
+
Channel 20
LO
8
AC Voltage
Connection
Digital outputs (channels 21–22)
Use the Model 7706 digital outputs to control indicators, fixtures, switches, solenoids, loads, relays, etc. Figure 9 shows a simplified schematic of the digital output.
Figure 9
Simplified schematic of digital output
Bit
16
Digital
Output
0
1
2
3
4
5
6
7
Channel 21
0
1
2
3
4
5
6
7
Channel 22
Non-isolated
Reference to chassis ground
Setting the digital output in 8-bit (byte)
To set the digital output, send the decimal equivalent of the binary pattern desired. Keep in mind that on each port, bit 7 is the
most significant bit (MSB) and bit 0 is the least significant bit (LSB). This makes the pin 1 screw terminal of each digital port
(TE2 and TE1) the LSB, and pin 10 the MSB.
NOTES
TE2 is Channel 21 and TE1 is Channel 22.
Pins 5 and 6 on each digital port are ground.
To find the decimal equivalent of the binary pattern, first determine the pattern mapped to the screw terminals on the desired
digital output (refer to the example contained in Figure 10). Setting a bit to a logic ‘1’ effectively sets the screw terminal to +5V,
while setting it to a logic ‘0’ sets the screw terminal to 0V. Then, for each screw terminal (or bit position), multiply the binary
value (either a 1 or a 0) by the decimal weight (see Figure 10). The sum of the products is the decimal equivalent value of the
binary pattern. This decimal value can be either sent over the bus (as in the example) or by using the front panel of the Model
2700. To send it over the front panel: under the SHIFT->CARD menu, key in the decimal value (138) for the menu item
“DIGOUT1: XXX”. Refer to Figure 11 for a sample on Channel 22.
9
Model 7706 module
Figure 10
Sample digital output for Channel 21
TE2
TE5
TE4
TE7
TE6
TE1
J3
TE3
J2
GND
GND
Digital output
CH21
10
9
8
7
4
2
B7 B6 B5 B4
1
B3 B2 B1 B0
Screw terminal number
Bit Position
0/1 0/1 0/1 0/1
0/1 0/1 0/1 0/1
Binary Value
(27) (26) (25) (24)
(23) (22) (21) (20)
Weights
128 64 32 16
Example:
3
8
4
2
1
Equivalent decimal
weight
1
0
0
0
1
0
1
0
10
9
8
7
4
3
2
1
1
0
0
1
0
1
0
Binary Value
64 32 16
8
4
2
1
Decimal weight
Channel 21
Multiply the binary values
by the decimal weight
Add the products together
128
0
128 + 0 + 0 + 0
Therefore, the command to send is:
OUTP:DIG:BYTE 138,(@121)
+
8 +0 +2 +0
= 138 (this is the NRf
value in the
command)
Channel 21 of the Model 7706 in slot 1
NRf value of 138 (specifies which terminals are 1 / 0)
8 bit
Digital
Output
10
Connection
Figure 11
Sample digital output for Channel 22
TE2
TE5
TE4
TE7
TE6
TE1
J3
TE3
J2
GND
GND
Digital output
CH22
10
9
8
7
4
2
B7 B6 B5 B4
1
B3 B2 B1 B0
Screw terminal number
Bit Position
0/1 0/1 0/1 0/1
0/1 0/1 0/1 0/1
Binary Value
(27) (26) (25) (24)
(23) (22) (21) (20)
Weights
128 64 32 16
Example:
3
8
4
2
1
Equivalent decimal
weight
1
0
0
0
1
0
0
1
10
9
8
7
4
3
2
1
1
0
0
1
0
0
1
Binary Value
64 32 16
8
4
2
1
Decimal weight
Channel 22
Multiply the binary values
by the decimal weight
Add the products together
128
0
128 + 0 + 0 + 0
Therefore, the command to send is:
OUTP:DIG:BYTE 137,(@122)
+
8 +0 +0 +1
= 137 (this is the NRf
value in the
command)
Channel 22 of the Model 7706 in slot 1
NRf value of 137 (specifies which terminals are 1 / 0)
8 bit
Digital
Output
11
Model 7706 module
Setting the digital outputs in 16-bit (word)
NOTE
Setting the digital output in 16-bit (word) can be accomplished only over the bus (no front panel operation).
To set the digital outputs in 16-bit, send the decimal equivalent of the binary pattern desired (similar to 8-bit). The binary pattern
will be twice as long as the 8-bit pattern (requiring both digital output ports). Keep in mind that bit 15 is the most significant bit
(MSB) and bit 0 is the least significant bit (LSB). This makes the pin 1 screw terminal of Channel 21 (TE2) the LSB and the
pin 10 screw terminal of Channel 22 (TE1) the MSB.
To find the decimal equivalent of the binary pattern, first determine the pattern mapped to the screw terminals on the desired
digital output (refer to the example contained in Figure 12). Setting a bit to a logic ‘1’ effectively sets the screw terminal to +5V
while setting it to a logic ‘0’ sets the screw terminal to 0V. Then, for each screw terminal (or bit position), multiply the binary
value (either a 1 or a 0) by the decimal weight (see Figure 12). The sum of the products is the decimal equivalent value of the
binary pattern. This decimal value can be sent over the bus as in the example.
The digital output allows the use of an external power supply up to 42V. Refer to Figure 13.
Inductive loads
Model 7706 operation is specified for resistive loads. Reactive (inductive) loads require voltage clamping. Before using inductive loads, take adequate circuit protection measures (refer to the appropriate appendices of the Model 2700 User’s Manual).
12
Connection
Figure 12
Sample sending a digital output word (16-bit)
TE4
TE5
TE6
TE7
TE1
TE2
J3
TE3
J2
B15 B14 B13 B12
B7 B6 B5 B4
3 2 1
0
B3 B2 B1 B0
Screw terminal label
Bit Position
0/1 0/1 0/1 0/1
0/1 0/1 0/1 0/1
0/1 0/1 0/1 0/1
0/1 0/1 0/1 0/1
Binary Value
(211) (210) (29) (28)
(27) (26) (25) (24)
(23) (22) (21) (20)
Weights
2048 1024 512
256
128 64 32 16
6
5
4
3
(215) (214) (213) (212)
32768 16384 8192 4096
2
1
6
5
4
Digital
output
CH21
0
B11 B10 B9 B8
7
7
GND
GND
GND
GND
Digital
output
CH22
8
4
2
Equivalent decimal
weight
1
1
1
0
0
0
0
0
0
1
0
0
0
1
0
0
0
7
6
5
4
3
2
1
0
7
6
5
4
3
2
1
0
0
0
0
0
0
1
0
1
0
0
0 Binary Value
2048 1024 512
256
128
64 32 16
8
4
2
1 Decimal weight
1
1
0
32768 16384 8192 4096
32768+16384 + 0 + 0
+
0
0
0
0
0
0
128 + 0 + 0 + 0
+
8 + 0 + 0 + 0 = 49288 (this is the NRf
value in the
command)
Therefore, the command to send is:
OUTP:DIG:WORD 49288,(@121)
Channel 21 of the Model 7706 in slot 1 (this command can only be sent to Channel 21)
NRf value of 49288 (specifies which terminals are 1 / 0)
16 bit
Digital
Output
13
Model 7706 module
Figure 13
Typical digital output with external power supply
Model 7706 Module
+5V
User supplied circuitry
Digital Output
Terminal
+ 42V (Maximum)
-
Output
Digital ground
(non-isolated,
referenced to
chassis)
Figure 14
Typical digital output (no external power supply)
Model 7706 Module
+5V
User supplied circuitry
Digital Output
Terminal
Logic Circuit
R
Output
Digital ground
(non-isolated,
referenced to
chassis)
14
≥2.4V @ 1mA
Connection
Analog outputs (channels 23–24)
CAUTION
Analog output current limit: 5mA (maximum).
The Model 7706 contains two DAC (Digital to Analog Converters). Use these analog outputs for tasks such as applying a voltage
bias to DUTs or analog control. The two analog outputs of the Model 7706 are capable of providing voltages in the range of
±12V. The analog outputs can be set from the front panel or over the bus. Figure 15 shows a simplified schematic of the analog
outputs.
Figure 15
Analog output
16
16
Channel 23
DAC
Channel 24
DAC
Channel 23
Channel 24
In the following examples, the Model 7706 module is in slot one of the Model 2700.
Sample 1: Set analog output 1 (channel 23) to 10.0V
To set analog output 1 using the front panel: under the SHIFT->CARD menu, key in the decimal value (for this example, 10.0)
for the menu item “AOUT1: +XX.XX”, and press enter. To set Channel 23 (analog output 1) over the bus, send the following
command:
OUTP:VOLT 10.0,(@123)
NOTES
Refer to “Front panel operation” for more information on menus and key location.
Voltage may be set in 1mV steps (values are rounded to the nearest millivolt).
15
Model 7706 module
Sample 2: Set analog output 2 (channel 24) to -5.5V
To set analog output 2 using the front panel: under the SHIFT->CARD menu, key in the decimal value (for this example, -5.5)
for the menu item “AOUT2: +XX.XX”, and press enter. To set Channel 24 (analog output 2) over the bus, send the following
command:
OUTP:VOLT -5.5,(@124)
Note that each output is referenced to the chassis. Each output can not “float” from each other. To operate with the analog output
in specification as a calibrated voltage source, the minimum resistance load is 2.2kΩ (refer to Figure 16).
Figure 16
Sample analog connection schematic
Channel 23
16 bit serial
communication
Channel 23
DAC
16 bit serial
communication
Channel 24
Channel 24
DAC
GND
GND
16
Connection
Loading effects
Loading of the voltage source becomes a consideration for low resistance loads. As the source resistance increases, the error
caused by loading increases. Figure 17 shows the method used to determine the percent error due to loading where:
Vs is the programmed analog output of the Model 7706
RLead is the total lead resistance of the wiring and connections
RLoad is the resistance of the user’s circuit
VM is the measured voltage
The voltage actually measured by the meter is attenuated by the voltage divider action of RS and RI, and it can be calculated as
follows:
V S R Load
V M = ---------------------------------R Load + R Lead
This relationship can be modified to directly compute for percent error:
R Load
Percent Error = ----------------------------------- × 100
R Load + R Lead
Using the above equation, to keep loading error within 0.1%, the resistance of the Model 7706 system must be at least 1/999th
the value of load resistance.
Figure 17
Loading effects
RLead
VS
Source
Voltage
+
RLoad
–
VM
Measured
Voltage
DAC output errors
The DAC output is most accurate when the Model 7706 is operated in stable temperature conditions that are as close as possible
to the environmental conditions used for calibration. Offset voltage drift over temperature is 1mV/°C. Also, the offset voltage
value may change when changing from slot 1 to slot 2.
17
Model 7706 module
Totalizer
Use the Totalizer to count more than 4 billion on/off events (contact closures, revolutions, power cycles, etc.). The Totalizer can
be accessed from the front panel or over the bus. Figure 18 shows a simplified schematic of the Totalizer connected to a function
generator.
NOTE
The Totalizer can count exactly up to 4,294,967,295 events (232-1). The count resets (sets its value to 0) when
it reaches 232.
Figure 18
Totalizer
Function generator
Model 7706 module
Manual read
Bus control
Counter
Totalizer
count
CH24
Signal conditioner
GND
GG+
IN+
IN+
18
J2 Threshold Selector
TTL: Close
AC: Open
Connection
Threshold detection
The Totalizer can count events at a rate of up to 100kHz. The count can be initiated manually or by configuring a scan. When
counting, the Totalizer can:
• Reset to zero every time it is read.
• Count on the rising or falling edge of the input signal.
• Count AC or TTL signals.
• Be governed by a gate signal.
Either through a menu (Figure 23) or over the bus (Table 5), the Totalizer can be configured to read (“READ”), or read and reset
(“RRES”). It can also be configured to which edge of the signal is read (rising or falling).
The type of threshold detected by the Totalizer is set by the position of jumper J2 (see Figure 3). Factory default setting for this
jumper is closed (TTL). The TTL wave as well as the AC type wave form are shown in Figure 19.
Figure 19
AC and TTL waveforms
TTL (J2 closed)
2.5V Threshold
AC (J2 opened)
0V Threshold
NOTES
The Totalizer counts when both terminals are either enabled or open.
Threshold levels cannot be programmed or set.
19
Model 7706 module
Gating provides specific control over when the Totalizer readings are taken. A gate always is interpreted if no gating signal is
present. To control counting through the G+ screw terminal, send a TTL high signal to enable counting and a TTL low signal
to disable counting. To control counting through the G- screw terminal, send a TTL low signal to enable counting and a TTL
high signal to disable counting. The Totalizer can be controlled from the G+ screw terminal, the G- screw terminal, or both (both
G+ and G- screw terminals have to be enabled to count). Samples of Totalizer input with gating are contained in Figure 20.
Figure 20
Sample totalizer input with gating
added to Totalizer count
+1
+2
+3
Rising edge
detection
IN+
TTL (J2 closed)
2.5V Threshold
IN-
G- (open)
G-
Counting enabled
G+ HIGH
G+
GND
Viewing Totalizer count
View the Totalizer count by using the CLOSE key and entering the Totalizer channel number (front panel). This opens all relays,
switches the Model 2700 function to Totalizer (“TOTALIZE”), and remembers the previous function. In this mode, the
TOTalize:TYPE setting is ignored (effectively ‘READ’).
The front panel of Model 2700 is shown in Figure 21. When viewing the Totalizer count, the Model 2700 keys function as contained in the list keyed to Figure 21.
Figure 21
Model 2700 front panel key operation (Totalizer)
Integra Series
SENSE
Ω 4 WIRE
INPUT
HI
350V
PEAK
1000V
PEAK
!
Model 2700 Multimeter / Data Acquisition System
MATH O U T P U T
SHIFT
1
DCV
DELAY
LOCAL
POWER
ACV
HOLD
EX TRIG TRIG
SAVE
SETUP
OPEN CLOSE
RATIO
DCI
LIMITS
CH AVG
CONT
ACI
Ω2
ON/OFF
STORE RECALL
CONFIG
HALT
STEP
SCAN
TYPE
OCOMP
LO
PERIOD SENSOR
Ω4
FREQ
MONITOR
CH-OFF
RANGE
F
FF
AUTO
FILTER
REL
TEST
LSYNC
GPIB
DIGITS RATE
EXIT
20
R
FRONT/REAR
3A 250V
RS-232
AMPS
RANGE
ENTER
3
2
500V
PEAK
INPUTS
TEMP
CARD
4
Connection
1 Special keys and power switch:
Normal operation.
2 Function and operation keys:
Top Row
Unshifted
DCV, ACV, DCI, ACI, Ω2, Ω4, FREQ, TEMP
Blocked.
Shifted
RATIO,CH-AVG, CONT, OCOMP, PERIOD
Blocked.
Middle Row
Unshifted
TRIG
and STORE, RECALL, FILTER, REL
Triggers the unit to read the current Totalizer count.
Moves between Totalizer channels (if more than one Model 7706
installed).
Blocked.
Shifted
LIMITS
ON/OFF
MONITOR
CARD
DELAY, HOLD
TYPE, CH-OFF
Sets the High Limit count for the Totalizer.
Enables/disables limits.
Sets unit to monitor Totalizer channel and turns monitor on. If monitor is
already on, it will be turned off.
Enters the card specific menu.
Normal Operation.
Blocked.
Bottom Row
Unshifted
OPEN, CLOSE
EXIT
STEP, SCAN, DIGITS, RATE, ENTER
Normal operation.
Clears the Totalizer count to zero.
Blocked.
Shifted
SAVE, SETUP, CONFIG, TEST, GPIB, RS-232
HALT, LSYNC
Normal operation.
Blocked.
3 Range keys:
and AUTO
Normal operation.
Blocked.
4 INPUTs switch:
Normal operation—the position of this switch does not affect Totalizer operation.
Adding Totalizer to scan list (via front panel)
Toggle the state of the Totalizer channel in the scan list using the SHIFT->CH-OFF key. The TYPE and EDGE controls are set
globally through the SHIFT->CARD menu key.
NOTE
Changing Totalizer settings (“READ” or “RRES”) must be done outside of the scanlist configuration.
Adding to scan list via GPIB
The ROUT:SCAN command is used to add Totalizer to the scan list. When a card that supports Totalizer is in the unit, the Totalizer channel can only be used as a Totalizer. Whenever it is added to the list it will read the current count value. The TYPE
and EDGE controls are set globally through the SENSe:TOTalize:EDGE and SENSe:TOTalize:TYPE commands.
21
Model 7706 module
Limits and analog trigger
The limit subsystem and analog scan triggering works the same for the TOTalize function as for any other Model 2700 function
with the exception that only the UPPer limit is evaluated. The LOWer limit setting is ignored by the TOTalize function. The
TOTalizer MUST be monitoring in order to initiate a scan based on a Totalizer limit. When a scan is initiated by a TOTalizer
count, and the Totalizer type is set to ‘READ’, the limit that initiated the scan is removed from the ROUTe:SCAN:TSOurce list
so that the Model 2700 only runs through the scan list once. Otherwise, it would keep scanning since the TOTalizer count would
remain above the upper limit until reset.
Totalizer channel monitor scan example
For this example, Channel 25 of the Model 7706 is used to monitor the Totalizer with the Model 7706 inserted into slot 1 of the
Model 2700. This is an example of a four channel scan with Channels 101–103 measuring DC voltage while, as previously mentioned, Channel 125 monitors the Totalizer. As programmed, when the Totalizer reaches 100,000 counts, the scan is initiated.
Operation
A simplified model of scan operation is contained in Figure 22. The procedure for front panel operation and equivalent programming commands for this simplified model is contained in Table 1. For this example, there are two modes of operation: monitor
and scan (see Figure 22). While in monitor mode, continuous Totalizer measurements are performed. The instrument remains
in the monitor mode until it reaches the high limit (in this example, the high limit is set to 100,000 counts). When this limit is
reached, the instrument changes over to scan mode (see Figure 22). The instrument is configured to scan four channels: three
DCV readings and the Totalizer channel (the buffer stores all four readings). After the fourth channel is measured, operation
turns again to the monitor mode to again measure Totalizer.
NOTE
When scan is initiated by a TOTalizer count with the type set to READ, the limit that initiated the scan is
removed from the ROUTe:SCAN:TSOurce list. This makes the unit run the scan list once. Otherwise, scanning would continue until reset as long as the TOTalizer count remains above the upper limit. If the type is set
to RRES when a scan is initiated and after the Totalizer channel is scanned, it is reset to zero (0). If the Totalizer again counts past the high limit set, the unit will run the scan list again, reset the count to zero, and so on.
22
Connection
Figure 22
Monitor scan example
Monitor Mode:
Close Monitor
Channel (125)
No
100,000
Counts
?
Yes
Scan
Measure
TOTALIZER
Scan Mode:
Close First
Channel
Return to
Monitor Mode
Yes
No
4
Measurements
?
Open Last Chan
Close Next Chan
Measure
23
Model 7706 module
Table 1
Monitor scan example (front panel and remote steps)
Step Front panel operation
1
2
3
b
c
5
Restore defaults:
Restore defaults (SHIFT SETUP > RESTORE: FACT).
*RST
For front panel operation, proceed to step 3.
For remote programming, clear buffer and disable buffer auto clear:
TRAC:CLE
Configure advanced scan (SHIFT CONFIG > ADVANCED):
a
4
Remote programming
Channel 101, 102, and 103:
Select DCV function.
Select 10V range.
Set filter count to 20 (SHIFT TYPE > 020 RDGS).
Enable filter (FILTER).
FUNC ‘VOLT’, (@101:103)
VOLT:RANG 10,(@101:103)
VOLT:AVER:COUN 20,(@101:103)
VOLT:AVER:STAT ON,(@101:103)
Channel 104:
Disable (off) Channels 104-120 (SHIFT CH-OFF).
ROUT:SCAN (@101:103,125)
Channel 125:
Enable Totalizer channel (SHIFT-CH OFF).
Set and enable high limit 1:
Set limit to 100000 (SHIFT LIMITS > HI1:+100.0000K).
Set and enable high limit 2:
Set limit to 1000000000 (SHIFT LIMITS > HI2:+1000000K).
Enable (on) limit (SHIFT OFF/ON > LIMITS: ON).
d
Disable immediate scan (IMM SCAN: N), and enable high limit 1
(HLIM1 SCAN:Y).
e
Disable timer (TIMER? OFF).
f
Set reading count to 4.
For front panel operation, proceed to step 5.
For remote programming, set the number of points in the monitor scan.
Select and enable monitor channel (SHIFT MONITOR > 125).
CALC3:LIM1:UPP 1e5,(@125)
CALC3:LIM1:STAT ON,(@125)
ROUT:SCAN:TSO HLIM1
ROUT:MON:POIN 4
ROUT:MON (@125)
ROUT:MON:STAT ON
Specifications
Full Model 7706 specifications are included at the end of this guide.
Connection log
Make a copy of Table 2 and affix it to the cover of the Model 7706. Use this to record connection information and channel descriptions as needed.
24
Connection
Table 2
Connection log Model 7706
Channel
INPUT
SENSE
CH1
CH2
CH3
CH4
CH5
CH6
CH7
CH8
CH9
CH10
CH11
CH12
CH13
CH14
CH15
CH16
CH17
CH18
CH19
CH20
CH21
CH22
CH23
CH24
CH25
Color
Description
H
L
H
L
H
L
H
L
H
L
H
L
H
L
H
L
H
L
H
L
H
L
H
L
H
L
H
L
H
L
H
L
H
L
H
L
H
L
H
L
H
L
H
L
B0 B1 B2 B3 B4
B0 B1 B2 B3 B4
H
GND
H
GND
IN+ IN- G+ G-
B5
B5
B6
B6
B7
B7
GND
GND
25
Model 7706 module
Front panel operation
Card specific menu
To open the card specific menu, press SHIFT->CARD (CARD is over the RIGHT arrow key). This menu contains all cardspecific functions from the front panel. For example, the analog outputs of a 7706 card would be configured from here. A sample
of accessing the card specific functions is contained in Figure 23.
Figure 23
Menu tree — Accessing card specific functions
Integra Series
SENSE
4 WIRE
INPUT
HI
Shift
350V
PEAK
1000V
PEAK
!
Model 2700 Multimeter / Data Acquisition System
MATH O U T P U T
SHIFT
DCV
DELAY
LOCAL
POWER
ACV
HOLD
EX TRIG TRIG
SAVE
SETUP
OPEN CLOSE
RATIO
DCI
LIMITS
CH AVG
CONT
ACI
Ω2
ON/OFF
STORE RECALL
CONFIG
HALT
STEP
SCAN
TYPE
OCOMP
LO
PERIOD SENSOR
Ω4
FREQ
MONITOR
CH-OFF
RANGE
AUTO
FILTER
REL
TEST
LSYNC
GPIB
DIGITS RATE
EXIT
500V
PEAK
INPUTS
TEMP
F
FF
R
CARD
FRONT/REAR
3A 250V
RS-232
RANGE
AMPS
ENTER
Card
Enter
Sequence
Key
Display
1
SHIFT-CARD
2
ENTER
AOUT1:+00.000V
3
AOUT2:+00.000V
4
DIGOUT1: 255
5
DIGOUT2: 255
6
TOT TYPE:(READ | RRES)
7
TOT EDGE:(RISE | FALL)
8
SWREV: A01
SLOT1: 7706
Readings mode
9
10
26
ENTER
SLOT2: 7702
Resumes normal readings since the Model 7702 does not have cardspecific features that need to be addressed in this menu.
Bus commands
Bus commands
When issuing commands over the bus, keep the following channel usage in mind:
Table 3
Channel description
Channels
Description
1-20
Voltage, resistance, temperature, frequency, period, etc., measurements
21-22
Eight-bit digital outputs
23-24
Sixteen-bit analog outputs
25
Totalizer
26
2/4 pole selection relay. Closing Channel 26 makes a 4-pole measurement
27
Sense terminals to backplane isolation
28
Input terminals to backplane isolation
Sending channel numbers
Express channel numbers as a three-digit number where the first digit is the slot number. For example, Channel 1 on slot 1 would
be Channel 101, and Channel 5 on slot 2 would be 205. The hundreds digit is the slot number, and the remaining digits denote
the channel number on the card (see “Channel list parameter” located at the bottom of Table 4).
27
Model 7706 module
OUTPut Subsystem
Commands to perform output operations are listed in Table 4. Details on these commands follow the table.
NOTE
The output subsystem is specific to the Model 7706 module. It is only available if a Model 7706 is installed.
Table 4
Output subsystem commands
Command
:OUTPut
Description
Default
Set the output of a 7706 channel.
:VOLTage <NRf>, <clist>
Forces the analog output of the given analog channel[s] to the desired
values in volts from -12 to +12.
:VOLTage? <clist>
Query the present voltage for the analog output channel[s].
:DIGital
Path to the digital commands.
:BYTE <nrf>,<clist>
Force the digital output of the given channel[s] to the desired value
(0 < × ≤ 255) in decimal format.
:BYTE? <clist>
Query the present bit pattern (0 < × ≤ 255) for the digital output channels.
:WORD <nrf>,<clist>
Force the digital output of the given channel[s] to the desired value
(0 < × ≤ 65535) in decimal format.
:WORD? <clist>
Query the present bit pattern (0 < × ≤ 65535) for the digital output
channels (returned in decimal format).
0.0
255
65535
Channel list parameter:
<clist> = (@SCH)
where: S = Mainframe slot number (1 or 2); CH = Switching module channel number (must be 2 digits);
Examples:
(@101) = Slot 1, Channel 1
(@101, 203) = Slot 1, Channel 1 and Slot 2, Channel 3
(@101:110) = Slot 1, Channels 1 through 10
:OUTPut
As mentioned in Table 3, Channels 21 and 22 are eight-bit digital output channels, and Channels 23 and 24 are analog output
channels with a range of -12V to +12V. For individual digital channels, the range of values allowed is 0-255, and the outputs
are set to the closest integer to the sent value. Analog outputs will accept values of -12 to +12. Attempting to use this command
with an input channel generates error –221 settings conflict.
:VOLTage <nrf>,<clist>
:VOLTage? <clist>
Force voltage
Query voltage
Use to force (or query) the analog output of the given channel[s] to the desired value. Values are rounded to the nearest mV.
(-12VDC < × < +12VDC).
28
Bus commands
:DIGital
:BYTE <nrf>,<clist> — Use to force the digital output of the given channel[s] to the desired value (0 < × < 255) in decimal
format. Use this command to write to Channel 21 or 22 individually. Bit 0 of each port is the LSB.
:BYTE? <clist> — Query the present bit pattern (0 < × < 255) for the digital output channels (returned in decimal format). Use
this command to query Channel 21 or 22 individually.
:WORD <nrf>,<clist> — Must write to the lower port (channel 21). Channel 21 bit 0 will be the LSB and Channel 22 bit 7 will
be the MSB.
:WORD? <clist> — Query the present bit pattern (0 < × < 65535) for the digital output channels (returned in decimal format).
This command must be sent to Channel 21.
SENSe[1] Subsystem
Commands to perform Model 7706 specific operations are listed in Table 5.
Table 5
Sense1 subsystem commands
Command
:SENSe[1]
:TOTalize
Description
Default
Path to the :SENSe[1] commands.
Path to configure 7706 Totalizer.
:TYPE < READ | RRESet >,<clist>
RRESet (read and reset) causes the Totalizer count to be
reset to zero every time it is read.
:TYPE? <clist>
Query Totalizer count readback type.
:EDGE < RISing | FALLing >,<clist>
Set which edge of the input signal to count.
:EDGE? <clist>
Query trigger edge for the Totalizer.
:DATA? <clist>
Query the current Totalizer count. This command will reset
the count to 0 if TOT:TYPE is set to RRESet.
READ
RIS
Channel list parameter:
<clist> = (@SCH)
where: S = Mainframe slot number (1 or 2); CH = Switching module channel number (must be 2 digits);
Examples:
(@101) = Slot 1, Channel 1
(@101, 203) = Slot 1, Channel 1 and Slot 2, Channel 3
(@101:110) = Slot 1, Channels 1 through 10
29
Model 7706 module
Unsupported SCPI commands
NOTE
The display will indicate which cards are installed immediately after showing the firmware revision at
power-up.
The ROUT:SCAN:NVOLatile command is not supported for Model 7706 module operation. Attempts to set
ROUT:SCAN:NVOL ON with a 7706 card present in either slot will generate error -221 settings conflict.
Verification
Use the procedures contained in this section to verify the analog outputs or the Totalizer.
Analog outputs
WARNING
The information contained in this section is intended only for qualified service personnel. Do not
attempt these procedures unless you are qualified to do so.
NOTE
After correctly wiring the Model 7706, installing it in the Model 2700, and turning the power on (step 5 in
the following procedure), the unit is required to warm up for two hours before proceeding.
Use the following steps to verify the Model 7706 analog output channels.
1.
2.
3.
4.
5.
6.
7.
8.
9.
10.
11.
12.
13.
30
Connect CH23 H and L outputs to CH1 H and L input terminals (respectively).
Connect CH24 H and L outputs to CH2 H and L input terminals (respectively).
Close and lock the Model 7706 cover.
Install the Model 7706 in slot 1 of the Model 2700.
Turn on the Model 2700.
Allow unit to warm up for two hours before proceeding.
Set the front panel INPUTS switch to the REAR position.
Set the Model 2700 to the 10V range:
a. Select the DC volts function by pressing the DCV key.
b. Select the 10V range.
Close channel 1:
a. Press the CLOSE key.
b. Key in 101.
Set analog output 1 to +10V:
a. Open the SHIFT-CARD menu (press SHIFT-CARD).
b. Key in analog output for AOUT1:+10.000V.
Verify analog output reading is within stated limits (see Table 6).
Set analog output 1 to -10V:
a. Open the SHIFT-CARD menu (press SHIFT-CARD).
b. Key in analog output for AOUT1:-10.000V.
Verify analog output reading is within stated limits.
Verification
14. Close channel 2:
a. Press the CLOSE key.
b. Key in 102.
15. Set analog output 2 to +10V:
a. Open the SHIFT-CARD menu (press SHIFT-CARD).
b. Key in analog output for AOUT2:+10.000V.
16. Verify analog output reading is within stated limits.
17. Set analog output 2 to -10V:
a. Open the SHIFT-CARD menu (press SHIFT-CARD).
b. Key in analog output for AOUT2:-10.000V.
18. Verify analog output reading is within stated limits.
19. Open channel 2 (press the OPEN key).
Figure 24
Verification—analog connections
TE2
TE6
TE5
TE7
TE1
TE4
J2
TE3
J3
Table 6
Analog output limits
Source DC Voltage
Reading limits (1 year, 18° to 28°C)
+10V
+9.966 to +10.034V 0.15% of reading + 19mV
-10V
-10.034 to -9.966V
31
Model 7706 module
Totalizer
WARNING
The information contained in this section is intended only for qualified service personnel. Do not
attempt these procedures unless you are qualified to do so.
NOTE
Correctly wire and install the Model 7706 in the Model 2700 before turning on the Model 2700.
Use the following steps to verify the Model 7706 Totalizer function.
1.
2.
3.
4.
Connect the function generator to the Model 7706 Totalizer IN+ and IN- terminals (see Figure 25).
Make sure to leave gate inputs (G+ and G-) open (gate always).
Set the threshold jumper to the TTL position (J2 closed).
Close and lock the Model 7706 cover.
NOTE
Make sure the Model 2700 is OFF before installing the Model 7706.
5. Install the Model 7706 in slot 1 of the Model 2700.
6. Turn on the Model 2700.
7. Set the function generator to:
• Burst mode
• Burst cycle count of 50,000
• Manual trigger source
• Output: 100kHz
• 0–5V square wave (50% duty cycle)
8. Close CH25:
a. Press the CLOSE key.
b. Key in 125.
9. Check Totalizer count — if count is not zero press EXIT key to clear count.
10. Verify that each time the function generator is triggered to output a burst, the Totalizer count increases by 50,000.
11. Open CH25:
12. Press the OPEN key.
32
Verification
Figure 25
Verification—Totalizer connections
Function Generator
50
Coax Cable
Function
Output
TE2
TE6
TE5
TE7
TE1
TE4
J2
TE3
J3
Gate +
Gate IN IN +
Threshold jumper (J2)
closed (1-2 TTL)
J2
TE3
33
Model 7706 module
Calibration
The following procedures calibrate the temperature sensors on the Model 7706 plug-in module as well as the analog outputs.
Recommended test equipment
In order to calibrate the Model 7706, you will need equipment summarized in Table 7.
Extender board connections
The Model 7706 being calibrated should be connected to the 7798-250B Calibration/Extender Board, and the extender board
must be installed in scanner Slot #1. Note that the module being calibrated will be external to the Model 2700 to avoid card
heating during calibration.
Table 7
Recommended calibration equipment
Description
Digital thermometer:18° to 28°C, ±0.1°C
Keithley 7798-250B Calibration Extender Board
Front panel Model 7706 temperature calibration
NOTE
Before calibrating the temperature on the Model 7706, make sure that power has been removed from the card
for at least two hours to allow card circuitry to cool down. After turning on the power during the calibration
procedure, complete the procedure as quickly as possible to minimize card heating that could affect calibration accuracy. Allow the Model 2700 to warm up for at least two hours.
1.
2.
3.
4.
5.
6.
Connect the Model 7706 to the 7798-250B Calibration Extender Board.
With the power off, install the Model 7706/7798 combination in Slot 1, and select the rear inputs with the INPUTS switch.
Press in and hold the Model 2700 OPEN key while turning on the power.
Allow five minutes for thermal equilibrium.
Accurately measure and record the cold temperature of the Model 7706 card surface at the center of the card.
Press SHIFT then TEST, then display TEST:CALIB with the up or down range key. Press ENTER, select RUN, then enter
the appropriate calibration code (default: 002700).
7. Using the up or down range key, select CARD at the CAL:RUN prompt, then press ENTER.
8. Using the up or down range key, select TEMP, then press ENTER.
9. Set the display value to the cold junction calibration temperature (°C) measured in step 4, then press ENTER to complete
Model 7706 temperature calibration.
34
Calibration
Remote Model 7706 temperature calibration
1.
2.
3.
4.
5.
6.
7.
Connect the Model 7706 to the 7798-250B Calibration/Extender Board.
With the power off, install the Model 7706/7798 combination in Slot 1, and select the rear inputs with the INPUTS switch.
Press in and hold the Model 2700 OPEN key while turning on the power.
Allow five minutes for thermal equilibrium.
Accurately measure and record the cold temperature of the Model 7706 card surface at the center of the card.
Turn on the Model 2700 power.
Unlock calibration by sending:
:DIAG:KEIT:CAL:UNLOCK
8. Enable calibration by sending the :CODE command. For example, the default command is:
:CAL:PROT:CODE 'KI002700'
9. Initiate calibration by sending the following command:
:CAL:PROT:CARD1:INIT
10. Calibrate temperature on the Model 7706 with the following command:
:CAL:PROT:CARD1:STEP0 <temp>
Here <temp> is the cold calibration temperature measured in step 4.
11. Send the following commands to save calibration, and lock out calibration:
:CAL:PROT:CARD1:SAVE
:CAL:PROT:CARD1:LOCK
Front panel Model 7706 analog output (DAC) calibration
1. Connect the Model 7706 CH23 and 24 to CH1 and 2 (use the same connection setup as in Figure 24):
• Connect CH23 H and L terminals to CH1 H and L terminals (H to H; L to L).
• Connect CH24 H and L terminals to CH2 H and L terminals (H to H; L to L).
2. With the power off, install the Model 7706 in Slot 1, and select the rear inputs with the INPUTS switch.
3. Press in and hold the Model 2700 OPEN key while turning on the power.
4. Allow unit to warm up for two hours before proceeding.
5. Press the SHIFT key and then the TEST key.
6. Select TEST:CALIB using the up or down range keys.
7. Press the ENTER key, select RUN, and enter the appropriate calibration code (default: 002700).
8. Using the up or down range key, select CARD at the CAL:RUN prompt, then press ENTER.
9. Using the up or down range key, select DAC at the next CARD prompt, then press ENTER to complete Model 7706 DAC
calibration.
35
Model 7706 module
Remote Model 7706 analog output (DAC) calibration
1. Connect the Model 7706 CH23 and 24 to CH1 and 2 (use the same connection setup as in Figure 24):
• Connect CH23 H and L terminals to CH1 H and L terminals (H to H; L to L).
• Connect CH24 H and L terminals to CH2 H and L terminals (H to H; L to L).
2. With the power off, install the Model 7706 in Slot 1, and select the rear inputs with the INPUTS switch.
3. Turn on the Model 2700 power.
4. Allow unit to warm up for two hours before proceeding.
5. Unlock calibration by sending:
:DIAG:KEIT:CAL:UNLOCK
6. Enable calibration by sending the :CODE command. For example, the default command is:
:CAL:PROT:CODE 'KI002700'
7. Initiate calibration by sending the following command:
:CAL:PROT:CARD1:INIT
8. Calibrate the Model 7706 analog output with the following command:
:CAL:PROT:CARD1:DAC:STEP0
9. Send the following commands to save calibration, and lock out calibration:
:CAL:PROT:CARD1:SAVE
:CAL:PROT:CARD1:LOCK
Calibration commands
Table 8 summarizes calibration commands for the Model 7706 plug-in module. Note that CARD1 commands calibrate the card
in Slot 1, while CARD2 commands request calibration count and date information from a card in Slot 2.
NOTE
The 7706 must be installed in Slot 1 through a Model 7798 extender card to perform temperature calibration.
36
Calibration commands
Table 8
Model 7706 calibration commands
Command
Description
:CALibration
:PROTected
Calibration root command.
All commands in this subsystem are protected by the calibration lock (except
queries and :CODE).
:CODE '<up to 8 char. string>'
Send calibration code. (Default KI002700)
:CARD1
Path to card in slot 1.
:INITiate
Initiate card calibration.
:COUNt?
Request number of times card had been calibrated.
:RCOunt
Reset card calibration count to 0.
:DATE?
Request card calibration date.
:SAVE
Save cal constants to card EEPROM.
:LOCK
Lock out calibration.
:LOCK?
Request cal lock state. (0 = locked, 1 = unlocked)
:STEP0 <NRf>
Temperature sensor cold calibration (<NRf> = temperature, °C).
:DAC
Path to analog output calibration.
:STEP0 :CARD2
Analog output DAC calibration.
Path to card in slot 2.
:COUNt?
Request number of times card has been calibrated.
:DATE?
Request card calibration date.
:DIAGnostic
:KEIThley
:CALibration
:UNLOCK
Diagnostic root.
Keithley path.
Calibration path.
Unlock command.
37
Model 7706 module
:CODE
(:CALibration:PROTected:CODE)
NOTES
The :CODE command should be sent only once before performing calibration. Do not send :CODE before
each calibration step.
The code parameter must be enclosed in single quotes.
Purpose
To program the calibration code or password so that you can perform the Model 7706
calibration procedures.
Format
:CAL:PROT:CODE '<CHAR_STRING>'
Parameter
Up to a 8-character string including letters and numbers.
Description The :CODE command enables the Model 2700 calibration procedures when performing
these procedures over the bus. This command must be sent to the unit before sending any
other Model 7706 calibration command. The default calibration code is KI002700.
Example
:CAL:PROT:CODE 'KI002700' Send default code of KI002700.
:COUNt?
(:CALibration:PROTected:CARD1:COUNt?)
(:CALibration:PROTected:CARD2:COUNt?)
Purpose
To determine how many times a Model 7706 has been calibrated.
Format
:CAL:PROT:CARD1:COUN?
:CAL:PROT:CARD2:COUN?
Response
<n> Calibration count.
Description The :CARD1:COUNt? and :CARD2:COUNt? commands allow you to determine how
many times a Model 7706 in Slot 1 and Slot 2, respectively, has been calibrated.
NOTE
Use the :COUNt? command to help you monitor for unauthorized calibration procedures.
Example
38
:CAL:PROT:CARD1:COUN?
Request card 1 calibration count.
Calibration commands
:DATE?
(:CALibration:PROTected:CARD1:DATE?)
(:CALibration:PROTected:CARD2:DATE?)
Purpose
To request the Model 7706 calibration date.
Format
:CAL:PROT:CARD1:DATE?
:CAL:PROT:CARD2:DATE?
Response
<year>, <month>, <day>
Description The :CARD1:DATE? and :CARD2:DATE? queries allow you to read back the calibration
date from a Model 7706 in Slot 1 and Slot 2 respectively.
NOTE
The card calibration date is automatically set to the Model 2700 real time clock date when the card is
calibrated.
Example
:CAL:PROT:CARD1:DATE?
Request card 1 cal date.
:INIT
(:CALibration:PROTected:CARD1:INITiate)
Purpose
To initiate Model 7706 calibration procedures.
Format
:CAL:PROT:CARD1:INIT
Parameter
None
Description The :INIT command enables Model 7706 calibration when performing these procedures
over the bus. This command must be sent to the unit after sending the :CODE command,
but before performing Model 7706 calibration.
Example
:CAL:PROT:CARD1:INIT
Initiate 7706 calibration.
:LOCK
(:CALibration:PROTected:CARD1:LOCK)
Purpose
To lock out Model 7706 calibration.
Format
:CAL:PROT:CARD1:LOCK
Parameter
None
Description The :LOCK command allows you to lock out Model 7706 calibration after completing the
procedure. Thus, :LOCK performs the opposite of enabling calibration with the :CODE
command.
Example
:CAL:PROT:CARD1:LOCK
Lock out card 1 calibration.
39
Model 7706 module
:LOCK?
(:CALibration:PROTected:CARD1:LOCK?)
Purpose
To read Model 7706 calibration lock status.
Format
:CAL:PROT:CARD1:LOCK?
Response
0 Calibration locked.
1 Calibration unlocked.
Description The :LOCK? query requests status from the Model 2700 on Model 7706 calibration locked/
unlocked state. Calibration must be enabled sending the :CODE command before
calibration can be performed.
Example
:CAL:PROT:CARD1:LOCK?
Request card 1 cal lock state.
:SAVE
(:CALibration:PROTected:CARD1:SAVE)
Purpose
To save calibration constants in card EEROM after the calibration procedure.
Format
:CAL:PROT:CARD1:SAVE
Parameter
None
Description The :SAVE command stores calculated calibration constants derived during Model 7706
calibration in card EEROM. (EEROM is non-volatile memory.) Calibration constants will
be retained indefinitely once saved.Generally, :SAVE is sent after all other calibration steps
(except for :LOCK).
NOTE
Card calibration will be only temporary unless the :SAVE command is sent to permanently store calibration
constants.
Example
40
:CAL:PROT:CARD1:SAVE
Save card calibration constants.
Calibration commands
:STEP0
(:CALibration:PROTected:CARD1:STEP0)
Purpose
To perform Model 7706 temperature calibration.
Format
:CAL:PROT:CARD1:STEP0 <TEMP>
Parameter
<temp> = Cold calibration temperature (°C)
Description :STEP0 performs temperature sensor calibration of the Model 7706. The card must be
allowed to cool down to ambient temperature before calibration, and the cold temperature
of the card must be measured and sent as the <temp> parameter during calibration.
NOTE
Before calibrating the temperature for the Model 7706, make sure that power has been removed from the card
for at least two hours to allow card circuitry to cool down. After turning on the power during the calibration
procedure, complete the procedure as quickly as possible to minimize card heating that could affect calibration accuracy.
Example
:CAL:PROT:CARD1:STEP0 23
Perform 7706 temperature calibration with card at
a temperature of 23°C (measured with an external
probe).
:DAC
:STEP0
(:CALibration:PROTected:CARD1:DAC:STEP0)
Purpose
To perform Model 7706 analog output (DAC) calibration.
Format
:CAL:PROT:CARD1:DAC:STEP0
Parameter
none
Description :STEP0 performs analog output calibration of the Model 7706. The card must be allowed
to warm up inside the powered-up unit for two hours before calibration. In this step, CH23
(analog output 1) must be connected to CH1, and CH24 (analog output 2) must be
connected to CH2.
Example
:CAL:PROT:CARD1:DAC:STEP0 Perform 7706 DAC calibration.
41
Model 7706 module
(:CALibration:PROTected:CARD1:STEP0)
Purpose
To perform Model 7706 temperature calibration.
Format
:CAL:PROT:CARD1:STEP0 <TEMP>
Parameter
<temp> = Cold calibration temperature (°C)
Description :STEP0 performs temperature sensor calibration of the Model 7706. The card must be
allowed to cool down to ambient temperature before calibration, and the cold temperature
of the card must be measured and sent as the <temp> parameter during calibration.
NOTE
Before calibrating the temperature on the Model 7706, make sure that power has been removed from the card
for at least two hours to allow card circuitry to cool down. After turning on the power during the calibration
procedure, complete the procedure as quickly as possible to minimize card heating that could affect calibration accuracy.
Example
:CAL:PROT:CARD1:STEP0 23
Perform 7706 calibration.
Remote error reporting
Methods to detect and determine the nature of calibration errors are discussed below.
Error summary
Table 9 summarizes Model 2700 calibration errors.
42
Remote error reporting
Table 9
Calibration error summary
Error number and description
Error number and description
+400, “10 vdc zero error”
+401, “100 vdc zero error”
+402, “10 vdc full scale error”
+403, “-10 vdc full scale error”
+404, “100 vdc full scale error”
+405, “-100 vdc full scale error”
+406, “1k 2-w zero error”
+407, “10k 2-w zero error”
+408, “100k 2-w zero error”
+409, “10M 2-w zero error”
+410, “10M 2-w full scale error”
+411, “10M 2-w open error”
+412, “1k 4-w zero error”
+413, “10k 4-w zero error”
+414, “100k 4-w zero error”
+415, “10M 4-w sense lo zero error”
+416, “1k 4-w full scale error”
+417, “10k 4-w full scale error”
+418, “100k 4-w full scale error”
+419, “1M 4-w full scale error”
+420, “10M 4-w full scale error”
+421, “10m adc zero error”
+422, “100m adc zero error”
+423, “10m adc full scale error”
+424, “100m adc full scale error”
+425, “1 adc full scale error”
+438, “Date of calibration not set”
+439, “Next date of calibration not set”
+450, “100m vac dac error”
+451, “1 vac dac error”
+452, “10 vac dac error”
+453, “100 vac dac error”
+454, “100m vac zero error”
+455, “100m vac full scale error”
+456, “1 vac zero error”
+457, “1 vac full scale error”
+458, “1 vac noise error”
+459, “10 vac zero error”
+460, “10 vac full scale error”
+461, “10 vac noise error”
+462, “100 vac zero error”
+463, “100 vac full scale error”
+464, “750 vac zero error”
+465, “750 vac full scale error”
+466, “750 vac noise error”
+467, “Post filter offset error”
+468, “1 aac zero error”
+469, “1 aac full scale error”
+470, “3 aac zero error”
+471, “3 aac full scale error”
+472, “Input time constant error”
+473, “Frequency gain error”
+474, “1K Ohm Ioff Ocomp FS error”
+475, “10K Ohm Ioff Ocomp FS error”
+476, “Temperature Cold Cal error”
+477, “Analog output zero error” *
+478, “Analog output pos. gain error” *
+479, “Analog output neg. gain error” *
+500, “Calibration data invalid”
+513, “AC calibration data lost”
+514, “DC calibration data lost”
+515, “Calibration dates lost”
+518, “Card calibration data lost”
+519, “Card calibration dates lost”
+610, “Questionable calibration”
*Model 7706 card specific.
Error queue
As with other Model 2700 errors, any calibration error will be reported in the bus error queue. You can read this queue by using
the :SYST:ERR? query. The Model 2700 will respond with the appropriate error message, as summarized in Table 9.
Status byte EAV (Error Available) bit
Whenever an error is available in the error queue, the EAV (Error Available) bit (bit 2) of the status byte will be set. Use the
*STB? query or serial polling to obtain the status byte, then test bit 2 to see if it is set. If the EAV bit is set, an error has occurred,
and you can use the :SYST:ERR? query to read the error and at the same time clear the EAV bit in the status byte.
43
Model 7706 module
Generating an SRQ on error
To program the instrument to generate an IEEE-488 bus SRQ when an error occurs, send the following command: *SRE 4. This
command will enable SRQ when the EAV bit is set. You can then read the status byte and error queue as outlined above to check
for errors, and to determine the exact nature of the error.
Detecting calibration step completion
When sending remote calibration commands, you must wait until the instrument completes the current operation before sending
a command. You can use either *OPC? or *OPC to help determine when each calibration step is completed.
Using the *OPC? query
With the *OPC? (operation complete) query, the instrument will place an ASCII 1 in the output queue when it has completed
each step. To determine when the OPC response is ready, do the following:
1. Repeatedly test the MAV (Message Available) bit (bit 4) in the status byte and wait until it is set. (You can request the status
byte by using the *STB? query or by serial polling.)
2. When MAV is set, a message is available in the output queue, and you can read the output queue and test for an ASCII 1.
3. After reading the output queue, repeatedly test MAV again until it clears. At this point, the calibration step is completed.
Using the *OPC command
The *OPC (operation complete) command can also be used to detect the completion of each calibration step. To use *OPC to
detect the end of each calibration step, you must do the following:
1. Enable operation complete by sending *ESE 1. This command sets the OPC (operation complete bit) in the standard event
enable register, allowing operation complete status from the standard event status register to set the ESB (event summary
bit) in the status byte when operation complete is detected.
2. Send the *OPC command immediately following each calibration command. For example:
:CAL:PROT:DC:STEP1;*OPC
Note that you must include the semicolon (;) to separate the two commands, and that the *OPC command must appear on
the same line as the calibration command.
3. After sending a calibration command, repeatedly test the ESB (Event Summary) bit (bit 5) in the status byte until it is set.
(Use either the *STB? query or serial polling to request the status byte.)
4. Once operation complete has been detected, clear OPC status using one of two methods: (1) Use the *ESR? query, then
read the response to clear the standard event status register, or (2) send the *CLS command to clear the status registers.
Note that sending *CLS will also clear the error queue and operation complete status.
Generating an SRQ on calibration complete
An IEEE-488 bus SRQ (service request) can be used to detect operation complete instead of repeatedly polling the Model 2700.
To use this method, send both *ESE 1 and *SRE 32 to the instrument, then include the *OPC command at the end of each calibration command line, as covered above. Refer to your controller’s documentation for information on detecting and servicing
SRQs.
44
Replaceable parts
Replaceable parts
Introduction
This section contains replacement parts information and component layout drawings for the Model 7706.
Parts lists
Both electrical and mechanical parts for the Model 2700 are listed in several tables on the following pages.
Ordering information
To place an order, or to obtain information concerning replacement parts, contact your Keithley representative or the factory
(see inside front cover for addresses). When ordering parts, be sure to include the following information:
•
•
•
•
•
Card model number (Model 7706 module)
Card serial number
Part description
Component designation (if applicable)
Keithley part number
Factory service
If the instrument is to be returned to Keithley Instruments for repair, perform the following:
•
•
•
•
Call the Repair Department at 1-888-KEITHLEY for a Return Material Authorization (RMA) number.
Complete the service form at the back of this manual, and include it with the instrument.
Carefully pack the instrument in the original packing carton.
Write ATTENTION REPAIR DEPARTMENT and the RMA number on the shipping label.
Component layout
A component layout for the Model 7706 circuit board is provided on the pages following the Model 7706 parts list (Table 10).
Table 10
Model 7706 parts list
Circuit Designation
C1,C2,C3,C4,C6
C13
C14
C16
C17,C22,C23
C18,C19,C20,C21,C28,C29
C39,C40
C41
C42,C43,C44,C45
C47
C48
C7-C9,C10-12,C24-C27,C30-C35,38,46,49-53
CR2-6,25,28,42,44,46,48,43,45,47,49,50
CR26,CR27
Description
CAP, 1000PF, 10%, 50V, MONO CERAMIC
CAP, 47P, 5%, 100V, CERAMIC
CAP, 47P, 5%, 100V, CERAMIC
CAP, 22U, 20%, 25V, TANTALUM
CAP, 0.47U, 20%, 25V
CAP, 100P, 10%, 100V, CERAMIC
CAP, 47UF, 20%, 20%, TANTALUM
CAP, 10UF, 20%, 25V, TANTALUM
CAP, 1000P, 10%, 100V, CERAMIC
CAP, 1000pF, 20%, 50V, CERAMIC
CAP, 0.01uF, 20%, 50V, CERAMIC
CAP, 0.1UF, 20%, 50V, CERAMIC
DIODE, DUAL SWITCHING, BAV99L
DIODE, DUAL HSM-2822T31
Keithley Part No.
C-452-1000P
C-465-47P
C-465-47P
C-535-22
C-520-.47
C-451-100P
C-575-47
C-440-10
C-451-1000P
C-418-1000P
C-418-.01
C-418-.1
RF-82
RF-95
45
Model 7706 module
Table 10 (Continued)
Model 7706 parts list
Circuit Designation
CR29,CR30,CR40,CR41
CR31,32,34,36,38,1,33,35,37,39
CR51-CR54
CR7-CR22
J1
J2
K1-K20,K23
K21,K22
L1,L2,L3,L4
Q1,Q2,Q3,Q4,Q53,Q54,Q56,Q58
Q25,27,29,31,33,35,37,39,41,43,45,47,49
Q26,28,30,32,34,36,38,40,42,44,46,48,50
Q5,Q6
Q51
Q52
Q55,Q57
Q9-Q24
R122,R126,R30
R13,R14,R17,R18
R19,R21
R1-R12,R15,R16
R20,R22
R23
R24,R25
R26
R27
R28,32-34,39,59-63,73,74,76,77
R29,R86,R87
R31,R38,R40
R36,R37,R41-R46,R75,R85,R35
R51,R52,R55,R56
R53,54,57,58,94-97,100-102
R64,R65,R66,R67
R68,R69
R70,R71
R78,R79,R80,R81
R82,R83
R84
RV1,RV2,RV3,RV4
SO33
TE1,TE2
TE3,TE4,TE5,TE6,TE7
TP1,TP2
U1
U12
U13,U23
U14,U15,U16,U17
U18
U19,U20
U2
U21,U22
U24,U34
46
Description
DUAL HIGH SPEED DIODE
DIODE, DUAL SWITCHING, BAV99L
DIODE, DUAL SWITCHING, BAV99L
DIODE, DUAL COMMON ANODE
BAW56LT2
CONN, RT ANGLE DUAL ROW RECEPT
CONN, BERG
SINGLE COIL LATCHING
NON LATCHING RELAY
FERRITE CHIP, 600 OHM, BLM32A07
TRANS, NPN SILICON
TRANS, PNP SILICON
TRANS, NPN SILICON
P CHANNEL TMOSFET
TRANS, PNP SILICON
TRANS, NPN SILICON
TRANS, PNP SILICON
TRANS, N-MEGAFET, RFD14N05LSM
RES, ARRAY, 4×10K, 5%, 0.125W
RES, 499K, 1%, 125MW, METAL FILM
RES, 332, 10%, 125MW, METAL FILM
RES, 13K, 1%, 125MW, METAL FILM
RES, 2K, 1%, 125mW, METAL FILM
RES, 28.7K, 1%, 0.125W, METAL FILM
RES, 4.75K, 1%, 125mW, METAL FILM
RES, 49.9K, 1%, 125MW, METAL FILM
RES, 4.99K, 1%, 125mW, METAL FILM
RES, 220, 5%, 125MW, METAL FILM
RES, ARRAY, 4×4.3K, 5%, 0.125W
RES, 475, 1%, 100MW, THICK FILM
RES, 1K, 5%, 125MW, METAL FILM
RES, ARRAY, 4×100K, 5%, 0.125W
RES, ARRAY, 4×10K, 5%, 0.125W
RES, 12.4, 10%, 100MW, THICK FILM
RES, 40.2K, 1%, 100MW, THICK FILM
RES, 54.9, 1%, 100MW, THICK FILM
RES, ARRAY, 4×1K, 5%, 0.125W
RES, 10K, 5%, 125MW, METAL FILM
RES, 100K, 5%, 125mW, METAL FILM
BIDIRECTIONAL TRANSIENT VOLT
SUPPRESSOR
SOCKET
CONN, FEMALE 12-PIN
CONN, FEMALE 16-PIN
CONN, TEST POINT
IC, VOLT. COMPARATOR, LM311M
IC, 8-CHAN ANA MULTIPLEXER, DG408DY
IC, DUAL OPTO
IC, CENTIGRADE TEMP SENSOR LM35DM
IC, UNREGULATED DC/DC CONVERTER
IC, 16-BIT MONOLITHIC PCM AUDIO DAC
IC, QUAD 2-INPUT NAND, 74HC00M
IC, OPA177GS
IC, TINYLOGIC CMOS INVERTER
Keithley Part No.
RF-147
RF-82
RF-82
RF-98
CS-1065-1
CS-339
RL-244
RL-243
CH-62
TG-389
TG-388
TG-389
TG-392
TG-388
TG-389
TG-388
TG-267
TF-276-10K
R-391-499K
R-391-332
R-391-13K
R-391-2K
R-391-28.7K
R-391-4.75K
R-391-49.9K
R-391-4.99K
R-375-220
TF-276-4.3K
R-418-475
R-375-1K
TF-276-100K
TF-276-10K
R-418-12.4K
R-418-40.2K
R-418-54.9
TF-276-1K
R-375-10K
R-375-100K
VR-8
SO-143-44
TE-118-12
TE-118-10
CS-553
IC-776
IC-844
IC-1358
IC-906
IC-1355
IC-1136
IC-781
IC-960
IC-1282
Replaceable parts
Table 10 (Continued)
Model 7706 parts list
Circuit Designation
U24,U34,U11,U26,U29,U7,U8,U9
U25
U3
U30,U31
U32
U33
U4,U5
U6,U10
VR1,VR2
Y1
MECHANICAL PARTS
Description
IC, OCTAL D FLIP FLOP
IC, -5V VOLTAGE REGULATOR
IC, 8 STAGE SHIFT/STORE, MC14094BD
IC, OCTAL BUFFER
IC, 2.5V, CASCADABLE SERIAL EEPROM
IC, 8-BIT MICROCONTROLLER
IC, SCHMITT-TRIGGER NAND GATE
IC, 3-TO-8 LINE DECODE, 74ACT138
DIODE ZENER 12V, MMSZ12T1
CRYSTAL CERAMIC RESONATOR, 8M
Keithley Part No.
IC-1353
IC-1171
IC-772
IC-1252
LSI-212
LSI-242
IC-950
IC-654
DZ-112
CR-59-2
TOP COVER HEAT STAKE ASSEMBLY
BOTTOM CARD COVER
COMPRESSION SPRING
7700-302A
7702-301C
SP-7-3
47
Model 7706 module
Figure 26
Component layout (Side-04)
48
Replaceable parts
Figure 27
Component layout (Side-01)
49
7706 All-in-One I/O Module
GENERAL
20 CHANNELS: 20 channels of 2-pole relay input.
All channels configurable to 4-pole.
RELAY TYPE: Latching electromechanical.
ACTUATION TIME: <3ms.
CAPABILITIES
CHANNELS 1–20: Multiplex one of 20 2-pole or one of 10 4-pole signals
into DMM.
Channels 21–25 are referenced to chassis ground.
CHANNELS 21–22: 16 Digital Outputs.
CHANNELS 23–24: Analog Voltage Output (2).
CHANNELS 25: Totalize Input.
Input
NOTES Channels 26–28 in this schematic
refer to the designations used for
control and not actual available channels.
HI
LO
Channels 26, 27, and 28 can be individually
controlled using ROUTe:MULTiple if the
module is not to be connected to the
internal DMM.
Sense HI
LO
Cold junction
Ref x2
Channel 1
For more information, refer to the
ROUTe:MULTiple command section
in the Model 2700 User’s Manual.
HI
LO
Channel 28
(see Note)
Backplane
isolation
(Channels 2–9)
HI
HI
Input
LO
Channel 10
LO
Channel 26
2-Pole (Open)
4-Pole (Closed)
(see Note)
INPUTS (Channels 1–20)
MAXIMUM SIGNAL LEVEL (Channels 1–20): 300V DC or rms, 1A
switched, 60W, 125VA maximum.
SAFETY CATEGORY: CAT I.
CONTACT LIFE (typ.): >105 operations at max. signal level: >108
operations no load.1
CONTACT RESISTANCE: <1 at end of contact life.
CONTACT POTENTIAL: <±2µV typical per contact pair, 3µV max.
OFFSET CURRENT: <100pA.
CONNECTOR TYPE: Screw terminal, #22 AWG wire size.
ISOLATION BETWEEN ANY TWO TERMINALS: >109 , <100pF with isolation channels 27 and 28 open.
ISOLATION BETWEEN ANY TERMINAL AND EARTH: > 109 , <200pF.
CROSS TALK (10MHz, 50 Load): <–35dB.
INSERTION LOSS (50 Source, 50 Load): <0.1dB below 1MHz.
<3dB below 2MHz.
COMMON MODE VOLTAGE: 300V between any terminal and chassis.
Cold junction
Ref x2
Channel 11
To Model 2700
Backplane
Channel 27
(see Note)
Backplane
isolation
HI
Sense
LO
HI
LO
(Channels 12–19)
HI
16
Channel 20
LO
Bit
16
Digital
Output
16
0
1
2
3
4
5
6
7
Channel 21
0
1
2
3
4
5
6
7
Channel 22
NOTE
Non-isolated
grounds ( )
are referenced to
chassis ground.
Channel 23
DAC
Channel 24
DAC
32
Totalizer
Channel 23
Channel 24
+IN
–IN
+GATE
–GATE
Channel 25
DIGITAL OUTPUT (Channels 21 and 22)
VOUT(L): <0.8V @ Iout = 400mA.
VOUT(H): >2.4V @ Iout = 1mA.
VOUT(H)MAX.: <42V with external open drain pull-up.
WRITE SPEED: 50/s.
ANALOG VOLTAGE OUTPUT (Channels 23 and 24)
DAC 1, 2: ±12V @ 1mA max, non-isolated.
DAC 1, 2: ±10V @ 5mA max.
RESOLUTION: 1mV.
SETTLING TIME: 1ms to 0.01% of output.
ACCURACY ±(% of output + mV):
Measured with 10M input resistance DMM. Accuracy includes
DMM’s DC plus RMS response.
1 year ±5°C: 0.15% + 19mV;
90 day ±5°C: 0.1% + 19mV;
24 hour ±1°C: 0.04% + 19mV.
TEMPERATURE COEFFICIENT: ±(0.015% + 1mV)/°C.
WRITE SPEED: 50/s.
TOTALIZE INPUT (Channel 25)
MAXIMUM COUNT: 232–1.
TOTALIZE INPUT: 100kHz (max), rising or falling edge, programmable.
SIGNAL LEVEL: 1Vp-p (min), 42Vpk (max).
THRESHOLD: 0V or TTL, jumper selectable.
DATE INPUT: TTL-Hi, TTL-Lo, or none.
COUNT RESET: manual or Read+Reset.
READ SPEED: 50/s.
ENVIRONMENTAL
Specified for Model 2700, firmware revision A02 or later.
OPERATING ENVIRONMENT: Specified for 0°C to 50°C.
Specified to 80% R.H. at 35°C.
STORAGE ENVIRONMENT: –25°C to 65°C.
WEIGHT: 0.5kg (1.1 lbs).
1. Minimum signal level 10mV, 10uA.
08/01/07
Rev. C
Specifications are subject to change without notice.
All Keithley trademarks and trade names are the property of Keithley Instruments, Inc.
All other trademarks and trade names are the property of their respective companies.
A
G R E A T E R
M E A S U R E
O F
C O N F I D E N C E
Keithley Instruments, Inc.
Corporate Headquarters • 28775 Aurora Road • Cleveland, Ohio 44139 • 440-248-0400 • Fax: 440-248-6168 • 1-888-KEITHLEY • www.keithley.com
12/06