1
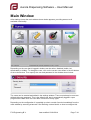
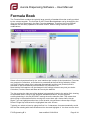
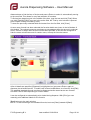
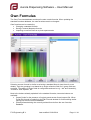
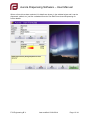
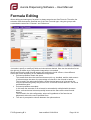
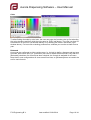
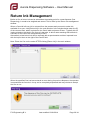
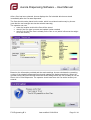
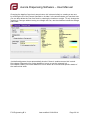
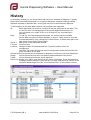
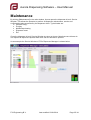
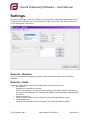
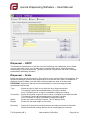
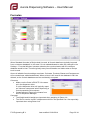
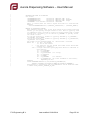
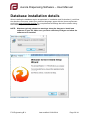
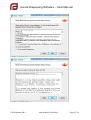
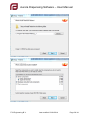
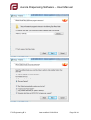
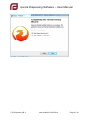
Aurora Dispensing Software – User Manual
Updated up to Aurora version 1.2.2.8
Contact information
Füll Engineering BV
Frankweg 65
2351PD, Nieuw-Vennep [NL]
www.fuell-engineering.com
General
[email protected]
+31 252 222012 (phone)
+31 848 827985 (fax)
Service
[email protected]
+31 252 222012 (phone)
+31 848 827985 (fax)
Sales
[email protected]
+31 252 222012 (phone)
+31 848 827985 (fax)
Füll Engineering B.V.
Last modfied: 03/01/2014
Page 1 / 41
Aurora Dispensing Software – User Manual
Content
Introduction ......................................................................................................................... 3
Notations used in this manual ............................................................................................ 3
User interface tips .............................................................................................................. 3
Installation and File locations............................................................................................. 5
Installation.......................................................................................................................... 5
File Locations ..................................................................................................................... 5
Main Window ....................................................................................................................... 7
Formula Book ...................................................................................................................... 9
Own Formulas ................................................................................................................... 11
Finding formulas by color................................................................................................. 13
Manual Dispense ............................................................................................................... 14
Dispensing ......................................................................................................................... 15
Formula Editing ................................................................................................................. 18
Return Ink Management .................................................................................................... 20
History ................................................................................................................................ 23
Maintenance....................................................................................................................... 25
Settings .............................................................................................................................. 26
General – General ........................................................................................................... 26
General – Units ................................................................................................................ 26
General – Users ............................................................................................................... 27
General – Options ............................................................................................................ 28
Dispenser – UDCP........................................................................................................... 29
Dispenser – Scale ............................................................................................................ 29
Layout – Images .............................................................................................................. 31
Layout – Labels ............................................................................................................... 31
Layout – Field-name overrides ......................................................................................... 31
Layout – Window size ...................................................................................................... 31
Formulas .......................................................................................................................... 32
Defining Custom Labels.................................................................................................... 33
Database installation details............................................................................................. 36
Füll Engineering B.V.
Last modfied: 03/01/2014
Page 2 / 41
Aurora Dispensing Software – User Manual
Introduction
The Aurora software allows the management of large collections of formulations used in
dispensing paint, ink and other substances. It supports both the paint specific use of Cans
prefilled with base paints and the ink specific return-ink management.
Aurora communicates to most retail and industrial dispensers using the industry standard
UDCP protocol and allows importing newly created formulations from several photo
spectrometers. Customer specific protocols can be added upon request.
Aurora has been developed by eMeeuw and is continuously extended in close cooperation
with Füll Engineering. Aurora seamlessly integrates with Füll’s ‘Dispenser Manager’ to get
the best out of Füll’s VX and HX dispensers, providing the following functionality:
• Very user-friendly operator interface
• Selection and dispensing of large formula collections
• Create new own formulas manually or by importing from a photo spectrometer
• Print labels manually or automatically during dispense
• Weigh-in and reuse return-ink
• Seamless integration with the Dispenser Manager for dispenser-maintenance,
-service and -configuration
Notations used in this manual
«Label»
<Key>
[Button]
Can
: A label referring to a configurable name of a directory, file, etc
: A key on the keyboard, like <Shift>, <Ctrl>, etc.
: A button in the software, like [OK], [Cancel], etc.
: Tot better differentiate between a 'Can' to dispense in and the verb 'can', a
Can to dispense in is capitalized.
User interface tips
•
•
•
•
Lists are only shown when applicable. When no list-items are available, the list is
hidden by an image. This allows for customization and focuses the user on the
remaining selection fields.
The fastest way to select a formula is by using the keyboard:
◦ When typing the first few letters of a formula field, Aurora highlights the first valid
entry in the list.
◦ Press <Arrow-Up>/<Arrow-Down> to highlight the previous/next item in the list
WITHOUT having to click on the list first!
◦ Press <Enter> or double-click a highlighted item to select it. Aurora automatically
selects the next field.
◦ Fields with only one possible item are automatically selected, moving on to the
next field.
Use <Esc> to close a window and return to the previous window.
Buttons can be clicked or activated by the keyboard-key(s) displayed in the corner(s)
of the button. The currently active button and/or the button under the mouse-cursor is
highlighted in green. Inactive buttons are greyed and cannot be selected.
Füll Engineering B.V.
Last modfied: 03/01/2014
Page 3 / 41
Aurora Dispensing Software – User Manual
•
•
•
•
The sorting order of most lists can be changed by clicking on the column title. Clicking
again on the same title reverses the sorting order.
Some lists support the selection of multiple items by holding <Ctrl> or <Shift> while
clicking an item.
Buttons attached to a numeric input field decrease/increase the value of the
field with an appropriate amount (typically ±1).
Keep <Ctrl> pressed when clicking the button for fine adjustments (typically ±0.1).
Keep <Shift> pressed when clicking the button to take 5x larger steps (typically ±5).
When editing colorant amounts (See Edit Formula and Manual Dispense), you can
move to the next colorant with either <Enter> or <Arrow-Down>. Move to the previous
colorant with either <Shift><Enter> or <Arrow-Up>.
Füll Engineering B.V.
Last modfied: 03/01/2014
Page 4 / 41
Aurora Dispensing Software – User Manual
Installation and File locations
Installation
Aurora is mainly installed by simply copying the complete file structure to hard disk. After this
only the database engine needs to be installed as described below. The location of the
UDCP dispenser driver is automatically detected when registered (see the Dispenser
Manager software manual for details).
Below «Root» refers to the Root directory in which all Dispenser Manager related files are
stored. As a standard this is C:\Fuell, but it can be any directory where all users have full
read and write access.
IMPORTANT: The «Program Files» directory on Windows Vista and above has NO write
access for all users and is therefore not allowed.
File Locations
All directories within the «Root» follow the naming scheme as specified below.
Directories with configuration specific names are specified as «Label». Further below the
standard name for each «Label» is specified.
Directory structure
«Root»
Aurora
Data
Images
Labels
Languages
«Spectro-InterfaceDir»
«Dispenser-DriverDir»
«Dispenser-InterfaceDir»
Standard label names
«Root»
«Dispenser-DriverDir»
«Dispenser-InterfaceDir»
«Spectro-InterfaceDir»
: C:\Fuell
: DM
: UDCP
: Gretag
Main programs and locations
Aurora.exe
: Aurora program.
Located in the Aurora directory
Firebird-2.5.xxx.exe
: Database engine installer v2.5.2. or higher
Needs to be started only once during installation.
See ‘Installing the database engine’ below.
Typically located in the Aurora directory
DM.exe
: Dispenser Manager. The dispenser driver for the Füll VX and
HX dispensers. Like any UDCP compliant driver the default
behaviour of Aurora is to automatically start this each time
Aurora is started.
Located in «Dispenser-DriverDir».
Füll Engineering B.V.
Last modfied: 03/01/2014
Page 5 / 41
Aurora Dispensing Software – User Manual
«Dispenser-InterfaceDir»
: Specify the same directory both in Aurora and the dispenser
driver software for storing interfacing files, like dispense
commands. UDCP compliant drivers automatically link to the
correct directory.
Installing the database engine
Aurora uses Firebird as the SQL database engine. Typically Firebird is already installed on
the dispenser PC when supplied by Füll. When installing Aurora on a new PC follow the
procedure below.
Locate the Firebird installer for your operating system and start it. Typically this is the file
‘Firebird-2.5.2.26539_0_Win32.exe’ or ‘Firebird-2.5.2.26539_0_x64.exe’, located in the
Aurora directory. The digits in the filename specify the version. Do not install a version lower
than the version specified above.
Follow the directions on screen, select your preferred language, agree with the licence
agreement and further keep all default choices. See 'Database installation details' at the end
of this manual for a complete overview of all dialogs that will be shown during the installation
process.
NOTE: Windows typically shows two warnings about the dangers to install new
software on your PC. Make sure you have sufficient privileges and allow the
software to be installed.
Füll Engineering B.V.
Last modfied: 03/01/2014
Page 6 / 41
Aurora Dispensing Software – User Manual
Main Window
After starting Aurora the main window shown below appears, providing access to all
available functionality.
Depending on the user that is logged in buttons can be active, disabled (visible, but
deactivated) or hidden. To change the user, click on the current user shown in the left bottom
of the main window. Then specify the user and password in the window shown below.
The users can be created and edited in the settings window. There must always be one user
defined without a password. This is the default user that is automatically logged in upon
program start. Make sure this user does not have too many rights.
Depending on the configuration it is possible to select a certain formula immediately from the
main window by scanning a barcode. See 'Defining custom labels' on how to configure this.
Füll Engineering B.V.
Last modfied: 03/01/2014
Page 7 / 41
Aurora Dispensing Software – User Manual
Note that in case the database engine has not yet been installed or one of the formulations
databases is not found, the error 'Database could not be started' is shown. Follow the
directions on screen and when necessary ask the network administrator for assistance.
Füll Engineering B.V.
Last modfied: 03/01/2014
Page 8 / 41
Aurora Dispensing Software – User Manual
Formula Book
The Formula Book contains the typically large quantity of standard formulas usually provided
by the colorant supplier. The formulas in the Formula Book database can be changed by the
user, but will then be saved in the Own Formulas database. Therefore the Formula Book
database can be easily updated to the latest version, without losing customer specific
modifications.
Select a formula as described in the ‘user interface tips’ section of the introduction. Formulas
are grouped in Collections, so Collection is presented as the first field of selection. When
only one Collection exists, this is selected automatically and the next (Product) field is
activated or also automatically selected when only one exists, etc.
Note that the field captions can be changed in the settings screen to any text you desire.
Collection, Product, Name and Base are merely the defaults.
The list covering the right part of the window is dynamically linked to the active field, showing
all selectable items. On top of the Windows standard behaviour, Aurora supports
scrolling/selecting in this list WITHOUT leaving the active selection field. This means that
while typing in the selection field or moving the cursor there with <Arrow-Left>/<ArrowRight>, you can highlight another item in the list with <Arrow-Down>/<Arrow-Up>/<PageDown>/<Page-Up> and select the highlighted item with <Enter>.
Typically you select an item by typing the first 2 or 3 characters. Aurora automatically scrolls
the first item starting with these characters into view and highlights it. You then move a short
Füll Engineering B.V.
Last modfied: 03/01/2014
Page 9 / 41
Aurora Dispensing Software – User Manual
distance down to find the item of choice and press <Enter> to select it, automatically moving
to the next field. This allows for very fast selection of formulas.
To find an item based on text in the middle of the item, type the text and click [Find]. When
you click [Find] WITHOUT any text in the active field, the 'Find by color' window is opened
(see Chapter Finding formulas by color)
To clear the previously selected fields and restart from the first field, click [Clear].
As soon as a formula has been selected the formula details are shown in the left bottom of
the window. The colorant amounts are shown as percentages while the amount is unknown
and in volume or weight after the amount has been specified. It can also be configured to
hide the exact colorant amounts for certain users, to keep the formulas secret.
After all details are specified, [Dispense] is highlighted, so just press <Enter> again to
dispense the selected formula. To make small custom modifications to a formula, click [Edit].
The modified standard formula can then be dispensed and/or saved as an own formula.
See Edit Formula and Dispensing for further details.
It can be configured to automatically print a label during dispense. With [Print] you can
manually print additional labels for the formula.
[Back] returns to the main window.
NOTE: To start selecting a new standard formula, best use [Clear] instead of [Back].
Füll Engineering B.V.
Last modfied: 03/01/2014
Page 10 / 41
Aurora Dispensing Software – User Manual
Own Formulas
The Own Formulas database contains all custom made formulas. When updating the
standard formulas database, the own formulas remain unchanged.
Own formulas can be created by:
• Changing a standard formula
• Saving a manual dispense formula
• Importing a new formula from a photo spectrometer
Selecting an own formula is similar to selecting a standard formula (see there for more
details). Only the grouping is not based on a single collection field, but 2 group fields are
provided. The naming of these fields is configurable and can be e.g. ‘Job’ and ‘Assembly’,
‘Customer’ and ‘Zipcode’, etc.
Next to the buttons already explained in the standard formulas, two extra buttons are
available:
• [Import] looks for the presence of a photo spectrometer formula export file. When
found this formula is loaded into the Edit Formula window for further editing and/or
saving into the own formula database.
• [Delete] allows deleting the currently seleted formula from the own formulas
database.
Füll Engineering B.V.
Last modfied: 03/01/2014
Page 11 / 41
Aurora Dispensing Software – User Manual
When a formula has been selected, it’s details are shown in the window below and it can be
dispensed, edited, etc. just like a standard formula. See Edit Formula and Dispensing for
further details.
Füll Engineering B.V.
Last modfied: 03/01/2014
Page 12 / 41
Aurora Dispensing Software – User Manual
Finding formulas by color
When you formulas contain color information, typically encoded as L*ab data, Aurora
supports finding formulas by just choosing the color you are looking for.
You can open the Find by color window from both the Formula book and Own formulas
window. Just click [Find] WITHOUT entering any search text in the current selection field.
Note that nothing will happen if the database doesn't contain color information.
In the Find by color window below click on
the optimal color panel or on [Choose
color] to specify the color you're looking
for. As a standard Aurora searches for
any formula regardless of the formula's
product or base. Optionally you can
specify to find only formulas having a
specific product and/or base. In
configurations not using products and
bases, as is common in the printing
industry, the product and base fields can
be reconfigured to e.g. substrate material
and substrate finish. This allows to find
the correct formulas even for semitransparent inks where the the substrate significantly influences the appearance.
The found colors are listed and sorted by the color-matching accuracy Delta-E. Scroll
through the list to see the formula colors in the Formula color panel for comparison with the
optimal color you're looking for. Double-click a line or click [Use formula] to return to the
formula selection window with the selected formula.
Füll Engineering B.V.
Last modfied: 03/01/2014
Page 13 / 41
Aurora Dispensing Software – User Manual
Manual Dispense
To dispense some additional colorants or a new formula not in any database yet, Manual
Dispense can be used. Here you just enter the exact amount of each ingredient. After that
you can immediately dispense it or save it as an own formula for later selection and
dispense. See Edit Formula and Dispensing for further details.
[Clear] clears all amounts, allowing you to define a new formula.
[Back] returns to the main window.
Füll Engineering B.V.
Last modfied: 03/01/2014
Page 14 / 41
Aurora Dispensing Software – User Manual
Dispensing
When pressing [Dispense] Aurora sends the necessary dispense commands to the
dispenser driver. It also monitors if the dispenser driver is responding. When there is no
response detected, the dispenser driver is most likely not (fully) started yet and the message
below is shown.
When the driver detects the dispense request, it can start the dispense automatically or show
a message to prompt for operator action.
After the dispense has finished the driver typically notifies the operator about this, prompting
him to remove the finished Can from the dispenser, etc..
Füll Engineering B.V.
Last modfied: 03/01/2014
Page 15 / 41
Aurora Dispensing Software – User Manual
In case Return-ink management is used, Aurora automatically checks before every dispense
if there is usable returned ink in stock. Two types of use are possible:
1. Exact formula match
2. Add missing components to an existing return ink Can
Use 1: Exact formula match
Return ink Cans are found that 'exactly' match the formula to dispense. Note that Aurora
compares this on actual ingredients to allow formula name changes and allows for small,
configurable differences to support dispending tolerances. The sorting order of the list is so
that the best matching Cans are at the top of the list. The sorting order of the list is so that
the oldest Cans are at the top of the list.
The operator selects the Can he'd like to use and clicks on [Use] below to use all or some of
this ink instead of dispensing new ink. Return ink Cans used in this way are marked as
reserved until they are weighed in again or deleted in the return ink management window.
While a return ink Can is reserved, it is not suggested for use in new dispenses. Using the
History window you can find out which return ink Cans are still reserved.
Click [Ignore] to ignore the suggested use of return ink and dispense new ink.
Click [Abort] to cancel the dispense without reserving any return ink Can.
Füll Engineering B.V.
Last modfied: 03/01/2014
Page 16 / 41
Aurora Dispensing Software – User Manual
Use 2: Add missing components to an existing return ink Can
Return ink Cans are found that contain some of the needed components, but never more
than needed in a Can that is big enough for the entire dispense. This means that after adding
the missing component amounts, such a Can can be used instead of dispensing the entire
formula anew. The sorting order of the list is so that the best matching Cans are at the top of
the list.
If the operator wants to use one of the Cans with returned ink as the starting point for the
new dispense, he should get the Can from the specified location, select it in the list and click
[Use]. Aurora will then subtract the ingredients already in the selected return-ink Can from
the current dispense, so only the missing colorants/amounts will be added.
Return ink Cans used in this way receive a new label with new description and ID. The
original Can is marked as being used for this new dispense and are removed from stock.
Click [Ignore] to ignore the suggested use of return ink and dispense new ink.
Click [Abort] to cancel the dispense without reserving any return ink Can.
See ‘Return-ink Management’ for further details.
Füll Engineering B.V.
Last modfied: 03/01/2014
Page 17 / 41
Aurora Dispensing Software – User Manual
Formula Editing
When editing and saving any formula it is always saved as an Own Formula. Therefore the
selection fields that can be specified are of the Own Formula type, using two groups with
customizable names like ‘Customer’ and ‘Reference’.
Just select, specify or modify all fields and colorants as desired. Here too the selection list at
the right top is hidden by a configurable image when not needed.
When specifying the total formula amount and confirming it with <Enter>, three different
events can occur depending on the database configuration:
• Colorant quantities remain the same.
This means that when the total formula amount is e.g. doubled, and the total amount
of colorant stays the same, the percentage of colorant in the formula is halved.
This is used in the paint-configuration, where the total amount of colorants in the
formula represents typically only around 10% of the total formula amount. The rest is
prefilled base paint.
• Colorant quantities are scaled.
In this case the amounts of all colorants is automatically multiplied with the same
factor, so that the total colorant quantity becomes the same as the total formula
amount.
This is used in the ink-configuration, where all ingredients of the formula are
dispensed, without the use of prefilled Cans.
• The user is prompted to choose between the options above.
Füll Engineering B.V.
Last modfied: 03/01/2014
Page 18 / 41
Aurora Dispensing Software – User Manual
Color
To allow finding formulas by color later, the user can enter the formula color by first selecting
the color checkbox and then click the color panel or [CIE L*ab] button. The color can then be
selected from a color-box (left window above) or by entering the exact L*ab values (right
window above). For best color matching performance, calibrate your monitor at least once a
year.
Released
Aurora can be configured to allow certain users (i.e. the lab) to define, dispense and test new
formulas, while other users (i.e. production) can't see or select these formulas. Only after the
[Released] checkbox of a formula has been checked, the formula is available for all users.
Note that in most configurations all users see all formulas, so [Released] does not need to be
set for each formula.
Füll Engineering B.V.
Last modfied: 03/01/2014
Page 19 / 41
Aurora Dispensing Software – User Manual
Return Ink Management
Before a Can of return-ink can be selected as the starting point for a new dispense (See
Dispensing), it needs to be weighed and stored. This is done by the Return Ink management
window.
When a Can with left-over ink is returned from the presses and you want to make this
available for re-use, click [Return Ink] in the main window. In the window below enter the ID
of the returned Can, which is printed on the Can’s label and press <Enter>. Typically this ID
is also printed on the label in the form of a barcode, in which case scanning this barcode is
sufficient for the Can to be recognised by Aurora.
Alternatively mixed return ink can be scanned with a spectrometer and then imported here
with the import icon on the right of the Can ID field.
Note: Place the Can on the scale AFTER clicking [Return Ink] in the main window.
When the specified Can had encountered an error during its previous dispense, the operator
is warned that the formula in it may not be completely dispensed and may choose to accept
the Can or not.
Füll Engineering B.V.
Last modfied: 03/01/2014
Page 20 / 41
Aurora Dispensing Software – User Manual
After a Can has been selected, Aurora displays the Can’s details which were stored
immediately after the Can was dispensed.
The Can should now be placed on the scale, which is monitored continuously by Aurora
(note that the can's weight can also be entered manually).
The operator can now:
• enter the location at which the Can will be stored
• check if the Can type is correct and update it when needed
• specify if the lid of the Can is already on the Can or not (which influences the weight
on of the content)
Based on the information provided and the scale readings, Aurora calculates the remaining
content of the originally dispensed formula and updates the display accordingly. When the
operator clicks [OK] and confirms the double-check dialog below, the Can is ready for use as
Return Ink in future dispenses. The operator should now store the Can at the location just
entered.
Füll Engineering B.V.
Last modfied: 03/01/2014
Page 21 / 41
Aurora Dispensing Software – User Manual
Changing the details of previously stored return ink is done similarly to creating a new one,
by entering the ID of the Can as specified on its label. In the window below you see that here
you can also delete the Can from stock by clearing the location or weight. To only change the
location or Can type without having to re-weigh the Can, use the checkbox below the storage
place field.
Just before dispense Aurora automatically checks if there is usable returned ink in stock.
See chapter 'Dispensing' for further details on how to re-use the returned ink..
See chapter 'History' for further details on how to obtain an overview and specific details of
the returned ink stock.
Füll Engineering B.V.
Last modfied: 03/01/2014
Page 22 / 41
Aurora Dispensing Software – User Manual
History
In the history window you can find all Cans that have been selected for dispense. Typically
these Cans are already dispensed, but in case the dispenser supports buffering multiple
dispense requests to dispense later, some Cans may only be scheduled for dispense.
To find anything in this large data collection, several filters are supported.
ID:
Each dispensed Can receives a unique ID that can be printed on the label. This
is used for return ink management, tracing back dispensed materials, etc.
You can search on a range of ID's or on a single ID (e.g. by scanning it's
barcode)
Date:
To find e.g. the Cans dispensed last week, etc. set the start an end-date.
Set the date using the pull-down calendar, or click on a day, month or year and
increase/decrease it using <Arrow-Up>/<Arrow-Down> or select other part of the
date using <Arrow-Left>/<Arrow-Right>.
Group 1: Main group of the dispensed formula.
Formula: Formula name
Location: Storage location of the dispensed Can. Typically used for return ink
management.
Note that The history window can also be configured to show the formula's Sub
group if Location is not used.
Scheduled: Include Cans that are scheduled for dispense, but have not yet been dispensed.
Ready:
Include Cans that have been successfully dispensed without any errors.
Failed:
Include Cans that had errors during dispense
Return ink storage only: ONLY show Cans from the return ink storage. These Cans all have
a storage location assigned. Cans that are currently reserved to be used for a job
instead of dispensing a new Can, are marked as 'Res.' In the Location column.
Füll Engineering B.V.
Last modfied: 03/01/2014
Page 23 / 41
Aurora Dispensing Software – User Manual
Click [Find] or press <Enter> to find all filtered Cans. The number of found Cans and their
combined content is shown below the list. The maximum number of Cans can be configured
to avoid incomprehensibly long lists. If the list is limited in this way, it is noted below the list.
To reset all filters to their defaults, click [Clear].
Click [Details] or double-click on a line in the history window to see all details of the Can as
shown below. The formula amounts are the actually dispensed amounts if the Can has been
already dispensed and if this is supported by the dispenser. Use [Print] if you need a new or
exrra label for the Can.
Füll Engineering B.V.
Last modfied: 03/01/2014
Page 24 / 41
Aurora Dispensing Software – User Manual
Maintenance
By clicking [Maintenance] in the main window, Aurora opens the dispenser driver’s Service
Window. This allows the operator to perform all dispenser maintenance, service and
configuration tasks supported by the dispenser driver. Typical tasks are:
• Canister filling
• Purging
• Nozzlecap cleaning
• Dispenser reset
• Etc.
Close the dispenser driver’s Service Window to return to Aurora. Note that some drivers do
not respond to dispense requests when their Service Window is opened.
As an example the Service Window of Füll’s Dispenser Manager is shown below.
Füll Engineering B.V.
Last modfied: 03/01/2014
Page 25 / 41
Aurora Dispensing Software – User Manual
Settings
By clicking [Settings] in the main window, the main Aurora configuration parameters can be
viewed and set, depending on the security level of the current user. See 'Main Window' on
how to change the current user.
General – General
Here you can select the language, program name (special branding) and confirmation
feedback.
General – Units
Select the units and the number of decimal places to be used by Aurora.
• Colorant unit:
Used for the colorants in a formula.
NOTE: The selected unit type (volume or weight) must match the way the formulas
are stored in the database. Ink formulas are typically stored by weight, paint formulas
by volume.
• Large volumes unit:
Used for total formula amounts, Can sizes, etc. when specified by volume.
• Large weights unit:
Used for total formula amounts, Can sizes, etc. when specified by weight.
Füll Engineering B.V.
Last modfied: 03/01/2014
Page 26 / 41
Aurora Dispensing Software – User Manual
General – Users
Create new, edit and delete users here. Aurora checks that at least one user exists without a
password, which is used as the default upon program start. Aurora also checks that at least
one user exists with user editing rights.
To make the setting of the many detailed access rights easier, two general levels are used:
• The Service level specifies access to features having to do with the dispenser. The
higher the knowledge of people regarding the dispenser's service and configuration,
the higher their Service level should be.
This level is automatically used when opening the dispenser's Service Window
• The Administration level specifies access to all dispenser-independent settings, such
as formula management, price calculation, label printing, program layout, etc.
Both Administration and Service level can be set to one of the settings below:
• Simplified use:
Virtually no setting can be changed and only the most important features and settigns
are shown. Use this for users that are easily confused by too much information.
• Normal use:
Virtually no setting can be changed, but most features and settings can be viewed.
This allows the user to see e.g. if a label should be printed before dispense, etc.
• Advanced use:
Virtually no setting can be changed, but virtually all features and settings can be
viewed.
• Foreman:
Basic settings that are easily understandable after a short introduction can be
changed and all settings can be viewed.
Füll Engineering B.V.
Last modfied: 03/01/2014
Page 27 / 41
Aurora Dispensing Software – User Manual
•
•
•
Trained service:
All settings that are explained during a typical service training can be changed and all
settings can be viewed.
Certified service:
Virtually all settings can be changed and viewed. Used exclusively for very
experienced administrators/servicemen
Full Control:
Virtually identical to Certified service with some additional testing features for the
development team.
Each of the main function buttons and some other detail function buttons can be enabled or
disabled for each user. To disable a button, it can be completely hidden or shown in a
disabled state.
'Show detailed paste amounts in formula' can be unchecked to hide the exact component
amounts of the formulas to keep these secret for unauthorised people. Make sure to disable
editing formulas for these users also.
'Hide formulas not yet released for production' can be checked, so that these users can only
select/dispense formulas that have been tested, optimised and then released by the lab.
General – Options
Default Can count:
When left blank, the number of Cans to dispense must be specified
before each dispense. Set this to 1 or more to skip this during most
dispenses. Only when another number of Cans is needed you can
override this during dispense.
Generate order info:
Use ONLY when the dispenser supports buffering multiple dispense
requests before starting to dispense. Typically used for dispensers
with automatic conveyers.
Show Own-Formula ID: Show the unique ID and check-digit of each Own-Formula. Typically
used in combination with auto-selecting formulas by scanning a
barcode from an order form.
Back to main window: When set, [Back] always returns to the main window immediately
instead of to the previous window. Typically used in combination
with auto-selecting formulas by scanning a barcode from the main
window.
Füll Engineering B.V.
Last modfied: 03/01/2014
Page 28 / 41
Aurora Dispensing Software – User Manual
Dispenser – UDCP
This shows the specification of the files used for interfacing to the dispenser driver. Readonly for most users. Here you can also select if the dispenser driver should be started
automatically by Aurora at start-up. Typically check this, except when the driver is already
automatically started by Windows.
Dispenser – Scale
Select the scale used by Aurora here. This scale is mostly used for Return Ink weighing. The
Dispenser Manager and most other dispenser drivers use their own scale for calibration or
dispense checking. Make sure that when multiple scales are used, all scales use a
DIFFERENT comport! At start up Aurora automatically re-connects using the scale
specifications saved here.
Type
: Select the type of scale to use from the list of supported scales
This setting is saved and activated when [Connect] is clicked
Level ‘Trained Service’ or higher is needed to change this setting
Connection : Select the physical comport to use or set to 0 (cleared) to simulate the scale
This setting is saved and activated when [Connect] is clicked
Level ‘Foreman’ or higher is needed to change this setting
Status
: Shows the result of the last Connect, Tare or Weight action
Weight
: Shows the last read weight on the scale
[Connect]
: Saves the Type and Connection settings and tries to connect to this scale.
Note that the scale settings therefor do not need [Apply] to be saved.
Füll Engineering B.V.
Last modfied: 03/01/2014
Page 29 / 41
Aurora Dispensing Software – User Manual
[Tare]
[Weigh]
: Tare (set to zero) the current weight displayed by the scale.
: Read the current weight displayed by the scale. To verify that you are
connected to the correct scale, place a small weight on the scale and verify
the reading using [Weigh].
Füll Engineering B.V.
Last modfied: 03/01/2014
Page 30 / 41
Aurora Dispensing Software – User Manual
Layout – Images
Customize your version of Aurora by selecting e.g. your company logo or advertisements as
the images hiding the lists when not in use.
Layout – Labels
Select one of the predefined labels to be used when dispensing standard or own formulas
and when weighing in Return-Ink. The number of ‘Labels per dispense’ specifies how many
labels are automatically printed during each dispense. Note that [Print] in the dispense
windows always prints 1 label of the specified type when clicked, regardless of the number
specified here.
See ‘Defining Custom Labels’ for information on how to create your own labels.
Layout – Field-name overrides
All formula field captions can be customised. Name, Product and Base are used for both
Standard and Own formulas. The other fields are exclusive to Own or Standard formulas.
When not overridden the default captions are used, e.g. ‘Customer’ and ‘Reference’ for Own
formulas.
Layout – Window size
Set the window sizes to be used by Aurora depending on your monitor resolution and
personal preferences.
Füll Engineering B.V.
Last modfied: 03/01/2014
Page 31 / 41
Aurora Dispensing Software – User Manual
Formulas
When Standard formulas (a Recipe book) is used, all formula details are typically imported
from a customer database. In this case it is not needed/allowed to make any changes in the
Settings – Formulas Window, because otherwise the synchronisation with the customer
database would be lost. Therefor typically many formula details are hidden when a Recipe
book is used.
Above all editable formula settings are shown. Colorants, Products, Bases and Cantypes can
all be created new, edited and deleted. When an item is still used in the database it can't be
deleted, so the formula database can't be accidentally corrupted.
Colorants
• Make sure the Code is EXACTLY the same
as in the dispenser driver.
If not the dispenser driver will typically report
an 'Unknown component' when dispensing a
formula containing this colorant.
• [Import] allows to import all colorants from
the Füll Dispenser Manager
Cantypes
• The Weight and Lid weight are important when weighing in Return ink
• The Size is used to check if a dispense would fit in the specified Can. Also especially
important when using Return ink.
Füll Engineering B.V.
Last modfied: 03/01/2014
Page 32 / 41
Aurora Dispensing Software – User Manual
Defining Custom Labels
All labels are stored in the Labels directory. A label definition file has extension ‘.lbl’. The
internal format is similar to a Windows ini-file and can be edited with Notepad or any other
text editor. Best use the existing labels as examples and starting point for the definition of
your own custom labels.
The latest and most detailed information of the Aurora Label Format is always described (in
English) in the file: ‘Label Definition specifications and example.txt’ in the Labels directory.
Also other information about specific printer settings can be found in this directory.
For your convenience the current version of ‘Label Definition specifications and example.txt’
is added below:
;--------------------------------------------------------------------------------------------; Aurora Label definition specifications and example
; Lines starting with ';' are comment only and ignored by Aurora
;
; WARNING: Since Aurora v1.2.2.8 The first character of the label file specifies it's use.
;
This is to make the selection of correct predefined labels easier for the user
;
S = Standard formulas / Recipe book formulas (imported from an external DB)
;
O = Own formulas (formulas created and edited in Aurora)
;
R = Return ink (label created when storing leftover returned ink)
;
;--------------------------------------------------------------------------------------------[Printer]
; specify which printer to use for labels (leave empty to use the default printer)
; ATTENTION: For some (Dymo) printers you MUST set the label-type in the printerdriver:
;
Windows-Start\Printers\Right-click printer\Default settings\Advanced
;
Set: Paper-size, PrintQuality(highest, graphics)
; ATTENTION: For some (Dymo) printers you MUST set the printer as the DEFAULT printer
;
to correctly use the defined label-type
Name=DYMO LabelWriter 450
; landscape 'L' or portrait 'P' (default) mode
Orientation=L
[Defaults]
; used unless specified otherwise in the text section below
; default values: 'Times New Roman', 10pts, spacing 50 [1/10mm]
FontName=Arial
; Combination of B, U, I and S to switch on Bold, Underline, Italic and StrikeOut
; Note that StrikeOut may not be supported by all printers (e.g. BI is Bold+Italic)
FontStyle=
FontSize=10
Linespacing=84
[Layout]
; Label size in 1/10mm
LabelWidth=700
LabelHeight=540
; Margins in 1/10mm used for text
MarginLeft=50
MarginTop=0
; Postions in 1/10mm from left-margin of label. TabStops 0..9 are supported
TabStop1=280
TabStop2=400
TabStop3=500
[Image]
; Image file (located in images directory). When empty no image is displayed
File=Logo-only.bmp
; Ofset in 1/10mm of Left/Top image corner from left/top of label (regardless of margins)
Left=0
Top=80
; image is scaled with this percentage when printed
ScalePct=100
Füll Engineering B.V.
Last modfied: 03/01/2014
Page 33 / 41
Aurora Dispensing Software – User Manual
[Text]
ExtraLineSpace1=-40
Line1=Name|<TAB=1>|: |<STYLE=B>|<FIELD=F_NAME>|<ASCII=153>
Line2=<STYLE=UI>|Collection|<STYLE=>|<TAB=1>|: |<FIELD=F_COLLECTION>
Line3=Product|<TAB=1>|: |<STYLE=B>|<FIELD=F_PRODUCT>
Line4=Base|<TAB=1>|: |<STYLE=BUI>|<FIELD=F_BASE>
ExtraLineSpace5=-240
Line5=<TAB=3>|<FONTNAME=I2OF5TXT>|<FONTSIZE=36>|<FIELD=F_HISTORYCAN_BARCODE_ITF>
ExtraLineSpace6=168
Line6=Created|<TAB=1>|: |<FONTNAME=COURIER>|<DATE=d-mmm-yyyy>
Line7=<FIELD=F_PCD1>|<TAB=1>|<FIELD=F_PQU1>
Line8=<FIELD=F_PCD2>|<TAB=1>|<FIELD=F_PQU2>
Line9=<FIELD=F_PCD3>|<TAB=1>|<FIELD=F_PQU3>
Line10=<FIELD=F_PCD4>|<TAB=1>|<FIELD=F_PQU4>
Line11=<FIELD=F_PCD5>|<TAB=1>|<FIELD=F_PQU5>
Line12=<FIELD=F_PCD6>|<TAB=1>|<FIELD=F_PQU6>
Line13=<FIELD=F_PCD7>|<TAB=1>|<FIELD=F_PQU7>
;
;
;
;
;
;
;
;
;
;
;
;
;
;
;
;
;
;
;
;
;
;
;
;
;
;
;
;
;
;
;
;
;
;
;
;
;
;
;
;
;
;
;
;
;
;
;
;
;
;
;
;
;
;
----- possible fields in Line text -----------------------------------------------------|
= Separates the lines in ordered segments.
In each segment the fields are NOT ordered
To make sure one field is printed before the other,
place it in different segments.
Each segment can contain only ONE field OR printable text.
The text or all of the fields except one would NOT be printed.
To print the pipe symbol itself, create an empty segment "||"
(Note: "|||" prints "||")
<TAB=n>
= Tab to postion of tabstop n (n in range [1..9])
<CAPS=n>
= Capslock state for text following on current line.
n is 1 for All Capital letters, 0 for for all Small letters,
empty (or anything else) for unchanged letters
<STYLE=xxx>
= Text style for text following on current line.
xxx is any combination of B, U, I and S for Bold, Underline, Italic
and StrikeOut
<REPL1=xyyy>
= Replaces the first character (x) with the following characters (yyy)
case insensitive for text following on current line.
<FONTSIZE=pts>
= Font size in points. Each line starts with default font size
<FONTNAME=xxx>
= Font name. Each line starts with default font name
<ASCII=xxx>
= print any (Extended) ASCII symbol. xxx must be in the range [0..255].
xxx examples
169=©, 153=™, 128=€
Note: Values may depend on font
<DATE=xxx>
= Print date+time formatted as specified by the xxx format string
e.g. d-mmm-yyyy hh":"nn":"ss
When xxx is omitted the date is formatted to Windows ShortDate format
(no time displayed)
<FIELD=xxx>
= Aurora specific (database) fields (exclude the '')
xxx Values:
'F_COLLECTION'
= Formula details for Std formulas only
'F_NAME'
= Formula name
'F_PRODUCT'
'F_BASE'
'F_CANNAME'
'F_AMOUNT'
= Total formula amount in ml or gram
(depends on grav/vol. unit-type used in the
Aurora configuration) without unit
'F_HISTORY_GRP1'
= Main-group used for history formula for
Return-Ink Labels only
'F_HISTORY_GRP2'
= Sub-group used for history formula for
Return-Ink Labels only
'F_HISTORY_LOC'
= Return-Ink location for Return-Ink Labels
only
'F_CUSTOMER'
= Formula details for Own formulas only
'F_ZIPCODE'
= Formula details for Own formulas only
'F_FORMULA_ID'
= ID of the current Std or Own formula
'F_FORMULA_ID_CHK'
= Idem incl. EAN/ITF type checkdigit
(Aurora v1.2.1.2+)
'F_HISTORYCAN_ID'
'F_HISTORYCAN_BARCODE_ITF'= Formula details for Std and Own formulas
Note: Field 'F_HISTORYCAN_BARCODE_ITF' is only of use when used in
combination with <FONTNAME=I2OF5TXT>
'F_PNM1'..'F_PNM9'
= Name of 1st ..9th paste in the formula
'F_PCD1'..'F_PCD9'
= Code of 1st ..9th paste in the formula
'F_PQU1'..'F_PQU9'
= Quantity+Unit of 1st ..9th paste in the
formula (Right aligned to fit largest amount)
Füll Engineering B.V.
Last modfied: 03/01/2014
Page 34 / 41
Aurora Dispensing Software – User Manual
;
;
;
;
;
;
;
;
;
;
;
;
;
;
;
;
;
;
;
;
;
;
;
;
;
;
;
;
;
;
;
;
;
;
;
;
;
;
;
;
;
PRINTING ANY TEXT AS A BARCODE
Use either:
<FONTNAME=AdvC39b>
and install 'ADVC39B_.TTF' (low)
<FONTNAME=AdvC39c>
and install 'ADVC39C_.TTF' (medium)
<FONTNAME=AdvC39d>
and install 'ADVC39D_.TTF' (high)
<FONTNAME=3 of 9 Barcode> and install '3OF9.TTF'
Add a '*' before/after the text to signal start/end of a valid barcode
Example:
Line1=<FONTNAME=AdvC39c>|*|<FIELD=F_COLLECTION>| - |<FIELD=F_NAME>|*
MAKING A QUICKSELECT STRING
When entering specific text in the first field of the formula selection
window, you can specify multiple fields at once. This is typically used
in combination with a barcode to select an entire formula with a single
barcode scan. Optionally you can add the 'F_CANNAME' to quickly select
the amount as well.
For the Own formula's a formula is typically defined by 'F_CUSTOMER',
'F_ZIPCODE' and 'F_NAME'
For the Std formula's a formula is typically defined by 'F_COLLECTION',
'F_PRODUCT' and 'F_NAME'
The format of the QuickSelectText is: '<T>$<C1><F1>..$<Cn><Fn>
Where <T> = 'S' for a Std Formula
'O' for an Own Formula
$
= the separator for the fields (the field values should NOT
contain any $ symbols!)
<Cn> = A single character specifying which field is contained in
this position
'C' = 'F_CUSTOMER'
'Z' = 'F_ZIPCODE'
'G' = 'F_COLLECTION' (i.e. Group)
'P' = 'F_PRODUCT'
'N' = 'F_NAME'
'A' = 'F_CANNAME'
(i.e. Amount)
'F' = 'F_FORMULA_ID' (ID of the standard or own formula,
depending on <T>)
Example:
Line9=<FONTNAME=AdvC39c>|*|O$C|<FIELD=F_CUSTOMER>|$Z|
<FIELD=F_ZIPCODE>|$N|<FIELD=F_NAME>|$A|<FIELD=F_CANNAME>|*
Alternatively a QuickSelect text for OwnFormulas can be made with ONLY
a number using field F_FORMULA_ID_CHK.
Füll Engineering B.V.
Last modfied: 03/01/2014
Page 35 / 41
Aurora Dispensing Software – User Manual
Database installation details
When installing the database engine as explained in 'Installation and file locations', just follow
the directions on screen, select your preferred language, agree with the licence agreement
and further keep all default choices. For completeness all dialogs that will be shown during
the installation process are listed below.
NOTE: Windows typically shows two warnings about the dangers to install new
software on your PC. Make sure you have sufficient privileges and allow the
software to be installed.
Füll Engineering B.V.
Last modfied: 03/01/2014
Page 36 / 41
Aurora Dispensing Software – User Manual
Füll Engineering B.V.
Last modfied: 03/01/2014
Page 37 / 41
Aurora Dispensing Software – User Manual
Füll Engineering B.V.
Last modfied: 03/01/2014
Page 38 / 41
Aurora Dispensing Software – User Manual
Füll Engineering B.V.
Last modfied: 03/01/2014
Page 39 / 41
Aurora Dispensing Software – User Manual
Füll Engineering B.V.
Last modfied: 03/01/2014
Page 40 / 41
Aurora Dispensing Software – User Manual
Füll Engineering B.V.
Last modfied: 03/01/2014
Page 41 / 41