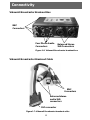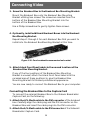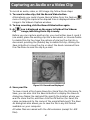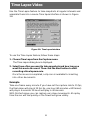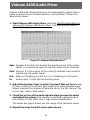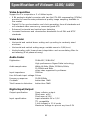
1
Videum 1000 Plus
Videum 1010 Plus
Videum 1000 VO Plus
Videum 4100/4400
Videum Conference Pro XP
VideumII Broadcaster Base Kit
VideumII Broadcaster Lite Kit
Hardware and Software
Installation Guide
Technical Support: [email protected]
Website: http://www.winnov.de
Sales Contact: [email protected]
Tel: +49 8243 9684 0
10/2002
1
EU010
Table of Contents
CE Declaration
4
Videum 10xx
7
VideumII Broadcaster
9
Videum 4100/4400
14
Watchdog
24
Hardware Installation
26
Connecting Video
27
Software Installation
32
Configuration of the breakout box
35
Future Updates
37
Multiple Capture Cards in one System
38
Videum Capture
40
Time Lapse Video
51
Stop Motion for Animations
52
WebCam
53
Videum Configure
55
Videum Zoom
61
Videum Insignia
63
Videum Mixer
66
Videum Source Switch
68
Winnov Watchdog
69
Digital Inputs/Outputs
72
Remote Control Server
76
Rich Media Presentation Manager
78
Software Development Kit (SDK)
80
Troubleshooting
84
Technical Specifications
86
Glossary
94
© 2002 Winnov. All rights reserved. Videum is a registered trademark of Winnov. Videum AV, Videum 1000,
Videum Conference Pro, VideumII Broadcaster, Xstream MultiCaster, Xstream RadioCaster, Videum
StreamEngine are trademarks of Winnov. Windows 2000 and Windows NT are trademarks of Microsoft
Corporation. Pentium is a trademark of Intel Corporation. Other trademarks mentioned in this document are
owned by their respective companies.
No part of this document may be photocopied, stored in a retrieval system, transcribed, or reproduced by any
method, either mechanical, electronic, photographic, or otherwise without prior written permission from
Winnov.
Winnov continuously improves and updates the products described in this document to suit the needs of
our customers. The contents of this document and the specifications of the hardware devices and software
are subject to change at any time without notice. Winnov makes no warranty of any kind with regard to this
material, including, but not limited to, implied warranties of merchantability and fitness for a particular
purpose.
2
Welcome
The ideal solution for collaboration and streaming media
applications
Videum
The Winnov Videum solutions are combinations of hardware and
software that enable you to utilize and maximize the power of video
communications and streaming media applications. Use our costeffective and high-quality solutions for these application areas:
Video Streaming:
• Video on Demand
• Live Video Broadcasting
• Audio and video streaming over the intranet and internet
Collaboration:
• Desktop video conferencing and collaboration
• Video presentations
• Corporate training
• VideoMail
• WebCam
Video Surveillance:
• Motion detection
• Face recognition
Multimedia:
• Still image, audio, video capture, animations
This users guide covers the installation and use of:
• Videum 1000 Plus
• Videum 1000 VO Plus
• Videum 1010 Plus
• Videum 4100/4400
• Videum Conference Pro XP Kit, collaboration kit for video
conferencing that includes Winnov Color Camera, Videum
Software and the Videum 1000 Plus capture card.
• VideumII Broadcaster Base Kit, professional capture card with
breakout box.
• VideumII Broadcaster Lite Kit, professional capture card with
breakout cable.
3
CE Declaration
Decleration of Conformity
Application of Council Directive 89/336/EEC
Standards to which Conformity is Declared:
ISO/IEC Guide 22 and EN 45014
Manufacturer’s Name:
Manufacturer’s Address:
WINNOV LP
1043 Kiel Court, Sunnyvale, CA 94089 - USA
Declares, that the product:
Product:
Videum Audio & Video Capture Card
Model:
Videum 1000 Plus
Videum 1010 Plus
Videum 1000 VO Plus
Videum 1010 VO Plus
Videum 4100/4400
Media:
Analog Stereo Audio, Composite Video,
S-Video
conforms to the following test specifications:
Standards:
EN 55022 (1998) - Class B
RFI Voltage 150kHz-30MHz (line conducted)
RFI Field Strength 30MHz – 1000 MHz
EN 61000-4-2:1995 + A1:1998 4kV
Electrostatic Discharge (ESD)
EN 61000-4-3:1996 + A1:1998 3V/m
Electromagnetic Fields
EN 61000-4-4:1995 +/- 1kV
Electrical Fast Transients
EN 61000-4-5:1995 power lines +/- 2kV
unsymmetrical, +/- 1kV sym.
High Energy Pulses (Surge)
EN 61000-4-6:1996 3V
Conducted RF-Disturbance
EN 61000-4-11:1994 > 95% for 5 ms; > 30% for 250 ms
Voltage Dips, Short Interruptions and Voltage
Variations
Test specification EN 50081-1:1992 and EN55024:1998
4
Supplementary Information:
The product herewith complies with the requirements of the EMC Directive
89/336/EEC.The product was tested in a typical configuration. Installation
instructions from the user’s manual need to be observed.
I, the undersigned, hereby declare that the equipment specified above
conforms to the above Directive and Standard.
Name:
Dipl. Ing. Wolfgang Kemmler
Title:
Managing Director
Date:
February 18th, 2002 (Videum 10xx)
October 4th, 2002 (Videum 4100/4400)
Official Notices and Warranties
5
About this Guide
About This Guide
This guide is designed to provide you with the information needed to
install the Videum 1000 Plus Family of capture cards, the VideumII
BroadCaster Family of capture cards and the Videum 4100/4400.
Special Symbols in this guide
Caution - A caution message contains important information that we
advice you to read carefully.
Contacting Winnov technical support
In order to better serve our customers in the most efficient manner,
Winnov has a dedicated support team available via email during
business hours.
To contact Winnov technical support:
• Email:
send email to [email protected]
• Fax:
+49 8243 9684 27
• Website: visit websites at http://www.winnov.de or
http://support.winnov.com
Contacting winnov sales
To purchase additional products or for product information, contact
your local computer dealer or Winnov sales at the following addresses:
•
•
•
•
Phone:
Fax:
Email:
Website:
+49 8243 9684 0
+49 8243 9684 27
[email protected]
visit our website at http://www.winnov.de
6
Videum 10xx
The Videum 1000 Plus Family includes the Videum 1000 Plus capture
card, the Videum 1000 VO Plus capture card and the Videum 1010 Plus
capture card.
Videum 1000 Plus
The Videum 1000 Plus capture card is an audio and video PCI capture
card for audio and video capture, video conferencing and video
surveillance. It supports composite, s-video and MXC video inputs and
captures 768x576 pixels at 25 frames per second (PAL). The Videum
1000 Plus supports square pixel resolution, providing you with
maximum performance and maximum flexibility. Two audio input
connectors are available on the bracket as well as one audio out
connector.
Features of your Videum 1000 Plus capture card
• High-performance video capture. Captures one audio and video
channel at up to 640x480, 30 fps uncompressed (NTSC) and
768x576 25 fps uncompressed (PAL).
•
Accepts data in a variety of ways:
NTSC, PAL and square pixel resolution (image aspect ratio = 4:3)
•
Captures widescreen formats:
640 by 360 (16/9) and 640 by 272 (2.35:1)
•
•
•
•
•
Synchronized audio and video
Integrated audio - no sound card required
Easy to use and to install
Supports multiple boards per installation
Videum 1000 Plus family of capture cards are universal capture
cards that fit in 32-bit and 64-bit PCI slots. They are smaller than
Videum 1000 family and use less consumption power.
7
Videum 10xx
Videum 1000 VO Plus
The Videum 1000 VO Plus capture card is a Video-Only PCI capture card
for video capture and video surveillance. It supports composite, SVideo and MXC video inputs and captures 768x576 pixels at 25 frames
per second. The Videum 1000 VO Plus supports square pixel resolution,
providing you with maximum performance and maximum flexibility.
One audio out connector is available on the bracket.
Videum 1010 Plus
The Videum 1010 Plus capture card has the same features and
performances as the Videum 1000 Plus. However the Videum 1010 Plus
has been engineered for low profile PCI slot. New flat panel and slimline
all in one computers only support low profile PCI slot.
The Videum 1010 Plus supports only one MXC video input on the
bracket. One adaptor cable (MXC to S-Video/Composite) as shown in
Figure is provided with the capture card. It will enable you to connect a
composite or S-Video video signal.
Figure 1.1 : MXC to Composite/S-Video adaptor cable
System Requirements
•
•
•
•
•
•
Pentium® processor (video streaming: Pentium 4)
One free PCI slot
Minimum 16 MB RAM (better 32 or 64 MB RAM)
Video streaming: 512 MB RAM suggested
Operating systems: Windows NT, 2000 and XP
Headset for audio communications without echo
Internet access for communications and driver updates
8
VideumII Broadcaster
The VideumII Broadcaster Family includes the VideumII Broadcaster
base kit and the VideumII Broadcaster lite kit.
The VideumII Broadcaster capture card is designed specifically to
meet the demands of professional webcasters, video production
experts and video presentation specialists. The VideumII Broadcaster is
a high quality audio and video PCI capture card.
The VideumII Broadcaster Base Kit
The VideumII Broadcaster Base Kit includes one rackmountable
breakout box which supports composite and s-video inputs (locking
BNC connectors) and balanced stereo audio via XLR connectors. The
breakout box features two XLR audio connectors, four phono audio
connectors and two BNC video connectors. The breakout box is easily
rackmountable and give an easy rackmount access to the connectors.
Refer to the next page to see a description of the breakout box.
The VideumII Broadcaster Lite Kit
The VideumII Broadcaster Lite Kit includes one breakout cable which
supports composite and S-Video inputs (locking BNC connectors) and
balanced stereo audio via XLR connectors.
Refer to the next page to see a description of the breakout cable.
9
Connectivity
Videum 1000 Plus
S-Video In
MXC Camera In
Composite Video In
Aux Audio In
Line/Mic Audio In
Audio Out
Figure 1.2: Videum 1000 Plus Bracket
Videum 1010 Plus
MXC Video input
for Winnov Camera
Aux Audio In
Line/Mic Audio In
Audio Out
Figure 1.3: Videum 1010 Plus Bracket
10
Connectivity
Videum 1000 VO Plus
S-Video In
MXC Camera In
Composite Video In
Audio Out
Figure 1.4: Videum 1000 VO Plus Bracket
VideumII Broadcaster Capture Card
DVI Connector for A/V
Media Cable
Figure 1.5: VideumII Broadcaster Bracket
11
Connectivity
VideumII Broadcaster Breakout Box
BNC
Connectors
Four Phono Audio
Connectors
Balanced Stereo
XLR Connectors
Figure 1.6: VideumII Broadcaster breakout box
VideumII Broadcaster Breakout Cable
BNC
Connectors
balanced stereo
audio XLR
connectors
DVI connector
Figure 1.7: VideumII Broadcaster breakout cable
12
Connectivity
Videum 1000 Plus, 1010 Plus, and 1000 VO Plus
Connector
S-Video
Connector Type
4-pin mini-DIN
Connect To ... Device
Only S-Video devices including VCRs,
camcorders, and other S-Video cameras
MXC
8-pin mini-DIN
Winnov composite video camera
Composite Video In
RCA jack
VCRs, camcorders, and composite video cameras
Aux Audio In
3.5mm stereo
Audio output from VCR, audio output from
another sound card
Line/Mic In
3.5mm stereo
Microphone, or audio from an S-Video camera
Stereo Audio Out
3.5mm stereo
Sound card Line In input; takes audio from video
camera to sound card audio input. Can also be
used for external speakers or headphones
13
Videum 4100
Videum 4100
The Videum 4100 is a one channel audio and video PCI capture card for
surveillance and video recording applications. It supports 4 composite
video (BNC) inputs from which one channel can be captured. It also
features a fast switching function that enables you to alternate
between the four video sources.
Four single ended analog audio stereo inputs can be captured in CD
quality through a Mini Din 8 connector.
Features of your Videum 4100 board
• Captures one audio and video data stream at full video size and full
resolution (768x576 at 25 fps).
• Fast switching function to alternate between the four video sources.
• Real time capture and preview of the video streams.
• Programmable capture resolution, frame rate and compression
settings.
• Supports multi-processor systems.
• Supports multiple boards per system.
• Integrated watchdog function for unattended operation. Automatic
failure log for bug tracking purposes.
• On-board digital I/O triggers providing alert detection and event
signaling.
• Remotely control image properties from anywhere at anytime using
your web-browser.
14
Videum 4400
Videum 4400
The Videum 4400 is a four-channel audio and video PCI capture card for
surveillance and video recording applications. It supports 4 composite
video (BNC) inputs out of which 4 channels can be simultaneously and
independently captured at full rate and full resolution.
Four single ended analog audio stereo inputs can be independently
captured in CD quality through a Mini Din 8 connector.
The Videum 4400 capture card performs hardware time stamping for
reliable, sustained audio-video synchronization.
System Interface
The board is based on Winnov proprietary advanced PCI interface and
data streams optimization circuit and includes four video processor
chips, four stereo audio codecs and a TTL Input/Output chip. It hosts a
32 bit PCI bus interface running at 33 MHz to provide complete
software compatibility with most video applications.
The Windows plug and play manager recognizes the board as four
independent audio and video devices. Therefore each audio and video
channel is handled by an independent driver. Each driver handles both
video and audio data streams.
Features of your Videum 4400 capture card
• Captures four independent audio and video channels at full video
size and full resolution on one PCI card
- 25 fps per channel simultaneously.
• Real time capture and preview of analog video streams.
• Programmable capture resolution, frame rate and compression
settings for each video stream.
• Supports multi-processor systems.
• Supports multiple boards per installation.
• Integrated Watchdog function for autoreboot. Automatic failure log
bug tracking.
• On-board digital I/O triggers providing alert detection event
signaling.
• Remotely controllable image properties via your web-browser.
15
Videum 4400
Audio and Video
• Four composite video inputs - Four independent video channels.
• Integrated video multiplexer allows selection of four video streams out of
any four video inputs.
• Integrated audio multiplexer allows selection of four stereo streams out of
any four stereo inputs.
• State of the art professional video quality through double rate oversampling.
• Summed stereo headphone output provides audio monitoring and wave
output of all four channels.
• Professional locking BNC connectors for video input.
• 75 Ohm termination can be individually disabled (via jumpers). This feature
allows cascading of video inputs and insertion of the card into an existing
video link without requirement of an additional video amplifier or router.
Digital I/O triggers and Watchdog function
• 8 digital alarm inputs/outputs.
• Watchdog reset functionality significantly enhances system resilience.
• Precision video time stamping fully synchronized with audio sample units
allows perfect alignment and easy synchronization of audio and video
streams.
Physical specifications
•
•
•
•
Universal 3.3 & 5V PCI card. Also works in all 64Bit PCI slots.
Lowest possible cost per video/audio channel.
Very compact size: ¾ length PCI card, 157mm x 95mm.
Low power consumption.
16
Videum 4100/4400
Videum 4100
6
8
7
9
10
1
2
3
11
4
5
12
15 14 13
Figure1.8: Top view of the Videum 4100 (one channel)
Videum 4400
6
9
7
10
1
2
3
11
4
5
12
15 14 13
Figure1.9: Top view of the Videum 4400 (four channel)
1 -2 -3 -4.
5.
6.
7.
8.
9.
10.
11.
12.
13.
14.
15.
External BNC connector for video input
Audio Inputs connectors (4x stereo)
Jumper J12
Jumper J 10
Monitor Output
Reset Switch connector
Watchdog Reset Cable Connector
Eight Digital inputs/outputs
TTL I/O voltage selector
One on-board stereo audio line and headphone output
Jumper J9
Jumper J13
White dot = pin 1
17
Connectivity
Videum 4100 and Videum 4400 bracket
Figure 1.10 shows the description of the Videum 4100 and Videum 4400
bracket.
Figure 1.10: Description of the Videum
4100/4400 bracket
Watchdog Reset Cable
Black 2-pin connector
The Watchdog Reset Cable,
as shown in Figure 1.11,
comes with your Videum
board. It has a 4 pin
connector with 2mm pitch
on one end and a standard
2 pin 100 mil socket on the
other end.
White 4-pin connector
Figure 1.11: Watchdog Reset Cable
18
Connectivity
Four channel audio cable
This four channel audio cable comes with your Videum 4100 or 4400
board.
8-pin mini DIN
connector
(will be connected to the
audio connector available
on the bracket ( ‘5’ in
Figures 1.8 and 1.9)
4 stereo 1/4” mini jacks
(will be connected to your audio
sources)
Figure1.12: Four-stereo channels audio cable
Make sure you have successfully plugged the cable on the 8-pin mini DIN
connector of the bracket.
19
Characteristics of the Audio Input
Videum 4400 features four stereo inputs. You will find in this section the
technical specifications for the audio inputs on bracket, the on-board
audio inputs and the audio output.
External audio inputs (J2 - on bracket)
Figure 1.13 shows the front of the audio input available on the bracket.
It is shown as seen when facing the front of the receptable on the
bracket.
Technical characteristics:
Connection:
J2 is connected in parallel to J1
Connector:
Mini Din 8 receptacle
Input impedance:
47 KOhm
Maximum input level:
1 Vrms
Figure1.13: Audio inputs on bracket
Internal audio inputs (J1 - on board)
Figure 1.14 shows the internal audio connector (J1).
Technical characteristics:
Connection:
J1 is connected in parallel to J2
Connector:
Internal 5x2 100 mil header
Input impedance:
47 KOhm
Maximum input level:
1 Vrms
Figure1.14: Internal audio inputs
20
Characteristics of the Audio Output
Audio line / headphone output
For audio output, left and right channel (J3)
Pin 1: Left channel
Pin 2: Shield
Pin 3: Shield
Pin 4: Right channel
Technical characteristics:
Connector:
4-pin 100 mil male header
Maximum output power: 60mW into 32 Ohm (headphone)
Maximum distortion:
0.1% into 32 Ohm headphone
2% into 8 Ohm speaker
Type:
Class AB stereo amplifier.
Output voltage:
3.5 V (at 0 dB) and 0.1% distortion
(peak-to-peak)
The stereo headphone amplifier also serves as a summing amplifier for
all four channels.
21
Termination of Video Inputs
75 Ohm termination jumper for the video inputs
Each of the four video inputs (BNC1-4) is terminated on-board with 75
Ohm. For proper video reception this termination is mandatory. It is
based on the assumption that there is only one video source and one
video input per link, which is the normal case. Refer to figure 1.8 to
locate the jumpers on the board.
There are cases however where this termination might not be desired.
For example:
• The card is inserted into an existing video link via a T-piece.
• All four inputs are fed from a single video source for example to
provide 4 streams with different resolutions from the same video
stream.
• Several Videum 4400/4100 cards are cascaded or run in parallel to
other video equipment.
In these cases the video termination requires a video amplifier/
repeater. However, with the Videum 4400/4100, this can be avoided by
individually disabling the termination. To disable the termination,
remove the jumper. Only one termination must remain per video link
as close as possible to the end of the whole link.
Function
BNC connector
TerminationJumper
Comp Video In 1
BNC 1 (top / J8)
J10
Comp Video In 2
BNC 2 (top / J11)
J12
Comp Video In 3
BNC 3 (top / J14)
J9
Comp Video In 4
BNC 4 (bottom / J16)
J13
Jumper removed: video termination disabled
Jumper placed: video termination enabled
J12 J10
J13
Figure1.15 : video termination jumpers
22
J9
Video Source
Connecting a video source to the Videum 4100/4400
Connector type:
Input type:
Number:
BNC
Composite video. Connects to normal
cameras and camcorders
S-Video (optional)
4 composite or 2 S-Video
23
Watchdog Capabilities
Winnov Watchdog is a crash-recovery function that automatically
reboots the system in the event of a software lock-up. This allows for
complete unattended operation, 24x7x365. The Watchdog feature is
particularly useful for systems that are operated in a remote location
and/or mission critical applications.
Connecting the Watchdog Reset Cable
If you want to take advantage of the Watchdog function, you need to
connect the Watchdog reset cable between your motherboard and
your Videum board.
1. Once your computer is off and unplugged, connect the 4-pin
connector of the Watchdog reset cable to the white Watchdog
housing connector on your Videum board, as shown in Figure 1.17.
Figure 1.16 : 4-pin connector of the
Watchdog reset cable
Figure 1.17: Watchdog reset housing
connector on Videum board
The Watchdog reset cable connector will only fit into the housing
connector on Videum board in one direction.
2. Unplug your computer’s reset cable where it connects to the
motherboard. To locate the reset cable, please refer to the
motherboard’s manual.
3. Connect the 2-pin connector of the Watchdog reset cable ( Figure
1.18) to the reset pins now opened on the motherboard.
Figure 1.18 : 2-pin connector of the Watchdog reset cable
24
Watchdog Capabilities
Here is the color code of the 2-pin connector showed in Figure 1.10:
Red: signal
Black: ground.
4. Connect your computer’s reset cable disconnected on step 2, to the
black 2-pin connector located on your Videum board, as shown in
Figure 1.9.
black 2-pin connector
Figure 1.19 : black 2-pin connector
5. Plug and turn on your computer.
How to test your Watchdog
Right click on the little dog icon located on your tray bar.
Select “Test Watchdog” from the Watchdog menu. The figure 1.18
will appear. Execute the test clicking ‘Yes’.
Figure 1.20: Test Winnov Watchdog
If the Watchdog Watchdog function does not work, you need to
reverse the black 2-pin connector connected to your motherboard.
6. If your reset button on your computer is not working, then flip the
black 2-pin connector that was connected to your Videum board in
step 4.
If you experience some troubles connecting your Watchdog reset cable,
please contact our Support department at [email protected]
You are now ready to utilize the Watchdog function of your Videum
board. For more information on the Watchdog function and how to
configure it, refer to the software section.
25
Hardware Installation
Installing the Videum board
Tools required: You will need a screwdriver to complete the
installation. You should also wear an antistatic strap when installing
any expansion board in your computer.
Caution: Electrostatic discharge can cause damage to your computer
circuitry, which can be followed by complete or intermittent failures. At a
minimum, touch a piece of grounded metal (like your computer chassis)
to discharge any static electricity before starting the installation.
To install this board into your computer, follow these steps:
1. Turn off your computer and all peripheral devices.
Unplug the computer and peripherals from the wall outlet.
2. Remove the cover of the computer so you have access to the
open slots.
3. Find an available PCI slot inside your computer.
4. Remove the protective slot cover from the back of your
computer using a screwdriver.
Save the screw, you will use it later to secure the Videum board.
Save the slot cover you removed for later use.
5. Install the Videum board into the
available slot.
Hold the Videum board at the edges
and align the pins on the board with
the pins in the connector. Firmly press
the pins into the connector until the
board is seated evenly.
6. Secure the board with the screw that was holding the
protective slot cover.
Tighten the screw until the board is secure.
7. Reinstall the cover of the computer.
8. Now you can see the Videum board connectors on the back of
the computer.
9. Refer to pages 16-17 for more specific information about
Videum II BroadCaster Base and Light Kits.
26
Connecting Video
Connecting a video camera to the Videum 1000 Plus
Only analog color video cameras (PAL or NTSC) may be connected to
the Videum 1000 Plus board.
• composite video input: connects to normal cameras and
camcorders. Audio connects to the Line/Mic input.
• S-Video input: connects to S-VHS or Hi-8 camcorders. Please
connect audio to the Line/Mic input.
•
MXC input: connects to the Winnov Video Camera or other cameras
via a special interface cable. This input combines audio, video and
power for the camera.
To connect the Winnov Video Camera, follow these steps:
1. Set the camera base on top of the
monitor.
Place the camera so that the power
light is on the right and the
microphone is on the left.
2. Connect the camera cable to the
Multimedia Extension Connector
(MXC).
3. Turn the camera on, if necessary, using the power switch on the
back of the camera.
Switch
Default Seetings
Description
BLC
On
Sets backlight compensation to prevent underexposed or
overexposed images.
WB
Fixed
Sets the white balance for color reproduction. Should be in
Fixed mode when you have a colored scene and stable
lighting conditions.
Image
Positive/Negative Positive shows the image normally, negative shows the
photographic negative of the image.
Note: certain camera models do not have an integrated microphone or
switches on the Back of the camera. Please make sure that you use the
right camera model. Please check the product number on the label of
the camera.
XC77B/490 standard PAL camera with mic and switches
XC77B/320 PAL camera w/o mic and switches (with Winnov cable)
27
Connecting Video
Connecting a video camera to the Videum 1010 Plus
MXC input: connects to the Winnov Video Camera or other cameras via
special interface cable. This input combines audio, video and power for
the camera.
If you need a composite or S-Video connector, use the MXC to
composite/S-Video cable which comes with your Videum 1010 Plus
board.
Remember that you won’t be able to have at the same time a composite
input, S-Video input and RCA input. This will cause your system to
malfunction.
Figure 1.21: MXC to composite or S-Video adaptor cable
28
Connecting Video
VideumII Broadcaster Lite Kit
1. Connect the DVI connector of the audio and video breakout cable
to the back of the VideumII BroadCaster Capture Card.
2. Connect the breakout cable to the audio and video sources using
the XLR audio connectors and BNC video connectors.
Once the connection is completed, please refer to the software section
to install the Videum Software CD.
VideumII Broadcaster Base Kit
Assembling the Breakout Box
Now is a good time to mount the VideumII BroadCaster Breakout Box
onto the Breakout Box Mounting Bracket. Figure 1.20 shows a sample
of a blank Breakout Box.
1. Decide on the position of the VideumII Broadcaster
Breakout Box.
Locate the Breakout Box Mounting Bracket anddecide in
which of the four possible positions you prefer to mount the
VideumII Broadcaster Breakout Box in.
2. Attach the front label to the Breakout Box Mounting Bracket.
Figure 1.22: Front label with legend
Locate the adhesive Front Panel Label with the legend.
Remove the protective back and attach the label into the
recessed area in the appropriate position on the front of
the Breakout Box Mounting Bracket.
29
Connecting Video
3. Screw the Breakout Box to the Breakout Box Mounting Bracket.
Mount the Breakout Box onto the Breakout Box Mounting
Bracket utilizing two screws. The screws are inserted from the
bottom of the Breakout Box Mounting Bracket into the
bottom of the Breakout Box.
Use a Philips screwdriver to gently tighten these screws.
4. Optionally, install additional Breakout Boxes into the Breakout
Box Mounting Bracket.
Repeat steps 1 through 3 for each Breakout Box that you want to
install into the Breakout BoxMounting Bracket at this time.
Figure 1.20: Four breakout boxes mounted on bracket
5. Attach blank Front Panel Labels to the unused locations of the
Breakout Box Mounting Bracket.
If any of the four positions of the Breakout Box Mounting
Bracket is unused, attach the blank Front Panel Label into the
recessed area of these positions to give the Breakout Box
Mounting Bracket its finished professional appearance.
You are now ready to connect the Breakout Box to your computer.
Connecting the Breakout Box to the Capture Card
To connect the external Breakout Box to the Videum Broadcaster
Capture Card, do the following:
1. Attach the A/V-Media cable to the DVI connector of the breakout
box. Carefully align the cable plug and the DVI connector on the
Breakout Box and insert the cable plug into the DVI connector.
2. Attach the A/V-Media cable to the DVI connector of the VideumII
Broadcaster Capture Card.
30
Connecting Video
Be careful when handling the A/V Media Cable. Do not bend the cable in a
sharp radius because this can cause internal damage to the signal wires
and/or shielding wires. Do not bend any of the delicate pins inside the
shrouded cable plug. Failure to properly handle the A/V-Media cable can
result in A/V signal quality degradation or complete signal loss.
3. Optionally if you have multiple boards in your system, repeat
steps 1 and 2.
If you have more than one Capture Card/Breakout Box combination,
it is wise to understand the correlation between the location of the
VideumII Broadcaster Capture Card inside your computer and the
enumeration of the VideumII Broadcaster Capture Card by the
Videum driver software. The streaming media encoding software
(Windows Media technology or Real Networks media technology)
utilizes this enumeration to select the audio and video inputs.
The Videum software driver searches for VideumII Broadcaster
Capture Cards in all PCI slots of your computer.
The first card will be labeled "xxxxxxx0",
The second card will be labeled "xxxxxxx1", the next card "xxxxxx2",
and so on.
Typically the computer starts searching from the PCI slot closest to
the other ports (serial, USB, video, for example) and works its way to
the far end of the computer.
Any connection scheme between the VideumII Broadcaster Capture
Cards and the Breakout Boxes will work. However, to simplify the
correlation between the enumeration of the four VideumII
Broadcaster Capture Cards and the four positions of the Breakout
Box in the Breakout Box Mounting Bracket, we suggest the
connection as listed in Figure.
left-most Breakout Box
middle-left Breakout Box
middle-right Breakout Box
right-most Breakout Box
Capture Card number 0
Capture Card number 1
Capture Card number 2
Capture Card number 3
You are now ready to start your computer and install Videum Software.
31
Software Installation
The Winnov Videum 10xx Family and VideumII BroadCaster Family of
capture cards work with the following operating systems:
• Windows NT4 Workstation (Service Pack 6a required)
• Windows NT4 Server (Service Pack 6a required)
• Windows 2000 Professional (no Service Pack required, but Service
Pack SP 1 strongly recommended)
• Windows 2000 Server (no Service Pack required, but Service Pack SP
1 strongly recommended)
• Windows XP
The Videum 10xx Family and VideumII BroadCaster Family of capture
cards presently do not support Windows 3.1, Windows 95, Windows 98 or
Windows Me. Please use the Videum AV and VO cards.
General driver release notes:
1. Please refer to the download section for latest hints and updates
2. Older cards may not be supported by the latest driver release:
Videum AV and VO PCI: install driver up to 2.10
3. New cards may require the latest driver
Videum 1000 Plus: requires 2.11 or greater
Videum 4400: requires 2.12 or greater
4. The USB camera has special drivers. Do not use version 2.xx drivers.
32
Software Installation (NT 4.0)
Windows NT 4.0 Software Installation (CD-ROM)
Make sure that your computer running on NT 4.0 (Workstation or
Server) has been upgraded to service pack SP 6a. The service pack
upgrade is available on the Microsoft website (www.microsoft.com/
ntworkstation) for download and installation.
1. Install the Videum board, as previously described, start computer.
2. Insert the CD “Winnov Videum Version 2.xx” in the CD-drive.
3. In Windows Explorer,
find the CD titled
VIDEUM 2.xx, right click
the CD and select “Setup
Videum 2.xx”.
Alternatively, you can run
“Setup.exe” directly from
the root directory of the
CD.
Figure 2.0: Screen Shot
The setup program will automatically install all files in the
appropriate locations. Follow the screen prompts during the
installation process.
5. Restart your
computer.
Figure 2.1: Screen Shot
When upgrading your operating system from NT 4.0 to Windows 2000, the
Videum Driver will no longer function. Follow the above Windows 2000
software installation to fix this problem.
33
Software Installation (2000/XP)
Windows 2000 and XP support plug-and-play software installation.
1. Install the Videum board, as previously described.
2. Start your computer and log-in.
3. Insert Videum Software CD in the CD-Driver.
4. When the system prompts you with a “New Hardware Found”
dialog box, press “Next”.
Figure 2.2: Screen Shot of New Hardware found
If you install multiple boards in your system, this dialog box will come up
multiple times. Always cancel them.
5. Click “yes” when the system will tell you that it is about to install
unsigned drivers. This dialog box will come up multiple times.
Always press “yes”.
Figure 2.3: Screen Shot of Digital Signature
6. Restart the computer
34
Configuration of the Breakout Box
VideumII BroadCaster Base Kit (only)
Configuring the Breakout Box
If you have a VideumII Broadcaster Base Kit, you have to configure your
Breakout Box. Winnov does not ship a video source/camera with the
purchase of a VideumII Broadcaster. Therefore, to continue with this
installation tutorial, you must have a S-Video or composite video
source and configure the provided VideumII Breakout Box. Figure 2.4
shows a sample Breakout Box.
Figure 2.4: Breakout Box
Look at the label on top of the breakout box to identify the
connectors.
With your video source handy, do the following to configure your
VideumII Breakout Box for use with your video source.
1. Connect the audio and video source.
Plug your camera into any of the BNC connectors on your
VideumII Breakout Box.
Make sure that your audio source is plugged into one of the audio
input connectors on your Breakout Box.
The VideumII Breakout Box is now connected. The VideumII
Breakout Box must be connected before the system is powered on
for it to be recognized by the system.
2. Run the “Video Source Configuration” Utilities.
The “Video Source Configuration” utilities will allow you to
configure your Breakout Box. Select Start | Programs | Winnov
Videum NT | Utilities | Video Source Configuration. Figure 2.5
appears.
35
Configuration of the Breakout Box
Figure 2.5: Video Source Configuration Interface
By default, the Breakout Box is set up for “4 Composite” video
inputs. If you are using S-Video sources and would like to connect
these to your Breakout Box, you must use this “Video Source
configuration” utility.
3. Configure the Breakout Box.
By default, the Breakout Box automatically detects board number
”0”.
Configure board number “0” by selecting the corresponding
configuration choice from the Video Source Configuration list.
4. Customize Video Source Names.
Enter the source name you want to assign to each video source
configuration into the corresponding text box. These names will
appear in the Videum Capture menu.
5. Select another board and repeat steps 2 and 3.
6. Click OK.
7. Reboot your system otherwise the settings will not be saved.
8. Check for Audio and Video Signals.
Once the Breakout Box is configured, start Videum Configure to
make sure that you have audio and video signals.
36
Future Updates
Videum Update Tool
Videum Update, as shown in Figure 2.6 is available from the setup
menu and from the task bar. It will allow you to keep your software upto-date at all times. Just open it and select “FTP Site”.
Winnov’s latest software updates can be found at:
http://www.winnov.de/support/software/index.htm
or
http://www.winnov.com/support/software/index.htm
Figure 2.6: Winnov Update Tool
37
Multiple capture cards in one system
The Winnov Videum hardware and software system enables you to
plug several Videum capture cards into your Windows 2000 and/or
Windows XP system.
1. Choose the device you want.
If you have inserted two Videum 4100/4400 capture cards in one
system, Videum Software won’t recognize the number of capture
cards you inserted in your system. Rather Videum Software
recognizes the number of devices you have. A device is an audio
and video data stream. Each device is assigned a unique number so
that you know which one you are using.
If you have installed two Videum 4400s, you will have 8 devices
numbered from 0 to 7.
If you have installed two Videum 10xxs or 4100s, you will have 2
devices numbered 0 and 1.
Because of operating sytem limitations, you cannot install more than two
Videum 4400 boards in one system. You may install up to nine Videum
4100 in one system.
2. To select the device you want:
Open Videum Capture by right clicking on the Winnov Eye located
in your system tray. Videum Capture allows you to select a device in
the Video Properties dialog box in the Device list box.
Or Open Videum Status by right clicking on the Winnov Eye located
on your system tray. Videum Status also allows you to directly select
the device you want.
3. Configure your devices.
Videum Configure is designed to help you configure the audio and
video properties of your devices.
4. Use multiple devices with other applications.
Most video applications, such as Windows Media Encoder and
Microsoft NetMeeting also allow the audio and video devices to be
selected. Refer to your application’s userguide for more information.
Some applications such as Adobe Premiere may not support more
than 1 card.
38
Videum Capture
Application
User’s Guide
39
Videum Capture
Videum Capture is a multimedia capture application. You can use it to
record audio, video, and capture still images, and then easily export
them to another document using drag-and-drop. Videum allows you
to add multimedia to web pages, word processing documents,
presentations, and so on.
Using the Videum Capture Window
To view and record audio, video, and still images: open the Videum
Capture application by right-clicking on Videum Eye or selecting
Start|Programs|WinnovVideumNT|Capture. All commands available are
listed on the next page:
Menus
Capture toolbar
Playback toolbar
Status bar
Figure 3.0: Videum Capture Application
40
Videum Capture Menus
Button Menu
File
Edit
SubMenu
Description
Open
Opens a capture file
Save As
Saves a captured clip to a file
Recent File
Lists the most recent files displayed
Exit
Exits the Capture program
Copy
Copies the current frame to the clipboard
View
Customizes your display to include some or
all of the menus, toolbars, and status bar
Preview
Selects the mode in which to preview a
video clip. You can select Freeze, Slow Speed,
Normal Speed, High Performance, or High
Performance and Stretch
(please choose the option which you think
works best for you)
Always on Top Keeps the Capture window as the top
window on your screen
Capture
Record Video
Records a video clip with audio
Record Audio
Records an audio clip
Still Image
Captures the image displayed when the
button or menu item is selected
Time Lapse
Playback
Video capture over a period of time with
programmable interval and duration
Stop Motion
Video capture one frame at a time to create
animations easily
Webcam
Capture a series of images
Properties
Sets video, audio, and still image properties
and selects the active board
Video Format Sets image characteristics such as image
size and compression ratio
Video Source Sets a variety of image options such as
brightness and contrast
Video Size
Selects a video size without having to
access another dialog box
Play
Plays the recorded audio or video clip
Stop/Freeze
Stops recording the audio or video clip and
stops the playback once it is started
Rewind
Rewinds the current audio or video clip to
the beginning
End
Goes directly to the end of the audio or
video clip
41
Video Capture Format
The Video Capture Format Settings as shown in Figure 3.1, allow you
to set the image size, the data format and the compression format.
1. Choose Video Format from the Capture menu or from the toolbar.
2. Set the image size.
By default, your camera will capture a video at 320x240 pixels. You
can either choose a image size in the menu or customize it.
Remember that your Videum 1000 allows you to capture at 640x360
for 16/9 (widescreen format) and 640x272 for 2.35/1 (widescreen
format).
For PAL, we propose the following image sizes:
192x176 (25% of the full image resolution)
256x192 (33.3%)
384x288 (50%)
768x576 (100%)
Please note that 352x288 (CIF) and 704x576 (4CIF) do no have a 4:3
aspect ratio and therefore distort the image.
3. Select the type of compression and performance.
Figure 3.1 : Video Capture Format Settings Interface
4. Use the compression slider to balance between the size of your
video file and the quality of the image.
42
Video Capture Format
Compression Type Description
RGB8
256 colors, in Windows format. A Videum card and Codec are
not needed to playback video in this format. These video
files can be very large.
RGBH
64k colors, in Windows format. A Videum card and Codec are
not needed to playback video in this format. These video
files can be very large.
RGBT
16.7M colors, in Windows format. A Videum card and Codec
are not needed to playback video in this format. These video
files can be very large.
WINX
Provides the highest compression (up to 1:48) but this
Videum Codec is also required for playback.
Only for playback on your own system.
WPY2
Provides compression but this Videum Codec is also
required for playback.
Only for playback on your own system.
WNV1
Provides good hardware compression (mostly used under
4:1) but this Videum Codec is also required for playback.
Only for playback on your own system. Install
WNV1View.exe on the other computer, to just install the
WNV1 codec on this system. This utility can be found on the
Videum software CD. This codec is not supported by the
Videum 4100/4400 cards.
YUY2
Uncompressed YUV 16-bits per pixel
YV12
Uncompressed YUV 12-bits per pixel
YVU9
Uncompressed YUV. Same as Intel Indeo® raw.
Be careful when you are using the YUY2 compression format. The
industrial standard is not clear. You can find two different definitions of
YUY2: one in which YUY2 is upside down and one in which YUY2 is right
side up. Thus YUY2 is not a recommended format for distributing AVI. files.
Use YV12 instead.
43
Video Capture Properties
Setting Capture Properties
To set video, audio, and still image capture properties, choose
‘Properties’ from the Videum Capture menu or select the “Capture
properties” icon from Videum Capture. The Capture Properties dialog
has three tabs: Video, Audio, and Still Image.
Set up the video
The Video tab, as shown in Figure 3.2, allows you to control properties
associated with video capture.
•
If you have only one Videum 10xx or 4100 card installed, only one
device will be available to you.
•
If you have the Videum 4400, four devices will be available to
you, numbered from 0 to 3. Each device represents an audio
and video stream that can be independently configured.
The following description of each device will be available in the
device drop down list.
(0) Videum Video Capture
(1) WnvVid32.dll 1: Videum AVX AV (PCI)
(2) WnvVid32.dll 2: Videum AVX AV (PCI)
(3) WnvVid32.dll 3: Videum AVX AV (PCI)
Figure 3.2: Video tab of the Capture Properties Interface
44
Video Capture Properties
Setting up the Video Properties
1. Select the device you want to configure .
2. Define the frame rate and whether or not you want to capture
audio along with your video.
3. Set a capture time limit. Thus, your movie files do not become too
large.
4. Specify the default file name for video captures, and give it an
initial size in megabytes. Pressing the Allocate button allocates
space for this file, which lets the Capture application capture more
efficiently.
Set up the audio
The Audio tab, as shown in Figure 3.3, allows you to set properties
relating to audio capture.
You can set a time limit and a default file name for audio-only captures.
The Videum application allows you to set the audio capture frequency
from 8 to 48 kHz, 8 or 16-bit, mono or stereo.
Figure 3.3: Video tab of the Capture Properties Interface
45
Still Image
Set-up a still image
The Still Image tab, as shown in Figure 3.4, allows you to set still image
characteristics.
Figure 3.4 : Still Image Tab of the Capture Properties Interface
1. Select the Image dimensions.
2. Define the Image orientation you want to have.
Still images can have two orientations: Landscape, which gives you
the standard image, which is wider than it is tall, and Portrait, which
is taller than it is wide. Portrait images will be rotated 90 degrees, so
you may want to re-orient your camera before taking a Portrait still.
3. Enable “delay” if you need and set-up the length of the delay.
Slow Scan Capture (for still objects):
With standard analog video cameras a frame consists of two halves,
the even and the odd field. These two fields are to be interleaved. To get
the maximum vertical resolution, the Videum board needs to digitize
both fields. Click this option to enable this feature.
The fields are then interleaved and multiple frames are averaged. This is
why it is reserved for still objects. Objects in motion would show jagged
vertical edges. When disabled, Videum only digitizes one field. This gives
the best results for moving objects.
Advice #1 for Videum 4400 only: We suggest you to open four instances
of Videum Capture at the same time. Thus you can have one device per
Videum Capture and be able to easily view and configure each device.
Advice #2 for Videum 4400 only: You can also use the four-video display
application sample or the QuadDVR application.
46
Capturing an Audio or a Video Clip
To record an audio, video, or still image clip, follow these steps:
1. To record a video clip, click the Record Video button.
Alternatively, you could choose Record Video from the Capture
menu. During the capture the elapsed time is displayed below the
image in the Videum Capture window.
2. To stop recording, click the Record Video button again.
3. An
icon is displayed on the upper left side of the Videum
Capture image, indicating that a clip is ready.
Before you can capture another clip, you must either save it, send it
(via email), place the existing clip into a document, or choose Delete
to delete this clip. You have the options of placing the clip into a
document, pressing the [Delete] key to delete the clip, clicking the
Save As button to save the clip or select the Send command from
the File Menu to send the clip by e-mail.
Figure 3.5: Record Icon Displayed
4. Save your file.
To save or send a file choose Save As or Send from the File menu. To
Save, you can also click the Save As button to display the Save As
dialog box. Name the captured file, specify the location where you
want to store the file, and then click the OK button (for Send, the
name corresponds to the name of the email attachment). The Save
As dialog box also allows you to save the file in any AVI format
available on your computer.
All video files are named with the .AVI extension (except for .ASF
files).
47
Capturing an Audio or a Video Clip
5. To record an audio clip, click the Record Audio button on the
Videum Capture window.
A clip icon is displayed on the left side of the Videum Capture image,
indicating that a clip is available for placement. You must add it to a
document, save it, or delete it before you can do another capture.
6. To capture a still image clip, click the Still Image Capture button
on the Videum Capture window.
A clip icon is displayed on the left side of the Videum Capture image,
indicating that a clip is available for placement. You must add it to a
document, save it, or delete it before you can do another capture.
Still images are normally saved as .BMP files. You can also use the
Save As button or menu item to save a still image as a .JPG (JPEG)
file.
48
Adding Clips to Documents
Once you have recorded an audio, video, or still image, you can paste it
into a clipboard-compliant file such as your e-mail, word processor,
spreadsheet, web page, or presentation tools. You can drag-and-drop
the clip icon to any application that supports drag-and-drop.
To add clips to documents, follow these steps:
1. Capture the clip according to the instructions in the previous
section.
Once the clip is captured, you can see the appropriate clip icon on
the Videum Capture window.
2. Open any other application that can accept audio, video, or still
images.
If the drag-and-drop feature is not supported by your application,
use the Paste feature in the Edit menu to insert the clip.
3. Drag the yellow clip icon from the Videum Capture window and
drop it on the document in which you want it placed.
This video clip was
captured with the
Videum camera at
352x288 pixels.
Note: for PAL video
please use 384x288
to avoid distortion
(see coin in the
picture)
Figure 3.6 : Yellow clip icon displayed on the
Videum Capture window after recording
49
Adding Clips to Documents
If you have transferred a video clip, a still image of the beginning of the
video is displayed in the document. You can play the clip by doubleclicking on the clip; use the playback toolbar to control the clip.
When you drag-and-drop an audio clip, an audio clip icon shown at the
left is displayed. When still images are inserted, they appear just as
they were snapped.
Example
For example, you can use audio and video clips to enhance
e-mail documents. Just open any clipboard-compliant application and drop the clip. Here is an example of what you can do:
Figure 3.7: Video clip inserted into an email
50
Time Lapse Video
Use the Time Lapse feature to take snapshots at regular intervals and
assemble them into a movie. Time lapse interface is shown in Figure
3.8.
Figure 3.8: Time Lapse Interface
To use the Time Lapse feature, follow these steps:
1. Choose Time Lapse from the Capture menu.
The Time Lapse dialog box is displayed.
2. Select how often you want to take snapshots and how long you
want this movie to record. Then click the Start button to start
recording a time lapse movie.
Once the movie is completed, a clip icon is available for inserting
into other documents.
Example
Take one frame every minute. If you have set the capture rate to 15 fps,
the final video will play at 15 fps. So, one hour (60 minutes = 60 frames)
will play in 4 seconds. 10 hours will play in 40 seconds.
With this technique you can capture very slow movements. At replay
time the sun will rise quickly or the flower will grow visibly.
51
Stop Motion for Animations
The Stop Motion feature allows you to take clips one frame at a time
and assemble them into a movie. This is useful for claymation
productions. The stop motion interface is shown in Figure 3.9.
Figure 3.9: Stop Motion Interface
To use the Stop Motion feature, follow these steps:
1. Choose Stop Motion from the Capture menu.
The Stop Motion dialog box is displayed.
2. Click the Frame button each time you want to record a frame.
3. Click the Done button when you are finished recording frames.
Once the movie is completed, a clip icon is available for inserting
into other documents.
Example
Create your own animations easily. Position an object in front of the
camera. Click the frame button once, to take one image. Move the
object slightly, and take the second image. If the capture rate (= replay
rate) is set to 15 fps, 30 frames captured create a 2 second video clip.
52
WebCam
The WebCam feature allows you to capture video images at regular
intervals and save them to one or more files or transfer them directly
to your website using the Internet File Transfer Protocol, FTP. You can
set the capture interval and transfer location according to your needs.
The Webcam Control Interface is shown in Figure 3.10.
Figure 3.10: Webcam Control Interface
To capture images for Web pages, follow these steps:
1. Select WebCam from the Capture menu.
The WebCam dialog box is displayed.
2. Use the Interval to set the time between captures.
Click the up and down arrows to set the minutes and seconds.
3. Use the Browse button or type the name of the file to which the
captures are to be saved.
4. Select the image type and quality.
53
WebCam
5. For more image saving options, click on the More button.
The Image Saving Options dialog box is displayed in Figure 3.11. You
can save each image to a new file and set the characters you want
appended to each file name specified in the previous dialog. You
can also automatically FTP each image to a server you specify. To
use FTP, you must specify the host name, the path from your login
directory to the directory where you want the image to be stored,
the FTP user name and password.
Figure 3.11: Save Images
6. Once all of the image saving options are specified,click the OK
button. Press the Start button to start capturing images at the
intervals specified or press the Take Now button to perform an image
capture. immediately.
For example: in order to avoid
unnecessary trips to an empty
coffee pot, the students pointed a
camera in the kitchen to see if
there is coffee left.
You can also start the webcam directly by the command line:
“wnvtool /wcam”.
A shortcut is available in the Winnov start menu.
54
Configure
The Videum Configure application allows you to set video, audio, and
power characteristics. After installation, you can run the configure
program or you can launch this program at any time from the Videum
menu to change your configuration.
The Videum Configure has four different tabs: Device Selection, Video
Inputs, Audio Inputs and Audio Output.
Select the Device
This tab allows you to select the device you want to configure.
1. Select which device you want to configure from the drop down
list, as shown in Figure 3.14.
If you are using a Videum 10xx or 4100, the device is numbered: 0.
If you are using a Videum 4400, four devices are available,
numbered from 0 to 3.
Figure 3.14: Device Selection Interface
2. General information.
This tab gives you some general information about your board.
Please refer to this tab when you are emailing Winnov’s technical
support.
55
Videum Configure
The Videum Configure application allows you to set video, audio,
and power characteristics. After installation, you can run the
configure program or you can launch this program at any time
from the Videum menu to change your configuration.
1. Select the default input
It selected when an application is started for the first time.
2. Select the default audio source to associate with that input
This feature is convenient for communication applications: audio
inputs switch automatically, when another video input is selected.
Figure 3.12: Videum Configure Applet for Videum 1000 Plus Family
Figure 3.13: Videum Configure Applet for VideumII Broadcaster Family
56
Videum Configure
Settings selected in Step #1 and 2 are applied to all the boards on your
system.
3. Click More to set the video parameters
This window as shown in Figure 3.14 allows you to modify the
settings such as brightness, contrast, saturation and hue.
Hue: this control is only used for NTSC cameras. For PAL it should
stay at the default setting of 50. Press the Default button, to reset
the value to 50. For NTSC cameras: set Hue to get the most realistic
color representation.
Select the video equipment you are using by checking “camera” or
“VCR”
Figure 3.14: More parameters interface
4. Click Advanced Options from the Video Inputs tab.
The dialog box in Figure 3.15 allows you to enable certain options
for a better video quality.
Figure 3.15: Advanced Options Interface
57
Videum Configure
Set-up the Audio Inputs
Figure 3.16 shows you the audio inputs interface for Videum 1000 Plus
family. Figure 3.17 shows you the audio inputs interface for VideumII
Broadcaster family.
Figure 3.16: Audio Inputs Interface for Videum 1000 Plus family
Figure 3.17: Audio Inputs Interface for the VideumII BroadCaster Family
1. For each audio inputs, adjust the input gain.
2. Click ‘auto’ if you prefer to have your system set them up for you.
58
Videum Configure
Set-up of the Audio Outputs
Adjust the audio out, Wave out and Wave in signals by moving the
slider controlling the volume, as shown in Figure 3.18 and 3.19. Check
the “mute” box if needed.
Figure 3.18: Audio Outputs Interface for Videum 1000 Plus Family
Figure 3.19: Audio Outputs Interface for Videum II Broadcaster Family
59
Videum Configure
Videum 4100/4400
These two cards feature four composite or two S-Video (optional)
inputs. Please assign one of the four inputs to become the default
input. Configure for PAL, if a PAL video source is connected.
Figure 3.20: Video inputs for the Videum 4100/4400
Set-up of the Audio Inputs
The Videum 4100/4400 features four stereo audio inputs. To take
advantage of these four audio inputs, you must connect the 4 channel
audio cable that comes with your Videum board. Figure 3.18 shows you
the audio inputs interface.
Figure 3.21: Audio inputs for the Videum 4100/4400
60
Videum Zoom
Videum Zoom
With the Videum Zoom as shown in Figure 4.0, you can control your
local camera on the Internet or on your corporate Intranet.
• Zoom, pan, tilt your video camera, either locally or remotely.
• Control brightness, contrast, saturation, hue of your Videum.
• Connect to another Winnov card using TCP/IP protocols.
• Switch to another camera, while you are conferencing.
Figure 4.0: Videum Zoom Applet
How to use Videum Zoom
1. Start the Videum Zoom application by right-clicking on the Eye in
the task bar or selecting “File | Start Videum Zoom” of your Videum
Capture.
2. Select the Video Source from the drop-down list.
3. Pan, tilt and zoom the video you selected.
4. Adjust the image properties of the video you selected. You can
modify the brightness, contrast, hue and saturation of the video.
61
Videum Zoom
How to control another camera remotely
In order to control another camera, you need a communication program
such as NetMeeting to see the remote video window.
1. Start the Videum Zoom application by right-clicking on the Eye or
selecting “File | Start Videum Zoom” of your Videum Capture.
2. Under “Connect”, enter the IP address of the system your are
conferencing with. The IP address 123.123.123.123 was entered.
3. Click “Connect”. Now you can control all video windows of the
remote system zooming, or changing the settings of the remote
camera. You can notice that “Window” become “conf” (conference
call) instead of “WnvTool”.
This procedure is even easier if you are already in a video conferencing
call with your peer. To remotely control his camera, you just need to
click on the ”Autoconnect” button which will detect the IP address of
his system.
Winnov Videum Zoom is an ActiveX that you easily integrate into a
webpage. For more information, please refer to the Winnov Software
Development Kit.
62
Videum Insignia
The Videum Insignia application, as shown in Figure 5.1 allows you to
add an existing insignia to your video window or to create a new
insignia for display on your video window. An insignia could be text or
graphic. You can create an insignia of your company logo and display it
in black and white in any corner of the video window. This is a great
tool to help you differentiate the different cameras you have.
The insignia is pasted into any local video window at the fixed size
specified.
Figure 5.1: Videum Insignia Applet
Add text or graphic on your video:
1. Close all your video applications
2. Start Videum Insignia
3. Select an existing insignia from the list
or Click the Create New button
or Select an existing insignia and click the Edit button
4. Define where you want to add the text or graphic.
63
Videum Insignia
Once an insignia is selected, the preview window will display the
insignia. Close Videum Capture and start it again to see the insignia
you just added on your video(s).
Create a new insignia or edit an existing insignia:
1. Click on the button “Create New”. The new interface will appear as
shown in Figure 5.2.
2. Select a name and dimensions for the insignia.
3. Use the drawing tools to create or edit the insignia.
4. Click Save to save it.
Figure 5.2: Videum Insignia Applet
64
Videum Insignia
System Time Overlay
Enable “System Time Overlay” if you want to add date and time in
minutes and seconds on each frame you will record. This is particularly
useful for video surveillance applications.
When you enable “System Time Overlay”, it will not be previewed on
the little preview window. To actually see the time overlay, you must
close and start again the Videum Capture applet.
Figure 5.3 shows you how it will look like on your video(s).
Figure 5.3: System Time Overlay
65
Videum Mixer
Videum Mixer allows you to adjust the audio signal that you connected
to your Videum board.
1. Start Videum Mixer by right-clicking on Videum Eye or selecting
Start|Programs|Winnov Videum NT/ Videum Audio Mixer. The
interface as shown in Figure 5.4 will pop up.
Figure 5.4: Videum Mixer Applet
2. Click on the Volume icon if you want to mute the four audio
sources if you have a Videum 4400 or on the only audio
source if you have Videum 4100.
3. Select one audio source represented by a dice icon. Make
sure you did not mute all the audio sources.
• Dice one represents the audio channel 1, labeled
“ch 1” on the four-channel audio cable provided
with your Videum board.
• Dice two represents the audio channel 2, labeled
“ch2” on the four-channel audio cable.
• And so on for dice three and dice four.
If you have Videum 4100, only one dice will be activated even though the
four dices show up.
4. Adjust the volume for each of audio source using the slider on
the left of the dices.
5. Click on the arrow icon for further options. The interface will
be expanded, as shown in Figure 5.5.
Figure 5.5: Videum Mixer Applet Expanded
6. Mute or unmute the wave out audio signal.
7. Mute or unmute the monitor audio inputs.
66
Videum 4400 Audio Mixer
Videum 4400 Audio Mixer allows you to independently adjust all four
audio channels of your Videum board in one interface. It shows the
absolute db levels.
1. Start Videum 4400 Audio Mixer selecting Start|Programs|Winnov
Videum NT/ Videum 4400 Audio Mixer. The interface as shown in
Figure 5.6 will pop up.
Figure 5.6: Videum 4400 Audio Mixer
Spkr: Speaker. It controls the level of the overall output of the audio
codec. It is a summed ouput of the four audio inputs channels.
Mon: Monitor. It is the output of the currently selected input used for
monitoring the audio signal.
Out: Wave out. Enabling ‘on’ will turn it on. Disabling ‘on’ will mute.
In:
Audio input. It is the actual recording level.
2. Adjust the ‘speaker’ level, ‘monitor’ level and ‘Wav out’ level using,
for each of them, the left and right sliders. The number below each
sliders indicates the number of absolute db for the left channel. The
minus sign means ‘attenuation’.
3. Check the ‘on’ box of the audio signal output you want to select
and adjust the volume. The volume is indicated in absolute db at
the bottom of each slider. The ‘+’ sign means ‘amplification’.
The stereo bar graph shows you the range of db (absolute value).
4. Repeat the steps 2 and 3 for each audio device.
67
Videum Source Switch
Videum Source Switch is the latest applet released by Winnov. This
applet enables you to automatically switch between video sources,
locally and remotely. You only need to set up the sequence and the
timeframe and hit “Start Cycle” !
1. Open Videum Capture Applet by right-clicking on Videum Eye or
selecting Start|Programs|Videum|Capture.
2. Open Videum Source Switch Applet by right-clicking on Videum Eye
or selecting Start|Programs|Videum|Source switch.
Figure 6.3: Videum Source SwitchApplet
3. Set up the following parameters:
Sequence: number between 1 and 3
Time intervals measured in seconds
4. Click “Start Cycle”.
By looking at the Videum Capture Applet, you will see the video
automatically switches. The name of “Video Source “ drop-down
menu will also switch as the video switches.
How to switch remotely
You can remotely switch the video sources of another computer from
your computer.
1. Enter the IP address of the second computer under “Connect”
2. Set up the sequence and the duration.
3. Click “Start Cycle”
You will not be able to check the actual video switching of the
second computer from your Videum Capture.
68
Winnov Watchdog
Winnov Watchdog is a crash-recovery function that automatically
reboots the system in the event of a software lock-up. This allows for
complete unattended operation, 24x7x365. Watchdog feature is
particularly useful for systems that are operated in a remote location
and in mission critical applications.
Watchdog program allows you to set the counter for the Watchdog,
that is to specify the time that the Watchdog should wait before
resetting the system after a system hang is detected.To take
advantage of this feature:
1. Make sure you have connected the Watchdog reset cable to the
Watchdog connector located on the Videum board. For more
information.
2. Right click on the dog icon located on your system tray.
Upon first installation of the drivers, a little dog icon representing
the Watchdog program will be located at your system tray on the
bottom right of your screen. By default the Watchdog program is
disabled, you need to enable it first.
3. Select “Configure Watchdog” and type in the time in seconds as
shown in Figure 7.0. In case a system hang is detected, your Videum
board will count down the number of seconds you set-up and will
reboot the system.
Figure 7.0: Configure Winnov Watchdog
4. Click OK
If you click on ‘Cancel’ button, the counter will retain the last value it
was set to.
69
Winnov Watchdog
5. Right click on the Watchdog icon and
select “Enable Watchdog”. Wathdog
function is now enabled. The expression
“Enable Watchog” will be replaced by
“Disable Watchdog”.
Figure 7.1: Disable Watchdog
6. Check the status of the Watchdog by selecting “Status” from the
Watchdog menu. “Status” provides information about your
Watchdog application.
Unknown (No information is available)
• Watchdog hardware is not present on this board
• Watchdog feature is disabled on this board
• Watchdog is not enabled
• Watchdog is enabled and running
It also tells you the history of your system boot
• System boot was not caused by Watchdog
• Watchdog was triggered, but did not reset the system
because the cable was not connected
• Watchdog was triggered, and reset the system
because the cable was connected
Figure 7.2 : Watchdog Status
70
Winnov Watchdog
Watchdog Information
Note that the Wachdog Status interface also provides you with
some information on the reasons why the system had to reboot.
How to access the failure log:
1. Open Windows Explorer and follow this path:
C:/my documents/ program files/ Winnov Videum NT
2. Locate the file named “WatchDog.log” in the Winnov Videum NT
folder. This notepad file automatically keeps track of all the failures.
Figure 7.3 shows you a sample of the log.
Figure7.3: Sample of Watchdog log
Special developers: Winnov Watchdog interface is available as an OCX,
enabling you to develop your own applications.
7. Test Watchdog
If you want to test Winnov Watchdog to see whether or not it works
on your system, right click on the Dog icon and click on “Test
Watchdog”. Then click ‘Yes’.
Please save all unsaved data before performing this action, as it will
be lost after the reset.
Also make sure the Watchdog reset cable is connected between the
Winnov capture card and the reset pins on your system
motherboard.
For more information on how to connect your Watchdog reset cable, refer
to the hardware section of this manual.
71
Digital Inputs/Outputs
Your Videum 4100/ 4400 features 8 digital input/output triggers that
can be used for event signaling. The 8 digital input/output interface on
the Videum 4100/4400 is controlled through Winnov’s ActiveX
software. Each Input/Output can be individually used as input or
ouput.
Please refer to page 6 to physically locate the eight digital I/Os on your
board.
Videum 4100/4400 driver supports interrupt driven status reporting of
the digital input/output ports. The inputs are 5 V tolerant even when
operated in 3.3 V mode. However, the logic threshold is lower in 3.3 Volt
mode.
Technical Specifications:
5V operation:
Input Voltage for High State:
Input Voltage for Low State:
Minimum Output Voltage (H):
Maximum Output Voltage (L):
Min. 2V, Max 5.5V
Max. 0,8V Min: -0,5V
4V (max. -10mA):
0,7V (max. 24mA)
3.3V operation:
Input Voltage for High State: Min. 2V, Max 5.5V
Input Voltage for Low State:
Max. 0,8V Min: -0,5V
Minimum Output Voltage (H): 2.5V (max. -10mA)
Maximum Output Voltage (L): 0,7V (max. 24mA)
The voltage mode of this interface is selected via J24.
72
Digital Inputs/Outputs
Electrical schematic of the digital inputs and outputs
8 Bit TTL I/O (J6)
Refer to Figure 8.0 in order to identify each digital input/output.
Figure 8.0: 8 bit TTL I/O
Pin 1 is on the top left side.
Via J24 the output level on this connector can be switched between 3,3
and 5 Volts.
8 Bit TTL I/O Voltage Level (J24)
Refer to Figure 8.1 in order to identify the voltage level.
Figure 8.1: 8 bit TTL I/O voltage level
Connect 3&2 for 5V operation, 1&2 for 3.3 V operation.
Pin 1 is on the bottom (white dot on the board).
73
Digital Inputs/Outputs
Configuring the digital inputs and outputs
1. Select the Videum Digital I/O Control Panel by selecting
Start|Programs|Winnov VideumNT|Utilities/Videum Digital I/O
Control Panel
Figure 8.2: Digital I/Os control panel
2. Set each line as an input or output.
If you selected the line as an output, set the state of the output:
Open means 1. Close means 0.
If you selected the line as an input, do the following:
3. Enable or disable the Event
Checked: an event will be raised when the line state changes.
Unchecked: no event will be raised even if the line state changes
If the Event Enable is checked, set on which transition you
want to raise the event
NC means Normally Closed and represents a transition from
1->0. Since you are dealing with a Normally Closed contact (NC),
the action is happening when a contact opens.
NO means Normally Open and represents transition
from 0->1. Since you are dealing with a Normally Opened contact
(NO), the action is happening when a contact closes.
4. If the Event Enable is checked and you set up the transition,
define the action you want to fire when there is a change.
This dropdown box contains a list of actions programmed by the
user in the advanced dialog box.
An action will be fired when the four following conditions are met:
74
Digital Inputs/Outputs
1. Line is set as Input
2. Event Enable is checked
3. An action is selected from the dropdown box
4. An event is fired
5. To create an action:
An action is a script, executable or patch files.
1. Click on the “Advanced” button. An interface shown in
Figure 8.3 will pop-up.
2. Type in the name of the action and the action.
3. Click on “Add action”
4. Click OK
You have successfully created an action that you can now
select from the “action on change” drop-down list.
Figure 8.3: Defining new actions
3. Click the Save Button
This button saves the current configuration to the registry. So upon
start of the program, the saved settings will be loaded.
4. Click the OK Button
This button dismisses the application, but the current configuration
will not be saved if the Save Button is not pressed first.
75
Remote Control Server
Remote Control Server
The Remote Control Server runs in the background and allows your
peers to pan, tilt and zoom your camera when video-conferencing. In
order for your camera to be remotely controllable from another
system, you need to have the Remote Control Server(NetListen)
running and enabled.
1. Select Start | Programs | Winnov Videum Application | Utilities |
Net Listen. And click on Net Listen. A little grey remote control
shows up in the right part of your tray.
Figure 6.1: Remote Control Server icon
2. Click- Right on the little remote control as shown in Figure 6.1.
Figure 6.2 will show up.
3. Select “Configure Server”.
4. Check the “Auto start Server at login time”. This guarantees the
Remote Control Server starts every time you log-in.
5. Make sure that you haven’t checked “Server Disabled”. If checked,
your camera will not be remotely controllable.
Figure 6.2: Videum Remote Control Server Applet
76
Applications
Video Conferencing
Use the Internet to see your friends or relatives
worldwide. Just install Microsoft NetMeeting
from the Videum Software CD-ROM or any
other video conferencing application of your
choice.
• Connect to the Internet via a fast modem or
ISDN.
• Select an Internet Service Provider, who
offers a good quality of service (stable
bandwidth) for audio without dropouts.
• Use a headset to eliminate echo.
• Use a full duplex sound card, so that you can
speak and listen.
• Set the Video Quality control in Tools |
Options.. | Video to find the best
compromise in frame rate andsharpness.
Figure 6.3: Netmeeting
Interface
Video Email
Use the Send feature to directly send your video from the Videum
Capture applet.
• Capture your video in an appropriate format (you do not want
the file to be too big)
If you use .ASF for email format, we recommend the following
properties for your video :
- 6 to 10 fps
- 8000 Hz mono sound
• Select the Send feature in the File Menu. The video will be
compressed in the selected format. .ASF format for email is the
default format.
• As soon as the compressed file is ready, a New Email window will
appear from your email application with the compressed Video
attached. Just enter your recipient’s address, the text you want to
add.
• Click Send.
This feature is available if your email application is Windows
messaging compatible. If not, save your video and send it attached.
77
Rich Media Presentation Manager
Auvidea RMPM
Extremely easy to use content creation tool for rich media
presentations: live and on-demand
• Synchronized flipping of powerpoint slides
• Switch between multiple video sources
• Import and convert powerpoint slides automatically
• Supports Windows Media and Real Media technologies
plus:
Live:
• Poll: send a question your to your audience and gather and
summerize the results instantaneously
On-Demand:
• Live creation of table of contents
• Content management system for on-demand presentations
Figure 6.4: Rich Media Presentation Manager
Complete system solution:
• Rich Media Presentation Manager with control of motor cameras
• Webserver and database
• Streaming media server
78
Surveillance
Quad DVR
4 Channel Digital Video Recorder based on Microsoft streaming
technologies. Full details at www.winnov.de. As a key difference to
other surveillance systems, this system use streaming technology.
Apart from easy distribution of video across the Intranet and Internet,
it has the following advantages:
1. Audio
2. 25 fps/channel
3. Space and
bandwidth
savings
(only 300k for 25 fps)
Figure 6.5: Quad Digital Video Recorder
Face recognition
Let the computer recognize your face, to gain access to your PC, and
restrict the access of other users. Please find sample applications on
the CD-ROM or check www.visionics.com and www.miros.com.
Motion detection
Set up the camera and a motion detection application such as Gotcha
(www.prescientsys.com), to protect your office, or your home. Specify
hot areas. Gotcha activates capturing as soon as motion is detected in
those areas defined. Video clips are stored on hard disk, which
document any intrusion. Gotcha!MultiCam is particularly useful with
Videum 4400.
79
Software Development Kit (SDK)
A powerful Software Development Kit (SDK) comes with any member
of the Videum product line. Winnov’s SDK is a set of ActiveX tools that
allow you to easily develop multimedia applications.
Specifications of Winnov’s SDK
Development platforms: HTML and web scripting, Visual C++,
Visual Basic
ActiveX Components:
Video and audio capture and preview
Remote control for video source selection
Audio monitoring
How to install Winnov’s SDK
In order to install the Winnov’s SDK help file, you need to select the
“custom installation” during the setup of your Videum Sofware
Application (as shown in Figure 7.0) and make sure that you have
selected the “ Videum Help file’” and “OCX”.
Figure 7.0: screen shot of customized installation
Help files
We include several help files that will greatly help you when developing
your own applications. The help files are located in the Winnov Videum
NT folder. They provide help on several Winnov’s ActiveX and OCX.
Figure 7.1 is a screen shot of the help files available to you.
80
Software Development Kit (SDK)
Figure 7.1: List of Help files available
E.Samples
Here are several sample programs developed with Winnov’s SDK:
Web based four-display video
Web based digital inputs
Web based automatic source switch
Web based automatic pan, tilt and zoom
Go to
http://www.winnov.com/products/capture/videum4400_quad.com
to open the Web-based four-video display sample.
Support
Support for ActiveX Controls and any programmatic features or issues
will be provided only through the Winnov Newsgroups. Please visit our
website for more information:
http://www.winnov.de/developers/index.htm
81
Software Development Kit
Four-Video Display Application Sample
The Four-Video Display Application sample is a sample of what you can
easily develop using Winnov’s Software Development Kit. This application was created in a matter of hours using Microsoft Frontpage and
Winnov’s ActiveX components. We advice you to take advantage of
this application as it is specifically designed for Videum 4400 capture
card.
Here is a description of the features available on the four-video display
sample.
How to use the Four-Video Display Application Sample
1. Start the Four-Video Display Application by opening your internet
browser and typing in:
http://www.winnov.com/products/capture/videum4400_demo/
v4000demo.htm
Figure 11.2 will appear in your internet browser.
Figure 11.2: Four-Video Display Application Sample
The Four-Video Display Application Sample only works with the Videum
4400 capture card. Please make sure you have installed such a board in
your system.
On the right side of the sample application, four independent videos
coming from the four video inputs are displayed
1. Start and stop each video by clicking on the button “start video
capture”.
2. Take still images by clicking on the button “capture still”.
82
Software Development Kit
How to use the Four-Video Display Application Sample
1. Select the video you wish to control from the drop down list
available under “video source”.
2. Once the video is selected, modify the images properties as
desired: brightness, contrast, hue and saturation.
3. Pan, tilt and zoom the video you selected to define the right area
you want to capture.
4. Start capturing a video by clicking on the button“start video
capture”
5. Stop capturing the video by clicking on the button“stop video
capture”
6. Play back the video by clicking on the “play” button located on the
bottom left side of the sample application.
You will notice that this left side is actually the Winnov’s Videum Zoom
applet included in the webpage. Videum Zoom is an ActiveX component
that can be easily integrated to a webpage.
Figure 11.3 is an example of the four running video displayed on the
same web-based interface. As a web-based interface, you can access
and control each video from anywhere at anytime.
Figure 11.3: Capturing 4 video cameras
83
Troubleshooting
No video image
If you have no video display (a black video window):
• Select the right video input. Use Configure to see all three video
inputs. Make sure PAL is selected (for Europe).
• No video in NetMeeting: you installed NetMeeting before installing
the Videum software. Uninstall NetMeeting, delete the NetMeeting
directory, reboot, and reinstall NetMeeting.
Scrambled video
If your video display is scrambled or the Video Control Panel shows
video but not your application:
• Verify the NTSC/PAL setting (in Europe: select PAL)
• Verify that the video format is compatible with your application.
• Try uncompressed capture (YUY2 or RGBT)
Speckled or grainy video
Your display is set to 256 colors or less. Set it to 16-bit or better 24-bit
color.
No audio
Multiple sound cards are supported in parallel. The Videum AV and the
VideumCam AV integrate an audio in and out device, a second sound
card in addition to the sound card, which may already be installed.
• Use the Multimedia control panel to select the sound device for
recording and playback.
• Open Audio Panel from the Videum menu to select the audio input
and output of the Videum board. Make sure the audio output is not
muted.
Black bars around video in MS NetMeeting
MS Netmeeting may show black bars around the video (in the “large”
mode). Please make the following change to the registry:
[HKEY_LOCAL_MACHINE\Software\Microsoft\Conferencing\CaptureDevices\
”driver name”]
„dwImageSize“ = 40,04,00,02 (hex)
84
Troubleshooting
Audio recording issues
Verify that the audio input cable is connected securely to the
•Troubleshooting
•
Videum board. A mono audio source is only heard from the left
speaker.
If you have another sound card please use the Multimedia control to
select the recording device.
No full-duplex sound
Many standard sound cards do not support full-duplex operation
(especially under Windows NT). Videum supports full-duplex audio
under all conditions.
• Select Videum as audio recording device.
• Select either Videum or your existing sound card as audio playback
device.
Echo during video conferencing
You hear yourself talking with a delay of about a second. The person
you are calling uses a loudspeaker. Your voice is then picked up by the
microphone and transmitted back to you. Please ask the person you
are calling to use a headset or a loudspeaker/microphone combination
with echo cancellation. Please use a headset yourself, too.
You need help?
If you have not found any help on the previous pages, please have a
look at the ReadMe file on the floppy disk or CD-ROM. Also, please have
a look at our support web pages on the Internet. Or visit our
newsgroups.
You can reach our technical support at http://www.winnov.de or
http://support.winnov.com or by e-mailing [email protected].
85
Technical Specifications
Winnov Video Camera (analog)
Part Number
Active Pixels:
White balance:
Microphone:
Lens:
Distance:
Dimensions:
Weight:
Power:
NTSC
XC77B/495
PAL
XC77B/490 or XC77B/320 with Winnov cable
512 (H) x 582 (V), 1/4“ CCD, 300000 pixels
automatic and manual
integrated
3.8mm, f2.0 (< 10 lux)
2mm to infinite
77x84x62 mm (WxLxH)
234 gr. incl. 2 m cable
5 V, < 2.5 Watts
Audio Connector Specifications
Connector
Characteristics
Line/Mic In
3.5 mm stereo mini-jack for dynamic or electret bias microphone
Aux In
3.5 mm stereo mini-jack with 1 Vp-p and 10 k Ω input impedance
CD Audio In
5-pin connector with stereo line level inputs
Pin 1,3,5
Ground
Pin 2
Left audio
Pin 4
Right audio
Audio Out
3.5 mm stereo mini-jack, 4 Watt RMS per channel to 4 Watt speakers (8 or
16 Ω only)
Video Connector Specifications
Connector
Characteristics
Composite
RCA jack with 1 Vp-p and 75 Ω input impedance
MXC
8-pin Mini-DIN (audio, video and power)
pinout in the table below
S-Video
4-pin mini-DIN with 75 Ω input impedance
2 video signals: luminance and chrominance
no audio (connect audio to Line/Mic or Aux In)
MXC Connector Pinout
Pin
Assignment
1
I2C SCL (control/data bus)
2
I2C SDA (control/data bus)
3
Ground
4
+5V DC at 500mA (unregulated from PC motherboard)
5
Ground
6
Line level audio (from camera microphone)
7
+5V DC at 500mA (regulated from Videum card)
8
Composite video (from camera)
86
Technical Specifications
Videum 1000 Plus , 1000 VO Plus and 1010 Plus
Video Capture
Video
NTSC or PAL
Composite, S-Video and MXC (connector for Winnov
Color Camera)
(For Videum 1010 Plus, Composite and S-video inputs
are available with a provided adapter cable)
Capture Formats
YUY2 YUV 4:2:2 (for streaming)
YV12
YUV 4:2:0 (for streaming)
YVU9 4:2:0 (Intel Indeo® Raw)
RGB8 8-bit RGB (256 colors)
RGBH 16-bit RGB (32K colors)
RGBT 24-bit RGB (16.8M colors)
WINX Interframe Compression, 16:1 to 48:1
WNV1 Hardware Compression, 1:1 to 12:1
Image Size
Square pixel resolution
32x24 to 640x480 (NTSC)
32x24 to 704x576 (PAL)
Performance
640x480 30 fps uncompressed (NTSC)
704x576 25 fps uncompressed (PAL)
Capture Modes
High-speed, time lapse, stop motion, webcam
File Format
AVI and ASF
Still Image
32x24; 640x480 (NTSC); 704x576 (PAL)
Format
BMP, JPEG
Webcam
Applet included
24-bit color, 16-bit color, 8-bit color or grey scale
Audio (not available on Videum 1000 Plus VO)
Capture format
8-bit or 16-bit mono or stereo
Sampling Rates
Up to 48 Khz
Full duplex audio for internet telephony
File format
WAV
Audio Outputs
Headset or active speaker output - no integrated amplifier
for passive speakers
Audio Inputs
Stereo Line/Mic In, Stereo Aux In, Mono Camera
Mic In (on MXC camera)
Voltage
3.3V or 5 V supply voltage
Dimensions
Universal capture cards for 32-bit and 64-bit slots
Videum 1000 (AV or VO)-Plus PCI: 4.75” (L) x 3.81” (H),
Videum 1010-Plus low profile PCI: 4.81” (L) x 2.625” (H)
87
Technical Specifications
VideumII Broadcaster Specification
Base Kit:
The VideumII Broadcaster Base kit contains:
- One VideumII Broadcaster Capture Card to capture audio and video.
- One VideumII Broadcaster Breakout Box to connect professional
audio and video devices.
- Two small mounting screws to mount the VideumII Broadcaster
Breakeout box onto the Breakeout Box mounting bracket.
- Four self-sticking Front Panel Labels with legend.
- Three blank self-sticking Front Panel Labels.
- One A/V-Media Cable to connect one VideumII Broadcaster Capture.
Card to one VideumII Broadcaster Breakeout Box.
- One Winnov Videum Software CD to install the drivers and capture
software for the Videum II Broadcaster.
Lite Kit:
The VideumII Broadcaster Light kit contains:
- One Videum II Broadcaster Capture Card to capture audio and video.
- One Videum II Broadcaster Breakout Cable.
- One Winnov Videum Software CD to install the drivers and capture
software for the Videum II Broadcaster.
88
Technical Specifications
VideumII Broadcaster Capture Card
Video Standards:
NTSC or PAL (switchable in software)
Capture formats:
YV12
YUV 4:2:0
YUY2
YUV 4:2:2
WNV1
RGHB 16-RGB rgb (32 colors)
RGHT 24-RGB rgb (16.8 million colors)
Image size:
32x24 to 640x480 NTSC or
32x24 to 768x576 PAL
640x360 for 16/9 widescreen format
640x272 for 2.35:1 widescreen format
Performance:
640x480 30 fps uncompressed (NTSC)
768x576 25 fps uncompressed (PAL)
Audio:
Selectable input level:-10dB and +4dB
Sampling Rates:
11kHz, 22kHz and 44kHz (multimedia)
8-bit and 16-bit mono or stereo
8kHz, 16kHz, 32kHz and 48kHz (communications)
full-duplex at all sampling rates
DVI Connector:
Video In 1 and Video In 2
Video In 3 and Video In 4
Audio in 1 and Audio In 2 (balanced stereo)
Audio Out (balanced stereo)
I2C control/data bus
Dimensions:
190mm x 108mm x 20mm
Weight:
0.084kg
89
Technical Specifications
VideumII Broadcaster Breakout Box:
DVI Connector:
Video In 1, 2, 3 and 4
Audio in 1 and Audio In 2 (balanced stereo)
Audio Out (balanced stereo)
I2C control/data bus
Vid1/Y and Vid2/C:
Two BNC connectors:
Composite Video In 1 (Vid1) and
Composite Video In 2 (Vid2) or
Luminance (Y) signal of S-video and
Chrominance (C) signal of S-video
Vid3/C and Vid4/Y:
Two BNC connectors on back of box:
Composite Video In 3 (Vid3) and
Composite Video In 4 (Vid4) or
Audio In 1:
Two 1/4" (6.3mm) TRS-phone jacks:
Left and right Audio In 1(balanced stereo)
Audio In 2:
Two combination XLR-phone jacks:
(female 3-pin XLR jack and 1/4" {6.3mm} TRS-phone jack)
Left and right Audio In 1(balanced stereo)
Audio Out:
Two 1/4" (6.3mm) TRS-phone jacks:
Left and right Audio Out (balanced stereo)
Dimensions:
1080mm x 95mm x 38mm
Weight:
0.175kg
A/V Media Cable:
Length:
6 ft (1.8m) / 29-pin DVI connector
Internal signals:
Video In 1, 2, 3, and 4
Audio in 1 and Audio In 2 (balanced stereo)
Audio Out (balanced stereo)
I2C control/data bus
Weight:
0.250kg
Bracket for 19" rack mounting:
Overall width:
19" with mounting ears
Height/Weight
1.75" (45mm) (1RU) / 0.500kg
90
Specification of Videum 4100
Hardware and Driver
Multiboard capable:
Yes, no interrupt or DMA conflicts
SMP capable:
Yes, optimized for multi-processor systems
Video
Video Sources:
4
Video Capture channel:
1 channel
Video Connections:
4 composite (75 Ohm)
Connector Type:
BNC
Video Standard:
NTSC or PAL
Capture Formats:
Motion JPEG compressed video
Uncompressed Video (YUV4:2:2, YUV4:2:0, or RGB)
Image Size:
Programmable per channel
32x24 to 640x480 (NTSC)
32x24 to 768x576 (PAL)
Digital Zoom:
Up to 4:1
Remotely controllable via IP
Image Properties:
Brightness, Contrast, Hue, Saturation
Remotely controllable via IP
Video Capture Performance: Up to 640x480 at 30fps (NTSC) per channel
Up to 768x576 at 25fps (PAL) per channel
Digital I/Os:
8 port TTL I/O with interrupt/event signaling
Display:
Full screen with direct draw capable graphic card
Text and Graphics Overlay:
Yes, programmable per channel
Date and Time Overlay:
Yes, selectable per channel
Watchdog Function:
Yes, programmable with automatic failure log
Audio
Audio Sources:
4 stereo inputs (-10dBu)
Audio Capture Channel:
Audio Connections:
Audio Output:
1 channel
4 stereo 1/4” mini jack via breakout cable
1on-board stereo audio line/ headphone output
Audio Formats:
Synchronization
Up to 48Khz 16-bit stereo
4 fully-synchronized audio and video channels
System Requirements
Operating System:
Voltage:
Windows NT 4.0, 2000 and XP
It is a 32Bit/33MHz PCI “Universal” (3.3 & 5V) card
Can be plugged in both 32 and 64 Bit PCI slots
Board Dimensions:
15.87 cm (L) x 9.525 cm (H)
91
Specification of Videum 4400
Hardware and Driver
Multiboard capable:
Yes, no interrupt or DMA conflicts
SMP capable:
Yes, optimized for multi-processor systems
Video
Video Sources:
4
Video Capture channels:
4 independent channels, aggregate 200 fps (PAL)
Video Connections:
4 composite (75 Ohm)
Connector Type:
BNC
Video Standard:
NTSC or PAL
Capture Formats:
Motion JPEG Compressed Video
Uncompressed Video (YUV4:2:2, YUV4:2:0, or RGB)
Image Size:
Programmable per channel
32x24 to 640x480 (NTSC)
32x24 to 768x576 (PAL)
Digital Zoom:
Up to 4:1
Remotely controllable via IP
Image Properties:
Brightness, Contrast, Hue, Saturation
Remotely controllable via IP
Video Capture Performance: Up to 640x480 at 30fps (NTSC) per channel
Up to 704x576 at 25fps (PAL) per channel
Digital I/Os:
8 port TTL I/O with interrupt/event signaling
Display:
Full screen with direct draw capable graphic card
Text and Graphics Overlay:
Yes, programmable per channel
Date and Time Overlay:
Yes, selectable per channel
Watchdog Function:
Yes, programmable with automatic failure log
Audio
Audio Sources:
4 stereo (-10dBu)
Audio Capture Channels:
Audio Connections:
Audio Output:
4 independent channels
4 stereo 1/4” mini jack via breakout cable
1on-board stereo audio line/ headphone output
Audio Formats:
Synchronization
Up to 48Khz 16-bit stereo
4 fully-synchronized audio and video channels
System Requirements
Operating System:
Voltage:
Windows NT 4.0, 2000 and XP
It is a 32Bit/33MHz PCI “Universal” (3.3 & 5V) card
Can be plugged in both 32 and 64 Bit PCI slots
Board Dimensions:
15.87 cm (L) x 9.525 cm (H)
92
Specification of Videum 4100/ 4400
Video Acquisition
Support for 4 x composite or 2 x S-Video inputs.
• 9 Bit analog-to-digital converter with two-fold ITU-656 oversampling (27MHz)
provide the most acurate professional quality image sampling available in
the market
• Digital PLL for synchronization and clock generation from all standards and
non standard video sources e.g. consumer grade VTR
• Enhanced horizontal and vertical sync detection
• Increased luminance and chrominance bandwidth for all PAL and NTSC
standards
Video Scaler
• Horizontal and vertical down scaling and up scaling to randomly sized
windows
• Horizontal and vertical scaling range: variable zoom to 1/64 (icon)
• Vertical scaling with linear phase interpolation and accumulating filter for
anti-aliasing (6 bit phase accuracy)
Audio Codec
Digitization:
20 Bit ADC, 20 Bit DAC
Audio sample rates:
48kHz, 44.1kHz, 32kHz, 22.05kHz, 16kHz,
11.025kHz and 8kHz
other rates supported by software.
Input impedance:
50kOhm
High performance Sigma Delta technology
Line full scale input voltage: 1Vrms
Frequency response:
20-20.000kHz
Crosstalk:
better than 70dB
Total harmonic distortion:
better than 74dB
Digital Input/Output
Output specification:
Open collector output
24mA max. at 5V
19mA max. at 3.3V
Input specification:
Input selectable 5V or 3,3 V
TTL compatible
5 Volt tolerant in 3,3 V mode
Maximum Voltage on pins at any time 5.5V
93
Glossary
Compress
Reducing the size of a file by eliminating irrelevant information and trying at
the same time to keep the same image impression.
Contrast
The tonal difference between light, midtone, and dark areas of an image.
Digital video (DV)
Refers to the capturing, manipulation and storage of video in digital formats. A
digital video (DV) camcorder, for example, is a video camera that captures and
stores images on a digital medium.
Distortion
Corruption of a signal caused by time delay, noise.
DSL
Refers collectively to all types of digital subscriber lines, the two main
categories being ADSL and SDSL.
Encoding
A method of compressing audio and video to turn it from analog to a digital
format.
Fps
Frames per second.
Frame rate
Number of frame of video displayed within one second.
Frame size
Refers to the size of a video window, usually described in pixel. Frame
size can be 640x480, 320x240, and so on…
H.323
Protocol for the communication over IP. Microsoft and Intel got
together and push standards thru appropriate bodies for product
interoperability.
Indexing
Enables you to search an audio or video piece with the media.
94
Glossary
Lossless compression
Finds repeated parts of the signal, removes them, then puts them back
in at the other end - important for data but not for voice.
Lossy compression
Use advanced modeling techniques to determine what is important to
the signal and what can be left out - signal should sound or look pretty
much same. This type of compression is used for audio and video. 50:1
Compression ratio means that a 50MB file becomes 1 megabyte.
MPEG
Standard used for coding and compressing moving pictures and
audio.
Multicast
Process where a single stream is servered from one server to multiple
clients. In other words it is a one-to-many communication.
NTSC
National Television Systems Committee which determines standards
for color picture broadcasting. Used in the USA, Canada and Japan…
PAL
Phase Alternating Line. Standard for television broadcast/reception used in
Europe.
PCI
Peripheral Component Interconnect. It has become one of the most industrial
computers. It solves a wide range of compatibility problems and performance
limitations that were encountered with the older ISA and VME standards.
Resolution
Typically determined by the quantity of pixels displayed per line or for a given
area. The better resolution is, the finer picture is.
Sampling
How often you measure analog video signals for transmission - ex. VCRversion.
SDK
Software Development Kit used by developers to quickly provide powerful
and innovative solutions.
95
Glossary
SECAM
Sequential Couleur A Memoire. TV standard developed in France.
Spatial compression
Compression technique that reduces the information needed to display video
frames.
S-Video
S-Video is one of the high quality methods of transmitting a television signal
from a device such as a Camcorder, DVD, or a digital satellite receiver. S-video
interface separates the color information (Chrominance) from the brightness
(Luminance), which prevents nasty things and helps increase clarity and
sharpness.
Synchronization
The linking of image and sound signals in order to run image and sound
events simultaneously.
WAV
Used for waveform and uncompressed audio file format.
XLR
Multi-pole, stable plug connection
YUV
A method for encoding analog video signals for digital video
applications. Y defines luminance, U defines hue, and V defines
saturation. The term YUV is usually followed by three numbers
representing the ratio of each component.
96