1
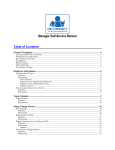
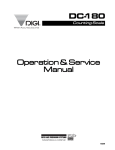
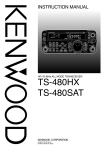
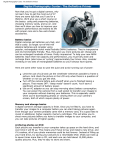
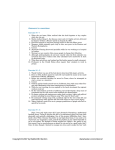
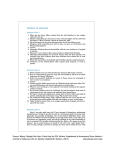
FT-950 Operator Assistant Utility by KD5SPX - Feb. 2012
Installation
&
User Manual
Table of Contents
Disclaimers
Introduction
..... 1
- My Ham Story ..... 2
Software Summary ..... 6
System Requirements ..... 7
Installation ..... 8
Operation ..... 10
Disclaimers
The software you are about to use was developed exclusively for my personal
use and is provided to you with no warranty of any type to use at your own
risk and discretion.
Should you feel less than grateful using this software you are most welcome
to remove it from your system and not use it.
I will not now or anytime in the future charge anything for the use of this
software for hobby use by individuals.
Introduction My Story of Ham Radio
I first obtained my Tech ham license in 2002. I purchased an Icom 2920 dual
receive unit for 2m/70cm and installed it in my vehicle. Prior to this I was a
shortwave/scanner listening enthusiast.
I never picked up an interest in repeater operation and it was never easy to try
to operate the unit while I was in a mobile status so I was just mostly listening
to conversations. Quickly my interest faded and I eventually sold the Icom ...
losing interest in ham radio due to my lack of desire to put any effort into
learning something I would never use .... morse code in a more
technologically advanced hobby.
August of 2011 arrived and while surfing the net I stumbled across something
that said the morse code requirement had been dropped for the ham
operator licenses of all classes! Like I said I had lost total interest in ham radio
and went back to scanners and shortwave listening as my radio hobby. This
hobby started to even fade when most of the police departments started using
digital transmissions and scanners changed from analog to digital systems.
So my radio hobby turned out being confined to shortwave listening
When I found out the code requirement was dropped I studied and within 3
weeks had passed the General Class ham license. I then started my hf
exploration and immediately was drawn to it. I purchased my first rig after
what I thought was thourough reasearch, a Kenwood TS-480SAT which I had
decided would be a small but non-mobile installation. I also purchased a tuner
even though the Kenwood had an internal one. I was really interested in
antennas and antenna theory as well.
My first antenna after some research was the Comet-CHA-250b vertical
without radials. This is what drew me to it was I did not need radials and a lot
of space since I was space confined. I put up the Comet on a mast 16 ft
above the ground so the top of the Comet sits at 40 feet in the air and the
mast is connected to a 4ft ground rod. Since installing the comet I have been
pleased with its performance making contacts over 3500 miles to Hawaii and
almost every state in the US and occasionally other countries such as Cuba,
Honduras and Belize. I was hooked on HF operation.
Introduction - continued
Then realizing the question pool was about to change for the Extra Class in
June of 2012 I studied another week and passed the Extra Class license in
January of 2012. I read a lot about other hf rigs and the more I used the
Kenwood the more I realized it was frustrating me and I seemed to be missing
something somewhere.
I was making contacts with the Kenwood but it was hard to hear them clearly.
It seemed no matter what I adjusted or how I adjusted the controls unless the
station was really strong I could not clearly hear them. Don't get me wrong I
was able to do the QSO's but it was really frustrating me with all the noise and
some stations seemed really weak sounding and I felt they should not be. I
made some QSO's and thought my signal reports should have been better
than they were ... yes I realize conditions change and I was in a learning
process but I still felt there was something missing from the setup I had in the
shack.
I had a lot invested at this point and was even considering a linear amplifer
but did not like the cost or amount of power they required and the greater
possiblity for RF in the shack. I decided that I would stay with 100 watts and
the main Comet antenna I had since I was pleased with it. I had greater
expectations for the Kenwood than apparently it was providing.
I watched the external peak tuner power meter one day and the most it would
indicate was 70-80 watts when I transmitted on the Kenwood. I changed
microphones purchasing a headset on ebay and setting up the VOX for use
with the Kenwood. I hated VOX! It would key when I sneezed, it would key
when I coughed ... what a useless thing. I went back to the original Kenwood
mic and kept using the headset which helped hear the contacts but there was
still so much damn noise compared to the signal I was hearing no matter what
I adjusted with the DSP etc. on the Kenwood. The power meter even with the
different mic was still at 70-80 watts. Something had to change.
Introduction - continued
I once again looked at Icom rigs - the IC-7000 and decided it would be no
different then the Kenwood a mobile confined to my desktop with mobile
features and mobile compromises to put in a small package to fit in a small
vehicle which was not the destination I had for my HF station.
I looked at desktop rigs ... I looked at SDR rigs .... I heard hams on SDR rigs
sounding really great ... then I heard them say they had to reboot and the
radio would just quit sometimes due to a software glitch or computer glitch. I
thought isn't that great spend the most for an SDR and it is not even reliable
due to the software and its externally computer dependent. That's a
nightmare! No THANKS! I am already frustrated I couldn't imagine the
nightmare an SDR would introduce into my shack!
I looked at more desktops ... I liked knobs more than menu's. I wanted
something substantial to put on the desktop that would scream I am a HAM
RADIO ... LOOK AT ME! I looked at the Kenwood TS-2000 I just was not
impressed with it. I looked at the Icom Pro III now that was a radio ... I liked it I
liked the Band Scope ... I liked the way it looked ... I could tolerate the price ...
ALAS ... they stopped making the damn thing! I could not find a new one
anywhere and I REFUSED to buy a USED RIG for almost as much as a new
one would cost and get no warranty! I scoured QST each month when it came
over and over and there was one thing which stood out each and every month
I went through the magazine. The Yaesu FT-9000, FT-2000 and FT-950. Now
those were HAM RADIOS ... large desktops with knobs, good looking, many
features, very high cost! I researched the FT-9000 and FT-2000. I read some
very bad things about the FT-2000 with software firmware updates etc. One
thing really stood out no matter what I read none of the issues that the
FT-2000 and FT-9000 had were related to the FT-950. I read mostly praises
about the FT-950 with the exception of those who would not read the manual
and learn the features and how to use them. A lot of the knobs the FT-2000
had were not on the FT-950 you had to adjust via menu but as I checked the
manuals almost everything on the FT-950 was accessible through the built-in
CAT Serial Port on the FT-950. I was also impressed with the DMU-2000 data
unit and all its features! This was the one for me.
Introduction - continued
I waited until the Thanksgiving Super Sale and ordered my setup from HRO,
to this day I am so glad I did. ALL the PRICES SKYROCKETED within weeks
after I ordered. I saved over $600.00 total over today's prices on what I
ordered! I do not regret it one bit ... This was the best!
I had the shack prepared for the order arrival. I set everything up, assembled
what I had to and connected up all the cords. I was skeptical and hoping for
the best. The 950 just fit where I had measured for it to be on the desktop.
Everything in place and assembled as necessary, all computer cables
connected, power, antenna, tuner, etc. Everything was ready to go now. Just
one last thing ... turn it on and ...
What is going on here? Why is the band so quiet? There is not much
background noise at all! I double checked the connections, tuner, antenna,
antenna switches etc. Everything was connected just as I had it connected
with the Kenwood. I even went outside to make sure the cables were
connected to the antennas. Everything is in place but its so quiet!
I started to tune the dial and BAM a strong signal came out of the quiet
background ... what is going on here? I dialed more and more signals, I
started to play with some of the settings, read the manual more and more and
realized this was a true high quality RECEIVER! The sound from the internal
speaker was also a quality sound not a tinny sound! This thing is amazing ....
So here we are today ... The FT-950 continues to amaze me and I actually
enjoy my time with my radio hobby now. I quickly discovered after studying a
lot from the FT-950 manual what a truly capable receiver this radio has.
Software Summary
Some of the features I found are only realized by utilizing the menu settings
while operating and this is really not handy for me. This is the reason I have
developed this software for those who like the knobs instead of menus for
operation. The software when run on a computer beside your FT-950 allows
you to access those receiver features at the same time you utilize your
FT-950 during normal operation without distracting you by making you access
the menus through the radio which can be awkward.
The software allows button control of power settings and receiver settings
which require menu settings for adjustment. I have not included receiver
features which are already controlled by a radio button unless that feature
requires related menu adjustments for optimization such as the contour filter,
noise blanker etc.
This software has been developed using Visual Basic 6. The setup file will
install all necessary support files for operation on your system including the
custom control files which upon installaton will self register on your system
requiring no fees for use.
This software should also run on the Windows 98 operating system.
System Requirements
This software was developed and tested on at least 2 different laptops whose
minimum specifications are listed below.
Common laptop specifications
Windows XP Service pak 2 OS
2GB Ram
1920 x 1200 LCD Display
External SVGA port for 2nd display
3 USB ports
Dual Core Intel processors minimum 2.0 Ghz
External mouse and connected external keyboard
FTDI chipset USB to Serial port adapters
Software Targeted System Requirements
Laptop or Desktop system
Windows XP OS
1 GB Ram
1024 x 768 display resolution
1 DB9 Serial Port
900 Mhz Intel Single core processor
Just a Note:
I originally wrote this software with the intention of running it on my Asus
EeePC with a celron intel processor and 16gb solid state drive.
It works very well on this Asus however the 7.2" screen turned out to be less
than tolerable for my aging eye sight.
FT-950 Operator Assistant Utility Software
Installation
Software Installation:
Step 1: Using a freeware utility unzip the FT950Utility.zip file and
extract all of the contents to a folder you have created on your desktop.
Step 2: Double click on the Setup.exe file in the folder where you have
placed all the extracted contents in Step 1.
Step 3: You will see the screen shown above – Click on OK to continue.
Step 4: You will see the screen shown above – You may accept the
current installation location or change the installation directory. It is
recommended that you accept the installation directory without change. So
just click on the box with computer in it to accept the shown installation
directory and begin the installation.
During the installation you may be presented with a box indicating that the
your current file is newer than the file to be installed. If you see this box
click YES which will retain your newer file and not overwrite it with an older
file. This will not affect the program installation or operation as long as you
select YES.
Installation will proceed as required and install all necessary files to ensure
the software will function as designed. This software WAS NOT
DESIGNED TO INSTALL OR OPERATE ON WINDOWS 7 or WINDOWS
VISTA!
When finished you will get a message indicating that the software has
installed successfully. You may start the software by clicking on the lower
left Start button and then selecting the PROGRAMS Menu and there you
will find an entry for FT950 Utlity and to the right a shortcut for the FT950
Utility.
Refer to the next section for program operation.
FT-950 Operator Assistant Utility Software
Operation
Prerequsites:
1. Installation of the software successfully on a compatible
operating system as previously described.
2. One available 9 pin Serial Port or properly installed and tested
USB to Serial Port adapter with FTDI chipset.
3. One pin to pin straight through Serial Port Cable connected to
the previous Serial Port on your computer and the other end
connected to your FT-950 CAT serial port on the FT-950.
4. FT950 menu items set as follows: Menu Item 026 Baud Rate set
at 9600 bps. Menu Item 027 CAT Timeout set at 3000 msec (#3)
Menu Item 028 RTS setting should not matter but if it does set at
ON. Be sure once changing the menu settings to press and
HOLD the menu button for 2 seconds to save the changed
settings if you do not hold this button for 2 seconds your
changed settings will not be saved.
5. Knowledge of which Serial Port number or USB to Serial
Adapter Port Number is designated as in your system which is
connected to the FT-950 by your Serial Cable. This software will
support Serial Port Numbers from 1 to 4. This software currently
ONLY supports a baud rate of 9600.
FT-950 Operator Assistant Utility Software
Operation
Program Startup:
Click the lower left corner “Start” then click “All Programs” then find
the item that shows FT950 Utility and place the mouse cursor over it. To
the right you will now see a shortcut that indicates “FT950 Utility”.
Now you may either click on the FT950 Utility to start the program
or If you want to place a direct shortcut on your desktop then place the
cursor over “FT950 Utility” and press and hold the right mouse button as
you drag you mouse cursor to the desktop area. Now release the right
mouse button and a box opens … click on the copy button and a shortcut
named FT950 utility will be copied to your desktop.
Now you can double click on the desktop shortcut to start the FT950
Utility program.
Once the program starts you will be presented with the screen below.
You must now choose which serial communications port to use on your
computer. This will correspond to the serial port you identified during the
prerequisite instructions that you have your serial cable connected to from
the computer to the CAT serial port on your FT-950 rig.
Example: In my case I select Com1 by clicking on the blue circle to the left
of the Com 1 box. Then press Accept to use this selection.
The following screens are ones which you might experience should you
not have followed the instructions correctly. These all relate to a
communications issue between your computer serial port connection to
the FT-950. They are pretty self explanative as to identify the issues.
When you have successfully selected and connected a proper serial port
from your computer to the FT-950 and established communication the
program will request Identification from the FT-950, determine whether or
not you have the DMU-2000 unit installed and available for use then
present the initial program screen.
Note: You do not have to have a DMU-2000 unit to use this software,
however if you do and have ensured it was on prior to starting this program
you will see features available in the program supporting the DMU-2000
system.
The initial program startup screen once initialized will appear as follows:
The software after confirming the FT-950 identity and DMU availability
then detects the current settings from the FT-950 for the current band and
receiver options controlled from the software program. Buttons on the
screen which are illuminated green indicate the current settings read from
your FT-950 for functions controlled by this software utility program.
You may control the settings of the functions provided in this utility by
pressing the corresponding button to change the settings. For example if
you wanted your power to be 10 watts instead of the currently indicated
100 watts you would press the button labled 10 W. When pressed the
software commands a menu setting change to 10 W and turns green to
indicate that that is now the menu setting.
This utility was developed for my own needs which currently is SSB phone
operation only.
This utility was developed providing functional control of receiver functions
which have added underlying menu functionality not easily accessed on
the FT-950 except through menus. This software is meant to run on a
laptop beside your FT-950 and/or DMU-2000 at the same time so that you
have easy control of the advanced receiver features available on the
FT-950 resulting in superior signal reception.
The MANUAL SYNC button has only 1 purpose. One of the features of the
FT-950 is that for each band button there are 3 quick memory settings
which retain 3 different receiver setups for each press of the same band
button.
While the software automatically reads the new band settings when you
press a band button to change from say 20 meters (14) to 17 meters (18)
and accordingly sets/resets and shows/hides and updates the program
screen, it can not identify which quick memory setting is selected if the
band button is pressed more than once. (Each same band button pressed
accesses a different set of settings for that band up to the 3 provided)
So if you change bands by pressing a band button and then press the
same band button again to use the 2nd set of settings for that band button
the software does not know that you pressed this button the 2 nd time and
are now using different receiver settings. Therefore you MUST press the
Manual SYNC button which then causes the software to query the FT-950
for the currently used receiver settings and when the FT-950 responds the
software updates the program screen to reflect the current receiver
settings. This is done within 2 seconds of pressing the SYNC button. In
fact you will notice the SYNC button will turn green indicating it has been
pressed and it will then turn back to blue again once the program update
has been completed.
The benefits of this utility are appreciated especially with the FT-950
Contour Filter whose gain may be adjusted from -40db to +12db which will
effectively provide the capability of another narrow or wide Notch filter or a
GAIN filter up to 12db! The width of this filter, the gain of the filter and the
frequency of where the filter is active from 100 hz to 3000 hz is all readily
accessible and adjustable from this program screen without having to
manually access the menu settings by using the FT-950.
The Wide and Narrow Noise Blanker adjustments are readily available as
well from the program. Even though you may have the narrow noise
blanker selected the adjustment for the wide noise blanker is also
available for adjustment at the same time should you desire to adjust it as
well, without it being active at the adjustment time.
Dynamic Noise Reducton is a powerful feature of the FT-950. However the
user needs to understand how to use it properly. Once turned on the
Dynamic Noise Reduction filter has up to 15 different software algorithms
for noise reduction. Each of these algorithms may be selected from the
program, however the user needs to allow the algorithm the time for it to
take effect. When you change from say 1 to 5 wait at least 20-30 seconds
before changing again and you will experience the functionality of the
change. These are REALTIME active algorithms and continuously
respond to signal conditions during the entire time they are enabled so
they are constantly adjusting and changing during the enabled time giving
you a more enjoyable listening experience.
The Dynamic Notch Filter selection is also included in the program so that
you may turn it on or off without having to access the FT-950 menu from
the FT-950.
Notes from the programmer:
I have tested this software throughout in an attempt to make it as bug free
as possible, however as a programmer we do not always see things as a
user. Therefore should something not work as described in this document
you may feel free to let me know about it at [email protected].
Just keep in mind I have developed this program for my purposes and my
use with no intention of distribution, however once I seen the value and
benefit of using it I chose to share it with the community of FT-950 users in
hopes it may also make your hobby more enjoyable. Please accept this
software with the intention it was provided.
You are certainly welcome to remove it from your computer and never use
it again if that is your desire. However I believe it provides and enhances
my use of the FT-950 and will continue to enjoy its benefits.
I have attempted to write this documentation on a low level of computer
user experience to assist those with limited computer experience. I hope I
have helped you realize the advanced features of the FT-950 and why it is
the BEST valued TRANSCEIVER on the market today when compared to
the cost.
Enjoy.
Wayne.
KD5SPX.