1
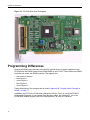
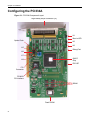
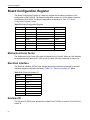
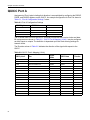
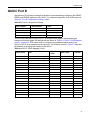
Chapter 3: Installation
Installing the PCI334A card into PC
Use the following steps to install the PCI334A card into a PCI slot. See Figure 3-2, “PCI334A
Installation Diagram,” on page 27.
Caution:
Electronic components on printed circuit boards are extremely sensitive to static electricity.
Ordinary amounts of static electricity generated by your clothing or work environment can
damage the electronic equipment. It is recommended that when installing the PCI334A in a
system that anti-static grounding straps and anti-static mats are used to help prevent
damage due to electrostatic discharge.
1. Quit all applications. Power down the PC and any attached peripherals. Remove the top cover of the
PC.
2. Configure the PCI334A. See “Configuring the PCI334A,” on page 24 for a complete description of
setup issues and jumper configuration procedures.
3. Select an available PCI slot and remove the slot filler panel.
4. Slide the PCI334A into the PCI connector of the system unit. Make sure the front plate on the
PCI334A card mounts flush with the chassis panel opening.
5. Install the front plate screw to secure the PCI334A card into the chassis. This also provides a chassis
ground connection to the PCI334A.
6. Replace the top cover.
7. Install the serial port cable assembly to the PCI334A connector.
8. Reconnect any cables from the peripheral devices. This completes the hardware installation. At this
point, turn power back on to the PC and proceed to any Software Installation Instructions that may
have been provided.
26