1
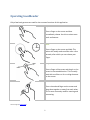
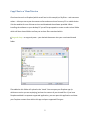
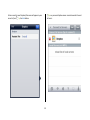
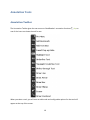
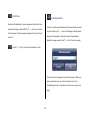
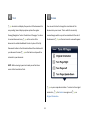
GoodReader User Guide
Version 1.0
GoodReader version 3.16.0
Contents
Operating GoodReader ________________________________________________________ 1
Send PDF files to Your iPad _____________________________________________________ 2
Copy Files with iTunes ______________________________________________________________________ 2
Copy Files to a ‘Cloud’ Service _______________________________________________________________ 5
Download Files from the Internet_____________________________________________________________ 6
Open Files in GoodReader ______________________________________________________ 8
From Another Application ___________________________________________________________________ 8
From a ‘Cloud’ service ______________________________________________________________________ 8
Open Locally Stored Files __________________________________________________________________ 13
Layout and Features __________________________________________________________ 14
Information Bar __________________________________________________________________ 15
File Name _______________________________________________________________________________ 15
File Tabs ________________________________________________________________________________ 15
My Documents __________________________________________________________________________ 15
Help ___________________________________________________________________________________ 15
Annotation Tools ____________________________________________________________ 16
Annotation Toolbar _______________________________________________________________ 16
Pin Menu _______________________________________________________________________________ 18
Add Bookmark ___________________________________________________________________________ 18
Add Text Box ____________________________________________________________________________ 19
Insert Pop-up Note _______________________________________________________________________ 20
Highlight Text ____________________________________________________________________________ 21
Underline , ‘Squiggly’ Underline and Strike-through Text _________________________________________ 21
Draw Line _______________________________________________________________________________ 22
Draw Arrow, Box and Ellipse ________________________________________________________________ 23
Eraser __________________________________________________________________________________ 23
Draw Freehand __________________________________________________________________________ 24
Navigation Tools ____________________________________________________________ 27
Navigation Slider _________________________________________________________________ 27
Previous Page ___________________________________________________________________________ 27
Next Page _______________________________________________________________________________ 27
Page Slider ______________________________________________________________________________ 27
Slide Bar ________________________________________________________________________________ 28
i
View/Navigation Tools ____________________________________________________________ 29
Brightness ______________________________________________________________________________
Go Back ________________________________________________________________________________
Text ___________________________________________________________________________________
Rotate _________________________________________________________________________________
Layout _________________________________________________________________________________
Crop ___________________________________________________________________________________
Locations _______________________________________________________________________________
Go To __________________________________________________________________________________
Search _________________________________________________________________________________
Lock Page _______________________________________________________________________________
Scroll Lock ______________________________________________________________________________
Actions _________________________________________________________________________________
Rotate Lock _____________________________________________________________________________
30
30
31
31
32
32
33
35
36
37
37
38
38
Finalising Your Work with GoodReader __________________________________________ 39
Saving Annotated Documents _______________________________________________________________ 39
Rename Files ____________________________________________________________________________ 39
Add Files to a ZIP Archive __________________________________________________________________ 39
Send Files from your iPad ______________________________________________________ 41
Send Files with iTunes _____________________________________________________________________ 41
Send Files with a ‘Cloud’ Service _____________________________________________________________ 43
Upload files via EASTS _____________________________________________________________________ 45
ii
Operating GoodReader
Only a few basic gestures are used for the common functions of this application.
Tap
Press a finger on the screen and then
immediately release. Use this to select most
tools and buttons.
Hold
Press a finger on the screen and hold. This
action will usually make an effect after a few
seconds, after which you can release your
finger.
Drag
Press a finger of the screen and drag it on the
screen in the stated direction. This is usually
used with scroll bars or for re-sizing elements
on the screen.
Pinch
Press a thumb and finger on the screen and
drag them together or away from each other.
This is most commonly used for zooming and
unzooming.
Gesture images by Gestureworks
1
Send PDF files to Your iPad
If you have files ready to use on your iPad you can transfer them onto the iPad in several ways.
Covered here are three of the most useful methods.
Copy Files with iTunes
Connect your iPad to your desktop PC via a USB cable. Open iTunes on your desktop PC.
Click
on your iPad name on the left and then click the Apps button at the top.
Your apps should be displayed on this screen (if not, click the File menu and select Transfer
Purchases from “[YOUR iPAD NAME] iPad”). Scroll to the bottom of the page under the
heading File Sharing.
2
Click on the GoodReader app to view its files.
3
Click the Add button below the file list and a pop-up dialogue will appear allowing you to
search for files. Navigate to where your desired files are location and highlight them.
Click on the Open button. Your files will now transfer to your iPad. The file list will repopulate
with the newly added files.
You can now open these files in GoodReader from your iPad.
4
Copy Files to a ‘Cloud’ Service
Cloud services such as Dropbox (which we will use in this example) or SkyDrive – and numerous
others – allow you store your documents online and access them from any PC or mobile device.
Visit the website for one of these services and download the software provided. When
installing the software to your desktop PC you will be prompted to create or select a local folder
which will be a shared folder to allow you to share files contained within.
Drag and drop – or copy and paste – your desired documents into your nominated shared
folder.
Files added to this folder will upload to the ‘cloud’. You can open your Dropbox app (or
whichever service you are employing) and see the content of your shared files. If you have
Dropbox enabled in a separate supported application, you can open this application and view
your Dropbox content from within this app and open supported file types.
5
Download Files from the Internet
If your preferred Internet browser on your iPad (e.g. Safari) supports a particular file type, such
as Word documents or PDF files, it will open and view them. If you want to open the file in a
particular app,
tap on the document and ‘Open In’ options will display.
Tap one of these
options then select the desired action/app.
Note that GoodReader supports ZIP files and you can download batch assignments directly
from the EASTS for Academics website to your iPad. Just open your browser and access and
download batched ZIP files from EASTS as you normally would on a desktop PC. You should be
prompted with the option to ‘Open In’.
Tap on Open in then
tap the option for GoodReader. The file will now be available in
GoodReader’s file manager under My Documents.
6
Tap the file to be prompted to unzip its contents.
Tap on Unzip to create a folder of the same filename with all the files contained within.
7
Open Files in GoodReader
PDF files can be opened in GoodReader in several ways.
From Another Application
Most applications have an ‘Open In…’ feature that allows you to open a selected file in another
app. So, for example, if you’ve downloaded a PDF with the Safari web browser, you can
on the screen and an Open In button will appear.
tap
Tap on the button and a menu should
appear listing applications which can open PDF files. Locate GoodReader in this menu and
tap it. The file will now open in GoodReader.
From a ‘Cloud’ service
Cloud services, such as Dropbox (the example we will use here), allow you to share files
between electronic devices by storing them online. Cloud services can be accessed through
GoodReader’s file manager, or you can open Dropbox and use the ‘Open In’ option as described
above in the From Another Application section of this guide.
To integrate the Dropbox service into GoodReader, first access GoodReader’s file manager (if
you’re in the main PDF editor,
tap the middle of the screen and then on the My Documents
button that appears at the top).
NOTE: The setup of other cloud services may contain different additional steps, however they
should remain essentially the same as Dropbox.
8
Tap on Connect to Servers on the right side of the screen.
Tap the Add button then
9
tap on Dropbox.
Enter a name for your Dropbox (this name will appear in your
server list) and tap the Add button.
Tap on your new Dropbox server connection under Connect
to Server.
10
Log in to your Dropbox service.
A message should appear informing you that GoodReader
wants to access Dropbox.
Enter your email and password then
tap the Log in button.
11
Tap the Allow button.
Your Dropbox contents will now be displayed.
12
Any time you wish to open a file from Dropbox in GoodReader, access the file manager and
tap on Connect to Servers, then
tap on Dropbox. When the files are displayed,
tap on the
file you wish to open and it will be downloaded to your iPad.
Open Locally Stored Files
When GoodReader opens a file it saves it locally within its file manger.
Tap on any PDF file
under My Documents to open it. If you have another file open and wish to access the file
manager,
tap the centre of the screen to show the menu and
button at the top of the screen.
13
tap the My Documents
Layout and Features
With a PDF file open,
tap the centre of the screen and GoodReader’s tools will appear. At the
top is the file Information Bar. Running down the right side are the Annotation Tools. Along the
bottom are document Viewing and Navigation Tools.
Information Bar
Annotation Toolbar
View/Navigation Bar
14
Information Bar
The Information Bar shows the name of the file currently being viewed and provides navigation
between open documents and My Documents (file manager).
My Documents
Help
File Tab
File Name
File Name
The name of the file currently being viewed is displayed at the centre of the Information bar.
File Tabs
If you have multiple files open, tabs for each file will be displayed at the bottom of the
Information Bar.
Tap on one of these tabs to view the file.
My Documents
Tap on the My Documents button to open GoodReader’s file manager.
Help
Tap on the Help button for information and instructions on how to use GoodReader.
15
Annotation Tools
Annotation Toolbar
The Annotation Toolbar gives the user access to GoodReader’s annotation functions.
Tap on
one of the icons to activate the tool for use.
When you select a tool, you will enter an edit mode and configurable options for that tool will
appear at the top of the screen.
16
A common feature for each tool’s configuration options is the previous page and next page
icons. When you have a tool active and wish to turn a page,
tap these icons. This saves
accidental placement of the tool effects when trying to turn pages.
Choose Tool
Previous Page
Next Page
You can also change to a different tool without exiting the edit mode by
name. A pop-up dialogue will appear with tool choices.
17
tapping on the tool
Tap on a tool icon to activate it.
Pin Menu
Add Bookmark
By default, GoodReader’s menus disappear (hide) after a few
seconds to display only the PDF file.
Use this to add a personal bookmark that can be referenced at
Tap on the pin to have
any time. When you
the Annotation Tools permanently displayed. The pin will turn
tap this tool a dialogue and will appear
along with the keyboard. Type the name of the bookmark
into an X.
(defaults to page number) and
You can
tap the OK button to apply.
tap the X to unpin the Annotation Tools.
This will not alter the appearance of the document. When you
place a bookmark you can use the Locations tool in the
View/Navigation bar at the bottom of the screen to go to this
page.
18
The text will appear on the document.
Add Text Box
Tap on your text to
view a context menu.
When you select this tool you can choose text colour via the
options at the top of the screen.
This menu allows you to change the attributes of the text box,
such as font size, colour and fill options, and edit the text. You
Tap on the document where you would like to add text. A
can also move the text box, change its dimensions, or place a
dialogue will appear along with the keyboard. Enter the
callout to point to a particular place on the page.
required text then
option to use it.
tap the Save button.
19
Tap on an
A note icon will appear on the document.
Insert Pop-up Note
Tap the icon to
view the text.
When you tap on this tool you can select text colour via the
options at the top of the screen.
NOTE: An important thing to remember with notes is that you
can export GoodReader annotated PDF files in two ways. If
exported as a regular PDF file, when viewed on a computer
the user can click on a note icon on a page to see the text
contained within the note when using a standard PDF viewer
such as Adobe Reader. If exported as a flattened PDF, the note
Tap on the document where you would like to place a note.
will be tethered to an icon in the left margin and assigned a
A dialogue will appear along with the keyboard. Enter the
required text then
number (page number – note number on page). An extra page
tap the Save button.
will be attached to the end of the document with a numbered
list of each note and the text contained within them. This
latter option is best used to print the document.
20
Highlight Text
Underline , ‘Squiggly’
Underline and Strike-through Text
When you
tap on this tool you can select text colour via the
options at the top of the screen.
Each of these tools work identically to the Highlight Text tool.
See the Highlight Text section above for details.
Tap on a single word to highlight it. To highlight a selection
of words, hold your finger on the first word or the selection
and
drag to the last word. The options will allow you to
undo and redo your last changes.
Tap the Save button to
confirm your changes and close the tool. Now when you
tap
on a highlight without the Highlight Tool active you will get a
context menu that allows you to copy or delete the highlight,
or change its colour.
Tap on an option to use it.
21
menu will appear that lets you change the line’s properties or
Draw Line
delete it.
When you select this tool you can select line colour, thickness
and opacity via the options at the top of the screen.
Tap on an option to use it.
Tap anywhere within the document to place a line in that
location. A context menu will appear and the line will have
editing points (
) that you can hold your finger on and
drag around the screen to change the length and angle of
the line.
When the line is to your satisfaction,
context menu. Now when you
tap on Done in the
tap on the line a context
22
Draw Arrow, Box and Ellipse
Eraser
Each of these tools work almost identically to the Draw Line
When you select this tool it allows you to erase elements
tool. See the Draw Line (p22) section above for details.
created with the Draw Freehand tool.
Tap on the tool to
open its options.
Holding a finger on the screen creates a circle underneath.
Any freehand elements within this circle are erased. You can
drag your finger around the screen to delete any freehand
elements in its path.
Tap the Save button to apply your changes.
23
The best way to visualise this is to think of a pencil and a
Draw Freehand
rubber eraser; The pencil is your Draw Freehand tool and your
rubber eraser is the Eraser tool.
When you
tap this tool, options at the top of the screen
allow you to select line colour, thickness and opacity.
To draw,
hold your finger (or stylus) on the screen and
drag to draw a line, shape or letter. This tool is very much
like a real-life drawing tool (i.e. pencil, highlighter, crayon) and
you can use it in the same way; lift your finger and resume
drawing from another position to create drawings or words.
Additional icons will appear at the bottom of the screen for
zooming options.
Zoom Mode
24
Palm Rest
Adjust Rest
Tap the zoom mode icon to display a window showing a
magnified portion of the page. The page will be greyed out
and the magnified portion will display at normal brightness.
Tap anywhere on the page to place the zoom window.
Pinch inside the zoom window to adjust the size of the
zoomed area.
You can use this magnified view for precise use of the
Other tools in the magnified view include zoom window
freehand drawing tool.
position buttons, undo and redo, palm rest options, and autoadvance zone (blue slider).
25
Previous Position
Next Line
Next Position
Undo
Redo
Toggle Palm Rest
Toggle Zoom
Adjust Palm Rest
Tap the Save button at the top of the screen to save your freehand drawings to the
document.
26
Navigation Tools
Navigation Slider
Several tools are available to alter the appearance of a document and to assist in navigating
through a document.
Previous Page
Page Slider
Slide Bar
Next Page
The Navigation Slider represents the entirety of your document. The left-most position is the
first page and the right-most position is the last page.
Previous Page
Tap this button to display the previous page.
Next Page
Tap this button to display the next page.
Page Slider
Drag your finger along the slider bar to navigate back and forth through each page of the
document.
27
Slide Bar
Tap anywhere on the slide bar to go to the page closest to that position.
28
View/Navigation Tools
These tools provide a variety of options for how you view and navigate a document.
Brightness
Text
Go Back
Layout
Rotate
Locations
Crop
Search
Go to
Tap on an icon to activate the tool associated with it.
29
Scroll Lock
Lock Page
Rotate Lock
Actions
Brightness
Go Back
Tap on this icon and a slider will pop up above it.
Tap this icon to return to your previous page after using the
Navigation Slider, a bookmark or link. This is most handy if you
accidentally leave the page you were working on.
Tap anywhere on the slider to change the brightness level
of the document.
adjustments.
setting.
Drag the slider to make fine
Tap on your document to use the brightness
Tap again on the Brightness icon to restore normal
brightness.
30
Text
Rotate
You can use this tool to change the orientation of the
Tap to extract and display the pure text of the document for
easy reading. Several display options replace the regular
document on your screen. This is useful for incorrectly
Viewing/Navigation Tools at the bottom of the page. To return
scanned images which may not be oriented with the rest of
to normal document view,
the document.
tap on the centre of the
Tap on the icon to and a menu will appear.
document to unhide GoodReader’s tools. In place of the My
Documents button in the Information Bar will be a button with
your document’s name.
Tap on this button and you will be
returned to your document.
NOTE: When viewing in pure text mode you will not have
access to the Annotation Tools.
Tap on your required orientation. To return to the original
orientation,
tap the Rotate icon again and
Original Orientation.
31
tap on
Layout
Crop
Use this tool to switch between single and double page
Use this tool to crop out margins so the document’s page
layouts.
contents fill the entire screen.
Tap on the icon and a menu will appear.
Tap on the icon and your
display will change to an editing screen.
Tap on your required layout.
32
Drag the crop buttons to edit where you wish to crop.
Locations
Tap this icon to view a dialogue with bookmarks, contents
and list annotations made to the document. When the
dialogue appears you can choose what to display by
Tap the Done button to apply the crop. To undo crops you
have made,
mode and
tapping the Bookmarks, Outlines and Annotations buttons.
tap on the Crop icon to enter the crop editing
tap on the No Crops button.
33
Bookmarks show bookmarks you have added via the
Outlines will show a table of contents (provided the original
Bookmark annotation tool.
document has a table of contents embedded into it) and you
Tap on a bookmark to go to the
can
corresponding page.
34
tap on an item to go to that page.
Go To
To go to a specific page of the document,
tap this icon and a
dialogue will appear with the keyboard.
Type in the number of the required page and then
Go button to display the page.
Annotations will list a summary of the annotations you have
made and
tapping on one will take you to the page it is on
and highlight that annotation.
35
tap the
When you conduct a search, the next term in the document
Search
matching your search will be highlighted. Three new icons will
also appear at the bottom of the page.
You can search for key words within your document.
Tap
this icon and a search dialogue will appear with the keyboard.
Type the word(s) you wish to search for and
tap the Search
button. Any previous search terms you have used will be
Previous
recorded in this dialogue. You can search one of these by
tapping on the word then
Next
Close
tapping the search button.
Tap the Previous icon to cycle back through the document
for matching search terms.
Tap the Next icon to cycle
forward through the document for matching search terms.
Tap the Close icon to cancel the search query.
36
Lock Page
Scroll Lock
The scroll lock feature allows you to lock horizontal scrolling of
Tap this tool to lock out screen gestures. This is handy when
you want to view the document without moving the page with
a document. However, in the version used for creating this
accidental hand gestures. You will be able to navigate back
guide it appears to be disabled.
and forth between pages, or close the lock page function, by
tapping the icons at the top-right of the screen.
Previous Page
Close
Next Page
37
Actions
Rotate Lock
Tap this icon to view a dialogue containing various actions
Tap this icon to lock the rotation of the screen so the
you can perform with the document, such as opening it in
document stays locked in the current perspective even if you
another app, flattening the document, email it, or print it.
tilt the iPad at any angle.
Tap on a menu item to initiate the action.
38
Finalising Your Work with GoodReader
Once you have finished annotating your PDF files you can perform a variety of actions to
prepare them for return to students.
Saving Annotated Documents
Each time you use a tool and subsequently hit a Save button to commit a change to the
document, this saves the change to the original document stored in My Documents. You do not
need to make a final separate save once you have finished annotating a document.
Rename Files
Access My Documents. Under the Manage Files tab, make sure you are in the correct folder in
which the file(s) you wish to rename is located.
will display check circles next to each file/folder.
Tap the Manage Files button and your file list
Tap on a file and then
tap the Rename
button on the right of the screen. A dialogue will pop up along with the keyboard. Edit the
name and then
tap the OK button to commit the change.
Note that when the dialogue appears, the cursor is at the end of the name. This is useful for
quickly preparing files for batch upload to EASTS as you just need to add the word marked at
the end of your filename.
Add Files to a ZIP Archive
You may wish to add files to a zip if you want to batch upload your files to EASTS directly from
the iPad, or simply to more easily manage your files. To do so, access My Documents. Under the
Manage Files tab, make sure you are in the correct folder in which the files you wish to zip are
39
located.
file/folder.
Tap the Manage Files button and your file list will display check circles next to each
Tap on each file you want to add to the zip. The check circle for each should have
a tick and the file highlighted green.
Tap on the Zip button on the right side of the screen. A
zip file called Archive.zip will be created and it will contain each of your selected files. You can
rename this file if required.
40
Send Files from your iPad
Once your files have been annotated and prepared you can send them back to another device,
such as your desktop PC, or even upload them via the Internet.
Send Files with iTunes
This process is almost identical to the Copy Files with iTunes (p2) section of this guide, only in
reverse direction.
Connect your iPad to your desktop PC via a USB cable. Open iTunes on your desktop PC. Click
on your iPad name on the left and then click the Apps button at the top.
Your apps should be displayed on this screen (if not, click the File menu and select Transfer
Purchases from “[YOUR iPAD NAME] iPad”). Scroll to the bottom of the page under the
heading File Sharing.
41
Click on the GoodReader app to view its files and highlight the files to copy.
42
Click the Save to button below the file list and a pop-up dialogue will appear allowing you to
search for a folder.
Select a folder then click on OK. Your files will now be copied to this location on your PC.
Send Files with a ‘Cloud’ Service
If you have Dropbox, or another cloud service, integrated into GoodReader, as outlined in the
From a Cloud Service (p8) section of this guide, you can copy files to this service.
Access My Documents and
its file folder.
files.
select the Connect to Servers tab.
Tap on Dropbox to display
Tap the Upload button below the list to display GoodReader’s locally stored
Tap on each file you wish to upload to select it.
43
Tap the Upload [X] Items button to upload the files to the Dropbox server. You can now
access these files from your other devices, such as your desktop PC.
44
Upload files via EASTS
If you have an Internet browser on your iPod which allows you to upload files, you can access
the EASTS for Academics webpage to upload single files or even batch upload your zipped files.
NOTE: All the same rules apply for uploading and batch uploading via iPad as they do for a
desktop PC. All files must be named with the appropriate convention.
E.g. NAMES11414376_1101285_1marked.pdf
A suggested browser to use is iCabMobile. We will use it in this example.
Access My Documents and select the Manage Files tab.
Tap the Open in button on the right
of the screen. You will have the option to send the file as is or to ‘flatten’ the annotations.
Tap one to select and a list of supported apps will appear.
Select the iCabMobile app.
The file has now been copied to iCabMobile and when you choose a file upon uploading to
EASTS in that browser, you will be able to select this file.
45