1
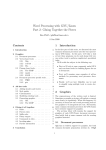
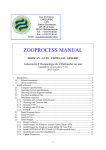
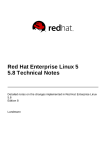
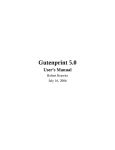
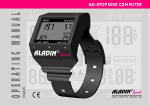
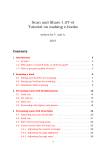
LXF42.tut_gimp
30/5/03
6:36 pm
Page 72
TutorialGIMP
IMPROVE YOUR PHOTOS
Subtle Changes
PART 5 Michael J Hammel introduces the photo-editing capabilities of this great art application.
The GIMP version
1.3.14 plus nearly
400 GIMP plugins!
72
nderexposed images can occur because of poor lighting or by
improper film processing. Fixing the mistakes isn’t as hard as
you might think using a few basic tools of The GIMP.
There are many problems in photography that are difficult
to solve with the mechanics of the shoot but easy to fix with digital
imaging software. Problems like underexposed portions of an image,
washed out colour from poor processing or poor lighting, and redeye
can all be addressed with minimal effort using tools like The GIMP.
This month’s tutorial looks at all three of these common problems
and how you can fix them with only a few minutes of work.
LXF42 JULY 2003
Scanner Support
Where to get your drivers
SANE www.mostang.com/sane/
XSANE www.xsane.org/
Vuescan www.hamrick.com
Image Scan! www.epkowa.co.jp/english/index_e.html
QuiteInsane http://quiteinsane.sourceforge.net/index.shtml
Epson KOWA www.epkowa.co.jp/english/linux_e/lsd_e.html
Linux USB Project www.linux-usb.org/
www.linuxformat.co.uk
LXF42.tut_gimp
30/5/03
6:37 pm
Page 73
TutorialGIMP
CONTRAST, LEVELS AND CURVES: washing the colour back in
Washed out images are often the result of using the wrong speed film,
overexposing the shot (which means using too much light), or because of poor
film processing. In all three cases, much of the information available to you is still
in the image – it just needs to be scanned at a high resolution and then postprocessed using The GIMP. This tutorial goes step by step through fixing one
image shot with the wrong speed film.
1 We start with an image with a fair amount of detail hidden by our poor
choice of film. The image content may be a bit on the boring side, but lets
see if we can pull some colour – and a bit of detail – back out.
2 The Levels tool is our first stop in correcting this image. This dialog shows
us, through the histogram at the top, that the darkest pixel is not truly black
and the lightest is not truly white. To fix this, we’ll spread the range of
colours so the darkest becomes black and the lightest becomes white. To do
this, just press on the Auto button. The picture shows the Levels dialog and
the histogram before the adjustment is made and the image after it has been
Auto corrected. The result is good, but we can improve on this.
3 One option here would be to manually adjust the Levels once again,
this time moving the center point slider (beneath the gradient bar under
the histogram) off to the right. The picture shows the image adjusted in
this way. This reduces the white range and increases the black range,
effectively bringing out more colour in the image by making it darker.
Unfortunately though, this process is less than perfect. A better tool to
use here is the Color Correction plug-in.
4 The Color Correction Plug-In, available from the GIMP Registry provides
a more detailed histogram in its Levels page. Here we see that there is a
slight skew of the histogram towards the right – more pixels with heavier
white content than black. We can adjust this by choosing one of the peaks
to the right (we chose the first peak) to add more black to the image. The
result is not as dark as the manually adjust Levels version, but more vivid
than the Auto-adjusted image. It’s better, but we still want more colour!
5 Now come the most subtle changes of all – we want to improve the
colour of the sky and tents using the Hue-Saturation tool. We’re going to
increase the saturation levels of three colour channels – the Red, Cyan and
Magenta. These were chosen through a little trial and error, but adjusting
these will bring out the blue in the sky and tents (from Cyan adjustment),
the Red in the tent and cone (from the Magenta and Red adjustments) and
the green and yellow in the grass (from the Red adjustment).
6 One final adjustment to the Brightness-Contrast of the image to bring
out a little more detail in the jet engines and we’ve quickly and easily
turned this faded and unremarkable photo into something respectable!
www.linuxformat.co.uk
LXF42 JULY 2003
73
>>
LXF42.tut_gimp
30/5/03
6:37 pm
Page 74
TutorialGIMP
<< BRINGING OUT LOST DETAILS: tweaking poorly exposed images
The last tutorial added a snap of colour to a poorly exposed image, but a closer
look shows some detail is still not visible. How can we pull real detail from a
poorly exposed image? By using the image data itself to brighten the areas that
are too dark, that’s how. Experiment with photos of your own to get a feel for it.
1 Our original image
shows a dancing fool on
the plains of Texas (cows
and oil wells not included).
Standing in the shade of
an outdoor shelter on a
bright day left him and the
shelter underexposed. But
there is detail in those
shadows! We start by
duplicating the
background layer.
1
2 The duplicate layer will
be desaturated (Image>
Colors>Desaturate) first.
This layer will be added
(actually, Screened) to the
original to brighten the
image. Desaturating it
assures that we add even
amounts to each colour
channel. Next, blur this
layer just a bit. We do this
so the Screening process
doesn’t create harsh edges
in the final image. The
amount to blur depends on
the image content, but in
this case we only blurred
about 8 pixels.
2
3 With the duplicate layer active (its layer
name is white on blue in the Layers and
Channels dialog), use Edit>Copy to save a
copy of the layer. Add a layer mask (right
click on the layer name in the Layers and
Channels dialog to get the Layers menu) to
the duplicate layer. The layer mask will start
out white. Click on the new layer mask to
make it active and then paste a copy of the
layer by using Edit>Paste (or Ctrl-V). Anchor
the floating layer into the mask. With the
mask still active, select Image>Colors>Invert
to produce a negative mask. Adjust the
Curves for the mask to isolate the area
under the shelter and our dancing fool. You
might have to manually touch up the mask
using the airbrush or paintbrush. Once
you’re satisfied with the mask, blur it
slightly – 10 pixels were used here but we
came back later and tightened up that blur
by adjusting the Curves yet again.
3
4 After cleaning up the
mask just a bit more
around the raised arm by
air brushing it white (so it
would be lightened the
same amount as the rest
the body), we changed the
layer blend mode to
Screen. And that’s it. A
close up here shows how
the detail in the final
version compares to the
same are in the original.
The blur in the final image
can be adjusted even more
by reducing the blur used
in the layer mask.
5
4
74
5 The resulting image,
while suffering from poor
content, is at least clearer
and filled with more
detail. We could apply the
steps from this month’s
first tutorial to bring out
the colours if we really
wanted, though here it
might be safer to keep
from bringing out too
much detail in our dancer.
LXF42 JULY 2003
www.linuxformat.co.uk
LXF42.tut_gimp
30/5/03
6:37 pm
Page 75
TutorialGIMP
REMOVING REDEYE: make a proper selection
Probably the most common touchup for amateur photographers is the removal
of redeye, the effect where pupils glow red when reflecting flash off the back of
the eye. Removing this effect is fairly simple, though its not the colour removal
where you’ll get tripped up - its in making a proper selection.
1 Our original image isn’t
terrible, but those red eyes a
definitely distracting. A close up
shows that the red area actually
bleeds a little in this photo,
possibly due to poor scanning
or even poor film development.
Treeware
Books on The GIMP
Grokking The GIMP, Carey Bunks, New
Riders ISBN: 0-7357-0924-6
GUM – GIMP User Manual, Kylander and
Kylander, Coriolis; ISBN: 1-5761-0520-2
(also online at www.gimp.org)
GIMP for Web Professionals, Hammel,
Prentice Hall ISBN: 0-1301-9114-0
Printer resources
For your GIMP masterpieces
1
2
3
2 If this were a truly good
photograph we might be able
to get a quick selection of the
pupils using just the Fuzzy
select tool. But this photo is not
that great, and we need a little
trick to isolate those pupils.
First, duplicate the layer so we
don’t corrupt the original layer.
Next, invert the colours (Image>
Colors>Invert) in the duplicate
layer. This lets us see the
regions of interest a little
better. In the Layers and
Channels dialog, choose the
Channels page. All three
channels should be active. Click
on the Red and Blue channels to
deselect them, leaving just the
green channel. Now choose the
Fuzzy Select tool from the GIMP
Toolbox. Click inside the pupils.
The selection you get may not
be that good – you might have
to adjust the Threshold level in
the Fuzzy Select’s Tool Options
dialog (double click on that
Fuzzy Select icon to get this
dialog). We had to manually add
the center points of the eye
after our Fuzzy Select by
holding the Shift key down
while doing an Elliptical
selection. Once you have the
selection, feather it lightly,
perhaps 3 pixels or so.
3 Delete the duplicate layer –
we don’t need it anymore. Make
the Red channel active in the
Channels page of the Layers and
Channels dialog but turn off the
Green and Red Channels. Then
choose Image>Colors>
Desaturate. That will remove
the red from the eyes. LXF
www.linuxformat.co.uk
www.cups.org/
CUPS provides networked printing
support and a spooling interface.
http://gimp-print.sourceforge.net/
GIMP-Print goes way beyond just a GIMP
print plug-in. It’s a full-featured set of
drivers for many printers. Its drivers are
so well done they are considered better
than some of the original manufacturers
drivers and are being used by many Mac
OS X users now as well.
www.linuxprinting.org/foomatic2.9/
Foomatic is the glue between print
spoolers and printer drivers.
www.linuxprinting.org
This is the place to start to find out
whether there is a driver available for
your particular printer.
URLS
Online GIMP Resources
The GIMP
www.gimp.org
GIMP Registry (hundreds of plugins)
http://registry.gimp.org/index.jsp
Graphics Muse Tools CD
www.graphics-muse.com/gfxmuse/
gfxmuse.html
Tutorials and other useful links:
www.graphics-muse.com/cgi/gmcat.pl?id=11
NEXT MONTH
Cleaning up your old photos isn’t all the
difficult with The GIMP, as long as you know
how to isolate the damaged portions. Next
month we’ll look at creating selections
using various GIMP selection tools, including
the often overlooked Quick Mask.
LXF42 JULY 2003
75