1
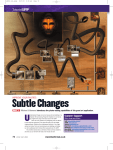
Appendix: Final Cut Pro Color-Correction, Keying, and
Matte Filters
As a complement to Chapter 10, here are images and instruction to control the filters
in Final Cut Pro that are used for color correction, keying, and matting images.
Color-Correction Filters
The following list covers the filters in the color-correction category (Effects > Video
Filters > Color Correction). Note: there are additional filters that can be used for color
correction in the image-control category.
Broadcast Safe—This filter is an easy way to make sure your video is legal. In most
situations, the Broadcast Safe filter does a good job making video legal. It cannot,
however, produce miracles. The Broadcast Safe filter is not meant to be a cure-all for
uncorrected clips, but rather, more of a second layer of protection against illegality. We
like to think of the Broadcast Safe filter as a safety net after we have already adjusted
and corrected our video.
The Broadcast Safe filter has several areas of control:
The Luma/Chroma Mode pulldown lets you choose presets for maximum allowable
composite level (luma and chroma combined). These are ranked by both description
and level. The best to use for most workflows will be “Very Conservative” and “Extremely
Conservative.” If you choose one of the presets other then the first one (Custom), none
of the sliders or controls below will have any effect. Choosing Custom will enable
greater control with the options below.
The Luminance Limiting section of the Broadcast Safe filter has several controls.
We can choose whether to enable or disable luminance limiting (the check box).
The Clamp Above control does two things. First, any value between the Start
(Threshold) and Clamp Above is compressed down to the value specified in the Max.
Output control. Second, any values that are above the percentage you enter are clamped
down to the value you specified in Max. Output.
The Max. Output control determines the maximum allowable luma for the footage.
The Start (Threshold) control allows you to specify what percentage to start compressing the luma.
The Saturation Limiting section works in exactly the same way, but on the chroma
portion of your image. There is one additional control in this section called Reduce
Chroma/Luma. This control affects how the illegal portions of the footage will be
1
2
Real World Workflows
Figure A.1 Controls for the Broadcast Safe filter.
Figure A.2 Controls for the Color Corrector filter.
Appendix
dealt with. Raising the value will darken more then desaturate illegal portions of the
footage, whereas lowering the value will desaturate more then darken illegal values
in the footage.
The last control is RGB Limiting. The ability to limit RGB is important because
many broadcasters have requirements for equivalent R’G’B values when converted
from Y’CBCR. You can choose to enable or disable this control as well as change the
Max. RGB Output Level control. Set at its default value of 100, no RGB limiting will
take place (you can adjust this value between 75 ando 125). If you need more control,
you can also use the RGB Limit filter (described below).
Color Corrector—This filter gives basic control over color balance and contrast.
After applying the Color Corrector filter, there are two ways of working with it. A new tab
will appear in the Viewer for a clip that has the Color Corrector filter applied to it. This
is the Visual tab of the Color Corrector. Most people prefer using the Color Corrector
in this way because it tends to be the most intuitive. You can also work with numerical controls for the Color Corrector by using the Filters tab of the Viewer. In the Color
Corrector tab, the top bar of the Color Corrector has several controls:
The Numeric button switches you back to the Filters tab for numeric entry and
control.
The circle with a diamond in it and the two arrows on either side are the keyframe
controls. Keyframing is how Final Cut Pro changes values over time. This is common
in color correction to compensate for changing lighting in a shot.
The check box next to the eye toggles the filter on or off.
Below the Numeric button are four options for copying the filter to and from
various clips.
Lastly, there is a mini-Timeline to view placement of keyframes, along with a
timecode box that displays current timecode.
Below these controls are two color wheels. The one on the left is the Balance control, and the one on the right is the Hue control. The Balance control lets you adjust
the color of the whites in the image, and the Hue control lets you adjust the hue of the
clip (this applies a hue to the whole clip, not to an individual channel). There is a Reset
button underneath the right side of each wheel. Underneath the left-hand side of the
Balance wheel is the Auto-Balance eyedropper, which lets you sample the footage for
true white. If you use the eyedropper, the balance will change, as indicated by the dot
moving in the center of the Balance wheel.
Below the color wheels, there are four sliders that let you control the levels for
the whites, mids, and blacks. Using these controls, you can adjust the contrast of
your footage. The fourth slider lets you control the overall saturation of the image. At
the end of each side of the sliders is a small triangle that lets you nudge the sliders in
small increments.
If you prefer, you can use the Auto White Level, Auto Black Level, and Auto Contrast
buttons to apply automatic adjustments to the footage. These buttons appear to the
right of the sliders.
To the right of the Auto Level buttons, you will find controls to match hues between
various clips. These Match Hue controls allow you to store and then apply a hue to
multiple clips. A common use of this is to match skin tones from scene to scene. This
process is a bit too lengthy to discuss here, so check out page 1382 (III-597) in the Final
Cut Pro User Manual (Help > Final Cut Pro User Manual) for more info.
Lastly, at the bottom of the Color Corrector, there is a disclosure triangle that
toggles open the Limit Effect controls. Using these controls, we can create secondary
color corrections and grades. For example, we can isolate the blue in the sky of a shot
3
4
Real World Workflows
and saturate it further. Or, if there is one color that is oversaturated in the footage—
say, a person wearing a bright red T-shirt—we can isolate that color and reduce its
brightness and saturation.
Again, Alexis Van Hurkman’s Encyclopedia of Color Correction: Field Techniques
Using Final Cut Pro is an excellent resource for learning the controls in the Limit Effect
section of the Color Corrector (as well as in the Color Corrector 3-way).
Color Corrector 3-way—This filter is similar to the Color Corrector. Controls that
are identical include the top bar; the four sliders that let you control the levels for the
blacks, mids, whites, and overall saturation (although the layout is somewhat different); the auto and Match Hue controls; and lastly, the Limit Effect controls. The big
difference is with controlling color balance. Instead of having one control for balance
and one for hue, we have three separate color wheels that let us adjust the mix of colors
for the black, mid, and white portions of the footage. Each color wheel has an AutoBalance eyedropper where you can sample true black, gray, and white in your image.
You can reset each channel with the Reset button located underneath the right side of
each wheel. In addition, you can reset all wheels and their respective level sliders all
at once by Shift-clicking one of the Reset buttons. These separate mechanisms allow
for much greater control over the footage. You can see why the Color Corrector 3-way
is the most often used filter in the color-correction group.
Desaturate Highlights—This is actually the same filter as Desaturate Lows
(described below), but has different options enabled by default. The Desaturate Highlights filter allows you to subtly desaturate unwanted highlights in an image after you’ve
applied primary or secondary color correction. After choosing Enable or Disable, you
can use the following controls:
• The Apply Above control lets you set a percentage of luma above which highlights
will be desaturated. The default is 70 percent.
• The Softness control lets you smooth out the transition from desaturated areas to
the rest of the image. The default is 15 percent.
• Lastly, Amount of Desaturation lets you determine how much the highlights will
be desaturated. The default is 100 percent.
Desaturate Lows—The Desaturate Lows filter is almost identical to Desaturate
Highlights. The main difference is that instead of applying desaturation above a
defined luma percentage, Desaturate Lows applies desaturation below a defined luma
percentage.
RGB Balance—This filter does what its name implies. It lets you control the balance
between the red, green, and blue portions of the image. Each channel has separate
controls to adjust highlights, midtones, and blacks. Keep in mind that this filter operates
in R’G’B space, not Y’CBCR, so it is possible to create illegal values for broadcast.
RGB Limit—A new (and much-needed) filter in FCP 6 allows you to prevent illegal
R’G’B levels when working with Y’CBCR. This is important because some broadcasters
require that Y’CBCR when converted to R’G’B (for display on an LCD or DLP monitor,
for example) fall in a range of 0 to 100 percent. This filter has several sections:
The first is Minimum RGB Limiting. Here, you can choose whether to activate
clamping at a certain percentage using the Clamp Levels Below control. What this
means is that R’G’B values that fall below the percentage you define will be clamped
at, or brought up to, your predefined percentage. The default is 0 percent (remember:
0 percent in Y’CBCR corresponds to either an RGB value of 16 for 8-bit video, or 64
Figure A.3 Controls for the Color Corrector 3-way filter.
Figure A.4 Controls for the Desaturate Highlights filter.
Appendix
5
6
Real World Workflows
Figure A.5 Controls for the RGB Balance filter.
Figure A.6 Controls for the RGB Limit filter.
Appendix
for 10-bit video).
The second section is Maximum RGB Limiting. As the name suggests, this controls
the maximum R’G’B values for your video. Using the Clamp Levels Above control,
you define the percentage where clamping will take place. This works like Minimum
RGB Limiting. In this case, R’G’B values that fall above the percentage you define will
be clamped at, or brought down to, your predefined percentage. The default value is
107 percent. Our feeling is that this is probably okay for most broadcasters. However,
if you want to be extra safe, a value of 100 percent would be best (remember: 100
percent in Y’CBCR corresponds to either an RGB value of 235 for 8-bit video, or 940
for 10-bit video).
The last section is Maximum RGB Reduction. Here, you control at what percentage
portions of the signal will be desaturated or darkened (in that order). In other words,
after clamping has been applied, any part of the signal that is above the percentage
you set with the Desaturate or Darken Levels Above control will be desaturated or
darkened. The default is 100 percent.
Masking Filters
Eight-Point Garbage Matte—Gives you eight points of control for a polygon shape.
By default, footage inside the shape will remain, but footage outside the shape will
become transparent. Additionally, you can choose to smooth the edges of the shape,
to choke (expand or contract) the edges, or to feather (blur) the edges. Finally, you can
invert the matte by clicking on the Invert check box.
Extract—Produces a matte based on the luma portion of the image. Using the
Threshold, Tolerance, and Softness controls, you can fine-tune the matte. You can also
choose to apply the matte to either the RGB or alpha channel (transparency) of your
footage. Lastly, you can choose to invert the matte.
Four-Point Garbage Matte—Acts in the same way the Eight-Point Garbage Matte
does, except with four points of control for simpler shapes.
Image Mask—Uses either the luma or alpha channel from another clip to create
a matte. This works by dragging a clip into the image well of the Mask parameter and
choosing either Luma or Alpha from the Channel pulldown.
Mask Feather—Lets you blur the alpha channel of a clip.
Mask Shape—Lets you choose from prebuilt shapes (rectangle, rounded rectangle,
oval, or diamond) to make a matte. Using the Horizontal Scale and Vertical Scale controls, you can adjust the size of the shape. The Center control lets you position the
mask on your footage. Lastly, you can invert the mask.
Matte Choker—Allows you to control the edges of a matte. This filter is often
used in conjunction with keying filters (described below). The Edge Thin slider lets
you smooth out the edges of the matte by either filling in keyed areas that are thin or
contracting areas that are not supposed to be part of the matte. Edge Feather lets you
blur the edges of the choked matte.
Matte Magic—Similar to the Matte Choker. You can use the Matte Magic filter to
control the edges of a matte.
Soft Edges—An an easy way to create vignetting on your footage. The Corners
control allows you to adjust the curve of the corners—you can choose Round, Bevel,
or Cut. You can adjust each corner using the Left, Right, Top, and Bottom controls. The
7
8
Real World Workflows
Figure A.7 Controls for the Eight-Point Garbage Matte filter.
Figure A.8 Controls for the Extract filter.
Appendix
Figure A.9 Controls for the Image Mask filter.
Figure A.10 Controls for the Mask Shape filter.
Dither and Gaussian check boxes allow you to alter the edges. Lastly, you can invert
the effect.
Widescreen—The Widescreen filter allows you to create a letterboxed look. Using
the Type pulldown, you can choose common aspect ratios such as 1.85, 2.35, and so
on. The Offset slider allows you to adjust the image up and down in order to keep the
subject in the middle of the letterbox. Lastly, you can add a border, adjust its color,
and feather the edges.
Keying Filters
Blue and Green Screen—The Blue Screen filter and the Green Screen filter allow
you to key out blue and green, which are common colors used as an artificial background to shoot foreground material meant to be composited with other elements.
The View pulldown gives you several choices: source (the original clip), matte
(what you are keeping and what you are deleting), final (the result), and a three-up
display of the three views. The Key Mode pulldown lets you choose blue, green, or
blue/green difference. The Color Level control lets you control how much blue or
green to key out.
The Color Tolerance control lets you expand or contract the key to adjacent
colors.
The Edge Thin control lets you smooth out the edges of the matte by either filling
9
10
Real World Workflows
Figure A.11 Controls for the Matte Choker filter.
Figure A.12 Controls for the Soft Edges filter.
Figure A.13 Controls for the Widescreen filter.
in keyed areas that are thin or contracting areas that are not supposed to be part of
the matte.
The Edge Feather control lets you blur the edges of the key. Lastly, you can invert
the key.
Chroma Keyer—Probably the most used filter in the group. The Chroma Keyer
filter has controls similar to the Limit Effect controls in the Color Corrector and Color
Corrector 3-way. You can choose to adjust the filter numerically by using the controls
in the Filter tab of the Viewer, or you can use the visual controls that appear in the
Appendix
Figure A.14 Controls for the Blue Screen and Green Screen keying filters.
Figure A.15 Controls for the Chroma Keyer filter.
Chroma Keyer tab that appears after you’ve applied the filter.
The top bar of the Chroma Keyer is identical to those of the color-correction filters.
On the right-hand side, you will find three buttons: an eyedropper that lets you sample
values in your footage to key; a Key button that lets you cycle through the source, matte,
and final views; and an Invert button to invert the key.
The Color Range control lets you choose a color or range of colors to take part in
the key. You can fine-tune this by using the Saturation and Luma controls.
11
12
Real World Workflows
Figure A.16 Controls for the Color Key filter.
Figure A.17 Controls for the Difference Matte filter.
Below the Color Range, Saturation, and Luma controls, there are three additional
controls that allow you to adjust the matte. The Edge Thin control lets you smooth out
the edges of the matte by either filling in keyed areas that are thin or contracting areas
that are not supposed to be part of the matte. The Softening control lets you blur the
edges of the key. The Enhance slider lets you suppress spill that results from the key
(see more about spill below).
Fig 16 Color Key—A versatile key filter that lets you pick any color to key. The
View pulldown lets you view the source layer, matte, final, and a three-up display of
the three views. The color controls let you pick the color to be keyed. The Tolerance
control allows you to adjust the portions of the footage that will be part of the matte.
The Edge Thin control lets you smooth out the edges of the matte by either filling in
keyed areas that are thin or contracting areas that are not supposed to be part of the
matte. The Edge Feather control lets you blur the edges of the key. Lastly, you can
choose to invert the key.
Color Smoothing–4:1:1—A very useful filter in conjunction with keying, Color
Smoothing–4:1:1 helps reduce aliasing that results from keying 4:1:1 chroma subsampled sources such as DV, DVCAM, and DVCPRO. This filter should always be
applied before the key.
Color Smoothing–4:2:2—Also used in conjunction with keying, Color Smooth-
Appendix
Figure A.18 Controls for the Luma Key filter.
ing–4:2:2 helps reduce aliasing that results from keying 4:2:2 chroma subsampled
sources such as DVCPRO50 and Digital Betacam. This filter should always be applied
before the key.
Difference Matte—The Difference Matte filter works by comparing two clips
and keying out the areas that are similar. A common use of this is to key out a static
background with a moving foreground when other types of keys (for example, luma
or chroma) will not work. This is done by using part of the footage without the foreground subject as the difference layer. The View pulldown lets you view the source
layer (the one to which you’ve applied the filter), the difference layer (the one that you
are comparing), the matte, the final image, or all four views as part of a four-up display.
The difference layer well lets you drag clips into it to act as the difference layer. The
Threshold and Tolerance controls allow you to adjust the portions of the footage that
will be part of the matte. Lastly, you can choose to invert that matte.
Luma Key—As its name implies, the Luma key allows you to key out parts of the
footage based on luma information. The View pulldown lets you view the source, matte,
and final, along with a three-up display of the three different views. The Key Mode
pulldown lets you choose if you want to key out brighter, darker, similar, or dissimilar
areas of the footage. The Matte pulldown lets you choose if the resulting matte will
be copied to the alpha channel of the footage to create transparency, or to RGB. The
Threshold and Tolerance controls allow you to adjust the portions of the footage that
will be part of the matte. Laslty, you can choose to invert the matte.
Spill Suppressor–Blue—The Spill Suppressor–Blue filter reduces “spill,” or residual
blue areas that were not keyed out completely using the Blue Screen filter, the Green
Screen filter, or the Chroma Key filter. This filter works by desaturating the edges where
the spill occurs. The Amount control lets you choose how much spill suppression to
apply. This filter should always be used after the key.
Spill Suppressor–Green—Identical to Spill Suppressor–Blue, but geared to controlling spill from greenscreens. This filter should always be used after the key.
13