1
NovaBACKUP xSP®
Instruction Manual
NovaStor / November 2010
© 2010 NovaStor, all rights reserved. All trademarks are the property of their respective owners. Features
and specifications are subject to change without notice. The information provided herein is provided for
informational and planning purposes only.
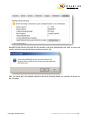
Index
About NovaBACKUP xSP .................................................................................................... 3
How this manual is organized: ........................................................................................................................ 5
Storage Server ................................................................................................................................................ 5
Remote Manager ............................................................................................................................................. 5
The Commerce Server .................................................................................................................................... 5
Application Update Server ............................................................................................................................... 5
The Remote Manager ACS Config.exe .............................................................................................................
The NovaBACKUP xSP Product Builder ......................................................................................................... 5
Client Module................................................................................................................................................... 6
Web Based Restore ........................................................................................................................................ 6
Installing NovaBACKUP xSP Storage Server ....................................................................... 7
Minimum System Requirements ..................................................................................................................... 8
Installation ....................................................................................................................................................... 8
NovaBACKUP xSP Storage Server Configuration Manager .............................................. 15
Starting up the Configuration Manager ......................................................................................................... 15
Accounts ........................................................................................................................................................ 17
General Tab................................................................................................................................................... 27
Security Tab .................................................................................................................................................. 28
A word about the master decryption key: ...................................................................................................... 29
Installing NovaBACKUP xSP Remote Manager ................................................................. 38
NovaBACKUP xSP Remote Manager ................................................................................ 47
Remote Manager ACS Configuration Utility ...........................................................................
Creating New Accounts, Modifying Existing Accounts (Remote Manager ACSConfig.exe) .............................
Starting Remote Manager Account Creation Settings: .....................................................................................
Commerce Server Installation and Upgrade ....................................................................... 71
System Requirements ................................................................................................................................... 72
Upgrading from a previous version ............................................................................................................... 72
Installing Commerce Server .......................................................................................................................... 72
NovaBACKUP xSP Commerce Server ............................................................................... 83
The Commerce Server User Interface .......................................................................................................... 85
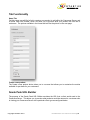
Tab Functionality ........................................................................................................................................... 86
Sneak Peak URL Builder ............................................................................................................................... 86
Account Tab .................................................................................................................................................. 87
Catalog Tab ................................................................................................................................................... 88
Create a new product .................................................................................................................................... 90
General Tab................................................................................................................................................... 92
Payment Methods Tab .................................................................................................................................. 93
PayPal Tab .................................................................................................................................................... 94
Newsletter Tab .............................................................................................................................................. 94
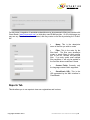
Reports Tab ................................................................................................................................................... 95
Copyright NovaStor 2010
NovaBACKUP xSP Instruction Manual | 1
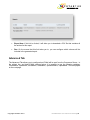
Advanced Tab ............................................................................................................................................... 96
Content Tab ................................................................................................................................................. 100
Database Tab .............................................................................................................................................. 101
NovaBACKUP xSP Application Update Server ................................................................ 102
Installing the NovaBACKUP xSP Application Update Server ..................................................................... 102
Using NovaBACKUP xSP Application Update Server ................................................................................ 108
NovaBACKUP xSP Product Builder ................................................................................. 112
Status .......................................................................................................................................................... 113
General ........................................................................................................................................................ 114
Languages ................................................................................................................................................... 115
Graphics ...................................................................................................................................................... 115
Code Signature............................................................................................................................................ 116
Setup ........................................................................................................................................................... 116
Help ............................................................................................................................................................. 116
Comments ................................................................................................................................................... 117
Sending your Client Application Settings to NovaStor ................................................................................ 117
About Timing Out......................................................................................................................................... 118
Distributing your client application ............................................................................................................... 119
NovaBACKUP xSP Client Module – Backup Software ..................................................... 119
Configure Device ......................................................................................................................................... 121
Security ........................................................................................................................................................ 123
Advanced ..................................................................................................................................................... 124
Staging ........................................................................................................................................................ 125
Importing the Stage Backup to the Server .................................................................................................. 127
How to change the online device settings ................................................................................................... 128
Running an online backup ........................................................................................................................... 130
A word on the simple view mode................................................................................................................. 132
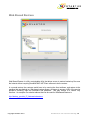
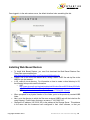
Web Based Restore ......................................................................................................... 133
Installing Web Based Restore ..................................................................................................................... 134
Customer Use of Web Based Restore ........................................................................................................ 135
APPENDIX ....................................................................................................................... 136
NovaBACKUP xSP Remote Settings: ......................................................................................................... 136
Commonly used Terms ............................................................................................................................... 138
Contacting Technical Support ..................................................................................................................... 139
Copyright NovaStor 2010
NovaBACKUP xSP Instruction Manual | 2
About NovaBACKUP xSP
NovaBACKUP xSP is a complete data protection system. NovaBACKUP xSP allows you to
provide your clients with automatic local and offsite backup, plus image based local disaster
recovery, through a single, simple SaaS interface that can be customized and rebranded.
NovaBACKUP xSP comes with rebranded interface, central management functions and
comprehensive automation requiring little administrative effort.
NovaBACKUP xSP allows your customers to manage local backups, offsite backups and
disaster recovery images from the same interface.
NovaBACKUP xSP is device and location independent.
An innovative seed licensing program helps you gain new customers and reduce your
customer acquisition cost.
Simple licensing eliminates additional costs for SQL/Exchange agents, etc.
Web based restore allows your clients to access their data anywhere they have an Internet
connection.
NovaBACKUP xSP‘s Commerce server, included with NovaBACKUP xSP, simplifies and
automates the creation of accounts, eases the sign-up of new users, and allows you to track
the payment and usage of customers. NovaBACKUP xSP also allows you to generate
status messages when a customer‘s backup is at or near quota. Automated E-Mail
messages to customers can be set up for greeting on signup and for reminders about trials
expiring, and can be set up for other events.
NovaBACKUP xSP also features a Product Builder application that enables you to specify
the IP address of the Storage Server, and also enabling you to customize many features of
the backup client. In NovaBACKUP xSP Product Builder, you can provide your own
graphics, help, and other files, and can thus create a very highly customized client
application.
NovaBACKUP xSP stores settings and data directly into the SQL database. The data items that
are stored in SQL provide the flexibility to create specific reports for end users, accounting, and
management by having all the data clearly available in a SQL database.
The NovaBACKUP xSP client software is based on NovaStor‘s award winning NovaBACKUP
software. This is a valuable, user friendly package that simplifies your customers‘ backup
operations. These operations can include making a full image of the computer onto which the
software is installed, backing up a single file or folder, backing up the system state of the computer,
backing up a Microsoft SQL or Exchange Server, or simply scheduling a copy of some files to
another machine. Plus, unlike most other purely Online Backup software, file copies or even
complete backup images can be made onto local devices such as USB drives, CD/DVD/BD, tape,
NAS devices, or to a local hard drive.
Before data is transferred to your Storage Server, it is encrypted and compressed, allowing safe,
compact data transfers over the Internet or through your company‘s internal networks. The data is
then stored in a proprietary compressed and encrypted format on the storage server.
NovaBACKUP xSP uses FastBIT™ technology. FastBIT™ transfers changed data only. Backups
made using NovaBACKUP xSP are up to 99% faster than backups using block level technology.
Copyright NovaStor 2010
NovaBACKUP xSP Instruction Manual | 3
File encryption and compression are standard features in NovaBACKUP xSP. The combination of
FastBIT™ and compression result in high speed backup. Encryption enables secure backup.
For customers with large amounts of data to back up, NovaBACKUP xSP provides the ability to
‗Stage‘ the backup data, recording an encrypted version of the data onto media that can be
delivered to the Storage Server for transfer onto the client‘s backup directory. For example, a
customer may want to back up 1 TB of data. This would take days or longer over the Internet.
Staging the data onto an external hard drive, and delivering the drive to you, for installation on the
client‘s directory on your Storage Server can save a tremendous amount of time.
Many of the NovaBACKUP xSP functions can be managed remotely, over the Internet or an
internal network, providing powerful administrative controls – whether you are at your office, or in a
remote location with Internet access.
To see the definitions of our commonly used terms, like FastBIT™, please look in the
Appendix on page 130.
Copyright NovaStor 2010
NovaBACKUP xSP Instruction Manual | 4
How this manual is organized:
This manual explores and explains NovaBACKUP xSP in the order in which the components are
installed:
Storage Server (also sometimes referred to as Backup Server) is the module that manages
the storage of subscriber data. The Storage Server is where the user data is sent from the client
software, and from which the files can be restored. All storage manipulation, such as the retention
period of the data for a user, is done on the Storage Server.
This section will explore installation, configuration and use of NovaBACKUP xSP Storage Server.
Remote Manager allows you to perform remote management of many of the tasks that are
done locally within the Storage Server Configuration Manager. Remote Manager is very rich in
features, and enables you to manage multiple Storage Servers.
An account creation module in this manual discusses the steps required to create new users and
new user accounts.
The Remote Manager section explores installation, configuration and use of the NovaBACKUP xSP
Remote Manager, and delves into account creation.
The Commerce Server
is used to support your efforts to develop a commercial,
subscription-driven, offsite backup business. Powerful tools enable you to configure the many
parameters of customer accounts. The SQL Engine on which NovaBACKUP xSP Commerce
Server is run can also prepare numerous reports of account activity, enabling you to quickly and
easily assess the status of your business.
In these pages, we discuss installing the Commerce Server, and configuring the Commerce Server
to support multiple accounts, and perform a wide range of functions.
Application Update Server
The Application Updater is a module that can be used to receive update requests from users and
provide the updates available to that user or group of users.
The NovaBACKUP xSP Product Builder
allows you to create a custom
version of NovaBACKUP that you can distribute to your customers as part of the service. The
Product Builder provides impressive flexibility, allowing you to use your own graphics to make the
product look like one you developed modify existing documentation or provide your own, and it
allows you to pre-configure the settings required to reach your Storage Server.
Copyright NovaStor 2010
NovaBACKUP xSP Instruction Manual | 5
Depending on your NovaBACKUP xSP subscription, you may be able to design and distribute
multiple different versions of the Client application, which are targeted to specific groups of users.
Additionally, NovaStor offers packages that will allow your business to be on its approved list of
online backup providers that is included in the commercial versions of NovaBACKUP.
Client Module
In this section, we will run through some of the steps required to install and initially configure the
NovaBACKUP xSP Client software(the version of NovaBACKUP that was built for you, based on
the settings you selected in Builder). This module provides simple instructions for selecting a
backup target and running a first backup.
Web Based Restore is a two-part solution.
The first part is a module that is installed on
the Storage Server and that allows a user to log in and access files that were backed up by the
user. On the user side, the user logs in to a special directory on the server. The first time the user
logs in, a small piece of software must be installed. The benefit of Web Based Restore is that it
enables the user to access and recover files without being required to use the Client software or to
restore to the directory from which the backed up file was originally copied.
Copyright NovaStor 2010
NovaBACKUP xSP Instruction Manual | 6
Installing NovaBACKUP xSP Storage Server
A SQL database is central to the structure of the Storage Server. A properly working SQL
database server is therefore required to install and operate NovaBACKUP xSP. It is essential that
the NovaBACKUP xSP SQL databases are regularly backed up in order to ensure rapid recovery in
the event of a system or data failure. The database server is the most significant part of scaling* a
NovaBACKUP xSP Storage Server installation.
Copyright NovaStor 2010
NovaBACKUP xSP Instruction Manual | 7
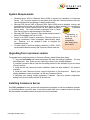
Minimum System Requirements
The minimum requirements are listed below:
Microsoft Windows 2003 Standard/Enterprise SP2 (32 or 64 bit)
or
Microsoft Windows 2008 Standard/Enterprise SP1 (32 or 64 bit)
Connectivity to one of the following:
Microsoft SQL 205 SP2+
Microsoft SQL 2008
.NET 3.5 Framework
Internet Explorer 7.0 or higher
* You can download and install the free version of Microsoft SQL called SQL Express, and
that will support you until you reach 35 – 50 users. Remember that the free version has a
hard memory limit of 4 GB. We recommend the full version of SQL for this reason.
Installation
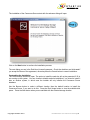
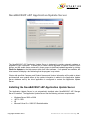
To start installation, click or run the Setup xSP.exe to begin the installer wizard.
After a few seconds, the NovaBACKUP xSP Storage Server Wizard will open.
Click next, and the License Agreement screen opens.
Copyright NovaStor 2010
NovaBACKUP xSP Instruction Manual | 8
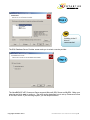
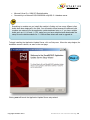
If you accept the terms of the license, click inside the box next to I accept the terms in the
License Agreement.
Click next to move to the next installation step.
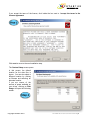
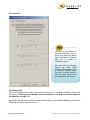
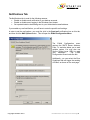
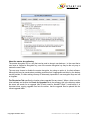
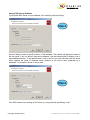
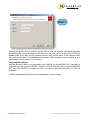
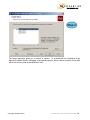
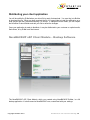
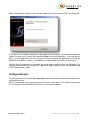
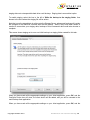
The Custom Setup screen opens:
In this screen, the default
location for the data files is
shown. You can also select a
different location by clicking
on Browse and selecting an
alternate location.
If you are unsure of the
amount of space available on
your drives, clicking on Disk
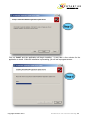
Usage will open the following
screen:
Copyright NovaStor 2010
NovaBACKUP xSP Instruction Manual | 9
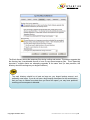
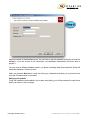
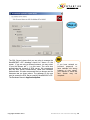
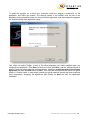
Click OK to return to the Setup screen.
NovaStor recommends that
you use the C: drive for the
SQL databases associated
with NovaBACKUP xSP.
Once you have selected
the target drive, or if you
choose to go with the
defaults, press Next, and
you will advance to the
Service Account screen.
If you are performing an Upgrade, you do not need to re-install the database portion unless
you want to install a ―dummy‖ database. If you do this, you must edit your backup server.ini
to the correct database after install before the backup server connects to the original
database.
Copyright NovaStor 2010
NovaBACKUP xSP Instruction Manual | 10
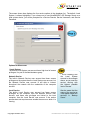
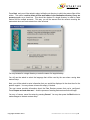
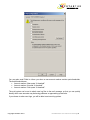
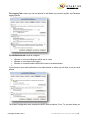
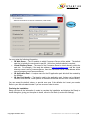
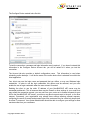
The screen shown here displays the four service options in the dropdown list. The default, Local
System, is shown highlighted. If you choose not to use NovaBACKUP xSP Storage Server as a
local system device, you will be prompted for a Service Domain, Service Username, and Service
Password.
Options for this screen:
* Local System:
The built-in Local System user account has a high level of access
privileges; it is part of the Administrators group.
Network Service:
The built-in Network Service user account has fewer access
privileges on the system than the Local System user account, but
the Network Service user account is still able to interact
throughout the network with the credentials of the computer
account.
Local Service:
The built-in Local Service user account has fewer access
privileges on the computer than the Network Service user
account, and those user privileges are limited to the local
computer. Use the Local Service user account if the worker
process does not require access outside the server on which it is
running.
Copyright NovaStor 2010
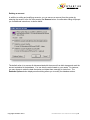
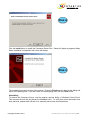
* We‘re installing with
the
Local
System
account in the example
above, as you want the
service running with
the highest possible
level of access.
Also be aware that the
name of the service as
it will appear under Win
services is ‗Backup
Server‘.
NovaBACKUP xSP Instruction Manual | 11
Once the type of account is selected, press Next to move to the next step in installation.
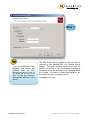
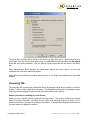
The following screen asks you which type of SQL program will be used for the database services
required by the xSP Storage Server. Because MySQL* is an open source SQL database program,
support for MySQL from NovaStor is very limited. We find that Microsoft SQL Server is a better
commercial product developed and supported by Microsoft and a network of consultants, and has
numerous online support forums. NovaStor encourages the use of Microsoft SQL Server with
NovaBACKUP xSP if at all possible.
Select the SQL Server Provider, and Click Next.
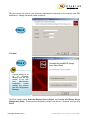
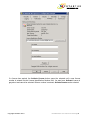
Coming to the next screen, you choose the correct instance of SQL, and use either Windows or
SQL authentication. If you are not familiar at all with SQL please use Windows authentication.
When you choose SQL server and it asks for the account, this is the sa account. Remember if you
want to us the sa account it must be enabled in SQL, and you must have a password activated. We
find that setting your SQL to use mixed mode authentication is helpful and will get you through any
issues on this screen. Still, we find the majority of customers who have no SQL knowledge getting
stuck on this particular screen. If you are not sure what to put in the SQL server field, or what an
instance name is, open SQL Server Management Studio. The very first screen in Management
Studio has the SQL instance name you can copy and paste into the setup wizard.
Copyright NovaStor 2010
NovaBACKUP xSP Instruction Manual | 12
If you are browsing for SQL
instances and cannot see
anything listed, the SQL
Browser service will need to
be turned on for you to be
able to have the instances
automatically detected in the
wizard.
Copyright NovaStor 2010
The SQL Server names available on the network are
retrieved by the NovaBACKUP xSP Storage Server
installer. The server instances shown may not be the
instance you choose to use. The database name field at
the bottom will be the name given to the database when
it is created. The default is always BackupServer, but
this can be changed to anything you like.
Click Next to continue.
NovaBACKUP xSP Instruction Manual | 13
This next screen will ask for your Windows Administrator username for the machine with SQL
installed on it. Adding the domain name is optional.
Click Next.
A good practice is to
go
to
Windows
services and set the
service to run with
your
Administrator
credentials
before
starting the service
and the Configuration
Manager.
The Final screen shows Start the Backup Server Service and Launch the Backup Server
Configuration Utility. These items are checked by default, and will run, if checked, once you click
Finish.
Copyright NovaStor 2010
NovaBACKUP xSP Instruction Manual | 14
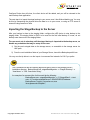
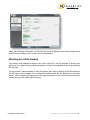
NovaBACKUP xSP Storage Server Configuration
Manager
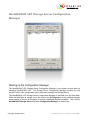
Starting up the Configuration Manager
The NovaBACKUP xSP Storage Server Configuration Manager is your primary access point for
managing NovaBACKUP xSP. The Storage Server Configuration Manager provides you with
access to all the main configuration menus required to manage your Storage Server.
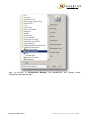
The NovaBACKUP xSP Storage Server Configuration Manager is launched from the Start Menu.
When the Start Menu is opened, move the mouse over All Programs until the additional program
screen opens, or click on All Programs to reveal the additional programs available. Then, click on
NovaBACKUP Storage Server and select Configuration Manager, as shown here:
Copyright NovaStor 2010
NovaBACKUP xSP Instruction Manual | 15
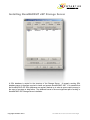
After you left-click on Configuration Manager, the NovaBACKUP xSP Storage Server
Configuration Manager will open.
Copyright NovaStor 2010
NovaBACKUP xSP Instruction Manual | 16
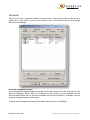
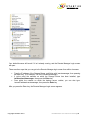
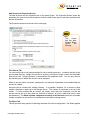
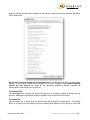
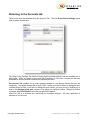
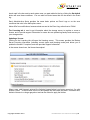
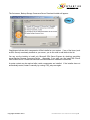
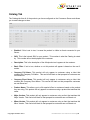
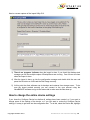
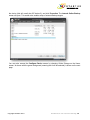
Accounts
This is the tab that is opened by default, as shown below. The primary function of this tab is to
enable you to add, remove, or view the Properties of your client accounts that use this Storage
Server for their backups.
Accounts management screen:
You can access the account properties and add or remove an account all on the same screen. The
Accounts Properties Screen shows the properties of the account you have selected, and the
Accounts Add Screen has not yet been populated with account information. In addition, you can
create and manage Groups in this screen.
A typical account properties screen has three tabs: General, Quota, and Settings.
Copyright NovaStor 2010
NovaBACKUP xSP Instruction Manual | 17
Please be aware that you are
only
able
to
manage
passwords in this screen if
you
have
used
SQL
authentication during the
installation. If Active Directory
is handling authentication,
these fields will not appear. If
you
want
to
change
authentication methods after
you‘ve
installed,
please
contact support for details on
this.
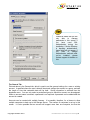
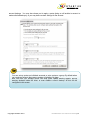
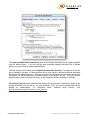
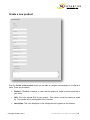
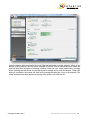
The General Tab
Pictured above is the General tab, which is used to set the general settings for a new or existing
account. It specified where the user‘s data will be stored, assigns the account to a group, and sets
the length of time that restorable data will be held. Group information is selected from the
dropdown menu. You can only select a pre-defined group to which this account can be assigned.
When an account name is entered, a password is not required. A password can be added after the
account is created.
Accounts can be created with multiple licenses. It is possible, therefore, for a license to allow
multiple computers to back up to the Storage Server. The number of computers is set up in this
screen. It is also possible that an account will support more than one computer, but that the
Copyright NovaStor 2010
NovaBACKUP xSP Instruction Manual | 18
account can be set up to only allow one machine to access it at a time, rather than one or more
simultaneously. The Allow separate computers to backup to this account check box will enable
multiple computers on the account to simultaneously access the Storage Server.
The primary storage location specifies where the backup server will cache certain account
information. The storage location is selected from a list of location specified on the Storage tab,
which will be discussed more in a later section. In addition to account information, this is also
where an account data folder will be created, which serves as a repository for files that are
backed up by the client that holds the account. By default, the data folder name is the same as the
account name. You can change the data folder name to suit your own needs, but it must be unique
across all account.
As the client backs up files they are stored in the data
folder. If the disk that contains the folder fills up then file
data will automatically be directed to an alternate storage
location if one is available. The automatic redirection
feature can be disabled for the account by checking
Restrict backed up files to primary storage location.
For new installations, setup
creates the default storage
location C:\UserData.
For
upgrades from versions prior
to 12.0, setup creates
storage locations based on
account information found in
the existing database.
Upgraded accounts will be
restricted to the primary
storage
location
for
compatibility with the older
software. After an upgrade,
review the account properties
to
make
any
desired
adjustments to the default
settings.
Copyright NovaStor 2010
NovaBACKUP xSP Instruction Manual | 19
The Quota Tab
You can set up quotas on
individual accounts or set a
quota on a group. By default
when you create an account,
there are no quotas or
limitations in place.
Also note that your Storage
Server can send quota
related warning reports, popup warning windows inside
the client, or even disable a
client‘s backup. All this can
be configured in this screen.
The Settings Tab
This screen enables you to add a new setting, edit the value of a setting, or delete a setting from
this account. Settings are pre-defined, and are included in a list at the end of this manual in
the Appendix, on page 130.
Returning to the Accounts tab will occur automatically after you press OK or Cancel in the Account
Properties or Account Creation screen.
Copyright NovaStor 2010
NovaBACKUP xSP Instruction Manual | 20
There are two more features selectable from buttons on the Accounts Tab: Data Restore Wizard
and Group Policy Settings.
Group Policy Settings
Opens a list of groups, shown here:
This screen lists the
Groups
that
are
already defined, and
also enables you to
add groups.
When
you select a group and
click Properties, or
click Add, a screen
like the one shown
here to add accounts,
or
enter
account
properties will appear.
Data Restore Wizard
This built in restore wizard enables you to upload a customer‘s entire backup to another media or
location. You have complete control over what type of media to write to, and can specify custom
sizes for new folders. The process will write a series of folders into whatever location you‘re
uploading to, including a folder called setup. Inside the setup folder, is a setup.exe that you will
need to run when you are ready to restore. This opens a lite version of the client made specifically
for restore. It is at this point you are able to restore individual files or the account‘s entire backup.
The initial screen looks like this:
Copyright NovaStor 2010
NovaBACKUP xSP Instruction Manual | 21
Once the wizard opens, you will see a list of accounts and the current disk usage of each. This is
shown on the next page.
Media you can use:
CD/DVD/BDU (Blu-ray),
internal or external hard
disc, or Flash Drive (still
compressed
and
encrypted).
Copyright NovaStor 2010
NovaBACKUP xSP Instruction Manual | 22
Here you select the account you want to restore, and press Next. Then select a volume that you
wish to restore, such as the C: drive. The Data Restore Wizard will provide information about the
space required to make the restore files, and then let you choose a target for the data restore files.
It is at this stage you are able to specify the media.
The screen, with Custom Media Size selected is shown here:
Copyright NovaStor 2010
NovaBACKUP xSP Instruction Manual | 23
Press Next, and you will be asked to select a Media root directory to which the restore files will be
written. The option to ask to delete all files and folders in the destination directory if any are
present appears as a check box. This should be checked if a single directory is used to create
restore files for multiple accounts. This way, you will be assured that the account receiving the
restore data does not receive data from other accounts.
You may browse for a target directory or enter the name of a target directory.
You will next be asked to select the language that will be used by the user when running data
restore Setup.
Next, you will be asked to enter information that you would like displayed in the about box for the
product support. You may choose to leave this empty, if desired.
The next screen provides information about the Data Restore process that you‘ve configured.
Press Prepare account data now! - And the process of creating data restore media will begin.
You may, of course, cancel the setup by pressing Cancel. You may also press the Back button to
make changes to the data restore setup.
Copyright NovaStor 2010
NovaBACKUP xSP Instruction Manual | 24
Deleting an account
In addition to adding and modifying accounts, you can remove an account from the system by
selecting the account in the list, then pressing the Remove button. A confirmation dialog will prompt
you for additional instructions, as shown below.
The default action is to remove all data associated with the account from disk storage and mark the
account as deleted in the database. You can alter the action based on your needs. For instance,
you may choose to retain the data directories and delete them manually at a later time. The
Database Options button displays another dialog allows you to modify the database actions.
Copyright NovaStor 2010
NovaBACKUP xSP Instruction Manual | 25
A permanently deleted account
cannot be ―undeleted.‖ Choose
this option only if you are certain
the account information is no
longer needed.
Hidden
accounts
are
automatically restored if an
account with the same name is
added through the Accounts tab.
The normal account disposition is the ―hide‖ the account, that is, keep it in the database but flag it
as deleted. This permits the account to be ―undeleted‖ later, if necessary. You can also choose
Preserve Account if the account should not be flagged as deleted, or Permanently delete
account to remove the account from the database.
You may optionally choose to delete the account‘s file information, which describes all the files
backed up by the account, or the request history, which is a log of requests the server has received
from the account. Note that you do not have the option of keeping any associated data if the
account is being permanently deleted.
Copyright NovaStor 2010
NovaBACKUP xSP Instruction Manual | 26
General Tab
The General Tab has some powerful features that enable you to control certain global settings. The
default Storage Server port is 308 – unless you have a reason to change the port, it should remain
at 308. If you want to change the port number, you may do so by scrolling up or down in the
Storage Server port: window, or by typing in a new port number. When that number is entered,
press Set Default to save the new port as the default.
If you change the
server port, be
aware you will
need to edit the
client‘s
backupclient.ini
file so that the
server and client
communicate
over the same
port. You can ask
Support for more
info about this.
The Limit bandwidth and connections section of the General tab allows you to create bandwidth
limits for backup users. If you are running other processes on your computer besides functioning
as a Storage Server, you may choose to create bandwidth limits.
The final section in the General tab is Duplicate account profiles directory. As explained in the
text that is included in this area, it is important that one or more copies of account profiles be
Copyright NovaStor 2010
NovaBACKUP xSP Instruction Manual | 27
duplicated and stored in a separate directory. This way, should a user.apf become corrupted, the
account information can be restored from information stored in the backup .apf file. You may use
the browse button to select a different directory, or just accept the default by making no changes.
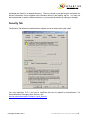
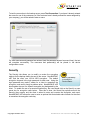
Security Tab
The Security Tab defines the authentication method you have chosen during the install.
You may implement TLS if you have a certificate that can be applied for authentication. For
information about Transport Layer Security, visit:
http://en.wikipedia.org/wiki/Transport_Layer_Security
Copyright NovaStor 2010
NovaBACKUP xSP Instruction Manual | 28
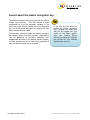
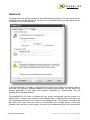
A word about the master decryption key:
The master decryption key is a key that can be used to
decrypt user backups. This little feature is often
overlooked but it can be extremely valuable. In the
event that a user loses or forgets his or her decryption
key, use of the master decryption key may be the only
way to restore the user‘s data.
The user may choose to disable the master decryption
key using an option in its client software. Although this
may be perceived as providing protection from
inappropriate activities by the backup service provider,
it is also making recovery of data nearly impossible if
user encryption keys are lost or forgotten.
Copyright NovaStor 2010
If you find that the button to
enable the master decryption
key is grayed out, make sure
that you are logged into your
server as the same specific
user your backup Server
Service is running as. Typically
this should be your Domain
Administrator account.
NovaBACKUP xSP Instruction Manual | 29
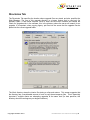
Directories Tab
The Directories Tab specifies the location where upgrade files are stored, and also specifies the
Work Directory. The use of this upgrade directory is a legacy feature that is used only for
NovaNET-Web 7.x and earlier versions. When a client runs the client software and checks the
Check for Upgrades tab in the software, this is the directory where the server will search for an
upgrade. It is important, when copying legacy .pat files into the server that the upgrade files be
placed into the correct upgrade folder.
The Work directory stores the interim files during a rollup and restore. This screen suggests that
the directory has a considerable amount of room to copy these temporary files. This is especially
important if multiple clients are attempting upgrades at the same time (for best practices, this
directory should be as large as your largest customer).
Copyright NovaStor 2010
NovaBACKUP xSP Instruction Manual | 30
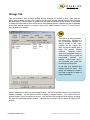
Storage Tab
This tab provides a way to define multiple storage locations for backed up files. Each time the
server gets a request to store a file it looks at the accounts primary storage location (see Accounts
tab) and checks if the free space is greater than the reserve specified for the location. If free space
is greater than the reserve, then the file sent to that storage location, otherwise the test is repeated
on all other defined locations, in order of rank, until a usable location is found. If none is found,
then the backup is aborted.
The reserve is only a guideline,
not a hard limit. Patches to a
file (incremental changes) are
always stored in the same
location as the original file.
Also, the server cannot split a
large file across multiple
locations. Therefore, ensure
there is an adequate margin to
allow existing files to grow as
incremental
patches
are
applied. Leave extra room if
you anticipate your users will
be storing very large files.
A red disk icon indicates the
location does not exist. The
server will attempt to create it
first time a request is made to
store a data there.
Use the Add button to define a new storage location. Use the Properties button to view or modify a
location‘s settings. Use the Remove button to delete a storage location. You cannot remove a
storage location if any accounts are using it. Use the Move Up and Move Down buttons to adjust
the rank of the selected storage location. Changes are not saved until you press the Apply or OK
buttons.
Copyright NovaStor 2010
NovaBACKUP xSP Instruction Manual | 31
Notifications Tab
The Notifications tab is used for the following reasons:
Enable or disable email notification to your backup accounts.
Enable or disable event logging in the Windows event viewer.
Set up administrative alerts being sent to your Administrative email address.
If you enable any mail notification, you will have to enter the specific mail settings.
In order to set the mail options, you must first click in the Send mail notifications box on this tab,
and then click the Mail Options button. This will open the E-Mail Configuration Menu.
The E-Mail Configuration menu
requires the SMTP Server Address,
From: To: and also allows you to send
multiple copies. You may also use
Secure Socket Layer (SSL) to send
your messages.
The E-Mail
Configuration screen looks like this:
Additionally, you can select the Error
Conditions that will trigger the sending
of E-Mail, as shown on the next page.
Copyright NovaStor 2010
NovaBACKUP xSP Instruction Manual | 32
You may also send E-Mail to inform you when a user account reaches certain quota thresholds.
The three thresholds are:
Account reaches ―Near quota % threshold‖
Account reaches ―At quota % threshold‖
Account reaches ―Over quota % threshold‖.
The mail system can be set to attach user log files to the mail message, so that you can quickly
identify which user accounts may be having problems or approaching quota limits.
If you choose to write event logs, you will be able to set event log options.
Copyright NovaStor 2010
NovaBACKUP xSP Instruction Manual | 33
The errors that you select will be written to the Event Log when they occur. When you have put a
check mark in the box next to each system error you want added to the log, clicking the Set default
button will save these conditions. You can also set Quota issues that can be saved in the Event
log.
Send Administrative Alerts provides the same basic options as Event Logs or as the error
conditions that exist in the Mail options menu.
Alerts differ from notifications, because alerts are sent to the Event Log, rather than to an E-Mail
address.
Licensing Tab
The Licensing tab is used to get information about the Storage Server and to register or renew a
license. It also contains registration information. The Registration information is provided to users
when they request support or request further information about your company.
Entering a license or updating to a new license:
Clicking on the Licensing tab will open the licensing screen. This screen provides the Storage
Server Licensing information (including current status and licensing mode) and allows you to
update the license if it‘s expired or entering a new license. It also provides Support Information that
you enter when you register the product.
Copyright NovaStor 2010
NovaBACKUP xSP Instruction Manual | 34
If a license has expired, the Activate License button cannot be selected until a new license
number is entered into the License Identification Number field. As seen here, Activate License is
grayed out and cannot be selected. When a number is entered, Activate license can be selected.
Copyright NovaStor 2010
NovaBACKUP xSP Instruction Manual | 35
This information will be sent to NovaStor and validated. Pressing Activate license will validate the
license information. If validation is successful, you will see the next screen:
Press yes, and the license information will be registered with NovaStor.
Copyright NovaStor 2010
NovaBACKUP xSP Instruction Manual | 36
Once validated and registered, the Licensing tab will show the expiration date of the current
license, the server version, and other information.
The Registration data provided in the Licensing tab is also provided to your client software if a
request for support is received.
Licensing information can also be entered or updated using the Remote Manager.
Active Users
The Active Users tab is primarily an informational tab that provides information about backups and
current connections to the NovaBACKUP xSP Storage Server.
Keep in mind that this
screen
will
only
display the accounts
that were connected
to the server when
you
started
the
configuration
manager.
If
an
account
connects
while this screen is
open, it has to be
refreshed or close
and
re-open
the
configuration
manager.
The purpose of this tab is to determine the cause of any system slowdowns or other performance
issues, and to get a quick look at the current server status. If, for example, a customer reports that
Copyright NovaStor 2010
NovaBACKUP xSP Instruction Manual | 37
a backup is going very slowly, you will be able to open Storage Server Configuration Manager
and then open the Active Users tab, and you will be able to see what processes were running at
the time the user reported the issue.
In this screen, you can determine the Account Name and IP Address of the users who were using
the Storage Server before the Storage Server Configuration Manager was launched. You can also
see the type of request the user made (backup or restore, for example), how much time has
elapsed since the process started, and the percent of progress the user‘s request has made in
completing the request.
Installing NovaBACKUP xSP Remote Manager
The NovaBACKUP xSP Remote Manager is designed to enable you to manage the NovaBACKUP
xSP Storage Server(s) using a web interface. Not all management functions can be performed,
because some of the management tasks require that they be done directly on the server. The
Remote Manager also exposes a web service through which yu can programmatically manage your
Storage Server(s).
Operation of the Remote Manager is explored in the next module.
Remote Manager can be installed on the same machine as the one onto which the Storage Server
is installed, or you can install the Storage Server Remote Management Service on the Storage
Copyright NovaStor 2010
NovaBACKUP xSP Instruction Manual | 38
Server, and install the web application/service portion on a separate web server. The Storage
Server Remote Management Service will allow communication between the Storage Server and the
Remote Manager.
The Remote Manager enables you to perform certain functions that the NovaBACKUP xSP
Configuration Manager is unable to perform. The main difference between the two modules is the
ability of Remote Manager to select, configure and modify multiple Storage Servers, while the
NovaBACKUP xSP Storage Server Configuration Manager can only configure the Storage Server
onto which it is installed. The NovaBACKUP xSP Storage Server Configuration Manager is able to
perform certain management and monitoring tasks that cannot be performed by the Remote
Manager.
Minimum Requirements
Windows Server 2003 SP2 or 2008
.NET 3.5
IIS *
Connectivity to one of the following:
Microsoft SQL 2005 SP2+
Microsoft SQL 2008
MySQL 5.1 with MySQL ODBD 5.1 Connector and ASP.net
Installation
To begin installation of Remote Manager, double-click on the setup.exe file that is used to set up
Remote Manager. This file may be called RM_Setup.exe. The setup process will start, and the
first screen will appear:
Copyright NovaStor 2010
NovaBACKUP xSP Instruction Manual | 39
Click Next to advance to the License Agreement screen:
If you have read and accept the license agreement, click the check box next to the words ‗I accept
the terms in the License Agreement‘, and click the Next button to advance to the Custom Setup
screen:
Copyright NovaStor 2010
NovaBACKUP xSP Instruction Manual | 40
The Custom Setup screen allows you to choose the drive and directories where the Remote
Manager will be installed. The Disk Usage button opens a screen (shown below) that shows you
the drives on your server and the available space. After reviewing the Disk Usage screen, you may
return to the Custom Setup screen by clicking ok.
In addition to providing a default location for the Remote Manager files, you can also browse for a
target directory.
NovaStor recommends that you use the C: drive for storing the Remote Manage files.
Copyright NovaStor 2010
NovaBACKUP xSP Instruction Manual | 41
When you have selected the location for your Remote Manager files, click next, and the SQL
Database Server Provider selection screen opens.
Click on the appropriate button and press next, to advance to the Database Server Instance
screen. Note: NovaStor may discontinue support for MySQL in upcoming versions. It is strongly
recommended that you use SQL Server as the database used with NovaBACKUP xSP. NovaStor
does not recommend the use of SQL Express for more than 25-50 users because the size of a SQL
Express database is limited to 4 GB.
The Server Instance selection screen opens. In this screen, you define the SQL Server instance
and location, the Database Name for the Remote Manager database, and the Authentication
method. In the graphic above, .\sqlexpress indicates that the database is local (the ‗.‘ means
local), and that the database being used is a SQL Express database.
Note also that the recommended user name for the SQL Server authentication is sa. The
password is the one used to get access to the SQL instance you have selected when you set up
your SQL server.
Copyright NovaStor 2010
NovaBACKUP xSP Instruction Manual | 42
After you have entered the date required by this screen, press next. The Windows Authentication
screen on the next page will open:
Copyright NovaStor 2010
NovaBACKUP xSP Instruction Manual | 43
The domain name is optional, in the case above we‘ve used a period (which means ‗local instance‘
to SQL Server). The Username is the one used to log in to Windows, and the Password is the
password used to access Windows.
Once the three lines of data are completed, press Next to open the IIS Web Application
configuration screen:
Default values are
automatically
entered
by
the
installer.
If your
values are different,
or IIS settings are
different from the
defaults, enter them
in to the IIS Web
Server screen.
When the data is entered, click Next to open the SMTP Server Instance screen:
Copyright NovaStor 2010
NovaBACKUP xSP Instruction Manual | 44
In the SMTP Server Instance screen, the location of the SMTP Server, and default message
headers are shown. In this case, the local host address (127.0.0.1) is shown. You may modify the
subject line and the E-Mail headers on this screen. Once these settings are completed, press next,
and the Install screen opens:
Pressing Install starts the NovaBACKUP xSP Remote Manager installation.
Copyright NovaStor 2010
NovaBACKUP xSP Instruction Manual | 45
Installation usually takes a few seconds. Once the installation is complete, a ‗finish‘ screen opens.
The one option is to Start the Backup Server Agent Service. The default is to start the service
when you press the Finish button. If you choose not to start the Backup Server Agent Service,
uncheck the box adjacent to this option.
Once you have reviewed and accepted (or not) the Start the Backup Server Agent Service
option, press Finish to complete the installation of Remote Manager.
Copyright NovaStor 2010
NovaBACKUP xSP Instruction Manual | 46
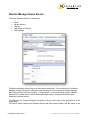
NovaBACKUP xSP Remote Manager
The NovaBACKUP xSP Remote Manager can potentially be one of the most important elements in
NovaBACKUP xSP. It is through the Remote Manager that an administrator, or other person
authorized to access the Remote Manager, can make the critical changes to the entire
NovaBACKUP xSP system. The Remote Manager can be used as a web based administration tool
for the Storage Server (or Storage Servers).
The Remote Manager also allows you to manage your Storage Server(s) through programs that
you write or modify to instruct the Storage Server(s) to perform certain functions in ways that you
program.
The Remote Manager enables you to select, set up, add or remove Storage Servers.
The Remote Manager is also the web management gateway for most of the NovaBACKUP xSP
Server, and client, settings.
Copyright NovaStor 2010
NovaBACKUP xSP Instruction Manual | 47
Remote Manager can be installed on the same machine hosting the Storage Server. Alternatively,
the Remote Management Service (which communicates to the Storage Server) can be installed on
the Storage Server, and the web application/service portion of Remote Manager can be installed
onto a separate web server.
Predefined settings and default values
Predefined values for Account Creation Settings are stored in the AccountCreationSettings.config
file.
The default location for this .config file is C:\Program Files\NovaNet-WEB Remote
Manager\Server\AccountCreationSettings.config. The file can be opened in Notepad. WordPad or
Word can also be used, but formatting must be turned off. A GUI will be opened, allowing you to
edit the AccountCreationSettings.config file, via a utility located in Start>All Programs>NovaNET–
WEB Remote Manager>Remote Manager ACS Config.exe
Starting the NovaBACKUP xSP Remote Manager
Like many of the features of NovaBACKUP xSP, there are often multiple ways to get the same
result. For example, launching Remote Manager can be done in a variety of ways:
From the Start Menu, move your mouse over All Programs. The Start Menu will open a list of all
the programs installed onto your server. Click on NovaNET-Web Remote Manager, and click on
Launch Remote Manager.
Copyright NovaStor 2010
NovaBACKUP xSP Instruction Manual | 48
Your default browser will launch if it isn‘t already running, and the Remote Manager Login screen
will open.
There are other ways that you can get to the Remote Manager login screen from within a browser:
Type the IP address of the Storage Server, and follow with /remotemanager, then pressing
the Enter key. (For example, 192.168.2.30/remotemanager)
If you‘re using the machine on which the Storage Server has been installed, type
localhost/remotemanager, then press the Enter key
From within the network on which the backup server resides, you can also type:
/serverIPaddress/remotemanager, then press the Enter key
After you press the Enter key, the Remote Manager Login screen appears:
Copyright NovaStor 2010
NovaBACKUP xSP Instruction Manual | 49
The default Username and Password is admin / admin
When you enter your Username and Password, and click on Login
(or just press Enter), the login will be verified and, if it matches the
data on file at the server, the Remote Manager Home screen will
open. The startup process may take a minute or more, depending on
the speed of your Storage Server, the amount of data that is currently
being backed up on the server, the amount of other processes being
performed on your server, and the speed of your connection to the
Internet.
Copyright NovaStor 2010
If you see a red
warning message,
be aware this is
normal when not
browsing using
HTTPS protocol.
NovaBACKUP xSP Instruction Manual | 50
Remote Manager Home Screen
The Home Screen provides five submenus.
Home
Backup Servers
Reports
Web Users and Groups
Web Settings
The Remote Manager Home Screen provides status information. The current version of Remote
Manager is shown, along with information about whether or not the version of Remote Manager
that is being used is the current version. In this example, ‗You have the latest version‘ indicates
that there is no newer version. When Remote Manager starts, it checks the NovaStor site to
determine the latest version.
The addresses for Technical Support are shown in the box to the right of the Updates box on the
Home page.
The Server Status indicates the Storage Servers that have been installed, and the status of the
Copyright NovaStor 2010
NovaBACKUP xSP Instruction Manual | 51
servers. Note that in this example, one of the Storage Servers ‗failed.‘ At the top of the ‗Status of
servers:‘ box, ‗1 server failed!‘ appears in Red letters. At the left, a red dot, to the left of the failed
server also indicates, at a glance, that a server is dead. The word ‗dead‘, in this case, means that
the backup server is unreachable. In this case, the original installation was performed at a different
location from the one where this manual was written. The original backup server was inaccessible
from the location where this document was written. When Remote Manager tried to reach this
unreachable server, it was unable to reach the server and reported that the server failed.
(This doesn’t necessarily mean that the server failed, however, it may just be unreachable).
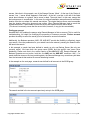
Finding an account
NovaBACKUP xSP enables the person using Remote Manager to find an account. This is useful for
troubleshooting; it‘s helpful for modifying the properties of customer accounts. Find an account
provides the ability to select the server(s) to be scanned for account information.
Additionally, the Boolean operators, AND, OR, AND NOT provide the flexibility to effectively target
your search. Once the parameters for your search have been entered, pressing the Search button
will launch the search.
In this example, a search has been defined to search on only one Backup Server (the only one
currently active). We knew both the group name (20GB) and the specific user name (Acer
Notebook). Please note that in the current version of NovaBACKUP xSP Remote Manager, the
Boolean Operators are not active, both the– the AND and the AND NOT conditions. Also – if a
search definition does not find any matching data, the Remote Manager may sometimes yield data
from the last search that resulted in account data being located.
In the example on the next page, a search was defined for all accounts in the 20GB group:
The search resulted in the two accounts previously set up in the 20GB group:
The search results provide the local address of the server, the group to which the user belongs, the
Copyright NovaStor 2010
NovaBACKUP xSP Instruction Manual | 52
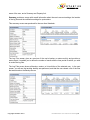
name of the user, and a Summary and Property link.
Summary provides a screen with overall information about the user‘s account settings, the location
of the log files and the notification settings for quota status.
This summary screen was produced for the user Acer Notebook:
The Log Files screen gives an overview of the user‘s backup or restore activity and provides a
status report. It enables you to define the number of results and the time period for which you wish
to review the log files.
The Log Files screen shows all backup, restore, or list activities of the selected user. In the next
screen, you will see that another backup was performed, and that the user viewed a list of the files
that was stored on the Backup Server.
Copyright NovaStor 2010
NovaBACKUP xSP Instruction Manual | 53
The View command generates a report on the transaction with the User during the listed session.
Here is the report for the View request shown in the figure above:
Note that everything between the client (user) and the server used 128-bit AES or 192-bit Triple
DES encryption.
The Account Property Screen
The Search Results that we reviewed earlier found two results of a search for users. In addition to
making a Summary screen available, the other option is Properties. This screen is opened by
clicking on Properties in the Search Results screen. In this example, we‘ll look at the Properties
screen for the Acer Notebook account.
The Properties screen for this account looks like this:
Copyright NovaStor 2010
NovaBACKUP xSP Instruction Manual | 54
There are four tabs in the Properties screen: General, Block, Quota and Settings.
The General Tab is locked in to the selected user account – you are not able to add an account in
this screen. Remote Manager provides an account creation screen that allows new user accounts
to be created.
However, most other parameters can be modified on this General screen.
The Block Tab allows you complete control over the items that can be blocked by the Backup
Server. The first two items – Use the group blocking options for this account, and Do not
apply any blocking options for this account enable you to apply or not apply pre-defined
blocking options. All other blocking options are grayed out, and not selectable, when either of
these options are selected. The third option, Use custom blocking options for this account,
opens the extensive list of blocking options that will be applied exclusively to this user account.
Blocking selected options provides the user with only those capabilities that the administrator wants
to provide. These options can be unblocked when desired. (For example, a user whose account
has expired may be blocked from making backups, but not from restoring data, or blocked by
blocking the Destination Tab while the account is expired. When the account becomes current,
these blocks can be removed).
Copyright NovaStor 2010
NovaBACKUP xSP Instruction Manual | 55
The Quota Tab
This tab enables you to choose to apply the quota settings for the group to which the user accounts
are a member. It also enables you to ‗not apply‘ these group quota settings. This would give the
user an unlimited amount of storage space. (It may be useful if, for example, an employee in a
20GB group is promoted to CEO.)
The third option is to use Custom Quota Settings for this account. When this option is selected, the
grayed out area of the screen will become selectable. In this screen you can define a new quota
and select the user notifications for near, at, and over quota. You can also specify functions when
these levels are reached.
The Settings Tab displays the settings already created for this account. It allows you to create a
new setting, to edit an existing setting, or to delete a setting.
The server currently maintains a collection of settings the admin has added (if any) server-side as
a ‗remote setting‘ for the client to pick up. This is accomplished by sending the client a file called
ClientSettings.ini when the client requests it. The convention has been to include a [settings]
section with settings to follow using the typical .ini file format:
<label> = <value>
These settings are listed in the Appendix to this User Guide.
Once the property screen has been reviewed and changes made, click OK to save the properties
and return to the Search Results page, or Cancel to discard changes and return to the Search
Results page.
The options for the Account Property menu are explored in more detail in the Account Setup
section of this User Guide.
Backup Servers
The Backup Servers screen provides a list of Backup Servers managed by NovaBACKUP xSP.
The screen looks something like this:
Copyright NovaStor 2010
NovaBACKUP xSP Instruction Manual | 56
In addition to showing the Description of the server, it also provides the name or IP address, the
communication protocol, the management port, and the status of the server. (If the server is not
online, the ‗connect‘ option will be grayed out.
Additionally, you can Connect to a server, and can also Edit the server‘s settings or delete the
server. To perform any of these functions, click on the available option desired.
The Backup Servers screen also allows you to Add a Storage Server, Add a new backup server
group, to view the status of an already configured backup server group, or to close the window.
These options will be explored after Connect and Edit are examined.
Connecting to a Storage Server
You can connect to a Storage Server in a few ways. Perhaps the easiest way is the one we just
defined – by opening Remote Manager and selecting Backup Servers, then clicking on Connect,
you will be connected to the Storage Server you selected. You can also connect to the Storage
Server using an FTP connection.
The Backup Server screen, shown on the next page, has seven tabs: Accounts, General, Security,
Directories, Logging, Notifications, and Licensing.
Copyright NovaStor 2010
NovaBACKUP xSP Instruction Manual | 57
Accounts
This tab is seen in the screen directly preceding this section. The primary function of this tab is to
enable you to add, remove, or view the Properties of the accounts that use this Storage Server as a
backup target.
Copyright NovaStor 2010
NovaBACKUP xSP Instruction Manual | 58
Add Screen and Properties Screen
The Add accounts and the Properties are on the same Screen. The Properties Screen shows the
properties of the account you have selected, while the Add Screen has not yet been populated with
account information.
The Properties screen loois shown on the next page:
This
screen
has four tabs:
General, Block,
Quota,
and
Settings.
The General Tab
You can use this tab to set general settings for new or existing accounts. It contains the path to the
account data directory, assigns the account to a group, and sets the length of time that restorable
data will be held. Group information is selected from the dropdown menu. You can only select a
pre-defined group to which this account can be assigned.
When an account name is entered, a password is not required. A password can be added after the
account is created.
Accounts can be created with multiple licenses. It is possible, therefore, for a license to allow
multiple computers to back up to the Storage Server. The number of computers is set up in this
screen. It is also possible that an account will support more than one computers, but that the
account can be set up to only allow one machine to access it at a time, rather than one or more
simultaneously. The Allow separate computers to backup to this account check box will enable
multiple computers on the account to simultaneously access the storage server.
The Block Tab
This tab provides many options for blocking elements of the client configuration. The default applies
Copyright NovaStor 2010
NovaBACKUP xSP Instruction Manual | 59
blocking settings that have been defined for the group to which this account belongs. The Block
Tab is shown here:
Do not apply blocking options for this account removes all blocking and does not apply group
settings. If you want to customize the settings for this user, clicking on Use custom blocking
options for this account will make all the previously grayed-out options available for
customization of the blocking for an account.
The Settings Tab
This tab enables you to add a new setting, edit the value of a setting, or delete a setting from this
account. Settings are pre-defined, and are included in a list at the end of this manual.
The Quota Tab
This tab allows you to define how and when quotas will be applied to this account. The default
action is to apply the quota settings that have already been defined for the group to which this
Copyright NovaStor 2010
NovaBACKUP xSP Instruction Manual | 60
account belongs. You may also choose not to apply a quota (doing so will enable to account to
make unlimited backups), or you may define custom settings for the account.
You can set up quotas on individual accounts or set a quota on a group. By default when
you create an account, there are no quotas or limitations in place.
Also note that your Storage Server can send quota related warning reports, pop-up
warning windows inside the client, or even disable a client‘s backup. All this can be
configured in this screen.
Copyright NovaStor 2010
NovaBACKUP xSP Instruction Manual | 61
Returning to the Accounts tab
There is one more tab selectable from the Accounts Tab. This tab, Group Policy Settings, opens
a list of groups, shown here:
The Group Policy Settings Tab lists the Groups that are already defined, and also enables you to
add groups. When you select a group and click Properties, or click Add, a screen like the ones
discussed for account creation and account properties will open.
The General Tab enables you to make general settings for the Storage Server that you are
configuring. The default Storage Server port is 308 – unless you have a reason to change the port,
it should remain at 308. If you want to change the port number, you may do so by scrolling up or
down in the Storage Server port: window, or by typing in a new port number. When that number
is entered, press Set Default to save the new port as the default.
Note: Port 308 is a reserved port specifically for NovaStor backups. No other application is
expected to use this port.
Copyright NovaStor 2010
NovaBACKUP xSP Instruction Manual | 62
The Limit bandwidth and connections section of the General tab allows you to create bandwidth
limits for backup users. If you are running other processes besides functioning as a Storage
Server, you may choose to create bandwidth limits.
The final section in the General tab is Duplicate account files directory. As explained in the text
that is included in this area, it is important that one or more copies of account profiles be duplicated
and stored in a separate directory. This way, should a user.apf file become corrupted, the account
information can be restored from information stored in the backup .apf file. You may use the
browse button to select a different directory, or just accept the default by making no changes.
The Security Tab defines the authentication method you have chosen, as well as an option to use
a security certificate for your server. You may implement TLS if you have a certificate that can be
applied for authentication. For information about Transport Layer Security, visit:
http://en.wikipedia.org/wiki/Transport_Layer_Security
Copyright NovaStor 2010
NovaBACKUP xSP Instruction Manual | 63
About the master decryption key
The master decryption key is a key that can be used to decrypt user backups. In the event that a
user loses or forgets its decryption key, use of the master decryption key may be the only way to
restore the user‘s data.
The user may choose to disable the master decryption key using an option in its client software.
Although this may be perceived as providing protection from inappropriate activities by the backup
service provider, it is also making recovery of data nearly impossible if user encryption keys are lost
or forgotten.
The Directories Tab specifies the location where upgrade files are stored. When a client runs the
client software and checks the Check for Upgrades tab in the software, this is the directory where
the server will search for an upgrade (this is solely used for NovaNET-Web 7.x and below). It is
important when copying upgrade files onto the server, that the upgrade files be placed into the
correct upgrade folder.
Copyright NovaStor 2010
NovaBACKUP xSP Instruction Manual | 64
The Work directory stores the temporary files during a rollup and restore. This screen suggests that
the directory has a considerable amount of room to copy these temporary files. This is especially
important if multiple clients are attempting upgrades at the same time (for best practices, this
directory should be as large as your largest customer).
The work directory should be at least as large as your largest backup account, and
preferably even larger. If you do not have a large enough free space for the work directory
and you have to restore more data than you have free space, you may have problems
restoring until more space is allocated.
Copyright NovaStor 2010
NovaBACKUP xSP Instruction Manual | 65
The Logging Tab is where you can set options for the Master log, Account log files, and Database
logging options.
The Notifications tab is used to configure:
Whether or not mail notifications will be sent to users
Whether or not events will be logged
Whether or not administrative alerts will be sent to the administrator.
If you choose to send mail notifications to the administrator or others, you will have to set your mail
options.
The E-Mail Configuration menu requires the SMTP Server Address, From: To: and also allows you
Copyright NovaStor 2010
NovaBACKUP xSP Instruction Manual | 66
to send multiple copies. You may also use Secure Socket Layer (SSL) to send your messages.
The E-Mail Configuration screen looks like this:
Additionally, you can select the Error Conditions that will trigger the sending of E-Mail, as seen
here:
You may also send mail to inform you when a user account reaches certain quota thresholds.
The mail system can be set to attach user log files to the mail message, so that you can quickly
identify which user accounts may be having problems or approaching quota limits.
If you choose to write event logs, you will be able to set Event log options.
The errors that you select will be written to the Event Log when they occur. When you have put a
Copyright NovaStor 2010
NovaBACKUP xSP Instruction Manual | 67
check mark in the box next to each system error you want added to the log, clicking the Set default
button will save these conditions. You can also set Quota issues that can be saved in the Event
log.
Send Administrative Alerts provides the same basic options as Event Logs or as the error
conditions that exist in the Mail options menu.
Alerts differ from notifications, because alerts are sent to the Event Log, rather than to E-Mail.
The Licensing tab is used to get information about the storage server, to register or renew a
license, and to provide support information for users who are performing backup and recovery on
your storage server.
Updating a license:
Clicking on the Licensing tab will open the licensing screen. This screen provides the Backup
Server Licensing information (including current status and licensing mode) and allows you to
update the license if it‘s expired, and also provides Support Information.
In the screen shown here, the license has expired.
When a new, valid license is entered, the Activate License button is no longer grayed out, if a valid
license is used. A valid license can be cut and pasted into the license key area. As shown here,
Activate License is no longer grayed out and can be clicked to apply the license.
Copyright NovaStor 2010
NovaBACKUP xSP Instruction Manual | 68
NovaStor‘s Web Server will check the key number, and once determined to be valid, a screen will
confirm that the license identification number entered is OK.
After you press yes, the updated expiration date and licensing details are updated, as shown on
the next page:
Copyright NovaStor 2010
NovaBACKUP xSP Instruction Manual | 69
When you enter registration information, and press Register, the information is sent to NovaStor
and checked for validity. This information is used to validate your license. It is also accessed by
your client software when a support request is made.
Licensing can be updated using the Remote Manager, or the Storage Server Configuration
Manager.
Copyright NovaStor 2010
NovaBACKUP xSP Instruction Manual | 70
Commerce Server Installation and Upgrade
Copyright NovaStor 2010
NovaBACKUP xSP Instruction Manual | 71
System Requirements
Windows Server 2003 or Windows Server 2008 is required for installation of Commerce
Server. * IIS 6 must be installed on the system that hosts the Commerce Server web site.
Use the Windows Server Manager to add or modify roles.
Microsoft SQL Server 2005 or Microsoft SQL Server 2008 must be installed, running, and
accessible to the system on which Commerce Server is being installed. For convenience,
Microsoft SQL Server Express 2008 can be installed as part of
Commerce
Server setup. You should already understand how to install
SQL Server if plan to take advantage of this feature.
Microsoft SQL Server Express is not recommended because it
* Remember to
has a SQL database size limit of 4 GB.
install the IIS 6
Access to an SMTP server is required by Commerce Server for
metabase
sending confirmation E-Mail messages, administrative alerts,
compatibility
etc. However, it is not needed in order to complete the
pack when using
installation process.
server 2008.
For best results, a minimum display resolution of 1024 x 768 is
recommended when accessing the Commerce Server web site.
Upgrading from a previous version
To upgrade from a previous version of Commerce Server, please follow these steps:
1. Copy the web.config and license agreement files from the existing installation. You may
need these later. Also, make sure you record the name of your existing database.
2. Uninstall Commerce Server (see the Uninstalling section in this document if you are unsure
of how to do this).
3. Verify that the old Commerce Server installation folder has been deleted, if not, delete it
manually.
4. Install the new Commerce Server using the directions in this document. Specify your
existing database in order to migrate it to the new Commerce Server.
5. Reinstate your existing license agreement, if desired. Copy any desired configuration
settings from your old web.config file to the new one.
Installing Commerce Server
Run CSS_setup.exe from an account with administrator privileges to start the installation process.
It is recommended to run the file from a local device rather than from a network resource to insure
that the installer is available should the system need to be restarted.
Copyright NovaStor 2010
NovaBACKUP xSP Instruction Manual | 72
The first screen, Backup Storage Commerce Server Download Installer will appear:
Checkboxes indicate which components will be installed on your system. If any of the items (such
as SQL Server) are already installed on your server, you do not need to add these to the list.
You can use the installer to install only Microsoft SQL Server Express by checking everything
except Backup Storage Commerce Server. Alternately, if you wish, you can install SQL Server
from another source. Please see Microsoft‘s documentation for installation instructions.
A system restart may be required after certain components are installed. If the installer does not
automatically restart, restart it manually by running CSS_setup.exe again.
Copyright NovaStor 2010
NovaBACKUP xSP Instruction Manual | 73
The installation of the Commerce Server starts with the welcome dialog will open.
Click on the Next button to continue the installation process.
The next dialog you see is the End-User License Agreement. Check the checkbox and click next if
you accept the terms of the agreement, otherwise press the Cancel button to cancel installation.
Customizing the installation
The Custom Setup screen will open. The option to install the web site will not be presented if IIS is
not running on the system. You can choose to disable web site installation if you intend to install it
later on another system, in which case the installer will only initialize the Commerce Server
database.
Use the Browse button to select a different location than the default location to install the
Commerce Server, if you want to do this. Press the Disk Usage button to view the available disk
space. Press the Next button when you are satisfied with the selected storage location.
Copyright NovaStor 2010
NovaBACKUP xSP Instruction Manual | 74
Installing to the C:
drive is
recommended.
The SQL Database Server Provider screen asks you to select a service provider.
The NovaBACKUP xSP Commerce Server supports Microsoft SQL Server and MySQL. Make your
selection and click next to continue. The next section describes how to set up Commerce Server
to use SQL Server. If you are using MySQL, you can skip this section.
Copyright NovaStor 2010
NovaBACKUP xSP Instruction Manual | 75
Using A SQL Server Database
If you choose SQL Server as your database, the next dialog will look like this:
Use this dialog to select a specific instance of the database. The installer will display the name of
the first server, if any, on which it discovers a database. Use the browse button to display a list of
other database servers. If the desired server is not in the list, you must manually enter the server
name. Append the name of database server instance to the server name, separated by a
backslash. An example is shown is shown here:
If the SQL instance isn‘t working on this screen, try using a period, symbolizing ―local.‖
Copyright NovaStor 2010
NovaBACKUP xSP Instruction Manual | 76
“SQLEXPRESS” is
the default name
of an SQL Server
Express database
unless
another
name
was
specified when the
software
was
installed.
Once you‘ve specified a database server instance you need to tell
setup which credentials to use to access the database.
Select
Windows authentication to use your Windows user name and
password. If you are using SQL Server authentication, select SQL
Server and enter a user name and password.
It is recommended that you use ‗sa‘ as the username to avoid any
possible permissions issues during creation and/or modification of
the database and its fields. The type of authentication to use
depends on how SQL Server was configured when it was installed.
Be aware that the database must be accessible to the web server, so authentication must be set up
accordingly. For this reason, you may find it easier to use SQL Server authentication to allow IIS
users access to the database. Refer to your database administrator if you are unsure of how to do
this.
You may enter a different database name if you prefer
something other than the default. Setup will create the
database if it does not exist.
When you press the Next button, setup will verify your
credentials and allow you to proceed to the next step if
authentication is successful.
“Using
the
default
database
name
is
recommended for any
future troubleshooting
or upgrades.”
The SQL Database Server Windows Authentication screen
records your credentials for your database server.
Copyright NovaStor 2010
NovaBACKUP xSP Instruction Manual | 77
Entering the domain name is optional; you will need to enter the Windows user name, preferably
the Administrator name and password. This must be a user who has full access to the SQL Server
database files. If you are not using a domain account, then type the name of the computer where
the user account exists (i.e. the database server name). This information is used by setup for onetime access to the file system. It is not stored.
Using a MySQL database
Note that NovaStor does not recommend the use of MySQL for NovaBACKUP xSP, and does not
guarantee long-term support of MySQL. However, for those users who are running NovaBACKUP
xSP and using MySQL to manage the data, this section provides instructions for such an
installation.
A MySQL database is specified using the dialog shown on the next page.
Copyright NovaStor 2010
NovaBACKUP xSP Instruction Manual | 78
Supply the name of the database server, the user name, and the password required to access the
database. If you are unsure of this information, your database administrator should be able to
provide it.
You may enter a different database name if you prefer something other than the default. Setup will
create the database if it does not exist.
When you press the Next button, setup will verify your credentials and allow you to proceed to the
next step if authentication is successful.
Setting up the website
If web site installation was enabled in the custom setup dialog, you will be prompted for web server
details, as shown on the next page.
Copyright NovaStor 2010
NovaBACKUP xSP Instruction Manual | 79
You may enter the following information:
IIS Web Server – The IIS website to which Commerce Server will be added. The default
web site is typically the one bound to port 80. At this time, default website is required.
Virtual Directory Name – The name of the Commerce Server‘s virtual directory within the
web site. For example, if the web site address is www.mycompany.com, and the virtual
directory name is set to CommerceServer, then the Commerce Server‘s web address will be
www.mycompany.com/CommerceServer.
IIS Application Pool – A unique name for the IIS application pool which will be created by
the installer.
IIS App Pool Identity – The identity used by the application pool. Values can be Network
Service, Local Service, Local System, or the name of the user account for a custom identity.
You can accept the default values, or provide new ones if the defaults don‘t meet your needs.
Refer to your web site administrator if you are unsure of what to enter.
Finalizing the installation
Setup now has all the information it needs to complete the installation and displays the Ready to
Install dialog box, giving you the option to Install, cancel or Go Back (to review the settings).
Copyright NovaStor 2010
NovaBACKUP xSP Instruction Manual | 80
Click the Install button to install the Commerce Server files. Setup will display a progress dialog.
When installation is completed, this screen will display:
The installation process may take a few minutes. Press the Finish button to dismiss the dialog and
return to the starting point. If you don‘t wish to install anything else, click the Close button.
Uninstalling
To remove the Commerce Server, use the program removal facility of Windows Control Panel.
This removes the web site but leaves the database intact. To verify that virtual directories have
been removed, please check IIS and if not, manually remove the virtual directories.
Copyright NovaStor 2010
NovaBACKUP xSP Instruction Manual | 81
The following table lists some issues that may arise during installation.
Problem Description
Solution
Setup restarts the system but does not finish
installation when the system comes back up.
Setup.exe was probably run from a network
resource that is not available after the system
was restarted. Locate setup.exe and relaunch it manually.
Setup fails to install Windows Installer 4.5,
Windows Powershell 1.0, or Microsoft SQL
Server 2008 Express.
Setup was unable to access Microsoft‘s web
site. Install SQL Server from another source,
or directly from Microsoft‘s web site if available.
Setup does not display the WebSite option in
the Custom Setup dialog.
IIS is not installed. Use Windows Server
Manager to add the Web Server role and
restart setup.
Your database server is not shown in the list of
available database servers.
Type the name of your database server in the
SQL Server field.
Setup is unable to authenticate with the
database server.
The database server, or database name, was
entered incorrectly; the server does not
support the mode of authentication selected;
the user name or password is incorrect; the
server or database is not available;
communication with the server is being
blocked by a firewall; the database server is
not listening on the default port. Verify the
information that was entered. Refer to your
system administrator to diagnose connection
problems.
Administrator authentication reports ―The
specified credentials failed to authenticate.‖
Verify that the correct domain name, user
name, and password were entered. If the
database server is installed on the current
system, then the domain can be left blank,
otherwise it should specify a domain name or
the name of the computer that the database is
installed on.
The web browser is unable to connect to the
Commerce Server Administrator site.
The IIS web server is not running. Start the
service and try again.
Copyright NovaStor 2010
NovaBACKUP xSP Instruction Manual | 82
Testing the installation
To verify Commerce Server installation, point your browser to this address:
http://localhost/backup_storage_commerce_server/Administration/Home.aspx
Alternately, you can use the Administration shortcut that was installed in the Windows start menu
under Backup Storage Commerce Server.
You should now be viewing the Commerce Server login page. The initial user name and password
is ‗admin‘. For the security conscious, we recommend that you should change this as soon as
possible.
NovaBACKUP xSP Commerce Server
“The NovaBACKUP xSP
Commerce Server is designed
to allow you to deliver backup
services, marketing materials,
newsletters and additional
benefits to the user.”
Copyright NovaStor 2010
The NovaBACKUP xSP Commerce Server is
designed to allow you to deliver backup services,
marketing materials, newsletters and additional
benefits to the user. The Commerce Server enables
you to configure and offer services to clients. The
Commerce Server is run as a web application, and
interacts with the SQL database storing the
Commerce Server data.
NovaBACKUP xSP Instruction Manual | 83
The Commerce Server is launched from the Start menu. When the Start menu opens, keep the
mouse on top of All Programs until the screen expands. Next, click on Backup Storage
Commerce Server to expand the menu, as shown here:
Then click on Administration.
The Commerce Server Administration screen will open in your default browser, and the login
screen will appear, as seen here:
Copyright NovaStor 2010
NovaBACKUP xSP Instruction Manual | 84
Enter the username and password used to access the SQL database (the default username and
password are admin), and click Log On.
The Commerce Server User Interface
The user interface consists of a single main screen. At the top of this screen you‘ll find the
navigation bar which you can use to move throughout the Commerce Server.
Tabs
The Home tab allows you to set up new products, and create preview products to review your
customer‘s experience.
The Account tab allows you to change your administrator password.
The Catalog tab allows you to view all of your configured products, and create new ones
The General tab enables you to configure your Google Analytics information, and turn on or
off the Welcome Step of user signup.
The Payment Methods tab allows you to change the payment methods you accept, and to
configure the order in which they appear.
The Paypal tab allows you to configure your PayFlow merchant account information.
The Newsletter tab allows you to configure E-Mail address insertion into bulk mailing
services.
The Reports tab allows you to view user registrations and invoices.
The Advanced tab allows you to configure the E-Mails that are sent to your end users.
The Content tab gives you the ability to edit the Commerce Server core files.
The Database tab allows you to view entries in the database backend of the Commerce
Server.
Copyright NovaStor 2010
NovaBACKUP xSP Instruction Manual | 85
Tab Functionality
Home Tab
On this screen you will find a link to create a new product to sell within the Commerce Server, and
a Sneak Peak URL Builder, which will allow you to preview what your product will look like to
customers. The options available in the Home tab look like the picture on the next page:
Create a new product
The Create a new product button takes you to a screen that allows you to customize the entries
available for purchase for your customers.
Sneak Peak URL Builder
The purpose of the Sneak Peak URL Builder emulates the URL that a client would send to the
Commerce Server. This allows you to preview what products would be returned to a customer who
is viewing your Commerce Server with a particular client type as configured below.
Copyright NovaStor 2010
NovaBACKUP xSP Instruction Manual | 86
Device Type: Currently this field must always be set to 1656.
Device Name: This will set the Device Name that is being passed to the Commerce Server
by the emulator.
Company Full Name: This will set the Company Full Name that is being passed to the
Commerce Server by the emulator. For default NovaBackup installations this is set to
―NovaStor‖
Company Short Name: This will set the Company Short Name that is being passed to the
Commerce Server by the emulator. For default NovaBackup installations this is set to
―NovaStor‖
Major Version: This will set the Major Version that is being passed to the Commerce
Server by the emulator. The Major Version is the number which appears before the period,
in the version number. (10.0, 11.0, etc)
Minor Version: This will set the Minor Version that is being passed to the Commerce
Server by the emulator. The Minor Version is the number which appears after the period, in
the version number. (10.3, 11.1, etc)
Build Number: The Build Number is the number which appears after the second period, in
the version number. This product will only show up to clients using a client with the Major
Version listed above, and the Minor Version listed above, and this specific build number
(10.3.5575, 11.1.7787, etc)
Is Eval: This will set whether or not the client that is being passed to the Commerce Server
by the emulator is an Evaluation account.
Language: This will set what language the emulator will be passed to the Commerce
Server.
Account Tab
From this screen you can change the logon
password for your account. Simply enter your
existing password, and then in the fields below
enter your new password. Your new password
must contain at least 5 characters.
Copyright NovaStor 2010
NovaBACKUP xSP Instruction Manual | 87
Catalog Tab
The Catalog tab lists all of the products you have configured on the Commerce Server and allows
you to make changes to them.
Enabled: If this is set to true, it means the product is visible to clients connected to your
Server.
SKU: This is the internal SKU for your product. This number is what the Catalog is sorted
by. This number will not be displayed to the customer
Description: This is the description of the offer/product as it appears to the customer.
Basic Filter: If set to true, whether or not this product will appear is based on the next 6
entries.
Company Full Name: This product will only appear to customers using a client that
matches this Company Full Name. This can be left blank so that prospective customers are
not filtered out.
Company Short Name: This product will only appear to customers using a client that
matches this Company Short Name. This can be left blank so that prospective customers
are not filtered out.
Product Name: This allows you to offer special offers to customers based on the product
they are using. This product will only appear to customers using a product that matches this
name.
Major Version: This product will only appear to customers using a client that matches this
Major Version. This can be left blank so that prospective customers are not filtered out.
Minor Version: This product will only appear to customers using a client that matches this
Minor Version. This can be left blank so that prospective customers are not filtered out.
Copyright NovaStor 2010
NovaBACKUP xSP Instruction Manual | 88
Is Eval: If checked, this product will only appear to customers using an Evaluation/Trial
client. If unchecked it will not show up to those clients in Evaluation mode.
Activates Account: By default this should be set to True. If set to False, if a customer
signs up for this account type they will not be automatically added to the Storage Server.
Advanced Filter: If set to True, the basic filter settings will be ignored, and the advanced
filter used instead. This filter uses JavaScript syntax. It is recommended to use the Sneak
Peak URL Builder on the home tab to test any advanced filters made.
Filter: The advanced filter will allow you to set up more complex scenarios to determine
whether or not this product is displayed.
Total MB: This value shows the total amount of storage available to individuals who select
this option.
Retail EU Price: This is the price for the product, displayed in Euros.
Retail Price: This is the price for the product, displayed in Dollars.
Edit: Clicking this link will allow you to edit this entry.
Copy: Clicking this link will take you to a ―create‖ screen with the settings from this product
copied.
Delete: This will delete this product from your catalog.
Create: This will take you to a screen where you can create a new product.
Copyright NovaStor 2010
NovaBACKUP xSP Instruction Manual | 89
Create a new product
From the Create a new product screen you are able to configure new packages to be offered to
users. These are the options:
Enabled: If Enabled is checked, it means that the product is visible to clients connected to
your server.
SKU: This is the internal SKU for your product. This number is what the catalog is sorted
by. This number will not be displayed to the customer
Description: This is the description of the offer/product as it appears to the customer.
Copyright NovaStor 2010
NovaBACKUP xSP Instruction Manual | 90
Retail EU Price: This is the price for the product that will be displayed in Euros.
Retail Price: This is the price for the product that will be displayed in Dollars.
Total MB: This value shows the total amount of storage available displayed to individuals
who select this option. It is important to be certain that this number matches the package
configured on the Remote Manager Account Creation Settings.
Basic Filter: If toggled on, whether or not this product will appear is based on the next 6
entries.
Company Full Name: This product will only appear to customers using a client that
matches this Company Full Name. This can be left blank to not filter out any prospective
customers.
Company Short Name: This product will only appear to customers using a client that
matches this Company Short Name. This can be left blank to not filter out any prospective
customers.
Product Name: This allows you to create special offers to customers based on the product
they are using, such as NovaBACKUP, Storageline, or Acme Backup. This product will only
appear to customers using a product that matches this name. This can be left blank to not
filter out any prospective customers.
Major Version: This product will only appear to customers using a client that matches this
Major Version. This can be left blank to not filter out any prospective customers.
Minor Version: This product will only appear to customers using a client that matches this
Minor Version. This can be left blank to not filter out any prospective customers.
Is Evaluation: If checked, this product will only appear to customers using an
Evaluation/Trial client. If unchecked it will not appear to those clients in Evaluation mode.
Please note that it is not possible to have one entry that will appear to both evaluation and
non-evaluation clients, but you can make a copy of your catalog item once entered for the
other version.
Advanced Filter: If toggled on, the basic filter settings will be ignored, and the advanced
filter used instead
Filter: The advanced filter will allow you to set up more complex scenarios to determine
whether or not this product is displayed. The filter uses JavaScript syntax to create filters
for which entries will, or will not, activates this particular filter.
Activates Account: By default this should be checked. If set to false, if a customer signs up
for this account type the customer will not be automatically added to the backup server.
Copyright NovaStor 2010
NovaBACKUP xSP Instruction Manual | 91
Account Creation Setting: This entry must perfectly match the Name setting on the
Remote Manager Account Creation Settings for the package you want to assign to this
catalog item.
Management WebService URL: This must match the Remote Manager URL.
License Agreement: This will allow you to preview and change the license agreement for
this product, in the 5 default languages supported by NovaBACKUP. By clicking the
―Download‖ link next to the existing HTML you may download a template which can then be
edited and re-uploaded via the Upload New link.
General Tab
The Commerce Server has Google Analytics code already included in the user signup process, and
through use of this free service provided by Google it becomes easy to track the end user‘s
progress through your signup process to find out where they are leaving the process, or to track
conversions.
Google Analytics Account Number
By entering your Google Analytics Account Number here, the code will be updated on each page of
the signup process to update Analytics with traffic information.
Sign-Up Google Analytics Goal Conversion Funnels
These are the URLs for tracking a customer‘s progress through your purchase process. These can
be configured as goals within Google to help with ‗at a glance‘ conversion statistics.
Copyright NovaStor 2010
NovaBACKUP xSP Instruction Manual | 92
Enable Welcome Step: The Welcome Step is an initial welcome screen that displays before the
end user receives the option to choose an installation package. If checked, when a customer
begins the sign-up process, the customer will first come to this screen, otherwise the customer will
be sent directly to selecting a package.
Welcome Step Title
This is the title of the Welcome Step. This appears at the top of the Welcome Step Screen
Welcome Step HTML
Here you can edit what the Welcome Step will look like using an HTML editor.
Payment Methods Tab
The display order here will organize the order in which the enabled payment methods appear
visible to a customer. With the exception of Pay flow Pro, which is configured via the PayPal tab,
all of these methods must be processed manually. Please note that if Manual Processing and Pay
flow Pro are both checked, the customer would see ‗Credit Card‘ appear twice.
Copyright NovaStor 2010
NovaBACKUP xSP Instruction Manual | 93
PayPal Tab
Enable PayPal Pay Flow
This option must be checked if you intend to use Pay flow.
Pay Flow User (US)
This is the Pay Flow user name associated with the account you
wish to use for any US payments.
Pay Flow Vendor (US)
This is the Pay Flow vendor name associated with the account you
wish to use for any US payments.
Pay Flow Partner (US)
This is the Pay Flow Partner name associated with the account you
wish to use for any US payments.
Pay Flow Password (US)
This is the password for your Pay Flow account for any US
payments.
Pay Flow User (EU)
This is the Pay Flow user name associated with the account you
wish to use for any EU payments.
Pay Flow Vendor (EU)
This is the Pay Flow vendor name associated with the account you wish to use for any EU
payments.
Pay Flow Partner (EU)
This is the Pay Flow Partner name associated with the account you wish to use for any EU
payments.
Pay Flow Password (EU)
This is the password for your Pay Flow account for any EU payments.
Newsletter Tab
Copyright NovaStor 2010
NovaBACKUP xSP Instruction Manual | 94
On this screen, integration of newsletter subscriptions may be processed utilizing an interface with
Clever Reach (www.cleverreach.com), a third party mass E-Mail provider. On the initial page you
may see any filters that have been created, and may create a new filter by selecting the ―Create‖
link.
Name: This is the descriptive
name of the filter you wish to create
Filter: This is the code for the
filter itself. The filter uses JavaScript
syntax to create filters for which entries
will, or will not, activate this particular
filter. If an entry would meet multiple
filter conditions, it will only be applied to
the first filter whose conditions it meets.
Custom Fields: Currently, only
the language custom field is supported.
CleverReach URL: This is the
URL generated by the XML Interface in
CleverReach
Reports Tab
This tab allows you to run reports to view user registrations and invoices.
Copyright NovaStor 2010
NovaBACKUP xSP Instruction Manual | 95
Export New: If this link is clicked, it will allow you to download a CSV file that contains all
the entries for this report
Run: On the screen that this link takes you to, you can configure which columns will be
included in the generated report.
Advanced Tab
The Advanced Tab allows you to configure how E-Mail will be sent from the Commerce Server. In
the subject line, and body E-Mail sections below, it is possible to use the following variables:
%userName, %password, %firstName, %lastName, %productName, %planName. This is displayed
on the next page.
Copyright NovaStor 2010
NovaBACKUP xSP Instruction Manual | 96
Copyright NovaStor 2010
NovaBACKUP xSP Instruction Manual | 97
SMTP Server Address: Here you can enter the IP address of the SMTP server that the
Commerce Server will use to send out E-Mail.
SMTP Server User Name: This is the user name used for authentication of the SMTP
server.
SMTP Server Password: This is the password used for authentication of the SMTP server.
Error E-Mail Sender Address: This is the E-Mail address that error E-Mails will be sent
from.
Error E-Mail Subject: This is the subject line that error E-Mails will be sent with. In the
subject lines of this E-Mail you may include the character {0} which will be replaced with the
URL of the server on which the error happened. You may also use the following variables:
%userName, %password, %firstName, %lastName, %productName, %planName.
Error E-Mail Recipient Address: This is the E-Mail address that error E-Mails are sent to.
Test E-Mail Settings: This button will test the E-Mail settings previously configured.
Copyright NovaStor 2010
NovaBACKUP xSP Instruction Manual | 98
Send E-Mail to administrator on user signup: If this button is checked, when a user signs
up an E-Mail will be sent to the administrator.
Send E-Mail to end user on signup: If this button is checked, when a user signs up an EMail will be sent to them.
Signup E-Mail Sender Address: This is the E-Mail address that signup E-Mails appear to
be sent from.
Signup Admin E-Mail Recipient Address: This is the administrator E-Mail address that to
which the signup E-Mail will be sent.
Signup E-Mail Subject: This is the subject line of the signup E-Mail. The following
variables may be used here: %userName, %password, %firstName, %lastName,
%productName,%planName.
Signup E-Mail Body: This is the body of the signup E-Mail that is sent to an administrator
on new signups. The following variables may also be used: %userName, %password,
%firstName, %lastName, %productName, %planName.
End User Signup E-Mail Subject: This is the subject line of the E-Mail that will be sent to
the end user when they have successfully subscribed to one of the products on the
Commerce Server. The following variables may be used here: %userName, %password,
%firstName, %lastName, %productName,%planName.
End User Signup E-Mail HTML: This is the body of the E-Mail that is sent to an end user
upon the successful subscription to one of the products on the Commerce Server. The
following variables may be used here: %userName, %password, %firstName, %lastName,
%productName, %planName.
Send E-Mail to administrator on user evaluation expiration: If checked, when a user
reaches the end of a free trial period, the administrator will be sent an E-Mail notification.
Send E-Mail to end user on evaluation expiration: If checked, when a user reaches the
end of a free trial period, the user will be sent an E-Mail notification.
Evaluation Expired E-Mail Sender Address: This is the E-Mail address which the trial
expiration E-Mail appears to be sent from.
Evaluation Expired Admin E-Mail Recipient Address: This is the administrator E-Mail
address to which expired trial notifications will be sent.
Evaluation Expired E-Mail Subject: This is the subject of the E-Mail that is sent to an
administrator when a trial subscription ends. The following variables may be used here:
%userName, %password, %firstName, %lastName, %productName, %planName.
Copyright NovaStor 2010
NovaBACKUP xSP Instruction Manual | 99
Evaluation Expired E-Mail Body: This is the body of the E-Mail that is sent to an
administrator when a trial subscription ends. The following variables may be used here:
%userName, %password, %firstName, %lastName, %productName, %planName.
End User Evaluation Expired E-Mail Subject: This is the subject of the E-Mail that is sent
to an end user when a trial subscription ends. The following variables may be used here:
%userName, %password, %firstName, %lastName, %productName, %planName.
End User Evaluation Expired Body HTML: This is the body of the E-Mail that is sent to an
end user when a trial subscription ends. The following variables may be used here:
%userName, %password, %firstName, %lastName, %productName, %planName.
Content Tab
In the content tab you can view the files that make up the Commerce Server, using this tab you can
edit, delete or rename the core files of the Commerce Server. It is possible to damage your install,
so be certain that you have backed up the Commerce Server database before making changes,
and that you are sure of what is being altered.
For more information about the fields and making modifications to the database files, please
contact NovaStor Technical Support.
Copyright NovaStor 2010
NovaBACKUP xSP Instruction Manual | 100
Database Tab
On the database tab, it is possible to view the database
tables and add, delete or edit entries. The database tab
will also enable you to insert new entries into the
database tables. When you‘re editing the properties and
fields of this tab, you are directly interacting with the SQL
database.
This can be much simpler than opening SQL
Management Studio, and opening tables, and having to
dig and find what you need.
Copyright NovaStor 2010
NovaBACKUP xSP Instruction Manual | 101
NovaBACKUP xSP Application Update Server
The NovaBACKUP xSP Application Update Server is designed to provide automatic updates or
upgrades to your customers. It allows you to create custom upgrades for specific clients or client
groups, and will enable those customers in those groups to download updates/upgrades by clicking
Check for Updates in the Help screen within their client software. If no updates are available, the
client screen will display a box indicating that the program is up to date.
Clients with specified Company and Product Names and Version information will be able to detect
and download new updates when a) the update information is added to the Application Update
Server database and b) the client application is configured to contact the Application Update
Server.
Installing the NovaBACKUP xSP Application Update Server
The Application Update Server is not automatically installed when NovaBACKUP xSP Storage
Server is installed. The Application Update Server has the following minimum requirements:
Windows Server 2003 or 2008
.NET 3.5 SP1
IIS
Microsoft Visual C++ 2005 SP1 Redistributable
Copyright NovaStor 2010
NovaBACKUP xSP Instruction Manual | 102
Microsoft Visual C++ 2008 SP1 Redistributable
Connectivity to a Microsoft SQL 2005/2008 or MySQL 5.1 database server
Something to consider as you install this module is finding out how many different client
builds have been deployed in the field. You will need to know because the different build
numbers are entered into the application update database later on. If you have multiple
builds such as 11.0.16 and 11.1.22, make sure you have submitted and downloaded the
setup file on the builder website for 11.1.28 that these clients will need to upgrade to.
To begin installing the Application Update Server, click on Setup.exe. When the setup begins, the
installation screen is shown, as seen on the next page.
Clicking next will launch the Application Update Server setup wizard.
Copyright NovaStor 2010
NovaBACKUP xSP Instruction Manual | 103
The Setup application gives you a number of options. To proceed with the installation of the
Application Update Server, click next. In the following screen, select a Server Instance for the SQL
server that is being used by NovaBACKUP xSP.
Copyright NovaStor 2010
NovaBACKUP xSP Instruction Manual | 104
The SQL Server instance that you are using to manage the
NovaBACKUP xSP database should be shown on the
screen. If you are using a different instance, you may select
it from the Browse tab (…) on this menu. You must also
authenticate this instance of SQL server. We recommend
that use SQL Server Authentication, rather than Windows
Authentication. We also recommend that you always use the
Username sa, as shown above. The password is the one
used to access the SQL Server used by NovaBACKUP xSP.
The Database Name is ApplicationUpdate.
Copyright NovaStor 2010
If you have entered an
incorrect password, or
have selected the wrong
instance of your server,
your request to move the
next screen may not
complete.
NovaBACKUP xSP Instruction Manual | 105
Once the above fields have been filled in, pressing next will load the IIS Web Application screen.
The IIS Web Application, seen here, will open:
The fields will be automatically populated when this screen is opened. Always use the default
website setting for the IIS Server.
Copyright NovaStor 2010
NovaBACKUP xSP Instruction Manual | 106
Click on Install, and the application will begin installing. It may take a few minutes for the
application to install. While the installation is proceeding, you will see a progress screen:
Copyright NovaStor 2010
NovaBACKUP xSP Instruction Manual | 107
When you finish, the screen will close.
Using NovaBACKUP xSP Application Update Server
In order to use the Application Update Server, you must launch the version of SQL Server (or
MySQL) that is being used as the database for NovaBACKUP xSP. To do this, select this version
of your SQL server from the Start menu. (You may have to click All Programs to make the SQL
server visible) Select SQL Server Management Studio.
Select the database engine and click Connect, and you will be connected to the database.
Copyright NovaStor 2010
NovaBACKUP xSP Instruction Manual | 108
You will see the Microsoft SQL Server Management Studio screen as displayed on the next page:
Click to open AutoUpdate->Tables->. Next, RightClick on dbo.ApplicationUpdate. Depending
upon which version of SQL Server you are using, the selection options are different. In SQL Server
2008, select Edit Top 200 Rows, for SQL Server 2003, select opentable.
A table, showing the stored settings for Application Update will be displayed. The table shown here
includes settings for one update client.
Copyright NovaStor 2010
NovaBACKUP xSP Instruction Manual | 109
The field descriptions are fairly obvious. Please leave the Application field blank – a number will be
assigned to it when the cursor is moved up or down.
The URL field should include the URL or the IP address of your NovaBACKUP xSP Storage
Server. We recommend setting Launch in Browser, and Command Line fields to 0. Your
company‘s full name goes into the CompanyFullName field; your company‘s short name goes in
the CompanyShortName field. Similarly, the name of the product (if you are renaming the
NovaBACKUP client application to one that you assign to it) goes into the ProductName field, the
major version number, minor version number, and build numbers go into the appropriately named
fields. Pressing the down-arrow adds the line to your database.
Save the file, in order to save your changes.
You may add or modify this data as needed. If you have multiple customers or groups of
customers, you can specify which update can be provided to each user or group. Based on your
settings for the client or group, the appropriate update file will be provided, when available.
Enabling customers to perform updates
Although you have configured the Application Update Server,
there is one more step required to give your customers the ability
to update their client application. You must set the Storage Server
URL inside the client application.
To do this, go to http://builder.NovaStor.com.
Copyright NovaStor 2010
Note: If your browser
adds www to the
URL,
you
won’t
connect
to
the
Novastor Builder.
NovaBACKUP xSP Instruction Manual | 110
From the Builder application, enter the URL or IP Address for the Application Update Server in the
Updates URL on the General Tab.
For more information about using Builder, please see documentation on the Builder Module in this
User Guide.
If you want to add Updates to an already created Client application, you should resubmit your
request to NovaStor to create an updated version of the application.
Copyright NovaStor 2010
NovaBACKUP xSP Instruction Manual | 111
NovaBACKUP xSP Product Builder
NovaBACKUP xSP Product Builder is the module used to build customized client-installable
software, using NovaBACKUP as its core. This module allows you to pre-configure the application
for your clients. You can define your own logos, create links to your NovaBACKUP xSP servers,
and do many more things to create a backup and restore application for your users. With
NovaBACKUP xSP Builder, you can create links to your own NovaBACKUP xSP servers, apply
custom graphics, create custom help screens and menus, and enable a client application that can
have as much – or as little – evidence of being a NovaStor product as you wish.
Creating the client application is not automatic – NovaStor will build the client, based upon settings
that you create at NovaStor‘s Builder site.
To get to the client creation site, type: builder.NovaStor.com. Please note that if your browser
inserts www. In front of builder.NovaStor.com, you will not link to the Builder site. The site will
open, presenting the sign-in screen. Log in or create a new user account. If you create a new user
Copyright NovaStor 2010
NovaBACKUP xSP Instruction Manual | 112
account, NovaStor will validate your login information and send you a confirmation that an account
has been created. Depending upon the version of NovaBACKUP xSP that you have licensed from
NovaStor, you may be able to create one or more client applications.
The welcome screen will show you the status of the client software builds that you have created.
To create a new client application, click on Create a new product.
A multi-tabbed interface will open, with the following tabs:
Status
General
Languages
Graphics
Code Signature
Setup
Help
Comment
Status
The Status screen is not the first screen that normally appears when you log in. It won‘t appear
until you select Update or Insert on one of the Builder tabs.
The Status screen, seen here:
This screen provides the status of the client application you are designing or have submitted to
Copyright NovaStor 2010
NovaBACKUP xSP Instruction Manual | 113
NovaStor for creation, the date of your last request, and the date of the last build of the application.
General
The opening screen, General, provides general options that will apply to the client software
packages that NovaStor creates for you. It will contain the general information that will be used for
all packages. (You can, however, modify any of the fields on this screen in order to further
customize the settings).
The options on the screen are mostly self-explanatory. In the example shown below, a client
application for internal clients (clients within a local Intranet) is developed for a fictional company
called xSP testers. Not all fields have been populated – these fields can be completed when you
create your specific accounts.
The option to ―Use Black Text on Splash Screen‖ is provided for users who use a light colored
splash screen. On such a screen, text written on top of the splash screen may be hard to read, or
may disappear entirely. NovaBACKUP xSP‘s default is White Text. By selecting the ‗Use Black
Text on Splash Screen‘ option, your text, shown against your light background, will be easier for the
client to read.
The option ‗Generate NovaNet-WEB Patch‘ creates a patch file that updates the client who is
currently using NovaNet-WEB for online backup.
‗Base Product‘ provides you with multiple choices. The most current version of the backup
application and some earlier versions are available. Use the button at the right side of the date
selection box to scroll to the version you wish to use.
The screen should look something like this:
Copyright NovaStor 2010
NovaBACKUP xSP Instruction Manual | 114
In most cases your screen will have additional fields representing your company‘s URL and related
special URLs for the specific functions you are defining.
When you have completed filling out the information in the General Tab, click Insert. The fields will
be saved. Click Edit, and you will be able to continue to edit your custom application.
Languages
This tab allows you to select which languages you wish to support. If there are any languages you
don‘t want to support, you may delete them by clicking on the Delete button.
Graphics
It is worth noting that the custom application you will be providing to your clients is a
customized version of NovaBACKUP, a well-reviewed, industry leading backup product
from a company with more than fifteen years of experience creating backup software. The
value of the Novastor name and graphics may enhance the perceived value of your online
backup service. However, if you prefer to supply your own graphics, NovaBACKUP xSP
enables you to do this on the Graphics screen.
The Graphics tab provides a screen that enables you to choose the NovaStor default graphics or to
use graphics that you provide for many of the visual elements in the client application. These
graphics appear in a number of places:
Banner Left
Bottom Left
Icon
Logo
Long Banner Left
Setup Header
Setup Page
Splash Screen
Animated Bitmaps 1-4
Tray Green
Tray Orange
Tray Red
All of the items in the template may be used. Each element name is followed by a list of
dimensions for the item. For example, Try Red uses a 24 x 24 icon.
You may use your own graphics for any of these elements by clicking Browse and selecting the
Copyright NovaStor 2010
NovaBACKUP xSP Instruction Manual | 115
appropriate graphic. When you download the element, Builder will display the element on the
Graphics screen.
To save your graphic settings, press Insert, and the Status tab will open. Click Edit, and then click
another tab. In this case, click the Code Signature tab.
Code Signature
The Code Signature is a statement that appears on the client software that identifies ‗Code By…‘ If
you don‘t change this setting, NovaStor will be listed as the source of the code. If you choose to
use your company name, the name you use must have an associated certificate issued by a
certification authority.
Setup
Setup is where much of the information required for the client to interface with the server is set up.
The top line is where you insert the static IP address or URL for your NovaBACKUP xSP Storage
Server. When the client initiates on online backup, the request is directed to this IP address or to
the IP address associated with the URL.
The next line asks for a URL for the Commerce Server. When the client wants to manage its
account, the system will direct it to your Commerce Server where the account maintenance
modules are running. Maintenance tasks include such elements as selecting a backup product,
setting up payment for backup services, and many more options.
BackupClient.ini, config.ini and exc.ini are pre-written as templates. You may use these templates
to control the client, configuration and exclusion files. By clicking View to the right of any of these
.ini file names, then Open, you can view these files. These files, by default, have none of the
options activated (all have the # at the beginning of the line). To activate one of the options,
remove the # and save the file, giving it a new name. The new file can be accessed as a custom
file.
Finally, you have the option of selecting whether your client application will have Anti-Virus or
Disaster Recovery modules included. Clicking on the box will enable these options.
Help
NovaStor has created Help files for the client applications in multiple languages. These help files,
in .chm format, contain multiple references to NovaBACKUP and feature the NovaStor logo on
many screens. The default is to enable these help files, although the files can be saved and
modified so that these graphics and references to NovaBACKUP and NovaStor are replaced by
your name and logos. To make these replacements, click the View button to the right of the
Template file name and click Save. The saved file can then be edited, using the appropriate
Copyright NovaStor 2010
NovaBACKUP xSP Instruction Manual | 116
software, and selected as the Help file.
If you choose to create custom help files, you can click on the Custom radio button, browse for the
custom file, and download it. When the application is built, your custom file(s) will become the help
files for the client application.
Comments
If you want to send a comment to the NovaBACKUP xSP Product Builder administrator, they can
be included in the Comments box.
Sending your Client Application Settings to NovaStor
Once you have finished creating the settings and options for your client application, click Submit
build request, and the file will be saved and sent to a NovaStor specialist who will create the
custom application. You will receive E-Mail when the application is ready, and will be sent a link to
download the EXE and PAT files. If there are errors in your settings, NovaStor will contact you.
After you submit your build request, the Status tab will display the current status of your request, as
seen on the next page:
When you log back in to the NovaStor Product Builder, you can check the status of your Build
Request. If your request was completed, the status menu will give you a Product Status of
Available for download. At this point, you can View the settings for the Client Application, Delete
the Client Application, or click Download Setup.
Copyright NovaStor 2010
NovaBACKUP xSP Instruction Manual | 117
The Status screen, with the status of the client application build and options looks like this:
When you click Download Setup, you have the following options: Run, Save, Cancel, Help. In
most cases, if you‘re ready to download the client application, click Save, and then provide a target
directory to which the files will be saved. If you choose to run the application, it will be downloaded
and installed – if your goal is to distribute the custom client application to subscribers, the file
should be downloaded and saved to a directory from which it can be accessed and sent to the
subscribers.
The file received is an .EXE file. This file may be sent to subscribers, or it can be burned to CDROM or DVD, or transferred onto a flash drive for receipt by your subscribers. Once the application
file is double-clicked, the installation will begin.
About Timing Out
The NovaStor Product Builder module may not always allow you enough time to complete your
product design. Therefore, it is important that you update the design every few minutes. In some
cases, your session may time you out and may not always save your most recent changes. If this
is the case, when you move to a new screen or try an Update, you may be asked to log in again.
Copyright NovaStor 2010
NovaBACKUP xSP Instruction Manual | 118
Distributing your client application
You will be notified by E-Mail when your client file is ready for download. You must log in to Builder
to download the file. When you have received the file, it‘s a good idea to install the application on a
local system and test it before distributing it to clients. If changes must be made, you can reopen
the NovaStor Product Builder and edit your file to reflect the changes.
Once your application is ready to distribute, it may be distributed to your customer on optical media,
flash drives, or by E-Mail over the Internet.
NovaBACKUP xSP Client Module – Backup Software
The NovaBACKUP xSP Client Module, which you created using NovaBACKUP Builder, is a full
backup application. It is built around a NovaBACKUP core, customized with your settings.
Copyright NovaStor 2010
NovaBACKUP xSP Instruction Manual | 119
To install the program (or to have your customers install the program), double-click on the
application, and follow the screens. The opening screen of the installer uses the title of the
application that you specified when you set up the client application, and also includes the graphics
you specified during client application setup.
Your client can select English, or any of the other languages you made available when you
configured the application. Click Next (or have your client click Next), and the software license is
opened. Once your client reads the entire agreement, selecting I accept the terms in the License
Agreement will make the Next button clickable. Your customer will next have the option of a typical
install or a Custom install. In most cases, selecting a typical install will provide the most commonly
used components. Accepting the agreement and clicking on Next will start the application
installation.
Copyright NovaStor 2010
NovaBACKUP xSP Instruction Manual | 120
When the application installer finishes with the installation, a screen similar to this one is displayed:
In this case, we‘ve created an application called Internal Online Backup. Clicking on the application
name in the gray box on screen, then pressing Finish will start the application. If the user doesn‘t
want to run the application yet, not clicking on the box that starts the application will finish the
installation and close the installer. The application will be available from within the Start menu.
The first time the application is launched, the online backup device should be configured. The
Configure Device screen will contain the IP address settings created when you created the settings
in the Product Builder module.
Configure Device
To test the connection, press the Test Connection button at the bottom of the Account Menu in the
Configure Device box.
Note: In this example, we’ve used the internal IP address of the server. This address can be used
for connecting to the NovaBACKUP xSP server over an internal network.
Copyright NovaStor 2010
NovaBACKUP xSP Instruction Manual | 121
The Configure Device module looks like this:
To test the connection, username and login information aren‘t required. If you haven‘t entered this
information in the Configure Device Account tab, you will be asked for it when you test the
connection.
The Account tab also provides a default configuration name. This information is used when
scheduling online backups – it will be the name of the online device that is selected from within the
client application.
Your client may use the login name and password that you define, or may use Windows login
credentials. In order to use the login credentials, this option must be selected, and you must
enable the use of login credentials when the user account is created.
Enabling the client to use the static IP address of your NovaBACKUP xSP server may be
somewhat problematic. This is because there may be firewall or other settings in your router that
may refuse the connection request, you may not have your router set to forward requests for port
308 to the NovaBACKUP xSP server, your server may block requests sent to the port, or for other
reasons. Conversely, your organization may already have settings allowing external requests,
configuring the server to accept and process logins from customers may be a relatively simple task
for some IT personnel. Your system administrator should be able to configure your settings to allow
remote access from your customers.
Copyright NovaStor 2010
NovaBACKUP xSP Instruction Manual | 122
To test the connection to the backup server, press Test Connection. If you haven‘t already entered
the name for one of the customers (or if the customer hasn‘t already entered the name assigned by
your company), you will be asked to enter a name:
If a valid username and password are entered (and the password entered a second time), the test
will complete successfully. The username and password(s) will be placed in the device
configuration screen.
Security
The Security tab allows you to modify or review the encryption
settings for the backup data to be sent to the server. NovaBACKUP
It is not necessary
xSP, and the client, use 128 bit AES encryption. The default
to modify the
encryption keyword is the login password for each user. Using the
Device Name.
login password may make it easier for a client to remember the
encryption code word, should a problem arise. NovaBACKUP xSP
also enables the use of a different encryption key designated by the
client. To enable the use of a secret encryption key, the user should click on the Specify my own
secret key for encryption radio button. Once this is done, the Secret Key options area on the
Security menu opens, and the client is asked to enter and re-enter the encryption code word.
NovaBACKUP xSP allows the user to enter an optional hint that should make it easier for the client
to remember the encryption code key.
Copyright NovaStor 2010
NovaBACKUP xSP Instruction Manual | 123
Advanced
The Advanced screen provides options for the backup and data recovery. The client can send a list
of deleted files to the Backup Server, by clicking on Send deleted file lists to the Backup Server.
The default is to not send these lists.
If network bandwidth is a problem – perhaps the client has a slow connection and doesn‘t want to
slow down the company‘s available bandwidth by running partial backups, you can select Limit
network bandwidth to: and select the maximum bandwidth for communicating with the
NovaBACKUP xSP Backup Server.
The NovaBACKUP xSP client is configured to very quickly communicate over the Internet to a
Storage Server. When a client connects to the Storage Server, changed files are encrypted, and
the encrypted data is sent over the Internet to the Storage Server. The process of encrypting the
data takes CPU cycles—the more data to be transmitted to the Storage Server, or the more
operations that the client is also running, the more is the likelihood that the client computer will
Copyright NovaStor 2010
NovaBACKUP xSP Instruction Manual | 124
seem to be working more slowly than it was before the backup was started. In order to reduce the
effect of the backup processes on the overall available processing power of the computer, you may
want to slide the CPU Utilization slider to the left of Faster Backup. If the slider is all the way to the
left, backup will be slowed considerably, while the CPU gives more clock cycles to the processes
being run on the client machine. Effectively balancing between faster backup and somewhat
reduced performance or slower backup but faster system speed may take a bit of tweaking of the
CPU Utilization slider.
The Temporary files folder enables you to specify a folder (directory) where the temporary
files are stored before they are sent to the NovaBACKUP xSP Storage Server.
Your Temporary file folders should be located on a drive with at least twice as much free
space as data the full backup set contains. So if the client‘s full backup is 40GB, the
Temporary folders should have 80 GB at least free. If not, the FastBIT™ will not work
properly. Besides the device temp folder, there is another folder that is used for plug-in
data. This can be moved by going to the Home tab/ default settings/ advanced.
Finally, the Data recovery option allows you to decide if the Backup Server Administrator would be
allowed to recover your files in an emergency. In order to do this, the Backup Server Administrator
would be able to use a master key that would un-encrypt the files for any customer who allows this.
It is possible, though highly unlikely, that a Backup Server Administrator would do this without
permission. If you do not want the Backup Server Administrator to be able to recover your data,
selecting Block the backup if the administrator can recover my data will not enable the Backup
Server Administrator to use a master code to recover your data.
Staging
Staging is an important option – whether the client has a 10 GB or a 10 TB backup plan. This
allows the backup to be made to a device that can be physically transported to the location of the
NovaBACKUP xSP Storage Server. Say, for example, that you have a 20 GB backup set. The
initial transfer of 20 GB over the Internet could take hours to accomplish, especially if the Internet
connection is slow, or the Backup Server Administrator limits the transfer speed for backups. A
staging folder, a folder on one of your drives specifically created to hold the initial backup can be
copied, in a compressed and encrypted format, onto an external hard drive, or a few DVDs, or
possibly onto a 32GB flash drive.
This drive can be shipped (or, if the Storage Server is local, driven) to the Storage Server. The
initial backup set can then be transferred onto the Storage Server. The devices or disks used to
transfer the staged data can be returned to the client after the staged data is moved onto the
Storage Server.
For a backup client with hundreds of gigabytes of data – or more – the amount of time saved by
Copyright NovaStor 2010
NovaBACKUP xSP Instruction Manual | 125
staging data onto a transportable hard drive could be days. Staging data is an excellent option.
To enable staging, select the box to the left of Write the backup to the staging folder, then
browse to the drive where the staging file will be written.
Note that, once the staged data is written onto the Storage Server, subsequent backups will contain
the changes to the data that occurred after the last backup. While it may have taken weeks or
months to accumulate your staging data, backups of this incremental data could take minutes to
complete.
This screen shows staging set to occur on initial backup to a staging folder created for this task:
When you have made all the appropriate settings on your client application, press OK, and the
Configure Device box will close, the client device will be added, and you will be returned to the
main backup client application.
When you have made all the appropriate settings on your client application, press OK, and the
Copyright NovaStor 2010
NovaBACKUP xSP Instruction Manual | 126
Configure Device box will close, the client device will be added, and you will be returned to the
main backup client application.
The next step is to import the stage backup to your server once it has finished backing up. You may
do this by transporting the physical drive the data is on to your server, or using an FTP server to
stream the large amount of data.
Importing the Stage Backup to the Server
After your backup is done to the staging folder, configure the xSP device to stop backup to the
staging folder. The staging folder is ONLY to be used for the first initial backup of a user, do not
backup more than once to the staging folder.
The user must not do a backup until the staged backup is imported to the backup server, so
disable any schedules that may be setup for the user.
1) Get the user‘s staged data on the storage server, or accessible to the storage server via
UNC path.
2) From the root installation folder of your Storage Server, launch the BackupImportUtil.exe
You may use the tip below to run the import via command line instead of a GUI if you prefer.
The Command line has the following arguments and is done in the Storage Server‘s
installation directory. BackupServer.exe -stagedDataMigration –s *Staged Directory* -u
*UserName* -c *SQL Connection String*
An example of a command line for this would be the following:
BackupServer.exe –stagedDataMigration –s ―C:\Staged\Base‖ –u testnate –c ―Provider=sqloledb;Server=.\SQLEXPRESS;DatabaseBackupServer;Trusted_Connection=no;user
id=sa;password=SQLpwd1;‖
Copyright NovaStor 2010
NovaBACKUP xSP Instruction Manual | 127
Here is a screen capture of the Import Utility GUI:
3) There is no ‘progress’ indicator when the import is done, if you check the windows task
manager you will see multiple copies of BackupServer.exe running. One of them will close
when the import is done.
4) After the import is done, go into the configuration manager and double click the user and
press the Ok button so it will read the Disk Usage correctly.
5) At this point the client software can do backups and restores from storage server. To be
sure the import worked correctly you can connect to the user account using the
NovaBACKUP software and go to the restore tab to make sure the files show up.
How to change the online device settings
If you close the Configure Device box before all settings have been created, or if you want to
change some of the settings of the device, or if you just want to review the Configure Device
settings, it is easy to get back into the configuration box. To do this, select the Device tab, highlight
Copyright NovaStor 2010
NovaBACKUP xSP Instruction Manual | 128
the device (this will usually be xSP device.0), and click Properties. The Internal Online Backup
screen will open. This screen also enables setup of external backup targets.
You may also access the Configure Device screen by choosing Online Storage on the Home
screen, as shown with the green background (meaning that it will be selected) is shown on the next
page.
Copyright NovaStor 2010
NovaBACKUP xSP Instruction Manual | 129
When Online Storage is selected, you will have the choice of defining a new online storage device
or reviewing the settings of your current online storage device.
Running an online backup
The backup client application features very useful Help files, and the program is already very
intuitive to use. Most questions about using and running the client application can be answered by
the help files.
For the purpose of demonstrating an easy first backup task, we‘ll be backing up My Documents to
the xSP server. In this example, we‘ve clicked the My Documents and the Music files on the Home
screen. When selected, the backup client will copy the contents of the user‘s Document directory,
and will also copy the default Music directory.
Copyright NovaStor 2010
NovaBACKUP xSP Instruction Manual | 130
Once the backup jobs are selected, the Job Type and destination must be selected. When a first
backup is being created, the only option available is Backup. After a backup has been made, the
client will also have the option of restoring a backup. When you click select a destination, a screen
opens, showing the local drives, the configured online storage device, and the Network. When xSP
device.0 is selected, the screen will show all the storage devices and a link to the Network. The
online backup device name appears at the top of the screen, in the Device box.
Copyright NovaStor 2010
NovaBACKUP xSP Instruction Manual | 131
Once the type of job and the backup device are selected, the client is returned to the home screen.
To start the backup, press Run, or click on Run Job.
A Backup will start, and a progress screen will begin to track the progress.
A word on the simple view mode
The client backup software is configured, by default, to run in the Advanced View User Interface.
This interface gives the client more choices, and more control, over the selection of files and the
entire process. However, there is also a more basic user interface, the Simple View.
To switch between views, just click the Switch button at the bottom of the screen to go from
one mode to the other.
Copyright NovaStor 2010
NovaBACKUP xSP Instruction Manual | 132
Web Based Restore
Web Based Restore is a fully customizable utility that allows a user to restore backed up files over
the Internet without requiring NovaBACKUP xSP Client software to do the restore.
In a normal restore, the customer would have to be running the client software, and restore to the
machine that was backed up. Web based restore allows a customer to access a URL of the service
provider‘s choosing, input the username and password, and gain access to a restore only
interface. An example of a website address that can be used for Web Based Restore is:
http://backup_provider_IP_Address/webrestore.
Copyright NovaStor 2010
NovaBACKUP xSP Instruction Manual | 133
Once logged in to the web restore server, the default interface looks something like this:
Installing Web Based Restore
To install Web Based Restore, you must first download the Web Based Restore files.
These files are accessible from:
http://backupfilestore.NovaStor.com/Downloads/Utilities/wbr.zip
Create a file on the root of the desired drive, calling it WBR. UnZIP the wbr.zip files to the
WBR file you just created.
In IIS, create a virtual directory. For information on how to create a virtual directory in IIS,
the following links provide useful information:
o IIS6:
http://www.microsoft.com/technet/prodtechnol/WindowsServer2003/Library/IIS/5adfc
ce1-030d-997c-bdbfa08ea459.mspx?mfr=true
o IIS7: http://technet.microsoft.com/en-us/library/cc771804(WS.10).aspx
When prompted for a physical location of the folder, point to the previously created WBR
folder.
Next, go to the directory to which the files were unzipped (WBR) and edit the index.htm file
using notepad. Find the entry that says: var server = ―192.168.0.129‖.
Change the IP address (192.168.0.129) to the address of the Storage Server. This address
is the same that the customers have configured in their client software, or that you
Copyright NovaStor 2010
NovaBACKUP xSP Instruction Manual | 134
configured, using NovaBACKUP xSP Product Builder, to create the specifications for their
client software.
Save, close and test the new directory.
Customer Use of Web Based Restore
When the customer/user first connects to web based restore (at the address you selected above),
the server will prompt the user to download and install a small file.
Once the file is installed, the customer will be able to run the web restore module and restore files
for the account into which he or she is logged in. The user is required to log in to be able to use the
web restore module.
Copyright NovaStor 2010
NovaBACKUP xSP Instruction Manual | 135
APPENDIX
NovaBACKUP xSP Remote Settings:
The server currently maintains a collection of settings the admin has added (if any) server-side as a
‗remote setting‘ for the client to pick up. This is accomplished by sending the client a file called
ClientSettings.ini when the client requests it. The convention has been to include a [settings]
section with settings to follow using the typical .ini file format:
<label> = <value>
Start NovaBACKUP Storage Server Configuration Manager, go to Accounts tab and click on a
Group Policy Settings. Select Everyone Group and click on Properties, then go to Settings Tab and
Click on NEW.
===============================================
DEVICE LEVEL (effects current device settings)
===============================================
Values = 0/1
"SpecifyCredentials"
"PurgeOldFiles"
"SaveFullBackup"
"UsePatching"
"WaitOnLockedFiles"
"CopyFileToWork"
"SpecifySecretKey"
"SendDeletedFiles"
"SecretBlockBackup"
"TLS"
"ESW" (means ForceDESEncryption)
"ForceUsePasswordForKey"
"ForceSetSecretKey"
"BandwidthLimited"
Values = variable
"ServerPort"
"NumRetries"
"RetryWaitSeconds"
"PurgeFileLength"
"LowDiskSize"
"PatchSpeed"
"CompressionSpeed"
"MaxMBCopy"
"MaxPatchWindow"
"MinPatchWindow"
"EncryptionType"
"BandwidthValue"
"ThrottleValue"
==================================================
SCRIPT LEVEL (affects [logs] section in xxdef.ini)
==================================================
Values = 0/1
-----------"PrintLog"
"MailSendAfterBackup"
Copyright NovaStor 2010
(Maps to: same)
(Maps to: "EmailLog")
NovaBACKUP xSP Instruction Manual | 136
Values = variable
----------------"LogOption"
"PrintOption"
(Maps to: "LogNotifyOpt")
(Maps to: "LogWriteOpt")
===================================================
SCRIPT LEVEL (effects [email] section in xxdef.ini)
===================================================
Values = 0/1
-----------"MailSMTPAuth"
―UseSSL‖
(Maps to: "SMTPAuth")
(Maps to: same)
Values = variable
----------------"MailServer"
"MailUsername"
"MailPassword"
"MailFrom"
"MailSendTo"
"MailSMTPPort"
"MailSubject"
"MailTimeout"
"MailRetries"
"MailCCTo"
"MailSenderName"
(Maps to:
(Maps to:
(Maps to:
(Maps to:
(Maps to:
(Maps to:
(Maps to:
(Maps to:
(Maps to:
(Maps to:
(Maps to:
Copyright NovaStor 2010
"SMTPHost")
"EmailUserName")
"EmailPassword")
"EmailSender")
"EmailSendTo")
"SMTPPort")
"EmailSubject")
"Timeout")
"Retries")
"EmailSendCC")
"EmailSenderName")
NovaBACKUP xSP Instruction Manual | 137
Commonly used Terms
.Apf file: Every backup account will have a cache.apf file, which is a special file that acts as a
connector between the backupserver SQL database, and the configuration manager. It stores all
sorts of information used to retrieve account information from the database during backups and
restore.
Backup Server Service: This is the background windows service that is installed with your Storage
Server. This service turns the backup server on and off.
Cache: We use this term to describe folders that store temporary files. Temp folders store data
required for FastBIT™, restore jobs, and file synchronicity to work.
Client Service: This is the main background windows service that runs the client, and enables the
scheduler to run while a client is logged off their machine.
Data directory: This is another name for the folder where an account‘s data is actually getting
backed up to.
FastBIT™: This is the patching process behind our speedy backup service. The patching process
involves the comparison of two different versions of the same file and extracting the differences
between the files. When the differences are extracted from the two files, they are saved into a new
file and compressed into what is known as a Patch. The patch file is often 85% to 99.9% smaller
than the file which the patch was extracted from originally.
In order to perform a FastBIT backup, the software has to backup the files 3 times: the first backup
is a full, the next backup will perform an incremental, and the third performs the first FastBIT
backup.
Stage Backup: This is another word for a ―Seed Backup‖. The concept is to store a large initial
customer‘s data on a local device such as an external hard drive, and then have the ability to
stream or transport the bulk of that data to your Storage Server. This can save hours, days or even
weeks of trying to move a large amount of data over the internet for the customer‘s first full backup.
Roll-up: This is a scheduled cleaning process for your Storage Server that clears out duplicate
data and outdated files from your backup accounts. This process works against the Data directories
to reduce storage, and erase files which the client has marked for deletion from their account.
Copyright NovaStor 2010
NovaBACKUP xSP Instruction Manual | 138
Contacting Technical Support
Whether you contact us via the phone or via the
Support Request Form, we will promptly log your
support request and quickly assign your issue to the
appropriate support engineer. The following sections
detail the life cycle of a support request and explain
best practices, our processes and your options as the
issue progresses. Here are general recommendations
for contacting us by phone, e-mail and website.
U.S. Hours of operation:
MON - FRI
7am – 5pm PST.
1-805-579-6700
Email: [email protected]
Knowledge base:
http://www.novastor.com/support/
knowledgebase/
Our support engineers or help-desk operators will ask
you a number of standard questions when
troubleshooting your issue. Please have the below
listed information before contacting NovaStor
Support. We need this information to diagnose problems and quickly log your request.
Contact Information: Name, Company name, Customer ID, Ticket ID (if you sent a prior request)
Telephone, fax, e-mail or other contact details where you can be contacted if you have not provided
this information earlier or you are contacting NovaStor first time.
Computing Environment Information:
System specifications and operating system
Product name and version
Build number
System configuration
Please describe your problem in an accurate and detailed manner so that our support Engineers
can assist you in the shortest possible time.
Copyright NovaStor 2010
NovaBACKUP xSP Instruction Manual | 139