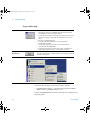
1
OmniBER XM
network simulator
User Guide
J7241-90011_frontcover.p65
1
06/01/2004, 12:49
sdh_Lynx2.book Page 148 Wednesday, April 17, 2002 12:49 PM
user_guide.book Page 1 Friday, January 30, 2004 11:35 AM
Agilent
OmniBER XM
Network Simulator
User Guide
Agilent Technologies
user_guide.book Page 2 Friday, January 30, 2004 11:35 AM
Notices
© 2004 Agilent Technologies UK Limited
Warranty
No part of this manual may be reproduced
in any form or by any means (including
electronic storage and retrieval or translation into a foreign language) without prior
agreement and written consent from Agilent Technologies, Inc. as governed by
United States and international copyright
laws.
The material contained in this document is provided “as is,” and is
subject to being changed, without
notice, in future editions. Further,
to the maximum extent permitted
by applicable law, Agilent disclaims
all warranties, either express or
implied, with regard to this manual
and any information contained
herein, including but not limited to
the implied warranties of merchantability and fitness for a particular purpose. Agilent shall not be
liable for errors or for incidental or
consequential damages in connection with the furnishing, use, or
performance of this document or of
any information contained herein.
Should Agilent and the user have a
separate written agreement with
warranty terms covering the material in this document that conflict
with these terms, the warranty
terms in the separate agreement
shall control.
Sales and Service Offices
An up-to-date list of Agilent Offices is
available through the Agilent Website at
URL: http://www.agilent.com
Manual Part Number
J7241-90011
Edition
First edition, February 2004
Printed in UK
Agilent Technologies UK Limited
Data Networks Division
South Queensferry, West Lothian,
Scotland EH30 9TG
Government will receive no greater than
Restricted Rights as defined in FAR
52.227-19(c)(1-2) (June 1987). U.S. Government users will receive no greater than
Limited Rights as defined in FAR
52.227-14 (June 1987) or DFAR
252.227-7015 (b)(2) (November 1995), as
applicable in any technical data.
Safety Notices
CAUTION
A CAUTION notice denotes a
hazard. It calls attention to an
operating procedure, practice, or
the like that, if not correctly performed or adhered to, could result
in damage to the product or loss
of important data. Do not proceed
beyond a CAUTION notice until
the indicated conditions are fully
understood and met.
Technology Licenses
The hardware and/or software described in
this document are furnished under a
license and may be used or copied only in
accordance with the terms of such license.
Restricted Rights Legend
If software is for use in the performance of
a U.S. Government prime contract or subcontract, Software is delivered and
licensed as “Commercial computer software” as defined in DFAR 252.227-7014
(June 1995), or as a “commercial item” as
defined in FAR 2.101(a) or as “Restricted
computer software” as defined in FAR
52.227-19 (June 1987) or any equivalent
agency regulation or contract clause. Use,
duplication or disclosure of Software is
subject to Agilent Technologies’ standard
commercial license terms, and non-DOD
Departments and Agencies of the U.S.
2
WARNING
A WARNING notice denotes a
hazard. It calls attention to an
operating procedure, practice,
or the like that, if not correctly
performed or adhered to, could
result in personal injury or
death. Do not proceed beyond a
WARNING notice until the
indicated conditions are fully
understood and met.
User Guide
user_guide.book Page 3 Friday, January 30, 2004 11:35 AM
AGILENT LICENSE TERMS
The following License Terms govern your use of the Licensed Materials
unless you have a separate written agreement with Agilent, in which
case, that written agreement will control and take precedence.
License Grant. Agilent grants you a non-exclusive license to use one
copy of the Licensed Materials. With respect to the software portion of
the Licensed Materials, "use" means to install, store, display, execute
and use the software on the computer or device, or on the class or series
of equipment, for which you have paid the corresponding license fee. If
no fee is required, you may use the software on one computer or device.
If the software is licensed for concurrent or network use, you may not
allow more than the maximum number of authorized users to access and
use the software concurrently.
License Restrictions. You may make copies or adaptations of the
Licensed Materials only for archival purposes or only when copying or
adaptation is an essential step in the authorized use of the Licensed
Materials. You must reproduce all copyright notices in the original
Licensed Materials on all permitted copies or adaptations. Except as
provided here, you may not copy, modify or translate the Licensed
Materials or disable any of its features. You may not copy the Licensed
Materials onto any public or distributed network or service bureau. In
addition, you may not lease, rent or sublicense the Licensed Materials
without Agilent's prior written consent.
Upgrades. This license does not entitle you to receive upgrades,
updates or technical support. Such services may be purchased
separately. If the Licensed Materials include an upgrade to previously
licensed material, your license in that material automatically terminates
and you should destroy the previous content and any copies or
adaptations.
Ownership. The Licensed Materials are owned and copyrighted by
Agilent or its third party suppliers. Your license confers no title to, or
ownership in, the Licensed Materials and is not a sale of any rights in
the Licensed Materials. Agilent's third party suppliers may protect their
rights in the event of any violation of these License Terms.
No Disassembly. You may not disassemble or decompile the Licensed
Materials unless you obtain Agilent's prior written consent. In some
jurisdictions, Agilent's consent may not be required for limited
User Guide
3
user_guide.book Page 4 Friday, January 30, 2004 11:35 AM
disassembly or decompilation. Upon request, you will provide Agilent
with reasonably detailed information regarding any such permitted
disassembly or decompilation.
High Risk Activities. The Licensed Materials are not specifically
designed, manufactured or intended for use in the planning,
construction, maintenance or direct operation of a nuclear facility, nor
for use in on-line control or fail safe operation of aircraft navigation,
control or communication systems, weapon systems or direct life
support systems.
Transfer. You may transfer the license granted to you here provided
that you deliver all the Licensed Materials to the transferee along with
these License Terms. The transferee must accept these License Terms as
a condition to any transfer. Your license to use the Licensed Materials
will terminate upon transfer.
Termination. Agilent may terminate your license upon notice for
failure to comply with any of these License Terms. Upon termination,
you must immediately destroy the Licensed Materials, together with all
copies, adaptations and merged portions in any form.
Export Requirements. The Licensed Materials may be subject to
export control laws, including the U.S. Export Administration
Regulations and other export laws and regulations of other countries.
You may not export or re-export the Licensed Materials or any copy or
adaptation in violation of any applicable laws or regulations. You
certify that you are not on the U.S. Department of Commerce's Denied
Persons List, the U.S. Department of Treasury's Specially Designated
Nationals list or other government list prohibiting you from receiving
the Licensed Materials.
U.S. Government Restricted Rights. Software and technical data
rights granted to the federal government herein by these License Terms
include only those rights customarily provided to end user customers.
Agilent provides this customary commercial license in software and
technical data pursuant to FAR 12.211 (Technical Data) and 12.212
(Computer Software) and, for the Department of Defense, DFARS
252.227-7015 (Technical Data - Commercial Items) and DFARS
227.7202-3 (Rights in Commercial Computer Software or Computer
Software Documentation).
4
User Guide
user_guide.book Page 5 Friday, January 30, 2004 11:35 AM
In This Guide...
This User’s Guide provides information in the following chapters on
how to use your OmniBER XM.
User Guide
1
Installation
2
Using the Graphical User Interface (GUI)
3
Getting Started
4
Instrument Setup and Use - VT/TU mode
5
Remote Access
6
Software Install/Upgrade
7
System Administration
8
Measurements
9
Specifications
10
Operator Maintenance
11
Performance Tests
12
Telecoms Concepts
5
user_guide.book Page 6 Friday, January 30, 2004 11:35 AM
6
User Guide
user_guide.book Page 7 Friday, January 30, 2004 11:35 AM
Contents
1
Installation
OmniBER XM at-a-Glance
16
To Contact us
17
For support through the World Wide Web
Specifications
18
Safety Precautions for the Operator
Environmental Conditions
20
Safety Symbols
21
18
19
Statement of Compliance
23
Electromagnetic Compatibility (EMC) Information
Safety Information
23
Overview: Network Simulator Components
24
Chassis and modules
25
Hot Swappable
26
Overview: Installation Process
Typical Configuration
23
27
28
Step 1: Plan your installation
29
How many ports and user sessions can your System Controller
support?
29
What are the power requirements of your configuration?
32
How should you position your test equipment?
33
Step 2: Install the Test Equipment
36
To set up chassis on a Benchtop
37
To rack mount a chassis
38
Set up the switches
39
User Guide
7
user_guide.book Page 8 Friday, January 30, 2004 11:35 AM
To rack mount switches
39
To set up a rack mount PC
40
Step 3: Connecting the test equipment
41
Connecting chassis together
42
Installing and removing modules
43
ESD Precautions
43
Installing modules in a chassis
45
Removing modules from chassis
46
Connecting the chassis to a switch
48
Connecting the System Controller
50
Connecting a rackmount Controller
51
To connect a laptop PC
52
Step 4: Power Up the System
53
Using the Diagnostics tool
54
To check module hardware indicators
To check switch hardware indicators
Module status indicators
57
56
56
Step 5: Connect to the System Under Test
59
To attenuate single mode optical signals for a multimode
optical interface
62
Step 6: Start the Software
64
To check the Network Simulator modules hardware
LEDs
67
To power down the system
68
2
Using the Graphical User Interface (GUI)
3
Getting Started
To launch OmniBER XM
74
To exit and log out
75
To get online help
76
8
User Guide
user_guide.book Page 9 Friday, January 30, 2004 11:35 AM
Tool Bar Explained
77
Configure a session offline
80
Example of OmniBER XM setup
81
To start a session and select modules and test ports
81
Ganged Port Operation
83
Turn on all Lasers and set up Physical parameters for each
Port
84
Setting up the Transmitter and Receiver Interface
84
Select Terminal or Thru mode
85
Setting up the Transmit Clock source
86
External Clock Reference
87
Selecting Signal Scrambling
88
Selecting STS-1 Bulk Filled Stuff Column Overwrite
89
To Copy Port Settings to other Ports
89
Transmitter and Receiver Channels Setup
90
Advanced Channel Configuration
92
Set Up Transmitter Payload Pattern
94
Add Errors or Alarms to the test pattern
95
Adding Errors and Alarms
96
Adding Path Errors/Alarms
97
Selecting which channels to insert Path errors/alarms
100
Set up Transmitter TOH/SOH
104
Generating K1, K2 Automatic Protection Switching (APS)
Messages
104
Generating Synchronization Status Messages
105
Editing Transmitter Section Overhead Bytes
106
Adjusting SPE or AU Pointer Values
107
Generating a J0 Section Trace Message
108
Overhead Byte Group Capture
109
Edit Transmitter Path Overhead Bytes
112
Generating a J1 Path Trace Message
113
Setting up the Receiver
User Guide
114
9
user_guide.book Page 10 Friday, January 30, 2004 11:35 AM
To set up the Receiver interface
115
To Set up Receiver channels
115
Set Up Receiver Payload Pattern
116
To Monitor Ports for Errors or Alarms
118
Monitoring Receiver Overhead Bytes
121
Viewing Measurement Results
123
Viewing Port and Channel Statistics
125
Viewing the Analysis of SONET/SDH Errors and
Alarms
126
To log events to a file
127
Setting a Measurement Gating Period
130
Viewing Service Disruption Time
131
To close a session
132
4
Instrument Setup and Use - VT/TU mode
Port and Channel Numbering Scheme
134
Setting up the VT/TU/PDH Transmit/Receive
Interface
135
Setting VT/TU Pointer Bytes
140
Edit VT /LO Path Overhead Bytes
142
Generating a J2 Path Trace Message
144
Viewing VT/TU Measurement Results
145
Viewing VT/LO/PDH Path Errors
145
Viewing VT/LO/PDH Alarms
145
Monitoring Received VT/TU Path overhead bytes
146
Measuring Service Disruption in a PDH system
147
Detecting Path Routing Faults
148
5
Remote Access
Remote Access
152
Types of Remote Access
153
Desk and Home Access
156
Troubleshooting Remote Access
10
157
User Guide
user_guide.book Page 11 Friday, January 30, 2004 11:35 AM
Step 1: Configure the Tester
158
To configure the tester for network access
158
To change the IP address of the switch card
160
To set up a VNC server
162
To set up a DCOM server
163
To set up a Terminal Services (TS) server
To install the TS software
166
To set up the TS server
167
165
Step 2: Configure the Remote Computer
170
To use the API remotely
171
To set up a VNC client
172
To set up a DCOM client
174
To set up a TS client
175
To access the online help remotely
177
6
Software Install/Upgrade
Software Installation Upgrades
180
System Requirements
180
Software Installed
181
To install/upgrade software
182
To install and enable IIS FTP
183
To uninstall a previous version
183
To install on remote computers
184
7
System Administration
System Administration
186
To change the password
187
To create a user account
187
To set a PC’s host name and domain
189
To set a PC’s IP addresses
190
To change the binding order of network ports
To list a PC’s IP addresses
193
User Guide
192
11
user_guide.book Page 12 Friday, January 30, 2004 11:35 AM
To use the Demo mode
194
To start and stop services
196
To configure the tester for printing
To recover from system problems
8
197
198
Measurements
Avoiding Problems When Making Measurements
APS Measurements
202
203
APS Measurements on multiple STS/AU channels (J7244A/45A
Option 010)
206
Detecting Path Routing Faults
209
Detecting VT/LO Path Routing Faults (J7244A/45A Option
010)
211
Making a BER Measurement
213
Making a BER measurement on VT/TU channels (J7244A/45A
Option 010)
218
9
Specifications
Specifications
224
Mechanical
226
Environmental
227
Connectors
227
Chassis
229
E7912A Portable Chassis - 2 Slot
Performance Tests
233
10
231
Operator Maintenance
Operator Maintenance
236
Optical Connector Cleaning
236
Optical Patch-cord connectors
237
Storage and Shipment
238
12
User Guide
user_guide.book Page 13 Friday, January 30, 2004 11:35 AM
11
Telecoms Concepts
Glossary
Signal Rates
243
259
Summary of Errors and Alarms
260
SONET Concepts
262
SONET STS-1 Frame Structure
263
SONET Payload Structure
264
SONET Overhead Bytes
265
Section Overhead (SOH)
266
Line Overhead (LOH)
267
STS Path Overhead (STS POH)
274
VT Path Overhead (VT POH for VT-1.5, VT-2 or
VT-6)
278
SDH Concepts
281
SDH Frame Structure
282
SDH Payload Structure
283
SDH Overhead Bytes
284
Regenerator Section Overhead (RSOH)
285
Multiplex Section Overhead (MSOH)
286
Higher Order Path Overhead (HO POH)
293
Lower Order VC-n Path Overhead (LO POH for VC-11,
VC-12 or VC-2)
298
Service Disruption
304
Test Configuration for Measuring Service Disruption
Time
305
Contributors to Protection Switching Time
306
Protection Switching Time Test Methods
308
Understanding Service Disruption Test Results
315
Index
User Guide
13
user_guide.book Page 14 Friday, January 30, 2004 11:35 AM
14
User Guide
user_guide.book Page 15 Friday, January 30, 2004 11:35 AM
Agilent J7241A OmniBER XM
User Guide
1
Installation
OmniBER XM at a Glance, page 16
To contact us, page 17
Step 1: Plan your installation, page 29
Step 2: Install the Test Equipment page 36
Step 3: Connect the Test equipment page 41
Step 4: Power up the System, page 53
Step 5: Connect to the System Under Test, page 59
Step 6: Start the Software, page 64
To power down the system, page 68
Agilent Technologies
15
user_guide.book Page 16 Friday, January 30, 2004 11:35 AM
1
Installation
OmniBER XM at-a-Glance
The OmniBER XM has been designed to address the requirements of
system verification and test (SVT) for Next Generation SONET and
SDH (i.e.Optical Cross Connect (OXCs), Bandwidth Managers and
Optical Edge Devices (OEDs)). It also meets the needs of Q&V for
Network Simulation and interoperability testing. This guide describes
how to install and start up the network simulator. Please first check the
Box Contents Lists to ensure that you have received all components.
16
User Guide
user_guide.book Page 17 Friday, January 30, 2004 11:35 AM
Installation
1
To Contact us
Should you require technical assistance, contact the center in your
region.
North America
Europe
Japan
Asia Pacific
User Guide
Location
Telephone
E-mail
9780 South Meridian Blvd.
Englewood, Colorado
USA 80112
1-800-452-4844
[email protected]
Test & Measurement
Startbaan 16
1187 XR Amstelveen
The Netherlands
You may also call these
local numbers:
Brazil 55-11-7297-3600
Mexico 01-800-506-4800
[email protected]
020 547 2111
You may also call these
local numbers:
France 0825 010 700
UK 07004 666666
Ireland 01 890 924 204
Germany (01805) 24-6330*
(*.24 DM/min)
Austria +43-1-25125-7006
Switzerland 41-1-735 9300
Italy 3902 9260 8484
0120-421-345
Hachioji Business Center
9-1 Takakura-Cho, Hachioji
Tokyo 192-8510
Japan
1-800-375-8100
438B Alexandra Road
Blk B, #05-08
Alexandra Point
Singapore 119958
[email protected]
[email protected]
[email protected]
[email protected]
[email protected]
[email protected]
17
user_guide.book Page 18 Friday, January 30, 2004 11:35 AM
1
Installation
For faster service
We require the following information to troubleshoot problems. The
more of this you provide, the faster we will be able to assist you.
• your name and contact details (phone or E-mail)
• your controller’s model and serial number
• your network simulator modules’ model number
• approximate purchase date
• software version (see the application’s splash screen or Help menu)
• software installed
• details of the problem
For support through the World Wide Web
You can also access technical support through the World Wide Web:
• www.Agilent.com/find/OmniBERXM.
This site provides general information about the tester: news, product
information, data sheets, and brochures.
Specifications
Refer to the www.Agilent.com/find/OmniBERXM web site for detailed
OmniBER XM specifications.
NOTE
Install an Antivirus application on system controller.
If your system controller is connected to a network, it is strongly
recommended that you install an Antivirus application and keep the
virus definition files up to date.
18
User Guide
user_guide.book Page 19 Friday, January 30, 2004 11:35 AM
1
Installation
Safety Precautions for the Operator
The following general safety precautions must be observed during
all phases of operation, service, and repair of this instrument. Failure
to comply with these precautions or with specific warnings
elsewhere in the manual violates safety standards of design,
manufacture, and intended use of the instrument. Agilent
Technologies assumes no liability for the customer’s failure to
comply with these requirements.
WARNING
No operator serviceable parts inside. Refer servicing qualified
personnel.
To prevent electrical shock do not remove covers.
To prevent possible electric shock hazard, disconnect power
cord before removing covers.
Power disconnect device is the appliance coupler (mains input
cord). Do not position the instrument such that access to the
disconnect device is impaired.
When installing into a rack or system, access may be impaired
and must be considered as part of the installation, in the form of
an easily accessible rack isolation switch, or similar.
Unused slots must be filled with blanking covers to ensure
correct operation and cooling. Warranty void if blanking covers
are not fitted.
Do not stack more than 8 free-standing chassis.
The Chassis is a Safety Class 1 Product (provided with a
protective earthing ground, incorporated in the power cord).
The mains plug shall only be inserted in a socket outlet provided
with a protective earth contact.
Any interruption of the protective conductor inside or outside of
the instrument is likely to make the instrument dangerous.
Intentional interruption is prohibited.
User Guide
19
user_guide.book Page 20 Friday, January 30, 2004 11:35 AM
1
Installation
WARNING
If this instrument is not used as specified, the protection
provided by the equipment could be impaired. This instrument
must only be used in a normal condition (in which all means of
protection are intact).
Modules may become hot during use. Do not touch any of the
components on a card as you remove it from the chassis.
CAUTIO N
This instrument is designed for use in Installation Category II and
Pollution Degree 2 per IEC 61010 and 60664 respectively.
Before switching on this instrument, ensure the supply voltage is in
the specified range.
This instrument has an autoranging line voltage input, ensure the
supply voltage is within the specified range.
CLASS 1
LASER PRODUCT
CAUTIO N
Use of controls or adjustments or performance of procedures other
than those specified herein may result in hazardous radiation
exposure.
The laser classification label is located on the metallic top cover of
each module adjacent to the serial number label.
Environmental Conditions
For indoor use only.
20
User Guide
user_guide.book Page 21 Friday, January 30, 2004 11:35 AM
Installation
1
Safety Symbols
The following symbols on the instrument and in the user documentation
indicate precautions you should take to maintain safe operation of the
instrument.
The Instruction Documentation Symbol. The product is marked with this
symbol when it is necessary for the user to refer to the instructions in the
supplied documentation.
This indicates that part of the equipment may be hot. Please refer to
accompanying documentation for specific information.
Indicates the field wiring terminal that must be connected to earth ground before
operating the equipment - protects against electrical shock in case of fault.
Frame or chassis ground terminal - typically connects to the equipment's metal
frame.
Alternating current (AC)
This symbol indicates the position of the operating switch for ‘On’ mode.
This symbol indicates the position of the operating switch for ‘Off’ mode.
Indicates hazardous voltages.
This symbol indicates that a device, or part of a device, may be susceptible to
electrostatic discharges (ESD) which can result in damage to the product.
Observe ESD precautions given on the product, or its user documentation, when
handling equipment bearing this mark.
User Guide
21
user_guide.book Page 22 Friday, January 30, 2004 11:35 AM
1
Installation
The CE mark shows that the product complies with all relevant European Legal
Directives.
The C-Tick mark is a registered trademark of the Australian Communications
Authority. This signifies compliance with the Australian EMC Framework
Regulations under the terms of the Radio communications Act of 1992.
ISM 1-A
ICES/NMB-001
This is a symbol of an Industrial, Scientific, and Medical Group 1 Class A
product.
This ISM device complies with Canadian ICES-001.
Cet appareil ISM est conforme a la norme NMB-001 du Canada.
The CSA mark is a registered trademark of the Canadian Standards Association,
and indicates compliance to the standards laid out by them.
Warranty and service
Standard warranty is one-year module exchange. Warranty and
calibration plan extensions to 3 and 5 years can be provided.
22
User Guide
user_guide.book Page 23 Friday, January 30, 2004 11:35 AM
Installation
1
Statement of Compliance
Electromagnetic Compatibility (EMC) Information
This product conforms with the protection requirements of European
Council Directive 89/336/EEC for Electromagnetic Compatibility
(EMC).
The conformity assessment requirements have been met using the
technical Construction file route to compliance, using EMC test
specifications EN 55011:1991 (Group 1, Class A) and EN
50082-1:1992.
In order to preserve the EMC performance of the product, any cable
which becomes worn or damaged must be replaced with the same
type and specification.
Safety Information
This instrument has been designed and tested in accordance with
publication EN61010-1(1993) / IEC 61010-1(1990) +A1(1992)
+A2(1995) / CSA C22.2 No. 1010.1(1993) Safety Requirements for
Electrical Equipment for Measurement, Control and Laboratory Use,
and has been supplied in a safe condition. The instruction
documentation contains information and warnings which must be
followed by the user to ensure safe operation and to maintain the
instrument in a safe condition.
User Guide
23
user_guide.book Page 24 Friday, January 30, 2004 11:35 AM
1
Installation
Overview: Network Simulator Components
OmniBER XM Network Simulator consists of the following
components:
• system controller which can be a laptop or a rackmount type as
shown below.
• switch
• chassis and modules
System Controller
Switch
NETGEAR
26-port 10/100 Mbps Modular Switch
1
2
3
4
5
6
7
8
9
10
11
12
14
15
16
17
18
19
20
21
22
23
24
FS726
Power
LED Mode
Reset
13
Used to connect chassis and modules to the System Controller PC.
Chassis and Modules
Two chassis are available the J7263A 4 slot chassis - holds up to four
modules, and the E7192A 2 slot chassis - holds up to two modules.
See “Chassis" on page 229 for further information.
24
User Guide
user_guide.book Page 25 Friday, January 30, 2004 11:35 AM
Installation
1
Chassis and modules
modules
front view
power
switch
Shows chassis
number
Shows module
number
rear view
Connects to System
Under Test
A blanking plate
Connects to external trigger
devices (optional)
Time synchronization inputs (optional)
TRIGGERS
IN
Connects to
Controller and
switch
OUT
10MHz
In
1Π
In
LINK ACT LINK ACT
MDI
MDI-X
LAN
IN
OUT
DAISY CHAIN
SERIAL
TIMING SYNC
Synchronizes ports
Connects to
power
Modules are inserted into a chassis.
Modules differ from each other in the number of test ports they provide,
the placement of test ports and the LEDs provided to indicate port
status.
User Guide
25
user_guide.book Page 26 Friday, January 30, 2004 11:35 AM
1
Installation
Hot Swappable
Modules are hot-swappable when not locked (in use) by a test session.
Module Removal
To avoid problems modules must only be removed from a chassis when
that module is not allocated to a test session. Removal of a module from
a currently active test session will result in a “script client abort” failure
which will terminate the session.
Note that removal of a module from a chassis does not compromise the
Clock/Event chain since this is handled entirely within the chassis.
CAUTIO N
The OmniBER XM chassis should not be used with empty slots.
Make sure that when removing a module or blanking plate that a
replacement module or blanking plate is available nearby.
Module Insertion
A module can be hot inserted into an OmniBER XM chassis at any time.
The module will go through it's boot process and identify itself to the
Resource Manager. The Resource Manager will allocate the module a
number according to the chassis in which it sits and it's position within
the chassis. On completion of this process the module is available to be
added to any pre-existing or new test session as far as the rules
regarding Clock/Event lines allow.
Note that a re-numbering operation requires that there are no test
sessions running on the host controller.
26
User Guide
user_guide.book Page 27 Friday, January 30, 2004 11:35 AM
Installation
1
Overview: Installation Process
2 Install the test equipment
1 Plan your installation
Do you need a switch?
How many ports and user sessions?
How many modules?
What are the power requirements?
Where to position test equipment?
3 Connect the test equipment
NETGEAR
26-port 10/100 Mbps Modular
1 Switch
2
3
4
5
6
7
15
16
17
18
19
8
9
10
21
22
11
4 Power up the system
12 FS726
Power
LED Mode
Reset
13
14
20
23
24
5 Connect to the System Under Test
User Guide
6 Start the software.
27
user_guide.book Page 28 Friday, January 30, 2004 11:35 AM
1
Installation
Typical Configuration
Connection to a chassis via a switch
System Controller
LAN
Switch
MDI-X
MDI
Chassis and Modules
Daisy chain together and connect to the controller using a LAN switch.
28
User Guide
user_guide.book Page 29 Friday, January 30, 2004 11:35 AM
1
Installation
Step 1: Plan your installation
Do you need a switch?
When assembling your Network Simulator system you should use a
switch if you have more than one piece of equipment in the
configuration that you want to connect to the Controller.
It is recommended that you use a switch if your configuration has:
• one or more chassis
You will need a second switch if you are using:
• the Netgear FS108 switch and have more than 7 chassis, or
• the Netgear FS726 switch and have more than 23 chassis
The second switch can be daisy-chained off the first one. For
information on how to daisy-chain switches, refer to Connecting the
chassis or module to a switch.
How many ports and user sessions can your System Controller
support?
The number of ports and user sessions (either local or remote through
the Terminal Server) your Controller can support is determined by its
available memory and CPU capacity.
The rules used to determine your system limitations are:
• 128 MB RAM if the Terminal Server is installed, plus
• 128 MB RAM for each user session, plus
• 4 MB RAM for each port (this may be the same memory reserved for
user sessions, but do not include memory reserved for the Terminal
Server)
Regardless of whether you have the Terminal Server installed, and
regardless of the number of user sessions you run, make sure that:
• with up to 15 ports, you have a minimum of 128 MB RAM
(recommended 256)
• with16 ports or more, you have a minimum of 256 MB RAM
User Guide
29
user_guide.book Page 30 Friday, January 30, 2004 11:35 AM
1
Installation
System Controllers
Product
Description
Application
No of Included Ethernet
LAN Hub size
ports
J7258A
High Performance
system controller (rack
mountable)
High port/channel
count, multiple users
2
24-port
J7258A-AQ2
Flat panel monitor and
keyboard (rack
mountable)
High port/channel
count, multiple users
J7259A
System controller (rack
mountable)
Medium port/channel
count, multiple users
2
8-port
J7259A-AQ2
Flat panel monitor and
keyboard (rack
mountable)
Medium port/channel
count, multiple users
J7257A
Laptop System controller
Medium port/channel
count, Single user
2
8-port
• Monitors are not included with rack-mountable controllers and can
be ordered through option AQ2.
• Option AQ2 provides a flat panel monitor and keyboard in a 2U high
rack-mountable drawer assembly.
• Rack-mount controllers are shipped with Windows 2000 Server
Edition, and laptop controllers with Windows 2000 Professional.
• Each controller includes an Ethernet switch. One controller Ethernet
port is required to connect to the chassis and/or switch. The other
controller Ethernet port can be used to connect the controller to an
external LAN to allow multi-user access.
• The laptop system controller has an Ethernet port to connect to the
chassis and/or switch, but the second port is a PCMCIA LAN card
which due to its limited bandwidth has poor performance for
connection to a LAN. This port therefore is not recommended for
remote control or multiple user applications. The PCMCIA LAN
card does not provide enough bandwidth for direct connection to the
chassis.
30
User Guide
user_guide.book Page 31 Friday, January 30, 2004 11:35 AM
Installation
CAUTIO N
User Guide
1
Install an Antivirus application on system controller PC
If your system controller is connected to a network, it is strongly recommended
that you install an Antivirus application and keep the virus definition files up to
date.
31
user_guide.book Page 32 Friday, January 30, 2004 11:35 AM
1
Installation
What are the power requirements of your configuration?
As part of the installation you must consider the power consumption of
equipment. Avoid overloading a socket outlet by checking the
combined power requirements of equipment on the same circuit.
CAUTIO N
It is important to consult with equipment manufacturers to determine the
equipment’s power requirements. Check the rating plate on the
equipment, or look in its documentation.
Below is a list of rated power for equipment typically used with
OmniBER XM Network Simulator. It is given as a guide only.
Device
Model
Rated Power Requirements
J7259A
J7258A
J7257A
Dell PowerEdge
Dell PowerEdge High Performance
Laptop - AC Adaptor
3.9 A (at 100V)
2 A (at 240V)
1.7A (at 100V)
monitor
rackmount (includes keyboard, trackball)
3.5 A (at 100V)
desktop
1.6 A (at 100V)
Netgear FS108 (8 port) — universal AC adaptor
1 A (at 100V)
Netgear FS726 (24-port)
1 A (at 100V)
4-slot chassis
with 4 cards (maximum)
6.3 A (at 100V)
3.2 A (at 240V)
2-slot chasis
with 2 cards (maximum)
3.3A (at 100V)
1.7A (at 240 V)
switch
32
User Guide
user_guide.book Page 33 Friday, January 30, 2004 11:35 AM
1
Installation
How should you position your test equipment?
Benchtop or rack
You may install chassis either on a benchtop or in a rack. Before
mounting chassis in racks, verify that they work by testing them first on
a benchtop.
Clock and event lines
The clock and event lines on chassis should be daisy-chained together.
The first chassis in the daisy chain is the one that has no input to its
clock and event lines. It provides the master clock, and sends timing
signals to the other chassis through the clock line.
The event line triggers chassis to start and stop traffic generation and
measurements at precisely the same instant.
There are some limitations brought about by the clock and event
synchronization described above that you should be aware of when
positioning the test equipment:
• keep modules that will be used together, contiguous in the chassis
• to use a port in a session, you lock the entire module the port is on
(you do not lock the entire chassis).
• to use modules in multiple chassis, you lock the daisy chain between
the chassis.
User Guide
33
user_guide.book Page 34 Friday, January 30, 2004 11:35 AM
1
Installation
Switches
If your configuration has more than one chassis, you need to connect
each chassis to a switch to enable communication with the Controller.
Cable the test equipment in your rack(s) in the order shown in this
diagram:
100
200
300
400
System Controller
J7263A chassis
Chassis numbering
Chassis are numbered in the order they are connected. The first chassis
in the daisy-chain will be numbered 100 by the System Controller, the
second 200, and so on. The first module in the daisy chain will be
numbered 1, the second 2, and so on.
The following diagram shows the rear view of the clock and event line
daisy-chain shown in the above diagram:
34
User Guide
user_guide.book Page 35 Friday, January 30, 2004 11:35 AM
Installation
1
100
200
300
400
J7263A chassis
Primary Disconnect
CAUTIO N
User Guide
When a chassis is used by itself, the primary disconnect device is the
chassis connector/power cord. However, once installed into a rack or
system, there may be a different primary disconnect. When planning
your installation, make sure you have clear access to the primary
disconnect mechanism.
35
user_guide.book Page 36 Friday, January 30, 2004 11:35 AM
1
Installation
Step 2: Install the Test Equipment
To install the test equipment, you will need to set up (either on a
benchtop or in a rack):
• the chassis and modules
• the switch
• the System Controller PC
When installing test equipment, be aware of the following:
Ventilation
CAUTIO N
Do not block the vent holes
Do not block the vent holes on the sides of chassis, or on the back of
switches. This overheats and damages the devices. A gap of at least
2” (50mm) must be left around all vent holes. Also, orient all
equipment correctly.
Racks
CAUTIO N
When you install the test equipment, beware of the safety hazards.
Review and follow the guidelines of the rack manufacturer. Check web
sites such as http://www.agilent.com/comms/racks.
Specifically:
• Avoid creating a top heavy rack. Install equipment from the bottom
of the rack up. Install heavier equipment at the bottom. Deploy any
anti-tip or anti-rolling mechanisms on the rack.
• Have two people secure equipment to the rack.
J7258A Controller 35 lbs (~16 kg).
A chassis weighs 22 lbs (10 kg).
Test modules weigh from 11 to 18 lbs (5 to 9 kg).
36
User Guide
user_guide.book Page 37 Friday, January 30, 2004 11:35 AM
Installation
1
• Racks: Review and follow the rack manufacturer’s guidelines. Check
web sites such as http://www.agilent.com/comms/racks. The
temperature inside the rack must remain below the operating
temperature limits. Refer to the Environmental specifications on
page 114.
To set up chassis on a Benchtop
Steps
1 Stick 4 of the provided rubber feet to the indent marks on the bottom
of each switch (24 port) and chassis. (The switches feet are in their
accessories bag.)
The rubber feet are to minimize slippage and scraping, not for air
flow. Ventilation occurs through the sides of the chassis, and through
the back of the switch. If you later mount chassis in a rack, you will
need to remove the rubber feet.
2 Stack the controller, switch and chassis.
The stack must not be more than 17U high, including the switch.
User Guide
37
user_guide.book Page 38 Friday, January 30, 2004 11:35 AM
1
Installation
To rack mount a chassis
1
2
Steps
1 Attach the mounting ears to each side of the chassis.
2 Holding the chassis in place, clip 4 nuts to the rack and secure the
mounting ears to the front two posts.
Notes:
38
Use the ears provided to mount chassis in an EIA-standard 19” rack.
The chassis is secured to 2 posts only (on 4-post racks, the chassis
mounts to the front 2 posts).
User Guide
user_guide.book Page 39 Friday, January 30, 2004 11:35 AM
1
Installation
Set up the switches
To rack mount switches
1
2
NETGEAR
26-port 10/100 Mbps Modular Switch
1
2
3
4
5
6
7
8
9
10
11
12
13
14
15
16
17
18
19
20
21
22
23
24
FS726
NETGEAR
26-port 10/100 Mbps Modular Switch
1
2
3
4
5
6
7
8
9
10
11
12
13
14
15
16
17
18
19
20
21
22
23
24
FS726
Power
Power
LED Mode
Reset
Steps
LED Mode
Reset
1 Secure two ears to each switch. The switches ears are in its
accessories bag. There are 4 x 10mm M4 cross-head screws.
2 Secure the switch to the rack using the 4 screws (5/8” 12-24
cross-head screws). Leave a gap above or below the switch to run
cables from the front of the switch to the back of the modules and
chassis.
Notes:
You may have either one of these switches:
• Netgear FS108 (8 port)
This was supplied with the single processor Controller and Laptop.
• Netgear FS726 (24 port)
This was supplied with the dual processor high performance
Controller.
It may be possible to mount the switch facing backwards to make
cabling easier.
The Netgear FS108 switch cannot be mounted in a rack, but can be
placed on top of a chassis.
User Guide
39
user_guide.book Page 40 Friday, January 30, 2004 11:35 AM
1
Installation
To set up a rack mount PC
2 .
1
Steps
1 Mount the Controller. For information on this see your Controller
Systems Rack Installation Instructions: “Installing the system in the
rack”.
2 (Optional) Mount the sliding, 2-slot, flip-up, flat-panel monitor. If
you have a rackmount monitor and keyboard, see the Flat Panel
Monitor/Keyboard Installation Guide Flat Panel Monitor/Keyboard
Owner’s Manual.
Otherwise, connect your own monitor and keyboard to the Controller.
The monitor should support a 1024 x 768 pixel area and 24-bit color. If
you do not need a local console in the lab, use the monitor and keyboard
only temporarily, to set up the controller for remote access (described in
“Remote Access" on page 151 .
Controller
See the Dell Systems Rack Installation Guide:
• Chapter 1-3: Four-Post Rack Installation
• Chapter 1-20: Two-Post Installation
40
User Guide
user_guide.book Page 41 Friday, January 30, 2004 11:35 AM
1
Installation
Step 3: Connecting the test equipment
To connect the test equipment, you will need to:
• connect the chassis together
• install the modules in the chassis
• connect the chassis to a switch
• connect the chassis and switch to the System Controller
When installing test equipment, be aware of the following:
Static Electricity
CAUTIO N
Take anti-static precautions.
The connectors on the modules are sensitive to static electricity. To
minimize electrostatic damage, please take the necessary anti-static
precautions (for example, wear a wrist strap).
Power cables
WARNING
WARNING:
Use the supplied power cords. They manage the required loads,
provide an earth ground, and protect you from electric shock.
For additional or replacement power cords, contact us — see
“To contact us” on page 17.
Only trained personnel who are aware of the hazards should
install and disassemble the tester. Before disassembling the
tester, turn off all power and unplug all power cords.
Do not block access to a power cord or switch, in case you need
to disconnect power in an emergency.
User Guide
41
user_guide.book Page 42 Friday, January 30, 2004 11:35 AM
1
Installation
Connecting chassis together
chassis 100 - rear view
TRIGGERS
to switch
IN
OUT
10MHz
In
1Π
In
LINK ACT LINK ACT
MDI
MDI-X
LAN
1
IN
OUT
DAISY CHAIN
SERIAL
TIMING SYNC
Chassis-to-chassis
cable
(E7900-64207)
2 .
3
BNC cable
(E7901-64207
chassis 200 - rear view
TRIGGERS
to switch
IN
OUT
10MHz
In
1Π
In
LINK ACT LINK ACT
MDI
MDI-X
LAN
Steps
IN
OUT
DAISY CHAIN
SERIAL
TIMING SYNC
1 Daisy-chain the clock and event lines of the chassis by connecting
the OUT port on the first chassis to the IN port on the next chassis.
The first chassis in this daisy chain becomes chassis number 100, the
second becomes chassis number 200, and so on.
2 (Optional) Connect an external trigger device (e.g., logic analyzer,
oscilloscope).
3 Plug each chassis into a power source. For more information, refer to
What are the power requirements of your configuration?
42
User Guide
user_guide.book Page 43 Friday, January 30, 2004 11:35 AM
Installation
1
Installing and removing modules
CAUTIO N
Take anti-static precautions
The components on the modules are sensitive to static electricity. To
minimize electrostatic damage, please take the necessary anti-static
precautions (for example, wear a wrist strap).
Do not operate chassis with empty slots
Fill any empty slots in the OmniBER XM J7263A chassis with
blanking plates (E7900-00001) to ensure correct operation of the
chassis. When inserting the blanking plate always use the runners on
the chassis otherwise you may damage the rear panel connectors.
WARNING
Modules may become hot during use
DO NOT touch any of the components on a module as you
remove it from the chassis.
ESD Precautions
The network simulator contains components sensitive to electrostatic
discharge. The smallest static voltage most people can feel is about
3500 volts. It takes less than one tenth of that (about 300 volts) to
destroy or severely damage static sensitive circuits. Often, static damage
does not immediately cause a malfunction but significantly reduces the
component’s life.
Adhering to the following precautions will reduce the risk of static
discharge damage.
• Keep the module in its conductive storage bag and box when not
installed in the OmniBER XM chassis. Save the box for future
storage.
• Before handling the module, select a work area where potential static
sources have been minimized. Avoid working in carpeted areas and
using nonconductive chairs. Keep body movement to a minimum.
User Guide
43
user_guide.book Page 44 Friday, January 30, 2004 11:35 AM
1
Installation
• Agilent Technologies recommends that you use a static controlled
workstation.
• Handle the module by its front panel. Avoid touching any
components or connectors. When about to install the module, keep
one hand in contact with the protective bag and pick up the module
with the other.
• Before installing the module, touch the metal surface of the
OmniBER XM chassis with your free hand to ensure that you, the
module and the chassis have the same static potential. This also
applies whenever you connect/disconnect cables on the front panel.
Module Handling Requirements
Care must be taken when fitting and removing modules into a chassis to
avoid trapping cables between the module and the chassis.
When fitting or removing a module into a chassis, which is operating
and contains any other modules, the following guidelines must be
adhered to:
• Disconnect and move aside all cabling from the module to be
removed.
• Ensure that the retaining screws have been released onto their
retaining springs.
• Make sure that when removing a module/blanking plate that a
replacement module or blanking plate is available nearby.
• Ensure that the time between first moving the fitted module and
replacing it with another module or blanking plate is kept to a
minimum.
• Never have a chassis operating without all module positions
occupied by either a module or a blanking plate. Sufficient blanking
plates are supplied with all chassis for this purpose.
• Always make sure that when fitting a module that the retaining
screws are securely located before attaching any cables to the front
panel.
44
User Guide
user_guide.book Page 45 Friday, January 30, 2004 11:35 AM
1
Installation
Installing modules in a chassis
Be aware of the safety/handling information given in “Installing and
removing modules" on page 43 before installing modules.
1
2
Steps
1 Remove the blanking plate from the slot you want to use (see
instructions following for removing a module).
2 Line up the module with the slot, close the extractor levers and push
the module firmly into place. Tighten the screwlocks until finger
tight.
Notes:
You can position the modules in any of the chassis slots, the order does
not matter.
Be sure to fill any unused chassis slots with J7263A chassis blanking
plate. When inserting the blanking plate always use the runners on the
chassis otherwise you may damage the rear panel connectors.
Hot
Swappable
User Guide
A module can be hot inserted into an OmniBER XM chassis at any time.
The module will go through it's boot process and identify itself to the
Resource Manager. The Resource Manager will allocate the module a
number according to the chassis in which it sits and it's position within
the chassis. On completion of this process the module is available to be
added to any pre-existing or new test session as far as the rules
regarding Clock/Event lines allow.
45
user_guide.book Page 46 Friday, January 30, 2004 11:35 AM
1
Installation
Note that a re-numbering operation requires that there are no test
sessions running on the host controller.
Removing modules from chassis
1
2
Steps
1 Unscrew the screwlocks. Pull the extractor levers outwards and pull
them gently towards you. Remove the module, holding it only by the
front panel and metal case. Be careful not to touch any of the
components on the module. Place the module on a hard, flat surface.
NEVER stack one module on top of another.
2 Replace the removed module with a blanking plate (see instructions
above for installing a module). NEVER operate a chassis with an
empty slot. ALWAYS replace the blanking plate to ensure correct
cooling of the chassis. When inserting the blanking plate always use
the runners on the chassis otherwise you may damage the rear panel
connectors.
Note that removal of a module from a chassis does not compromise the
Clock/Event chain since this is handled entirely within the chassis.
46
User Guide
user_guide.book Page 47 Friday, January 30, 2004 11:35 AM
Installation
Hot Swappable
User Guide
1
To avoid problems modules must only be removed from a chassis when
that module is not allocated to a test session. Removal of a module from
a currently active test session will result in a “script client abort” failure
which will terminate the session.
47
user_guide.book Page 48 Friday, January 30, 2004 11:35 AM
1
Installation
Connecting the chassis to a switch
chassis —rear view
LINA LINAC
M MD
LA
1
TRIGI O
1Π
10
I
O
DAISY
SETIM-
RJ-45 straight-through
Ethernet cables
(E7901-64210)
switch
NETGEAR
26-port 10/100 Mbps Modular Switch
1
2
3
4
5
6
7
8
9
10
11
12
13
14
15
16
17
18
19
20
21
22
23
24
FS726
Power
LED M ode
Reset
2
Steps
1 Connect the ethernet cables from the back of each chassis to the front
of the switch. When connecting a chassis, use a straight-through
cable if you are connecting from the MDI port, and a cross-over
cable if you are connecting from the MDI-X port.
2 Plug the switch into the power source. Switches have no ON switch,
and power up once plugged in.
Notes:
48
The supplied switches are auto-sensing and detect whether the cables
attached to them are straight-through or cross-over. They will
auto-switch, performing the cross-over correction of data when it is
necessary.
User Guide
user_guide.book Page 49 Friday, January 30, 2004 11:35 AM
1
Installation
NETGEAR
26-port 10/100 Mbps Modular Switch
1
2
3
4
5
6
7
8
9
10
11
12
13
14
15
16
17
18
19
20
21
22
23
24
FS726
Power
LED Mode
Reset
To PC
Notes:
If you stacked the chassis on a bench, connect the cables and run them
over or to the side of the switch. If you installed the chassis in a rack,
run cables over or under the switch.
You will need a second switch if you are using:
• Netgear FS 108 switch (8 port) and have more than 7 chassis, or
• Netgear FS 726 (24 port) switch and have more than 23 chassis.
Daisy-chain the second switch off the first one by connecting any port
on the first switch to any port on the second switch. See the switch’s
Installation Guide for more information on daisy-chaining switches.
User Guide
49
user_guide.book Page 50 Friday, January 30, 2004 11:35 AM
1
Installation
Connecting the System Controller
Controller to switch
To PC
Connect the Controller to the switch with a straight-through LAN cable.
straight-through
E7901-64210
or
NETGEAR
26-port 10/100 Mbps Modular Switch
1
2
3
4
5
6
7
8
9
10
11
12
14
15
16
17
18
19
20
21
22
23
24
FS726
switch
Power
LED Mode
Reset
13
crossover
E7901-64212
CAUTIO N
Tester uses 10.x.x.x subnet addresses
The Ethernet port that connects the switch uses the IP address
10.0.0.1/8. A DHCP server on the Controller dynamically assigns
each test port an IP address from this 10.x.x.x subnet range. If
10.x.x.x addresses are also used in your test lab/LAN, or by a
software application (e.g., to connect to a VPN), change the switch
and test port addresses to avoid conflicts. For complete details, see
“To change the Tester’s subnet IP Addresses” on page 72.
50
User Guide
user_guide.book Page 51 Friday, January 30, 2004 11:35 AM
Installation
1
Connecting a rackmount Controller
1
To Tester
Hub
2
Steps
To LAN
3
4
1 Connect the mouse, keyboard, and monitor. Plug the cable
connectors securely into the ports.
2 Connect this 10/100 Mb/s Ethernet port to a chassis or 10/100 Mb/s
port on the switch.
3 (Optional) Connect this 10/100 Mb/s Ethernet port to your LAN.
You can access the tester remotely and the tester can use shared
network resources like file servers and printers. You must supply
your own LAN cable for this connection.
4 Plug the controller and monitor into a power source.
User Guide
51
user_guide.book Page 52 Friday, January 30, 2004 11:35 AM
1
Installation
To connect a laptop PC
1
2
3
Rear panel
Steps.
1 Connect the laptop's 10/100/1000 Ethernet port to a chassis or
10/100 Mb/s port on the switch. Refer to “Connecting the system
controller PC” on page 50 for cable information. If you connect the
laptop to a single chassis you do not need to connect any other
cables.
2 As needed, use the Universal AC adapter to plug the laptop into a
power source.
3 (Optional) You can access a LAN using the Intel Wireless 2100
WLAN MiniPCI card installed in the PC card slot on the left side of
the laptop. For details about the wireless adapter or other peripherals
included with the PC, it is recommended that you read the
accompanying printed or online documentation or see the
manufacturer (Dell, Intel) web site.
10.x.x.x subnet
used
52
The PC Ethernet port that connects the chassis, hub, or switch uses the
IP address subnet 10.0.0.1/8. Specifically, a DHCP server on the PC
dynamically assigns each test port an IP address from this 10.x.x.x
subnet range. If 10.x.x.x addresses are also used in your test lab/LAN,
or by a software application (for example, to connect a laptop to a
VPN), change the subnet addresses used to avoid conflicts. For details,
see “To change the IP address of the switch card” on page 160.
User Guide
user_guide.book Page 53 Friday, January 30, 2004 11:35 AM
Installation
1
Step 4: Power Up the System
1
controller - front view
Steps
1 Power up the controller.
2 On the controller, log in as user Administrator. The password is
preset in the factory to be blank but you might need to change it to
conform to company conventions. See “To change the password” on
page 93.
3 Power up each chassis using the power switch on the front of the
chassis. Any modules in the chassis will boot up at this time.
To avoid possible numbering problems, turn on the chassis in the
order they are connected, leaving the chassis that is at the end of the
event-line daisy-chain until last.
User Guide
53
user_guide.book Page 54 Friday, January 30, 2004 11:35 AM
1
Installation
Using the Diagnostics tool
You can use the Diagnostics Tool to perform a system test once it has
powered up.
1
Steps
54
1 Launch the Diagnostics Tool through the Windows desktop icon, or
through the Start menu.
User Guide
user_guide.book Page 55 Friday, January 30, 2004 11:35 AM
Installation
7
2
3
1
4
5
6
Steps
2 Check that each module has a unique number.
3 Check that each module appears in the “Ready” state.
4 Check the system state. If all modules are installed successfully, it
will say “Ready”. If errors are reported, follow any actions
recommended.
5 After fixing cabling problems, or adding or removing modules click
this button.
6 Click this button to reboot a module. This may clear a bad state.
Notes:
User Guide
For help with this tool and troubleshooting module problems, select
Contents from the Diagnostic Tool’s Help menu (7). Follow the
instructions in the displayed online help.
55
user_guide.book Page 56 Friday, January 30, 2004 11:35 AM
1
Installation
If the modules are installed successfully, close the Diagnostic Tool and
review “To check module hardware indicators”. The hardware
indicators will also indicate success but you should familiarize yourself
with them in the event there are problems later.
To check module hardware indicators
Each time you power on or reboot a module, it runs through several self
check stages. You should check that they display the correct indicators.
1
Module — front view
Steps
1 Check the module display. Each module should have a unique
number based on the chassis number, and its position in the chassis.
If the display shows an error message, see the next section for
information on possible errors.
To check switch hardware indicators
To determine whether the switches in your configuration have powered
up without error, refer to the Netgear Fast Ethernet Switch Installation
Guide.
56
User Guide
user_guide.book Page 57 Friday, January 30, 2004 11:35 AM
Installation
1
Module status indicators
When booting, the module LED indicators run through the following
sequence of codes. If a problem occurs, the code shows what stage of
the boot sequence was reached and a message may be scrolled across
the display.
Following is a list of possible problems and recommended actions
Code
BHW1
Diagnosis and Recommended Action
The boot kernel cannot initialize its core devices. Please return the module to
Agilent.
BHW2
The boot kernel cannot initialize the kernel services. Please return the module to
Agilent.
BNET
The boot kernel cannot establish an Ethernet link with the module controller.
Please return the chassis and module to Agilent.
BIP
The boot kernel cannot obtain an IP address from the controller. Check that all
(Connect Ethernet and Ethernet cables are connected and all units in the network (including the switch)
Enable DHCP)
are powered up. Check that you are using the correct Ethernet ports on the
chassis and controller. Check that the DHCP Server (dhcpdNT) is running on
the controller. If it is not, start it. If it is, try restarting it.
BAPP
The boot kernel cannot load the main kernel image. Check that the FTP
Publishing Service is running on the controller. If it is not, start it. If it is, check
that the file E7900-64010/vxWorks.st exists on the controller in the FTP
directory and restart the FTP Publishing Service.
KHW1
The main kernel cannot initialize its core devices. Please return the module to
Agilent.
KHW2
The main kernel cannot initialize kernel services. Please return the module to
Agilent.
KNET
The main kernel cannot establish an Ethernet link with the controller. Check that
all Ethernet cables are connected and all units in the network (including the
switch) are powered up. Check that you are using the correct Ethernet ports on
the chassis and controller.
KIP
The main kernel cannot initialize the IP stack or required services. Please return
the module to Agilent.
KAPP
The main kernel cannot initialize the application services. Please return the
module to Agilent.
Empty display
The main kernel cannot establish a connection with the resource manager on the
controller.
Display shows
The module cannot discover its number. Check the instrument cabling, then
---click the Diagnostics Tool’s “Update module numbers” button.
Two modules with the The daisy chain that connects the chassis is segmented. Check for a break in the
same chassis number chain immediately before the chassis with the duplicate module number.
User Guide
57
user_guide.book Page 58 Friday, January 30, 2004 11:35 AM
1
Installation
When the module is downloading data, the display flickers to show this
activity. When the module is ready for use, it displays its number and a
‘trail’ of pixels snakes round the perimeter of the display. When in use
by a test session, the display is constant, showing only the number. It
will also periodically scroll the session label.
58
User Guide
user_guide.book Page 59 Friday, January 30, 2004 11:35 AM
1
Installation
Step 5: Connect to the System Under Test
Review the following safety information before connecting to the
system under test.
WARNING
Do not look into a Transmit laser.
Lasers produce a very intense visible or invisible light that is
harmful to human tissue and may cause eye damage. Never look
into a Tx port to see if the laser is working. Before disconnecting
or connecting a cable from or to a Tx port, ensure that the red
LASER LED next to the port is off.
To avoid hazardous exposure to laser radiation, it is recommended that
the following practices are observed during system operation:
• ALWAYS DEACTIVATE THE LASER BEFORE CONNECTING
OR DISCONNECTING OPTICAL CABLES.
• When connecting or disconnecting optical cables between the
network simulator and device-under-test, observe the connection
sequences given below.
WARNING
Optical receivers can be permanently damaged by excessive
Optical Power or Optical Transients. Ensure that any signal
applied to the receiver is attenuated before connection so that
the signal level applied is within the receiver operating range
and also that the receiver is not subject to excessive optical
transients.
Connecting: Connect the optical cable to the input of the
device-under-test before connecting to any of the network simulators
Optical Out connectors. When connecting to the Optical In ports ensure
the power level never exceeds the maximum stated limit for that port.
Also ensure that the power level of a signal applied to a receive port is
within the recommended operating level for that port.
User Guide
59
user_guide.book Page 60 Friday, January 30, 2004 11:35 AM
1
Installation
Disconnecting: Disconnect the optical cable from the Optical Out
connector before disconnecting from the device-under-test. Always
close the fiber optic connector dust caps over the laser aperture.
• NEVER examine or stare into the open end of a broken, severed, or
disconnected optical cable when it is connected to one of the network
simulator Optical Out connectors.
• Arrange for service-trained personnel, who are aware of the hazards
involved, to repair optical cables.
.
module — front view
1
Rx
Tx
Rx
Tx
DUT
Steps
1 Connect the transmit (Optical Out) and receive (Optical In) of each
test port on the module, as a pair, to an interface on the Device Under
Test (DUT). This allows port-based protocol exchanges.
Optical fibre cables
You must supply your own optical cables. Each test port has two
separate, female SC ports — push cable connectors firmly into these
ports. For the best results, use single mode fibers with single mode test
ports, and multimode fibers with multimode test ports. The port types
are as follows
J7241A/J7242A modules
Optical Out Port
60
Wavelength: Tx 1550 nm (J7241A) or 1310 nm (J7242A), Rx 1280 to
1580 nm.
User Guide
user_guide.book Page 61 Friday, January 30, 2004 11:35 AM
Installation
1
Fiber power output J7241A: Min –5 dBm, max –1 dBm.
Fiber power output J7242A: Min –6 dBm, max –1 dBm
Connectivity: Single mode
Optical In Port
Maximum input power: –0.5 dBm.
Maximum input power damage level: + 3 dBm.
Minimum sensitivity: –11 dBm (1310nm), -14dBm (1550 nm) .
Safety Classification: Class 1 laser product (60825-1:1993 + A1:1997
+ A2:2001).
Connectivity: Single mode
J7244A/J7245A modules
Optical Out Port
Wavelength: Tx 1310 nm (J7244A) or 1550 nm (J7245A); Rx 1250 to
1660 nm.
Fiber power output: Min –5 dBm, max –0 dBm (1310 nm)
Min -2 dBm, max +3 dBm (1550 nm).
Connectivity: Single mode
Optical In Port
Maximum input power: –2.5 dBm.
Maximum input power damage level: + 4 dBm.
Minimum Sensitivity: OC-3 -24dBm; OC12 -24 dBm; OC-48 -20 dBm
Safety Classification: Class 1 laser product (60825-1:1993 + A1:1997
+ A2:2001).
Connectivity: Multi mode
WARNING
User Guide
Do not exceed the stated maximum input power damage level
when applying input signals.
61
user_guide.book Page 62 Friday, January 30, 2004 11:35 AM
1
Installation
To attenuate single mode optical signals for a multimode optical
interface
As indicated in the previous table, some single mode optical test ports
provide connectivity with multimode interfaces.
DUT
multimode transceiver
Test Port
single mode transceiver
T x Rx
Tx R x
1
3
2
Note: Tx = Optical Out; Rx = Optical In on module front panel
Steps
1 Use an attenuator to reduce the test port’s transmitter output power to
a level compatible with the Device under tests (DUT’s) receiver.
2 Use a single mode fibre (yellow) to connect to the DUT’s receiver.
3 Use a multimode fibre (may be orange, grey, green, or white) to
connect to the test port’s receiver.
Notes:
You can order attenuators from manufacturers like AMP. The required
attenuation depends on the DUT’s receiver and the losses introduced by
the optical fibers and connectors. For instance, assume the:
• single mode Tx output= S to T dBm— e.g., -15 to -8 dBm
• Rx input sensitivity= M to N dBm— e.g., -26 to -12 dBm
• fiber and connector loss— e.g., ~1 dB
You would require attenuation in this range:
• maximum= S - M - loss dB— e.g., (-15)–(-26)–(1) = 10 dB
• minimum= T - N dB— e.g., (-8)–(-12) = 4 dB
62
User Guide
user_guide.book Page 63 Friday, January 30, 2004 11:35 AM
1
Installation
In this example, a 6 dB attenuator would work well, as it would reduce
the output signal level to the range -21 to -14 dBm, well within the
receiver’s sensitivity range.
About single mode fiber
Single mode fiber has a narrower core and provides one possible path
for an optical signal to follow. It is typically used in applications
requiring a high degree of signal preservation, for example,
SONET/SDH communications.
User Guide
63
user_guide.book Page 64 Friday, January 30, 2004 11:35 AM
1
Installation
Step 6: Start the Software
Verify physical-layer connectivity between the tester and the DUT, by
starting the Network simulator application and turning on transmissions.
1
Steps
64
1 Launch the application through the Windows desktop icon, or
through the Start menu.
User Guide
user_guide.book Page 65 Friday, January 30, 2004 11:35 AM
Installation
1
2 Choose the controller you are connecting
to.
3 Create a new test session, restore a saved
session or connect to an existing session.
4 Click OK to display the Port Selection
dialog. It may take a few minutes for the
Port Selection dialog to appear.
5 Select the test ports that are currently connected to the DUT. Click the OK button
to display the OmniBER XM Network Simulator window.
User Guide
65
user_guide.book Page 66 Friday, January 30, 2004 11:35 AM
1
Installation
To turn on the Lasers
1 Click on the Laser On icon on the OmniBER XM Toolbar to turn all
the lasers on.
The laser column should switch from off to on for each test port.
2 To turn all the lasers off, click Laser Off.
66
User Guide
user_guide.book Page 67 Friday, January 30, 2004 11:35 AM
1
Installation
To check the Network Simulator modules hardware LEDs
The last step is to check the physical LEDs for the hardware modules.
10G Module
1 Check the LOF/LOP LED:
LOF/LOP (yellow) The test port detects a Loss of Frame alarm (A1/A2 framing errors for
~ 3 ms) or Loss of Pointer alarm (8-10 consecutive frames with
invalid pointers). Possible causes:
• The tester and DUT clocks are not synchronized to the same
master.
• Mismatched or incompatible SONET/SDH settings.
The LED turns off on receipt of valid frames.
2 Check the AIS/RDI LED:
AIS/RDI (yellow) The test port detects an Alarm Indication Signal or Remote Defect
Indicator in received frames. Possible causes:
• You did not turn on this test port’s laser.
• Faults in the DUT or DUT cabling.
3 Check the signal LED:
SIGNAL (green)
The test port is receiving a valid optical signal from the DUT.
4 Check the Laser LED:
LASER (red)
The test port’s laser is turned on.
User Guide
67
user_guide.book Page 68 Friday, January 30, 2004 11:35 AM
1
Installation
To power down the system
1
2
3
Steps
1 Close all test sessions. Do this before you power down any of the test
equipment. Select Shut Down from the Start menu, then select Shut
Down from the pop-up window, and click OK.
2 Once Windows has shut down, switch off the System Controller.
3 Switch off the power to the test equipment. It does not matter in
which order you switch off the test equipment. The power switches
are at the front of the chassis.
4 Disconnect the power cord from the back of the switch after the
chassis have been powered down.
Note
68
It is not necessary to power down the system before removing or
inserting modules. See Hot swapping modules, page 26
User Guide
user_guide.book Page 69 Friday, January 30, 2004 11:35 AM
Agilent OmniBER XM Network Simulator
User’s Guide
2
Using the Graphical User Interface
(GUI)
Shortcuts page 70
Quick Selections page 71
This chapter provides information on how to use the Windows based
graphical user interface of the OmniberXM Network Simulator.
Agilent Technologies
69
user_guide.book Page 70 Friday, January 30, 2004 11:35 AM
2
Using the Graphical User Interface (GUI)
The graphical user interface is Windows based and has the benefits of
using components that are probably familiar to you, and uses many of
the Windows shortcuts. The following list describes the shortcuts and
quick selections available.
Shortcuts
70
Shortcut
Description
Tool Tips/Pop-up
Windows
On the Toolbar, move the mouse over the graphic to
display a short tool tip describing the action that will take
place on selecting this item.
On the Channels, Pattern or POH pages, move the
mouse over a channel within the window to display a
popup window containing information on the channel you
are pointing to.
On E & A Inject page, move the mouse over the mask to
display information on the channel you are pointing to.
On the Overview page, move the mouse over the mask to
view a status summary.
Context menu
On the Channels, Pattern, E&A Inject tabs right click
the mouse to display a context sensitive menu listing the
selections available.
Column sort
You can click on some column headers to sort the column
into ascending or descending order.
Mouse actions
In the Channels page double click the mouse in a channel
to Select or Unselect it. Note you can also do this by
pressing the spacebar see Quick Selections on next page.
Pattern page: double click mouse or use the spacebar to
cycle through pattern choices.
E+A Inject page: double click mouse or use the spacebar
to Add or Remove channels from the mask.
VT POH/LO-POH page: No double click action
Overview page: Double click mouse to go to the E+A
page then select appropriate channel.
E+A page: Double click mouse to go to Counts page and
select required channel.
User Guide
user_guide.book Page 71 Friday, January 30, 2004 11:35 AM
Using the Graphical User Interface (GUI)
2
Quick Selections
Press
To perform this action:
Spacebar
To toggle the state of the highlighted
item, for example (Un)Select.
UP / DOWN ARROW
To move highlight to previous or
following line.
LEFT / RIGHT ARROW
To move highlight from left to right.
SHIFT+ UP/ DOWN ARROW
Highlights all the channels between the
selection point and the row above or
below.
SHIFT+LEFT / RIGHT ARROW Highlights the channel to the left or right
as well as the current selection.
User Guide
Ctrl + A
Highlights all channels/paths/VTs/TUs.
Home
Highlights first channel/path/VT/TU.
End
Highlights last channel/path/VT/TU.
Shift left mouse click
Highlights all channels between the last
selection and the current one.
Ctrl left mouse click
Invert the highlight on the selected
channel.
Left mouse click
Highlight a single channel.
71
user_guide.book Page 72 Friday, January 30, 2004 11:35 AM
2
72
Using the Graphical User Interface (GUI)
User Guide
user_guide.book Page 73 Friday, January 30, 2004 11:35 AM
Agilent J7241A OmniBER XM
User Guide
3
Getting Started
“To launch OmniBER XM" on page 74
“To exit and log out" on page 75
“Tool Bar Explained" on page 77
“Configure a session offline" on page 80
“To start a session and select modules and test ports" on page 81
“Setting up the Transmitter and Receiver Interface" on page 84
“To Copy Port Settings to other Ports" on page 89
“Transmitter and Receiver Channels Setup" on page 90
“Set Up Transmitter Payload Pattern" on page 94
“Add Errors or Alarms to the test pattern" on page 95
“Set up Transmitter TOH/SOH" on page 104
“Edit Transmitter Path Overhead Bytes" on page 112
“Setting up the Receiver" on page 114
“To Monitor Ports for Errors or Alarms" on page 118
“Monitoring Receiver Overhead Bytes" on page 121
“Viewing Measurement Results" on page 123
“To log events to a file" on page 127
“Setting a Measurement Gating Period" on page 130
“Viewing Service Disruption Time" on page 131
“To close a session" on page 132
“Port and Channel Numbering Scheme" on page 134
This chapter describes the basic tasks you need to complete in order to
configure a test session.
Agilent Technologies
73
user_guide.book Page 74 Friday, January 30, 2004 11:35 AM
3
Getting Started
To launch OmniBER XM
Windows Desktop
On the Windows desktop, double-click this icon to launch the
Network Simulator application.
Start Menu
Or, from the Windows
Start menu, select
Programs, OmniBER XM.
74
User Guide
user_guide.book Page 75 Friday, January 30, 2004 11:35 AM
Getting Started
3
To exit and log out
Exit
From the application File menu, select Exit. Indicate whether
you want to save your current test configuration. If you had
detached the test session from your GUI, indicate whether to
leave the test session running in the background. Note: You
can close the GUI without ending your test session.
Log Out of
Windows
From the Start menu, select Shut Down.
Confirm that you want to end
your Windows session.
Before you turn off the controller, always log off Windows. Wait for the
message indicating that it’s safe to power down.There are two ways to
power down:
• select Shut Down from the Start menu
• click Shut Down on the Windows Security dialog
User Guide
75
user_guide.book Page 76 Friday, January 30, 2004 11:35 AM
3
Getting Started
To get online help
Help Menu
Dialog
Help Buttons
The OmniBER XM network simulator help includes:
• Introduction: Describes OmniBER XM and its help. Provides
Acrobat/PDF versions of the paper guides.
• Using Network Simulator: Describes how to display and use the
application’s dialogs, with details about what to enter for each
field.
• Provides troubleshooting help.
• Using the API: Describes how to use the Application
Programming Interface.
• Using SCPI commands: provides a list of commands for
controlling the OmniBER XM.
• Technology Reference: Provides white papers on testing and
technologies; helpful web sites; and a glossary of terms.
Provides context-sensitive details about the current dialog and what
to enter for each field.
Start Menu
Provides access to the same help as that described above for the Help Menu.
The online help and paper guides are provided on both the
• OmniBER XM controller: C:\Program Files\Agilent\OmniBER
XM\doc and the OmniBER XM CD: \doc
Launch OmniBERXM.chm to see the online help or the .pdf files to see
the paper guides.
76
User Guide
user_guide.book Page 77 Friday, January 30, 2004 11:35 AM
3
Getting Started
Tool Bar Explained
The functions you can access via the File, Tools and Help menus are
explained here.
File Menu
Selections are: Open, Save, Set label, Reset, Configure Logging and
Exit.
To open a session configuration from file
1 Select File then Open from the menu.
2 Select a file from the Open dialog window.
3 You can select which port to restore the saved settings on by clicking
on the Restore On column.
You can restore a complete session or a partial session by clicking
the appropriate radio button. If you select a partial session you can
choose from the settings displayed in the bottom half of the dialog.
4 Select Open. This will apply the file settings to the current session.
To save session configuration to a file
Save a session configuration you wish to keep to a file. The file can then
be restored on demand.
1 Select File then Save from the menu.
2 Enter a name in the File name field.
3 Set Save as type to Configuration Files (*.xml).
4 Click on a Port and add a Comment if required.
5 Determine whether you wish to save a “Complete session” (all the
settings for that session are retained) or a “Partial Session”. By
User Guide
77
user_guide.book Page 78 Friday, January 30, 2004 11:35 AM
3
Getting Started
default, test configuration files are stored in:
C:\Program Files\Agilent\OmniberXM\config\OmniberXm.
To set a label
1 Select File then Set label.
2 Enter a label for the current session in the Session label dialog
window.
To Reset configuration to system default settings
1 Select File then Reset
Choosing reset will cause you to lose all selections and data.
2 Decide whether you wish to save the current configuration to a file
before resetting. If not select No.
To Configure Logging: Please refer to “To log events to a file" on
page 127.
To Exit
1 Select File then Exit. See “To close a session" on page 132 for a
more detailed explanation.
Tools Menu
Selections are: Tcl Shell and About the Tools Menu.
Tcl Shell: A window similar to the one opposite is
displayed allowing you enter Tcl commands.
About the Tools Menu: This provides help on
how you can customize this menu and add other
menus to launch your own software applications
and scripts. Refer to the OmniBER XM online
help provided with your system for more
information on how to customize the menus.
78
User Guide
user_guide.book Page 79 Friday, January 30, 2004 11:35 AM
3
Getting Started
Help Menu
Selections are: Contents, To Contact Agilent, and About OmniBER
XM
Contents: Opens up the OmniBER XM online help.
To Contact Agilent: Provides information on how to contact Agilent.
About OmniBER XM: States the current application software version
build and date.
Configuration: Hide/Show
To Hide the Configuration part of the display
1 Click on the Configuration Hide icon to hide all the configuration
part of the display and allocate all of the display to the Results
window. Selecting Show will return to the normal display.
Clear History on all ports
1 Click on the Clear history icon to remove historical error indication
(chassis/ports shown pink) from the instrument GUI.
User Guide
79
user_guide.book Page 80 Friday, January 30, 2004 11:35 AM
3
Getting Started
Configure a session offline
With OmniBER XM you can configure a new session offline while
there is an online session in progress. This saves you time as you don’t
need to wait until the online session is finished before setting up a new
configuration. You can then save the offline session to file and restore it
later into a new future session.
To configure a session offline
1 Double click on the Agilent OmniBER XM icon on your Controller
display to start an OmniBER XM session.
2 When the Test Session dialog window opens set the Session Mode
to Offline. Also enter a Label for your session.
3 Set the Type of test session to Create a new session.
4 Select OK.
5 In the Port Selection dialog window, select the ports you want to
configure. Select OK.
6 Set up the Transmitter, Receiver and Results interface settings as
required.
7 When you are finished setting up the OmniBER XM, select File then
Exit from the OmniBER XM Toolbar.
8 In the Exit dialog window select Close Session, and then click on the
Save then exit button.
9 In the Save As dialog enter a file name for your saved configuration.
Also decide whether you wish to save a “Complete” or “Partial
Session”. If you choose a Partial session you can then select which
setting you wish to save.
10 Select the Save button. The Session will close down and your
configuration will be saved with the file name you entered in step 9.
To restore a saved session
1 Double click on the Agilent OmniBER XM icon on your Controller
display to start an OmniBER XM session.
2 In the Test Session dialog select Restore a saved session, then click
on Browse. From the Open dialog select the file required then Open.
Click on OK to restore the saved file.
80
User Guide
user_guide.book Page 81 Friday, January 30, 2004 11:35 AM
Getting Started
3
Example of OmniBER XM setup
To start a session and select modules and test ports
1 Double click on the OmniBER XM icon.
2
3
4
5
To Start a session
1 Launch OmniBER XM session by double clicking on the Agilent
OmniBER XM icon on the Controller display.
2 Choose the Controller you are connecting to.
3 Determine whether you wish to “create a new test session”, “restore
a saved session” or “connect to an existing session”.
User Guide
81
user_guide.book Page 82 Friday, January 30, 2004 11:35 AM
3
Getting Started
4 Set the Session Mode to Online. Select Offline if you wish to
configure a session offline - see Configure a session offline page 80.
When you select Offline you are not connected to the chassis or
modules hardware.
5 Click OK to display the Port Selection dialog.
6 Select the test modules to use in your test. Note any modules
currently in use in a test session are shown blue on the display and
are unable to be selected (the tic box is greyed out).
7 Select the ports to use in your test.
8 Click OK to display the OmniBER XM: Session window
NOTE
When selecting test ports on OmniBER XM test modules, select ports
on consecutively numbered modules. Because of the event line used to
synchronize these types of modules.
Thus if you select ports on chassis 1 and 3 in one session, you cannot
select ports from chassis 2 and 4 in another session. You can select ports
on chassis 2 or 4 but not them both together.
82
User Guide
user_guide.book Page 83 Friday, January 30, 2004 11:35 AM
Getting Started
3
Ganged Port Operation
The ‘Ganged Port’ feature allows you to perform the same operation on
all relevant ports on an OmniBER XM session. The timing of the events
on each port is not synchronous, but is as close in time as internal
processing allows. This feature is supported for all user interfaces.
Ganged Port operation is only available for the following instrument
features:
Laser On/Off
All ports within a session can have their transmit
lasers switched on and off by a single operation. Select the appropriate
icon.
The On Off buttons on the Toolbar control both errors and alarms at the
same time, see below.
Errors On/Off All relevant ports within a session can have their
Errors ON and Errors OFF controls activated by a single operation. The
specific error types on each port can be selected individually, allowing
different error conditions to be generated on a port by port basis. The
feature applies to all error generation modes - Continuous and Pulse
Burst.
Alarm On/Off All relevant ports within a session can have their
Alarm ON and Alarm OFF controls activated by a single operation. The
specific alarms which apply to each port can be selected individually,
allowing different alarm conditions to be generated on a port by port
basis. The feature applies to all alarm generation modes - Continuous,
Pulse Burst, and Timed Burst.
Single Selecting the Single icon adds a single error of the type you
have configured for a port and/or transmits a SEF/OOF event for any
port that has been configured to transmit a SEF or OOF event.
For example: if for a selected port you select the E+A Inject tab and set
up Add Errors to add CV-S (B1) Transport Errors and Add Alarms to
add RDI-P Path Errors, then when you select Single a single CV-S (B1)
error is transmitted and also a single Path RDI-P event.
User Guide
83
user_guide.book Page 84 Friday, January 30, 2004 11:35 AM
3
Getting Started
Turn on all Lasers and set up Physical parameters for each Port
You can switch all the lasers on or off for the selected ports (see below)
or switch on or off individual lasers (see step 6 of “To set up the
transmitter and receiver interface" on page 84).
To turn lasers on/off
1 Select All Lasers On from the Ports Toolbar to turn all the lasers on
or select All lasers Off to turn them off.
Setting up the Transmitter and Receiver Interface
To set up the transmitter and receiver interface
1 Select the Physical tab.
2 Set the Transmitter and Receiver Signal Standard to SONET or
SDH as required.
3 Set the Signal Rate (if applicable).
To set line rate offset
4 You can offset the Transmitter Line Rate by plus or minus 100 ppm.
The resolution is 1ppm. Click on the Edit button then enter the value
required and click on OK.
5 You can switch off or on the laser for the selected Port by clicking on
the Laser button.
84
User Guide
user_guide.book Page 85 Friday, January 30, 2004 11:35 AM
3
Getting Started
Select Terminal or Thru mode
The following procedures illustrates how to select Terminal or Thru
mode. If your OmniBER XM has option 010 fitted you can also select
VT/TU mode. However Thru mode and VT Mode are mutually
exclusive. If Thru mode is selected VT Mode is disabled and vice-versa.
To select Terminal or Thru mode
1 Select the Physical tab.
2 Click on the Mode required, Terminal or Thru Mode. Confirm in
the dialog window that you wish to change mode for the selected
port. Note that it takes approximately 5 seconds for a Mode change
to be completed.
Terminal Mode: Multi-channel, mixed payload generation with
pattern, error and alarm generation.
Thru Mode: Two types of Thru Mode are available - Transparent and
Intrusive.
Transparent Thru Mode
In transparent thru mode, the signal on the receive port is routed
unchanged, to the transmit port. The OmniBER XM operates as normal,
monitoring errors and alarms in the received signal. No data is altered,
and no BIP’s re-calculated.
Intrusive Thru Mode
Re-transmits received payload, with ability to add errors or alarms to
any or all channels as they pass. The following OmniBER XM
Transmitter functionality is available in Thru Mode.
User Guide
85
user_guide.book Page 86 Friday, January 30, 2004 11:35 AM
3
Getting Started
You can add the following errors and alarms in Thru mode:
• B1, B2 and B3 errors.
• LOS, LOF, LOP, AIS-L/MS-AIS, AIS-P/AU-AIS alarms.
Refer to Chapter 4 “Instrument Setup and Use - VT/TU mode” for
detailed information on VT/TU operation.
Setting up the Transmit Clock source
You can reference the transmitters timing to an internal or recovered
clock source.
To set up the transmitter clock source
1 Select the Physical tab.
2 Set the Clock Source to Internal (Global), (10 MHz, see External
Clock Reference) or Recovered (clock recovered from received
data) as required. In Thru mode the Transmitter clock is locked to
the Recovered clock.
When in Internal mode an external clock source can be used as a
reference source. This external reference signal is applied via one of
the clock input ports on the J7263A Chassis rear panel (see External
Clock Reference).
86
User Guide
user_guide.book Page 87 Friday, January 30, 2004 11:35 AM
Getting Started
3
External Clock Reference
An OmniBER XM system can comprise of multiple chassis, populated
with multiple modules (four per chassis). By connecting the chassis
together via the event system cabling you can synchronize the transmit
clock on all modules to a common source. The choice for the clocks is
always set up and connected to the first chassis in the system.
Only one external reference clock source should be applied to the
chassis rear panel at any given time. If more than one clock source is
applied during operation the chassis will lock to the first valid signal
present. If more than one clock signal is present at re-boot the chassis
will lock using the following order of preference:
User Guide
Clock Input Port
Clock Signal
50 Ohm BNC
10 MHz reference clock
100 Ohm Bantam
1.544 Mbs BITS
87
user_guide.book Page 88 Friday, January 30, 2004 11:35 AM
3
Getting Started
Clock Input Port
Clock Signal
75 Ohm BNC
2.048 Mbs MTS
75 Ohm BNC
2.048 MHz reference
clock
Siemens 3-pin
2.048 Mbs MTS
Selecting Signal Scrambling
To set signal scrambling for selected port
1 Select the Advanced Setup button.
2 Click on the respective boxes to select or deselect Tx or Rx Signal
Scrambling. The SONET/SDH signal can be scrambled/de
scrambled according to G707/GR253 network specifications.
3 Set on all valid ports: If this box is checked the OmniBER XM
attempts to apply the features selected to all valid ports in the current
session.
88
User Guide
user_guide.book Page 89 Friday, January 30, 2004 11:35 AM
3
Getting Started
Selecting STS-1 Bulk Filled Stuff Column Overwrite
To select STS-1 bulk filled stuff column overwrite
1 Select the Advanced Setup button.
2 Select Tx or Rx overwrite as required.
For STS-1 only: 'Stuff column overwrite mode' can be enabled. In this
mode the payload overwrites the Fixed Stuff columns in the SPE/VC.
For AU3, stuff columns cannot be overwritten.
NOTE
If you are using OmniBER XM with an OmniBER 718 and experience
Bit errors or B3 errors on STS-1 operation. Set Tx and Rx STS-1 bulk
filled stuff column overwrite to ON.
To Copy Port Settings to other Ports
To copy a ports setup to another port
1 Click on the Copy Port Setup To button.
The Copy Port Setup To dialog window displays the Current Port
Setup and ports to which you can copy settings.
2 If you wish to copy the settings of the currently selected port to all
the other ports listed in the dialog window choose Select All,
otherwise click on the box for each individual port as required.
3 Click on the Advanced button to see a list of modes and settings
that can be copied from port to port.
4 If you have a mix of different rate modules/ports to which you may
wish to copy settings, you are restricted to copying those of a similar
rate (i.e. all 2.5 Gb/s or all 10 Gb/s). To change this select the
Advanced button and switch off Rate
User Guide
89
user_guide.book Page 90 Friday, January 30, 2004 11:35 AM
3
Getting Started
Transmitter and Receiver Channels Setup
The OmniBER XM user interface allows to quickly setup individual
channels within the transmitter and receiver channel mask (see “To set
up individual channels “) or re-configure all of the channels (see
“Advanced Channel Configuration" on page 92).
To Set up Transmitter channels
Up to 192 channels can be defined for the 10GHz ports (48 for 2.5GHz).
Each channel can be defined as ‘selected’ or ‘unselected’. Any
unselected channels are set to ‘Unequipped’ (that is all payload and path
overhead bytes are set to 00h, but the pointer is set as per selected
channels. Selected channels contain a full Path Overhead (POH) and
BER pattern.
Any change to the Transmitter structure will take effect with no
‘intermediate’ states, that is, it is hitless to the structure of channels that
are unchanged. This applies to SPE/VC structure, not to payloads.
90
User Guide
user_guide.book Page 91 Friday, January 30, 2004 11:35 AM
Getting Started
3
To set up individual channels
1 Click on the Channels Setup tab.
2 Position the display cursor on the desired channel then click the right
mouse key, and select from the choices given in the menu. The
choices offered are ones that are valid for the selected channel. When
you position the cursor over a channel a ToolTip box appears giving
Transport and Path interface settings for the selected channel, an
example is given below.
To set a channel to unselected
3 To toggle between a channels current payload setting and
Unselected, position the cursor on the channel of interest and double
click the left mouse key. The display will change to show
Unselected or just U (for an STS-3c or STS-1). Double clicking the
left mouse key again returns to the original setting. You can also
select and unselect a channel from the right-click menu
To copy channel setup from Tx to Rx - or - Rx to Tx
4 Use the Copy → button to copy the Transmitter settings to the
Receiver, and the ← Copy button to copy the Receiver settings to the
Transmitter.
User Guide
91
user_guide.book Page 92 Friday, January 30, 2004 11:35 AM
3
Getting Started
Advanced Channel Configuration
The advanced channel configuration window allows you to quickly set
up the desired transmitter or receiver, channel configuration.
For fast channel setup
1 Select the Channels Setup tab.
2 Click on Advanced button to display the Advanced Channel
Configuration dialog.
3 Use the channel buttons (1, 3, 6, 9, 12, 24 and 48) to set your channel
configuration, or type in your selection using the controller
keyboard. Or use a combination of both keyboard and buttons.
4 If your system has option 010 fitted and you have selected VT/TU
operation a VT/TU Preview Text dialog window is displayed
enabling you to select VT/TU types.
92
User Guide
user_guide.book Page 93 Friday, January 30, 2004 11:35 AM
3
Getting Started
Delete last channel selection
5 If you make a mistake while inputting a channel type into the
Comma Separated list use the Delete button to delete the last entry in
the list.
Note: The Delete function deletes the last entry from the Comma
Separated list fills the deleted channel with STS-1’s or AU-3’s
(SDH).
Reset channel configuration to all STS-1s
6 Clicking on the Reset button will reset all channels to
STS-1’s/AU-3’s.
To cancel advanced channel configuration edits
7 Click on the Cancel button to cancel all edits, close the Advanced
Channel Configuration window and return to your original
transmitter settings.
NOTE
User Guide
The Advanced Channel Configuration dialog will only apply the new
structure to the port when the dialog is OK’d
93
user_guide.book Page 94 Friday, January 30, 2004 11:35 AM
3
Getting Started
Set Up Transmitter Payload Pattern
The pattern-type can be selected on a per-channel basis, each channel
can be set to one of the following:
User Word: User defined 16-bit word. The same word value is used for
all channels set to User Word.
PRBS23 or PRBS23 inverted: The pattern is byte-aligned to the
SONET/SDH frame (but has no specified alignment to the frame).
The pattern can be inverted or non-inverted. This is selectable on a
per-channel basis.
To set up the transmitter pattern
1 Click on the Pattern tab.
2 Position the display cursor on the channel of interest and click the
right mouse key to display the pattern selection menu, or hit the
spacebar to toggle round the available options. Set the Transmitter
pattern selection to one of the following:
• PRBS 23 (shown on display as PRBS23 or P)
• PRBS 23 Inverted (shown on display as PRBS23-INV or I).
94
User Guide
user_guide.book Page 95 Friday, January 30, 2004 11:35 AM
Getting Started
3
• User Word (user definable 16-bit user-word shown on display as
User or W)
3 If you selected User Word type the required 16 bit word in the User
Word fields at the bottom of the Transmitter display.
Copy Tx Pattern to Rx
You can copy the current Transmitter Pattern selections to the Receiver,
this includes User Word setup. Set up the Transmitter Payload Pattern
selection for each channel, then select the Copy→ button.
Add Errors or Alarms to the test pattern
You can add errors and alarms to a SONET or SDH signal during
testing while in Terminal or Intrusive Thru Mode. See “Ganged Port
Operation" on page 83.
To add errors and/or alarms
1 Click on the E+A Inject tab.
Add Errors
2 Select the Errors Type required.
3 If you select Path or Pattern errors, set up the Rate for each Payload.
User Guide
95
user_guide.book Page 96 Friday, January 30, 2004 11:35 AM
3
Getting Started
4 Set the Add Error Mode field to Manual or Timed Burst (refer to
“Burst Mode Generation" on page 102 for information on Timed
Burst operation).
Add Alarms
5 Select the Alarm Type, then Alarm Mode.
6 Click on the Error Rate and /or Alarm On buttons to transmit the
selected errors or alarms.
NOTE
You can add errors and alarms at the same time.
Adding Errors and Alarms
You can add the following error and alarm types for SONET and SDH.
Only one error type at a time can be injected.
SONET Transport/SDH Section Errors
SONET errors
SDH errors
CV-S (B1)
B1
CV-L (B2)
B2
REI-L
MS-REI
SONET Transport/SDH Section Alarms
96
SONET/SDH
Alarm
Continuous
Timed Burst
Pulse
LOS (Physical)
yes
no
no
SEF/OOF*
*see Note below
yes
yes
LOF
yes
yes
yes
AIS-L/MS-AIS
yes
yes
yes
RDI-L/MS-RDI
yes
yes
yes
User Guide
user_guide.book Page 97 Friday, January 30, 2004 11:35 AM
3
Getting Started
*Note: SEF/OOF are one-shot alarms that are transmitted using the
Transmit button. All other alarms are transmitted continuously until
turned off.
Error rates
• Errors can be added singly on demand (via the Single Error Add
button), or at user defined rates.
• Error rates: Errors can be added at a rate of w.xyE-z where w.xy is
1.00 to 9.99, and z is 3 to 7. For example 1E-3 will give a result of
1.000E-3 on the Receiver.
• Error Distribution: For B1 and B2 errors, the bit selected for error
is ‘rotated’, for example for B1 (a single byte), the first error is added
to bit 1, and the second to bit 2 and so on.
Refer to the Specifications, available on the CD-ROM (supplied with
your system) for a full list of errors and alarms.
Adding Pattern Bit Errors
You can add pattern bit errors to both SONET and SDH payloads. The
errors can be added singly, at a fixed rate or in timed burst mode.
Adding Path Errors/Alarms
The following STS Path and HO Path errors are available for SONET
and SDH. The errors can be added to any combination of the selected
transmitter channels via the user-defined Path Errors & Alarms Mask.
Only one error type at a time can be injected.
The following table lists the errors and error add modes available.
User Guide
SONET
SDH
Single
Timed Burst
CV-P (B3)
B3
yes
yes
REI-P
HP-REI
yes
yes
97
user_guide.book Page 98 Friday, January 30, 2004 11:35 AM
3
Getting Started
M1 only mode for REI-L/MS-REI errors
The M1 Only mode is for Tx and Rx, 10G ports only and is provided
for backwards compatibility with old network equipment. It uses M1
only, and saturates at 255 errors. Normally at 10G two bytes M0 and
M1 are used which is sufficient to indicate up to 1536 errors.
M1 only mode can be selected independently for each port in a session.
The mode applies to both transmit and receive properties of the port. On
the transmit side, it determines the overhead byte(s) in which REI-L
errors are generated and on the receive side it will determine in which
byte(s) REI-L/MS-REI errors are detected.
To select M1 only mode
1 Select the Advanced Setup button.
2 Set the REI-L/MS-REI mode field to M1 Only or M0 and M1 as
required.
Path Alarms
The following Path alarms can be generated.
SONET
SDH
AIS-P
AU-AIS
LOP-P
AU-LOP
RDI-P
HP-RDI
UNEQ-P
HP-UNEQ
PDI-P
HP-PDI
You can select enhanced RDI-P/HP-RDI alarms by selecting one of
three user definable modes (payload, server and connectivity). You can
also set the PDI-P alarm (set C2 POH byte) to any user definable value.
98
User Guide
user_guide.book Page 99 Friday, January 30, 2004 11:35 AM
Getting Started
3
To generate enhanced RDI-P/HP-RDI path alarms
1 Select the E+A Inject tab and set the Add Alarms Type field to STS
Path/HO Path and then select RDI-P/HP-RDI as required.
2 Click in the Enhanced box, if appropriate.
3 Select a value from the drop down menu (payload, server or
connectivity). The following table illustrates the value of bits 5-7 of
the POH G1 byte for the options available.
Alarm On
Alarm Off
•
Non-enhanced
•
•
•
•
User Guide
Enhanced
G1 Bits 5-7
000
•
•
001
100
Payload •
010
Server •
101
Connectivity •
110
99
user_guide.book Page 100 Friday, January 30, 2004 11:35 AM
3
Getting Started
Selecting which channels to insert Path errors/alarms
You can add errors/alarms to all channels or just a chosen few. This is
achieved using the Path Errors & Alarms Mask.
Channels shown in white will not
be errored or alarmed.
Channels shown in red and with a
tick are selected and can be
errored/alarmed.
The currently selected channel is
shown in the system highlight color.
Right click on the mask to display a menu of options enabling you to select All or
None for Error/Alarm Inject, or select the channel under the mouse for error/alarm
inject enable/disable.
To set up the path errors & alarms mask
1 Use the Path Errors & Alarms Mask to select which channels you
wish to add errors or alarms.
2 Position the display cursor on the channel of interest and then double
click the left mouse key. Channels with a tick will be
errored/alarmed when the OmniBER XM error add/alarm function is
enabled. You can also use the Controller keyboard up/down arrows
to select channels and the spacebar to toggle the add error/alarm
function.
Path error add modes
Path errors can be added singly on demand, at a user-defined rate or as a
timed burst. To add single errors: Click on the Single Error Add
button.
Note that each channel is errored completely independently of all the
other channels. When a single error is added, it is added to all of the
selected channels in the mask. The error will be added to each channel
100
User Guide
user_guide.book Page 101 Friday, January 30, 2004 11:35 AM
3
Getting Started
at the next valid point in time. For example if you are adding a single
CV-P(B3) error, then the error will be added to each channel on the next
occurrence of its B3 byte within the POH.
Error Rates
Errors can be added at a rate of w.xyE-z where w.xy is 1.00 to 9.99, and
z is 3 to 7. For example 1E-3 will give a result of 1.000E-3 on the
Receiver.
Error Distribution
In multi-channel mode, when an error is added to B3 or to the pattern,
the same bit positions are always errored.
Error Rate Mappings
To set error rate mappings
1 You can set the error-add rate for each mapping independently. For
example STS1/AU3 channels can be set independently of the rate for
STS3/AU4 channels. All selected channels with the same
mapping-type will be errored at the same rate.
2 Click on a Payload Rate cell that you wish to edit and use the drop
down menu to enter a new value, or use the keyboard to enter your
own value The range for the selected mapping is shown at the bottom
of the list.
User Guide
101
user_guide.book Page 102 Friday, January 30, 2004 11:35 AM
3
Getting Started
Burst Mode Generation
Two types of burst generation are provided for alarms and errors, they
are:
• Timed error/alarm burst generation and
• Pulse mode alarm burst generation
Timed error burst generation
1 Select the E+A Inject tab.
2 Select the Type of errors you wish to generate.
3 Set the Mode field to Timed Burst.
With Timed Burst you can set a burst of errors or alarms to be:
• ON for X seconds or OFF for Y seconds, where X and Y are between
1 and 10,000.
X: 1 to 10,000; Y: 0 to 10,000; Z: 1 to 10,000.
• Repeat the ON/OFF cycle Z times, where Z is 0 to 10,000.
Note: When Y is 0, there is no OFF time, just a one-shot burst of X
seconds.
The Timed Burst mode is applied to the currently selected error or alarm
types.
4 Use the Timed Burst Parameters edit fields to enter On, Off and
Cycle values for a timed burst.
5 Click on the Timed Burst button to start the burst of error.
Note: Stopping the burst will reset it so that it will start from the
beginning if restarted. Also the Timed Burst Parameters fields are
greyed out (disabled) when there is a timed burst in progress.
102
User Guide
user_guide.book Page 103 Friday, January 30, 2004 11:35 AM
3
Getting Started
Pulse mode alarm burst generation
You can generates alarms bursts of SONET/SDH frames. Pulse Mode
bursts are applied to the currently selected alarm type.
The pulse mode alarm burst sequence is as follows:
• burst starts OFF -> then goes to ON for X frames -> then OFF.
Where X is 1 to 64. Frames are SONET/SDH frames or SPE/VC frames
depending upon the currently selected alarm type. Pulse mode bursts are
applied to the currently selected alarm type.
1 Select the E+A Inject tab.
2 Select the Type of alarm you wish to generate.
3 Set the Mode to Pulse Burst.
4 Enter a Burst Length value (1 to 64).
5 Click on the Pulsed Burst Start button to start the burst of Alarms.
There is no stop control for pulse mode as the burst terminates after a
maximum of 8 milliseconds (64 frames).
User Guide
103
user_guide.book Page 104 Friday, January 30, 2004 11:35 AM
3
Getting Started
Set up Transmitter TOH/SOH
Select the TOH/SOH tab.
Within the TOH/SOH tab you can set up the following:
• K1, K2 Automatic Protection Switching
• S1 Synchronization Status Message
• Configure the Section Overhead bytes
• Increment/decrement Pointer value
• J0 Section Trace Message
• Overhead Sequence Capture
Generating K1, K2 Automatic Protection Switching (APS)
Messages
You can check network equipment ability to switch to a standby line (to
maintain service when a failure is detected). Switching is controlled by
Automatic Protection Switching (APS) messages controlled by the K1
and K2 bytes.
APS occurs when there is a signal failure, signal degradation, or in
response to commands from a local terminal or remote network
manager.
You can view the K1/K2 bytes as either Linear or Ring.
Note that the modules error add test function interacts with the setting of
the K2 overhead byte. If the RDI-L and AIS-L alarms are active, any
byte values generated by those features will override the value
previously assigned to K2.
For more information refer to “Telecomm Concepts” page 304.
To generate an APS message
1 Select the TOH/SOH tab.
2 Click on the Edit K1, K2 button.
104
User Guide
user_guide.book Page 105 Friday, January 30, 2004 11:35 AM
3
Getting Started
3 Set the Protocol to Ring or Linear APS.
4 Set K1 b1-b4 and b5-b8 as required.
5 Set K2 b1-b4, b5 and b6-b8 as required.
6 Select OK or Cancel to undo your selections.
Generating Synchronization Status Messages
You can transmit synchronization status messages in bits 5 to 8 of the
S1 byte.
For more information, see “Synchronization Status Messages (S1 bits 5
to 8)” on page 273.
To generate a S1 synchronization status message
1 Select the TOH/SOH tab.
2 S1 (b5-b8) indicate the levels of synchronization being used at the
transmit end of a line span. Set the Synchronization Status
Message bits as required from the drop down menu. When you select
a message, its binary value is automatically displayed. Unused bits
(b1-b4) are set to 0000.
User Guide
105
user_guide.book Page 106 Friday, January 30, 2004 11:35 AM
3
Getting Started
Editing Transmitter Section Overhead Bytes
You can assign values to the transmitter Section Overhead bytes using
the Advanced, Configure Overhead window. All bytes in any STS-3
position can be selected to be individually set with the following
exceptions:
• B1, B2, J0 and H1, H2 and H3 in STS-3 #1
• B2, H1, H2, H3 in all other STS-3’s
Any settable byte can be set to a value in the range 00-FF hex.
To edit section overhead bytes
1 Select the TOH/SOH tab.
2 Click on the Advanced button (at bottom of display under the S1
byte) to open the Configure Overhead window.
3 Select the Nth STS3’s worth of Overhead you wish to edit in the
STS3 Number field.
4 To edit a byte, position your controller cursor on the byte of interest,
click, and then enter a new byte value using the keyboard, or use the
‘Tab’ key on your keyboard to access a byte and then enter a new
106
User Guide
user_guide.book Page 107 Friday, January 30, 2004 11:35 AM
3
Getting Started
value. Note: You can only edit the bytes shown red or blue in color.
Editable bytes are shown black, non editable bytes are greyed out.
5 Use the Apply button to implement your edits before choosing
another STS3 Number
6 Select OK when finished editing bytes to close the Dialog window,
or Cancel to undo your edits.
7 Click on the Default All Bytes button if you wish to set the bytes to
there default values.
Adjusting SPE or AU Pointer Values
You can check your systems ability to handle adjustments to SPE or AU
pointer values.
A single pointer value is transmitted in all channels.
You can increment or decrement any pointer value, or enter a new value
(via the Set New Pointer Value dialog) with or without a New Data
Flag. When the pointer value is moved, it moves simultaneously in all
channels.
The transmitter Pointer SS bits are set to the following:
SONET: 00
SDH: 01
To adjust pointer values and/or set a new data flag
1 Select the TOH/SOH tab.
2 Use the Pointer Control +1 or -1 buttons to increment or decrement
the Pointer value, or select the Edit Pointer button and enter a new
Pointer Value.
3 Select the New Data Flag checkbox if required.
4 Select OK to close the Set New Pointer Value dialog window.
User Guide
107
user_guide.book Page 108 Friday, January 30, 2004 11:35 AM
3
Getting Started
Generating a J0 Section Trace Message
You can insert trace messages to verify signal routing through your
system. The message format can be 16-byte CRC-7 (to G707) or 64 byte
format (ending in <CR><LF>).
The trace message can be set to a default value or user defined.
The default trace message identifies the originating port (i.e. ‘ppp’
[001-999]). The default values are:
16 byte mode
“Agt ppp<padding><CRC-7>”
64 byte mode
Agilent OmniBER XM JxxxxxPort ppp<padding><CR><LF>
Instrument number Jxxxxx will match the current instrument. Padding
is NULL characters.
User defined string.
They can be up to (and including) 15 or 62 bytes long depending on the
current selected setting of trace mode. The appropriate terminator will
be added. The strings are:
• <inst> - Instrument number (6 characters, taken from configured
name).
• <port> - Port number (6 characters in the format nnnn/n, which is
made up of the rack position, module number and the physical port
within the module).
•
108
<c> - Channel number (3 digits, leading 0 added if needed).
User Guide
user_guide.book Page 109 Friday, January 30, 2004 11:35 AM
Getting Started
3
To generate a J0 trace message
1 Select the TOH/SOH tab.
2 Select a 16 byte or 64 byte message and enter the required message
using the keyboard.
Overhead Byte Group Capture
Overhead channels available for capture are:
• K1 K2 byte-pair
• K1 K2 K2-2 byte-triplet
No other overhead byte groups are selectable for sequence capture.
Result Presentation
The results are correlated for all ports configured for byte capture as
shown:
User Guide
109
user_guide.book Page 110 Friday, January 30, 2004 11:35 AM
3
Getting Started
The captured byte values are displayed in hexadecimal or text form
(selectable with the Decodes button) alongside the following:
State
Frames
Start Frame
• Position in sequence
• The number of frames for which that value persisted.
• The Frame Number at which the transition to this value took place,
where the first frame captured is numbered '1'. This enables easy
correlation of captured events across multiple ports.
Note that two events with the same 'Frame Number' on different ports
cannot be said to be 'the same frame'. Frames are terminated at each
node in the network, and also there can be significant delays through
network elements. It is, however, true to say that the events happened
within 125 microseconds of each other (due to capture being started
synchronously across all ports) so cause and effect can be deduced.
To Configure Sequence Capture
1 Select the Byte Capture tab.
2 Select the Ports and Byte Groups button.
3 Select the Byte Group (K1,K2 or K1,K2,K2-2).
Click on the Set on All Ports button if you wish to capture the same
set of bytes for all the selected ports.
110
User Guide
user_guide.book Page 111 Friday, January 30, 2004 11:35 AM
Getting Started
3
4 Clock on OK when finished selecting the required Port and Byte
Groups.
To Start or Stop Byte Capture
5 Capture is initiated by selecting the Gating Start button and stopped
by selecting the Gating Stop button.
User Guide
111
user_guide.book Page 112 Friday, January 30, 2004 11:35 AM
3
Getting Started
Edit Transmitter Path Overhead Bytes
You can set up the path overhead bytes for an individual channel or a
number of selected channels. A unique J1 message can also be defined
for each of the defined channels. Refer to the Telecoms Concepts
chapter at the rear of this manual for descriptions of the STS Path
Overhead bytes.
To edit the path overhead bytes
1 Select the STS POH/HO-POH tab. Select a channel or channels for
editing as follows:
To select a channel:
• position your mouse cursor on the channel of interest and single click
(either left or right mouse key works).
Add/remove a channel from current selection:
• control+click adds the channel under the mouse to the selection (or
removes it, if it is already in the selection)
Select a block of channels
• shift+click selects all the channels between the last selected channel
and the one currently under the mouse.
2 Set up the Path Overhead Bytes once you have selected the
channels of interest.
112
User Guide
user_guide.book Page 113 Friday, January 30, 2004 11:35 AM
3
Getting Started
Default All Bytes Select the Default All Bytes button to set all bytes
to their default value.
Generating a J1 Path Trace Message
You can check for continuity between the transmitting and receiving
ends of a path by transmitting a message in the J1 byte.
The message format can be 16 byte CRC-7 or 64 byte non-CRC. You
can set the trace message to a default value or define your own message.
The default trace message identifies the originating port and channel.
The Port and Channel Numbering scheme is as follows:
• Port: ‘ppp’ [001-999].
• Channel number: ‘ccc’ [001-192] indicates the starting STS-1
number where the channel starts.
User defined string.
They can be up to (and including) 15 or 62 bytes long depending on the
current selected setting of trace mode. The appropriate terminator will
be added. The strings are:
• <inst> - Instrument number (6 characters, taken from configured
name).
• <port> - Port number (6 characters in the format nnnn/n, which is
made up of the rack position, module number and the physical port
within the module).
•
<c> - Channel number (3 digits, leading 0 added if needed).
To generate a J1 trace message
1 Select the STS-POH/HO-POH tab.
2 Select a 16 byte or 64 byte message and enter the required message.
User Message 16 Byte mode: You can enter up to 15 characters. The
system will pad up to 15 with NULL, and add the CRC-7 header.
User Message 64 Byte mode: You can enter up to 62 characters. The
system will pad up to 62 with NULL, and add the <CR><LF>.
User Guide
113
user_guide.book Page 114 Friday, January 30, 2004 11:35 AM
3
Getting Started
Setting up the Receiver
Optical Connector Safety Information
Please be aware of the optical connector safety information before
making connections to the receiver - refer to “Step 5: Connect to the
System Under Test" on page 59.
Optical Power Indicator
Indicates the level of power being received in relation to that required
for a BER measurement. There are three colored regions on the optical
power indicator to indicate power level status for a BER measurement.
• Blue region - low power
• Green region - correct power
• Red - high power
There is also an indication of received Port optical power in the Port
Selection window, adjacent to the yellow Laser icon. You can quickly
check the received power for a port by selecting the port and viewing
the legend in the Power field (it will be U/R under range, OK, high or
damage).
114
User Guide
user_guide.book Page 115 Friday, January 30, 2004 11:35 AM
3
Getting Started
To set up the Receiver interface
To set up the receiver interface
1 Select the Physical tab.
2 Set the Signal Standard and Rate as required.
3 If your system has option 010 fitted you can switch VT/TU Mode
operation on, see “Instrument Setup and Use - VT/TU mode" on
page 133 for more detailed information.
To Set up Receiver channels
Up to 192 channels can be defined for the 10GHz ports (48 for the 2.5
GHz).
Each channel can be defined as ‘selected’ or ‘unselected’.
Measurements are only made on selected channels; any unselected
channels are ignored by the Receiver.
Receiver Auto Discovery
The OmniBER XM receiver Auto Discover feature automatically
detects the mixture of payload types at its input and configures its
channel structure to match the incoming signal.
Configure transmitter channels
You can also quickly set up the OmniBER XM transmitter channels
settings by doing an auto discover on the input signal (perhaps from
equipment under test), and then copying the receiver settings to the
transmitter.
User Guide
115
user_guide.book Page 116 Friday, January 30, 2004 11:35 AM
3
Getting Started
To perform an auto discovery on a receiver input signal
1 Connect a suitable optical input signal to the OmniBER XM receiver
OPTICAL IN port.
2 Select the Channels Setup tab.
3 Select the Auto Discover button. The receiver will quickly align its
channels structure to that of the received input signal.
4 If required you can now copy the receiver setup to the transmitter;
select the ← Copy button.
Set Up Receiver Payload Pattern
The pattern-type can be selected on a per-channel basis, each channel
can be set to one of the following:
User Word: The 16-bit word value is the same for all channels that
contain a word pattern. The Receiver 16 bit User word specification is
identical to the Transmitter.
PRBS23/PRBS23 inverted: The pattern is byte-aligned to the
SONET/SDH frame (but has no specified alignment to the frame).
The Receiver pattern can be inverted or non-inverted. This is selectable
on a per-channel basis.
116
User Guide
user_guide.book Page 117 Friday, January 30, 2004 11:35 AM
3
Getting Started
Live mode
When the pattern is set to 'Live', no pattern measurements (Pattern Sync
Loss and bit errors) are attempted for this channel.
To set up the receiver pattern
1 Click on the Pattern tab to display the Pattern dialog.
2 Position the display cursor on the Receiver channel whose pattern
you wish to select and right click the mouse key. Choose a pattern
from the choices offered in the popup menu. They are:
• PRBS 23 (shown on display as PRBS23 or P)
• PRBS 23 Inverted (shown on display as PRBS23-INV or I)
•
User Word (user definable 16-bit user-word shown on display as
User or U)
• Live (shown on display as Live or L)
3 If you selected User Word type the required 16 bit word in the User
Word fields at the bottom of the Receiver display.
4 Multi-channel selection: To select a range of channels (click on a
channel, then shift click on another channel) and press the spacebar
to toggle through the available choices.
User Guide
117
user_guide.book Page 118 Friday, January 30, 2004 11:35 AM
3
Getting Started
To Monitor Ports for Errors or Alarms
Use the Overview window to quickly check all the chassis/ports in your
current session for errors or alarms. Any errored ports are shown red in
color.
Overview
The chassis and port view are exactly the same except for the layout of
ports. The two views both show the status of all channels on all ports in
the session
The Overview window enables you to quickly check for errored or
alarmed channels/ports. The current and historical error/alarm events
for an individual port/channel is displayed via a popup window when
you position your controller cursor over a port/channel. If you find an
errored or alarmed channel simply double click the left mouse key to
display the E+A window. This allows you to check the full set of alarm
and error events for the selected channel.
Both port and channel measurements can be logged to a file on a
per-second basis along with a timestamp. See “To log events to a
file" on page 127.
118
User Guide
user_guide.book Page 119 Friday, January 30, 2004 11:35 AM
Getting Started
3
Overview Tool Tip Window explained
If you move the cursor onto a channel a ToolTip window gives a display
of current and historical errors. It also gives the position of the channel
currently selected (the one your cursor is sitting over). In VT mode the
whole VT/TUG group is also shown.
How to quickly find and identify errors
1 Select the Overview window.
2 Determine whether you wish to view the chassis in the current
session (select Chassis View) or view the ports (select Port View).
Chassis view represents physical position, port view allows more
ports to be seen at a higher detail.
3 If you have a large number of chassis/ports in your current session
you can use the slider control to adjust the resolution of the display
for better viewing. For an extra large display of the Overview,
Chassis or Port view set the Configuration (on top Tool bar) to
Hide. This hides all the Configuration window settings and allocates
the whole display to the Overview window. To return to showing the
full configuration window select Show.
User Guide
119
user_guide.book Page 120 Friday, January 30, 2004 11:35 AM
3
Getting Started
4 If there are any Transport or Path errors present on a port, there will
be a RED border around the port channel mask. If there are Path
errors then the errored channels will also be shown RED. To
investigate an errored channel further position the controller cursor
on the channel of interest and double click the left mouse key. This
will close the Overview window and open the E+A window.
5 You can now view the errors and alarms for the selected port and/or
channel.
Port Error/Alarm
Mask.
Channels shown
red are errored.
Pink channels
indicate historical
errors.
Blue channel is
currently selected
channel.
Clear History
Select the Clear History button to clear all the historical error/alarm
events.
On selected port only
Select this function to only clear historical errors from a user definable
port. The order in which channels are displayed is automatically sorted
such that those with errors/alarms appear at the top of the list.
120
User Guide
user_guide.book Page 121 Friday, January 30, 2004 11:35 AM
3
Getting Started
Monitoring Receiver Overhead Bytes
You can view a snapshot of all the Transport/Section Overhead bytes
for a selected STS-3/STM-1 channel. This includes TOH/SOH Decodes
values for K1,K2, S1 and J0 bytes, and STS-POH C2, G1 and J1 values.
For SDH the HO-POH decodes values for C2, G1 and J1 are given.
To Monitor Received Overhead bytes
1 Select the OH tab from the Results display area.
2 Select the required STS3 or STM channel. There are three methods
available for quick selection of a channel.
• First - selects the first STS or STM channel.
• User selectable - up/down keys allow you to select the required
channel number, or you can type the number in the box.
• Linked to Path - When you select this option the STS3 position
selected is linked to the channel currently selected in the Selected
Path mask (selected channel is shown blue).
User Guide
121
user_guide.book Page 122 Friday, January 30, 2004 11:35 AM
3
Getting Started
Monitoring J0, J1 Trace Messages
You can check for continuity between the transmitting and receiving
end of a section, STS or VT path by monitoring a message in the J0 or
J1 byte. The message format can be 16-byte CRC-7 or 64 byte
To monitor J0 and J1 overhead bytes
1 Select the OH tab from the Results display area.
2 The J0 Section trace message and J1 Path trace message are
displayed as shown above along with the other bytes.
122
User Guide
user_guide.book Page 123 Friday, January 30, 2004 11:35 AM
3
Getting Started
Viewing Measurement Results
How are Results presented?
Measurements are performed during a measurement period (Gating
period) set by the user, see “Setting a Measurement Gating Period" on
page 130. When a gating period has ended, the final results for each
measurement remain available to the user. When a new gating period is
started, all results are cleared. Results from previous gating periods are
now unavailable.
Section and Line level results are displayed for all receiver ports in a test
session. Path level results are displayed for all selected channels within
a specified receiver port.
Results Format
All results are displayed as follows:
Count: Displays as an integer for counts up to 999,999, then changes to
X.XXX E+nn where 6 ≤ nn ≤ 15.
Ratios: Displays as X.XXX E-nn where 0 ≤ nn ≤ 15.
Total (Cumulative) Results
All results listed for SONET/SDH error results are cumulative totals
over the entire measurement period.
Basic SONET/SDH Error Measurements
Error Counts
Number of errors over the measurement (gating) period.
Error Ratio
Ratio of counted errors to the number of error opportunities in the
measurement period.
Alarms stopping error counting
The following table defines, for each error source which alarms prevent
error counting.
User Guide
123
user_guide.book Page 124 Friday, January 30, 2004 11:35 AM
3
Getting Started
Error Type
Alarms that inhibit error counting
CV-S (B1)/RS-BIP
LOS, LOF
CV-L (B2)/MS-BIP
LOS, LOF, AIS-L/MS-AIS
CV-LFE/MS-REI
LOS, LOF, AIS-L/MS-AIS, AIS-P/AU-AIS,
LOP-P/AU-LOP
CV-P (B3)/Path BIP
LOS, LOF, AIS-L/MS-AIS, AIS-P/AU-AIS,
LOP-P/AU-LOP
REI-P/HP-REI
LOS, LOF, AIS-L/MS-AIS, AIS-P/AU-AIS,
LOP-P/AU-LOP, RDI-P/HP-RDI
Bit
LOS, LOF,AIS-L/MS-AIS, AIS-P/AU-AIS,
LOP-P/AU-LOP, PSL
Pointer Activity Measurements
Pointer Activity Seconds The number of seconds during which a
pointer movement occurred.
Pointer Increment Count The number of pointer increment
adjustments in the measurement period.
Pointer Decrement Count The number of pointer decrement
adjustments in the measurement period.
Pointer Measurement Inhibition
Measurement Type
Alarms that Inhibit Counting
Pointer Increment/Decrement Count LOS, LOF, AIS-L/MS-AIS,
AIS-P/AU-AIS, LOP-P/AU-LOP
To View Pointer Results
1 Select the Counts tab.
2 Select the Select Statistics button.
124
User Guide
user_guide.book Page 125 Friday, January 30, 2004 11:35 AM
Getting Started
3
3 In the Select Basics Statistics dialog window select the STS Path
tab and Pointer Activity. Add PTR-ACT, PTR-INC, PTR-DEC to the
Selected list.
Viewing Port and Channel Statistics
To select port and channel statistics for viewing
1 Select the Counts tab.
2 Select the Select Statistics button.
3 Use the Select Basic Statistics dialog window edit functions to add
or remove Alarm Seconds, Ratios or Count results to the Transport,
STS Path or VT Path selected list. Click on Alarm Seconds and
Error Counts and Ratios to view the statistics available.
The up/down arrows enable you to sort the order in which statistics
appear on the measurements display. For example, the statistics at
the top of the list will appear at the extreme left of the display, next to
the Port column.
Analysis Enhanced RDI-P Mode
The default for this mode is Off. When set to On it affects how B3 errors
are counted. Refer to the Enhanced Remote Defect (RDI) alarm
function (as specified in Telecordia GR-253 CORE issue 3 and ITU-T
G.707) for more details.
To enable analysis enhanced RDI-P mode
1 Select the Advanced Setup button (next to Copy Port Setup To
button).
2 Click in the Analysis Enhanced HP-RDI Mode box.
User Guide
125
user_guide.book Page 126 Friday, January 30, 2004 11:35 AM
3
Getting Started
Viewing the Analysis of SONET/SDH Errors and Alarms
The OmniBER XM provides the following types of error analysis.
• G.826 and G.828.
• GR-253.
You can select one of these standards per port for analysis but not both.
The choice is independent of the SONET/SDH Signal Standard setting
in the OmniBER XM Receiver.
Results Presentation
Analysis measurements are made during a measurement period (gating
period). When a measurement period has ended, the final results for
each statistic are available either via the GR-253 and G.828 tabs on the
results display, or via the system API. When a new measurement period
is started, all results are cleared. Results from previous measurement
period are now unavailable.
Analysis results are updated once per second. Section/Regenerator and
Line/Multiplex path level results are displayed for all Receiver ports in a
test session. STS-Path/HO-Path level results are displayed for all
selected channels within the currently selected port.
To view the analysis of results
1 Select the GR-253 or G.828 tab as required.
2 To set the analysis mode click on the All Ports GR-253 or All Port
G.828 buttons to set all ports to the mode selected or click on the
Analysis Mode button and set selected ports as required.
3 Click on the Select Statistics button and choose the Section and HO
Path Statistics to be displayed. Use the Add/Remove keys to move
statistics within the Selected list.
4 Click OK when finished.
5 Click on the Start gating button to obtain Analysis results.
126
User Guide
user_guide.book Page 127 Friday, January 30, 2004 11:35 AM
3
Getting Started
To log events to a file
You can log error results, alarms and statistics which have occurred
during a measurement period to a file. Logging is only enabled during a
measurement (gating) period. Results are logged to a file in text format
(.csv).
Types of Logging
The following items are logged
• Alarm Second Events
• Error Events
• Reports (Statistics)
The OmniBER XM system controller logs each of these items in
separate files.
Alarm Second Event Logs and Error Second Event Logs are
created/written as they happen in real time. You can choose to log either
or both.
Statistic Reports are produced and logged at pre-determined intervals
during gating, and also at the end of a period. The interval between
reports is set by the user. The minimum configurable interval is 10
minutes and the maximum 1 hour (in seconds). All results are
cumulative over the entire measurement (gating) period.
Alarm Events
These events are recorded along with a time stamp indicating when they
occurred. Minimum resolution for event reporting is one second. Both
the start and end of an event is logged. The start is logged as a SET
event and the end as a CLEAR event.
Error Second Events
These events are also recorded along with a time stamp indicating when
they occurred. Minimum resolution for event reporting is one second.
These events are logged on a per second basis. That is every second in
which there was at least one occurrence of that event is logged. A count
of the number of each event in that second is also logged.
User Guide
127
user_guide.book Page 128 Friday, January 30, 2004 11:35 AM
3
Getting Started
What is not logged
Any unselected port, and any channels within a Receiver port which are
unselected (unequipped) are not included in the logging process.
To log errors, alarms and statistics results to a file
Result events are logged during and at the end of a measurement period.
Set up and enable logging before you run a test.
You must first set up logging to log the type of results events (errors,
alarms or statistics) for your current measurement. Then choose a log
event file name, and destination where you wish to save the logged file
of results.The final step is to select from which ports to log results and
the type of result events to be logged.
To set up logging
1 From the Toolbar select File then Configure Logging.
In the Logging Configuration window determine whether you wish
to enable:
• Error Event Logging
• Alarm Event Logging or
• Statistics Report Logging
Click in the appropriate boxes as required. When you enable a
logging event the ports selected for logging are those that were
selected the last time you configured that event.
Select which events to log
2 Click on the Options button for each event you wish to log, and
choose from the menu of events listed. If you choose to log statistics
you can set up to log events at pre-determined intervals during
gating, and also at the end of a period. Use the Interval (secs) spin
control or type a value to set up a time interval (600 to 3600
seconds).
Save events to a file
3 You can save the logged results of error, alarm or statistics events to
a file. With the Logging Configuration dialog still open click on the
File button for any events logging that you wish to save to a file.
128
User Guide
user_guide.book Page 129 Friday, January 30, 2004 11:35 AM
3
Getting Started
4 Choose a File name (files are saved in .csv format which can be
viewed in Microsoft Excel).
5 Choose where you wish to save the file. The default is to save the file
in C:/Programs/Agilent/OmniberXM/data. The file path you choose
is displayed in the Logging Configuration window.
Note: If the file already exists, any previous log data will be
overwritten
Port Selection
You can choose the type of events to be logged for each port.
Select results to be logged
6 In the Port Selection window click on the All button for a logging
event (errors, alarms or statistics) to configure all the ports in your
current session to log that event. Select None to disable logging for
all ports for the chosen event. You can also configure events for
individual ports by clicking in the event columns for the required
port.
7 Logging only occurs during a measurement (Gating) period.
Configure your system to perform a measurement, start gating and
then view the results in your chosen log file at the end of the
measurement.
User Guide
129
user_guide.book Page 130 Friday, January 30, 2004 11:35 AM
3
Getting Started
Setting a Measurement Gating Period
Measurement Gating System
Measurements are made on a per port basis but controlled on a per
session basis. That is, for every port in a session, individual
measurements are gathered and maintained. However, every port
allocated to a session will make those measurements simultaneously.
Measurement Period
The measurement period (gating duration) is the block of time over
which a measurement is made. There are two methods for setting this
time - Single Measurement Mode and Continuous Measurement Mode.
Single Measurement Mode (Once)
Allows you to set the time over which a measurement is made. Once a
gating period is started it will automatically terminate when the time
you defined has elapsed.
Continuous Measurement Mode
In this mode a gating period is controlled manually via the Gating,
Start and Stop buttons
.
To set up and control a gating period
1 On the OmniBER XM ToolBar select the Gating Setup button.
2 Select Continuous or Once as required. If you select Once also set
the Test Duration.
3 To start a measurement select the Start button, to stop select Stop.
130
User Guide
user_guide.book Page 131 Friday, January 30, 2004 11:35 AM
Getting Started
3
Viewing Service Disruption Time
Definition
Service Disruption is the time from the first error in a burst to the last
error. The last error is considered to have happened after an error-free
‘Guard Time’ has elapsed. For a more detailed description of Service
Disruption and the testing methods refer to the Telecoms Chapter in this
guide.
Service Disruption with PRBS or User Word payloads
When a PRBS payload is used, the service disruption time can be
measured in all selected channels simultaneously. Service disruption
measurements are also available with 16-bit word payloads but it is not
advisable to use an all-ones pattern because most network equipment
will send all-ones when a switchover is in progress, and this will
emulate a good payload.
Result Updates
Results are available on a per-second basis. A result is reported in the 1
second interval during which the service disruption ends. The
OmniBER XM display gives results for each channel of Last Time and
Max Time.
Last Time The duration of the last error burst detected in each
1-second interval during the test.
Count
gating.
Displays the number of disruptions measured since the start of
Max Time The duration of the longest error burst detected in the
current measurement (gating) period.
To view service disruption time
1 Select the SRV-DIS tab.
2 Refer to “APS Measurements" on page 203 for detailed instructions
on how to perform a measurement.
User Guide
131
user_guide.book Page 132 Friday, January 30, 2004 11:35 AM
3
Getting Started
To close a session
The OmniBER XM allows you to close a session or leave the session
active. Before you exit the session you can also save the current session
configuration to a file (.xml).
Closing a session
If you choose the Close a session option both the GUI and the session
close down completely. If you have not saved the configuration for the
session in a file the configuration is lost.
Leaving the session active
If you choose to Leave the session active the GUI closes down but the
session stays active. When you next start up the GUI and a Test Session
you can select the Connect to an existing session option and return to
the active session.
To close a session
1 On the OmniBER XM Toolbar select File then Exit.
2 Determine whether you wish to close the session or leave the
session active. Select the required option.
3 Decide whether you wish to save the current test configuration in a
file before exiting. If No select Exit, if Yes select Save then exit.
To save a Session’s configuration in a file
1 Select File, Save or if closing a session and you wish to save, select
the Save then exit button.
2 Enter a name for your file in the File name field.
3 To add a comment click on the Port field then on the Comment field
(under Comment), and enter the required text.
4 Determine whether you wish to save a Complete or Partial Session.
If you select a Partial Session also select from the list of Settings
those that you wish to save.
132
User Guide
user_guide.book Page 133 Friday, January 30, 2004 11:35 AM
Agilent J7241A OmniBER XM
User Guide
4
Instrument Setup and Use - VT/TU
mode
“Port and Channel Numbering Scheme" on page 134
“Setting up the VT/TU/PDH Transmit/Receive Interface" on page 135
“Setting VT/TU Pointer Bytes" on page 140
“Edit VT /LO Path Overhead Bytes" on page 142
“Generating a J2 Path Trace Message" on page 144
“Viewing VT/LO/PDH Path Errors" on page 145
“Viewing VT/LO/PDH Alarms" on page 145
“Monitoring Received VT/TU Path overhead bytes" on page 146
“Measuring Service Disruption in a PDH system" on page 147
“Detecting Path Routing Faults" on page 148
This chapter describes how to set up the OmniBER XM (J7244A/45A
Option 010) for VT/TU operation.
Agilent Technologies
133
user_guide.book Page 134 Friday, January 30, 2004 11:35 AM
4
Instrument Setup and Use - VT/TU mode
Port and Channel Numbering Scheme
SONET LO Channel Numbering
On the instrument GUI, LO channels will be numbered according to the
GR.253 VT numbering scheme. This scheme numbers the constituent
channels of an SONET STS signal based on VT-groups.
There are 7 VT-groups in an STS-1, and the VT channels within a
VT-group are numbered with a 2-digit scheme, B, A where B represents
the VT-group number and A represents the VT number within the
group:
• VT1.5 channels in an STS-1 are numbered 1,1 through 7,4
• VT2 channels in an STS-1 are numbered 1,1 through 7,3
• VT3 channels in an STS-1 are numbered 1,1 through 7,2
• VT6 channels in an STS-1 are numbered 1,1 through 7,1
SDH LO Channel Numbering
On the instrument GUI, LO channels will be numbered according to the
G.707 TUG numbering scheme. This scheme numbers the constituent
channels of an SDH VC signal based on TUG positions.
For a VC4 signal, there is a 3 digit scheme C, B, A where C represents
the TUG3 number within the VC4, B represents the TUG-2 number
within the TUG-3, and C represents the TU11 or TU12 number within
the TUG-2. For a TU channel that occupies whole TU group, its number
within that group is designated '0'. For example:
• TU11 channels in a VC4 are numbered 1,1,1 through 3,7,4.
• TU12 channels in a VC4 are numbered 1,1,1 through 3,7,3.
• TU3 channels in a VC4 are numbered 1,0,0 through 3,0,0
For a VC3 signal, there is a 2 digit scheme B, A where B represents the
TUG-2 number within the VC3, and C represents the TU11 or TU12
number within the TUG-2. For TU channels that occupy whole TU
groups, their number within that group is designated '0'. For example:
• TU11 channels in a VC3 are numbered 1,1 through 7,4.
• TU12 channels in a VC3 are numbered 1,1 through 7,3.
134
User Guide
user_guide.book Page 135 Friday, January 30, 2004 11:35 AM
4
Instrument Setup and Use - VT/TU mode
Setting up the VT/TU/PDH Transmit/Receive Interface
To set up the transmitter/receiver interface for VT/TU operation
1 Select the Port you wish to set up for VT/TU operation (see “To Start
a session" on page 81 for advice on starting a session and selecting
ports).
2 Select the Physical tab.
3 Set the Transmitter and Receiver Signal Standard to SONET or
SDH as required.
4 Set the Signal Rate as required.
To set Line Rate Offset
5 You can offset the Transmitter Line Rate by plus or minus 100 ppm.
The resolution is 1ppm. Click on the Edit button then enter the value
required and click on OK.
To set transmitter/receiver for VT/TU operation
6 On the transmitter set the Mode Type to Terminal and VT/TU
Mode to On.
7 On the receiver set VT/TU Mode to On.
Port Laser Control
8 You can switch off or on the laser for the selected Port by clicking on
the Laser button, or the Laser On icon on the Toolbar.
To set Clock Source
9 Set the Clock Source to Internal (Global) or Recovered as required.
To set up VT/TU mappings within individual channels
1 Click on the Channels setup tab.
2 Position the display cursor on the desired channel then click the right
mouse key, and select from the choices given in the menu. The
choices offered are ones that are valid for the selected channel.
When you position the cursor over a channel a ToolTip box appears
giving interface settings for the selected channel.
For SDH, AU3 and AU4 are selectable:
AU3 - You can select a TU-11, TU-12 or Direct Mapping
User Guide
135
user_guide.book Page 136 Friday, January 30, 2004 11:35 AM
4
Instrument Setup and Use - VT/TU mode
AU-4 - you can select a TU-11, TU-12 or TU-3.
For SONET VT1.5 and VT2 are selectable.
You can also set up VT/TU channels using the Advanced Channel
Configuration dialog - select the Advanced button in the Channels
dialog window and use the VT/TU Preview Text dialog to set up the
channels.
Note Direct mapping is where non VT/TU structured DS3/E3 PDH
signals are mapped into STS-1/AU-3 signals.
Selected and Unselected Channels
Each LO channel can be defined as Selected or Unselected. Any
unselected channels are set to VT/TU Unequipped (that is all payload
and LO path overhead bytes are set to 00h, but the VT/TU pointer is the
same as that in the selected channels). Selected channels contain a full
LO POH and payload. All channels can be selected (up to 1344
VT1.5/TU11 in an OC48/STM16 for example).
Any changes to the transmitter channel configuration will take effect
with no intermediate states.
To select/unselect VT/TU channels
1 Click on the Channels setup tab.
2 To toggle a channel between Selected and Unselected, click on the
channel of interest, and then double click the left mouse key to
change the selection. You can also select and unselect a channel
using the spacebar. To select a block of channels click on the first
channel, then shift click on the last channel. If you view the Tooltip
window for the selected channel you will see the “Selected” field
change from No to Yes or Yes to No.
Set up Transmitter/Receiver Payload Mapping
To select transmitter and receiver VT/TU payload mapping
1 Check you have set VT/TU Mode to On in the Physical tab window.
2 Select the Channels tab and then the Mappings button.
3 Double click on the Tx Mapping or Rx Mapping field for the
VT/TU Type you wish to set up, and select from the drop down
menu. The options available are given in the following Table.
136
User Guide
user_guide.book Page 137 Friday, January 30, 2004 11:35 AM
Instrument Setup and Use - VT/TU mode
VT/TU
User Guide
Tx Mapping
4
Rx Mapping
VT1.5/TU11
DS1ASYNC SF,
DS1 ASYNC ESF,
DS1 ASYNC UNFRAMED,
Bulk Filled
DS1 ASYNC SF,
DS1 ASYNC ESF,
DS1 ASYNC UNFRAMED,
Bulk Filled
VT2/TU12
E1 ASYNC UNFRAMED,
E1 ASYNC CRC ON,
E1 ASYNC CRC OFF,
Bulk Filled
E1 ASYNC UNFRAMED,
E1 ASYNC CRC ON,
E1 ASYNC CRC OFF,
Bulk Filled
TU3
E3 ASYNC UNFRAMED,
DS3 ASYNC UNFRAMED,
DS3 ASYNC M23,
DS3 ASYNC CBP
Bulk Filled
E3 ASYNC UNFRAMED,
DS3 ASYNC UNFRAMED,
DS3 ASYNC M23,
DS3 ASYNC CBP
Bulk Filled
AU-3/STS-1
E3 ASYNC UNFRAMED,
DS3 ASYNC UNFRAMED,
DS3 ASYNC M23,
DS3 ASYNC CBP
E3 ASYNC UNFRAMED,
DS3 ASYNC UNFRAMED,
DS3 ASYNC M23,
DS3 ASYNC CBP
137
user_guide.book Page 138 Friday, January 30, 2004 11:35 AM
4
Instrument Setup and Use - VT/TU mode
Adding VT/TU LO Path Errors to the transmitted signal
Errors can be added to any combination of the selected transmitter
channels. Only one error type at a time can be injected. The following
VT/TU errors can be added to the transmitted signal:
Sonet VT Path Errors
Mapping
VT1.5, VT2, TU-3
Error
CV-V (BIP), REI-V
SDH LO Path Errors
Mapping
Errors
TU-11, TU-12, TU-3
TU-BIP, LP-REI
To add VT/LO path errors
1 Ensure that you have switched on VT/TU Mode on the Physical tab
for the selected port.
2 Click on the E+A Inject tab.
3 Select LO Path (SDH) or VT Path (Sonet) and choose the Type of
error.
4 Select a Rate for each Payload.
5 If you wish to error selected channels only, use the Path Errors and
Alarms Mask to select the required channels (see “Selecting which
channels to insert Path errors/alarms" on page 100).
6 Click on the Error Rate On button to transmit the selected errors, or
the Single Error Add button to inject single errors.
138
User Guide
user_guide.book Page 139 Friday, January 30, 2004 11:35 AM
4
Instrument Setup and Use - VT/TU mode
Adding Alarms to the transmitted signal
Only one alarm type can be enabled at a time. The alarms can be added
to any combination of the selected channels using the Path Errors and
Alarms Mask. You can add the following VT/LO Path Alarms,
H4-LOM is also added to the list of alarms for the Sonet ‘STS Path’ and
the SDH ‘HO Path’.
SDH
LO Path
TU-AIS, TU-LOP, LP-RDI, LP-UNEQ, LP-RFI
PDH
AIS, LOF
SONET
VT Path
AIS-V, LOP-V, RDI-V, UNEQ-V, RFI-V
PDH
AIS, LOF
To add alarms to a DSn/PDH signal
1 Ensure that you have switched on VT/TU Mode on the Physical tab
for the selected port.
2 Click on the E+A Inject tab.
3 Select LO Path (SDH) or VT Path (Sonet) or PDH and choose the
type of alarm.
4 If you wish to alarm selected channels only, use the Path Errors
and Alarms Mask to select the required channels (see “Selecting
which channels to insert Path errors/alarms" on page 100).
5 Click on the Add Alarms, Alarm button to transmit the selected
alarm
User Guide
139
user_guide.book Page 140 Friday, January 30, 2004 11:35 AM
4
Instrument Setup and Use - VT/TU mode
Setting VT/TU Pointer Bytes
VT/TU pointer occupy the V1V2 bytes for all mappings except TU3,
which occupy H1,H2 bytes in a fixed location within the TUG3. In both
cases the pointer bytes are treated as a single 16-bit word whose
function is very similar to that of the AU pointer. The pointer bits are
numbered as follows:
Pointer Bits (numbered 1-16)
Use
bits 1-4
New data flag
bits 5-6
SS (pointer size) bits
bits 7-16
10-bit pointer value
Transmitter Pointer
A single pointer value is transmitted in all VT/TU channels of a given
VT/TU type (that is there is one value for VT1.5/TU11, another value
for VT2/TU12, and another for TU3). The following operations are
available, independently on each pointer type.
• Increment
• Decrement
• New Pointer Value with or without NDF
When the pointer value for a given pointer type is moved. It moves
simultaneously in all channels of that type at once.
Pointer SS Bits
The SS (pointer size) bits indicate VT/TU type as follows:
SS Bits
Size
00
(VT6/TU2)
10
VT2/TU12
11
VT1.5/TU11
The SS bits for TU3 are not used and are transmitted as 10.
140
User Guide
user_guide.book Page 141 Friday, January 30, 2004 11:35 AM
4
Instrument Setup and Use - VT/TU mode
Pointer Range
The VT/TU pointer range for each supported channel type is:
• VT1.5/TU11: 0 - 103
• VT2/TU12:
• TU3:
0 - 139
0 - 764
To adjust VT/TU pointer values
1 Ensure you have VT/TU Mode selected in the Physical tab window.
2 Select the TOH/SOH tab.
3 In the VT/LO Pointer Control dialog window click on the drop
down menu arrow and select the required VT/TU.
4 Use the VT/LO Pointer Control -1 or +1 buttons to increment or
decrement the pointer value, or select the Edit Pointer button and
enter a new value.
User Guide
141
user_guide.book Page 142 Friday, January 30, 2004 11:35 AM
4
Instrument Setup and Use - VT/TU mode
Edit VT /LO Path Overhead Bytes
Path Overhead Byte Access
You can set up the VT/TU path overhead bytes for an individual
channel or a number of selected channels. Every POH byte in every
channel can be set to a unique value.
VT1.5/TU11/VT2/TU12 POH settings
For any chosen channel, any POH byte except V5 and J2 can be
individually set. The selected byte can be set to a value in the range 00 FF hex.
To edit the VT/TU path overhead bytes
1 Select the VT POH/LO POH tab.
2 Use the ‘Selected Path’ mask to select a channel or channels for
editing as follows:
To select a channel
Use the zoom feature - click on x at corner of mask for a larger display.
• position your mouse cursor on the channel of interest and single click
(either left or right mouse key works).
Select a block of channels
• shift+click selects all the channels between the last selected channel
and the one currently under the mouse.
142
User Guide
user_guide.book Page 143 Friday, January 30, 2004 11:35 AM
4
Instrument Setup and Use - VT/TU mode
• Ctrl A highlights all the channels.
• You can also use the keyboard arrow keys and the home and end
buttons to navigate around the channels.
3 Set up the following Path Overhead Bytes once you have selected
the channels of interest.
SONET: V5, Z6, Z7 and J2 (see “Generating a J2 Path Trace
Message" on page 144).
SDH: V5, J2, N2 and K4.
Default All Bytes
Select the Default All Bytes button to set all bytes to their default value.
User Guide
143
user_guide.book Page 144 Friday, January 30, 2004 11:35 AM
4
Instrument Setup and Use - VT/TU mode
Generating a J2 Path Trace Message
You can check for path routing faults, following for example a
protection switching event by monitoring the content of the J2 byte.
Refer to “To monitor J2 path routing" on page 148 for instructions on
how to capture and monitor the J2 byte.
To generate a J2 path trace message
1 Select the VT POH/LO POH tab.
2 Enter the required 16 byte message for each low order path or select
a preset default message. Selecting the Default Message button calls
up a default message which identifies the originating port and HO
and LO channel.
3 If you set the transmitter to SDH mode with TU Mode enabled and
then select an AU4 and TU3 channels, when you select the LO-POH
tab and select a TU3, the number of bytes displayed changes to 9
with a 16 byte or 64 byte J1 Path Trace Message offered.
144
User Guide
user_guide.book Page 145 Friday, January 30, 2004 11:35 AM
4
Instrument Setup and Use - VT/TU mode
Viewing VT/TU Measurement Results
Viewing VT/LO/PDH Path Errors
Use the following procedure to view low order path errors.
To view VT/LO path errors
1 Ensure VT/TU Mode is set to On in both transmitter and receiver
(selectable via the Physical tab).
2 Select the E+A tab and view which Ports or Channels are errored
(errors are shown red in color).
3 Click on an errored port or channel, or select the Counts tab and then
select a port.
4 Use the Port mask to select individual channels for viewing.
For an enlarged Port mask display making it easier to select channels
click on the zoom icon at the top right corner of the Port mask.
For SONET - STS Path and VT Path errors are displayed.
For SDH - HO Path and LO Path errors are displayed.
PDH-LOF and PDH-AIS results are given at the extreme right of the
VT Path/LO Path display.
Viewing VT/LO/PDH Alarms
You can view the time alarms are active as follows:
To view VT/LO/PDH alarms
1 Select the E+A tab in the Results part of the display.
2 Select the port you which to check for alarms.
3 View the alarms present in the VT/LO path results display.
4 Use the Port mask to select individual channels.
User Guide
145
user_guide.book Page 146 Friday, January 30, 2004 11:35 AM
4
Instrument Setup and Use - VT/TU mode
Monitoring Received VT/TU Path overhead bytes
You can view a snapshot of all nine of the STS POH bytes for any
chosen channel, and also the VT/LO POH bytes (V5, Z6, Z7, J2 for
SONET and V5, N2, K4, J2 for SDH) for any chosen channel.
To monitor received VT/LO POH bytes
1 In the Measurements/Results window, select the OH tab.
2 Select the required Port.
3 Select the required SOH/TOH. There are three methods as follows:
• First - selects the first STS-3 or STM-1.
• User selectable - up/down keys allow you to select the required
STS-3/STM-1 (1-16), or you can type the number in the box.
• Linked to Path - When you select this option the position selected is
linked to the STS-3/STM-1 currently selected in the Selected Path
mask (selected channel is shown blue).
4 Click on the required VT/TU channel to observe the VT/LO POH
bytes for the selected channel. For easier selection of individual
VT/TU channels - use the zoom feature to give an enlarged Port
Mask. Click on the icon at the top right corner of the mask.
146
User Guide
user_guide.book Page 147 Friday, January 30, 2004 11:35 AM
4
Instrument Setup and Use - VT/TU mode
Measuring Service Disruption in a PDH system
You can measure the time it takes (service disruption time) for the
automatic protection switch (APS) circuit to detect and activate the
standby equipment when a fault occurs.
To view service disruption time
1 Select the SRV-DIS tab.
Set up Guard Time
2 The guard time which is used to define the end of an error burst can
be set between 100ms and 1600ms in 1ms steps. You can define it
for All Ports in a session or for a Selected port only (select the On
selected port only box).
3 Select the Guard Time Edit button and enter the required value.
Set Warning Threshold
You can set a Warning Threshold - any channels which have a service
disruption time equal to or above your pre-set threshold will be
displayed red in color in the Port mask and in the VT/LO Path Max
Time and Last Time columns.
4 If required set a Warning Threshold value.
5 Start a measurement - select the Gating: Start button.
6 Verify error-free reception of the PRBS test pattern (select the
Overview tab - Chassis View and check for a red border or channels
indicating errors).
7 Invoke a protection switch on a working section of the equipment
under test that is transporting the PRBS.
8 Select the SRV-DIS tab, view the list of ports in your session and
check if the Max Time field gives a value for any port.
9 Select any port that has SRV-DIS flagged and view the Max Time,
Last Time and Count and results in the channel list window. You
can use the Port channel mask to quickly examine the results for a
particular channel.
10 Select Gating: Stop when you wish to end the measurement.
User Guide
147
user_guide.book Page 148 Friday, January 30, 2004 11:35 AM
4
Instrument Setup and Use - VT/TU mode
Detecting Path Routing Faults
You can use the J2 byte to check for continuity between the transmitting
and receiving ends of a VT/LO path.
You must first configure a set of reference Expected J2 path trace
messages. When you start a J2 test the OmniBER XM compares the
expected J2 path trace messages with the captured (current) measured J2
path trace messages and produces a result indicating whether there are
any received J2’s in error (mismatched).
Set up Expected J2 Path Trace messages
You can set up the expected J2 Path Trace messages either by entering a
message manually, or by copying the message from the Tx of another
port or the Rx input for the currently selected port. See “Generating a J2
Path Trace Message" on page 144.
To monitor J2 path routing
1 Select the Connectivity tab (click on the > arrow at the extreme right
of the Tool bar) if this tab is not visible.
Note: to make it easier to see the full width of the Connectivity display,
try selecting the Configuration, Hide icon on the OmniBER XM
Toolbar. Select Configuration, Show to return to the normal display.
2 If you wish to perform a test on only one port, select the port, then
click in the On selected port only box. Otherwise all ports in the
current session will be tested for a J2 mismatch.
3 Determine the Expected Path Trace message from one of the
following methods:
From the Copy Expected Messages window select either:
• From: Tx on (current port, or select a port from the drop down menu
if there are other ports with the same channel configuration).
• From: Current Rx.
If you select the All Ports box then the Path Trace messages for all ports
in the current session are copied as Expected Path Traces messages.
148
User Guide
user_guide.book Page 149 Friday, January 30, 2004 11:35 AM
4
Instrument Setup and Use - VT/TU mode
• you can also enter a Path Trace message manually, by clicking on the
VT Path, Expected Path Trace field for a chosen channel and then
editing the message via the keyboard.
4 If you chose to copy J2 Path Trace messages from the signals at the
Tx or Rx ports, select the Copy Now button.
Compare J2’s
5 Click on the Start Test button. The expected J2 Path Trace messages
are compared with the measured J2 Path Trace messages and the
results given as the number of VT Mismatches for each Port and also
a Pass or fail for each Channel.
View the number of Mismatches for each Port and also the Pass or Fail
result for each Channel. The Port mask highlights in red any channels
which have a J2 mismatch between the expected and measured J2’s. If
you click on an errored (red) VT/TU channel, the channel is highlighted
in the VT Path Results display.
User Guide
149
user_guide.book Page 150 Friday, January 30, 2004 11:35 AM
4
150
Instrument Setup and Use - VT/TU mode
User Guide
user_guide.book Page 151 Friday, January 30, 2004 11:35 AM
Agilent OmniBER XM Network Simulator
User Guide
5
Remote Access
Types of Remote Access, page 153
Desk and Home Access, page 156
Troubleshooting Remote Access, page 157
Step 1: Configure the Tester, page 158
To configure the tester for network access, page 158
To change the IP address of the hub card, page 160
To set up a VNC server, page 162
To set up a DCOM server, page 163
Step 2: Configure the Remote Computer, page 170
To use the API remotely on page 171
To set up a VNC client, page 172
To set up a DCOM client, page 174
To access the online help remotely, page 177
This chapter provides information on how to configure the network
simulator for remote operation and access.
NOTE
It is recommended that you consult your system administrator to ensure
correct configuration of the network simulator on your network, and to
determine any security restrictions to networking the tester.
Agilent Technologies
151
user_guide.book Page 152 Friday, January 30, 2004 11:35 AM
5
Remote Access
Remote Access
The network simulator software provides both a Windows-based
Graphical User Interface (GUI), as well as an Application Programming
Interface (API) that allows you to automate tests, for example, to:
• run tests that would be too tedious or imprecise to do manually or
repeatedly through the Graphical User Interface (GUI)
• integrate tests with larger test suites that access other test equipment
and Systems Under Test
• repeat tests for subsequent product builds
• regression test new versions or releases of products
You might want remote access if:
• the tester is in a lab and you want to access it from your desk or home
• you want to use a UNIX workstation to run tests
• several users want to run tests at the same time
• you want to run test scripts remotely
The network simulator rack-mount controller comes with two 10/100
Mb/s Ethernet ports:
• Port #1: Connects to your company LAN.
• Port #2: Connects to the tester switch, which in turn connects to the
network simulator modules.
The Ethernet port configured for your LAN is labelled “To LAN”. If
you have not already, connect this port to your LAN.
This chapter describes:
• different methods of remote access
• how to use the different methods for desk or home access
• how to set up the tester and remote computers for remote access
152
User Guide
user_guide.book Page 153 Friday, January 30, 2004 11:35 AM
Remote Access
CAUTIO N
5
Consult with your system administrator to ensure correct
configuration of the network simulator on your network and to
determine any security restrictions to networking the tester. You will
need to obtain for the tester:
a network IP address
domain or workgroup
unique host/computer name
Please note that when setting up a DCOM server and client you must
ensure that both the tester and remote computers are on the same
network and belong to the same domain or workgroup.
When using the API remotely ensure that the tester and remote
computer are both in the same network.
Types of Remote Access
API access
To accommodate different customer preferences, two API syntax styles
are available within the single command set:
• SCPI based syntax
• TCL syntax
The tester’s API allows several remote users to launch separate test
sessions from remote PCs or UNIX workstations. The GUI is not used.
You must install SCPI, Tcl/Tk and the tester’s Tcl package on the
remote computer — see “To use the API remotely” on page 171.
User Guide
153
user_guide.book Page 154 Friday, January 30, 2004 11:35 AM
5
Remote Access
GUI access
VNC
— remote GUI
Virtual Network Computing (VNC) is a freely available product from
AT&T Research. VNC allows a single user to access the controller PC’s
Windows desktop from a remote PC, UNIX workstation, Linux
workstation, or Macintosh. VNC also supports remote control through
web browsers. VNC is suitable if only one user wants to control the
tester at any given time. If several users try to access the tester at the
same time, they will all see the same desktop and be competing for
control of the mouse and keyboard.
You must install VNC software on the tester’s controller PC and remote
computer — see “To set up a VNC server” on page 162 (for the tester)
and “To set up a VNC client” on page 172 (for remote computers).
DCOM
— remote GUI
The Distributed Component Object Model (DCOM) is a built-in
Windows capability that allows PCs to control COM-based applications
on other PCs. DCOM allows several remote users to launch separate,
remote instances of the tester GUI. Each launches a separate test session
on the tester and can select a different set of test port interfaces. Thus,
users do not interfere with others' sessions. Note that, unlike VNC,
DCOM does not allow remote access to non-COM applications like the
Diagnostics Tool.
You must install and use the tester software on the remote PC and thus,
the remote PC must be running Windows 2000 — see “To set up a
DCOM server” on page 162 (for the tester) and “To set up a DCOM
client” on page 172 (for remote computers).
Terminal Services
-remote GUI
Terminal Services (TS) is a Microsoft Windows 2000 utility that allows
several users to log in from remote computers and establish separate
desktop instances on the TS computer to control its software. Remote
desktops are provided through thin terminal-emulator clients.
Controllers shipped with OmniBER XM software installed have the TS
software pre-installed (it does however have to be enabled by the user).
If you want to use TS on a controller that does not have the software,
154
User Guide
user_guide.book Page 155 Friday, January 30, 2004 11:35 AM
Remote Access
5
you must install the TS software. Note: TS is not supported on
OmniBER XM laptop controllers. For more information see “To set up
the TS server" on page 167 and “To set up a TS client" on page 175.
User Guide
155
user_guide.book Page 156 Friday, January 30, 2004 11:35 AM
5
Remote Access
Desk and Home Access
You may access OmniBER XM network simulator from your desk or
home. The tester may be connected to your office LAN directly or
through a lab LAN. The office LAN in turn may be connected via a
WAN (Internet, VPN) to your home:
The Lab
Your Desk
The tester’s Server
(aka. controller)
Lab
LAN
OR
Router
Office
LAN
Home
WAN
Client
Client
You may use the different methods of remote access as follows:
Desk Access
API
Advantages:Multiple concurrent users, cross-platform support, programmable
VNC
Advantages: Control of all tester software, cross-platform support. Limitation:
One user at a time, performance
DCOM
Advantage: Multiple concurrent users. Limitations: Control of network
simulator GUI only, PCs running Windows 2000 only.
Home Access
156
API
Advantages: Multiple concurrent users, cross-platform support
VNC
Limitations: One user at a time, works only if the WAN can access the tester
connecting the lab LAN, performance
DCOM +
VNC
You set up a DCOM session from the desktop PC, then use VNC from home to
control the desktop PC. Advantages: Works even if the WAN cannot access the
Lab Router, faster than using only VNC, allows multiple concurrent users (each
uses their own desktop PC).
User Guide
user_guide.book Page 157 Friday, January 30, 2004 11:35 AM
5
Remote Access
Troubleshooting Remote Access
Before setting up remote access, beware of these potential problems::
Potential Problem ...
Troubleshooting ...
Duplicate 10.x.x.x IP addresses.
10.x.x.x
LAN
/ WAN
10.x.x.x
10.x.x.x
Client
Server
Reversed binding order of LAN ports.
#2
#1
LAN
/ WAN
DHCP client uses incorrect LAN IP address
LAN
/ WAN
User Guide
127.0.0.1
The tester uses IP addresses in the subnet 10.x.x.x/8 to
control its test interfaces. A DHCP server on the tester
PC dynamically assigns each network simulator test port
an IP address from this subnet. If you are also using
10.x.x.x addresses in your test lab/LAN or to connect
remote clients through a VPN, you must avoid
addressing conflicts by changing the subnet addresses
used by the tester.
See “To change the IP address of the switch card” on
page 160.
The tester’s DCOM software is sensitive to the order of
LAN interfaces. The LAN interface that connects your
test lab/LAN (which in turn connects remote clients)
must be first in the tester’s network binding order. The
LAN interface that connects the test interfaces must be
second. Otherwise, remote clients will not be able to
connect to the tester software. The order is configured
properly on controllers from Agilent.
See “To change the binding order of network ports” on
page 192.
A known problem with Windows 2000 causes the
DHCP client to ignore the address assigned by DHCP
when interacting with DCOM on a Windows 2000 client
PC. Instead, the client PC uses the default address,
127.0.0.1, which prevents the controller PC from
connecting to the Windows 2000 client PC.
There are two possible fixes:
Use a static IP address on the Windows 2000 client PC
instead of DHCP.
Install the Microsoft’s hotfix Q299407 on the Windows
2000 client PC.
To install the hotfix: download and install Windows
2000 Service Pack 2, if you have not already and then
execute Q299407_W2K_SP3_x86_en.exe.
157
user_guide.book Page 158 Friday, January 30, 2004 11:35 AM
5
Remote Access
Step 1: Configure the Tester
A summary of the tasks:
• “To configure the tester for network access” on page 158
• “To change the IP address of the switch card” on page 160
• “To set up a VNC server” on page 162
• “To set up a DCOM server” on page 163
• “To set up the TS server" on page 167
To configure the tester for network access
Log into the tester using the Administrator account, which has the
required administrator privileges. You must set up the tester with the
following:
IP address
If your lab is set up to use:
• DHCP: Set up the tester to use its DHCP client software to obtain an
IP address dynamically from your LAN’s DHCP server. Then,
determine the IP address that was allocated.
• hardcoded IP addresses: Manually enter a unique IP address.
The procedure for setting up IP addresses varies depending on whether
your controller has Windows 2000. If you need help doing this, see “To
set a PC’s IP addresses" on page 190. To see which addresses are
allocated by DHCP servers, see “To list a PC’s IP addresses" on
page 193.
Host name and domain
The tester’s controller PC has a factory-preset host computer name but
you may change it to something that:
• is more appropriate for your installation
• is unique
• conforms to your company or lab’s conventions for host names
158
User Guide
user_guide.book Page 159 Friday, January 30, 2004 11:35 AM
Remote Access
5
Again, the procedure for setting up host names varies depending on
whether your controller has Windows 2000. If you need help doing this,
see “To set a PC’s host name and domain" on page 189.
User Guide
159
user_guide.book Page 160 Friday, January 30, 2004 11:35 AM
5
Remote Access
To change the IP address of the switch card
Important
This may be required. As described on page 157, the tester uses
addresses from the subnet 10.x.x.x/8 for its test interfaces. If 10.x.x.x
addresses are also used in your test lab/LAN, or by a remote client (e.g.,
connecting via a VPN), you must change the addresses used by the
tester’s subnet.
Modify the controller’s DHCP configuration file and system registry
:
2 Right-click
DHCPD.CONF,
select Open
(With), then
select NOTEPAD.
1 In Windows Explorer, select
the DHCPDNT folder.
3 Change the IP address in the
4 places indicated.
Do not change the netmask; the first
8 bits in the address is used for the
network and the last 24 bits for hosts
(i.e. the Ethernet card and test port
interfaces). The Ethernet card’s host
number must be 1. Save the changes
and exit Notepad.
(Continued on the next page.)
160
User Guide
user_guide.book Page 161 Friday, January 30, 2004 11:35 AM
5
Remote Access
4 Back in Windows Explorer, right-click
the file DHCPD.REG, then select Edit
to display the file in NOTEPAD.
5 Change the IP address here.
You must use the same number as
before (e.g., 11). Save the changes
and exit Notepad.
6 Back in Windows Explorer,
double-click the dhcpd.reg file you
changed to update the system
Next, modify an environment variable, set the switch port’s IP address,
and restart the test system:
1 Reset the environment variable CM_ADDRESS to the new address.
This procedure varies depending on whether you have Windows
2000 — for details, see “To set up an environment variable" on
page 195.
2 Reset the IP address of the Ethernet port connecting the switch and
test interfaces so that it uses the new IP address. This procedure also
varies depending on the operating system — for details, see “To set a
PC’s IP addresses" on page 190. You will be prompted to restart the
PC.
3 Restart the PC. This is when the Resource Manager obtains a new IP
address for the interface connecting the controller to the switch.
4 Reboot each test module. Do not use the Diagnostics Tool’s
Broadcast Reboot — instead, power each module down, then up
again. Each device will obtain a new IP address in the new subnet
range.
Use the Diagnostics Tool to verify that the new IP addresses are being
used.
User Guide
161
user_guide.book Page 162 Friday, January 30, 2004 11:35 AM
5
Remote Access
To set up a VNC server
To install VNC
VNC is now installed as an optional component along with the network
simulator software. If it is not currently installed on the tester PC, install
it the same way you would install network simulator software. See “To
install/upgrade software" on page 182. Simply select VNC from the list
of optionally installed software.
For complete documentation on VNC, see the AT&T Research web
site: http://www.uk.research.att.com/vnc/
To enable
remote access
On the tester PC, log in with administrators’ privileges. Then select
Start menu > Programs > VNC > Run WinVNC (App Mode)
.
Enter a password that
remote users must enter to
control the tester desktop.
Change the default settings
for the other parameters as
needed. Then click OK.
This displays an icon in the lower right corner of the tester PC’s
desktop.
.
When you are ready to
disable remote access,
right-click the icon and
select Close VNC.
162
User Guide
user_guide.book Page 163 Friday, January 30, 2004 11:35 AM
Remote Access
5
To set up a DCOM server
You must configure the tester PC’s DCOM security to allow remote
computers to access ResourceManager and sessionexec.
1 Select Start menu > Run to display the Run dialog. Then type
dcomcnfg to display the Distributed COM Configuration Properties
dialog.
2 On the Applications tab, select ResourceManager and click
Properties to display the ResourceManager Properties dialog.
User Guide
163
user_guide.book Page 164 Friday, January 30, 2004 11:35 AM
5
Remote Access
3 On the Security tab, set the access permission to “Use custom”. Click
Edit to display the Registry Value Permissions dialog. Click Add to
display the Add Users and Groups dialog. Select Everyone and click
Add to give everyone access. Click OK to close the Add Users and
Groups dialog and the Registry value permissions dialog.
4 On the Security tab of the ResourceManager Properties dialog, set
the launch permission to “Use default”. Then click OK to close the
dialog.
5 On the Applications tab of the Distributed COM Configuration
Properties dialog, select sessionexec and click Properties to display
the sessionexec Properties dialog. Repeat Step 3 to give everyone
access permission.
6 On the Security tab of the sessionexec Properties dialog, set the
launch permission to “Use custom“. Click Edit and repeat Step 3 to
allow everyone to launch test sessions.
7 Click OK to close the sessionexec Properties dialog and the
Distributed COM Configuration Properties dialog.
164
User Guide
user_guide.book Page 165 Friday, January 30, 2004 11:35 AM
Remote Access
5
To set up a Terminal Services (TS) server
About TS
TS is installed along with the OmniBER XM software. If your
controller does not have Terminal Services installed, use the OmniBER
XM Operating System Recovery CD supplied with your system to
install all required TS software. To see if you have TS installed on your
controller, select Start menu > Administrative Tools. You should see
Terminal Services menu items (Client Creator, Configuration, Manager,
Licensing).
If you do not have TS installed, see:
1 To install the TS software, page 166
2 To set up the TS server, page 166
3 To set up a TS client, page 175
If you do have TS installed, see:
1 To set up the TS server, page 167
2 To set up a TS client, page 175
For complete documentation on TS, see the Microsoft web site:
www.microsoft.com/windows2000/technologies/terminal/
System requirements
A system controller requires extra resources (CPU, memory, disk space)
to run as a TS Server. To review the system requirements, see “How
many ports and sessions can your system support?” on page 29.
About licensing
When you install TS from the OmniBER XM Recovery CD, it is
installed in Application Server mode. This mode is licensed, and
requires a license server installed in the domain (usually the server
itself). There is no hard limit to the number of licenses that can be
installed, so the real limit is the resources available. To use TS, you
need three licenses:
•
User Guide
Server license—Conformance is met by installing a legal version of
the Windows 2000 Server operating system.
165
user_guide.book Page 166 Friday, January 30, 2004 11:35 AM
5
Remote Access
• Client Access License (CAL)—A CAL is used for each remote
connection that uses a Microsoft service (e.g. Terminal Services,
file/printer sharing). The version of Windows 2000 Server shipped
with OmniBER XM comes with 5 built-in CALs.
• Terminal Services — Client Access License (TS-CAL): Each remote
connection must also have a TS-CAL. Windows 2000 Server comes
with an unlimited number of “built-in” Windows 2000 Pro and
Windows XP Pro TS-CALs. Other clients running operating systems
like Windows NT, XP Home, ME, 98, and 95 get a temporary license
for 90 days after first connecting to a server. When this 90-day
temporary license expires, you need to obtain your own permanent
TS-CAL licenses through Microsoft. You could also enquire whether
your corporate IT group has or can more easily obtain TS-CAL
licenses.
Normally, a multi-user system allows concurrent or per-server
licensing. Instead, TS-CAL licensing uses per-seat licensing and
licenses are permanently assigned to computers. This means a user
connecting from both home and office uses two licenses. OmniBER
XM controllers use a hotfix that allows a license to time expire and be
reclaimed if a connection from a given computer is not repeated within
52 to 89 days.
To install the TS software
CAUTIO N
When you install TS from the OmniBER XM Recovery CD, it
completely replaces the hard disk image on your OmniBER XM
controller with a new image containing the latest operating system and
OmniBER XM software.
Any third-party software applications and data files you have installed
or saved on the controller will not be preserved.
1 Save all your data and configuration files before you install the hard
disk image, so that you can restore these files to the controller at a
later stage. For help on saving these files, contact your system
administrator.
2 Insert the OmniBER XM Recovery CD into the CD-ROM drive.
3 Power up the controller.
166
User Guide
user_guide.book Page 167 Friday, January 30, 2004 11:35 AM
5
Remote Access
4 Follow the instructions provided with the OmniBER XM Recovery
CD and install the hard disk image.
5 Use the third party software CDs to re-install any additional software
you require.
6 Restore any data and configuration files you backed up previously.
To set up the TS server
To review the default remote connection options
1 Select Start menu > Administrative Tools > Terminal Services
Configuration to display the Terminal Services Configuration
window.
2 Review the default server settings.
3 In the left-hand pane, select Connections. In the right-hand pane,
right click RDP-Tcp; then select Properties.
User Guide
167
user_guide.book Page 168 Friday, January 30, 2004 11:35 AM
5
Remote Access
4 On the RDP-Tcp dialog, select the Network Adapter tab; then enter
the maximum number of remote clients allowed.
The default is 0. This is a security precaution, to prevent unauthorized
remote access until you have configured the server to your
requirements. Through the Remote Control tab, you can deselect the
Require user’s permission check box, so that you can access from home
a session you initiate at the office.
To activate the License Server and obtain a license
1 Select Start menu > Administrative Tools > Terminal Services
Licensing. The Terminal Services Licensing window is displayed.
168
User Guide
user_guide.book Page 169 Friday, January 30, 2004 11:35 AM
5
Remote Access
From this window, you will be able to review who is currently using
permanent and temporary licenses, and install additional licenses.
2 The servers listed under All servers are computers in the network
which have been set up as Terminal Services license servers.
Right-click the current controller name and select Activate Server.
The Licensing Wizard is displayed.
3 Specify how you want to contact Microsoft to obtain a license
(Internet/E-mail, web, phone, fax), or activate your license manager.
The wizard displays your Product ID to relay to Microsoft.
Depending on the method of contact you choose, you may need to
identify:
• an Install Option (select Activate a license server)
• the Purchase Method (select Other)
• user info, address, country
Microsoft generates a TS Server License ID based on the Product ID.
You enter this license into the wizard. (The format of the license varies
depending on the method used to obtain the license.)
4 Deselect Install licenses now, unless you need to install additional
license key packs for TS clients.
To review the manager options
1 Select Start menu > Administrative Tools > Terminal Services
Manager. The Terminal Services Manager window is displayed.
2 Review the available options. From this window, you can:
• view the active processes running on each server and client
• connect to a client session (you may use Remote Control)
• send messages to clients
• forcefully disconnect or log off clients
User Guide
169
user_guide.book Page 170 Friday, January 30, 2004 11:35 AM
5
Remote Access
Step 2: Configure the Remote Computer
Remote API access
• “To use the API remotely" on page 171
• “To access the online help remotely" on page 177
Remote GUI access
• “To set up a VNC client" on page 172
• “To set up a DCOM client" on page 174
• “To set up a TS client" on page 175
• “To access the online help remotely" on page 177
170
User Guide
user_guide.book Page 171 Friday, January 30, 2004 11:35 AM
5
Remote Access
To use the API remotely
The tester’s API allows several remote users to launch separate test
sessions from remote PCs or UNIX workstations. You must first install
Tcl/Tk Version 8.0 or later on the remote computer. The tester CD
provides Tcl/Tk 8.2 for Win32 computers. If installing onto a UNIX
system, download the software from http://tcl.sourceforge.net/ or
http://www.tcl.tk/. Build (i.e. compile) the Tcl source code as described
at the web site.
.
1 On the tester PC, copy
the file AgtClient.tcl.
Copy this Tcl package to
the remote computer’s
Tcl /lib directory.
2 On the remote computer,
launch Tcl.
3 Include the tester’s Tcl package.
4 Connect to a running test session
or open a new one.
User Guide
171
user_guide.book Page 172 Friday, January 30, 2004 11:35 AM
5
Remote Access
To set up a VNC client
To install VNC
If the remote computer is a Win32-based PC (i.e., Windows 95, 98,
2000, NT4), follow the same steps outlined for the tester PC under “To
install VNC" on page 162.
If the remote computer is another type of computer, download the
appropriate VNC package from the AT&T Research web site.
http://www.realvnc.com/
For details, please see the documentation at the above web site. If you
encounter problems, please see the FAQ web page:
http://www.realvnc.com/faq.html
To control the tester remotely
1 On the remote computer, launch the VNC viewer. On a PC, select
Start > Programs > VNC > Run VNC Viewer.
2 When prompted, enter the tester PC’s IP address or host name, then
the password you set up in “To enable remote access" on page 162.
.
3 When the tester PC’s desktop appears, launch and use the tester
software as normal. If you need to refresh the display, right-click the
VNC title bar and select “Request Screen Refresh“.
172
User Guide
user_guide.book Page 173 Friday, January 30, 2004 11:35 AM
5
Remote Access
To control the tester via a web browser
1 On the remote computer, launch a web browser.
2 For the URL address, enter “http://” followed by the tester PC’s IP
address followed by the port number “:5800”; for example,
http://10.1.1.1:5800.
3 When prompted, enter the password you set up under “To enable
remote access" on page 162.
.
4 When the tester PC’s desktop appears, launch and use the tester
software as normal
User Guide
173
user_guide.book Page 174 Friday, January 30, 2004 11:35 AM
5
Remote Access
To set up a DCOM client
To install the tester software
Install the tester software on the remote computer, as described fully in
Chapter 4, “Software Installation/Upgrades”. Select:
• GUI Installation: If you do not plan to use Demo mode. This
installation requires less disk space, as described under “System
Requirements" on page 180.
• Full Installation: If you plan to use Demo mode to simulate network
simulator test modules and interfaces (e.g., to see what you can do
with test interfaces you do not currently have connected).
To control the tester remotely
1 Launch the application as shown on page 64.
2 On the Test Session dialog, enter the IP address or host name of the
tester PC as defined in “To configure the tester for network
access" on page 158.
This connects your remote instance of a GUI to a test session running on
the controller PC.
To update old desktop icons
If you previously set up desktop shortcut icons on your remote PC to
connect to the tester, check the following: Right-click the icon and
select Properties. In the Target field, any command such as:
C:\PROGRA~1\Tcl\bin\wish82.exe “C:\Program Files\Agilent \
OmniberXM\etc\LicCheck.tcl” -server <n>
must be changed to ...
“C:\Program Files\Agilent\Omniberxm\bin\XmLauncher.exe” -server
<n>
where <n> is used to specify a default tester host name or IP address.
174
User Guide
user_guide.book Page 175 Friday, January 30, 2004 11:35 AM
Remote Access
5
To set up a TS client
About TS client licensing
Each remote connection must have a Terminal Services - Client Access
License (TS-CAL). Windows 2000 Server comes with an unlimited
number of built-in Windows 2000 Pro and Windows XP Pro TS-CALs.
Other clients running operating systems like Windows NT, XP Home,
ME, 98, and 95 get a temporary license for 90 days after first connecting
to a server. When this 90 day temporary license expires, you need to
obtain your own TS-CAL licenses through Microsoft. You could easily
enquire whether your corporate IT group has, or can more easily obtain
TS-CAL licenses.
To install the client software
You can find this software on the:
• controller hard disk:
C:\WINNT\system32\clients\tsclients\msrdpcli.exe
• OmniBER XM Operating System Recovery software CD: at the top
level
\msrdpcli.exe
• web site:
www.microsoft.com/windowsxp/pro/downloads/rdcliental.asp
1 Navigate to the required .exe file listed above, and double-click.
2 Accept the license and install the application for anyone who uses the
client PC. It takes less than one minute to install the files.
User Guide
175
user_guide.book Page 176 Friday, January 30, 2004 11:35 AM
5
Remote Access
To configure connection options
1 From the Start menu, launch the Remote Desktop Connection.
2 In the Computer field, select the OmniBER XM controller to which
you want to connect.
Note: If you want to configure the display, resource, and
performance options, click the Options button. Click the Help button
for full details.
3 Click the Connect button. The Log On to Windows dialog is
displayed.
4 Log on to the OmniBER XM controller. Use the OmniBER XM
application as normal.
To disconnect or log off the server
If you want to:
• leave active processes running in the background and reconnect
later—click the X icon on the server taskbar. Alternatively, select
Start menu > Shutdown; then select Disconnect from the Shut Down
Windows dialog.
• log off and terminate all active processes—shut down your PC as
normal by selecting Start menu > Shutdown; then select Log off
from the Shut Down Windows dialog.
176
User Guide
user_guide.book Page 177 Friday, January 30, 2004 11:35 AM
Remote Access
5
To access the online help remotely
If you are using VNC or DCOM, you simply display the online help as
normal: from the Windows Start menu, tester application’s Help menu,
or dialog Help buttons. If you are using the API, you have these options:
If your remote computer is a PC with IE3 or later
You can view the same help files displayed on the tester PC. These help
files are Compiled HTML Help (.CHM) files. They are viewable on any
Windows PC that has Internet Explorer 3.0 or later. (The HTML Help
uses DLLs supplied with IE.) The .CHM help files are provided on the:
• tester PC: C:\Program Files\Agilent\Omniberxm\doc
• tester CD: \doc
User Guide
177
user_guide.book Page 178 Friday, January 30, 2004 11:35 AM
5
Remote Access
If it is not
Use Acrobat to read the PDF files which are also on the PC and CD:
• user_guide.pdf— OmniBER XM network simulator User Guide.
• installation_guide.pdf - OmniBER XM network simulator
Installation Guide.
• api_programming_guide.pdf— OmniBER XM network simulator
API Programming Guide.
• rem_cntrl_mnl.pdf - OmniBER XM network simulator SCPI
Programming Guide.
178
User Guide
user_guide.book Page 179 Friday, January 30, 2004 11:35 AM
Agilent J7241A OmniBER XM
User Guide
6
Software Install/Upgrade
System Requirements, page 180
Software Installed, page 181
To install/upgrade software, page 182
To install and enable IIS FTP, page 183
To uninstall a previous version, page 183
To install on remote computers, page 184
CAUTIO N
Caution: Support for modified or non-Agilent hardware and
software
Disregard any instructions in the PC User’s Guide directing you to
check or install components inside your PC. We cannot guarantee
that the network simulator is compatible with other hardware,
peripherals, operating systems, or software applications not
purchased through Agilent. Consequently, we do not provide
warranty for or support problems associated with modified or
non-Agilent systems or systems with altered operating system
configuration or initialization files.
Agilent Technologies
179
user_guide.book Page 180 Friday, January 30, 2004 11:35 AM
6
Software Install/Upgrade
Software Installation Upgrades
The tester software is factory-installed on each controller PC shipped.
You may however be:
• upgrading software on the controller
• installing or upgrading software on a computer that will remotely
access the controller through DCOM, as described in “To set up a
DCOM client" on page 174
Please review the System Requirements before starting the installation.
System Requirements
To install and run the software, a PC minimally requires the following:
Controller PC (Full Installation)
Remote Client PC (GUI Installation)
Operating System Windows 2000 Version 5.0, Service Pack 1
Windows 2000 Version 5.0, Service Pack 1
RAM
256 MB for medium-sized systems of 5 to 20
network simulator modules
512 MB for large systems of 21 to 32 network
simulator modules
128 MB
Disk Space
Total: 500 MB
On the C: drive:
300 MB to install the software
500 MB to run the software
Total: 300 MB
On the C: drive: 200 - 250 MB
The actual software occupies less space. The extra space is required during installation to unpack
software and during operation for virtual memory usage.
180
User Guide
user_guide.book Page 181 Friday, January 30, 2004 11:35 AM
6
Software Install/Upgrade
Software Installed
The following software is installed:
• OmniBER XM network simulator software
• PDF’s of manuals, online help, release notes
• Tcl/Tk 8.2: Tcl Widgets, BLT, Expect: scripting tools, extensions to
Tcl and Tk
• Acrobat Reader 4.0: displays electronic versions of guides and
papers
• HTML Help: displays the online help
• vi, emacs: Windows versions of UNIX editors
• VNC: enables remote access (see “Types of Remote Access" on
page 153)
NOTE
Install anti-virus software on system controller PCs
If your system controller PC is connected to a network, it is strongly
recommended that you install an anti-virus program and keep the virus
definition files up to date.
User Guide
181
user_guide.book Page 182 Friday, January 30, 2004 11:35 AM
6
Software Install/Upgrade
To install/upgrade software
Before you begin
• You need the OmniBER XM network simulator CD-ROM.
• If you are installing to a new remote computer, you must ensure IIS
FTP is installed and enabled. For details, see “To install and enable
IIS FTP" on page 183
• If you are upgrading software, you must uninstall the previous
version. For details, see “To uninstall a previous version" on
page 183.
To install/upgrade software
1 Insert the CD-ROM into the CD-ROM drive. The CD-ROM should
autostart and display the ‘Home’ page.
2 Double-click on OmniberXM Software.
3 Double–click the file Setup.exe. This launches the InstallShield
wizard.
4 Follow the prompts and accept the defaults in the installation. Select
a:
• Full Installation: If you are installing the software on a controller
PC or a remote PC that will run Demo Mode (i.e., to simulate
connected test interfaces).
• GUI Installation: If you are installing on a remote PC that will
not run Demo Mode.
5 When the installation has finished copying files, it restarts the PC.
6 To verify that the installation was successful, log in and launch the
Diagnostics Tool as described in “Step 4: Power up the System” in
the Installation chapter. On the Diagnostic Tool, click Run system
tests to verify that all files were installed.
182
User Guide
user_guide.book Page 183 Friday, January 30, 2004 11:35 AM
6
Software Install/Upgrade
To install and enable IIS FTP
File Transfer Protocol (FTP), a component of Internet Information
Services (IIS), is required to download firmware to the test modules.
The IIS software is factory-installed on system controllers but is not
distributed on the tester CD and must be installed on your own PCs
before you can do a Full Installation of the tester software.
The software might already be installed on your PC. In this case, you
simply enable it — follow the procedures below to do this. If the
software is not on your PC, you need the Windows CD to install it.
Windows 2000
Install IIS from the Control Panel:
1 Choose Start, Settings, Control Panel and double-click the
Add/Remove Programs icon.
2 Select the Add/Remove Windows Components button, on the left
hand side, to open the Windows Components Wizard dialog.
3 Select Internet Information Services (IIS) from the list. Click the
Details button.
4 In the IIS dialog, select File Transfer Protocol (FTP) Server and click
OK.
5 The Common Files and IIS Snap-In components will be
auto-selected. Click the Next button to complete the installation.
To uninstall a previous version
1 From the Settings menu, select Control Panel.
2 Double-click the Add/Remove Programs icon.
3 Select OmniBER XM.
4 Click Remove or Add/Remove (depends on your version of
Windows).
5 Repeat steps 3 and 4 for other Agilent network simulator products.
User Guide
183
user_guide.book Page 184 Friday, January 30, 2004 11:35 AM
6
Software Install/Upgrade
To install on remote computers
You must:
• install omniBER XM network simulator software
• enter product licenses (simply double-click the Add License desktop
icon and enter your licenses)
Shortcut
If you need to install software onto multiple remote PCs, you can:
• copy all files from the CD into a temporary folder on the controller
• set up that folder for sharing (right-click the folder in Windows
Explorer and click Sharing)
• remotely install the software from the controller’s hard drive
(double-click Network Neighborhood or My Network Places; the
tester PC; then the folder containing the unpacked software; then
double-click the Setup.exe for the software)
184
User Guide
user_guide.book Page 185 Friday, January 30, 2004 11:35 AM
Agilent J7241A OmniBER XM
User Guide
7
System Administration
To change the password, page 187
To create a user account, page 187
To set a PC’s host name and domain, page 189
To set a PC’s IP addresses, page 190
To change the binding order of network ports, page 192
To list a PC’s IP addresses, page 193
To set up an environment variable, page 195
To start and stop services, page 196
To configure the tester for printing, page 197
To recover from system problems, page 198
CAUTIO N
Network Configuration: It is recommended that you consult your
network system administrator to ensure correct configuration of the
network simulator on your network, and to determine any security
restrictions to networking the tester.
Caution: Support for modified or non-Agilent hardware and
software
Disregard any instructions in the PC User’s Guide directing you to
check or install components inside your PC. We cannot guarantee
that the tester is compatible with other hardware, peripherals,
operating systems, or software applications not purchased through
Agilent. Consequently, we do not provide warranty for or support
problems associated with modified or non-Agilent systems or
systems with altered operating system configuration or initialization
files.
Windows 2000: Different vendors provide slight variations of
Windows 2000 — the instructions provided here apply to the
Windows 2000 included with PCs purchased through Agilent.
Agilent Technologies
185
user_guide.book Page 186 Friday, January 30, 2004 11:35 AM
7
System Administration
System Administration
This chapter describes tasks required to configure the tester PC and is
designed for those without a lot of PC administration experience and
those migrating from Windows NT or FreeBSD to Windows 2000.
Please also consult the Windows guide for tasks not covered here. This
appendix describes how:
• “To change the password" on page 187
• “To create a user account" on page 187
• “To set a PC’s host name and domain" on page 189
• “To set a PC’s IP addresses" on page 190
• “To change the binding order of network ports" on page 192
• “To set up an environment variable" on page 195
• “To start and stop services" on page 196
• “To configure the tester for printing" on page 197
System Recovery
This chapter also provides basic system recovery information.
Problem
Recovery
Windows or the tester
If you have an existing Windows NT controller
software has somehow been from Agilent, you may be able to use a backup
corrupted
partition on the PC hard disk — see “To recover
from system problems" on page 198. To install
the latest tester software on this partition, see
Chapter 4, “Software Installation/Upgrades”
The PC hard disk has been
corrupted
186
If you need assistance, contact Technical
Support — see “To contact us” in the Installation
chapter
User Guide
user_guide.book Page 187 Friday, January 30, 2004 11:35 AM
7
System Administration
To change the password
First, log on as Administrator. The password is preset in the factory to
be blank but you might need to change it to conform to company
conventions.
1 Press Ctrl-Alt-Delete to display the Windows Security dialog.
2 Click on the Change Password button to display the Change
Password dialog.
3 Enter the Old Password (blank), then the New Password in both
fields.
To create a user account
To install and use the OmniBER XM software a new user account must
be given administrators’ privileges. These are needed to, for example,
set up TCP sockets. Thus, log in using the Administrator account to give
new accounts the required access. Initially, there is no password for this
account but if one has been set up, enter it. The rest of the procedure
depends on the Windows system:
Windows 2000
1 Select Start menu -> Settings -> Control Panel. Double-click Users
and Passwords. (On some Windows 2000 systems, you must
double-click Administrative Tools, then Computer Management,
and select the Local Users and Groups from the left-hand panel).
2 Select the Advanced tab, then click the Advanced button.
3 In the left-hand pane of the Local Users and Groups dialog,
right-click the Users folder and select New User.
4 In the New User dialog, use these account values:
• User name: <abbreviated login name>
• Full name: <more descriptive name for account>
• Description: <blank>
• Password & Confirm password: <Password>
• Disable: User must change password at next logon
• Enable: Password never expires
User Guide
187
user_guide.book Page 188 Friday, January 30, 2004 11:35 AM
7
System Administration
5 Click the Create button, then click the Close button. Back on the
Local Users and Groups dialog, you should see the new user in the
right-hand pane. Double-click this new user entry.
6 In the Properties dialog, select the Member Of tab, then click the
Add button.
7 In the Select Groups dialog, select Administrators from the list at
top then click the Add button.
8 Click OK twice to dismiss the two most recent dialogs.Then close
the Local Users and Groups and Users and Passwords dialogs.
Log off, then log in as the new user to verify.
188
User Guide
user_guide.book Page 189 Friday, January 30, 2004 11:35 AM
System Administration
7
To set a PC’s host name and domain
The tester’s controller PC has a factory-preset host computer name but
you may change it to something that is more meaningful, unique, or
conforms to your company or lab’s conventions for host names.
1 Right-click My
Computer and
select Properties.
2 Select the
Network
Identification
tab, click
Properties.
3 Specify a unique host
name for the tester.
4 Specify the domain or
workgroup to which
the tester belongs.
User Guide
189
user_guide.book Page 190 Friday, January 30, 2004 11:35 AM
7
System Administration
To set a PC’s IP addresses
1 Right-click My
Network Places and
select Properties.
2 Right-click a LAN port and select Properties.
Important: LAN Port #1 must connect to your company
LAN and Port #2 must connect to the tester
switch/modules. Otherwise, you will experience
communication problems.
3 Select TCP/IP,
click Properties.
190
4 Identify the IP address the LAN port is to use.
If your network uses a DHCP server to auto-assign IP addresses, simply select
Obtain an IP address automatically.
If your network does not, ask your system administrator for an IP address, subnet
mask, and default gateway. Select Use the following IP address and enter them.
User Guide
user_guide.book Page 191 Friday, January 30, 2004 11:35 AM
System Administration
CAUTIO N
7
To enable remote clients to set up connections with the tester PC’s
software, the Ethernet port that connects to the LAN must be first in
the network binding order. If you have set up your own PC to be a
tester PC, please see the next section “To change the binding order of
network ports" on page 192.
The second Ethernet port, used to connect the switch and test
interfaces uses the subnet 10.0.0.1/8. You must reset this if an
address in this range is already being used in your LAN. For details,
please see “To change the IP address of the switch card" on
page 160.
User Guide
191
user_guide.book Page 192 Friday, January 30, 2004 11:35 AM
7
System Administration
To change the binding order of network ports
On the tester PC, the Ethernet port that connects the LAN (which in turn
connects remote clients) must be first in the PC’s network binding
order. Otherwise, remote clients will not be able to connect to the tester
software. The order is configured properly on PCs from Agilent but may
not be on PCs you set up as tester PCs.
1 Right-click My
Network Places and
select Properties.
2 Select Advanced Settings.
3 Make the LAN port the first connection.
Select the Ethernet port that connects the
LAN (which in turn connects remote clients).
Then click the up arrow button to move it to
the top of the binding order list. Click OK to
save the change.
192
User Guide
user_guide.book Page 193 Friday, January 30, 2004 11:35 AM
7
System Administration
To list a PC’s IP addresses
The fastest way to list the IP addresses currently being used by a PC’s
LAN ports is through a DOS command. First launch a DOS shell:
1 Select Start > Programs > Accessories > Command Prompt.
2 Enter the command “ipconfig”:
The port connecting
your company LAN.
The port connecting
the tester switch and
test interfaces.
User Guide
193
user_guide.book Page 194 Friday, January 30, 2004 11:35 AM
7
System Administration
To use the Demo mode
If you do not have test modules connected to your PC but want to
simulate traffic generation and see sample statistics, you can do so
operating in Demo mode. To set up the Demo mode, you must set
certain environment variables.
NOTE
To use the Demo mode on a PC other than the Controller PC, you must
do a Full (not GUI only) Installation of the software.
To create dummy modules:
Create the variable AGT_DUMMY_MODULE_LIST. This variable
allows you to specify the network simulator modules the program
displays.
Choose from the following module types:
AGT_CARD_ONEPORT_OMNIBERXM_10G_SONET_1550
AGT_CARD_ONEPORT_OMNIBERXM_10G_SONET_1310
AGT_CARD_TWOPORT_OMNIBERXM_2G5_SONET_1310
AGT_CARD_TWOPORT_OMNIBERXM_2G5_SONET_1550
194
User Guide
user_guide.book Page 195 Friday, January 30, 2004 11:35 AM
System Administration
7
To set up an environment variable
1 Right-click My
Computer and
select Properties.
2 Select the
Advanced
tab, click
Environment
Variables.
3 Click New to create a new
variable, OR, select an existing
variable and click Edit to change it.
4 Enter the variable name and value.
User Guide
195
user_guide.book Page 196 Friday, January 30, 2004 11:35 AM
7
System Administration
To start and stop services
1 From the Start Menu, select
Settings, then Control Panel.
2 Double-click Administrative Tools,
then Computer Management.
3 Right-click
the service
and select
Start/Stop.
The available
selections on
the menu
depend on
whether the
service is
running.
196
User Guide
user_guide.book Page 197 Friday, January 30, 2004 11:35 AM
7
System Administration
To configure the tester for printing
You might want to print and analyze test results or help information
offline. You can connect a parallel printer directly to the tester or use a
printer on your company LAN. Ask your system administrator about
printer names.
.
1 Double click
My Computer.
3 Select a locally connected
or network-based printer.
2 Double click
Printers,
then Add
Printer.
4 Select the
printer.
User Guide
197
user_guide.book Page 198 Friday, January 30, 2004 11:35 AM
7
System Administration
To recover from system problems
WARNING
All data will be erased when this process begins. Back up any
data before beginning recovery.
If the Windows 2000 operating system or tester software becomes
corrupted you can recover it using the OmniBER XM network simulator
Recovery CD and Application CD. This will restore the network
simulator system controller to the Agilent factory default state. You will
have to repeat any configuration changes you have made to the
controller such as IP address changes.
To use the Operating System recovery disk
• Make sure the controller can boot from the CD-ROM drive. To do
this, restart the controller and interrupt the boot process to enter
‘setup’ or ‘boot devices’. In the boot order settings, make sure the
CD-ROM drive is listed before the hard disk drive. If it is not, change
the order and exit setup, saving changes. If the order is correct, exit
setup, discarding changes.
• Insert the CD-ROM into the drive.
• Restart the controller.
• Follow the instructions on the screen.
To install OmniBER XM Application
• Insert the OmniBER XM application CD (part number J7241-90003)
into your controller. If the application does not auto-run select the
drive containing the application CD, and select the file start.htm.
• To load the application select the OmniBER XM Software link.
• Follow the on screen instructions.
198
User Guide
user_guide.book Page 199 Friday, January 30, 2004 11:35 AM
System Administration
7
Add a License
Before you next run an OmniBER XM test session you will need to add
a license. This requires entering a special license key provided by
Agilent.
1 Click on the Add License icon on your desktop and select
OmniberXm.
2 Select Modify License and choose Permanent.
• Enter the license key provided with your OmniBER XM system. The
key shown in the figure above is for example only, it is not a valid
key.
• Click on Update when finished. You can now click on the
OmniBER XM icon on your desktop and start a new session.
User Guide
199
user_guide.book Page 200 Friday, January 30, 2004 11:35 AM
7
200
System Administration
User Guide
user_guide.book Page 201 Friday, January 30, 2004 11:35 AM
Agilent J7241A OmniBER XM
User Guide
8
Measurements
Avoiding Problems When Making Measurements, page 202
APS Measurements, page 203
APS Measurements on multiple STS/AU channels (J7244A/45A Option
010), page 206
Detecting Path Routing Faults, page 209
Detecting VT/LO Path Routing Faults (J7244A/45A Option 010),
page 211
Making a BER Measurement, page 213
Making a BER measurement on VT/TU channels (J7244A/45A Option
010), page 218
Agilent Technologies
201
user_guide.book Page 202 Friday, January 30, 2004 11:35 AM
8
Measurements
Avoiding Problems When Making Measurements
Bit errors can occur due to network defects (such as faulty network
elements, damaged optical fiber or dust/dirt particles in the fiber
connections) or problems with the test environment/setup. Follow the
steps below to avoid problems when making measurements.
To avoid introducing errors when performing tests:
1 Ensure that optical fibers connecting the instrument to the network
are not damaged - check that fibers have not been crimped.
2 Avoid acute bends in the fiber. Ensure that fibers only have gentle
arcs.
3 If the system is left unattended for a long term test, ensure that the
equipment is not in a position where people will disturb the
connecting fibers.
4 Ensure that all fiber connections are clean and dirt-free. Use a
fiberscope to measure the cleanliness of an (unpowered) fiber. A
poorly cleaned fiber results in a drop in power. Alternatively, use a
power meter (e.g. the instrument’s internal power meter) to measure
the power at the end of a fiber, the other end of which is connected to
the network.
5 Before connection is made, always clean the connector ferrule tip
with acetone or alcohol using a cotton swab. Dry the connector with
compressed air. Failure to maintain cleanliness of connectors is liable
to cause excessive insertion loss.
202
User Guide
user_guide.book Page 203 Friday, January 30, 2004 11:35 AM
8
Measurements
APS Measurements
Definition
In the XM it is the time from the first error in a burst to the last error.
The last error is considered to have happened after an error-free ‘Guard
Time’ has elapsed. For a more detailed description of Service
Disruption and the testing methods refer to the Telecoms Chapter in this
guide.
Service Disruption with PRBS or Word payloads
When a PRBS payload is used, the service disruption time can be
measured in all selected channels simultaneously. Service disruption
measurements are also available with 16-bit word payloads but it is not
advisable to use an all-ones pattern because most network equipment
will send all-ones when a switchover is in progress, and this will
emulate a good payload.
Result Updates
Results are available on a per-second basis. A result is reported in the 1
second interval during which the service disruption ends. The XM
display gives results for each channel of Last Time and Max Time.
Last Time
Count
Max Time
User Guide
The duration of the longest error burst detected in each 1-second
interval during the test.
Displays the number of disruptions measured since the start of gating.
The duration of the longest error burst detected in the current
measurement (gating) period.
203
user_guide.book Page 204 Friday, January 30, 2004 11:35 AM
8
Measurements
To check switching thresholds by injecting errors and alarms
The following procedure assumes that you have already set up the
network simulator to run a test session.
1 Connect the XM OPTICAL OUT port via a suitable optical cable
and attenuator to the device under test (DUT). Connect the output of
the DUT to the XM OPTICAL IN port. Be aware of the safety
factors involved before connecting/disconnecting optical cables, see
“Do not look into a Transmit laser." on page 59.
2 Select the Add Ports button on the Toolbar and select the modules
and ports you intend to use for this measurement in the Port
Selection window.
3 Switch ON the lasers for the ports you are using.
4 Select the Physical tab and set up the transmitter and receiver Signal
Standard and Rate.
5 Set the transmitter Mode Type to Terminal.
6 Select a Clock Source.
7 Select the Channels Setup tab. You can do one of the following:
• If you have already setup a structured signal in the device under
test, you can select Auto-Discover. This configures the XM
receiver channel setup to that of the received signal from the
DUT. Now copy the Receiver Channel Setup to the Transmitter
(select <-Copy).
OR
• Select the Transmitter Advanced button and use the Advanced
Channel Configuration edit buttons to set up channels as
required. Select OK when finished. Now copy the Transmitter
channel setup to the Receiver (select Copy ->).
8 Select the Pattern tab and set the transmitter to generate a PRBS.
9 Select the Gating Setup button on the Toolbar and select
Continuous, then OK.
To view service disruption time
10 Select the SRV-DIS tab.
204
User Guide
user_guide.book Page 205 Friday, January 30, 2004 11:35 AM
8
Measurements
Set up Guard Time
11 The guard time which is used to define the end of an error burst can
be set between 100ms and 1600ms in 1ms steps. You can define it
for All Ports in a session or for a Selected port only (select the On
selected port only box).
12 Select the Guard Time Edit button and enter the required value.
Set Warning Threshold
You can set a Warning Threshold - any service disruption times equal to
or above your pre-set threshold will be flagged and displayed red in
color in the Port and STS Path/HO Path Max Time and Last Time
columns.
13 If required set a Warning Threshold value.
14 Start a measurement - select the Gating: Start button.
15 Verify error-free reception of the PRBS test pattern (select the
Overview tab - Chassis View and check for a red border or channels
indicating errors).
16 Invoke a protection switch on a working section of the equipment
under test that is transporting the PRBS.
17 Select the SRV-DIS tab, view the list of ports in your session and
check if the Max Time field gives a value for any port.
18 Select any port that has SRV-DIS flagged and view the Max Time,
Last Time and Count and results in the channel list window. You
can use the Port channel mask to quickly examine the results for a
particular channel.
19 Select Gating: Stop when you wish to end the measurement.
NOTE
User Guide
You can deliberately invoke a protection switch in equipment under test
carrying a PRBS by generating a burst of errors. You can simulate a
node failure by removing the Laser power from the transmission
element.
205
user_guide.book Page 206 Friday, January 30, 2004 11:35 AM
8
Measurements
APS Measurements on multiple STS/AU channels (J7244A/45A
Option 010)
This test involves using one pair of ports to stimulate the system under
test with a test pattern and monitor the system output. An other set of
ports is used to inject errors/alarms in Thru Mode to force Path
Protection Switch Events.
To check switching thresholds by injecting STS/HO path errors
1 Connect Port 1 and Port 2 of the XM as shown in the diagram
above. Be aware of the safety factors involved before
connecting/disconnecting optical cables. See “Do not look into a
Transmit laser." on page 59.
2 Select the Add Port button on the Toolbar and select the modules
and ports you intend to use for this measurement.
3 Switch ON the laser for the ports you are using.
Port 1 set up.
4 Select the Port you are connecting as per Port 1 in the diagram.
206
User Guide
user_guide.book Page 207 Friday, January 30, 2004 11:35 AM
8
Measurements
5 Select the Physical tab and set up the Transmitter Signal Standard
and Rate. Set the Mode Type to Terminal and VT Mode to On.
6 Set the Receiver Interface Signal Standard and Rate as per the
transmitter settings, and set VT Mode to On.
7 Select the Channels tab. Check on the Transmitter channels display
that all VT channels are set to VT1.5 (they are brown in color, VT2
channels are color coded purple). If necessary right click on a
channel to change selection. For SDH operation set TUs to TU-11.
8 Select the Mappings button and set the VT1.5/TU-11 Tx and Rx
Mapping as required for your test. Click on the Tx and Rx Mapping
fields to enable the drop down menu’s. Click on OK when finished.
Port 2 set up
9 Ensure the working path of the system under test is connected to the
Receiver Optical IN port of the Port configured as per Port 2 in the
diagram.
10 In the Port display (top left) select the Port you are connecting as
shown for Port 2 in the hook-up diagram.
11 Select the Physical tab and set the Transmitter to Thru Mode and the
Thru Mode Type to Intrusive.
12 Set the Receiver Signal Standard and Rate to those you set
previously in Step 6 for Port 1. Ensure VT Mode is set to On.
13 Select the Channels tab and click on the Auto-Discover button to
configure the Receiver to the incoming signal.
14 Select the Gating Setup button on the Toolbar and select
Continuous.
To view service disruption time
15 Select the SRV-DIS tab.
Set up Guard Time
16 The guard time which is used to define the end of an error burst can
be set between 100ms and 1600ms in 1ms steps. You can define it
for All Ports in a session or for a Selected port only (select the On
selected port only box).
17 Select the Port you configured as per Port 1 in the hook-up diagram.
18 Select the Guard Time Edit button and enter the required value.
User Guide
207
user_guide.book Page 208 Friday, January 30, 2004 11:35 AM
8
Measurements
Set Warning Threshold
You can set a Warning Threshold - any channels which have a service
disruption time equal to or above your pre-set threshold will be
displayed red in color in the Port mask and in the VT/LO Path Max
Time and Last Time columns.
19 Enter a Warning Threshold for port 1 if required.
20 Start a measurement - select the Gating: Start button.
21 Verify error-free reception of the PRBS test pattern (select the
Overview tab - Chassis View and check for a red border or channels
indicating errors).
Add Errors/Alarms
• Invoke a protection switch on a working section of the equipment
under test that is transporting the PRBS or use the XM to inject
errors/alarms to the DUT as follows:
22 Select the Port you have configured for Thru Mode operation.
23 Select the E+A Inject tab.
24 Add Pattern Bit errors at a high enough rate to invoke a path
protection switch event. Use the Path Errors and Alarms Mask to
select the channels to be errored.
25 Select the SRV-DIS tab and view the list of ports in your session and
check if the SRV-DIS field indicates Yes for any port.
26 Select any port that has SRV-DIS flagged and view the Max Time,
Last Time and Count results in the channel list window. You can
use the Port channel mask to quickly examine the results for a
particular channel.
27 Select Gating: Stop when you wish to end the measurement.
208
User Guide
user_guide.book Page 209 Friday, January 30, 2004 11:35 AM
Measurements
8
Detecting Path Routing Faults
The J1 Connectivity Test detects path routing faults, e.g. following a
protection switch event.
The user must first configure a set of reference “Expected” J1 trace
messages, then capture the received “Measured” J1 Trace Messages.
The XM then compares the Expected J1 messages with the captured
(Measured) messages and produces a result indicating whether there
are any received J1’s in error (mismatched). Use the following
procedure to monitor J1 Path routing.
To monitor J1 path routing
The following procedure assumes that you have already set up the
network simulator to run a test session.
1 Connect the XM OPTICAL OUT port via a suitable optical cable
and attenuator to the device under test (DUT). Connect the output of
the DUT to the XM OPTICAL IN port. Be aware of the safety
factors involved before connecting/disconnecting optical cables, see
“Do not look into a Transmit laser." on page 59.
2 Select the Add Ports button on the Toolbar and select the modules
and ports you intend to use for this measurement.
3 Switch ON the laser for the modules you are using.
4 Select the Connectivity tab (click the → button at the top right of the
Results window if J1 Trace is not visible).
5 The default condition is that all ports in your current session are
included in the J1 Path Trace test. If you wish to perform the test on
only one port, select the port, then click in the On selected port only
box.
Set up expected J1’s
6 You can set up the expected J1 trace messages either by manually
entering a value, by copying the values from the signal transmitted
from a port, or by copying the values from the signal at the receiver
input. Use the Copy Expected Messages From options to copy from
a selected Tx port or from the Current Rx.
7 If you choose to copy values from the signals at the transmit or
receive ports, select the Copy Now button.
User Guide
209
user_guide.book Page 210 Friday, January 30, 2004 11:35 AM
8
Measurements
8 If you wish to enter a trace message manually, select a Channel then
the Expected J1 Path Trace field and enter your message. To
change the length of the J1 byte double click in the Length field for
the required channel and select from the drop down menu.
Compare J1’s
9 Check you have selected the ports to be included in the test (see step
2).
10 Select the Start Test button. The J1 Path Trace test runs through a
compare test and displays in the Port STS Mismatches column the
number of mismatches found for each port, and also gives channel
results for (pass or fail) for the currently selected port.
Expected and Measured J1 values for the currently selected port are
displayed.
The Port mask highlights in red any channels which have a J1
mismatch between the expected and received J1’s.
If you click on an errored (red) channel, the channel list changes to
highlight that channel allowing you to quickly view results.
210
User Guide
user_guide.book Page 211 Friday, January 30, 2004 11:35 AM
8
Measurements
Detecting VT/LO Path Routing Faults (J7244A/45A Option 010)
The J2 byte connectivity test detects Sonet VT path trace routing faults,
while both J1 and J2 can be used to detect SDH LO path trace routing
faults, e.g. following a protection switch event.
The procedure is to first configure a set of reference “Expected” Path
Trace messages, then capture the received “Measured” Trace
Messages. The XM then compares the Expected messages with the
captured (Measured) messages and produces a result indicating
whether there are any received messages in error (mismatched). Use the
following procedure to monitor path trace routing.
To monitor VT/LO path trace routing
The following procedure assumes that you have already set up the XM
to run a test session.
1 Connect the XM OPTICAL OUT port via a suitable optical cable
and attenuator to the device under test (DUT). Connect the output of
the DUT to the XM OPTICAL IN port. Be aware of the safety
factors involved before connecting/disconnecting optical cables, see
“Do not look into a Transmit laser." on page 59.
2 Select the Add Port button on the Toolbar and select the modules
and ports you intend to use for this measurement.
3 Switch ON the laser for the modules you are using.
4 Select the Physical tab and ensure the Transmitter and Receiver
VT/TU Mode selection is set to On.
5 Select the VT-POH/LO-POH tab and view the current Transmitter
J2 Path Trace Message, edit the message if required.
Monitor J2 Path Trace Message
6 Select the Connectivity tab (click the → button at the top right of the
display if you cannot see the Connectivity tab).
7 The default condition is that all ports in your current session are
included in the Path Trace test. If you wish to perform the test on
only one port, select the port, then click in the On selected port only
box.
Set up expected Path Trace Message’s
User Guide
211
user_guide.book Page 212 Friday, January 30, 2004 11:35 AM
8
Measurements
8 You can set up the expected path trace message’s either by manually
entering a value, by copying the values from the signal transmitted
from a port, or by copying the values from the signal at the receiver
input. Use the Copy Expected Messages From options to copy from
a selected Tx port or from the Current Rx.
9 If you choose to copy values from the signals at the transmit or
receive ports, select the Copy Now button.
10 If you wish to enter a trace message manually, select a VT Path then
the Expected Path Trace field and enter your message.
Note: If you have configured the XM Tx/Rx interface to SDH with a
TU-3 within an AU-4 the byte used for path trace routing is J1
which can be set to 16 or 64 byte length. To change the length of the
J1 byte double click in the Length field for the required channel and
select from the drop down menu.
Compare Path Trace Message’s
11 Check you have selected the ports to be included in the test
(see step 7). Select the Start Test button. The Path Trace test runs
through a compare test and displays in the Port Mismatches column
the number of mismatches found for each port, and also gives
channel results for (pass or fail for the currently selected port).
Expected and Measured J1/J2 values for the currently selected port
are displayed.
The Port mask highlights in red any channels which have a
mismatch between the expected and received J1/J2 byte’s.
If you click on an errored (red) channel, the channel list changes to
highlight that channel allowing you to quickly view results.
Connectivity Port Mask Color Scheme
If there have been no connectivity tests performed (the Result column
reads Not Tested) the Port mask is light grey in color. This changes to a
darker grey when a test is performed. Any errored channels are shown
red - use the mask zoom facility to better view channels.
212
User Guide
user_guide.book Page 213 Friday, January 30, 2004 11:35 AM
8
Measurements
Making a BER Measurement
The procedure given here describes how to start a session, set up the
Transmitter and Receiver interface and channel configuration; set up a
measurement period; add errors/alarms to the transmitted signal and
view the results.
To start a session
1 Connect the XM OPTICAL OUT port(s) via attenuator(s) to the
device under test (DUT). Connect the output from the DUT to the
XM OPTICAL IN port(s).
2 Start a session by double clicking on the Agilent XM icon (if not
already in a session) on your Controller display.
3 Select Create a new session and click on OK.
4 In the Port Selection window (top left) click on the Add Ports icon
and select the ports required for the test session.
5 Click on OK.
To configure the Transmitter interface
6 On the XM Setup for Port window select the Physical tab.
7 Set the Signal Standard to SONET or SDH and select a Signal
Rate (if applicable).
8 Set the Mode Type to Terminal.
9 Switch the Laser to On.
10 Set the Clock Source to Internal (Global).
To Configure the Receiver interface
11 Set the Receiver Signal Standard as per the Transmitter selection.
Also set the Signal Rate if applicable.
12 Check that the Optical Power Indicator displays a received power
level within the operable BER measurement range.
User Guide
213
user_guide.book Page 214 Friday, January 30, 2004 11:35 AM
8
Measurements
Channels Set up
13 Select the Channels tab.
14 Click on the Advanced button and use the Advanced Channel
Configuration dialog edit keys to set up the transmitter channels.
Note that the Delete button deletes the channel type at the end of the
list and substitutes it with STS-1’s (SONET) or AU-3’s (SDH).
15 Click OK when finished channel setup.
16 Double clicking on a channel will set it to Selected or Unselected
depending on its current setting. Measurements are not made on
channels that are set to Unselected (the channel(s) that will be
changed are shown in the system highlight color (which is blue).
17 Click on the Copy -> button to copy the Transmitter channel settings
to the Receiver.
To set up payload pattern
18 Select the Pattern tab.
19 Set the payload pattern for each of the Transmitter channels. Right
click on your mouse to display the pattern menu. Double clicking on
a selected channel alternates the pattern selection between:
For Tx - PRBS23, PRBS23-INV and Word, and for Rx -PRBS23,
PRBS23-INV, Word and Live.
20 Set up the Receiver channels to have identical payloads to the
Transmitter. Any differences will result in errors - visible if you
select the Overview or E+A tabs on the Results window (top right of
display). Click on the Pattern Copy -> button to copy the Transmitter
pattern settings to the Receiver.
Note: The Copy buttons on the Channels setup and Pattern tabs
copy both the structure and the pattern (i.e. both buttons perform the
same task).
Switch off any pre-configured errors and alarms
21 Select the E+A Inject tab.
22 Ensure the Error Rate and Alarm buttons are switched off. If any
Errors/Alarms are being generated they can be seen by selecting the
E+A tab in the Results display, or checking the Port status bar for an
error or alarm indication in the Inject column.
214
User Guide
user_guide.book Page 215 Friday, January 30, 2004 11:35 AM
8
Measurements
Set Section Overhead Bytes and J0 Trace Message
23 Select the TOH/SOH tab.
24 You can set all the bytes to a their default condition by selecting
Default All Bytes or select the Edit K1K2 button to set up K1,K2
bytes, and the Advanced button to set up Section Overhead bytes.
25 Select a 16 or 64 byte J0-Section Trace Message. Set to a default
message by clicking on the Default Message button or enter your
own message.
Set POH bytes and J1 Section Trace Message
26 Click the STS-POH/HO-POH tab.
27 Set up the Path Overhead bytes and J1 Section Trace message as
required or select Default All Bytes and Default Message to set all
bytes to their default condition.
Set up Gating period
28 Click on the Gating Setup button (on Toolbar at top of display).
29 Set the measurement Run period to Once, also set the Test
Duration.
30 Click OK when finished.
Check Results window for any errors present
Select the E+A results tab. The channel setup for the selected port
will be shown in the Port mask.
White is a correct signal, pink is a historical error and red is a
current error. In the Port and Channel results display green bullets
indicate a correct state, red an error and pink historical errors.
Note: White is the system window default color.
Selecting the Overview tab will also give you an indication of the
presence of results.
31 Click on the Clear icon on the Toolbar to clear any historical errors.
If there are any channels still shown red determine the cause. Check
the errors and alarms being received and reconfigure the XM or DUT
appropriately.
User Guide
215
user_guide.book Page 216 Friday, January 30, 2004 11:35 AM
8
Measurements
Configure XM to generate errors
32 In the Setup for Port window (bottom left) select the E+A Inject
tab.
33 Select the Type of errors you wish to add and also the Rate. You can
use the Path Errors and Alarms Mask to select which Channels
you wish to error. Double click on a Channel to turn it off or on (if
already off). Channels not selected for error/alarm inject are shown
white in color.
34 Select the Add Errors Mode - Timed Burst or Manual. If you
selected Timed Burst also set up the Timed Burst Parameters.
Select Statistics to be displayed
35 On the XM Results window select the Counts tab. The Port mask
will indicate the presence of errors. If only Transport errors are
present only the outside border of the Port mask is shown red. If Path
errors are present then both the outside border and the errored
channels are shown red.
36 Click on the Select Statistics button.
37 Under Transport Statistics and STS Path/HO Path Statistics click
on Error Counts and Ratios and Alarm Seconds and select the
type of measurements you wish displayed in the Results window.
38 Click OK when finished.
Start a measurement period
39 Check that there are no errors present - the Port mask should be
completely white (no red areas).
40 Add errors: In the Setup for Port window (bottom left), select the
E+E Inject tab and set the Error Rate button to On to inject the
type of errors already setup in steps 32-34 of this procedure.
41 Click on the Gating Start button.
42 Observe the error results accumulating for the errored channels in the
Counts results display.
43 Click on the Gating Stop button to end the measurement or wait
until the end of any preset gating period.
216
User Guide
user_guide.book Page 217 Friday, January 30, 2004 11:35 AM
Measurements
NOTE
User Guide
8
Error results are Cumulative over the entire measurement period. Use a
timed gating period (Once) to ensure that a known fixed transmitted
error rate is measured correctly in the XM receiver.
217
user_guide.book Page 218 Friday, January 30, 2004 11:35 AM
8
Measurements
Making a BER measurement on VT/TU channels (J7244A/45A
Option 010)
The procedure given here describes how to start a session, set up the
Transmitter and Receiver interface and channel configuration; set up a
measurement period; add errors/alarms to the transmitted signal and
view the results.
To start a session
1 Connect the XM OPTICAL OUT port(s) via attenuator(s) to the
device under test (DUT). Connect the output from the DUT to the
XM OPTICAL IN port(s).
2 Start a session by double clicking on the OmniBER XM icon (if not
already in a session) on your Controller display.
3 Select Create a new session and click on OK.
4 In the Port Selection window (top left) click on the Add Ports icon
and select the modules and ports required for the test session.
5 Click on OK.
To configure the Transmitter interface
6 From the list of ports you have chosen select a port to configure.
7 On the XM Setup for Port window select the Physical tab.
8 Set the Signal Standard to SONET or SDH and select a Signal
Rate (if applicable).
9 Switch the Laser to On.
10 Set the Mode to Terminal.
VT/TU Mode Operation
If your XM supports VT/TU operation set the Transmitter VT/TU
Mode selection to On.
11 Set the Clock Source to Internal (Global).
218
User Guide
user_guide.book Page 219 Friday, January 30, 2004 11:35 AM
8
Measurements
To Configure the Receiver interface
12 Set the Receiver Signal Standard as per the Transmitter selection.
Also set the Signal Rate if applicable. Set VT/TU Mode to On.
13 Check that the Optical Power Indicator displays a received power
level within the operable BER measurement range.
Channels Set up
14 Select the Channels tab.
15 Click on the Advanced button and use the Advanced Channel
Configuration dialog edit keys to set up the VT/TU channels -orposition the cursor over a channel, right click your mouse, then
choose from the options given in the pop-up menu.
16 Double clicking on a channel will set it to Selected or Unselected
depending on its current setting. Measurements are not made on
channels that are set to Unselected (they are shown white in color).
TU-12/VT 2’s are colored purple and TU-11/VT1.5’s a shade of
Brown, TU-3’s are shown in a solid orange color.
17 Click on the Copy → button to copy the Transmitter channel settings
to the Receiver.
To set up payload pattern
18 Select the Pattern tab.
19 Set the payload pattern for each of the Transmitter channels. Right
click on your mouse to display the pattern menu. Double clicking on
a selected channel alternates the pattern selection between:
For Tx - PRBS23, PRBS23-INV and Word, and for Rx -PRBS23,
PRBS23-INV, Word and Live. Selecting the zoom icon at the top
right corner of the Transmitter Pattern display gives a larger display,
making it easier to select/set channels. You can also use the keyboard
spacebar to toggle pattern selections when you position the cursor
over the selected channel.
20 Set up the Receiver channels to have identical payloads to the
Transmitter. Any differences will result in errors - visible if you
select the Overview or E+A tabs on the Results window (top right of
display). Click on the Copy -> button to copy the Transmitter pattern
settings to the Receiver.
User Guide
219
user_guide.book Page 220 Friday, January 30, 2004 11:35 AM
8
Measurements
Note: The Copy buttons on the Channels and Pattern tabs copy both
the structure and the pattern (i.e. both buttons perform the same
task).
Switch off any pre-configured errors and alarms
21 Select the E+A Inject tab.
22 Ensure the Error Rate and Alarm buttons are switched off. If any
Errors/Alarms are being generated the port concerned will have an E
inject icon (syringe with red tip) in the Inject column.
Set Section Overhead Bytes and J0 Trace Message
23 Select the SOH/TOH tab.
24 You can set all the bytes to a their default condition by selecting
Default All Bytes or select the Edit K1K2 button to set up K1,K2
bytes, or the Advanced button to set up Section Overhead bytes.
25 Select a 16 or 64 byte J0 Section Trace Message. Set to a default
message by clicking on the Default Message button or enter your
own message.
Set POH bytes and J1 Section Trace Message
26 Select the STS POH/HO POH tab.
27 Set up the Path Overhead bytes and J1 Path Trace Message as
required or select Default All Bytes and Default Message to set all
bytes to their default condition.
Set up Gating period
28 Click on the Gating Setup button (on Toolbar at top of display).
29 Set the measurement Run period to Once, also set the Test
Duration.
30 Click OK when finished.
220
User Guide
user_guide.book Page 221 Friday, January 30, 2004 11:35 AM
8
Measurements
Check Results window for any errors present
31 Select the E+A results tab and check for any results present. The
channel setup for the selected module will be shown in the port
mask. Note that in the mask, channels shown white indicate a correct
signal, pink is a historical error and red is a current error. In the Port
and Channel results display green bullets indicate a correct state, red
an error and pink historical errors. Note white is the system window
default color.
32 Click on the Clear icon on the Toolbar to clear any historical errors.
If there are any channels still shown red determine the cause. Check
the errors and alarms being received and reconfigure the XM or DUT
appropriately.
Configure XM to generate errors
33 In the Setup for Port window select the E+A Inject tab.
34 Select the Type of errors you wish to add and also the Rate. You can
use the Path Errors and Alarms Mask to select which
Channels/Paths you wish to error. Double click on a Channel/Path to
turn it off (channels/paths are shown white when off).
Select Statistics to be displayed
35 On the XM Results window select the Counts tab. The Port mask
will indicate the presence of errors. If only Transport errors are
present only the outside border of the Port mask is shown red. If Path
errors are present then both the outside border and the errored
channels are shown red.
36 Click on the Select Statistics button.
37 Click on the VT Path tab and select the type of measurements you
wish displayed in the Results window. You can also display
Transport or STS Path results.
38 Click OK when finished.
Start a measurement period
39 Check that there are no errors present - the Port mask should be
completely white (no red areas).
User Guide
221
user_guide.book Page 222 Friday, January 30, 2004 11:35 AM
8
Measurements
40 Add errors: Select the E+E Inject tab and set the Error Rate button
to On to inject the type of errors already setup.
41 Click on the Gating Start button.
42 Observe the error results accumulating for the errored channels in the
Counts results display.
43 Click on the Gating Stop button to end the measurement or wait
until the end of any preset gating period.
NOTE
222
Error results are Cumulative over the entire measurement period. Use a
timed gating period (Once) to ensure that a known fixed transmitted
error rate is measured correctly in the XM receiver.
User Guide
user_guide.book Page 223 Friday, January 30, 2004 11:35 AM
Agilent J7241A OmniBER XM
User Guide
9
Specifications
Mechanical, page 226
Environmental, page 227
Connectors, page 227
Chassis, page 229
Option 010, page 232
Accessories, page 233
Performance Tests, page 233
Agilent Technologies
223
user_guide.book Page 224 Friday, January 30, 2004 11:35 AM
9
Specifications
Specifications
The specifications listed here are only a subset of the full OmniBER
XM specifications. Please refer to the OmniBER XM web site for a list
of complete specifications given in the J7241A/42A and J7244A/45A
Technical Datasheets at:
www.Agilent.com/find/OmniBERXM
Modules
10 Gb/s Transceiver Modules
Product
Description
J7241A
OC-192/STM-64 Transceiver module:
single port (1 x Tx/Rx); 1550nm.
J7242A
OC-192/STM-64 Transceiver module:
single port (1 x Tx/Rx); 1310nm.
2.5 Gb/s (and below) Multi-Rate Transceiver Modules
224
Product
Description
J7244A-002
OC-48/STM-16 multi-rate transceiver
module:
includes OC-12/STM-4 and
OC-3/STM-1 capability; dual port (2 x
Tx/Rx); 1550nm.
J7244A-010
Adds multi-channel VT/TU calability.
J7245A-002
OC-48/STM-16 multi-rate transceiver
module:
includes OC-12/STM-4 and
OC-3/STM-1 capability; dual port (2 x
Tx/Rx); 1310nm.
J7245A-010
Adds multi-channel VT/TU calability
User Guide
user_guide.book Page 225 Friday, January 30, 2004 11:35 AM
9
Specifications
Calibration
We recommend a 2 year calibration cycle. Contact Agilent
Technologies for assistance. See “To Contact us" on page 17.
Electrical
Power
Requirements
AC Voltage
nominal
Frequency
100 - 120V
200 - 240V
50/ 60 Hz
Power
230W typical
630W per chassis
maximum
LASER
For your protection, review all laser information given in this manual
before installing or using the instrument.
CLASS 1
LASER PRODUCT
This marking indicates that the radiant energy present in the instrument
is non-hazardous. The product is a Class 1 laser product in Europe and
complies with the standard IEC 60825-1:1993 + A1:1997 + A2:2001 /
EN 60825-1:1993/A2:2001. Complies with 21 CFR 1040.10 and
1040.11 except for deviations pursuant to Laser Notice No. 50, dated
July 26, 2001.
WARNING
User Guide
To prevent exposure to hazardous laser radiation, this product should
not be disassembled. Service personnel should not attempt to
disassemble or repair the laser device incorporated within this product.
225
user_guide.book Page 226 Friday, January 30, 2004 11:35 AM
9
Specifications
WARNING
Use of controls or adjustments or performance of procedures other than
those specified herein may result in hazardous radiation exposure.
Mechanical
J7241A and J7242A
Size
Width
Height
Length
187mm
29 mm
287 mm
1.7 kg
Width
Height
Length
187mm
29 mm
287 mm
1.44 kg
Width
Height
Length
454 mm
889 mm
490 mm
9.1 kg
Width
Height
Length
300 mm
110 mm
490 mm
5.1 kg
Weight
J7244A and J7245A
Size
Weight
J7263A
Size
Weight
E7912A
Size
Weight
226
User Guide
user_guide.book Page 227 Friday, January 30, 2004 11:35 AM
Specifications
9
Environmental
Note: For indoor use only.
Use Conditions
Operating
Temperature
5° to 40°C
Humidity
Installation Category
Maximum relative humidity 80% for
temperatures up to 31°C decreasing
linearly to 50% relative humidity at
40°C.
II
Pollution Degree
Altitude
2
Up to 2000 m.
German Noise Declaration
LpA<70dB
am Arbeitsplatz (operator position)
normaler Betrieb (normal position)
nach DIN 45635 pt.19 (per ISO 7779)
Cleaning
To clean the OmniBER XM, use a soft, dry cloth to clean the
front-panel and side covers.
Connectors
J7241/42A Modules
Optical Out
Wavelength: Tx 1550 nm or 1310 nm, Rx 1280 to 1580 nm.
Fiber power output: 1550nm - Min -5 dBm, max -1 dBm (single mode)
1310nm - Min -6dBm, max -1dBm (single mode).
Tx spectral width: < 3 nm.
Extinction ratio (min): 6dB at 1310nm, 8.2dB at 1550nm.
Min sensitivity: –11dBm at 1310nm, -14dBm at 1550nm.
User Guide
227
user_guide.book Page 228 Friday, January 30, 2004 11:35 AM
9
Specifications
Tx clock sync: Tx clock can be synchronized to either BITS, MTS, or
internal 10 M through the XM chassis, or to recovered clock.
Tx clock performance: Frequency: ± 0.2 ppm;
Stability: ± 1.0 ppm/year max.
Tx Eye clock
Optical In
The eye clock frequency is set to the line rate divided by 16 (e.g. 622.08
MHz for 9.95 GHz SONET/SDH line rates).
Max input power: -1dBm.
Max input power damage level: + 3 dBm.
Optical pulse mask: SDH - S-64.2, S64.3 (ITU-T G.691)
SONET - OC-192 (reach to VSR-1)
J7244A/45A Modules
Optical Out
Wavelength: Tx 1550 nm or 1310 nm, Rx 1250 to 1600 nm.
Fiber power output: 1310nm - Min -5 dBm, max 0 dBm (single mode)
1550nm - Min -2 dBm, max +3dBm (single mode).
Tx spectral width: <1 nm at -20dB.
Extinction ratio (min): 8.2 dB.
Optical eye mask: Complient with Telecordia GR-253 and ITU-T G.957
Tx clock sync: Tx clock can be synchronized to either BITS, MTS, or
internal 10 M through the XM chassis, or to recovered clock.
Tx clock performance: Frequency: ± 0.1 ppm;
Stability: ± 1.0 ppm/year max.
Tx Eye clock
Optical In
The eye clock frequency is set to a quarter of the line rate (e.g. 622.08
MHz for 2.48832GHz SONET/SDH line rates).
Min sensitivity: OC-3 -24 dBm; OC-12 -24 dBm; OC-48 -20 dBm.
Max input power: -2.5 dBm.
Max input power damage level: + 4 dBm.
228
User Guide
user_guide.book Page 229 Friday, January 30, 2004 11:35 AM
9
Specifications
Chassis
Two chassis are available, the J7263A and the E7912A. Each module
uses one slot in a chassis.
J7263A Chassis
4 slot chassis - holds up to four modules. Comes complete with:
• external 10M/BITS/2M clock reference input.
• four blanking plates.
• a chassis-to-chassis cable for interconnecting chassis.
J7263A chassis connectors
External BITS (DS1) 1.544 Mb/s
A DS1 reference signal as specified in GR-378-CORE (Issue 2,
February 1999).
Connector: 100 Ohm balanced Bantam socket.
Signal Level: As per T1.102-1993, 3V pp nominal.
Vpp max = 3.6V
Vpp min = 2.4V
Format: Framed all 1s, Ternary, Return to zero.
External Balanced MTS Clock 2.048 Mb/s
2.048 Mb/s reference as per ITU-T G.703 (11/2001) section 9.
Connector: 120 Ohm balanced Siemens 3-pin socket.
Level: Mark, 3.0 Vpeak , Space, 0 +/- 0.3 Vpeak
Data Format: Data format framed all ones as per ITU-T G.703
(11/2001) section 9
External Un-balanced MTS Clock 2.048 Mb/s
2.048 Mb/s reference as per ITU-T G.703 (11/2001) section 9.
Connector: 75 Ohm BNC female.
User Guide
229
user_guide.book Page 230 Friday, January 30, 2004 11:35 AM
9
Specifications
Level: Mark, 2.37 Vpeak; Space, 0 +/- 0.237 Vpeak
Data Format: Data format framed all ones as per ITU-T G.703
(11/2001) section 9.
External 2.048 MHz synchronization clock
2.048 MHz reference as per ITU-T G.703 (11/2001) section 13.
Connector: 75 Ohm BNC female.
Level: Vpeak max = 1.5V; Vpeak min = 0.75V
External 10.0MHz synchronization clock
The chassis will retain the existing 10 MHz external clock reference
function.
Connector: 50 Ohm BNC female.
Level: Vpp min = 0.5V; Vpp max = 3.6V
Reference Output to Module control PCA
Rate: The BITS PCA will output a 10 MHz signal to the chassis.
Other Chassis Connectors
Power: Male AC power receptacle.
MDI: RJ-45. 100 Mb/s Ethernet (to PC controller).
MDI-X: RJ-45. 100 Mb/s Ethernet (to next chassis).
Daisy-chain Out: Male D-shell Event/ clock connections to next chassis.
Daisy-chain In: Male D-shell. Event/ clock connections from previous
chassis.
230
User Guide
user_guide.book Page 231 Friday, January 30, 2004 11:35 AM
9
Specifications
E7912A Portable Chassis - 2 Slot
The E7912A chassis holds up to 2 modules. Each module uses one slot
in the chassis.
The E7912A chassis includes the following:
• A chassis to chassis connecting cable
• 2 Blanking plates (a blanking plate must be fitted to any unused slot
to ensure correct operating temperature range).
NOTE
The E7912A portable chassis supports a 10 Mhz reference input, with
no support for an external BITS/2M reference.
E7912A Other Chassis Connectors
Power: Male AC power receptacle.
MDI: RJ-45, 100 Mb/s Ethernet (to PC Controller).
MDI-X: RJ-45, 100 Mb/s Ethernet (to next chassis)
Daisy-chain Out: Male D-shell, Event/clock connections to next chassis.
Daisy-chain In: Male D-shell, Event/clock connections from previous
chassis.
External Trigger In: Female BNC, Trigger input from external device.
External Trigger Out: Female BNC, Trigger output to external device.
1 pps In: Female BNC, 1 pulse-per-second input from GPS module
Serial: RJ-45, Serial input from GPS module
User Guide
231
user_guide.book Page 232 Friday, January 30, 2004 11:35 AM
9
Specifications
Option 010 -Multi-channel VT/TU mode
Adds multi-channel VT/Low Order Path BER, VT/Low Order Path
APS switching times and J2 path connectivity testing for verification of
multi-service provisioning platforms. Full bandwidth simultaneous
measurement of up to 1344 VT1.5s or 1008 TU-12s is supported within
each OC-48. In addition, framed/unframed DS-3/DS-1/E1 mapped
payloads are supported, as well as unframed E3 mapped payloads.
Option 010 enable
Normally option 010 is factory enabled when you place an order for
option 010, however if need to switch on Option 010 in a module use
the following procedure.
1 On your OmniBER XM controller select:
Start, Programs, OmniBER XM and Option Controller.
2 In the Module Option Controller dialog window enter the module
Serial Number, Enabled Option and in the Key box the codeword
provided by Agilent to enable VT/TU operation in the chosen
module.
Exchangeable optical connectors
One option must be ordered per module.
• FC/PC connector - option 609
• SC connector - option 610
• ST connector - option 611
• UK calibration certificate - option UK6
232
User Guide
user_guide.book Page 233 Friday, January 30, 2004 11:35 AM
9
Specifications
Accessories
Part number
Product name
Description
E7900-64207
J7263 chassis-to-chassis
cable
Interconnects J7263A
chassis (included with
J7263A)
E7900-64208
Rack-to-rack cable across
19-inch racks
Interconnects J7263A
chassis
J7283A
Optical connector
One exchangeable optical
FC/PC connector
J7284A
Optical connector
One exchangeable optical
SC connector
J7285A
Optical connector
One exchangeable optical
ST connector
J7287A
XM product CD
Software and user manual
CD
Performance Tests
Performance tests are provided in the XM Verification manual, a copy
of which (in .pdf format) can be found at the following web site:
www.Agilent.com/find/OmniBERXM
User Guide
233
user_guide.book Page 234 Friday, January 30, 2004 11:35 AM
9
234
Specifications
User Guide
user_guide.book Page 235 Friday, January 30, 2004 11:35 AM
Agilent OmniBER XM Network Simulator
User’s Guide
10
Operator Maintenance
“Operator Maintenance" on page 236
“Optical Connector Cleaning" on page 236
“Optical Patch-cord connectors" on page 237
“Storage and Shipment" on page 238
This chapter provides information on cleaning optical connectors and
module storage and shipment.
Agilent Technologies
235
user_guide.book Page 236 Friday, January 30, 2004 11:35 AM
10 Operator Maintenance
Operator Maintenance
WARNING
WARNING NO OPERATOR SERVICEABLE PARTS INSIDE.
REFER SERVICING TO QUALIFIED PERSONNEL. TO PREVENT
ELECTRICAL SHOCK DO NOT REMOVE COVERS.
Maintenance that can be done by operators:
• Optical connector cleaning.
Optical Connector Cleaning
Fibre optic connectors must be cleaned prior to making every optical
connection. This chapter details the equipment and the techniques to be
used.
Equipment required
Isopropyl Alcohol
Lint-free cloth: Typically SWI400 from Automation Facilities
Cleaning stick: Typically Cletop NTT-ME/2.5mm
Compressed Air: Typically Ambersil ARD 400
(Alternative: Cleaning cassette reel Cletop-S, Type-A)
CAUTIO N
Isopropyl alcohol (IPA) should be stored in a pump action solvent
container (designed to allow a small amount of alcohol to be dispensed
on demand) with a cap to prevent evaporation of the alcohol.
IPA should be stored and used only in a clean, cool and ventilated area.
Inhalation of vapors and repeated or prolonged contact of the liquid with
skin or clothing should be avoided.
Hands should be washed after use of IPA.
Do not touch the area of lint-free cloth to be used for cleaning.
236
User Guide
user_guide.book Page 237 Friday, January 30, 2004 11:35 AM
Operator Maintenance
10
Optical Patch-cord connectors
Wet/Dry Cleaning
• Remove connector dust cap.
• Moisten a small section of a lint free cloth with IPA and place the
cloth on a clean, dry flat surface. Hold the connector vertically and
using light downward pressure, inscribe several figure 8 motions on
the cloth.
• Using a dry portion of the cloth dry the ferrule immediately. Failure
to do this will result in a residue on the ferrule and/or fibre end-face.
• Dispose of the cloth immediately after use - do not use it to clean
another connector.
• A compressed air spray may be used as a final operation to remove
any residual particles.
• Replace the dust cap on the connector, taking care not to touch the
ferrule/fibre end-face.
Dry Cleaning (alternative method)
This method addresses the potential to use a cassette-style cleaner e.g.
NTT-ME 'Cletop' range.
• Clean the connector end using the cassette cleaner by advancing the
tape belt, exposing a fresh tape section and sliding the ferrule/fibre
end-face along the exposed tape section with a light downward
pressure. The Cletop cassette has two adjacent "slots" thus exposing
two sections of tape. Hence two separate cleaning operations should
be employed per connector.
• Replace the dust cap on the connector, taking care not to touch the
ferrule/fibre end-face.
Inspection
Either of the above methods should produce acceptable results, however
connector inspection is the only way to guarantee that a cleaning
operation was successful.
User Guide
237
user_guide.book Page 238 Friday, January 30, 2004 11:35 AM
10 Operator Maintenance
Module Front Panel Optical Connectors
• Remove the dust cap and optical adaptor.
• Moisten a small section of a lint free cloth with IPA. Bring the cloth
into contact with the exposed end of the ferrule and using light
pressure, inscribe several figure 8 motions with the cloth.
• Using a dry portion of the cloth dry the ferrule immediately. Failure
to do this will result in a residue on the ferrule.
• Dispose of the cloth immediately after use - do not use it to clean
another connector.
• A compressed air spray may be used as a final operation to remove
any residual particles.
• Replace the optical adaptor after cleaning (see below) then replace
the dust cap, taking care not to touch the ferrule end-face.
Module Front Panel Optical Adapters (FC/PC and SC)
• Carefully remove the optical adaptor from the instrument.
• Moisten a new stick cleaner with isopropyl alcohol.
• Clean the adapter by pushing and pulling the cleaner within the
alignment sleeve. Rotate the cleaner slowly during the push/pull
operation.
• Using a new, dry cleaner, remove the alcohol.
• Dispose of the stick cleaners - do not re-use.
• Replace the optical adaptor, taking care not to touch the ferrule
end-face.
Storage and Shipment
Storage
The module may be stored in or shipped to environments that meet the
following conditions:
• Temperature: -20 °C to +60 °C
• Altitude: Up to 15,200 meters (50,000 feet)
238
User Guide
user_guide.book Page 239 Friday, January 30, 2004 11:35 AM
10
Operator Maintenance
• Humidity: Up to 90% relative humidity to 60 °C.
The module should also be protected from extreme temperatures that
could cause interior condensation.
Shipment
Repackaging for Shipment
Original Packaging Containers and materials identical to those used in
factory packaging are available from Agilent Technologies offices. If
the module is being returned to Agilent Technologies for servicing,
attach a tag indicating the type of service required; return address,
model number, and full serial number.
Mark the container FRAGILE to ensure careful handling. In any
correspondence, refer to the module by its model number and full serial
number.
Other Packaging
The following general instructions should be followed when
repackaging with commercially available materials:
• Always use a static bag and then wrap module in paper or plastic. If
the module is being shipped to Agilent Technologies, attach a tag
indicating the type of service required; return address, model number
and full serial number.
• Use a strong shipping container. A double-walled carton made of
350-pound test material is adequate.
• Use a layer of shock absorbing material 70 to 100 mm (3 to 4 inches)
thick, around all sides of the module to provide firm cushioning and
prevent movement inside the container.
• Seal shipping container securely.
• Mark shipping container FRAGILE to ensure careful handling.
• In any correspondence, refer to the module using its model number
and full serial number.
User Guide
239
user_guide.book Page 240 Friday, January 30, 2004 11:35 AM
10 Operator Maintenance
240
User Guide
user_guide.book Page 241 Friday, January 30, 2004 11:35 AM
11
Telecoms Concepts
Glossary 243
Signal Rates 259
Summary of Errors and Alarms 260
SONET Concepts 262
Service Disruption 304
This chapter provides useful reference material, including a summary of
the ITU standards, explanations of telecoms terms and lists of overhead
bytes, signal rates and errors/alarm.
Agilent
241
user_guide.book Page 242 Friday, January 30, 2004 11:35 AM
11 Telecoms Concepts
242
User Guide
user_guide.book Page 243 Friday, January 30, 2004 11:35 AM
11
Glossary
Numerics
User Guide
10BASE-2
10 Mb/s Ethernet on 200-meter segments of thin copper standard 75 ohm coax. (“Cheapernet” or “Thinlan”.)
10BASE-5
10 Mb/s Ethernet on 500-meter segments of coaxial cable “fat” 75 ohm coax. (The original Ethernet.)
10BASE-FL
10 Mb/s Ethernet on 2-km multimode fiber-optic cables at
850 nm.
10BASE-T
10 Mb/s Ethernet on 200-meter loops of unshielded twisted
pair copper - UTP Cat 3.
100BASE-FX
100 Mb/s Ethernet on 2-km multimode or 10-km
single-mode fiber-optic cables at 1310 nm.
100BASE-SX
100 Mb/s Ethernet on 2-km multimode fiber-optic cables at
850 nm.
100BASE-T
100 Mb/s Ethernet on 200-meter loops of unshielded
twisted pair copper.
100BASE-TX
100 Mb/s Ethernet on 200-meter loops of unshielded
twisted pair copper - UTP Cat 5.
1000BASE-LX
1 Gb Ethernet on 2-km multimode or 10-km single-mode
fiber-optic cables at 1310 nm.
1000BASE-SX
1 Gb Ethernet on 2-km multimode fiber-optic cables at
850 nm.
1000BASE-T
1 Gb Ethernet on 30-meter loops of unshielded twisted pair
copper - UTP Cat 5.
802.3ae
The IEEE standard for 10 Gb Ethernet.
802.3z
The IEEE standard for 1 Gb Ethernet.
243
user_guide.book Page 244 Friday, January 30, 2004 11:35 AM
11
A
AAL
ATM Adaption Layer.
ABR
Available Bit Rate.
ADM
Add and Drop Multiplexer.
ADPCM
Adaptive Coded Differential Pulse Coded Modulation.
AIS
Alarm Indication Signal.
AIS-P
Synchronous Transport Signal Path Alarm Indication
Signal.
AIS-L
Line Alarm Indication Signal.
AIS-V
Virtual Tributary Path Alarm Indication Signal.
AIS-C
Concatenated Signal Alarm Indication Signal.
AMI
Alternate Mark Inversion.
ANSI
American National Standards Institute.
APS
Automatic Protection Switch.
ASCII
American Standard Code for Information Exchange.
ATM
Asynchronous Transfer Mode.
AU
Administrative Unit.
AU-AIS
Administrative Unit Alarm Indication Signal.
AU-LOP
Administrative Unit Loss Of Pointer.
AU-NDF
Administrative Unit New Data Flag.
B
244
BBE
Background Block Error.
BBER
Background Block Error Ratio.
BC
Background Channel.
User Guide
user_guide.book Page 245 Friday, January 30, 2004 11:35 AM
11
BCD
Binary Coded Decimal.
BER
Bit Error Rate.
BERT
Bit Error Rate Test.
BIP
Bit Interleaved Parity.
BPS
Bits Per Second.
BPV
Bipolar Violation.
B3ZS
Bipolar with 3 Zero Substitution.
B8ZS
Bipolar with 8 Zero Substitution.
C
User Guide
CAN
Campus Area Network.
CAS
Channel Associated Signaling.
Cat 5
Category 5 unshielded twisted pair copper.
CATV
Cable Television.
CBR
Constant Bit Rate.
CCITT
Consultative Committee for International Telephony and
Telegraphy.
CCS
Common Channel Signaling.
CDT
Cell Delay Tolerance.
CDV
Cell Delay Variation.
CEPT
Committee of European PTTs.
CMI
Coded Mark Inversion.
CO
Central Office.
CoS
Class of Service.
CRC
Cyclic Redundancy Check.
245
user_guide.book Page 246 Friday, January 30, 2004 11:35 AM
11
CSES
Consecutive Severely Errored Seconds.
CSMA/CD
Carrier Sense, Multiple Access with Collision Detection.
CV-L
Line Code Violation, also L-BIP.
CV-LFE
Line Far End Code Violation, also REI-L.
CV-P
Synchronous Transport Signal Path Code Violation, also
P-BIP.
CV-PFE
Synchronous Transport Signal Path Far End Code
Violation, also REI-P.
CV-S
Section Code Violation, also S-BIP.
CV-V
Virtual Tributary Path Code Violation, also V-BIP.
CV-VFE
Virtual Tributary Far End Code Violation, also REI-V.
D
246
D/I
Drop and Insert.
DACS
Digital Access and Cross-connect Switch.
dB
Decibel.
DCC
Data Communications Channel.
DCS
Digital Cross-connect Switch.
DDF
Digital Distribution Frame.
DDN
Digital Data Network.
DSn
Digital Signal Hierarchy.
DTMF
Dual Tone Multi-Frequency signaling.
DUT
Device Under Test.
DWDM
Dense Wave Division Multiplexing.
DXC
Digital Cross-connect Switch.
User Guide
user_guide.book Page 247 Friday, January 30, 2004 11:35 AM
11
E
EB
Errored Block.
EBCDIC
Extended Binary Coded Decimal Interchange Code.
EOW
Engineering Order Wire.
ES
Errored Second.
ESF
Extended SuperFrame format.
ESR
Errored Second Ratio.
ETSI
European Telecommunications Standards Institute.
F
FAS
Frame Alignment Signal.
FC
Foreground Channel.
FCS
Frame Check Sequence.
FDDI
Fiber Distributed Data Interface.
FDM
Frequency Division Multiplexing.
FEAC
Far End Alarm Channel.
FEBE
Far End Block Error.
FEC
Forward Error Correction.
FERF
Far End Receive Failure.
G
User Guide
GBIC
Gigabit Interface Converter.
GP-IB
General Purpose Interface Bus.
GUI
Graphical User Interface.
247
user_guide.book Page 248 Friday, January 30, 2004 11:35 AM
11
H
HDB3
High Density Bipolar 3.
HDLC
High-level Data Link Control.
HEC
Header Error Control.
HO
High Order.
HO PTE
High Order Path Terminating Equipment.
HP-BIP
High Path Bit Interleaved Parity error.
HP-PLM
High Path Payload Label Mismatch.
HP-RDI
High Path Remote Defect Indication.
HP-REI
High Path Remote Error Indication.
HP-TIM
High Path Trace Identifier Mismatch.
HP-UNEQ
High Path Unequipped.
Hz
Hertz.
I
ICMP
Internet Control Message Protocol.
IEC
Incoming Error Count.
IHL
Internet Header Length.
IP
Internet Protocol.
ISDN
Integrated Services Digital Network.
ISO
International Organization for Standardization.
ITU
International Telecommunications Union Telecommunications.
IXC
Inter eXchange Carrier.
J
248
User Guide
user_guide.book Page 249 Friday, January 30, 2004 11:35 AM
11
K
K-bytes
K1 and K2.
L
User Guide
LAN
Local Area Network.
LCD
Loss of Cell Delineation.
LEC
Local Exchange Carrier.
L-BIP
Line Bit Interleaved Parity error, also CV-L.
LCP
Link Control Protocol.
LLC
Logical Link Control.
LO
Low Order.
LOF
Loss of Frame.
LOM/LOMF
Loss of Multiframe.
LOP
Loss of Pointer.
LOP-C
Loss of Concatenation.
LOP-P
Synchronous Transport Signal Path Loss Of Pointer.
LOP-V
Virtual Tributary Path Loss Of Pointer.
LOS
Loss of Signal.
LP-BIP
Low Path Bit Interleaved Parity error.
LP-PLM
Low Path Payload Label Mismatch.
LP-RDI
Low Path Remote Defect Indication.
LP-REI
Low Path Remote Error Indication.
LP-RFI
Low Path Remote Failure Indication.
LP-TIM
Low Path Trace Identifier Mismatch.
LP-UNEQ
Low Path Unequipped.
249
user_guide.book Page 250 Friday, January 30, 2004 11:35 AM
11
LSB
Least Significant Bit.
LTM
Line Terminal Multiplexer.
M
MAC
Media Access Control.
MAN
Metropolitan Area Network.
M/F LOSS
Loss of Multiframe (PDH).
MMF
Multi Mode Fiber.
MS
Multiplexer Section.
MS-AIS
Multiplexer Section Alarm Indication Signal.
MS-BIP
Multiplexer Section Bit Interleaved Parity error.
MSOH
Multiplexer Section OverHead.
MSP
Multiplexer Section Protection.
MS-RDI
Multiplexer Section Remote Defect Indication.
MS-REI
Multiplexer Section Remote Error Indication.
MSTE
Multiplexer Section Terminal Equipment.
MTBF
Mean Time Between Failures.
MTJ
Maximum Tolerance Input Jitter.
MUX
Multiplexer.
N
250
NDF
New Data Flag.
NE
Network Element.
NFAS
Non Frame Alignment Signal.
User Guide
user_guide.book Page 251 Friday, January 30, 2004 11:35 AM
11
O
OAM
Operations, Administration and Management.
OC
Optical Carrier.
OCh
Optical Channel.
ODI
Outgoing Defect Indication.
ODU
Optical channel Data Unit.
OEI
Outgoing Error Indication.
OH
Overhead.
OLTU
Optical LIne Terminal Unit.
ONNI
Optical transport Network Node Interface.
OOF
Out Of Frame.
OOM
Out Of Frame.
OPU
Optical channel Payload Unit.
OS
Operating System.
OSC
Optical Supervisory Channel.
OSI
Open Systems Interconnection.
OTM
Optical Transport Module.
OTN
Optical Transport Network.
OTU
Optical channel Transport Unit.
P
User Guide
P/AR
Peak to Average Ratio.
P-BIP
Synchronous Transport Signal Path Bit Interleaved Parity
error, also CV-P.
PBX
Private Branch Exchange.
251
user_guide.book Page 252 Friday, January 30, 2004 11:35 AM
11
PC
Personal Computer.
PCM
Pulse Code Modulation.
PCS
Physical Coding Sublayer.
PCR
Peak Cell Rate.
PDH
Plesiochronous Digital Hierarchy.
PES
Percentage Errored Seconds.
PHY
Physical layer device.
PLM
Payload Label Mismatch.
PLM-P
Synchronous Transport Signal Path Payload Label
Mismatch.
PLM-V
Virtual Tributary Path Payload Label Mismatch.
PMD
Physical Media Dependent.
POH
Path OverHead.
PoP
Point of Presence.
POS
Packet Over SONET.
PPP
Point-to-Point Protocol.
PRBS
Pseudo-Random Bit Sequence.
PSN
Packet Switched Network.
PSTN
Public Switched Telephone Network.
PTE
Path Terminating Equipment.
PUAS
Path UnAvailable Seconds.
Q
QoS
252
Quality of Service.
User Guide
user_guide.book Page 253 Friday, January 30, 2004 11:35 AM
11
R
RAI
Remote Alarm Indication.
RAI (M/F)
Loss of Multiframe Remote Alarm Indication.
RDI
Remote Defect Indication.
RDI-L
Line Remote Defect Indication.
RDI-P
Synchronous Transport Signal Path Remote Defect
Indication.
RDI-V
Virtual Tributary Path Remote Defect Indication.
REBE
Remote End Block Error.
REI
Remote Error Indication.
REI-L
Line Remote Error Indication, also CV-LFE.
REI-P
Synchronous Transport Signal Path Remote Error
Indication, also CV-PFE.
REI-V
Virtual Tributary Path Remote Error Indication, also
CV-VFE.
RFI-V
Virtual Tributary Path Remote Failure Indication.
RS
Regenerator Section.
RS-BIP
Regenerator Section Bit Interleaved Parity error.
RSOH
Regenerator Section OverHead.
RSTE
Regenerator Section Terminating Equipment.
RS-TIM
Regenerator Section Trace Identifier Mismatch.
RX
Receiver
S
User Guide
S/N
Signal to Noise Ratio.
S-BIP
Section Bit Interleaved Parity error, also CV-S.
253
user_guide.book Page 254 Friday, January 30, 2004 11:35 AM
11
SCPI
Standard Commands for Programmable Instrumentation.
SDH
Synchronous Digital Hierarchy.
SEF
Severely Errored Frame.
SEP
Severely Errored Period.
SEPI
Severely Errored Period Intensity.
SES
Severely Errored Seconds.
SESR
Severely Errored Seconds Ratio.
SF
Super Frame.
SFD
Start Frame Delimiter.
SLA
Service Level Agreement.
SMF
Single Mode Fiber.
SNMP
Simple Network Management Protocol.
SOH
Section OverHead.
SONET
Synchronous Optical Network.
SPE
Synchronous Payload Envelope.
STM
Synchronous Transport Module.
STS
Synchronous Transport Signal.
T
254
TC
Tandem Connection.
TC-APId
Tandem Connection Access Point Identifier.
TC-BIP
Tandem Connection Bit Interleaved Parity error.
TC-IAIS or
TC-INCAIS
Tandem Connection Incoming Alarm Indication Signal.
TC-IEC
Tandem Connection Incoming Error Count.
User Guide
user_guide.book Page 255 Friday, January 30, 2004 11:35 AM
11
User Guide
TC-OOM
Tandem Connection Out of Multiframe.
TCI
Tag Control Information.
TCP/IP
Transmission Control Protocol/Internet Protocol.
TC-RDI
Tandem Connection Remote Defect Indication.
TC-REI
Tandem Connection Remote Error Indication.
TC-UNEQ
Tandem Connection Unequipped.
TDM
Time Division Multiplexing.
TDMA
Time Division Multiple Access.
TE
Terminal Equipment.
TIM
Trace Identifier Mismatch.
TIM-P
Synchronous Transport Signal Path Trace Identifier
Mismatch.
TIM-V
Virtual Tributary Path Trace Identifier Mismatch.
TM
Terminal Multiplexer
TMN
Telecommunications Management Network.
TOH
Transport OverHead.
TPID
Tag Protocol Identifier.
TU
Tributary Unit.
TU-AIS
Tributary Unit Alarm Indication Signal.
TUG
Tributary Unit Group.
TU-LOM
Tributary Unit Loss Of Multiframe.
TU-LOP
Tributary Unit Loss Of Pointer.
TU-NDF
Tributary Unit Pointer New Data Flag.
TX
Transmitter.
255
user_guide.book Page 256 Friday, January 30, 2004 11:35 AM
11
U
UAS
UnAvailable Second.
UI
Unit Interval.
UNEQ
Unequipped.
UNEQ-P
Synchronous Transport Signal Path Unequipped.
UNEQ-V
Virtual Tributary Path Unequipped.
UTP
Unshielded Twisted Pair.
UUT
Unit Under Test.
V
V-BIP
Virtual Tributary Path Bit Interleaved Parity error, also
CV-V.
VBR
Variable Bit Rate.
VC
Virtual Channel (ATM).
VC-AIS
Virtual Container Alarm Indication Signal.
VC-n
Virtual Container.
VID
VLAN Identifier.
VLAN
Virtual Local Area Network.
VP
Virtual Path (ATM).
VT
Virtual Tributary.
VT PTE
Virtual Tributary Path Terminating Equipment.
W
256
WAN
Wide Area Network.
WDM
Wave Division Multiplexing.
User Guide
user_guide.book Page 257 Friday, January 30, 2004 11:35 AM
11
WIS
WAN Interface Sublayer.
WWDM
Wide Wave Division Multiplexing.
X
X-Connect
Cross-Connect.
X-bits
DS3 bits, X1 and X2.
Y/Z
Yellow
User Guide
Yellow Alarm.
257
user_guide.book Page 258 Friday, January 30, 2004 11:35 AM
11
258
User Guide
user_guide.book Page 259 Friday, January 30, 2004 11:35 AM
Telecoms Concepts
11
Signal Rates
User Guide
Rate (Mb/s)
Optical Carrier
SONET STS
SDH STM
51.84
OC-1
STS-1
STM-0
155.52
OC-3
STS-3
STM-1
466.56
OC-9
STS-9
STM-3
622.08
OC-12
STS-12
STM-4
933.12
OC-18
STS-18
STM-6
1244.16
OC-24
STS-24
STM-8
1866.24
OC-36
STS-36
STM-12
2488.32
OC-48
STS-48
STM-16
2 666.06
OTU-1
4976.64
OC-96
STS-96
STM-32
9953.28
OC-192
STS-192
STM-64
10709.23
OTU-2
39 813.12
OC-768
STS-768
STM-256
43 018.41
OTU-3
259
user_guide.book Page 260 Friday, January 30, 2004 11:35 AM
11 Telecoms Concepts
Summary of Errors and Alarms
260
Acronym
Error/Alarm
AIS
Alarm Indication Signal
BIP
Bit Interleaved Parity
IEC
Incoming Error Count
LOF
Loss of Frame
LOM/LOMF
Loss of Multiframe
LOP
Loss of Pointer
LOP-C/AU-LOP
-C
Loss of Concatenation
LOS
Loss of Signal
ODI
Outgoing Defect Indication
OEI
Outgoing Error Indication
OOF
Out of Frame
PLM
Payload Label Mismatch
RAI
Remote Alarm Indication
RDI
Remote Defect Indication
REI
Remote Error Indication
RFI
Remote Failure Indication
SEF
Severely Errored Frame
TIM
Trace Identifier Mismatch
UNEQ
Unequipped
User Guide
user_guide.book Page 261 Friday, January 30, 2004 11:35 AM
Telecoms Concepts
User Guide
11
261
user_guide.book Page 262 Friday, January 30, 2004 11:35 AM
11 Telecoms Concepts
SONET Concepts
For SONET reference information, see:
• “SONET STS-1 Frame Structure" on page 263
• “SONET Payload Structure" on page 264
• “SONET Overhead Bytes" on page 265
262
User Guide
user_guide.book Page 263 Friday, January 30, 2004 11:35 AM
Telecoms Concepts
11
SONET STS-1 Frame Structure
The relationship between the various elements that make up a SONET
STS-1 signal is shown in the following diagram.
User Guide
263
user_guide.book Page 264 Friday, January 30, 2004 11:35 AM
11 Telecoms Concepts
SONET Payload Structure
The payloads that can be carried in a SONET signal are outlined below.
• You can asynchronously map a framed/unframed DS3 (44 Mb/s) or
E3 (34 Mb/s) signal into a full STS-1 SPE, or you can bulk fill the
STS-1 SPE.
• You can transmit 28 VT1.5s, 21 VT2s or 7 VT6s in a STS-1 SPE.
The VTs are structured into 7 virtual tributary groups (VT Groups)
within a STS-1 SPE. Each VT-group can contain 4 VT1.5s, 3 VT-2s
or 1 VT-6.
• You can transmit concatenated payloads in SONET signals. These
types of payload reduce test times by testing the entire bandwidth in
one go.
264
User Guide
user_guide.book Page 265 Friday, January 30, 2004 11:35 AM
Telecoms Concepts
11
SONET Overhead Bytes
Four overheads are used to transport SONET signals across the spans of
a network.
For more information, see:
• “Section Overhead (SOH)" on page 266
• “Line Overhead (LOH)" on page 267
• “STS Path Overhead (STS POH)" on page 274
• “VT Path Overhead (VT POH for VT-1.5, VT-2 or VT-6)" on
page 278
User Guide
265
user_guide.book Page 266 Friday, January 30, 2004 11:35 AM
11 Telecoms Concepts
Section Overhead (SOH)
The Section overhead (SOH) supports the transmission of SONET
signals across the section span of a network.
Byte
Label
Description
A1, A2
Framing
Provides a frame alignment pattern (A1=F6 Hex,
A2=28 Hex), The frame alignment word of an
STS-n frame is n A1 bytes followed by n A2
bytes.
J0
Section
Trace
Supports continuity testing between the
transmitting and receiving device on each section
span.
Z0
266
Reserved for future international standardization.
B1
Section
Code
Violation
(CV-S)
Provides section error monitoring. The section
BIP-8 provides end-to-end error performance
monitoring across an individual section. The
BIP-8 is calculated over all bits of the previous
STS-n frame after scrambling. The computed
value is placed in the B1 byte of the current STS-n
before scrambling.
E1
Orderwire
Provides local orderwire channel for voice
communication between regenerators, hubs and
remote terminal locations.
F1
User
Channel
Provides a 64 kb/s proprietary data
communications channel for the user. It is
terminated at each section terminating equipment.
D1 to D3
Data
Comm.
Channel
Provides a 192 kb/s message-based data
communications channel (DCC) for
administration, monitor, alarm and maintenance
functions between section terminating equipment.
User Guide
user_guide.book Page 267 Friday, January 30, 2004 11:35 AM
Telecoms Concepts
11
Line Overhead (LOH)
The LOH carries SONET signals over the line span of a network.
Byte
Label
B2
Line
Code
Violation
(CV-L)
Provides line error monitoring. The BIP-8 is
calculated over all bits of the line overhead and
envelope capacity of the previous STS-n frame
before scrambling and is placed in the B2 byte of
the current STS-n frame before scrambling.
K1, K2
APS
Channel
Line automatic protection switching (APS) is
controlled by the K1K2 bytes. Two APS message
types are used:
Linear APS messages
Ring APS messages
For more information, see “Linear APS Messages
(Telecordia GR-253-CORE Issue 3)" on page 269
and “Ring APS Messages (Telecordia
GR-1230)" on page 271.
D4 to D1
2
Data
Comm.
Channel
Provides a 576 kb/s data communications channel
(DCC) between line terminating equipment. Used
for network administration/maintenance
information.
S1
Sync
Status
S1 bits 5 to 8 show which levels of synchronization
are being used at the transmit end of a line span.
For more information, see “Synchronization Status
Messages (S1 bits 5 to 8)" on page 273.
Z1, Z2
User Guide
Description
Allocated for future growth.
M0
REI-L
STS-1 line remote error indication (defined only
for STS-1) conveys the B2 errors detected by the
downstream line terminating equipment.
M1
REI-L
STS-n line remote error indication (defined for
n>3) conveys the B2 errors detected by the
downstream line terminating equipment.
E2
Orderwir
e
Provides express orderwire channel for voice
communication between line terminating
equipment.
267
user_guide.book Page 268 Friday, January 30, 2004 11:35 AM
11 Telecoms Concepts
Byte
H1 to H3
268
Label
Description
The payload pointer contained in the H1 and H2
bytes of the line overhead designates the location
of the byte where the STS SPE begins. The last ten
bits (bits 7 to 16) of H1H2 carry the pointer value
(0 to 782). The H1 and H2 bytes are also used to
indicate a concatenated payload by transmitting the
pointer word “1001XX1111111111” in the second
to Nth STS-1 in an STS-Nc.The H3 bytes is
allocated for SPE frequency justification purposes
and can carry “live” information from a STS SPE
when a negative pointer adjustment occurs.
User Guide
user_guide.book Page 269 Friday, January 30, 2004 11:35 AM
Telecoms Concepts
11
Linear APS Messages (Telecordia GR-253-CORE Issue 3)
Protection Switching Protocol
K1
Condition
Bits 1 to 4
1111
Locked out of protection
1110
Forced switch
1101
Signal fail high priority
1100
Signal fail low priority
1011
Signal degrade high priority
1010
Signal degrade low priority
1001
Unused
1000
Manual switch
0111
Unused
0110
Wait-to-restore
0101
Unused
0100
Exercise
0011
Unused
0010
Reverse request
0001
Do not revert
0000
No request
Bits 5 to 8 Selects channel used by APS messages
User Guide
269
user_guide.book Page 270 Friday, January 30, 2004 11:35 AM
11 Telecoms Concepts
Protection Switching Protocol
K2
Condition
Bits 1 to 4 Selects bridged channel used
Bit 5
Bits 6 to 8
100
101
110
111
270
Determines APS architecture
0 - 1:1 Architecture - short path
1 - 1:N Architecture - long path
Provisional mode is unidirectional
Provisional mode is bidirectional
RDI-L
AIS-L
All other combinations of bits 6 to 8 not used.
User Guide
user_guide.book Page 271 Friday, January 30, 2004 11:35 AM
Telecoms Concepts
11
Ring APS Messages (Telecordia GR-1230)
Protection Switching Protocol
K1
Condition
Bits 1 to 4
1111
Locked out of protection (span) or signal fail
(protection)
1110
Forced switch (span)
1101
Forced switch (ring)
1100
Signal fail (span)
1011
Signal fail (ring)
1010
Signal degrade (protection)
1001
Signal degrade (span)
1000
Signal degrade (ring)
0111
Manual switch (span)
0110
Manual switch (ring)
0101
Wait-to-restore
0100
Exercise (span)
0011
Exercise (ring)
0010
Reverse request (span)
0001
Reverse request (ring)
0000
No request
Bits 5 to 8
User Guide
Destination node ID
271
user_guide.book Page 272 Friday, January 30, 2004 11:35 AM
11 Telecoms Concepts
Protection Switching Protocol
K2
Bits 1 to 4
Bit 5
Bits 6 to 8
000
001
010
011
100
101
110
111
272
Condition
Source node ID
Path code: 0 = short path request, 1 = long path request
Idle
Bridged
Bridged and switched
Extra traffic (ET) on protection channels
Note used
Not used
RDI-L
AIS-L
User Guide
user_guide.book Page 273 Friday, January 30, 2004 11:35 AM
Telecoms Concepts
11
Synchronization Status Messages (S1 bits 5 to 8)
S1 (Bits 5 to
8)
Quality level
0001
1
Stratum 1 traceable
0000
2
Synchronized-traceable
0111
3
Stratum 2 traceable
1010
4
Stratum 3 traceable
1100
5
SONET minimum clock traceable
n/a
6
Stratum 4 traceable
1111
7
Do not use for synchronization
0111
User Guide
SONET synchronization quality level
description
User-assignable Reserved for network synchronization
use
273
user_guide.book Page 274 Friday, January 30, 2004 11:35 AM
11 Telecoms Concepts
STS Path Overhead (STS POH)
The STS Path overhead (STS POH) support the transmission of SONET
signals across the path of a network.
274
Byte
Label
Description
J1
Path Trace
The first byte in the STS SPE. Its location is indicated
by the pointer (H1H2). Provides an STS path trail trace
identifier (64-byte free format string or 16 frame
including CRC7). Supports end-to-end monitoring of
an STS path.
B3
Path Code
Violation
(CV-P)
Provides STS path error monitoring. The BIP-8 is
calculated over all bits of the previous STS SPE. The
computed value is placed in the B3 byte before
scrambling.
C2
Signal
Label
STS path signal label indicates the content of the STS
SPE, including the status of the mapped payloads. For
more information, see “C2 Byte Mapping" on
page 276.
G1
Path Status
STS path status contains status and performance
monitoring information from the receiving path
terminating equipment to the originating equipment.
Allows status and performance of the complete duplex
path to be monitored at either end.For more
information, see “G1 (Bits 5 to 7) Coding and
Interpretation" on page 277. Bits 1 to 4 of this byte
indicate the count of interleaved-bit block errors, based
on the B3 count, to the upstream path terminating
equipment.
F2
User
Channel
STS path user channel. Allocated for network operator
communication between STS path terminating
equipment.
H4
Position
Indicator
This byte provides multiframe phase indication for VT
structured payloads.
User Guide
user_guide.book Page 275 Friday, January 30, 2004 11:35 AM
Telecoms Concepts
Byte
Z3, Z
4
N1
User Guide
Label
11
Description
Allocated for future use.
Allocated for tandem connection maintenance and the
path data channels. Bits 1 to 4 are used to provide
tandem connection incoming error count (IEC). Bits 5
to 8 ar used to provide the path data channel. For more
information, refer to ANSI T1.105.05.
275
user_guide.book Page 276 Friday, January 30, 2004 11:35 AM
11 Telecoms Concepts
C2 Byte Mapping
Bits 1 to 4 Bits 5 to 8
276
Hex
Code
Description
0000
0000
00
Unequipped
0000
0001
01
Equipped - non-specific
0000
0010
02
VT-structured STS-1 SPE
0000
0011
03
Locked VT mode
0000
0100
04
Asynchronous mapping for DS3
0001
0010
12
Asynchronous mapping for DS4NA
0001
0011
13
ATM mapping
0001
0100
14
Mapping DQDB
0001
0101
15
Asynchronous mapping for FDDI
User Guide
user_guide.book Page 277 Friday, January 30, 2004 11:35 AM
11
Telecoms Concepts
G1 (Bits 5 to 7) Coding and Interpretation
Bits 5 to
7
User Guide
Description
Triggers
000
No remote defect
No defect
001
No remote defect
No defect
010
Remote payload defect
LCD-P, PLM-P
011
No remote defect
No defect
100
Remote defect (RDI-P, ERDI-P)
AIS-P, LOP-P
101
Remote server defect (ERDI-P-S)
AIS-P, LOP-P
110
Remote connectivity defect (ERDI-P-C)
TIM-P, UNEQ-P
111
Remote defect (ERDI-P-P)
AIS-P, LOP-P
277
user_guide.book Page 278 Friday, January 30, 2004 11:35 AM
11 Telecoms Concepts
VT Path Overhead (VT POH for VT-1.5, VT-2 or VT-6)
The VT Path Overhead (VT POH) support the transmission of SONET
signals across the tributary path of a network.
Byte
Label
Description
V5
CV-V,
Signal
Label
and Path
Status
This byte contains error analysis, signal label and path
status information.
Bits 1 and 2 contain lower order path error analysis
(BIP-2).
Bits 5, 6 and 7 contain signal label. For more information,
see “V5 (bits 5 to 7) Signal Label" on page 279.
Bit 3 contains the Remote Error Indication (REI-V).
Bit 4 contains the Remote Failure Indication (RFI-V).
Bit 8 contains the Remote Defect Indication (RDI-V).
Number of data bytes separating fields: VT-1.5 = 25, VT-2 = 34 and VT-6 =
106
J2
VT Path Supports the end-to-end monitoring of a path.
Trace
Identifier
Number of data bytes separating fields: VT-1.5 = 25, VT-2 = 34 and VT-6 =
106
Z6
Reserved for future use.
Number of data bytes separating fields: VT-1.5 = 25, VT-2 = 34 and VT-6 =
106
Z7
Bits 5 to 7 of Z7 provide enhanced RDI-V. Bits 5 to 7 of
Z7 together with bit 8 of V5 provide codes to indicate both
the old version and enhanced version of RDI-V. For more
information, see “Z7 (bits 5 to 7) Coding and
Interpretation" on page 280.
Number of data bytes separating fields: VT-1.5 = 25, VT-2 = 34 and VT-6 =
106
278
User Guide
user_guide.book Page 279 Friday, January 30, 2004 11:35 AM
Telecoms Concepts
11
V5 (bits 5 to 7) Signal Label
Bits 5 to 7
User Guide
Description
000
Unequipped
001
Equipped - non-specific
010
Asynchronous mapping
011
Bit synchronous mapping (no longer valid for DS1)
100
Byte synchronous mapping
101
Unassigned
110
Unassigned
111
Unassigned
279
user_guide.book Page 280 Friday, January 30, 2004 11:35 AM
11 Telecoms Concepts
Z7 (bits 5 to 7) Coding and Interpretation
280
V5 bit 8
Z7 bit5
Z7 bit 6
Z7 bit 7
Interpretation
Triggers
0
0
0
No remote defect
No defect
0
0
1
No remote defect
No defect
0
1
0
Remote payload
defect
PLM-V
0
1
1
No remote defect
No defect
1
0
0
Remote defect
AIS-V, LOP-V
1
0
1
Remote server defect AIS-V, LOP-V
1
1
0
Remote connectivity
defect
UNEQ-V
1
1
1
Remote defect
AIS-V, LOP-V
User Guide
user_guide.book Page 281 Friday, January 30, 2004 11:35 AM
Telecoms Concepts
11
SDH Concepts
For SDH reference information, see:
• “SDH Frame Structure" on page 282
• “SDH Payload Structure" on page 283
• “SDH Overhead Bytes" on page 284
User Guide
281
user_guide.book Page 282 Friday, January 30, 2004 11:35 AM
11 Telecoms Concepts
SDH Frame Structure
The relationship between the various elements that make up an SDH
signal is shown in the following diagram.
282
User Guide
user_guide.book Page 283 Friday, January 30, 2004 11:35 AM
11
Telecoms Concepts
SDH Payload Structure
The payloads that can be carried in a SDH signal are outlined below.
• You can asynchronously map a framed/unframed DS3 (44 Mb/s) or
E3 (34 Mb/s) signal into a full VC-3/4, or you can bulk fill the
VC-3/4.
• You can transmit 28 TU-11s, 21 VT12s or 7 TU-2s in a VC-3, or 84
TU-11s, 63 TU-12s or 3 TU-3s in a VC-4. The TUs are structured
into tributary unit groups (TUG) within the VC-3/4. A VC-3 contains
7 TUG-2s, each TUG-2 can contain 4 TU-11s, 3 TU-12s or 1 TU-2.
A VC-4 contains 3 TUG-3s, each TUG-3 contains 7 TUG-2s or 1
TU-3.
• You can transmit concatenated payloads in SDH signals. These types
of payload reduce test times by testing the entire bandwidth in one
go.
User Guide
283
user_guide.book Page 284 Friday, January 30, 2004 11:35 AM
11 Telecoms Concepts
SDH Overhead Bytes
Four overheads are used to transport SDH signals across the spans of a
network.
For more information, see:
• “Regenerator Section Overhead (RSOH)" on page 285
• “Multiplex Section Overhead (MSOH)" on page 286
• “Higher Order Path Overhead (HO POH)" on page 293
• “Lower Order VC-n Path Overhead (LO POH for VC-11, VC-12 or
VC-2)" on page 298
284
User Guide
user_guide.book Page 285 Friday, January 30, 2004 11:35 AM
11
Telecoms Concepts
Regenerator Section Overhead (RSOH)
The regenerator section overhead (RSOH) bytes support the
transmission of an SDH signal across the regenerator section span of a
network.
Byte
Label
Description
A1, A2
Framing
Provides a frame alignment pattern (A1=F6 Hex,
A2=28 Hex), The frame alignment word of an
STM-n frame is 3 x n A1 bytes followed by 3 x n
A2 bytes.
J0
Regenerator Regenerator section trace (16-byte frame
Section
including CRC) supports continuity testing
Trace
between the transmitting and receiving device on
each regenerator section span.
Z0
User Guide
Spare. Reserved for future international
standardization.
B1
RS-BIP
Provides regenerator section error monitoring. The
regenerator section BIP-8 provides end-to-end
error performance monitoring across an individual
regenerator section. The BIP-8 is calculated over
all bits of the previous STM-n frame after
scrambling. The computed value is placed in the
B1 byte of the current STM-n frame before
scrambling.
E1
Orderwire
F1
User
Channel
Provides a 64 kb/s proprietary data
communications channel for the user. It is
terminated at each regenerator section terminating
equipment.
D1 to D3
Data
Comm.
Channel
Provides a 192 kb/s message-based data
communications channel (DCC) for
administration, monitor, alarm and maintenance
functions between regenerator section terminating
equipment.
Provides local orderwire channel for voice
communication between regenerators, hubs and
remote terminal locations.
285
user_guide.book Page 286 Friday, January 30, 2004 11:35 AM
11 Telecoms Concepts
Multiplex Section Overhead (MSOH)
The multiplex section overhead (MSOH) bytes support the transmission
of an SDH signal across the multiplexer section span of a network.
Byte
Label
Description
B2
MS-BIP
Provides multiplex section error monitoring. The
BIP-n x 24, of an STM-n frame, provides end-to
end performance monitoring across an individual
multiplexer section and is calculated over all bits of
the previous STM-n frame except for the first three
rows of the current STM-n frame before
scrambling.
K1, K2
MS-APS
Multiplexer section automatic protection switching
(APS) is controlled by the K1K2 bytes. Two APS
message types are used:
Linear APS messages
Ring APS messages
Bits 6 to 8 of the K2 byte contain MS-RDI and
MS-AIS. This byte is defined only for STM-1#1a
of a SDH frame. For more information, see “Linear
APS Messages" on page 288 and “Ring APS
Messages" on page 290.
D4 to D1
2
Data
Comm.
Channel
Provides a 576 kb/s data communications channel
(DCC) between multiplex section terminating
equipment. Used to carry network administration
and maintenance information.
S1
M1
286
Sync Status S1 bits 5 to 8 indicate which of the four levels of
synchronization is being used at the transmit end of
a multiplexer section span.
MS-REI
Multiplexer section remote error indication
conveys the B2 errors detected by downstream
equipment.
User Guide
user_guide.book Page 287 Friday, January 30, 2004 11:35 AM
Telecoms Concepts
Byte
Label
E2
Orderwire
H1 to H3
User Guide
11
Description
Provides express orderwire channel for voice
communication between Multiplex Section
terminating equipment.
AU Pointer The payload pointer contained in the H1 and H2
bytes of the multiplex section overhead designates
the location of the byte where the VC-n begins.
The last ten bits (bits 7 to 16) of H1H2 carry the
pointer value (0 to 782). The H3 bytes is allocated
for VC frequency justification purposes and can
carry “live” information from a VC-4 when a
negative pointer adjustment occurs.
287
user_guide.book Page 288 Friday, January 30, 2004 11:35 AM
11 Telecoms Concepts
Linear APS Messages
ITU-T G.783 Protection Switching Protocol
K1
Condition
Bits 1
to 4
288
1111
Locked out of protection
1110
Forced switch
1101
Signal fail high priority
1100
Signal fail low priority
1011
Signal degrade high priority
1010
Signal degrade low priority
1001
Unused
1000
Manual switch
0111
Unused
0110
Wait-to-restore
0101
Unused
0100
Exercise
0011
Unused
0010
Reverse request
0001
Do not revert
User Guide
user_guide.book Page 289 Friday, January 30, 2004 11:35 AM
Telecoms Concepts
11
ITU-T G.783 Protection Switching Protocol
0000
No request
Bits 5 to 8 Selects channel used by APS messages
K2
Condition
Bits 1 to 4 Selects bridged channel used
Bit 5
Bits 6 to
8
110
111
User Guide
Determines APS architecture
MS-RDI
MS-AIS
All other combinations of bits 6 to 8 not used.
289
user_guide.book Page 290 Friday, January 30, 2004 11:35 AM
11 Telecoms Concepts
Ring APS Messages
ITU-T G.741 Protection Switching Protocol
K1
Condition
Bits 1 to 4
1111
Locked out of protection (span) or signal fail
(protection)
1110
Forced switch (span)
1101
Forced switch (ring)
1100
Signal fail (span)
1011
Signal fail (ring)
1010
Signal degrade (protection)
1001
Signal degrade (span)
1000
Signal degrade (ring)
0111
Manual switch (span)
0110
Manual switch (ring)
0101
Wait-to-restore
0100
Exercise (span)
0011
Exercise (ring)
0010
Reverse request (span)
0001
Reverse request (ring)
0000
No request
Bits 5 to 8
290
Destination node ID
User Guide
user_guide.book Page 291 Friday, January 30, 2004 11:35 AM
Telecoms Concepts
11
ITU-T G.741 Protection Switching Protocol
K2
Bits 1to 4
Bit 5
Bits 6 to 8
000
001
010
011
100
101
110
111
User Guide
Condition
Source node ID
Path code: 0 = short path, 1 = long path
Idle
Bridged
Bridged and switched
Not used
Note used
Not used
MS-RDI
MS-AIS
291
user_guide.book Page 292 Friday, January 30, 2004 11:35 AM
11 Telecoms Concepts
Synchronization Status Messages (S1 bits 5 to 8)
S1 (Bits 5 to 8)
292
SDH synchronization quality level description
0000
Quality unknown
0001
Reserved
0010
G.811
0011
Reserved
0100
G.812 transit
0101
Reserved
0110
Reserved
0111
Reserved
1000
G.812 local
1001
Reserved
1010
Reserved
1011
Synchronous equipment timing source (SETS)
1100
Reserved
1101
Reserved
1110
Reserved
1111
Do not use for synchronization
User Guide
user_guide.book Page 293 Friday, January 30, 2004 11:35 AM
11
Telecoms Concepts
Higher Order Path Overhead (HO POH)
The higher order path overhead (HO POH) bytes support the
transmission of an SDH signal across the high order path of a network.
User Guide
Byte
Label
Description
J1
Path Trace
The first byte in the virtual container (VC). Its location
is indicated by the AU pointer (H1H2). Provides a
higher order trail trace identifier (64-byte free format
string or 16 frame including CRC7). Supports
end-to-end monitoring of a higher order path.
B3
HP-BIP
Provides higher order path error monitoring. The BIP-8
is calculated over all bits of the previous VC-n. The
computed value is placed in the B3 byte before
scrambling.
C2
Signal
Label
Higher order signal label indicates the content of the
VC, including the status of the mapped payloads. For
more information, see “C2 Byte Mapping" on
page 295.
G1
Path Status
Higher order path status contains status and
performance monitoring information from the
receiving path terminating equipment to the originating
equipment. For more information, see “G1 (Bits 5 to 7)
Coding and Interpretation" on page 296. Allows status
and performance of the duplex path to be monitored at
either end. Bits 1 to 4 of this byte contain the Path REI
count. Bits 5 to 7 contain Path RDI.
F2
User
Channel
Higher order path user channel. Allocated for network
operator communication between path terminating
equipment.
H4
Position
Indicator
This byte provides multiframe phase indication for TU
structured payloads.
F3
User
Channel
Higher order path user channel. Allocated for network
operator communication between path terminating
equipment.
293
user_guide.book Page 294 Friday, January 30, 2004 11:35 AM
11 Telecoms Concepts
Byte
Label
Description
K3
HO-APS
Higher order automatic protection switching (bits 1 to
4). Bits 5 to 8 are currently not used.
N1
294
Higher order tandem connection monitoring. There are
two possible implementations described in Annex C
and Annex D of ITU-T G.707. In Annex C, the N1 byte
provides a tandem connection incoming error count
(TC- IEC) and the remaining four bits provide an
end-to-end data link. For more information, see “N1
(Bits 7 and 8) Multiframe Structure" on page 297. The
Annex D option contains an incoming error count
(IOC), tandem connection REI (TC-REI), outgoing
error indication (OEI) and a 76-byte multiframe
containing a tandem connection access point identifier
(TC-APId)
User Guide
user_guide.book Page 295 Friday, January 30, 2004 11:35 AM
11
Telecoms Concepts
C2 Byte Mapping
Bits 1 to 4 Bits 5 to 8
User Guide
Hex
Code
Description
0000
0000
00
Unequipped or
supervisory-unequipped
0000
0001
01
Equipped - non-specific
0000
0010
02
TUG-structure
0000
0011
03
Locked TU
0000
0100
04
Asynchronous mapping of 34 Mb/s or
45 Mb/s into the container C-3
0001
0010
12
Asynchronous mapping of 140 Mb/s
into the container C-4
0001
0011
13
ATM mapping
0001
0100
14
MAN (DQDB) mapping
0001
0101
15
FDDI mapping
1111
1110
FE
O.181 test signal (TSS1 to TSS3)
mapping
1111
1111
FF
VC-AIS
295
user_guide.book Page 296 Friday, January 30, 2004 11:35 AM
11 Telecoms Concepts
G1 (Bits 5 to 7) Coding and Interpretation
Bits 5 to
7
296
Description
Triggers
000
No remote defect
No remote defect
001
No remote defect
No remote defect
010
Remote payload defect
LCD
011
No remote defect
No remote defect
100
Remote defect (RDI-P, ERDI-P)
AIS, LOP, TIM,
UNEQ (or PLM,
LCD)
101
Remote server defect (ERDI-P-S)
AIS, LOP
110
Remote connectivity defect (ERDI-P-C)
TIM, UNEQ
111
Remote defect (ERDI-P-P)
AIS, LOP, TIM,
UNEQ (or PLM,
LCD)
User Guide
user_guide.book Page 297 Friday, January 30, 2004 11:35 AM
Telecoms Concepts
11
N1 (Bits 7 and 8) Multiframe Structure
Frame
Number
N1 Bits 7 and 8 Description
1 to 8
Frame alignment signal: 1111 1111 1111 1110
9 to 12
TC-APId byte # 1 [1 C1 C2 C3 C4 C5 C6 C7]
13 to 16
TC-APId byte # 2 [0XXXXXXX]
17 to 20
TC-APId byte # 3 [0XXXXXXX]
.
.
65 to 68
TC-APId byte # 15 [0XXXXXXX]
69 to 72
TC-APId byte # 16 [0XXXXXXX]
73 to 76
TC-RDI, ODI and reserved (see below)
.
User Guide
.
.
N1 bit 7 Description
N1 Bit 8 Description
73
Reserved (default = 0)
TC-RDI
74
ODI
Reserved (default = 0)
74
Reserved (default = 0)
Reserved (default = 0)
76
Reserved (default = 0)
Reserved (default = 0)
297
user_guide.book Page 298 Friday, January 30, 2004 11:35 AM
11 Telecoms Concepts
Lower Order VC-n Path Overhead (LO POH for VC-11, VC-12 or
VC-2)
The lower order path overhead (LO POH) bytes support the
transmission of an SDH signal across the low order path of a network.
Byte
Label
Description
V5
LP BIP,
Signal
Label
and Path
Status
This byte contains error analysis, signal label and path
status information.
Bits 1 and 2 contain lower order path error analysis
(BIP-2).
Bits 5, 6 and 7 contain signal label. For more information,
see “V5 (bits 5 to 7) Signal Label" on page 300.
Bit 3 contains the Remote Error Indication (LP-REI).
Bit 4 contains the Remote Failure Indication (LP-RFI).
Bit 8 contains the Remote Defect Indication (LP-RDI).
Number of data bytes separating fields: VC-11 = 25, VC-12 = 34 and VC-2 =
106
J2
Trail
The lower order trail trace identifier (16-byte frame
Trace
including CRC7) supports the end-to-end monitoring of a
Identifier lower order path.
Number of data bytes separating fields: VC-11 = 25, VC-12 = 34 and VC-2 =
106
N2
LO TCM The lower order tandem connection monitoring byte
contains the following information:
Bits 1 and 2 contains BIP-2 error analysis.
Bit 3 is set to “1”.
Bit 4 contains incoming AIS.
Bit 5 contains Tandem Connection Remote Error
Indication (TC-REI).
Bit 6 contains Outgoing Error Indication (OEI).
Bits 7 and 8 contain a 76-byte multiframe containing a
tandem connection access point identifier (TC-APId),
TC-RDI, ODI or reserved. For more information, see “N2
(bits 7 and 8) Multiframe Structure" on page 301.
Number of data bytes separating fields: VC-11 = 25, VC-12 = 34 and VC-2 =
106
298
User Guide
user_guide.book Page 299 Friday, January 30, 2004 11:35 AM
Telecoms Concepts
Byte
Label
K4
LO APS
11
Description
The lower order automatic protection switching (APS)
and enhanced RDI.
Bits 1 to 4 contain the APS.
Bits 5 to 7 contain the enhance RDI. For more
information, see “K4 (bits 5 to 7) Coding and
Interpretation" on page 302.
Number of data bytes separating fields: VC-11 = 25, VC-12 = 34 and VC-2 =
106
User Guide
299
user_guide.book Page 300 Friday, January 30, 2004 11:35 AM
11 Telecoms Concepts
V5 (bits 5 to 7) Signal Label
Bits 5 to 7
300
Description
000
Unequipped or supervisory unequipped
001
Equipped - non-specific
010
Asynchronous
011
Bit synchronous
100
Byte synchronous
101
Reserved for future use
110
O.181 test signal (TSS4)
111
VC-AIS
User Guide
user_guide.book Page 301 Friday, January 30, 2004 11:35 AM
Telecoms Concepts
11
N2 (bits 7 and 8) Multiframe Structure
Frame
Number
N2 Bits 7 and 8 Description
1 to 8
Frame alignment signal: 1111 1111 1111 1110
9 to 12
TC-APId byte # 1 [1 C1 C2 C3 C4 C5 C6 C7]
13 to 16
TC-APId byte # 2 [0XXXXXXX]
17 to 20
TC-APId byte # 3 [0XXXXXXX]
.
.
.
.
65 to 68
TC-APId byte # 15 [0XXXXXXX]
69 to 72
TC-APId byte # 16 [0XXXXXXX]
73 to 76
TC-RDI, ODI and reserved (see below)
N2 bit 7 Description
User Guide
N2 Bit 8 Description
73
Reserved (default = 0)
TC-RDI
74
ODI
Reserved (default = 0)
74
Reserved (default = 0)
Reserved (default = 0)
76
Reserved (default = 0)
Reserved (default = 0)
301
user_guide.book Page 302 Friday, January 30, 2004 11:35 AM
11 Telecoms Concepts
K4 (bits 5 to 7) Coding and Interpretation
Bits 5 to
7
Description
Triggers
000
001
No remote defect
No remote defect
010
Remote payload defect
LCD, PLM
101
Remote server defect
AIS, LOP
110
Remote connectivity
defect
TIM, UNEQ
011
100
111
302
User Guide
user_guide.book Page 303 Friday, January 30, 2004 11:35 AM
Telecoms Concepts
User Guide
11
303
user_guide.book Page 304 Friday, January 30, 2004 11:35 AM
11 Telecom Concepts
Service Disruption
Service disruption is the time it takes for a transmission system to
perform an automatic protection switch following the detection of a
transmission defect. Events occurring during protection switching are
shown:
If a fiber break causes protection switching in a network element, an
Alarm Indication Signal may be initiated by the network element. Once
switching takes place, the AIS is removed. After a period of
synchronization on the protection signal path, error-free operation is
resumed.
ITU-T recommend that protection switching should take
50 milliseconds or less. While this is a difficult standard to meet, a large
part of the problem is in actually initiating the protection switch. There
are two methods to achieve this effectively:
• Create a LOS failure, which will typically be detected in under 100
microseconds.
• Generate control parity errors on the protected system.
Each method has its own advantages and is ideal for particular test
scenarios.
For more information, see:
• “Test Configuration for Measuring Service Disruption Time" on
page 305
• “Contributors to Protection Switching Time" on page 306
• “Protection Switching Time Test Methods" on page 308
• “Measuring Protection Switch Time" on page 309
• “Understanding Service Disruption Test Results" on page 315
304
User Guide
user_guide.book Page 305 Friday, January 30, 2004 11:35 AM
Telecom Concepts
11
Test Configuration for Measuring Service Disruption Time
To measure service disruption time, insert a PRBS pattern at the
tributary side of the device-under-test, looping it back on itself on the
corresponding drop-side tributary. Monitor the received PRBS for
errors as a switch occurs.
Result accuracy and reliability are based on the instrument’s ability to
measure the duration of error bursts associated with a protection switch
event.
By measuring service disruption time from the tributary-side of the
system-under-test, the measurement will be independent of the
protection switching architecture. This setup supports all protection
switching architectures. The performance of the system-under-test
cannot be affected by the instrument since results are obtained through
passive monitoring of the PRBS for errors.
User Guide
305
user_guide.book Page 306 Friday, January 30, 2004 11:35 AM
11 Telecom Concepts
Contributors to Protection Switching Time
When a protection switch is triggered (a fiber break can trigger a
protection switch), it results in the PRBS test pattern being corrupted for
a short period. The duration of this corruption is controlled by the
following factors:
• The system’s fault detection time
• The system’s protection-switching time
• The time taken by the instrument to re-align to the pointers
(SONET/SDH tributary only) and test pattern
System Fault Detection Time
For fault detection time, this is achieved by triggering the protection
switch using a failure that results in a LOS defect. Although ITU-T
G.783 (2000) defines LOS detection time as being “in the province of
regional standards”, it provides an example based on a value of less than
100 microseconds (less than 0.2% of the maximum acceptable
306
User Guide
user_guide.book Page 307 Friday, January 30, 2004 11:35 AM
Telecom Concepts
11
protection-switching time). In the case of pointer and pattern
acquisition, the required times are 125 to 375 microseconds for STS/AU
pointers, and 500 to 1500 microseconds for VT/TU pointers.
System Protection Switching Time
When measuring a system’s protection-switching time, the total
systematic error associated with the instrument’s service disruption
measurement can be restricted to between +0.3% to +4.05% of the
maximum acceptable switching time. Consequently, it can be relied on
to accurately evaluate this important system specification.
User Guide
307
user_guide.book Page 308 Friday, January 30, 2004 11:35 AM
11 Telecom Concepts
Protection Switching Time Test Methods
Many SONET/SDH linear and ring networks have built-in fault
restoration known as Automatic Protection Switching (APS). However,
the basic principles behind the instrument’s Service Disruption
measurement, and its application in verifying a transmission system’s
protection switching time, remain valid.
Following a failure, full service is not restored until all the Bridge and
Switch operations are completed. A key goal for Network Equipment
Manufacturers (NEMs) is to keep service disruption as short as possible,
as their customers (Network Operators) will demand that all systems
deployed in the network meet or exceed the specification published by
the governing standards body (Telcordia or ITU-T). This section deals
with the challenge of making meaningful and repeatable measurements
of Protection Switch Time.
Protection Switching Summary
The diagram shows the state of the nodes after a switch has taken place.
A typical sequence of events is listed below:
1 The Tail-End node detects the failure and signals the Head-End to
request a Protection Switch.
2 The Head-End node performs a Bridge or Bridge and Switch
operation, and sends back an acknowledgement.
3 The Tail-End node receives the acknowledgement and performs a
Bridge and Switch operation, then finishes by sending a status
message to the Head-End.
308
User Guide
user_guide.book Page 309 Friday, January 30, 2004 11:35 AM
Telecom Concepts
11
4 The Head-End node finishes by performing a Switch operation if
necessary.
Measuring Protection Switch Time
The Protection Switch Time of a transmission system should be equal to
or less than 50 milliseconds. The switching process is dominated by the
protocol processing time at each node on the Protection Circuit. The
ITU-T standards specifies Protection Switch Time and the ‘detection
times’ for various SF and SD conditions.
Protection switching can be initiated by the following events:
1 Signal Fail (SF): usually loss of signal, loss of framing, or a very
high error ratio such as 10E-03 or greater.
2 Signal Degrade (SD): a persistent background error rate that exceeds
a provisioned threshold in the range 10E-05 to
10E-09. Note that, at the Multiplex Section level, ITU-T G.806
(October 2000 draft) specifies the ‘detection time’ for these errors as
10E-09.
To reliably measure protection switching time, you need to measure the
service disruption time associated with a SF/SD condition that either
minimizes the ‘detection time’ (create a LOS failure – typically detected
in less than 100 ms), or eliminates the ‘detection time’ (generate control
Parity Errors (B2 and B3) on the entity being protected). Dividing
service disruption time into its component parts is necessary due to the
wide variation in detection times for different SF/SD conditions.
Detection Times
These range from 100 microseconds for a LOS failure to 10,000
seconds for a Signal Degrade that has a provisioned threshold of 10E-09
error rate. Also, the nature of some faults can be very unpredictable. For
example, when a fiber is damaged during construction work it may not
break cleanly. Instead, the optical signal may fade over several tens of
milliseconds or vary erratically before finally disappearing. So the
ITU-T standards require that, once SF/SD is detected, a Protection
Switch event must be completed in 50 milliseconds or less. This is a
User Guide
309
user_guide.book Page 310 Friday, January 30, 2004 11:35 AM
11 Telecom Concepts
tough requirement, but if it is met, end-users will not normally notice a
Protection Switch event even allowing for a realistic SF/SD detection
time.
310
User Guide
user_guide.book Page 311 Friday, January 30, 2004 11:35 AM
Telecom Concepts
11
Generating LOS Failure
This diagram shows three ways to generate a LOS failure.
If you use Thru mode, the LOS condition is induced by either
switching off the instrument’s laser transmitter or using its alarm
generation controls to transmit LOS. Both of these controls produce a
predictable and instantaneous LOS condition, and consequently enable
repeatable and accurate protection switching time measurements to be
performed.
The only source of measurement error associated with this method will
be due to the LOS detection time being included in the service
disruption time result. This is the recommended method for generating a
LOS failure when measuring protection switch times.
If you manually disconnect an optical fiber, you will generate the LOS
(but it is not an instantaneous LOS). The power level will roll-off over
the time taken to perform the disconnect. Consequently, variation in the
‘speed’ of manual disconnection can lead to poor result repeatability.
WARNING
User Guide
Exercise extreme caution when disconnecting an optical fiber – follow
your organization’s standard safety procedures.
311
user_guide.book Page 312 Friday, January 30, 2004 11:35 AM
11 Telecom Concepts
If you insert a programmable optical attenuator in to the working
circuit, you have a more predictable method of inducing LOS. However,
it may not fully address the issue of ‘measurement error’ due to the
optical power level rolling-off over a finite period of time. Most
programmable optical attenuators have a specified response time.
312
User Guide
user_guide.book Page 313 Friday, January 30, 2004 11:35 AM
11
Telecom Concepts
Generating Excessive Errors (SF Trigger)
With the instrument in Thru mode, inject a high-rate of errors into the
parity-check byte(s) associated with the protection system under test. In
a Multiplex Section/Line protected system, B2 parity errors are used,
while HP-B3 and LP-B3/BIP-2 parity errors are used for High-order
Path and Low-order Path protected system respectively.
In the following example, the system-under-test is protected at the
Multiplex Section/Line level.
To generate excessive errors and create a Signal Fail condition in the
system-under-test, inject B2 errors at rate that exceeds the receiving
NE’s provisioned threshold for the Excessive Error condition.
To always exceed the provisioned error threshold, inject the maximum
error rate supported by the parity-check bytes (in this case –
continuously error all bits of all B2 bytes).
Since errors are only injected into the B2 parity bytes they will not
affect the traffic being carried. Consequently, no errors will be added to
the PRBS test pattern.
This method will produce accurate and repeatable protection switching
time results.
User Guide
313
user_guide.book Page 314 Friday, January 30, 2004 11:35 AM
11 Telecom Concepts
Signal Fail (SF) Triggering a Protection Switch Sequence
Within 10 ms of injecting the B2 errors, the Tail-End node (the NE
receiving the B2 errors) will detect the Excessive Error condition. This
causes the NE to declare a SF and to initiate a protection switch
sequence.
In addition, the Tail-End node is required to insert an AIS alarm in all
down-stream traffic channels within 250 microseconds of declaring SF.
And since this AIS will overwrite the PRBS test pattern that is
transmitted and monitored by test set#2, it causes the service disruption
measurement to be triggered (started).
For standards compliant network elements, this method will produce
accurate and repeatable protection switching time results. Its main
advantage over the ‘LOS methods’ discussed earlier is that it eliminates
the ‘SF detection time’ error from the measured result. The only
technical drawback is that its results slightly under-estimate a system’s
protection switching time – but only by up to 250 microseconds
(assuming that the Tail-End node inserts the downstream AIS within the
250 microseconds period specified in ITU-T G.783). Possibly the most
serious ‘drawback’ associated with this measurement method is a
commercial one – it requires two transmission test sets (one covering
the required tributary rates, the other covering required line rates).
314
User Guide
user_guide.book Page 315 Friday, January 30, 2004 11:35 AM
Telecom Concepts
11
Understanding Service Disruption Test Results
To interpret service disruption results you must understand the rules
associated with the analysis of error-burst duration.
The service disruption test measures the elapsed time between the first
and last error in an error-burst that consists of one or more errors. The
error-burst is taken as having ended when no errors are detected for a
period of greater than the Guard Time following the last error.
“Illustrating Service Disruption Results" on page 316 shows the affect
these simple rules have on measurement results when different error
distributions are present in the received test pattern.
User Guide
315
user_guide.book Page 316 Friday, January 30, 2004 11:35 AM
11 Telecom Concepts
Illustrating Service Disruption Results
Case 1: Two errort bursts measured separately
Longest Burst
>200ms
Shortest &
Last Burst
Case 2: Two error bursts measured as one
<200 ms
Measured Switching Time
Key:
Error burst from Protection Switch
In Cases 1 and 2 the system-under-test generates two error-bursts when
a protection switch is made. The results will be affected by the
separation of these two error-bursts. In Case 1 a result for each
error-burst will be reported (since they are more than the Guard Time
apart), while in Case 2 only a single high value will be reported (since
they are less than the Guard Time apart). In both cases the reported
results will indicate that a problem exists in the system-under-test.
316
User Guide
user_guide.book Page 317 Friday, January 30, 2004 11:35 AM
Index
A
A1, A2 framing byte
SDH (Concepts), 285
SONET (Concepts), 266
Add Alarms, 96
Add Errors, 95
VT/TU LO Path Errors, 138
Adding Errors and Alarms, 96
Alarms
Add, 95
APS Measurements, 203
APS messages (Concepts)
linear (SDH), 288
linear (SONET), 269
ring (SDH), 290
ring (SONET), 271
Auto Discovery
Receiver, 115
Avoiding Problems When Making
Measurements, 202
B
B1 byte
SDH (Concepts), 285
SONET (Concepts), 266
B2 byte
SDH (Concepts), 286
SONET (Concepts), 267
B3 byte
SDH (Concepts), 293
SONET (Concepts), 274
BNC cable, 42
Bulk Filled Stuff Column
Overwrite, 89
C
C2 signal label byte
SDH (Concepts), 293
SONET (Concepts), 274
User Guide
Calibration, 225
Capture
Overhead Byte Group, 109
Channel configuration set up, 92
Channel Numbering
SONET/SDH, 134
Chassis and modules, 25
Chassis Connectors, 229
Chassis numbering, 34
Cleaning, 227
Clear History, 120
Clear History on all ports, 79
Clock and event lines, 33
Clock source, 86
Closing a session, 132
Codeword Enable, 232
Compliance, 23
Configuration, 28
Hide/Show, 79
Connecting a rackmount
Controller, 51
Connecting the chassis to a
switch, 48
Connector Cleaning, 236
Connectors
Chassis, 229
Contact Agilent, 17
Continuous Measurement Mode, 130
Controller
rackmount connection, 51
Copy Port Settings, 89
D
DCC bytes (D4 to D12)
SDH (Concepts), 286
SONET (Concepts), 267
DCC channel (D1 to D3)
SDH (Concepts), 285
SONET (Concepts), 266
Detecting Path Routing Faults, 209
DHCP server
changing IP addresses, 157
dhcpd.conf file, 160, 161
dhcpdnt folder, 160
Diagnostics, 54
Do you need a switch?, 29
E
E7901-642xx cables, 42
edit section overhead bytes, 106
Edit Transmitter Path Overhead
Bytes, 112
Edit VT /LO Path Overhead
Bytes, 142
Electrical
Specifications, 225
Electromagnetic Compatibility, 23
Enhanced RDI-P Mode, 125
Enhanced RDI-P/HP-RDI alarms, 98
Environmental Conditions, 20
Error Rate Mappings, 101
Error Rates, 101
Error rates, 97
ESD Precautions, 43
Ethernet cables
straight-through, 42
External Clock Reference, 87
F
F1 user channel byte
SDH (Concepts), 285
SONET (Concepts), 266
F2 user channel byte
SDH (Concepts), 293
SONET (Concepts), 274
F3 user channel byte
SDH (Concepts), 293
File Menu, 77
317
user_guide.book Page 318 Friday, January 30, 2004 11:35 AM
Index
G
G1 path status byte
SDH (Concepts), 293
SONET (Concepts), 274
Ganged Port Operation, 83
German Noise Declaration, 227
J1 path trace byte
SDH (Concepts), 293
SONET (Concepts), 274
J2 path trace identifier
SONET (Concepts), 278
J2 trail trace identifier
SDH (Concepts), 298
H
K
H1 to H3 bytes
SDH (Concepts), 287
SONET (Concepts), 268
H4 position indicator byte
SDH (Concepts), 293
SONET (Concepts), 274
Handling Requirements
Modules, 44
hardware indicators, 56
Help Menu, 79
High order path overhead (HO POH)
(Concepts), 293
History
clear history of error
conditions, 79
Hot Swappable, 45, 47
K1, K2
APS Messages, 104
K1, K2 bytes
SDH (Concepts), 286
SONET (Concepts), 267
K3 byte
SDH (Concepts), 294
K4 lower order APS byte
SDH (Concepts), 299
I
indicators
hardware, 56
Installation
Planning, 29
Installation Process
Overview, 27
Installing modules in a chassis, 45
Intrusive Thru Mode, 85
ITU/ANSI Analysis, 126
J
J0 Section Trace Message
Transmit, 108
J0 trace byte
SDH (Concepts), 285
SONET (Concepts), 266
J1 Path Trace
Transmit, 113
318
L
laptop PC
connection, 52
Laser safety, 225
Lasers, 84
Log events, 127
Logging
Port Selection, 129
Select results to be logged, 129
Lower order path overhead (LO
POH) (Concepts), 298
M
M0 remote error indication byte
SONET (Concepts), 267
M1 byte
SDH (Concepts), 286
SONET (Concepts), 267
M1 only mode for REI-L/MS-REI
errors, 98
Making a BER Measurement, 213
Measurement Gating System, 130
Measurement Period, 130
Measurement Results, 123
Mechanical
Specifications, 226
Module Handling Requirements, 44
Module Insertion, 26
Module Removal, 26
Module status indicators, 57
Modules, 224
modules
install, 45
remove from chassis, 46
Monitor J0, J1 bytes, 122
Multiplexer section overhead
(MSOH) (Concepts), 286
N
N2 lower order tandem connection
byte
SDH (Concepts), 298
Noise Declaration, 227
O
Operator Maintenance, 236
Optical Adapters
cleaning, 238
Optical Connector Safety
Information, 114
Optical Connectors
cleaning, 238
Optical fibre cables, 60
Optical In, 228
Optical Out, 227
Optical Power Indicator, 114
optical signals
attenuate, 62
Option 010 enable, 232
Orderwire byte (E1)
SDH (Concepts), 285
SONET(Concepts), 266
Orderwire byte (E2)
SDH (Concepts), 287
SONET (Concepts), 267
Overhead Byte Group Capture, 109
Overhead Bytes
Receiver, 121
VT/LO Path, 142
Overview
OmniBER XM, 24
Overview Tool Tip Window, 119
User Guide
user_guide.book Page 319 Friday, January 30, 2004 11:35 AM
Index
P
Path Alarms, 98
Path Errors
Add VT/TU errors, 138
Path Errors/Alarms
Adding, 97
Path overhead (STS) (Concepts), 274
Pattern Bit Errors, 97
Payload Mapping
Setup, 136
Payload Pattern, 94
Receiver set up, 116
Performance Tests, 233
POH Bytes
Edit Transmitter, 112
Pointer Activity Measurements, 124
Pointer Bytes
Setting VT/TU bytes, 140
Pointer Decrement Count, 124
Pointer Increment Count, 124
Pointer Measurement Inhibition, 124
Pointer Range, 141
Pointer Values, 107
Port and Channel Numbering
Scheme, 134
Power cables, 41
power down, 68
power requirements, 32
Power Up the System, 53
Primary Disconnect, 35
Problems When Making
Measurements, 202
Pulse mode alarm burst, 102
Q
Quick Selections, 71
R
rack mount PC, 40
Racks, 36
Receiver interface, 115
Receiver Payload Pattern, 116
Regenerator section overhead
(RSOH) (Concepts), 285
Repackaging, 239
Result Updates, 131
User Guide
Results, 123
Analysis, 126
Results Format, 123
RJ-45 cables
straight-through, 42
S
S1 Byte
Synchronization status
message, 105
S1 sync status byte
SDH (Concepts), 286
SONET(Concepts), 267
Safety, 23
Safety Precautions, 19
Safety symbols, 21
Save events to a file, 128
SDH LO Channel Numbering, 134
Section overhead (SOH)
(Concepts), 266
Section Overhead Bytes
Transmitter, 106
Select which events to log, 128
Selected and Unselected
Channels, 136
Service Disruption Time
Viewing, 131
Setting up the VT/TU/PDH
Transmit/Receive Interface, 135
Shipment, 238
Shortcuts
Windows, 70
Signal label (V5)
SDH (Concepts), 298
SONET (Concepts), 278
Signal label byte (C2)
SDH (Concepts), 293
Signal Scrambling, 88
Single Measurement Mode, 130
single mode fiber, 63
SMA cable, 42
SONET LO Channel
Numbering, 134
Specifications, 18, 224
Start a session, 81
Start Menu, 74
Start the Software, 64
Static Electricity, 41
Status Messages
synchronization, 105
Storage, 238
straight-through cables, 42
STS path overhead (POH)
(Concepts), 274
Support
Technical, 18
Switches, 34
switches
rack mount, 39
set up, 39
Symbols
Safety, 21
Sync status byte (S1)
SDH (Concepts), 286
SONET (Concepts), 267
System
Power up, 53
System Controllers, 30
T
Technical Support, 18
10.0.0.1 (hub card address),
changing, 157
Terminal Mode, 85
Thru mode, 85
Timed error/alarm burst, 102
To close a session, 132
To connect a laptop PC, 52
To exit and log out, 75
To get online help, 76
To log errors, alarms and statistics
results to a file, 128
To power down the system, 68
To rack mount a chassis, 38
To set up a rack mount PC, 40
To set up chassis on a Benchtop, 37
To Set up individual channels, 91
To set up individual channels, 91
TOH/SOH
Transmitter, 104
Tool Bar, 77
Tools Menu, 78
Transmitter
Payload set up, 94
Transmitter and Receiver Channels
Setup, 90
319
user_guide.book Page 320 Friday, January 30, 2004 11:35 AM
Index
Transparent Thru Mode, 85
twin BNC cable, 42
Tx Eye clock, 228
Types of Logging, 127
Typical Configuration, 28
V
V5 byte
SDH (Concepts), 298
V5 signal label
SDH (Concepts), 298
Ventilation, 36
Viewing Port and Channel
Statistics, 125
VT POH (VT path overhead)
(Concepts), 278
VT/LO/PDH Path Errors
Viewing, 145
VT/TU channels
select/unselect, 136
VT/TU Pointer Bytes, 140
VT/TU/PDH Alarms
Viewing, 145
W
Warranty and service, 22
What is not logged, 128
Window Shortcuts, 70
Windows Desktop, 74
Z
Z7 Interpretation, 280
320
User Guide
sdh_Lynx2.book Page 148 Wednesday, April 17, 2002 12:49 PM
Printed in U.K. 02/04
J7241-90011
J7241-90011_frontcover.p65
2
06/01/2004, 12:49