1
Quadro FXO 4 Manual I: Installation Guide
Copyright and Trademarks
Copyright © 2003-2012 Epygi Technologies, Ltd. All Rights Reserved. Quadro FXO 4 is a registered trademark of Epygi
Technologies, Ltd. Microsoft, Windows, and the Windows logo are registered trademarks of Microsoft Corporation. All other
trademarks and brand names are the property of their respective proprietors.
Limited Warranty
Epygi Technologies, Ltd. (‘Epygi’) warrants to the original end-user purchaser every Quadro to be free from physical defects in material and workmanship under normal use for a period of one (1) year from the date of purchase (proof of purchase required) or two (2) years from the date of purchase (proof of purchase required) for products purchased in the
European Union (EU). If Epygi receives notice of such defects, Epygi will, at its discretion, either repair or replace products
that prove to be defective.
This warranty shall not apply to defects caused by (i) failure to follow Epygi’s installation, operation or maintenance instructions; (ii) external power sources such as a power line, telephone line, or connected equipment; (iii) Products that have
been serviced or modified by a party other than Epygi or an authorized Epygi service center; (iv) Products that have had
their original manufacturer’s serial numbers altered, defaced, or deleted; (v) damage due to lightning, fire, flood, or other
acts of God.
In no event shall Epygi’s liability exceed the price paid for the product from direct, indirect, special, incidental, or consequential damages resulting from the use of the product, its accompanying software, or its documentation. Epygi offers no
refunds for its products. Epygi makes no warranty or representation, expressed, implied, or statutory, with respect to its
products or the contents or use of this documentation and all accompanying software, and specifically disclaims its quality,
performance, merchantability, or fitness for any particular purpose.
Return Policy
If the product proves to be defective during this warranty period, contact the Epygi authorized reseller from whom you purchased the product to obtain a Return Material Authorization (RMA) Number. When returning a product, mark the Return
Authorization Number clearly on the outside of the package and include your original proof of purchase. Return requests
cannot be processed without proof of purchase. Customers are responsible for shipping and handling charges when shipping to Epygi.
Epygi or its service center will use commercially reasonable efforts to ship a replacement Product within ten (10) working
days after receipt of the returned product. Actual delivery times may vary depending on the Customer's location.
Epygi reserves the right to revise or update its products, pricing, software, or documentation without obligation to notify any
individual or entity. Please direct all inquiries to:
Epygi Technologies, Ltd., Two Legacy Town Center, 6900 North Dallas Parkway, Suite 850, Plano, Texas 75024
Notice to Users
This Installation Guide in whole or in part, may not be reproduced, translated, or reduced to any machine-readable form
without prior written approval.
Epygi provides no warranty with regard to this Installation Guide or other information contained herein and hereby expressly
disclaims any implied warranties of merchantability or fitness for any particular purpose with regards to this manual or such
other information. In no event shall Epygi be liable for any incidental, consequential, or special damages, whether based on
tort, contract, or otherwise, arising out of or in connection with this manual or other information contained herein or the use
thereof.
FCC Statement (Part 15) Class A
The Epygi Quadro has been tested and found to comply with the limits for a class A digital device, pursuant to Part 15 of
the FCC Rules. These limits are designed to provide reasonable protection against harmful interference in a commercial
installation. This equipment generates, uses, and can radiate radio frequency energy and, if not installed and used according to the instructions, may cause harmful interference to radio communications. However, there is no guarantee that interference will not occur in a particular installation. If this equipment does cause harmful interference to radio or television reception, which is found by turning the equipment off and on, the user is encouraged to try to correct the interference by one
or more of the following measures:
•
•
•
•
Reorient or relocate the receiving antenna
Increase the separation between the equipment and device
Connect the equipment to an outlet different from the receiver
Consult a dealer or an experienced Radio/TV technician for assistance
You are cautioned that any change or modification to the equipment not expressly approved by the manufacturer could void
the user’s authority to operate this device.
Administrative Council for Terminal Attachments (ACTA) Customer Information
This equipment complies with Part 68 of the FCC rules and the requirements adopted by the ACTA. A plug and jack used
to connect this equipment to the premises wiring and telephone network must comply with the applicable FCC Part 68 rules
and requirements adopted by the ATCA.
If the Quadro FXO 4 causes harm to the telephone network, the telephone company will notify you in advance that temporary discontinuance of service may be required. But if advance notice isn’t practical, the telephone company will notify the
customer as soon as possible. Also, you will be advised of your right to file a complaint with the FCC if you believe it is necessary.
The telephone company may make changes in its facilities, equipment, operations or procedures that could affect the operation of the equipment. If this happens, the telephone company will provide advance notice in order for you to make necessary modifications to maintain uninterrupted service.
Quadro FXO 4; (SW Version 5.3.x)
Quadro FXO 4 Manual I: Installation Guide
Connection to party line service is subject to state tariffs. Contact the state public utility commission, public service commission or corporation commission for information.
If your home has specially wired alarm equipment connected to the telephone line, ensure the installation of the Quadro
FXO 4 does not disable your alarm equipment. If you have any questions about what will disable alarm equipment, consult
your telephone company or a qualified installer.
Electrical Safety Advisory
To reduce the risk of damaging power surges, we recommend you install a quality AC surge suppressor in the AC outlet
from which the Quadro FXO 4 is powered.
Industry Canada Statement
This product meets the applicable Industry Canada technical specifications.
Safety Information
Before using the Quadro FXO 4, please review and ensure the following safety instructions are adhered to:
•
•
•
•
•
•
•
•
•
To prevent fire or shock hazard, do not expose your Quadro FXO 4 to rain or moisture.
To avoid electrical shock, do not open the Quadro FXO 4. Refer servicing to qualified personnel only.
Never install wiring during a lightning storm.
Never install telephone jacks in wet locations unless the jack is specified for wet locations.
Never touch un-insulated telephone wire or terminals unless the telephone line has been disconnected at the network interface.
Use caution when installing or modifying cable or telephone lines.
Avoid using your Quadro FXO 4 during an electrical storm.
Do not use your Quadro FXO 4 or telephone to report a gas leak in the vicinity of the leak.
An electrical outlet should be as close as possible to the unit and easily accessible.
Emergency Services
The Quadro FXO 4 SIP Service is intended to function as a secondary telephone service. These services are made available through the Internet and therefore are dependent upon a constant source of electricity and network availability. In the
event of a power outage, the Quadro FXO 4 SIP Service will automatically be disabled. User understands that in the event
of a power or network outage, the Quadro FXO 4 SIP Service will not support 911 emergency services and further that
such services will only be available via the user's regular telephone line not connected to the Quadro FXO 4. User further
acknowledges that any interruption in the supply or delivery of electricity or network availability is beyond Epygi's control
and that Epygi shall have no responsibility for losses arising from such interruption.
Quadro FXO 4; (SW Version 5.3.x)
Quadro FXO 4 Manual I: Installation Guide
Table of Contents
Manual-I: Installation Guide
About This Installation Guide ...................................................... 5
Requirements ........................................................................... 6
Hardware Overview ................................................................... 6
Quadro FXO 4’s Rear Panel .................................................................... 6
Quadro FXO 4’s Front Panel LEDs ........................................................... 7
Installing the Quadro FXO 4 ........................................................ 8
Networking Overview ............................................................................ 8
Connecting the Hardware .................................................................... 10
Configuring the Standalone Gateway Quadro FXO 4 ....................... 11
Logging in to Quadro FXO 4 ................................................................. 11
Basic Configuration............................................................................. 12
Run the System Configuration Wizard ........................................................... 13
System Configuration ............................................................................ 13
DHCP Settings for the LAN Interface ......................................................... 14
Regional Settings .................................................................................. 14
Finishing the System Configuration Wizard ................................................ 15
Run the Internet Configuration Wizard .......................................................... 17
Uplink Configuration .............................................................................. 17
WAN IP Configuration ............................................................................ 18
PPP/PPTP Configuration .......................................................................... 18
WAN Interface Configuration ................................................................... 19
DNS Settings ....................................................................................... 20
Finishing the Internet Configuration Wizard ............................................... 21
Configuring the Firewall .............................................................................. 21
Setting up Call Routing ....................................................................... 22
Configuring the Quadro FXO 4 as an IP PBX Expansion device.......... 29
Step
Step
Step
Step
1:
2:
3:
4:
Connecting the Quadro FXO 4................................................... 30
Enable the DHCP Server on the Quadro IP PBX ........................... 31
Sharing Mode Configuration on Quadro IP PBX ........................... 32
Sharing Mode Configuration on Quadro FXO 4 ............................ 34
Registering on Epygi’s Technical Support...................................... 37
Appendix: PC DHCP Settings ...................................................... 38
Appendix: Changing the Admin's Password ................................... 40
Appendix: Configuring SIP NAT Traversal ..................................... 42
Appendix: Checking the Connections ........................................... 44
Manual II: see Administrator's Guide
Describes in detail the Quadro FXO 4 management menus and includes all system default values at a glance, too.
Quadro FXO 4; (SW Version 5.3.x)
Quadro FXO 4 Manual I: Installation Guide
About This Installation Guide
About This Installation Guide
This Installation Guide explains the installation of the Quadro FXO 4 gateway.
This Installation Guide does not provide advanced configuration information. For these features, refer to the Administrator's Guide.
The Quadro FXO 4 is an analogue gateway that allows connectivity between the PSTN and
a VoIP network. The Quadro FXO 4 gateway can be configured to work as:
• An FXO 4 expansion board to supplement a Quadro IP PBXs with additional LINE
ports.
• A standalone analogue gateway.
In case of using Quadro FXO 4 as LINE expansion board it can be connected both to WAN
and LAN for Quadro IP PBX to emulate additional FXO ports on Quadro IP PBX with diverse
configurations depend on usage scenarios.
This document describes how to configure the Quadro FXO 4 as an LINE expansion board
connected to the LAN interface of a Quadro IP PBX to increase the FXO capability on the
Quadro IP PBX with minimal configuration.
For the detailed information on how to install and use the Quadro FXO 4 refer to the Quadro
FXO 4 Manual II: Administrator's Guide.
For the detailed information on how to install and use Quadro IP PBXs refer to the Quadro
IP PBX Manual I and II: Installation and Administrator's Guide.
Hardware Overview shows all plugs and LEDs of the Quadro FXO 4.
Installing the Quadro FXO explains connection of cables and devices to the Quadro FXO
4.
Configuring the Standalone Gateway Quadro FXO describes the configuration steps
needed to establish Quadro FXO 4 as a standalone gateway. The chapter includes information about the System and Internet Configuration Wizards to integrate the Quadro
FXO 4 in your network environment and about the basic setting up of the call routing
functionality.
Please Note: The Quadro FXO 4 configuration described in this Installation Guide describes basic configurations only. For more complex configurations, please refer to the
Quadro FXO 4 Administrator's Guide.
Configuring the Quadro FXO as an IP PBX Expansion device describes the configuration
steps that might be needed to establish Quadro FXO 4 as a LINE expansion for a Quadro
IP PBX.
Please Note: For more details on this configuration, please refer to the Quadro IP PBX
Using Shared FXO Lines document on the Epygi WEB Support portal.
Registering on Epygi’s Technical Support shows you how to gain access to the Epygi
Technical Support Center and the Epygi SIP Server.
Appendix: PC DHCP Settings explains how to configure your PC to access the Quadro
configuration GUI.
Appendix: Changing the Admin's Password explains how to change the default administrator password.
Appendix: Configuring SIP NAT Traversal explains configuration of the Quadro if it is
placed behind a NAT enabled router.
Quadro FXO 4; (SW Version 5.3.x)
5
Quadro FXO 4 Manual I: Installation Guide
Appendix: Checking the Connections
About This Installation Guide
gives
hints
to solve
common
problems.
Requirements
•
•
•
•
•
•
One 120/240 V power outlet in close proximity to the Quadro FXO 4.
One RJ-45 Ethernet 10/100 broadband Internet connection, if Quadro FXO 4 shall
be used as a standalone gateway
One CAT 5 Ethernet cable with an RJ-45 connector to connect to the Quadro FXO
4 LAN port
One PC with a 10Mbps or a 10/100 Mbit/s Ethernet card or adapter installed.
TCP/IP network protocol installed on each PC.
For optimal results, Internet Explorer 5.5 or higher, or Netscape Navigator 4.7 or
higher are recommended.
Please Note: The Quadro FXO 4 is shipped with one straight RJ-45 CAT 5 cable. If the LAN
connector of the Quadro FXO 4 is to be connected to a hub or switch, a crossover cable
may be required.
Quadro FXO 4; (SW Version 5.3.x)
6
Quadro FXO 4 Manual I: Installation Guide
Hardware Overview
Hardware Overview
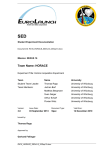
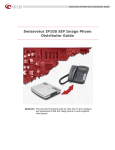
Quadro FXO 4’s Rear Panel
Fig. I-1: Quadro FXO 4’s backplate
1
Power supply socket. Use only the power adapter delivered with the Quadro FXO
4.
2
LINE sockets to connect the Quadro to the PSTN network using standard analog
phone service. These are FXO (Foreign Exchange Office) analog ports
3
The Reset button may be used in two ways: (1) to initiate a normal reset, (2) to carry
out a factory reset. A normal reset is executed by pressing the Reset button with a paper clip for an instant.
Pressing the reset button and holding it down for 7 seconds or more will execute a factory reset. This will restore the factory defaults and clear all settings including the IP
address and the administration password you entered.
Please Note: A Factory Reset forces the default LAN IP address of 172.28.0.1 and
default administrator's password of 19.
4
RJ-45 socket to attach a Local Area Network (LAN) via an Ethernet CAT 5 cable. If a
Quadro IP PBX or a PC is connected directly to this socket, a straight cable is used. If
an Ethernet hub, router or switch is used, a crossover cable may be required.
5
RJ-45 socket to attach the Internet Uplink (WAN) via an Ethernet CAT 5 cable.
Quadro FXO 4; (SW Version 5.3.x)
6
Quadro FXO 4 Manual I: Installation Guide
Hardware Overview
Quadro FXO 4’s Front Panel LEDs
1
BUSY, green
Status of CPU
off: No power
on or blinking: Normal activity
2
INFO/FAULT,
yellow/red/green
System information
on (yellow):
device is booting
on (red):
error or system is booting
on (green):
system is operational
3
LINE 1, green
Status of the FXO LINE 1
on: line in use
off: line not in use
4
LINE 2, green
Status of the FXO LINE 2
on: line in use
off: line not in use
5
LINE 3, green
Status of the FXO LINE 3
on: line in use
off: line not in use
6
LINE 4, green
Status of the FXO LINE 4
on: line in use
off: line not in use
blinking (yellow/green):
event occurred, details specified in
the System Event section of the Management interface
blinking (red/green):
system unusable
blinking (red/yellow):
emergency firmware is needed
blinking (red/green/red/yellow):
firmware update
LED Indication during a firmware update
A firmware update is indicated by the yellow/red/green Info/Fault LED. It will blink red/green
for about five minutes while the firmware is updated. The Quadro FXO 4 will then re-boot automatically showing the boot LED sequence.
LED Indication during a boot sequence
A boot sequence is indicated as follows: The yellow/red/green Info/Fault LED will glow red
for a few seconds, then turn to yellow for another four or five minutes while the green Busy
LED is blinking. Once the Info/Fault LED is green, the boot sequence has been completed
successfully.
LED indication during uploading an emergency firmware
The yellow/red/green Info/Fault LED will stop blinking alternately red/yellow and start blinking red/green/red/yellow. This shows that Quadro has accepted the emergency firmware and
is loading it. After a few seconds, Quadro will boot, showing the boot LED sequence.
Quadro FXO 4; (SW Version 5.3.x)
7
Quadro FXO 4 Manual I: Installation Guide
Installing the Quadro FXO 4
Installing the Quadro FXO 4
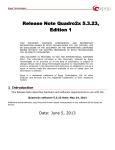
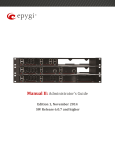
Networking Overview
To establish a connection between the PSTN (or your PBX) and the Internet, a gateway is
needed. The Quadro FXO 4, used as a standalone gateway, will perform the task of connecting your PSTN (or PBX) via its WAN port to a Private Data Network that includes Quadro IP PBXs or the Internet. The Quadro FXO 4 will process and regulate the voice traffic
between these networks by means of Call Routing paths that are specified by the administrator according to a dial plan. The Quadro FXO 4 has one LAN port that is used to connect
a PC for management purposes. The WAN port transmits up to 10 Mbps, and the LAN port
transmits at 10 Mbps or 100 Mbps.
Fig. I-2: Standalone gateway: Connection overview
Every device within an IP network requires a unique IP address to identify itself. Since the
Quadro FXO 4, used as a standalone gateway, connects to both the LAN (Admin PC) and
the WAN (Private Data Network or Internet), it has to be part of both networks, and must
have two IP addresses: one for the WAN side and one for the LAN side. The Quadro FXO
4’s integrated firewall/NAT functionality will hide the LAN IP address from the WAN (Internet)
side. (As the firewall is switched off per default, you need to enable it.)
There are two ways of assigning an IP address: statically or dynamically. The Quadro FXO 4
can be configured with a static IP address on the WAN interface. You also can use a DHCP
server assigned IP address on the WAN side.
Please Note: A DHCP client is software that requests an IP address from a DHCP server. A
DHCP server assigns on request a unique IP address to a device. The Quadro FXO 4 acts
as a DHCP client on its WAN interface and as a DHCP server on its LAN interface.
Fig. I-3: LINE expansion: Connection overview
Quadro FXO 4; (SW Version 5.3.x)
8
Quadro FXO 4 Manual I: Installation Guide
Installing the Quadro FXO 4
Besides acting as a standalone gateway, Quadro FXO may serve as a LINE expansion for
Quadro IP PBXs. In this case, Quadro FXO 4 needs only a LAN IP address which it gets
from the DHCP server of the attached Quadro IP PBX (see chapter Configuring the Quadro
FXO 4 as an IP PBX Expansion device).
Quadro FXO 4; (SW Version 5.3.x)
9
Quadro FXO 4 Manual I: Installation Guide
Installing the Quadro FXO 4
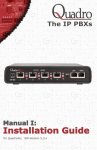
Connecting the Hardware
Fig. I-4: Connecting the Hardware
•
•
•
•
•
•
•
Verify the product package contents are complete. Refer to the contents sheet included
in the packaging to determine if all the items were shipped in the box.
Connect the Quadro FXO 4’s LINE ports to your PBX or the trunk from the PSTN Central Office.
If the Quadro FXO 4 is used as a standalone gateway, a PC may be connected via a
straight CAT 5 cable with an RJ45 connector to the LAN socket of the Quadro FXO 4. If
a hub or switch shall be connected, use a crossover cable from the LAN interface of the
Quadro FXO 4 to the hub or switch.
The LAN port is not needed, if Quadro FXO 4 shall be used as a LINE expansion.
If the Quadro FXO 4 shall be used as a standalone gateway, connect its WAN port to
the Internet service via a cable or DSL modem. In this case, you should enable the firewall, as it is disabled by default).
Connect the WAN port of the Quadro FXO 4 to the LAN port of the Quadro IP PBX to
use the Quadro FXO 4 as an LINE expansion for the Quadro IP PBX.
When using a DSL or Cable modem, power up the modem before the Quadro.
Connect the power adapter to the POWER port on the Quadro FXO 4’s rear panel and
plug the power adapter into a power outlet. Only use the original power adapter and plug
it into a power strip with surge protection or to a UPS if available.
The red LED (Fault) will glow for several seconds followed by the yellow LED (Info),
which will glow for several minutes. As soon as Info is off, the Quadro FXO 4 is operational.
Check the LEDs: The green Busy LED should glow continuously. The green LAN and
WAN LEDs will blink when cables are connected to these ports and all devices are powered up. If the green LAN and WAN LEDs do not blink, verify cabling and ensure that
all devices are powered up.
Please Note: CAT 5 cables can be faulty without visual indication. The LAN and WAN
LEDs verify that the Ethernet connection is established between the end points. If these
LEDs are not illuminated, there is a connection problem between the Quadro FXO 4 and
the other device. Some modems, hubs, switches and routers will require the use of
crossover cables.
Quadro FXO 4; (SW Version 5.3.x)
10
Quadro FXO 4 Manual I: Installation Guide
Configuring the Standalone Gateway Quadro FXO 4
Configuring the Standalone Gateway Quadro FXO
4
To configure the standalone gateway Quadro FXO 4 basically, two steps are needed:
Step1: Basic Configuration using the System Configuration Wizard and the Internet
Configuration Wizard
Step 2: Specifying the Call Routing paths according to your dial plan
The most important settings required in Step 1: Basic Configuration are:
Assigning an IP address to the WAN Interface. If you use a DHCP server, please configure it to deliver an IP address. In this case, Quadro FXO 4 will get its IP address
automatically, as it acts as a DHCP client on the WAN side.
Bandwidth - used to regulate a number of calls allowed by the Quadro FXO 4 to avoid
degradation in low bandwidth conditions.
Regional Settings - if your Quadro FXO 4 is located outside the United States, it is important to properly configure your line connections to the PSTN in your location
Firewall - enable and configure the firewall to make the Quadro FXO 4 safe and accessible for management.
To customize these settings, connect a PC to Quadro FXO 4’s LAN port, log in and complete the
Basic Configuration as described in the following sections.
Logging in to Quadro FXO 4
Start a browser (MS Internet Explorer, Netscape, Opera) on a PC connected to Quadro FXO 4’s
LAN port. Enter http://172.28.0.1 (Quadro FXO 4’s default LAN IP address) into the address
field. The Login page of the Quadro FXO 4 will be displayed:
Fig. I-5: Quadro FXO 4’s login page
Enter admin as the Username and 19 as the Password to log in as the administrator.
After logging in, the Quadro FXO 4 Management page will be displayed.
Quadro FXO 4; (SW Version 5.3.x)
11
Quadro FXO 4 Manual I: Installation Guide
Configuring the Standalone Gateway Quadro FXO 4
Please Note: If you enter a wrong password and/or username five times, the device will become
unavailable for login during the next five minutes.
Fig. I-6: Quadro FXO 4’s Management page
Basic Configuration
Two Configuration Wizards are available to accomplish the basic configuration of Quadro devices:
• The System Configuration Wizard - a tool for the administrator to define the Quadro's
Local Area Network settings and to specify regional configuration settings to make Quadro operational in its LAN. It must be run upon Quadro first startup.
• The Internet Configuration Wizard - a tool for the administrator to configure the WAN
settings and to adjust Quadro's connectivity in the global network. It must be run if Quadro is desired to be connected to the Internet.
Please Note: It is strongly recommended that factory default settings are left unchanged if their
meanings are not completely clear.
Quadro FXO 4; (SW Version 5.3.x)
12
Quadro FXO 4 Manual I: Installation Guide
Configuring the Standalone Gateway Quadro FXO 4
Run the System Configuration Wizard
Open the System Configuration Wizard by selecting the corresponding menu item on the System menu. The page Getting Started will be displayed:
Fig. I-7: System Configuration Wizard
This first page of the System Configuration Wizard is for information only and lists the items to be
configured, Click on the Next button to get to the System Configuration page.
System Configuration
Enter into the Host Name field a unique name for the Quadro FXO 4. This is useful when many
Quadro’s are part of a network and one administrator has remote access to all of them. All Web
Management pages show this Host Name in the top right corner.
For a basic configuration, the LAN IP address needn't be changed. If you have to change it (e.g.
to integrate the device into an existing LAN), enter a new LAN IP address and have it handy. You
need it to re-access Quadro management.
Fig. I-8: System Configuration page
Clicking Next shows the page DHCP Settings for the LAN Interface.
Quadro FXO 4; (SW Version 5.3.x)
13
Quadro FXO 4 Manual I: Installation Guide
Configuring the Standalone Gateway Quadro FXO 4
DHCP Settings for the LAN Interface
If the DHCP server is enabled, the Quadro FXO 4 will assign dynamic IP addresses to the Admin
PC connected to its LAN port.
If you didn’t change the default IP address of the Quadro FXO 4, you may also leave the default
values for IP Address Range. Make sure your connected Admin PC belongs to the same network as the LAN port of your Quadro FXO 4.
Please Note: Make sure there is only one DHCP server on the LAN. Otherwise, unpredictable
network behavior can occur.
Fig. I-9: DHCP Settings for the LAN Interface page
Click on Next to display the Regional Settings page.
Regional Settings
Fig. I-10: Regional Settings page
Proper configuration of Regional Settings is important to the functionality of the voice subsystem. The Regional Settings determine the proper telephony parameters for the specified country.
Select the country where the Quadro FXO 4 is located. If you do not find your country in the list,
pick the closest. If this setting does not work, issue a request to Epygi technical support under
the Support section of www.epygi.com.
Quadro FXO 4; (SW Version 5.3.x)
14
Quadro FXO 4 Manual I: Installation Guide
Configuring the Standalone Gateway Quadro FXO 4
The Quadro gets the correct time automatically over the Internet from a time server. If you are
not located in US/Central Standard Time Zone, you will need to change the Timezone to your
region.
Click Next to show the summary page.
Finishing the System Configuration Wizard
Fig. I-11: System Configuration Wizard finishing page
Click the Finish button to complete the System Configuration Wizard. The Quadro FXO 4 will
then stop internal functions and apply the changes made in the wizard.
Fig. I-12: Wizard execution process
After this is complete, the Quadro FXO 4 will reply with the Confirm Settings page requesting
confirmation of the changes. Press the OK button to confirm the settings.
Quadro FXO 4; (SW Version 5.3.x)
15
Quadro FXO 4 Manual I: Installation Guide
Configuring the Standalone Gateway Quadro FXO 4
Fig. I-13: Confirm Settings page
Please Note: you must confirm the settings within 20 minutes. If not, the device will revert back
to the previous configuration and reboot.
Please Note: If you do not use DHCP for your LAN and you have changed your LAN settings,
make sure that the IP address of the PC connected to Quadro is still within the specified IP address range. Otherwise, your PC might be unable to establish a connection to Quadro.
If you changed the network configuration of the LAN, you may have to reboot your PC to get a
new IP address from the new network. You can then access the Web Management of the Quadro on the new IP address you assigned to the Quadro.
Quadro FXO 4; (SW Version 5.3.x)
16
Quadro FXO 4 Manual I: Installation Guide
Configuring the Standalone Gateway Quadro FXO 4
Run the Internet Configuration Wizard
Open the Internet Configuration Wizard by selecting the corresponding menu item on the
System menu. The page Getting Started will be displayed:
Fig. I-14: Internet Configuration Wizard
This first page of the Internet Configuration Wizard is for information only and lists the items
to be configured, Click on the Next button to get to the Uplink Configuration page.
Uplink Configuration
Select here the WAN Interface Protocol required by you ISP: PPPoE (Point to Point Protocol over Ethernet), PPTP (Point to Point Tunneling Protocol) or Ethernet.
Fig. I-15: Uplink Configuration
Enter WAN Interface Bandwidth to assure the quality of IP calls. If available bandwidth is
used to the point of which the quality of an additional IP call would suffer, new IP calls are
rejected.
Quadro FXO 4; (SW Version 5.3.x)
17
Quadro FXO 4 Manual I: Installation Guide
Configuring the Standalone Gateway Quadro FXO 4
The bandwidth provided by your ISP must be specified for both Upstream and Downstream
fields. The default entry in both fields is 10000, the maximum bandwidth of the 10 MB uplink
module.
The Min Data Rate text field is used to specify the amount of bandwidth reserved for data
applications. The value entered here has to be smaller that the value specified for Upstream
Bandwidth. Specify the WAN Interface Protocol by choosing between PPPoE (Point to
Point over Ethernet) and Ethernet. Use Ethernet for DHCP or static IP.
Clicking Next shows WAN IP Configuration page. If PPPoE is the selected WAN Interface
Protocol, the next page will be PPP/PPTP Configuration.
WAN IP Configuration
Your Internet Service Provider (ISP) should provide this information.
•
Assign automatically via DHCP - The parameters are set automatically by the
ISP. This is common with cable modem and DSL service.
• Assign Manually requires the administrator to enter the external IP Address, the
corresponding Subnet Mask, and the IP address of the Standard Gateway. This
is common when you have a static IP address with your ISP.
Fig. I-16: WAN IP Configuration page
Click the Next button to display the WAN Interface Configuration page.
PPP/PPTP Configuration
Enter the IP address of the PPTP server into the PPTP Server text field.
Choose the encryption for the traffic over the PPTP interface from the Encryption drop
down list.
Authentication Settings require the Username and the Password used for the authentication on the ISP server.
Dial Behavior radio buttons:
Quadro FXO 4; (SW Version 5.3.x)
18
Quadro FXO 4 Manual I: Installation Guide
Configuring the Standalone Gateway Quadro FXO 4
• Dial Manually - if this radio button is activated, a button will be displayed in the main
management window that serves to switch the Internet connection on/off. When accessing the Internet, every station of the connected LAN has to connect to Quadro first.
• Always connected - Quadro stays in the always connected mode. This will allow Quadro always remain online in the network.
The IP Address Assignment field is used to specify the external IP address given to the
Quadro. Usually it is a dynamic address but in some cases you may be given a static IP address.
Fig. I-17: PPP/PPTP Configuration page
If your ISP assigns a dynamic IP address, activate the Dynamic IP Address radio button,
otherwise activate the Fixed IP Address radio button and enter the IP address you were
assigned by your ISP.
Keep Connection alive checkbox enables keeping the connection alive by sending control
packets dedicated for the link state verification.
Click the Next button to display the WAN Interface Configuration page.
WAN Interface Configuration
If your ISP requires a specific MAC address (e.g., for authentication), it can be entered on
this page. The required MAC address can be entered into the User defined field. If a specific MAC address is not required, leave the default selection This device selected.
Quadro FXO 4; (SW Version 5.3.x)
19
Quadro FXO 4 Manual I: Installation Guide
Configuring the Standalone Gateway Quadro FXO 4
Fig. I-18: WAN Interface Configuration page
Click Next to display the DNS Settings for the LAN Interface page.
DNS Settings
Select Fixed Nameserver and enter its IP address. If you use your DHCP server and if it will
deliver a DNS server, you may select Dynamically by Provider. When using a static IP address, fixed values must be entered.
Fig. I-19: DNS Settings page
Click Next to show the summary page of the Internet Configuration Wizard:
Quadro FXO 4; (SW Version 5.3.x)
20
Quadro FXO 4 Manual I: Installation Guide
Configuring the Standalone Gateway Quadro FXO 4
Finishing the Internet Configuration Wizard
Fig. I-20: Internet Configuration Wizard Summary page
Click the Finish button to complete the Internet Configuration Wizard. The Quadro will then
stop internal functions and apply the changes made in the Wizard. After this is complete, the
Quadro will reply with the Confirm Settings page requesting confirmation of the changes.
Press the OK button to confirm the settings.
Please Note: you must confirm the settings within 20 minutes. If not, the device will revert
back to the previous configuration and reboot.
Please Note: If you do not use DHCP for your LAN and you have changed your LAN settings, make sure that the IP address of the PC connected to the Quadro FXO 4 is still within
the specified IP address range. Otherwise, your PC might be unable to establish a connection to the Quadro FXO 4.
If you changed the network configuration of the LAN, you may have to reboot your PC to get
a new IP address from the new network. You can then access the Web Management of the
Quadro FXO 4 on the new IP address you assigned to the Quadro FXO 4.
Configuring the Firewall
Select Firewall/NAT from the Internet Uplink menu to open the Firewall Configuration
page. By default, the Firewall configuration is disabled on the Quadro, which allows any incoming traffic from the WAN.
It is recommended to leave the firewall disabled if Quadro FXO 4 acts as a FXO expansion
board.
If Quadro FXO 4 acts as a standalone board, it is recommended to configure the firewall on
the Quadro FXO 4. To do so, check the Enable Firewall checkbox and select an adequate
security level to protect your Quadro FXO 4:
Quadro FXO 4; (SW Version 5.3.x)
21
Quadro FXO 4 Manual I: Installation Guide
Configuring the Standalone Gateway Quadro FXO 4
Fig. I-21: Firewall Configuration page
If you have enabled the firewall and if the Quadro FXO 4 shall be managed through the
WAN port, a configuration of the filtering rules is needed. Open View Filtering Rules from
the Firewall Configuration page and configure the rule Management Access accordingly.
Setting up Call Routing
The Call Routing service allows you to specify the communication structure between all involved devices by developing a dialing plan and setting the call routing paths accordingly.
For the Quadro extension users, the call procedure should be simple and familiar for all
kinds of calls (internal, IP, PSTN or IP-PSTN).
The possibilities Call Routing offers are numerous. The following configuration just a single
and simple example used to explain the setup of the Quadro FXO 4 as a gateway:
In this example, the Quadro FXO 4 is connected within a protected Private Data Network
built of a Quadro2x with the extensions 11, 12 and a Quadro4x with the extension 21, 22, 23
and 24. Each of these extensions will be configured such that they all shall reach the PSTN
using the prefix 9. All extensions also shall be reached by calls from the PSTN.
Fig. I-22: Call Routing example
Quadro FXO 4; (SW Version 5.3.x)
22
Quadro FXO 4 Manual I: Installation Guide
Configuring the Standalone Gateway Quadro FXO 4
Your PSTN Service Provider supplies you with a telephone number for the FXO lines connected to the Quadro FXO 4. If you want to allocate the incoming calls of that number, you
need to
•
•
Create a dial plan to define Call Routing paths on the Quadro FXO 4 and on
each of the other Quadro devices.
modify the Quadro FXO 4’s Auto Attendant welcome message inform the callers
about the extension numbers to enable them to reach the desired destination
To illustrate the dial plan with an example, we will assume, you have got the phone number
854603 and you want to offer connections assigned the numbers as follows:
Quadro 2x (IP: 10.20.30.10)
Quadro4x (IP: 10.20.30.20)
Quadro
FXO
10.20.30.30)
Extension 11
-11
Extension 21
-21
Extension 12
-11
Extension 22
-21
Extension 23
-21
Extension 24
-21
All incoming calls from the
PSTN will be caught in the Auto
Attendant: The welcome message of the Auto Attendant may
inform the callers about the extension numbers.
4
(IP:
In this case, the following call routes are needed:
Fig. I-23: Call Routing example; dialing plan
Quadro FXO 4
Call Type
Destination
Address
Description
1?
SIP
10.20.30.10
path to Quadro2x
2?
SIP
10.20.30.20
path to Quadro4x
9*
PSTN
10.20.30.30
path for all outgoing calls to
PSTN
Pattern
NDS
Prefix
Quadro FXO 4; (SW Version 5.3.x)
23
Quadro FXO 4 Manual I: Installation Guide
Configuring the Standalone Gateway Quadro FXO 4
Quadro2x
Pattern
NDS
Prefix
Call Type
Destination
Address
Description
1?
PBX
path to the single extensions
9*
PSTN
10.20.30.30
path for all outgoing calls to
PSTN
Call Type
Destination
Address
Description
Quadro4x
Pattern
NDS
Prefix
2?
PBX
9*
PSTN
path to the single extensions
10.20.30.30
path for all outgoing calls to
PSTN
To define the call routing paths needed on Quadro FXO 4 open Call Routing in the Telephony menu and select Local Routing Table. The Call Routing - Local Routing page will
be displayed:
Quadro FXO 4; (SW Version 5.3.x)
24
Quadro FXO 4 Manual I: Installation Guide
Configuring the Standalone Gateway Quadro FXO 4
Fig. I-24: Call Routing example; dialing plan
Per default, in standalone mode, Call Routing Table is empty on Quadro FXO 4. You need
to add all routing rules manually.
Select Add to set the 1? route that leads the incoming PSTN calls to the Quadro IP PBX:
Fig. I-25: Local Call Routing Wizard: Routing Call Type Add Entry page 1
The Enable checkbox is used to enable the newly created routing rule. By default, this
checkbox is selected, so the newly created routing rule will be enabled. But if you wish to
create a routing rule for a later use, disable it from this page. The new routing rule will be
added to the Call Routing Table but will be disabled and will not be considered when placing
calls through the call routing unless it is enabled again.
Pattern requires the routing pattern. To make the specified call, the appropriate Call Code
should be dialed prior to the routing pattern. Only digit values and wildcard symbols are allowed here:
Quadro FXO 4; (SW Version 5.3.x)
25
Quadro FXO 4 Manual I: Installation Guide
•
•
•
•
Configuring the Standalone Gateway Quadro FXO 4
the "?" character stands for only one unknown digit
the "*" character stands for any number of any digits.
the “!” character stands for exclusion.
'[' , ']' , ‘{’ , ‘}’ , ',' and '-' are used to define a range or a quantity of numbers.
Number of Discarded Symbols (NDS) specifies the number of digits that that should be
discarded from the beginning of the routing pattern. In this example, no digits have to be discarded, so leave that field empty.
Prefix specifies digits that will be inserted at the beginning of the routing pattern. Leave the
field empty if no digits need to be added.
Suffix specifies digits that will be inserted at the end of the routing pattern. Leave the field
empty if no digits need to be added.
Call Type gives a possibility to select the routing call type (PBX, SIP, FXO or IP-PSTN). For
this example SIP has to be selected.
Metric allows entry of a rating for the selected route in a range from 0 to 20. If no value is inserted into this field, 10 will be used as a default. When two route entries match a user's dial
string, the route with the lower metric will be preferred. In this example the Metric field will
be left empty.
Description allows entry of short text, e.g. to name the path.
Filter on Source/Modify Caller ID allows to limit the functionality of the current route to be
used by the defined caller(s) only. If this checkbox is enabled, inbound caller information (Inbound Caller Pattern, Inbound Call Type, Inbound Port ID, etc.) will be required later in the
Local Call Routing Wizard (see Manual-II, Administrator's Guide). In this example, no caller
specific limitation is needed, so leave that checkbox unchecked empty.
Set Date/Time Period(s) allows setting a time period, during which the route shall be valid.
For this purpose, and own page is displayed as the third page of the Local Call Routing Wizard.
Set Tracing / Debug Options on This Rule checkbox is used to switch events notification
on the certain execution results of the corresponding routing rule.
Next will display the second page of the Local Routing Wizard:
Quadro FXO 4; (SW Version 5.3.x)
26
Quadro FXO 4 Manual I: Installation Guide
Configuring the Standalone Gateway Quadro FXO 4
Fig. I-26: Local Call Routing Wizard: Routing Call Type Add Entry page 2
Use Extension Settings is applicable to SIP and IP-PSTN call types only and allows to select the extension (also Auto Attendant) on behalf of the call that will be placed. The SIP settings of the selected extension will be used as the caller information. If no entry is selected in
this list, the original caller information will be kept. If the Keep original DID checkbox is selected, the called destination will receive the original caller’s information, rather than the information of extension selected from the Use Extension Settings list.
Destination Port requires the port number of the destination or the SIP server. As Quadro
devices use port 5060 per default, enter 5060.
User Name and Password are identification settings for public SIP servers or servers requiring authentication. Leave these fields empty.
AAA Required checkboxes are used to choose one or more Authentication, Authorization,
and Accounting (AAA) settings:
•
Local Authentication – with this checkbox selected, callers will need to pass authentication through Local AAA table (see below) when dialing the current pattern.
•
RADIUS Authentication and Authorization – checkbox is present when RADIUS client is enabled. With this checkbox selected, when dialing the current pattern, callers will need to pass the authentication through RADIUS server (see
above).
•
RADIUS Accounting - checkbox is present when RADIUS client is enabled. With
this checkbox selected, no authentication will take place, but a caller identifying
CDR (call detail report) will be sent to the RADIUS server. Checkbox selection
enables accounting on the RADIUS for the certain call.
Fail Reason offers a list of fail reasons depending on the selected call type. If the selected
fail reason occurs, the local routing table will be parsed for the next matching pattern, and if
found, the call will be routed to the destination specified there. In the example described
here, the default value None is used.
Quadro FXO 4; (SW Version 5.3.x)
27
Quadro FXO 4 Manual I: Installation Guide
Configuring the Standalone Gateway Quadro FXO 4
The Transport Protocol for SIP messages manipulation radio buttons group is available
for SIP or IP-PSTN call types only and allows you to select the transport (UDP, TCP or TLS)
to transmit the SIP messages through.
The SIP Privacy manipulation radio buttons group is only available for the SIP call type and
allows you to select the security of the SIP route by means of hiding (or replacing, depending on the configuration of the SIP server) the key headers of the SIP messages used to establish the call.
• Default Privacy – with this selection, Quadro specific SIP privacy will not be applied
and all privacy will rely on the configuration of the SIP Server.
• Disable Privacy – with this selection, SIP call security will not be disabled and all
headers of the SIP message will be transparently visible to the destination.
• Enable Privacy - with this selection, SIP privacy will be specified for the corresponding
route. This selection enables a group of checkboxes in order to choose the key headers
that are to be fully or partly hidden or replaced. The Require Privacy checkbox selection is used to restrict the delivery of the SIP message if any of the selected headers
cannot be hidden (or replaced, depending on the configuration of the SIP server) before
being sent to the destination.
The last page of the Local Call Routing Wizard summarizes all settings and Finish will save
the route. The Call Routing – Local Routing page is displayed again showing the new call
routing path.
Quadro FXO 4; (SW Version 5.3.x)
28
Quadro FXO 4 Manual I: Installation GuideConfiguring the Quadro FXO as an IP PBX Expansion device
Configuring the Quadro FXO 4 as an IP PBX Expansion device
Quadro FXO 4 as a LINE expansion device
does not require further configuration but
the FXO line sharing, if the Quadro IP PBX
•
•
is connected to the network and all network settings are done without
any issues
still acts as a DHCP Server as it does by default
The only required configuration for sharing the FXO lines of the Quadro FXO 4 to the Quadro
IP PBX is the sharing mode configuration on both devices (see details in Step 3: Sharing
Mode Configuration on Quadro IP PBX and Step 4: Sharing Mode Configuration on Quadro
FXO 4).
In this case, the Quadro FXO 4 has to be connected with its WAN interface to the LAN interface of the Quadro IP PBX and with its LINE ports to the FXO telephone lines. The Quadro
FXO 4 will get its IP address from the DHCP server of the Quadro IP PBX and will automatically route all incoming PSTN calls to the Auto Attendant of the Quadro IP PBX and will allow
all routed FXO calls from the Quadro IP PBX to access the FXO lines of the Quadro FXO 4.
If your Quadro IP PBX does not act as a DHCP server and/or does not use the default LAN IP
address any more, follow the step-by-step instructions presented below on both the Quadro IP
PBX and Quadro FXO 4 setups for incoming/outgoing calls through Quadro FXO 4 ports.
Quadro FXO 4; (SW Version 5.3.x)
29
Quadro FXO 4 Manual I: Installation Guide
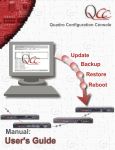
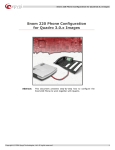
Connecting the Quadro FXO
Step 1: Connecting the Quadro FXO 4
•
•
Connect the WAN port of the Quadro FXO 4 to the LAN port of the Quadro IP PBX
via a straight-through Cat 5 cable with a RJ 45 connector.
Make sure that the LINE ports of the Quadro IP PBX and the Quadro FXO 4 are
connected to FXO telephone lines.
Fig. I-27: Installation of Quadro FXO 4 as a LINE expansion for a Quadro IP PBX
•
•
The software version 5.3.x or later must be running on the Quadro IP PBX.
The software image FXO-SW 5.3.3 and higher must be running on the Quadro
FXO.
Quadro FXO 4; (SW Version 5.3.x)
30
Quadro FXO 4 Manual I: Installation Guide
Step 2: Enable the DHCP Server on the Quadro IP PBX
Step 2: Enable the DHCP Server on the Quadro IP PBX
The Quadro FXO 4 has to have an IP address to identify itself in the Quadro IP PBX LAN.
This IP address can be assigned to it manually or dynamically via the DHCP server of the
Quadro IP PBX. The simple way from the configuration perspective is to dynamically get an
IP address from the Quadro IP PBX (default IP is 172.28.0.1). This will be done automatically, if the connected Quadro IP PBX acts as a DHCP server and if the Quadro FXO 4 acts as
a DHCP client.
To make sure, that the Quadro IP PBX will serve as a DHCP server, login to the Quadro IP
PBX as an administrator and select DHCP Settings for the LAN Interface from the LAN
services menu.
Fig. I-28: LAN-DHCP Settings pager
Make sure the Enable DHCP Server checkbox is selected and the IP Address Range is
configured.
To make sure, that the DHCP Server of the Quadro IP PBX assigned a valid IP address to
the Quadro FXO 4, go to the LAN Services Menu of the Quadro IP PBX, click on DHCP
Settings for the LAN Interface and select View DHCP Leases. The table on the opened
page should list the IP address and other details of Quadro FXO 4.
Fig. I-29: DHCP Leases page of the Quadro IP PBX
Quadro FXO 4; (SW Version 5.3.x)
31
Quadro FXO 4 Manual I: Installation Guide
Step 3: Sharing Mode Configuration on Quadro IP PBX
Step 3: Sharing Mode Configuration on Quadro IP PBX
This configuration is required on the Quadro IP PBX in order to make it use the shared FXO
lines on the Quadro FXO 4, as well as to configure the appropriate settings for the successful authorization between Quadro IP PBX and the Quadro FXO 4.
Connect to the Web GUI of the Quadro IP PBX and login as an administrator. From Telephony menu, enter External PSTN Gateways page.
Fig I-30 – External PSTN Gateways page on Quadro IP PBX
Select the Use PSTN lines of the other device checkbox and press Save to apply
changes. Press the Authorization Parameters link. External PSTN Gateways – Authorization Parameters page is displayed. Here, a list of authorized devices should be configured.
Fig I-31 – External PSTN Gateways – Authorization Parameters page on Quadro IP PBX
Press Add functional link to add new authorization parameters for the Quadro FXO 4.
Fig I-32 – External PSTN Gateways – Authorization Parameters – Add Entry page on Quadro IP PBX
Quadro FXO 4; (SW Version 5.3.x)
32
Quadro FXO 4 Manual I: Installation Guide
Step 3: Sharing Mode Configuration on Quadro IP PBX
On the opened page, insert the Username and the Password in the corresponding text
fields. These authentication parameters should match on Quadro IP PBX and Quadro FXO
4. Save the parameters.
Quadro FXO 4; (SW Version 5.3.x)
33
Quadro FXO 4 Manual I: Installation Guide
Step 4: Sharing Mode Configuration on Quadro FXO
Step 4: Sharing Mode Configuration on Quadro FXO 4
This configuration is required on the Quadro FXO 4 to share its FXO lines to the Quadro IP
PBX. Open the Web Management of the Quadro FXO 4 in your browser (the Quadro FXO 4
IP address is 172.28.0.1 by default).
Go to Telephony menu, enter PSTN Lines Sharing menu.
Fig I-33 – PSTN Lines Sharing page on Quadro FXO 4
Select the Provide PSTN lines for master device checkbox. Insert the Username and the
Password in the corresponding text fields. These authentication parameters should match
on both Quadros. Enter the IP address of the Quadro IP PBX into the Master device IP text
field. Enter the SIP Port of the Quadro IP PBX into the Master device port text field. Save
the inputs.
The results:
The configuration above will cause the corresponding 4 FXO lines of the Quadro FXO 4 device to be shared to the Quadro IP PBX.
Additional FXO lines appear in FXO Settings page on the Quadro IP PBX:
Fig 1 – FXO Settings page with shared FXO lines on Quadro IP PBX
New routing rule (#16) is automatically added to the Call Routing table on the Quadro IP
PBX:
Quadro FXO 4; (SW Version 5.3.x)
34
Quadro FXO 4 Manual I: Installation Guide
Step 4: Sharing Mode Configuration on Quadro FXO
Fig 2 – Call Routing table on Quadro IP PBX
FXO Settings page becomes read-only on the Quadro FXO 4:
Fig 3 – FXO Settings page in read-only mode on Quadro FXO 4
New routing rules (# 1-9) are automatically added to the Call Routing table on Quadro FXO
4:
Quadro FXO 4; (SW Version 5.3.x)
35
Quadro FXO 4 Manual I: Installation Guide
Step 4: Sharing Mode Configuration on Quadro FXO
Fig 4 – Call Routing table on Quadro FXO 4
All these routing rules cannot be edited or deleted.
Please Note: Any changes made in the FXO Settings on the Quadro IP PBX will automatically be reflected in this table.
Please Note: Following dependencies are used when sharing the FXO lines:
•
•
•
•
The configuration of all FXO lines (line state, PSTN Number, Allowed Call Type,
etc.) on the Quadro FXO 4 gateway is transparent to Quadro IP PBX and will be
displayed in the table on the FXO Settings page.
Independent of the configuration on the Quadro FXO 4, the incoming calls on all
shared FXO lines will be automatically routed to the default Auto Attendant (00)
once FXO sharing is activated. Occasionally, routed destinations can be changed
on Quadro IP PBX by clicking on the corresponding FXO line.
Any changes applied to the configuration of shared FXO lines on Quadro IP PBX
will be automatically reflected in the FXO Settings page and Call Routing table
on the Quadro FXO 4 gateway.
All custom Call Routing rules created on the Quadro IP PBX and dedicated for
some advanced call routing through the shared Quadro FXO 4 gateway will be automatically deleted once the FXO line sharing is disabled. Those routing rules will
not be recovered if the sharing is enabled again.
How this configuration works:
When the Quadro IP PBX user dials 9 followed by a PSTN number (or 9+ # + PSTN number) and no FXO line is available on the Quadro IP PBX (they are either unavailable, in use
or disabled), the call will be routed to Quadro FXO 4 and will go through the first available
FXO line port on the Quadro FXO 4.
When incoming call arrives to either of the FXO port on the Quadro FXO 4, it will be automatically routed to the Auto Attendant on the Quadro IP PBX (unless stated otherwise from
the FXO Settings page on the Quadro IP PBX).
Quadro FXO 4; (SW Version 5.3.x)
36
Quadro FXO 4 Manual I: Installation Guide
Registering on Epygi's Technical Support
Registering on Epygi’s Technical Support
It is recommended that you register your Quadro FXO 4 on the Epygi Technical Support web
page. Registration will give you access to the Technical Support Database. There, you can
send requests concerning technical problems as well as refer to the frequently asked questions. In addition, the technical support page allows users to download new firmware, manuals and other information. You can access the support section only if you are registered.
Additionally, registration at Epygi’s Technical Support web page gives you the username
and password to login to the Epygi SIP Server.
To register, you need to know the serial number of your Quadro FXO 4, which you will find
on Quadro FXO 4’s bottom label and its purchase date. Next, open the Epygi home page
(www.epygi.com), select Support and click on Registration Form. The online registration
page will appear:
Complete all fields and
record the Login Name and
Password in a safe place.
You will need it for the SIP
server.
Please Note: In some cases the Quadro FXO 4 units
will
be
shipped
preconfigured from the factory
with the Support login and
password already set-up. In
this case, an information
sheet is included in the
packaged contents indicating the username/password
to access Epygi’s online
Support and the Epygi SIP
Server.
Fig. I-34: Registration form
Quadro FXO 4; (SW Version 5.3.x)
37
Quadro FXO 4 Manual I: Installation Guide
Appendix: PC DHCP Settings
Appendix: PC DHCP Settings
The Quadro FXO 4 LAN port has a DHCP server that provides DHCP IP addresses to devices connected to the LAN either directly or through an Ethernet hub or switch. Appendix A
describes how to configure Windows PCs for DHCP. The PC used to access the Quadro
FXO 4 must meet the following conditions:
•
•
TCP/IP network protocol has to be installed.
DHCP has to be activated to request the IP address automatically.
Please Note: If your PC is already configured for DHCP, then simply power it on. Verify the
LAN LED is lit. If not, check the cable connections.
Follow the instructions below to install TCP/IP and enable DHCP functionality:
TCP/IP and DHCP under Windows 2000/Windows XP
Windows 2000 and Windows XP PCs with Ethernet cards or adapters normally are configured with a TCP/IP network connection by default. Nothing additional needs to be installed.
To enable the DHCP functionality, you may have to modify the properties of TCP/IP:
1. Click the Start button. Choose Settings, then
Control Panel.
2. Double-click on the Network Connection icon
to open the corresponding window. Select Local Area Connection with the right mouse button and select Properties.
3. Highlight Internet Protocol (TCP/IP) and click
Properties. The corresponding window will be
displayed.
Quadro FXO 4; (SW Version 5.3.x)
38
Quadro FXO 4 Manual I: Installation Guide
4.
Select Obtain an IP address automatically,
then click on Advanced.
5.
You will see the entry DHCP Enabled.
6.
Click OK three times to close all windows.
Appendix: PC DHCP Settings
TCP/IP and DHCP under Windows 95/98/ME
1.
Click the Start button. Choose Settings, then Control Panel.
2.
Double-click on the Network icon to open your Network window. Select the Configuration tab.
3.
Click Add.
4.
Double-click on Protocol.
5.
Highlight “Microsoft” under the list of manufacturers.
6.
Find and double-click on TCP/IP in the list to the right.
7.
The Network window will appear with the TCP/IP protocol now listed.
8.
Highlight “TCP/IP” and click on Properties.
9.
Select Getting IP address automatically to enable the DHCP functionality.
10. Click OK.
11. Windows will ask you to restart the PC. Click Yes.
The TCP/IP installation is now complete and the DHCP functionality is enabled.
Quadro FXO 4; (SW Version 5.3.x)
39
Quadro FXO 4 Manual I: Installation Guide
Appendix: Changing the Administrator's Password
Appendix: Changing the Admin's Password
For security reasons, it is recommended that you change the default admin password. The
username of the administrator (admin) cannot be changed.
To change the administrator password, go to the System menu, User Rights Management.
Fig. I-35: User Right Management page
Choose admin from the list and press the Change Password functional button from the
User Right Management page toolbar.
For Administrator account the page contains two parts - one for GUI Access Password,
the other one for Phone Access Password.
Fig. I-36: Change Password page
The GUI Access Password offers the following components:
•
•
The Old Password field requires the current password of the Administrator. An
error message prevents entering the wrong password.
The New Password field requires a new password for the Administrator. Reentering the new password in the Confirm New Password field will confirm the new
password. The New Password field is checked against its strength and you may
see how strong is your inserted password right below that field. Up to twenty (020) digits and symbols are allowed.
Quadro FXO 4; (SW Version 5.3.x)
40
Quadro FXO 4 Manual I: Installation Guide
Appendix: Changing the Administrator's Password
Fig. I-37: Change Password page
The Phone Access Password offers the following components:
•
•
The Old Password field requires the current password of the Administrator. An
error message prevents entering the wrong password.
The New Password field requires a new password for the Administrator. Reentering the new password in the Confirm New Password field will confirm the new
password. The New Password field is checked against its strength and you may
see how strong is your inserted password right below that field. The password can
consist of numeric values only. Up to twenty (0-20) digits are allowed. A corresponding warning appears if any other symbols are inserted.
Please Note: If Administrator is changing the Local Administrator or Extension passwords or Local Administrator is changing the Extension password then the Old Password field is not displaying.
Attention: It is highly recommended to define a proper and non-empty password on this
page if the extension is being used for the Call Relay service from the Quadro's Auto Attendant.
Write down the password somewhere and keep it in a secure place. If the password is lost, a
factory reset will be required on the unit (see Administrator's Guide, Hardware Overview). All
settings are lost after a factory reset. After a factory reset the default password (19) will be
restored.
Quadro FXO 4; (SW Version 5.3.x)
41
Quadro FXO 4 Manual I: Installation Guide
Appendix: Configuring SIP NAT Traversal
Appendix: Configuring SIP NAT Traversal
The Quadro FXO 4 initiates and receives SIP calls from the network connected to the WAN
port) To receive SIP calls, the Quadro FXO 4 must be able to receive packets from the SIP
server or any other device that is trying to make an incoming call. If the Quadro FXO 4 is
placed behind a router with NAT, like most basic routers on the market today, the Quadro
FXO 4 will not be able to receive calls. To resolve this issue, either STUN must be enabled
on the Quadro FXO 4 or SIP NAT traversal must be set up in the router and in the Quadro
FXO 4 to properly route the incoming calls.
NAT or Network Address Translation is a common feature used to expand the use of connected PCs and other networked devices without having to use multiple global Internet public IP address. Most ISP will assign one public IP address to each customer that is connected to the Internet. The customer can use a router to provide NAT capability and create a
private network of PCs and other devices not visible to the Internet. This method offers security and also eliminates the need to assign global Internet public IP addresses to each device.
Please Note: SIP NAT traversal only works with Internet connections that have static IP addresses. Verify from your provider this is the case for your Internet connection. Some ISPs
provide dynamic IP addresses that may change from time to time, and are not appropriate
for SIP NAT traversal.
Please Note: If you have more than one router in series between the Quadro FXO 4 and the
Internet, the same port forwarding setup must be configured on each router.
SIP NAT Traversal Setup
• Install the Quadro FXO 4 behind the router. If the Quadro FXO 4 is configured with its
factory default settings, it is already configured for DHCP and will obtain an IP address
automatically from the router. If the DHCP was changed, please Run the System Configuration Wizard to place the Quadro FXO 4 in DHCP mode. Power up the Quadro FXO
4.
• Connect a PC or laptop to the Quadro FXO 4 LAN port and power it up.
• Verify the Quadro FXO 4 can connect to the Internet by opening a browser window and
browsing to a familiar WEB site. If the Quadro FXO 4 cannot reach the Internet, verify the
LAN/WAN LEDs and the cabling. Verify the Quadro FXO 4 is set up for DHCP on the
WAN and that the router has the DHCP server enabled for the devices behind it.
• Find the address of the router and log into the router. Refer to the router user manual on
how to open the router configuration.
• Set up port forwarding on the router to forward the UDP ports according to the ports specified for SIP (Mapped Port for SIP, default: 5060) and RTP/RTCP (Min mapped
RTP/RTCP port (default 6000 and Max mapped RTP/RTCP port (default 6099)) on the
Quadro FXO 4. The router should forward that UDP (USP/TCP for SIP) ports to the IP
address assigned to the Quadro FXO 4. You can see the IP address of the Quadro FXO
4 in the System menu under Status. The IP address will be listed as the WAN IP address. Your router may also indicate the IP address assigned to the Quadro FXO 4.
• Find
out the public Internet address of the router. To do so, open a browser and go to
www.whatismyip.com. The site will return your public Internet IP address. Record this IP
address.
• From the
Quadro FXO 4 Management menu, go to the Telephony menu, select NAT
Traversal Settings/SIP Settings and check Use Manual NAT Traversal.
Quadro FXO 4; (SW Version 5.3.x)
42
Quadro FXO 4 Manual I: Installation Guide
Appendix: Configuring SIP NAT Traversal
• For
Mapped Host, enter the router IP address found on the step above and the port
number 5060 for Mapped Port. Save the settings
• Select
the RTP Parameters link, check Use Manual Nat Traversal, enter again the
router's IP address into the Mapped Host field. In the area Mapped RTP/RTCP Port
Range for FXS Lines enter for Min: 6000 and for Max 6059.
• Click the Save button to save the contents.
The Quadro FXO 4 will activate the settings and register the extension on the Epygi SIP
Server after a few minutes. You can verify the settings from the main Quadro FXO 4
Management menu under Status in the SIP Registration Status section.
Quadro FXO 4; (SW Version 5.3.x)
43
Quadro FXO 4 Manual I: Installation Guide
Appendix: Checking the Connections
Appendix: Checking the Connections
If the system seems to work incorrectly even when all cables are connected properly, it may
be helpful to Start Network Diagnostics: The WAN link, IP configuration, gateway, DNS
server, and STUN-NAT (if used) will all be checked.
To start diagnostics, open the System's menu item Diagnostics and click Start Network
Diagnostics.
Fig. I-38: System Diagnostics page
In the case of a successful test, the output of the system looks as follows:
Basic Tests:
Checking for physical link:
WAN link ok
Checking IP configuration:
dynamically via DHCP Client
DHCP Client is running
Checking internet connectivity (ICMP ping):
Gateway:
reached
Primary nameserver:
reached
Secondary nameserver: not configured
www.epygi.com:
reached
STUN Network Address Translation (NAT) Check:
External visibible address: 212.126.210.179
Detected NAT type
: Restricted cone
Performing MTU Discovery:
preparing system
Sending UDP Datagram of size 1500
got answer
clean up
Largest usable MTU size is: 1500 Bytes
Test successful.
Depending on where the test is failing, the diagnostic can give some advice to solve the
problem. See the example below of a failed test:
Quadro FXO 4; (SW Version 5.3.x)
44
Quadro FXO 4 Manual I: Installation Guide
Appendix: Checking the Connections
Basic Tests:
Checking for physical link:
Please check the physical
plugged or broken?
connection
no WAN link
of
the
WAN
interface. Cable
not
Test failed.
If you pass the diagnostics successfully, but are still not able to place a call to 899# then
check the SIP registration status.
Open the SIP Registration Status page using the Quadro FXO 4 management System
menu item Status. If Quadro FXO 4 is placed behind a NAT router, the detected NAT type
and the IP address of this router's WAN port are displayed.
Fig. I-39: SIP Registration Status page
If you are using the STUN functionality the page shown above will additionally display the
Detected Connection Type. Unsupported Connection types will cause one of the following
messages:
•
•
•
•
Unknown connection - unexpected error
Symmetric NAT
Symmetric Firewall
Blocked UDP
If the Detected Connection Type is any of the types listed above, Quadro FXO 4 cannot
work behind your router. You must either connect the Quadro FXO 4 in front of the router, or
configure NAT traversal manually as explained in Appendix: Configuring SIP NAT Traversal
If you are unable to resolve your problems, please send us a technical support request on
the Support section of http://www.epygi.com/. Please prepare a system log file and attach it
to your request. To create a system log file, open the System Diagnostics page System
menu item Diagnostics) and click Download System Logs.
Quadro FXO 4; (SW Version 5.3.x)
45
QuadroFXO 4 Manual I: Installation Guide
Appendix: Configuring NAT Traversal
Copyright 2003 - 2012
Epygi Technologies, Ltd.
All rights reserved
Quadro FXO 4; (SW Version 5.3.x)
46