1
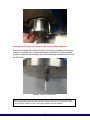
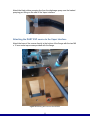
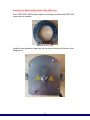
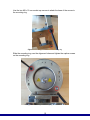
SI-200-GIST
DART AB Sciex Interface Manual
User Manual
Manual Revision 2
Document # 7.5.058
IonSense Inc.
999 Broadway
Suite 404
Saugus, MA 01906
Copyright © 2005-2015 by
IonSense Inc.
All rights reserved.
The information in this document has been carefully checked and is believed to
be reliable. However, no responsibility is assumed for inaccuracies. Statements
in the document not intended to create any warranty, expressed or implied.
Specification and performance characteristics of the hardware and software
described in the manual may be changed at any time without notice. IonSense
Inc. reserves the right to make changes in any product herein in order to improve
reliability, design, or function. IonSense does not assume any liability arising out
of application or use of any product or circuit described nor does it cover any
license under its patent rights or the rights of others.
The apparatus and application of the apparatus described in this document is
protected by US Patent Number 6,949,741 and used under license; additional
patents pending.
All trademarks are properties of their respective owners.
2
Table of Contents
Scope of Delivery ........................................................................................ 4
Standard System Components ............................................................................. 4
Configuration Dependent Components ................................................................. 4
Functional Description .......................................................................................... 5
Safety.................................................................................................................... 5
Installation ....................................................................................................... 5
Preparing the Source Region ................................................................................ 5
Attaching the Vapur Interface ............................................................................... 6
Inserting the Ceramic Ion Transfer Tube into the Vapur Interface ........................ 7
Attaching the DART SVP source to the Vapur Interface ....................................... 8
Attaching the Mounting Ring (3200, 4000, 5000 only) .......................................... 9
Operation .................................................................................................... 11
Recommended Operating Parameters ............................................................... 11
Troubleshooting .................................................................................................. 11
Maintenance ....................................................................................................... 11
Replacement Parts ............................................................................................. 12
Revision History .................................................................................................. 12
3
Scope of Delivery:
This chapter lists the components of the ABI Sciex Interface.
Figure 1: Scope of Delivery
Standard System Components
1.
2.
3.
4.
5.
6.
SI-200-A-R
SI-999-14
JG10019
SI-200-INT-5500
SI-200-CC-A
SHSH_SS188_M6_12mm
ABI Sciex Flange Assembly
VAPUR Pump Kit – 1/4”
Graphite Vespel Ferrule
Sciex Interlock Plug (installed on SI-200-A-R)
Sciex Contact Closure Cable
M6 x 12 Socket Cap Screws
Configuration Dependent Components
1. Varies*
2. JVLC-ACCUTOF-A
Ceramic Tubes
PLATE, SUPPORT, YOKE, ACCUTOF
ASSEMBLY**
*NOTE: See VAPUR Interface_Ceramic Tubes Reference Sheet 7.5.038 for
ceramic tube lengths (available on ionsense.com).
**NOTE: Only for 3200, 4000 and 5000 Models.
4
Functional Description
The ABI Sciex Interface transfers the ions created by the DART source to the
mass spectrometer and allows the DART source to mount on the mass
spectrometer.
Safety
Caution: The surface of the flange can get hot.
Installation
Preparing the Source Region
First, before installing the DART interface, place the Sciex Instrument in
‘Standby’ mode.
Then, carefully remove all gas and electrical connections from the AB Sciex
APCI source and remove the source from the instrument.
The source area should look like the one in the figure below. Carefully remove
the cover plate and set that aside. Caution: the cover plate may be very hot.
Figure 2: AB Sciex Source Region
Once the AB Sciex source and cover plate are removed, the DART flange can be
installed.
5
Attaching the Vapur Interface
Check that the set screw on the back of the flange is completely inserted into the
flange.
Figure 3: Set Screw
Orientate the interface so that the turning rods (circled in red in the picture below)
line up with the keyholes on either side of the source region. The interlock plug
should also line up.
Figure 4: Turning Rods
Next gently place the interface over the source region and turn the handles
downward locking the interface in place.
6
Figure 5: Installed Interface
Inserting the Ceramic Ion Transfer Tube into the Vapur Interface
Remove the Swagelok nut from the front of the Vapur interface and insert the
ceramic ion transfer tube. Secure the ceramic tube with one of the provided
graphite Vespel ferrules making sure to set a 2 mm gap between the tube and
the APC Inlet.
Figure 6: Ceramic ion transfer tube
NOTE: To easily set the 2 mm gap, push the ceramic tube against the Sciex inlet, secure
the Swagelok fitting with ferrule and then mark the tube with a pencil. Pull the tube out as
shown in Image 3 above so that a 2 mm gap is created inside the interface.
7
Attach the black rubber pumping line from the diaphragm pump over the barbed
pumping port fitting on the side of the Vapur interface.
Figure 7: Pumping Port
Attaching the DART SVP source to the Vapur Interface
Attach the base of the source directly to the bottom of the flange with the two M6
x 12 mm socket cap screws provided with the flange.
Figure 8: Attaching the source to the interface
8
Attaching the Mounting Ring (3200, 4000, 5000 only)
Sicex 3200, 4000, 5000 models require a mounting ring before the DART SVP
source can be installed.
Figure 9: Mounting Ring
Install the two alignment screws into the top right and bottom left holes on the
flange piece.
Figure 10: Alignment Pins
9
Use the two M6 x 12 mm socket cap screws to attach the base of the source to
the mounting ring.
Figure 11: Attaching the source to the mounting ring
Slide the mounting ring over the alignment holes and tighten the captive screws
on the mounting ring.
Figure 12: Attaching the mounting ring to the interface
10
Operation
Recommended Operating Parameters
Ion Source: Turbo Spray
Curtain Gas (CUR): 10.0
Collision Gas (CAD): ~ 7 (dependent on MRM tune)
IonSpray Voltage (IS) 0.0
Temperature (TEM) 0.0
Ion Source Gas 1 (GS 1) 0.0
Ion Source Gas 2 (GS 2) 0.0
Interface Heater: ON
Suggested Ranges for the “Compounds” Tab (compound-specific):
Declustering Potential (DP): 0-200 V
Entrance Potential (EP): 1-12 V
Collision Energy (CE): 5-130 V
Collision Cell Exit Potential (CXP): 0-58 V
Resolution Q1: Unit
Resolution Q3: Unit
Troubleshooting
Issue
Pressure is too high.
Solution
1. Check the vapur pump settings. See
the DART Vapur Pump Optimization
Protocol 7.5.052 for details (available
on ionsense.com).
2. Check the ceramic tube spacing to
ensure a 2 mm gap. See page 8 for
further details.
Maintenance
No special maintenance is required for the ABI Sciex Interface.
11
Replacement Parts
SI-999-14
VAPUR Pump Kit - 1/4"
JG10019
Graphite Vespel Ferrule
SI-200-CC-A
Sciex Contact Closure Cable
SI-9xxx-47*
Ceramic Tubes
*NOTE: See VAPUR Interface_Ceramic Tubes Reference Sheet 7.5.038 for
ceramic tube lengths (available on ionsense.com).
Revision History
Template Revision: 1
REV
1
2
DCR #
43
221
Revision History
Description of Change
Initial Release
Updated to new format (User
Manual Template_Rev1_7.5.111).
Deleted models on page 1. Updated
copyright page. Deleted disclaimer
sentence above table of contents.
Deleted pumping requirements.
Deleted and re-wrote pages 5-8
with new pictures.
12
Effective Date
11/11/2013
7/2/2015