1
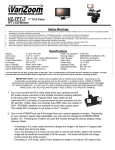
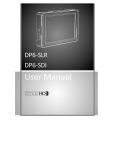
MarshallM-CT508-06
Marshall
Camera-TopElectronics
Monitor Owner’s Manual
M-CT508-06
C a m e r a - To p M o n i t o r
Owner’s Manual
www.LCDracks.com
M-CT508-06 Camera-Top Monitor Owner’s Manual
Dear users:
Thank you for purchasing Marshall’s M-CT508-06 HD DSLR LCD Monitor.This 5” Pro
HD LCD Monitor is designed to be used as an external video display, allowing you
to step back from the camera while still being able to frame and capture the action
without having to look through the camera’s built-in viewfinder. It employs advanced
integrated circuits, high quality TFT LCD modules, and low power consumption.
This monitor is designed to be small, easily operated, and portable,
with HDMI, Composite Video, Audio Input and HDMI Output.
This monitor is supplied with a Canon E6 battery plate.
See page 11 for other available battery kits.
CONTENTS
1. Product description _________________________________4
Panel Instruction ____________________________________4
Rear view _________________________________________5
1/4 inch standard screw bracket fixed hole picture _________5
Battery plate ________________________________________6
Product Advanced Features:
Sunhood installation and removal _______________________6
Zoom mode
HDMI input and output. Video Input and Audio input
Viewfinder marked ranges: 0%, 85%, 90%, 93%, 96%
Center Marker
16:9 or 4:3 Aspect Ratio Setting
Headphone output
Brightness, Contrast, Hue, Saturation and Color Temperature
Adjustment
• Supports DSLR, camcoder or AA batteries
• Removable Sunhood
2. Power input ________________________________________6
To ensure the best use of this product, please read this manual carefully
beforehand.
7. Menu List _________________________________________11
•
•
•
•
•
•
•
CAUTION
3. Operating instructions _______________________________7
Panel shortcut button function instruction__________________7
Menu operating instruction ____________________________8
4. Parameters ________________________________________9
5. Accessories _______________________________________9
6. Trouble shooting ____________________________________10
Battery Compatibility_________________________________11
1.
2.
3.
4.
Please use the adapter attached in the accessory or another qualified adapter.
Please do NOT expose this product to direct sunlight, heat, or humid conditions.
Please avoid heavy impact or droping onto the ground.
Please do NOT use chemical solutions to clean this product. Please wipe with a
clean, soft cloth to maintain the brightness of the surface.
5. Please do not take apart or repair the unit by yourself to avoid damage to the
product.
2
Marshall Electronics
www.LCDracks.com
3
M-CT508-06 Camera-Top Monitor Owner’s Manual
Product Description
11
10
14
16
17
13
9
1
2
3
4
5
6
7
15
12
8
Panel Instruction
Rear View
1.Volume down to adjust the value setting function
2.Volume up or to adjust the value setting function and activate the volume adjust menu
3.MENU: To activate OSD menu
4.Menu navigation key down
5.Menu navigation key up
6.HDMI / Video selector key
7.Zoom - DSLR mode
8.Indicator light
9.Speaker
10.
11.
12.
13.
14.
15.
16.
17.
HDMI input jack
HDMI output jack
3.5mm headphone jack
Power on/off
Battery mount
DC12V input jack
Video In
Audio In
1/4-inch Fixed hole
There is a 1/4”-20 standard screw bracket fixed hole on the top and bottom
of the monitor for mounting the monitor and mounting accessories onto the
monitor.
4
Marshall Electronics
www.LCDracks.com
5
M-CT508-06 Camera-Top Monitor Owner’s Manual
3. Operating Instruction
Battery plate
3.1 Menu operating instructions
Before setting the menu functions, please make sure the device is
connected correctly. Turn the Power switch (lower right corner of the unit)
dial to ON position. The monitor enters into working state. Turn dial to
OFF position when closing the unit. Press the “mode” button on the unit
to switch between “HDMI, VIDEO”. Press “MENU” button on the unit to
enter into OSD menu operation. Operate “▲”or “▼”on the unit to select
or adjust the needed options:
Color; Menu; Function; Sound;
Battery Plate:
This monitor is supplied with a Canon E6 battery plate.
To power the monitor with DSLR, camcorder or AA batteries,
please see battery configuration chart, page 11.
After selecting the options, press “►”or “◄” on the unit to confirm, then
using “▲” or “▼” to select or adjust the value of Analog Data. After
confirm the needed adjust parameters, use “►” or “◄” to adjust. If you
need to exit OSD menu, repress “MENU” button.
Battery installation
Color
Suggestion: Remove the battery during long periods of inactivity.
Sunhood installation and Removal
Attach the self adhesive side of the Velcro® to the side of the monitor.
2. Power input
The monitor can be powered by the enclosed CE6 or equivalent battery
or by a 12V power adapter with at least 1Amp (optional). Please note the
input polarity is Center Positive.
6
Marshall Electronics
Enter into “Color” OSD, press “◄”or “►” button to confirm, then enter to
adjust the color parameters, use “▲” or ”▼” to select adjustment item,
then use “◄” or “►” adjust the parameters.
• Saturation: To adjust color concentration.
• Hue: Adjust balance between chroma channels.
• Sharpness: Sharpens horisontal and vertical edges in the image.
• Color temperature: Enter into (color) menu, press “◄” or “►” on the unit to confirm, press ”▲” or “▲” to select the form of color temperature, then press “◄” or “►” on the unit to confirm, then
use “▲” or ”▼” to select color temperature such as: 9300K, 6500K or USER. (the monitor leave the factory default is 6500K).
• Brightness: To adjust the display’s brightness.
• Contrast: To adjust ratio of the brightest and darkest parts of the image.
www.LCDracks.com
7
M-CT508-06 Camera-Top Monitor Owner’s Manual
When selecting “USER”, use “▲” or ”▼” to select color R.G.B., then use
“◄” or “►” to adjust the value to make sure the color of the picture meets
your needs.
Function
After selecting “function”, press “◄” or “►” button to confirm, then enter
into parameters adjustment. Use “▲” or ”▼” button to select adjustable
items, then using “◄” or “►” button to adjust the parameters.
• Reset Back: to original setting
• Display Ratio: To change the display ratio, 16:9/4:3
• Language: Select the OSD language. Choose between: English, Spanish, French
• Halftone: change the opacity of the Menu
System
•
•
•
•
Center Mark: Screen center mark (cross mark) display setting
Safe Border: Safety frame setting
Volume: To adjust the volume
Field Check: use to isolate the R, G, B components of an image for
calibration
• Peaking: enable an edge detecting on-screen display
4. Parameters
Display panel size
TFT LCD 5.0-inch
Panel type
TFT Active Matrix
Resolution
800 x 480
Display ratio
15:9
Brightness
350 cd/m2
Contrast
500:1
Response time
10ms - 15ms
Viewing angle
70°/70°(L/R) 50°/70°(U/D)
Backlight
LED
Input signal
HDMI, VIDEO, AUDIO
Signal output
HDMI(optional)
Supported format
480i, 480p, 576i, 576p, 720p, 1080i, 1080p
Video color system
PAL-4.43; NTSC-3.58
Power consumption
<7w
Standby current
<50mA
Unit size(LWH)
146mm(L) *100mm(H) *46mm(W)
Weight (no battery)
260g
With sunhood
340g
5. Accessories
•
•
•
•
•
8
Marshall Electronics
HDMI - mini HDMI cable
HDMI cable
Hot shoe mount
Canon E6 battery plate
Sunhood
www.LCDracks.com
9
M-CT508-06 Camera-Top Monitor Owner’s Manual
6. Troubleshooting
6.1. Only black and white or monochrome picture.
Please check saturation, brightness & contrast adjustment.
6.2. No picture after turning on the power.
Check signal cable connecting, make sure use the standard adapter is
connected the monitor. If power is supplied by battery, please check if the
battery is fully charged.
Menu Option Chart
Input Mode
Color
OSD
6.3. The image color is distorted or abnormal, e.g. lacking some color.
Please check the signal cable for proper connection. If the cable
is damaged or loosened, it will cause poor transfer, causing this
malfunction.
If you are still experiencing problems, contact Marshall Electronics
technical support at: (800) 800-6608 or +1 (310) 333-0606
Function
Sound
HDMI
Video
Brightness
X
X
Contrast
X
X
Hue
X
X
Saturation
X
X
Color Temperature
X
NO
Language
X
X
H Position
X
X
V Position
X
X
OSD Timeout
X
X
Zoom
X
NO
Transparent
X
X
Reset
X
X
Display Ratio
X
X
Screen Marker
X
X
Center Marker
X
X
DSLR
X
NO
Volume
X
X
Battery Compatibility
The Canon E6 battery plate is supplied with this monitor.
This monitor is compatible with a variety of different DSLR and camcorder
batteries, depending upon which option is purchased:
10
Marshall Electronics
Available Battery Kits
Description
M-AC-AA
AA Accessories Kit
M-AC-E6
E6 Accessories Kit
M-AC-NEL15
NEL 15 Accessories Kit
www.LCDracks.com
11
Marshall Electronics
1910 E. Maple Avenue
El Segundo, CA 90245 USA
Phone: 310-333-0606 • 800-800-6608
• Fax: 310-333-0688
www.LCDracks.com
Manual contents subject to change without notice.