1
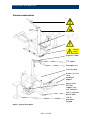
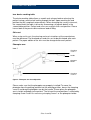
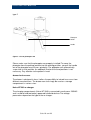
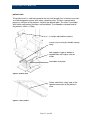
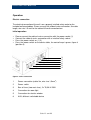
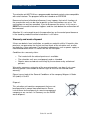
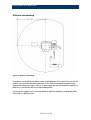
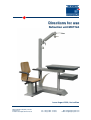
Directions for use
Refraction unit MOTIVA
Issue August 2009, first edition
Wagner&Guder UG(mbH) & Co.KG
Dorfstraße 57
D- 99510 Saaleplatte OT Hermstedt
Tel.: +49 (0) 3644 - 51 55 61
Fax: +49 (0) 3644 - 51 55 63
Web: www.wagner-guder.com
E-Mail: [email protected]
Refraction unit MOTIVA
Congratulations on your purchase of the refraction unit MOTIVA. If you have a
look at this informations with hints and tips, you will have much joy in using the
examination unit.
Contents
SAFETY INSTRUCTIONS.......................................................................................3
General advises .....................................................................................................3
Device description .................................................................................................3
meaning of used symbols and icons:..................................................................4
Safety instruction of assembly and operating ....................................................5
Electric safety.........................................................................................................6
Proper operation ....................................................................................................7
GENERAL CONSTRUCTION .................................................................................8
Phoropter arm ........................................................................................................9
OPERATION..........................................................................................................13
Electric connection..............................................................................................13
Initial operation ....................................................................................................13
Electronic and Electric connections ..................................................................15
WARRANTY AND WASTE DISPOSAL................................................................16
Instruction for maintenance and repair .............................................................17
Cleaning................................................................................................................17
Maintenance/ Technical service .........................................................................17
Repairs by yourself..............................................................................................18
Combination with medical devices or devices from other manufactures......18
PATIENTS SURROUNDING .................................................................................19
APPENDIX.............................................................................................................20
Seite 2 von 20
Refraction unit MOTIVA
Safety instructions
General advises
Before the first start of the refraction unit MOTIVA please read the instructions and the
instructions of the system equipment manufacturers. For further information please
contact our service or authorized dealers.
Device description
The refraction unit MOTIVA is an ophthalmologic examination unit and serves to
receive testing and measuring instruments of eyewear. The modular design of the
unit could be individually designed and can be ordered in different types. The
refraction MOTIVA is manufactured in accordance with the current state of the art
and according to accepted safety requirements. Each unit is subject to stringent
quality control and production control.
Informations about the system
Device name:
MOTIVA
Manufacturer:
Wagner&Guder UG(mbH) & Co.KG
Dorfstraße 57
D- 99510 Saaleplatte OT Hermstedt
Intended use (use as directed)
The examination unit MOTIVA is an ophthalmologic examination unit and used
exclusively to accommodate testing and measuring instruments of eyewear.
Another use than the specified is not allowed.
classification
According to the directive of medical devices 93/ 42/ EEC, the ophthalmologic
examination unit MOTIVA a non-invasive, active medical device in category I.
Seite 3 von 20
Refraction unit MOTIVA
meaning of used symbols and icons:
ATTENTION, WARNING
If you do not take into account the information given under
CAUTION, may lead to moderate injuries and / or property
damage or changes in the product.
DANGER OF VOLTAGE; ELECTRICITY
If you do not take into account the information given under
Electricity, it can lead to exposure to electricity.
MAIN VOLTAGE
If you open the housing please separate the unit from the
mains voltage.
GROUNDING
Points for security on the ground (protective earth).
CE- Marking
The ophthalmic examination unit MOTIVA complies with
medical product directive 93/42/EEC.
WEEE- Marking
Regard to the proper disposal of a waste disposal service
Seite 4 von 20
Refraction unit MOTIVA
Safety instruction of assembly and operating
•
Observe the legal regulations for the prevention of accidents
•
Don’t install or use the examination unit in moist rooms.
Avoid dribbling or splashing water.
•
Don’t operate the examination unit in hazardous location.
Environmental conditions for transport and installation:
a) Ambient temperature: +10°C... +40°C
b) Relative humidity:
30%... 75%, no condensation
c) Air pressure:
700hPa... 1060hPa
•
Only specialist staff, which is thoroughly acquainted with
installation, implementing and operation of the product, is allowed
to install the examination unit and put it into operation.
Specialist staff in the sense of this operating manual is every
person, who can assess the assigned works and perceive
possible dangers on account of their professional education, their
skills and experiences as well as their knowledge of the relevant
norms. Only our service staff or authorized dealers are allowed
to do Modifications and repairs on the examination unit. The
fabricator is not legally liable for possible damages which are
caused by non- authorized treatments.
In this case all warranty claims do expire.
•
Before first start-up, please pay attention that stability of the unit
is ensured. Therefore the matching additional weights are to be
assembled in the rear corpus of the unit.
•
The examination unit has been levelled in the process of
installation. If you want to move the unit, please pay attention that
all mounting elements of the base plate do touch the ground.
Only in this case the static safety of the unit and the stability of
the examination devices are ensured
(see also transport description).
•
If you want to displace the basic unit, please pay attention that the
table has completely been retracted and the examination devices
have been fixed or removed. If you do not follow the safety advise,
on an inclined plane a danger of tilting of about >10°exists.
Seite 5 von 20
Refraction unit MOTIVA
•
•
•
The maximum load capacity of the device table is 50kg, while the
devices may be loaded position 1 with a maximum of 25kg.
The maximum loading capacity of the patient chair is 170kg.
The column of the patient chair is not designed for continuous
operation. After an operating period of more than 60 seconds,
the column of the patient chair required a cooling time by 9min.
Electric safety
•
Medical devices are subject to special precautionary
measures according to the electromagnetic compatibility EMC.
Please pay also attention on this during the operation.
•
The examination unit may only be plugged into shockproof
sockets installed according to the regulations and with the line
cable which is supplied.
•
Before establishing the connection, please control the line
voltage 230V/AC.
•
Extension wires and non-stationary multiple sockets must not be
used for the operation of the refraction unit.
•
It is not allowed to interrupt the protective conductor, for this can
cause danger to the user/ patient as well as damages on
installed devices.
The examination unit has to be detached from the electrical
connection and protected against accidental use, if the
protective conductor is affected or electric cables are damaged.
Every unit has a grounding and a housing leakage current.
These mount up, if you connect line-operated devices directly to
the examination unit. The limit value according to IEC/VDE for
the grounding leakage current is 500µA and for the housing
leakage current is 100µA. For the specific values of your
examination unit please consult the protocol.
•
•
Only the change of the main power fuses, which are accessible
from the outside, is allowed.
•
Only as authorized stated specialist staff is allowed to open the
examination unit. Please pay attention to the advices in the
chapter Instruction for maintenance and repair.
•
Before beginning cleaning works, please disconnect the mains.
Please pay attention, that no cleansing agent or water gets into
the examination unit.
Seite 6 von 20
Refraction unit MOTIVA
Proper operation
The Examination unit MOTIVA does duty as basic unit for the setup of working places for determination and modulation of vision
aids and for optical examination.
Another use as the specified one lies in the exclusive responsibility
of the user. The manufacturer therefore will be released from legal
liability.
The examination unit may only be operated by briefed and trained
persons.
Because of the diverse design and equipping alternatives specialist
staff, which is authorized by us, performs a basically briefing to
your individual examination unit.
This also applies to the installation and connection of optional
equipment and extension modules. Please pay attention to the
advices in the operating manuals of the equipment fabricators or
ask our specialist staff for information.
The description of control modules like curtain or ambient light
control is not included in this operating manual. Therefore an
individual briefing to the screen procedures will be performed.
An additional instruction of the operating personal is in duty of the
buyer.
For description of safety advices see above!
Seite 7 von 20
Refraction unit MOTIVA
General construction
projector holder
TFT holder
Phoropter arm
2 device table
drawer for lens
case
keyboard
deposit
patient chair
with foot
support, arm
rest, headrest
look in position,
device table
rack of
phoropter
keypad
figure 1: general description
Seite 8 von 20
Refraction unit MOTIVA
two- device working table
The deviec working table allows a smooth and safe pan before releasing the
patient having a mechanical locking through the foot. Upon reaching the end
position that will snap back automatically. When changing the survey instrument,
the second hold, the table is driven by overcoming a magnetic detent in the
second table position. Patient and users can maintain their seat position. Please
have a look at the permissible maximum load of 50kg.
Chin rest
When using a chin rest, the cleaning and use instructions of the manufacturer
must be observed. The forehead rest and chin rest to be disinfected after each
patient. The paper edition of the chin must be changed after each patient.
Phoropter arm
type 1
Clamping
screw 1
handle
phoropter
holder
Clamping
screw 2
figure 2: Phoropter arm free adjustable
Please make sure that the phoropter was properly installed! To move the
phoropter from the parking position into the working position, loosen the clamping
screw 2 and drag the phoropter arm by the handle. Please place the phoropter
arm in height and depth to the patient. The fixing of the end positions is effected by
clamping screw 2 and if its necessary clamping screw 1 or the phoropter holder.
Seite 9 von 20
Refraction unit MOTIVA
type 2
Phoropter
holder
handle
figure 3: scissor phoropter arm
Please make sure that the phoropter was properly installed! To move the
phoropter from the parking position into the working position, you pull the handle
out of the phoropter arm(scissors principle). The phoropter arm automatically
snaps into its final position. An additional fixation of the end positions is not
necessary. Pay attention to the patient's head.
drawer for lens case
The drawer is designed in form, it offers the possibility to include lens cases from
different manufacturers. The drawer can also simply be used as a storage
compartment in various sizes.
Heine NT 200 re-charger
The charging compartments (Heine NT 200) is connected in continuous 230VAC
and is used to hold two battery-powered handheld devices.The voltage
parameters depend on the type of the re-charger.
Seite 10 von 20
Refraction unit MOTIVA
patient chair
The patient chair is solid connected to the unit and already has in the basic version
an electromagnetic column with safety switching strip. This bar is designed to
prevent a collision of the patient's leg with the device table. The chair is available
with further adjustment functions and retrofitted. The allowable standard load of
the patient's chair is 170kg.
In height adjustable headrest
armrest, by turning the handle swung
away
foot support single or double in
combination with higher seat for
childs
moveable seat plate
figure 4: patient chair
Safety switch bar safety stop in the
upward movement of the patient's
chair
figure 5: safety switch
Seite 11 von 20
Refraction unit MOTIVA
figure 6: patient chair
Please take care of all adjustable accessories that no danger occurs to the patient.
Precisely because the seat movement is a source of danger to the patient when
used at actuated seat module of the patient's chair in height. The unit is staffed
with a security bar for the legs, but this is by design not always engaged.
Please pay attention to the downward movement of the chair, that the shoes of the
patient with the foot rest will not get caught!
Seite 12 von 20
Refraction unit MOTIVA
Operation
Electric connection
The electrical connection of the unit is on a properly installed safety socket or the
included wall mounted box. Please use only the calbe of mains connection, 3m cable
length, wire size 1.5 mm2 or the cable of the wall connection box.
Initial operation
•
•
•
•
Please connect the cable of mains connection with the power socket (1)
Connect the cable of mains connection with a installed safety socket
Press the power switch on „I“ (2)
Press the power switch on the device table, the control lamp is green, figure 8
(position 8)
3
2
1
6
5
4
figure 7: mains connection
1
Power connection (cable 3m, wire size 1,5mm2)
2
Power switch
3
Box of fuses (two main fuse), 2x T6,3A H 250V
4
Connection for room light
5
Connection for electric window
6
AUX, different switchable device
Seite 13 von 20
Refraction unit MOTIVA
The engage switch with green control light is on the working device table, have a
look at figure 8 (position 8). The refraction unit is from stand-by to operational as
soon as the engage switch has been pressed and the lamp is green.
This also applies to already installed equipment or analysis of additional
components. The survey instruments on the telescope table are automatically
ready for use when the table position 1 and table position 2 are achieved. Besides
the power switch located on the tabletop other switching elements.
control panel
1
2
3
4
5
6
7
8
1
figure 8: control panel
1
button patient chair DOWN
2
button patient chair UP
if you put on both buttons together the chair move down automatic
„Automatic DOWN“, after a time delay of 10s you can move the chair UP
3
button reading lamp
4
button roomlight dimming
5
window control DOWN
6
window control UP
7
AUX, different switchable device
8
engage button with LED light green, Stand- By- Modus
Seite 14 von 20
Refraction unit MOTIVA
Stand- By- Mode
When the power button is switched on (switch position „I“) and the
operating key is switched off (LED does not shine), the examination
unit stays in stand-by-mode. In this state only the re-charger Heine
NT200 for the hand devices is being supplied with power. When you
push the power button (switch position „0“), the whole examination unit
will be off-state. When you do not use the unit for a longer time, for
instance during holidays or conference journey, we recommend to
deactivate the examination unit completely; Power button (switch
position “0”). In daily use of the examination unit, the stand-by-mode is
applicable without restriction; power button (switch position „I“).
TIP
Electronic and Electric connections
Switched socket
Power supply
6VDC, adjustable
Power supply
12VDC adjustable
Motherboard
Non- switched
socket
Figure 9: electric connections
Seite 15 von 20
Refraction unit MOTIVA
The refraction unit MOTIVA has a programmable electronic control system compatible
with serial interface. The programs will be lost stored on an EEPROM.
Because of external disturbing influences it may happen, that not all functions of
the examination unit can be used or partial system malfunctions can arise. This
malfunction can only be remedied, if you to disconnect the mains. In this case a
RESET of the control electronics happens and the state before the malfunction will
be recovered.
Attention! It is not enough to push the operation key on the control panel because
in the stand-by-mode the control electronics is still active.
Warranty and waste disposal
If there are defects from installation, assembly or materials within 24 months after
purchase, we guarantee the fastest and free repair of the refraction unit, or after
our decision, a free exchange. For electronic components such as power supply or
motherboard defect within 12 months will be set free repair.
Conditions for a warranty claim:
•
•
•
The invoicel with the date of purchase is available
The refraction unit was used properly and as intended
Repairs were carried out exclusively by the customer or by authorized
persons
Warranties cause any extension of the warranty periods, nor does it set a new
warranty period. Consumable or normal signs of use are not covered under
warranty.
Please have a look at the General Conditions of the company Wagner & Guder
UG (mbH) & Co.KG
Disposal:
This refraction unit contains components that can not
be disposed of in normal household waste. Please
instruct them for the disposal of a waste management
company or our services. In Germany use the WEEE
waste disposal.
Seite 16 von 20
Refraction unit MOTIVA
Instruction for maintenance and repair
Switch off the examination unit with the power button and disconnect
the mains!
Please avoid in case of cleaning, that cleansing agent or other fluids can
get into the examination unit or on installed examination devices.
Cleaning
For cleaning the varnished parts and the seat upholstery of MOTIVA
please use a wet cloth. Into the water you can add a mild cleaning
agent (if necessary „scouring milk“). Obstinate dirt at varnished
surfaces can be removed with the help of cleaning solvent or rectified
spirits.
In case of cleaning the installed examination devices, please follow the
hints and comments of each device producers or ask authorized
specialist staff.
Maintenance/ Technical service
The examination unit MOTIVA and its accessories are lowmaintenance when proper used. Nevertheless periodic maintenance
works, which serve the units safety, have to be carried out either selfsupporting or by our service partners:
1
Check the proper fastening of the examination devices regularly.
2
Check the safety advices affixed at the supplied products.
3
Check the safety inscriptions at your examination unit. When
inscription elements are missing or damaged contrary to the
user manual please contact our service technician.
4
Check the integrity of housing an isolations
5
Check the operational reliability of safety-relevant circuits
(switch-off panel and current limitations)
6
Regular measuring (annual) of substitute leakage current
7
Complete check of examination unit’s and accessory's
operational reliability
In case of technical problems or decline of handling please consult
your dealer or our service center.
Seite 17 von 20
Refraction unit MOTIVA
Repairs by yourself
Please, every time before repairing, pull the mains plug!
Exchange of main fuses
An exchange of the main fuses must not be done while the mains plug is
not disconnected. You should consider an exchange only when the control
lamp does not shine even though the power button and the operating key
are switched on.
•
•
•
•
You can find the mains fuses in the fuse box on the side face of the
examination unit (figure 7, position 3)
Push the plastic tongue that is attached at the box (e.g. using a screwdriver or the like) upwards. That loosens the lock of the fuse box.
Pull the box out of the hatch by hand.
Replace the defect fuses with new once
(identification: T6,3A H 250V).
Push the fuse box back into the therefore intended hatch until the
plastic tongue clicks into place.
In the electronic pocket further four protected fuse carriers are situated on
the master module. These contain the fuses for the chair, the projector, the
reading lamp, the 6V-devices fuse, the 12V-devices fuse etc. An
exchange of these fuses may only be carried out by authorized specialist
staff or our service technicians!
Exchange of lamps
An exchange of the reading lamp (230VAC; GU10; 35VA) may only be
done while the mains plug is disconnected and the luminous agent has
cooled down. Please use only the original luminous cartridges! In case
of problems please contact our service centre.
Combination with medical devices or devices from other manufactures
Please assemble on the refraction unit only medical devices produced against medical
directive EN 60601-1. A different application than that provided by the manufacturers
is not allowed.
A control for roomlight and window control is potential free and is made possible
through a wall connection box. There are different lighting systems and also different
boxes. For security reasons, the installation must be made by an electrician.
Seite 18 von 20
Refraction unit MOTIVA
Patients surrounding
figure 10: patient surrounding
As patients surrounding the above areas is highlighted. In this area will ensure for the
patient, the maximum possible protection. In the area surrounding the patient may
experience dangerous areas. Here is a special duty of care of the doctor or optician is
precisely in connection with the installed equipment.
Outside of this region must share the doctor or optician to patients accordingly, does
not reside in a different area.
Seite 19 von 20
Refraction unit MOTIVA
Table of figures:
FIGURE 1: GENERAL DESCRIPTION....................................................................8
FIGURE 2: PHOROPTER ARM FREE ADJUSTABLE............................................9
FIGURE 3: SCISSOR PHOROPTER ARM ...........................................................10
FIGURE 4: PATIENT CHAIR .................................................................................11
FIGURE 5: SAFETY SWITCH ...............................................................................11
FIGURE 6: PATIENT CHAIR .................................................................................12
FIGURE 7: MAINS CONNECTION........................................................................13
FIGURE 8: CONTROL PANEL ..............................................................................14
FIGURE 9: ELECTRIC CONNECTIONS ...............................................................15
FIGURE 10: PATIENT SURROUNDING ...............................................................19
Appendix
Conformation of conformity
ROHS conformity
Technical data sheet
Electrical plan MOTIVA
Seite 20 von 20