1
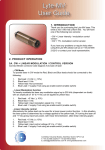
Optical Power Meter With VFL
User Manual
Optical Power Meter
Contents
1. Summary.............................................................................1
2. Functions.............................................................................2
3. Specifications .....................................................................3
4. Layout..................................................................................4
5. Operation ............................................................................5
6. Maintenance .......................................................................9
7. Charge battery ...................................................................9
8. Faults & Solutions............................................................10
9. Software ............................................................................10
1
Optical Power Meter
1. Summary
Optical
Power
Meter,
a
new
generation
of
high-performance optical network test meter, with the
characteristics
of
excellent
performance
and
fast
filed–test, has adopted the latest laser exploration and
processing technology. It is a compositive optical power
meter aimed at optical network maintenance, equipment
research and development.
It can be used to test optical power within the range of
800~1600nm wave length, with the unit asµW,dB and dBm. Its
display resolution level and test accuracy are high. There are
850nm, 980nm, 1300nm, 1310nm, 1550nm, 1490nm six kinds
of wavelength calibration points. It can be used for linearity
and non- linearity test and it can display both direct and
relative test of optical power. Meanwhile it also has storage,
page up/down functions for the test figure. The instrument is
small, light and easy to carry with large LCD screen. It can be
widely used in the test of LAN, wide-area network,
metropolitan network, CATV net or long-distance fiber net and
other situations. It can be used to distinguish the fiber, to test
fiber loss accurately, to check the fiber continuity and to help
to evaluate the transmission quality of fiber chain with the
laser source.
1
Optical Power Meter
2. Functions
2.1 Multi-wavelength precise measurement
2.2 Absolute power measurement of dBm or µW
2.3 Relative power measurement of dB
2.4 Real-time clock function, display the current time. It
can record the test time
2.5 Enable to memorize and manage 255 groups of
measured data
2.6 Low voltage warning display
2.7 3 minutes automatic shutoff
2.8 Applicable to versatile adapters (FC,ST, SC)
2.9 Portable, large LCD display
2.10 LED backlight display
2.11 Back light automatic off after 60 seconds
2.12 Communicate with the management software
through USB connector,It can calibrate the meter,upload
test results etc.
2.13 Through USB connector. It can charge the meter
2.14 Visual Fault Locator Function
2
Optical Power Meter
3. Specifications
3.1 Wavelength range (nm): 800~1600;
3.2 Detector type: InGaAs;
3.3 Measurement range(dBm):-50~+26 or -70~+10;
3.4 Uncertainty:±5%;
3.5 Resolution:
Linearity display: 0.1%; Logarithm display 0.01 dBm
3.6 Communication: USB mode
Virtual serial port baud rate: 19200
3.7 Operating temperature (℃):0~+40
3.8 Storage temperature (℃):-10~+60
3.9 Auto shutdown duration (min):3 (When the auto
shutdown function is open, this function is default
after next turned on)
3.10 Battery-hold duration (h): no less than 30
Battery: 3.7V 1150mAh rechargeable lithium battery
3.11 Low voltage warning:≤3.2V
Auto shut off when less than 3.0V
3.12 Weight (g):260
3.13 Dimensions (L*W*H, mm): 175×79×40
3
Optical Power Meter
3.14 Visual Fault Locator
Wavelength: 650nm±10nm
Light source: FP-LD laser
Output power: 1mW, 3mW, 5mW, 10mW,
15 mW ,20 mW (optional)
Connector: 2.5mm universal adapter
Working mode: CW or 2Hz modulation
4. Layout
Pic1 : LCD Display
4
Optical Power Meter
Pic2: Apperance
5. Operation
1. On/Off
Press”
” button to turn on or turn off the tester.
Auto-off function: Press”
”button for more than 3
seconds, and the auto-off mark
will appear in the
LCD, this means the auto-off function is working; If there’s
5
Optical Power Meter
no operation on the tester, it will shut off automatically
after three minutes.
Close the Auto-off function: Press”
”button for more
than three seconds, and when the mark
diappears
from the LCD, the auto-off function was closed.
2. Backlight:
System defaults that backlight is on and backlight auto
shut off function opens. The LCD shows
. Press this
key to control the backlight on or off.
Close backlight auto shut off function :In the backlight
auto shut off using mode, press
3 seconds, the
button for more than
sign disappeared, then backlight auto
shut off function was closed.
Open backlight auto shut off function :In the backlight
auto shut off not used mode, press
than 3 seconds, the
button for more
sign appeared, then backlight auto
shut off function was opend.
3. Select optical power measurements mode
System default the absolute optical power measurements,
optical power 1 shows the linear power value (xW),
optical power
2 Logarithmic power value (dBm),. Press
6
Optical Power Meter
dBm
key to switch to the relative power measurement
mode. At this time, the optical power 1 the relative power
(dBm).
optical power 2 shows logarithm value (Db).
4. Select wave length
You can choose one kind of four wave length, namely
850nm, 980nm, 1300nm, 1310nm, 1490nm and1550nm,
by pressing this λ
key and the wave length which is
chosen will be displayed in the top right corner of the LCD
screen.
5. Save the current test figure
You can save the current test figure when you press the
F/save key and there is the
left corner,
sign displayed in the top
when the sign disappear, means the data
been saved. The systerm can save 255 groups result.The
first stored figure will be replaced by the last one if the
stored figures exceed 255 groups.
6. Browse the saved records
Press the F/save button more than 3 seconds ; it will
display checking sign
on the LCD. It indicates the
system is in the reading status. The latest storage data
will be displayed in the LCD. Press it again to get back to
the normal state. In the checking data mode, press the
dBm
“
”key to browse the front page; press " λ
browse the next page.
7
" key to
Optical Power Meter
7. The low voltage indication function
sign when the battery
The LCD will display the
voltage is under 3.0 V. If you do not charge it now, it will
be auto off after short time working. Charge the tester
until the battery display
. Or the charger’s LED turns
off from red.
8. Time adjusting
Press“
dBm
”button and“ λ
”button, and lift up the two
keys simultaneously to get into the time adjusting state.
Press“
dBm
press“ λ
”button to choose time you want to adjust,
”button to adjust chosen time. Press“F/SAVE”
button, and lift up the two keys simultaneously to set the
time and quit to the normal state.
9. Visual Fault Locator function
Press “VFL” key, the VFL indicator is on, the locator
output 650nm red laser.Press the “VFL” key again, the
locator and indicator are blinking at the same time, the
frequency is about 2Hz, which is convenient to check line
faults.
Press the “VFL” key the third time, then the VFL indicator
is off, and the locator laser if off..
8
Optical Power Meter
6. Maintenance
1. Please keep the sensor surface clean, do not use the
dirty or nonstandard adapter tie-in, do not insert into the
port which is poorly polished, otherwise, it will damage
the sensor end.
2. Please operate carefully to replace adapter for different
linkers. The spare adapter should be stored hermetically
to avoid the dust.
3. Please cover the dustproof cover to keep the interface
clean when the optical power meter is not used. Please
do not put the sensor in the air, or something of test error
will be caused because of the dust.
4. Please clean the sensor end regularly.
5. In order to make the service time of battery as long as
possible. Please take out the battery if it is not used for
long.
7. Charge battery
During the operation, if the low battery power mark
appears, please turn off the tester, and charge the
battery.
The tester adopts 1150mAh rechargeable Li-con battery. In
order to protect the tester and ensure the accuracy of the testing
results, Please do not operate the tester when charging.
9
Optical Power Meter
8. Faults & Solutions
Faults
Reason
LCD display is
Low voltage.
dark.
Solution.
Recharge
battery.
Big error for test
Sensor’s surface is
Clean sensor.
result.
dirty.
There is nothing
The battery is under
Switch on it
displayed when
voltage/other
again or
switch on.
reason.
recharge
battery.
9. Usage of Management Software
Please copy Optical Power Meter management software
V1.2.exe
file
and
CP210x_VCP_Win2K_XP_S2K3
setup.exe file to PC from CD
9.1 Installation of Driver
Double click icon
( CP210x_VCP_Win2K_XP_S
2K3 setup.exe),starts to install the Driver
operate as the instructions.
10
, you can
Optical Power Meter
9.2 Usage
Software
of
the
Management
Connect Optical Power meter with PC via USB cable,
power on the meter.
Then double click the “Optical Power Meter management
software V1.2.exe”, which display as following:
11
Optical Power Meter
9.2.1
Connect power meter
Select Virtual serial port, often choose the serial port 3.
Click ”open” icon to open the com3, then you can click
“test” icon on the soft to test the connection of them. if
they connects successfully, the software will prompt:
successful connection.
Select current date,and the click “set date” icon to set the
Optical Power Meter’s real date.
Select current time,and the click “set time” icon to set the
Optical Power Meter’s real time.
12
Optical Power Meter
9.2.2
Read history data
Click “Read” icon, 255 groups test results will be
displayed automatically. Click “Save” icon, which can
save the record to EXCEL table for the convenience of
management and transmission.
9.2.3
Calibrate power meter
Note:You can use “data calibration” in the software when
the tester needs to be calibrated. You do not need to use
it during the normal test.
13
Optical Power Meter
1310nm wavelength calibrate example:
Use a standard optical power meter test the value of a stability
laser source on 1310 wavelength (such as -05.60dBm). Record
test results.
Remove the standard optical power meter,connect laser source
to the optical power meter whice to be calibrated,Selcet
1310nm wavelength, Behind the text box at a wavelength of
1310 input -05.60 (Please enter in strict accordance with the
format), click “calibration”icon. if calibrate successfully, the
software will prompt: successful. Otherwise, please try
again
Other wavelengths calibrate is the same operation.
14