1
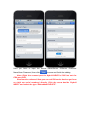
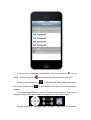
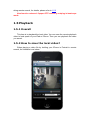
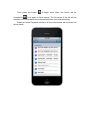
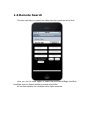
iPhone and iPad Client software
user manual
Thank you for purchasing our software, here is a simple guide to help you
to acquaint and use it more easily. This new version software upgrade:
1.
Support connecting to DH series EMDVR/IPCs which are got
from us (with our serial number) directly.
2. Support PTZ control by swiping in landscape mode.
This new version Client software for iPhone and iPad are similiar in
interface and operation, so here we just take iPhone as an example.
Note: For iPad client user, please switch to landscape mode to start
the system menu.
1.1 Search and download software
1.1.1 Enter App Store
1.1.2 Search for NDVR Client
After downloading the client,click the icon to run the Client software.
1.2 Add Server
When running NDVR Client software, the main interface will be showed as
below:
Select “Manage Servers” then click on the button
again, you will enter the following interface:
, then click the button
Here you have to input the Server name/Server IP/Server Port/User
Name/User Password, then click
to save and finish the adding.
Note: Right the connect port for Hybrid NDVR is 5100 but not the
PDA port 5101.
New function released: Now you can add DH series devices got from
us (with our serial numbers) directly. Click the arrow beside “Hybrid
NDVR” and select the type “Embedded DVR/IPC”.
1.3 Delete Server
There are two ways to delete a server.
Select “Server Manage” then click on the button
, in that interface
software will list all added Servers, if you push a server left or right, the server
will pop up red button “Delete”, hit the button to delete this server.
,
Another way is to select “Server Manage” then click on the button
then click “Delete” button, then all the added servers will pop up a button
before the server name, hit the button, the server will pop up a
button, click the it to delete this server.
1.4 Live View
1.4.1 Overview
This item is for viewing live stream from PC-DVR. all the devices you
added will be showed after you by click this item
.
If you want to view live stream of a certain camera,just click the server
then all the cameras will be showed under this server, select the camera and
click the button on the right to display this camera in the window.
If the server is connected successfully,the icon should be
offline,the icon turns to
. You can see the connect status by the icon.
There is a full-screen icon
full screen. Another icon
. If it is
. It will make the video display area to be
is used to close the video of selected preview
window.
If you rotate your iPhone,it turns to Portrait (vertical screen).There is the
playing timeline, PTZ, zoom control and preset call. (from left to right).
Playing timeline is unavailable when preview, it can only be used while
doing remote search, for details, please refer to 1.5.2
New function released: Support PTZ control by swiping in landscape
mode.
1.5 Playback
1.5.1 Overall
This item is to playback the local video. You can save the remote playback
video to local space of your iPad or iPhone. Then you can playback the video
you saved.
1.5.2 How to save the local video?
When playing a video file by holding your iPhone in Portrait in remote
search, the interface is as below:
Then press the button
changed to
to begin save video, the button will be
, hit it again to finish saving. The file name of the file will be
showed in the white blank box automatically when you finished saving.
When you enter Playback interface, all the video saved will be listed in a
list as below:
1.6 Remote Search
This item can help you search the video from the remote server by time.
Here you can hit each option to select Server/Channel/Begin time/End
time/Date, then hit Search button to search record files.
All the files matches the condition will be listed as below:
Note: Right now remote playback function does not support recorded data
from EW series products. This is because of the decode algorithm. And this
function will support EW series products in next version.
1.7 DO Control
(New!)
This item can help you to control the DO of the connected devices.
The box on the right side shows the status of the current DO port.
Click on the “Off” button on the right of the DO port, it will change to “On”,
and the DO of the device will also be switched to “On” status.