1
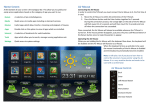
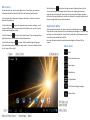
Menu Icons
At the bottom of your screen are the Menu icons. This will give you important
information about the status of the @Tab as well as options and shortcuts.
You can quickly see the amount of charge in your battery, the time, increase or
decrease the volume etc.
Touch the Back icon
to go to the previous screen you were working in, even if
it was in a different app. Once you are back at the Home screen, you can't go any
further back through your history.
Touch the Home icon
to return to the Home Screen. If you’re viewing a left or
right Home screen, this will open the central Home screen.
Touch the Recent Apps icon
to view a list of thumbnail images of Apps you
have worked with recently. To open an App, touch it. To remove a thumbnail from
the list, swipe it left or right.
Tap the Menu Icon
at any time to bring up a menu of options relevant to the
screen you have open. For example on the home screen, tapping the menu icon
brings up ways to change your home screen, and if you have the Browser app open
the menu icon brings up options to do with your Browser. Pressing the Home icon will
take you straight back to your main home screen.
Applications Menu
At the top right hand side of your home screen is the Applications menu icon
.
Touch the icon to open a menu of all your installed apps and widgets. To open an app
just tap it once and it will launch. You will have to swipe left or right between screens
to see all the apps installed on the @Tab.
For more information about the applications and widgets see Chapter 9 of the
manual.
Menu Icons
Back
Return to Home Screen
Recent Apps
Menu Button
All Applications
Wi-Fi Status and Signal Strength
Battery Status
Connecting to Wi-Fi
Follow the instructions below to connect to a b/g Wi-Fi Connection:
1.
2.
3.
4.
5.
From the Applications screen touch the Settings icon.
Turn on Wi-Fi, if it's not already on.
The @Tab will scan for available Wi-Fi networks and display the names
of those it finds. Touch the entry for the network you want to connect to.
If the network is secured, you will be prompted to enter a security key.
This key is usually printed on a sticker on the Wireless Router. If the router
doesn’t have this sticker, you will have to ask whoever setup the network.
When finished, touch Save.
For more in-depth instructions, please see chapter 8.1 of the manual.
Files and Folders
To browse your files and folders touch the File Manager icon on the home screen.
When File Manager opens it will show all the folders and files at the highest level of
your @Tabs internal storage.
You can navigate through folders just by touching them and select files by also
touching them. To access a micro SD card, touch the
menu option or to access
and external USB storage device touch the
menu option.
To copy and paste files from one folder to another, tap and hold the original file
until a menu appears with options to Delete, Rename, Copy, Move(Cut) or Email the
file. Tap Copy File to create a duplicate of the file or Move(Cut) to move the original
file to a new location. You can then navigate to the destination folder where you
want to copy the file. Tap and hold the folder you want to Copy / Move the file to
and from the menu which appears, select Paste into Folder (you may have to scroll
down to find this option) and the file Copy / Move will complete.
To create a new folder for your own files, tap the menu icon
and select the New
Directory option and use the virtual keyboard to type the folder name.
About your @Tab
About your Home Screen
With its amazing LED backlit touchscreen, navigating around the @Tab is easy. Use
your fingers to manipulate icons, buttons, menus, the onscreen keyboard, and
other items on the touchscreen. You can also change the screen's orientation. To
select or activate something, touch it. To type something, such as a name,
password, or search terms, just touch where you want to type. A keyboard will
popup and allow you to type into the field.
Touch & hold
Touch & hold an item on the screen by touching it and not lifting
your finger until an action occurs.
The @Tab has five home screens where you can add shortcuts to places and
programs as well as adding widgets (apps that reside on your home screen such as a
clock / calendar).
To add a widget or shortcut just ‘tap and hold’ some blank space on your home
screen. A pop-up menu will appear so you can choose your widget which will appear
on the home screen. To move it around the home screen tap and hold the icon until it
becomes larger, then drag it to where you want it.
To delete a widget or shortcut, tap and hold the icon then drag it to the recycle bin.
The recycle bin icon appears as an X icon at the top of the screen.
For more information about the home screen, applications and widget see Chapter 7
of the manual.
Drag
Touch & hold an item for a moment and then, without lifting your
finger, move your finger until you reach the target position.
Setting the date and time
Swipe or slide
Quickly move your finger across the surface of the screen, without
pausing. You can slide a Home screen left or right to view the other
Home screens.
Double-tap
Tap quickly twice on a webpage, map, or other screen to zoom.
Pinch
In some apps you can place two fingers on the screen at once and
pinch them together (zoom out) or spread them (zoom in).
Other common gestures include:
Some of the @Tab’s software and widgets require the date and time to be correct to
function correctly. To set the time and date go to Settings > Date & time. Uncheck the
Automatic setting then tap Set Date, use the + and - buttons to change the date and
then press Set. For more information see Chapter 8.12 of the manual.
Note: If you run completely out of battery life you will lose your time and date
settings.
Introduction
Battery Charging
Please read this quick start guide carefully
to help you get the most out of your @Tab.
Your new @Tab is a great way
to experience the web, and access all
your media using the latest Google™
Android™ 4.0 OS with its touchscreen
interface.
The @Tab has a built-in battery, which should be re-charged, using the 5V power
adapter provided with the device, or alternatively the @Tab can be charged via a USB
cable connected to a PC or other USB charging source. When your battery charge is
low, the device will emit a warning tone and display a low battery message. The
battery icon will also be empty. If the battery charge becomes too low, the @Tab will
automatically power off. Recharge your battery to continue using your device.
Charging via the power adapter
1. Connect the power adapter to the Power-in socket.
2. Plug the power adapter into a power outlet.
Package Contents
Before using your @Tab, please check your package contents to ensure there aren’t
any items missing. If any of the listed items are missing or damaged, please contact
your point of purchase for assistance.
Charging via USB
1. Connect the USB cable to the mini USB socket.
2. Plug the USB cable into a USB power source (power adapter, PC, Laptop etc.).
The package includes:
1. @Tab Tablet
2. 5V Power Adapter
3. User Manual
4. Quick Start Guide
5. USB Cable (for connecting to a PC)
6. USB Adapter Cable (for connecting external USB devices)
When it is charging, the battery symbol in the bottom right hand corner of the
desktop will show a charging (lightning) symbol
.
When the battery is fully charged (no lightning symbol in the battery icon), unplug the
power adapter or USB cable from the @Tab and then from the power socket.
Help & Support
To help you get the best out of your product we provide you with a limited 1 year
Return to Base Warranty and Support Helpdesk. For all technical support please
contact our helpdesk using the details below:
Telephone Support
Email Support
+44 (0) 844 997 7666
[email protected]
(calls charged at 5p per minute)
9:30am to 6:00pm GMT
Monday to Friday.
Please provide detailed
information about the problem
you are experiencing.
If you have any problems or questions about your
@Tab, please contact us for some helpful advice.
Turning your @Tab on
Once you’ve charged the battery you can turn the @Tab on, by pressing and holding
the power key for 3 seconds until the @Tab starts to boot. Once it has finished, the
lock screen will be shown.
To unlock the @Tab, drag the “locked” symbol to the right until it becomes an
“unlocked” symbol.
The screen will automatically lock after a period of non-use when the @Tab enters
sleep mode. You can change the length of this time period in the Settings menu, for
more information see Chapter 8.3 of the manual.
Storage & Expansion
You can expand the @Tabs 8GB of internal storage using the Micro SD Card
Slot. Capacities up to 32GB are supported allowing you to store your favourite music,
movies and photos.
Insert the card with the metallic connectors facing the front of the @Tab, until you
feel a click which will lock the card into place. To remove the card, push the card
gently inwards until you hear a click and then it will pop out.