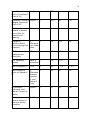
1
1 Final Design Documentation P09503 – Electrophotographic Development and Transfer Station (EDTS) Kate Gleason College of Engineering Rochester Institute of Technology Faculty Guide Dr Marcos Esterman 2 Table of Contents Part I – Background Information 1.0 Introduction ................................................................................................................................ 3 2.0 System Overview ....................................................................................................................... 4 3.0 System Level Functional Diagram ..................................................................................... 7 4.0 Customer Needs ......................................................................................................................... 8 5.0 Engineering Specifications .................................................................................................... 9 Part II – System Level Design Improvements 6.0 Ozone Fan/Filter Assembly .................................................................................................. 14 7.0 Monitoring Charge on Photoconductor ........................................................................... 22 8.0 LED Exposure System ............................................................................................................. 32 9.0 Paper Delivery System ............................................................................................................ 39 10.0 Implementation of Higher Visibility Warning Signs ............................................... 47 11.0 Camera System ........................................................................................................................ 52 12.0 Transfer Roller Speed Measurement ............................................................................. 53 13.0 Labview Control Interface .................................................................................................. 56 14.0 Issues Still to be Addresses ................................................................................................ 63 3 1.0 Introduction Electrophotography (EP) is the base technology that is used in many modern day copiers and printers. Examples of manufacturers that use this technology in their products include Xerox, Canon, Lexmark, and Hewlett‐Packard, to name a few. Electrophotography is a six‐ step process that consists of uniformly charging a photoconductive material. Photoconductive materials allow charge to flow when exposed to light. EP products exploit this property by selective discharging areas on the photoconductor to form what is referred to as a latent image. When this latent image comes close to charged toner particles, these charged particles will transfer onto the latent image to form a developed image. Through the use of electrostatics, the image is ultimately transferred onto a media substrate (such as paper) and fused. The experimental EP station in this project will contribute to the understanding of current EP technology by allowing for the manipulation of certain input parameters. Some of these inputs can include charging voltage, discharge intensity, development voltage and transfer current to name a few. Different technologies such as Charged Area Development and Discharge Area Development may also be explored. The device must be operational and posses an easy to use interface to allow operators at all levels of expertise to research and understand the EP process. The objective of this project is to make an existing electrophotographic development and transfer station function and to improve at a minimum its usability and to automate the control of the machine. It is also expected that additional performance improvement opportunities will be identified, designed and implemented. Project Deliverables: Deliverable 1: An inventory and status of the current sub‐systems, including the needed supporting systems (e.g. 220 Voltage Drop). Deliverable 2: A working EP development and transfer station. Deliverable 3: Demonstrably improved device safety Deliverable 4: An improved user interface (this includes control and display functions) Deliverable 5: Device documentation for use, maintenance and upgrade of the device (User & Lab Technician Manual) Deliverable 6: Demonstrably improved sensing and control subsystem. 4 2.0 System Level Overview The EDTS includes the following subsystems normally found in a standard laser printer: Photoconductor The purpose of the photoconductor system is to transverse along the EDTS while carrying photosensitive material that will hold electrostatically charged toner for transfer to a medium substrate, such as paper. The photosensitive material increases conductivity during exposure to light. The photoconductor directly interacts with the charging system, discharge system, development system and the transfer system. Charging The purpose of the charging system is to establish an electrical field within the area of the photoconductor and consists of two parts, the corona and the grid. The corona wires, enclosed by the grid, are subjected to voltages that can range up to 10,000 volts. The purpose of the grid is to ensure that charge uniformity exits on the photoconductor; the potential applied on the grid is closer to what is desired on the photoconductor. The photoconductor does not come into contact with the grid but instead passes over at distances in the micron range. 5 Exposure The purpose of the exposure station is to expose the photoconductive material to light thereby reducing charge on certain areas of the photosensitive material depending upon the discharge pattern. Due to the properties of the photoconductive material this light then neutralizes the charged area leaving only an electrostatic latent image on the photoconductive surface. Development The purpose of the development system is to deposit charged toner particles onto the charged surface of the photoconductor. The photoconductor transverses the development system at distances that range in the microns to allow for a wall of toner, created by a magnetic field, to attach to the photosensitive material. 6 Transfer The purpose of the transfer system is to transfer the toner on the photosensitive material to first a charged roller and then secondly onto the substrate, such as paper. The photoconductor comes into direct contact with the transfer roller in this step. 7 3.0 System Level Functional Diagram Since the high level architecture has already been defined for the EDTS concept generation activities involved creating a large list of possible improvement opportunities. The project customer and guide, Dr. Marcos Esterman, provided the functional diagram below. The purpose of providing this diagram was to capture the functional areas of the EDTS that have opportunities to be improved from the current capabilities. 8 4.0 Customer Needs The following is a list of customer needs. The customer has provided most needs while others have been elicited from meetings with end users and faculty consultants. 1. Is Operational 2. Is Safe 3. Minimizes user intervention during Charging 4. Minimizes user intervention during Discharge 5. Minimizes user intervention during Development 6. Minimizes user intervention during Transfer 7. Minimizes user intervention during maintenance 8. Can monitor key process parameters 9. Automation of Parameter Settings 10. Can operate and monitor machine from one interface 11. Easy to learn to use 12. Areas for system upgrades are identified and documentation for upgrade procedures available where applicable 13. Maintenance of system is documented 14. Both drawings and Bills of Materials document device 15. Operation of Device Is Documented 16. Toner clean up 17. Inventory and Status Report of current systems 18. Vary charging voltage 19. Vary charging current 20. Vary exposure 21. Can accommodate different toner materials 22. Vary development voltage 23. Vary development current 24. Can use multiple toner stations 25. Vary transfer voltage 26. Vary transfer current 27. Improve exposure subsystem 28. Monitor charge of the Photoconductor 29. Incorporate other manufacturers development systems 30. Paper delivery system 31. Ability to accommodate different types of media 9 5.0 Engineering Specifications The following is a list of engineering specifications. This list has been improved and refined throughout the previous nine weeks of Senior Design I as system improvements have been identified and designed. Metric Importance Current Marginal System Value Ideal Value # Human Shock/Short Faults Identified during FMEA Analysis 5 17 <5 0 # 5 2 <2 0 Insufficient or Not # Present Warning Labels identified during FMEA Analysis 5 4 <1 0 Time to Shut Down Seconds System 5 2 <2 <2 Steps required to # Shut Down System 5 1 1 1 Surrounding Lab 1, 2, 3, 4 or 5 Area has been organized using 5S 3 0 >3 equal to 5 EDTS has been 1, 2, 3, 4 organized using 5S or 5 3 0 >3 equal to 5 ppm 2 TBD <0.05ppm <.001ppm PC/Transfer Drum Volts Measurement Resolutions 3 TBD TBD TBD 3 TBD TBD TBD Pinch Point Faults Identified during FMEA Analysis Amount of ozone present in air Passes Standard Units TBD 10 "EP Process" Test Charging Voltage Range kV 5 0-10kV 0-10kV 0-10kV Charging Current Range Amp 5 0-200uA 0-200uA 0-200uA Exposure Range TBD 5 TBD TBD TBD Number of toners useable on machine # 2 1 >/=1 equal to 4 Development Voltage Range kV 5 0-10kV 0-10kV 0-10kV Development Current Range Amp 5 0-200uA 0-200uA 0-200uA 2 4 4 # Number of toner stations functioning 4 Transfer Voltage Range kV 5 0-10kV 0-10kV 0-10kV Transfer Current Range Amp 5 0-200uA 0-200uA 0-200uA LEERS Usability Test Result Subj 4 N/A Easy to Use Extremely Easy to Use User Manual Present % 5 10% 85% 100% % of Toner left on % Photoconductor after Transfer 3 N/A <10% equal to 0% % of Toner left on % Transfer Drum after Media Transfer 3 N/A <10% equal to 0% 5 Yes Yes Yes Power is Yes/No 11 controllable Variable Test Mode 0-99 5 0-99 0-99 0-99 Variable Exposure 0-9 Time 5 0-9 0-9 0-9 Manual Control of Yes/No Paper Feed (Part of UI) 4 TBD Yes Yes Manual Control of Lamp Exposure (Part of UI) Yes/No 4 TBD Yes Yes Manual Picture Exposure (Part of UI) Yes/No 4 TBD Yes Yes Manual Control of Pretransfer Lamp (Part of UI) Yes/No 4 TBD Yes Yes Manual Control of Yes/No Transfer Drum Drive Engage (Part of UI) 4 TBD Yes Yes Manual Control of Yes/No Transfer Drum Drive Bias (Part of UI) 4 TBD Yes Yes Manual Control of Yes/No Backup Roller Engage (Part of UI) 4 TBD Yes Yes TC Measurement of Yes/No Station 1-4 (Part of UI) 4 TBD Yes Yes Station 1-4 Drive Yes/No Control (Part of UI) 4 TBD Yes Yes Yes/No Station 1-4 Rate Control (Part of UI) 4 TBD Yes Yes 12 Yes/No Drive Speed Control Functional (Part of UI) 4 TBD Yes Yes Pneumatic Pressure Yes/No Gauges Functional (Part of UI) 4 TBD Yes Yes Number of screws # needed to detach ozone filter for removal and cleaning 2 4 4 4 Charge on photoconductor after charging and exposure 3 % difference from Ideal Value N/A 10% 0% ESVM Measurement Resolution DPI 3 N/A 0.254 2.5 LED Exposure System 4 Ratio of Intensities N/A <100 1 4 N/A 7" x 4" 9" x 4" Match speed of Drum to Speed of PC 4 % difference between speed of PC and Speed of Drum N/A 5% 0% UI Includes Automatic and Manual Control of Device Yes/No 4 No Yes Yes Ability to view current status of machine during operation Yes/No 5 No Yes Yes Size of imaged PC L x W 13 Ability to control system with current controls and improved controls Yes/No 5 No Yes Yes 14 6.0 Ozone Fan/Filter Assembly – Phil Lopez Description The goal of this is to reduce and secure the area of the test stand of ozone, which may develop during the charging process of the photoconductor. Ozone in itself is hazardous to humans if exposed to enough of it. The law states that the maximum allowable amount of ozone in an air conditioned space is 0.050 ppm. Studies also show that at 0.200 ppm and higher there is a possibility of decrease lung function, nasal irritation, induced asthma, coughing, chest pains, and inflammation of lung tissue. Also sensitive humans may detect ozone in the range of 0.01‐0.03 ppm, but this isn’t the case for all people. Since the only moderating device of ozone is the fan/filter assembly, determining the amount of ozone that is produced if the assembly wasn’t functioning properly has to be addressed. We have concluded to verify if the current sub‐system is safe enough, or to proceed with implementation of further improvements to bring the ozone level within EPA regulations. Customer Needs Satisfied and Associated Specifications Customer Need Satisfied Is Safe Maintenance of system is documented Specification Ideal Value Marginal Value Amount of Ozone Present in Air Number of screws needed to detach ozone filter for removal and cleaning 0.001 ppm 4 0.050 ppm 4 Figure 1: Current Mount 15 Detailed Drawings/Schematic Drawing 1: Current Mount 16 Drawing 2: New Mount (if necessary) 17 Proof of Concept Testing/Experimental: TBD – due to insufficient equipment We will be measuring the amount of ozone emitted at various locations around the charging station. One of the solutions being examined is the idea of mounting the current fan/filter assembly higher, thus raising it 2 inches closer to the actual charging area. The below test plan will be implemented 2 inches in each away from the charging station in every direction (with respect to a x,y,z coordinate frame), which results in a total of 6 separate tests for each area. Test Areas = Charging Station Figure 2: Testing Areas (top‐down view) 18 Charging Station Figure 3: Testing Areas (left‐side view) 19 At Original Height Corona and Grid (kV) Ozone Produced (ppm) Ozone Produced w/Fan (ppm) Ozone Produced w/o Fan (ppm) Ozone Produced (ppm) Ozone Produced w/Fan (ppm) Ozone Produced w/o Fan (ppm) 0.1 0.2 0.3 0.4 0.5 0.6 0.7 0.8 0.9 1 1.5 2 2.5 3 3.5 4 4.5 5 5.5 6 6.5 7 7.5 8 8.5 9 9.5 10 2 inches higher Corona and Grid (kV) 0.1 0.2 0.3 0.4 0.5 0.6 0.7 0.8 0.9 1 1.5 2 2.5 3 3.5 4 4.5 5 5.5 6 6.5 7 7.5 8 8.5 9 9.5 10 20 Extended Mount Improvement: The stress acted upon a new taller mount (Figure 2) made of Al 6061 was calculated. The stress was found to be ~520 psi which is less than the Ultimate Stress (40ksi) and the Yield Stress (35ksi). In regards to this calculation it means the mount will be able to withstand the weight applied to it due the filter/fan assembly. Bill of Materials Ozone Filter Supplier Item Material Description Supplier Part No. Sheet Al 6061 See below McMaster 89015K38 Total Lead Time n/a Total Qty Price Price 1 23.86 23.86 23.86 23.86 Scrap metal will be looked at as alternative. Risk Assessment Description of Possible Risk Consequences Loose Fan Severity of Risk (H/M/L) Overall Risk (H/M/L) Contingency Plan M H M Reattach M H M Ozone over M EPA regulations Ozone Unable to L Measurement measure Device Ozone levels H L Examine and do required maintenance N/A H M Particulate Build Up or Clogging Power Loss to Fan Ozone over EPA regulations Ozone over EPA regulations Probability of Risk (H/M/L) Resources http://www.ozoneservices.com/articles/007.htm Not Available 21 0.001 to 0.125 ppm Typical ozone concentrations found in the natural atmosphere. These levels of concentration vary with altitude, atmospheric conditions and locale. 0.050 ppm Maximum ozone concentration produced by electronic air cleaners and similar residential devices according to the proposed amendment of the Federal Food, Drug and Cosmetic Act. Corona Emission and Ozone Production by Carbonized and Oxidized High-Voltage Wires Mara E. M. Horwitz, S. Gray Horwitz, and Chris M. Horwitz http://www.epa.gov/iaq/pubs/ozonegen.html#how%20is%20ozone%20harmful 22 7.0 Monitoring the Charge on Photoconductor – MinShi Hsiao P09503 – Electrophotographic and Transfer Station (Monitoring the Voltage on Photoconductor—MinShi Hsiao) Description The output quality of the xerographic image is determined by the functionality of each subsystem. Monitoring the voltage on the photoconductor right after the charging station will help to characterize the photoconductor’s dark decay property as well as charge uniformity as the exposure input noise source. It can also be helpful in terms of creating a voltage vs. exposure level plot when the measurement is taken after exposure. Trek 344, the Electro‐Static Voltage Meter (ESVM) as shown in Figure 1 will be the measuring device. The probe works like a capacitor that charges itself up to the same level as the object being measured. Therefore it allows potential on the photoconductor plate to be determined without physical contact. 23 Customer Needs Satisfied and Associated Specifications Customer Specification Need Satisfied Ideal Value Marginal Value 1.20: Monitor key process parameter Voltage on photoconductor after charging Voltage across is smooth Voltage on photoconductor after discharge (exposure) Voltage +/‐ 10% of the proportional ideal value to the exposure level 1.70: Monitor Measurement accuracy charge of the Photoconductor Measurement resolution Same as the actual voltage +/‐ 0.05% 3mm in diameter per pixel +/‐ 5% or 8.5 dpi +/‐ 5% of the mean value 24 Detailed Drawings/Schematics The probe (Figure 2) has to be placed 2mm from the surface of the photoconductor. It cannot be held by hand since it will charge itself up with respect to the object being measured; therefore, the probe needs to be positioned by a fixture. The solution is to use the existing camera station (Figure 3) as the probe fixture since it can be easily adjusted and repositioned while staying at the same distance from the photoconductor. However, due to the risk of accidental shock, user will not be touching or moving the probe during the experiment. The position of the probe should be fixed before the xerographic process starts. There is an intermediate probe mount shown in Figure 4 required to join the camera mount and the probe in order to get obtain the correct orientation. The material used for the probe mount is aluminum, ASTM 6061. Readings of the charge will be taken immediately after charging and exposure station by two individual ESVMs. Figure 5 and 6 shows the image of these two locations. Based on the position of the photoconductor, the controller will select the correct ESVM for measurement. The reading of the ESVM will then be feed to the main controller through the output port via coax‐cable. The reading can be plotted as charge vs. position or exposure level. Figure 1: Trek 344, ESVM 25 Figure 2: Probe for the ESVM Figure 3: Camera Station used as probe fixture 26 Figure 4: Probe Mount 27 Figure 5: Closer view of the probe fixture after charging station 28 Figure 6: Locations where charge of the photoconductor will be measured 29 30 Proof of Concept General Voltage Monitoring Process At the current stage of the project, the concept will be tested using Mylar as the photoconductor material. Since Mylar is not sensitive to light, exposure will not be necessary. However, the charge will still be measured at both locations. A piece of Mylar will be glued on the photoconductor plate and driven down using a bypassed motor controller for the main screw. All controls as well as data capture will be directed manually. The process will start from the charging station at 500V and measurement of the surface voltage will be taken as it moves to the next station (exposure). After it passes the exposure station, surface voltage is then measured again by the second ESVM. Rough plots of the voltage vs. position and exposure level can then be generated from the data. Dark Decay Analysis Dark decay is one of the characteristics of a photoconductor. It is the amount of charge lost on a charged photoconductor without light exposure. A graph of the voltage measured for 10 seconds after the photoconductor is charged can show the dark decay characteristic of the photoconductor. This procedure should be run with at least 20 different charging voltages to see the effects of initial voltage. Measurement for the Entire XY Plane Measurement throughout the entire photoconductor plane after exposure system is one of the possibilities that can be done with the ESVM. The whole area can be measured with the photoconductor moving incrementally along the main drive direction (x‐axis) while another motor drives the probe back and forth in the y‐axis. This method is going to be time consuming, thus prone to be effected by dark decay. However, if dark decay of the photoconductor can be modeled then the time factor can then be taken out. The following equation gives the total time it will take to measure the voltage on the entire photoconductor plane. Where W is the width of the photoconductor in x‐direction and L is the length in y‐ direction. y0 is the extra distance the probe traveled each time in addition to L. vx is the velocity of the main screw and vy is the velocity of the probe drive. 3mm is the diameter of each measurement. Vibration Tolerance Since the photoconductor plate is driven by the main drive, vibration from the screw will affect the measurement directly. If the vibration gets too strong, the reading of the ESVM can be inaccurate. A test can be run simply by measuring the voltage on the photoconductor as it moves from charging to exposure station. If the reading is smooth, then it is safe to assume vibration is negligible. If it’s not smooth, then the data can be processed and filtered to get rid of the noise. 31 Risk Assessment Description of Risk Possible Consequence s Probability of Risk (H/M/L) Severity of Risk (H/M/L) Overall Risk Contingency Plan (H/M/L) manually moving the brick Electric shock L H L Avoid contact when machine is powered, user manual, warning sign, wear insulating gloves Dark decay Inaccurate ESVM reading H L L If dark decay can be modeled as a function of time, then the original voltage can be traced back Vibration of the PC plate Inaccurate ESVM reading L H M Have to filter out the high frequency component of the voltage curve or use other methods to take measurement 32 8.0 LED Exposure System – Rachel Chrash Description LED print heads are used in copiers, duplicators, and printers to expose a photoconductive member or photosensitive film in the apparatus in such a manner that a latent image is formed on the surface or film. This is a technology commonly used in industry to expose photoconductive material and has much research backing the use of this technology. An LED exposure system will replaced the current system that uses light from a projector bulb to expose photoconductive material. The advantages an LED system will have over the current is that it will decrease power consumption, allow for a longer bulb lifetime, does not have the potential to overheat, and will be inexpensive to replace if needed. It would also prove to be a more reliable and versatile light source. Customer Needs Satisfied and Associated Specifications Customer Need Satisfied 3.2: Improve exposure subsystem Specification Ideal Value Marginal Value Implement 1 <100 an LED Exposure System Table 1: Customer Needs and Associated Specifications‐ This table lists the specific customer need that the LED exposure system is related to. Ideally, the ratio of the bulb intensity to the LED intensity should be less than one to be an effective exposure system. An ideal value would result in a ratio of 1, meaning that the LED intensity is equal that that of the projector bulb intensity. 1) Ratio of intensities 33 Detailed Drawings/Schematics image plane with modulating masks image plane with modulating masks collimating lens incandescent light source Current System 4x4 array of LEDs Better LED system Figure 1: Current System vs. Led System‐ This is a figure of the Current System vs. the LED system courtesy of Dr. Jon Arney. The incandescent light source in the projector uses a collimating lens to collect the light and direct it towards the modulating masks. The LEDs provide a more direct source of light to the image place with modulating masks. 34 Figure 2: LED Array Figure 3: Relative Intensity vs. Wavelength‐ This figure shows the intensity, or relative spectral power distribution with respect to wavelength. Photoconductive material is most sensitive to blue light which has the shortest wavelength. Therefore, the photoconductive material is least sensitive to red, orange, and yellow light. This is the reason that the system can be successfully operated in yellow light without having a large impact on the exposure of the photoconductive material. Proof of Concept The exposure subsystem consists of a light source located below the image plane that is completely encased so that light does not bleed and the material becomes pre‐exposed. At the moment of exposure, a shutter will open for a predetermined amount of time and light will be emitted to the image plane with the modulating masks for the purpose of exposing the photoconductive material. For the most successful exposure, light should be distributed evenly across the entire image plane and be intense enough to be an effective light source. In this test, three different light sources were tested for intensity and light uniformity with the use of Gossen PanLUX Analog lux meter. The lux meter measures illuminance, which is the total luminance flux incident upon a surface per unit area or the measurement of intensity of incident light. A grid was constructed on the image plane, the level where the exposure will take place, to measure light intensity and uniformity every 1x1 inch. The lux meter measurement probe was then limited with a piece of black electrical tape so that pin point measurements could be taken of the current system, a 2x2 blue LED array, and a 2x3 LED array. 35 Intensity (Lux) Intensity Ratio Current System 5600 NA 2x2 LED Array 100 .017 2x3 LED Array 145 .025 Table 2: Intensity Comparison‐ Intensity was measured at 6” away from the direct center of each light source. Further results of this experiment are attached at the end of this document. Discussion of Results: The current projector bulb system, a 2x2 blue LED array, and a 2x3 LED array were tested at the exposure level. The projector bulb was measured to be a total distance of 27” away from the exposure level. The projector bulb is fixed within the projector casing and therefore testing distance cannot be varied. Results show a somewhat uniform distribution with intensity being slightly more intense at the center while light drops off at the edges of the image plane. For the 2x2 LED array, it was placed at the top of the projector casing, on top of the projector for simplicity, and centered as best as possible. This configuration was about 2” away from the shutter and 20” away from the exposure level. This provided a sharp increase in intensity at the center of the image plane but the Gaussian distribution provided almost no exposure light to the edges. A second set of data was collected for when the array was placed a farther distance way from the exposure level to test if the distribution became more uniform. The array was placed at the bottom of the projector casing which is 35” away from the exposure level, centered, and proved to still provide a very Gaussian distribution that was much less intense. The 2x3 array produced similar results when tested at this length. When the 2x3 array was tested closer to the shutter it provided similar results to that of the 2x2 array but with less intensity. No further LED configurations were tested due to a lack of blue LEDs. When comparing the projector bulb to the LED measurements taken at 20” from the exposure level, the projector bulb was the most uniform and intense. Strictly looking at the data this would seem to be the chosen exposure system. There are certain advantages to using an LED array as opposed to continuing to use the current system and it will ultimately be up to the customer if the benefits of using an LED exposure system outweigh the performance. There is a margin of intensity that can be applied when determining how intense a light source could be as explained in equation 1, so the LED system would still be effective in the case of intensity. Although, the most important factor when exposing the photoconductive material is that a uniform light distribution is applied to the modulation 36 masks so that the latent image on the photoconductive material is even, otherwise the final image could come out faint at the edges. If an LED system is to be used further testing for optimal use can be done. A few possible options could be making the shutter larger, testing a closer distance to the exposure level, or using the collimating lens from the projector to see if the LED light becomes more uniform. Luxeon emitter LED, model number LXHL‐BB01 has a turn on voltage of 3.42VDC with a maximum at 3.99VDC. LEDs can be bought individually for $4.54 or in an array. Voltage can be provided by an adapter that steps down 120VAC to an appropriate voltage that can be used or a small power supply could be used. These LEDs were recommended by Dr. Arney but other sources were also considered. Item Material 1 Description Blue LED LED Mounting System Supplier Supplier Part No. Lead Time Qty Price Luxeon LXHL‐BR02 2 weeks 6 $4.54 Total Price $27.24 Table 3: Bill of Material‐ This bill of material depends on if the customer decides to go with the LED exposure system. The number of LEDs will depend on further testing of smaller systems to see if a larger array will be needed. If the LED exposure system is to be used, the system can be kept off until exposure is necessary. This can be controlled either in labview or manually and the time of exposure can also be controlled and would eliminate the use of the shutter. The turn on constant of the LEDs is 20ns which is short enough that this can be a valid option. The projector bulb takes too long to heat up and to its desired level, which is another reason why an LED system would prove to be beneficial. The system could currently be mounted on top of the projector casing. Further Testing Procedure The past testing procedure will be followed to test different collimating lenses with the LEDs to gain a more uniform distribution of light. This will be done at 20” from the exposure level and at a distance closest to the exposure level as possible. 37 Risk Assessment Description of Risk Possible Consequences Lead Time if Time Delay Parts need to be ordered Uniform Light Distribution Larger LED Array Probability of Risk (H/M/L) Severity of Risk (H/M/L) Overall Risk (H/M/L) Contingency Plan Order Ahead Further LED Testing L L L Uneven Exposure H H H Doesn’t Fit Inside Projector Case H H H Modify Projector Case 38 39 9.0 Paper Delivery System – Ruth Gay Description Existing system requires manually catching paper after application of toner from the transfer roller, resulting in a risk of marring image quality by handling, as well as hazards to hands including a pinch point at the transfer roll, high voltages, moving parts, and pneumatics. Solution must be able to smoothly guide and hold 4.25” x 5.5” paper samples. It must fit in available space adjacent to the transfer roller and have sufficient clearance, even when camera is in place. It must be easily and quickly manufactured using appropriate inexpensive, easily obtainable materials. It must be easy to install and remove. Tray must be able to withstand high fusing temperatures. Paper delivery system design consists of a durable frame which supports a flat, removable aluminum tray and guides the paper into the tray. Customer Needs Satisfied and Associated Specifications Customer Need Satisfied Is safe Is safe Is safe Minimizes user intervention during Transfer Minimizes user intervention during Transfer Minimizes user intervention during Transfer Paper Delivery System Specification Ideal Value Human Shock/Short Faults Identified during FMEA Analysis Pinch Point Faults Identified during FMEA Analysis Insufficient or Not Present Warning Labels identified during FMEA Analysis Human Shock/Short Faults Identified during FMEA Analysis Pinch Point Faults Identified during FMEA Analysis Insufficient or Not Present Warning Labels identified during FMEA Analysis Pass standard “EP Process Test” N/A Marginal Value 0 <5 0 <2 0 <1 0 <5 0 <2 0 <1 N/A 40 Detailed Drawings/Schematics Figure 1 Tray Assembly 41 Figure 2: TRAY DRAWING 42 Figure 3: RIGHT SIDE BAR Figure 4: LEFT SIDE BAR 43 Figure 5: CROSS BAR Figure 6: SUPPOR T LEG (2X) 44 Bill of Materials: Item Socket Cap Screws .032" Aluminum Sheet .375" Thick Aluminum Sheet Material Description 5/32" hex socket, 10‐32 thd, 3/4" length, fully stainless threaded, head: steel dia .32" ht .190" 6061 Aluminu 12"x12", brushed m Finish, .032" Thk 6061 12"x12", Aluminu Unpolished finish, m .375" Thk 6061 Aluminu 12" length, 1/4" m dia. Aluminum Rod Total Material Cost Supplier Supplier P/N Quantity Price 8 (includes 25) $8.86 McMaster‐ Carr 92185A991 McMaster‐ Carr 1651T11 1 $12.7 6 McMaster‐ Carr 9246K23 1 $31.9 8 McMaster‐ Carr 6750K131 1 Note: All part prices and details are quoted from Mcmaster‐Carr. Most of these can be obtained quickly and at less cost through local suppliers such as the Home Depot or Rochester Steel. $3.41 $57.0 1 45 Proof of Concept Figure 7: Approximate location of Assembly within System 46 Risk Assessment Description of Risk Lead time of parts Cost Space Possible Consequences Not completed soon enough Exceed budget Part Interferes with Camera System Probability of Risk (H/M/L) M Severity of Risk (H/M/L) M Overall Risk (H/M/L) Contingency Plan M Make at in‐ house shop L M M H M M Change part design to minimize cost, use available stock material Adjust design and/or placement of both systems to accommodate both. Possibly cut a hole in tray and put camera beneath. 47 10.0 Implementation Higher Visibility Warning Signs – David Schwartz Description The purpose of a warning sign is to alert the user to a specific hazard and to identify how the hazard can be avoided. Warning Signs typically indicate any potential hazard, obstacle, or condition requiring special attention. The implementation of higher visibility warnings signs on the Eletrophotographic Development and Transfer Station are intended to replace the current signs in use and add additional ones where needed. The improved visibility warning signs will encompass the type of hazard along with safety information in word and symbolic form, which the current signs do not accomplish. The location of each improved safety sign has been identified in the Failure Modes Effects Analysis (FMEA). International Standard 3864 specifies graphical symbols and design principles for product safety labels and will be used as a guide. Customer Needs Satisfied and Associated Specifications Customer Need Satisfied Is Safe Is Safe Is Safe Specification Marginal Value Ideal Value Pinch Point Faults Identified during FMEA Analysis Insufficient or Not Present Warning Labels Identified During FMEA Analysis Human Shock/Short Faults Identified during FMEA Analysis <2 0 <1 0 <5 0 Detailed Drawings/Schematics The FMEA Analysis identified two major areas where signs are needed; these include areas where a shock or short can occur and a pinch point. The following are images of the proposed warning signs and locations. 48 Figure 1 –Warning Sign for High Voltage Hazards Height of Sign is 1.5 Inches Figure 2 – Warning Signs for Pinch Points Height of Sign is 1. 5 Inches Figure 3 – Warning Signs on Sides of EDTS Height of Sign is 1.25 Feet 49 Figure 5 – High Voltage area before Warning Sign Figure 5 – High Voltage area after Warning Sign 50 Figure 7 – Pinch Point Area before Warning Sign Figure 7 – Pinch Point Area After Warning Sign Figure 8 & 9 – EDTS before and after Warning Sign A total of x new signs will be added. The signs will be constructed of ordinary printer paper that has been laminated. The signs will be attached with double sided tape. Proof of Concept International Standard 3864 identifies two terms and definitions relevant to the hazards that have been identified for our use. The standard defines Danger as a signal word used to indicate an imminently hazardous situation that, if not avoided, 51 will result in death or serious injury. The second definition that is of relevance is Caution which is a signal word used to indicate a potentially hazardous situation which, if not avoided could result in minor or moderate injury. These two definitions are relevant to the two hazards that have been identified during the FMEA analysis, which in this case is a shock/short of up to 10,000 volts or a pinch point representing a hand or finger that could possibly get caught between two rollers where pressure is applied. The international standard also identifies various layouts and guidelines as to the proper visuals, size text and color to use. The minimum height in mm of the safety sign, excluding borders, should be calculated from the following equation: h = D/40, where D = safe viewing distance in mm. The safe viewing distance in this case is five feet away from each hazard. However an additional sign will be placed on each side of the EDTS to indicate users who are approaching the machine at a distance of 50 feet that injury could result during use of the machine. Therefore for each hazard the signs will be 1.5 inches in height where the signs on either side of the machine will be 1.25 feet in height. Risk Assessment Description of Risk User Ignores Sign Signs Detach Possible Consequences Probability of Risk (H/M/L) Severity of Risk (H/M/L) Overall Risk (H/M/L) Contingency Plan Assure the signs are the proper size Attach all signs securely, print extra Shock/Short M or Pinch M M No sign present L L L 52 11.0 Camera System – Andrew Kearns Description A Nikon D50 camera will be used to study the xerographic process as it occurs. The camera system is being implemented in order to gain a more detailed understanding of how an image is developed on photoreceptive material. This aspect of the machine also reflects the customer’s desire for the system to be used as a learning tool for imaging science students. The camera will be automated through Labview using the Nikon Image Capture Control software package. After the development stage the photoconductor will jog to the camera position specified by the third magnetic sensor and stop. A front surface mirror will reflect the image on the photoconductor and the camera will capture the reflected image. Customer Needs Satisfied and Associated Specifications Customer Need Satisfied Can Monitor Key Process Parameters Specification Ideal Value Marginal Value Take image the size of PC 9”x4.75” 7”x4” Proof of Concept The camera will be secured underneath the test bed on top of the control box. The camera will interface with the computer through a USB cable. Labview will then call a command from the Nikon software to tell the camera to take the picture when the photoconductor is in front of the third magnetic sensor on the main drive frame. If the paper delivery system uses too much space the image on the mirror may be obstructed. Removal of the LED bar in front of the development station would create more space but possibly degrade the quality of the image on the photoconductor. Development with and without the LED bar should be executed for comparison in order to determine how to save space. Risk Assessment Description of Risk Possible Consequences Probability of Risk (H/M/L) Severity of Risk (H/M/L) Overall Risk Contingency (H/M/L) Plan Camera space Less space for H paper delivery M M Picture timing Image decay on the PC L L L Use front surface mirrors to Capture a reflected image Speed up PC 53 12.0 Transfer Roller Speed Measurement – Andrew Kearns Description The speed of the Transfer roller is critical to timing control and image quality. The first step in the transfer process is for the photoconductor to jog to a position directly above the transfer drum. The drum will then elevate to the height of the photoconductor. From this position the drum will rotate at the speed the photoconductor is traversing until the drum has received the entire image. Once the image is on the drum it will stop rotating and descend to the home position. The drum will start rotating again once the transfer medium is fed through. One revolution is required for the drum to receive the image. Another revolution is required for the drum to transfer the image to a medium. The optical encoder on the drum will be used to stop rotation at the appropriate time. The encoder will also provide feedback as to the current speed of the drum in relation to the speed of the photoconductor as well as the transfer medium to ensure the image is not distorted. Customer Needs Satisfied and Associated Specifications Customer Need Satisfied Can Monitor Key Process Parameters Specification Match the speed of the Drum to the speed of the PC Ideal Value N/A Marginal Value 1 to 12 (in/sec) Detailed Drawings/Schematics FIGURE 1: Schematic of Connections Needed to Monitor Drum Speed FIGURE 2: Timing Diagram for the Control Signals Generated by the Encoder 54 Proof of Concept The optical encoder sends 1,024 pulses per revolution. The DAQ can count the number of pulses during a given interval which will give the frequency of the signal. The frequency of the signal is the number of cycles completed in one second. The quotient of the frequency and the number of pulses per revolution will give the value for angular velocity in (1). Linear velocity is the product of angular velocity with the factor 2πR, where R is the radius of the drum. This analysis provides equation (2) as the expression for linear velocity of the Drum. ω r = 60(sec/ min) f ( pulses / sec) ⎛ 15 ⎞ =⎜ ⎟ f (rev / min) 1024( pulses / rev) ⎝ 256 ⎠ (1) ⎛ 15πR ⎞ v = 2πR(in / rev) ω r (rev / min) = ⎜ ⎟ f (in / min) ⎝ 128 ⎠ (2) FIGURE 3: A and B Outputs of Drum Encoder at a frequency of 1.74 kHz 55 Table 1: Measurements Taken for Encoder B Output Signal Vpp Frequency Period Pulse Width+ Pulse Width- 2.20E+00 1.74E+03 5.74E-04 2.82E-04 2.92E-04 Test Plan 1. Verify Encoder Performance a. Connect encoder to appropriate ground ports on supply b. Connect oscilloscope probes to appropriate encoder pins c. Connect encoder to appropriate DC bias d. Turn on supply e. Rotate shaft and capture signals 2. Determine if Calculation for speed based on Encoder Signals is Accurate a. Initialize the encoder b. Apply a DC sweep to the motor attached to the encoder going from 1 V to 10 V in 0.5 V steps using the E-652-m supply c. Record rpm’s as displayed by the supply d. Capture the output signals from the encoder e. Compare the rpm’s measured and the rpm’s calculated f. Determine if the calculations need adjustment g. Correct as necessary Table 2: BOM Risk Assessment Description of Risk Possible Consequences Probability of Risk (H/M/L) Severity of Risk (H/M/L) Overall Risk (H/M/L) Contingency Plan Drive a seven segment display with the encoder output Verify proper acquisition of signals Obtain new encoders Inability to interface with the DAQ Decreased image quality L H M Inability to read A and M outputs Encoders do not function Unknown direction of motion H M H Inability to control speed H H H 56 13.0 Labview Control Interface – Sasha Oliver Description Current control of the system is done via the KV300 PLC. A better solution is needed to replace the current control system with a new user friendly and easier to adapt solution. LabView uses dataflow programming to define inputs/outputs and execution sequence of the virtual instrument. By creating a LabView interface and connecting it to a DAQ system it will allow for a user friendly and free‐form way of controlling the system. This upgrade will enhance the Kodak prototype by removing the current PLC interface and replacing with a more intuitive and user friendly graphical user interface designed in LabView. Customer Needs Satisfied and Associated Specifications Customer Need Satisfied Can monitor key process parameters Specification Ideal Value Marginal Value Ability to Yes view current status of machine during operation UI Includes Yes Automatic and Manual Control of Device Yes Can operate and monitor machine from one interface Ability to control system with current controls and improved controls Yes Yes Easy to learn to use LEERS Usability Test Result Extremely Easy to use Easy to Use Automation of Parameter Settings Detailed Drawings/Schematics Yes 57 Figure 1 –UI with Automatic setting enabled. The device will be controlled with a LabView interface. This interface will have two modes: Manual and Automatic. It will be possible to switch from one mode to another with the Automatic/Manual button. Manual will provide the user with direct control over the system enabling the user to vary particular settings not normally available. Automatic will automate the process from start to finish with minimal user interaction. The user will still have access to Start, Stop and Go Home buttons. The LED at the top is a mode indicator. There will be preset minimal and maximum ranges for varying parameters preventing the user from damaging the system. The Position slider will gather data from the 4 magnetic position sensors and display the approximate position of the photoconductor to the user. 58 Figure 2 –UI with Manual setting enabled. Proof of Concept The PLC will be removed entirely from the system and the inputs will be connected to LabView directly via the DAQ. This would allow for a more direct control over the entire process as well as individual elements of the process. The goal of the experiment is to have the following controls to be manipulated via LabView interface: ‐PC Speed (inches/min) ‐Exposure lift ‐Toner Motor speed ‐Toner forward/reverse ‐Toner Station Drive ‐Toner Bias ‐Toner Solenoid ‐Exposure light (on/off) ‐E‐stop ‐Transfer roller speed ‐Intermediate roller speed ‐Intermediate roller/lock ‐Transfer clutch 59 ‐Camera ‐Intermediate roller clutch Below is a wiring diagram of all the inputs/outputs available for control: Wiring Diagram SubSystem Description/Source Purpose Wire Number Photoconductor Photoconductor Drive Motor Control Photoconductor Motor Speed PC1 Photoconductor Encoder 1 TBD Photoconductor Encoder 2 TBD Photoconductor Encoder 3 TBD SubSystem Description/Source Purpose Wire Number Exposure Remote Switch from Uniblitz Control Shutter ‐ Open/Closed EX1 Exposure Exposure Lift Control 1 Control Exposure Lift Pneumatics ‐ Up/Down EX2 Exposure Exposure Lift Control 2 Control Exposure Lift Pneumatics ‐ Up/Down EX3 SubSystem Purpose Control Speed of Developer DE1 Control Speed of Developer DE2 Development Description/Source Toning Speed Motor Control 1 Toning Speed Motor Control 2 Toning Speed Motor Control 3 Wire Number Control Speed of Developer DE3 Development Toning Station On / Off Control Power of Devlopment Station ‐ On/Off DE4 Development Toning Station FWD/REV Control Rotation Direction of Development Station ‐ FWD/REV DE5 Development Toning Station Drive DE6 Development Toner Roller Bias Apply Charge to Toner DE7 Development Toner Solenoid +12V Actuate Developer Solenoid DE8 SubSystem Description/Source Purpose Wire Number Transfer Paper Back Up Roller Control Small Roller Pneumatics ‐ Up/Down TR1 Transfer Paper Back Up Roller Control Small Roller Pneumatics ‐ Up/Down TR2 Transfer Intermediate Roller Lifts up Transfer Drum Roller ‐ Up/Down TR3 Transfer Intermediate Roller Lifts up Transfer Drum Roller ‐ Up/Down TR4 Transfer Intermediate Roller Lock Locks Transfer Drum Roller ‐ Locked/Not Locked TR5 Transfer Intermediate Roller Lock Locks Transfer Drum Roller ‐ Locked/Not Locked TR6 Transfer Transfer Drum Motor Controls Transfer Drum Roller Speed TR7 Development Development 60 Transfer Paper Drum Motor Controls Paper Motor Speed TR8 Transfer Transfer Drum Clutch Controls Transfer Drum Clutch TR9 Transfer Transfer Drum Clutch Controls Transfer Drum Clutch TR10 Transfer Transfer Drum Clutch Controls Transfer Drum Clutch TR11 Transfer Transfer Drum Clutch Controls Transfer Drum Clutch TR12 Transfer Paper Sensor Sense if Paper is Present on Tray TR13 Transfer Encoder 1 TBD Transfer Encoder 2 TBD Transfer Encoder 3 TBD SubSystem Description/Source Purpose Wire Number Stand Sensor 1 Determine position of Photoconductor PS1 Stand Sensor 2 Determine position of Photoconductor PS2 Stand Sensor 3 Determine position of Photoconductor PS3 Stand Sensor 4 Determine position of Photoconductor PS4 Stand Emergency Stop Cut all power to machine ES1 Stand Cut all power to machine ES2 Stand Emergency Stop Electrostatic Volt Meter (ESVM) Measure Charge on the Photoconductor EV1 Stand Camera Image the Photoconductor at Various stages TBD Stand Camera Image the Photoconductor at Various stages TBD Stand Camera Image the Photoconductor at Various stages TBD Stand Camera Image the Photoconductor at Various stages TBD Not all of these controls will be accessible and defined by the user; the LabView interface will largely automate the processes and control the components themselves within the system. User input and alteration will be used for particular parameters. 61 Figure 3 Workflow Diagram A simulation of the processes can be done in LabView via attaching the input signals/outputs to the appropriate ports on the block diagram and running the system. The system should provide a response to user actions ( such as pressing the Manual/Automatic button or varying the input parameters such as PC speed). Risk Assessment Description of Risk Possible Consequences Interface may not be able to control system as the PLC did Some parts of the system may not work Probability of Risk (H/M/L) M Severity of Risk (H/M/L) H Overall Risk (H/M/L) Contingency Plan H Refine system 62 The previous state machine is not replicated correctly (incorrect parameters passed into device) Damaged parts L H M Refine State machine 63 14.0 Other Issues 14.1 Tilting or Machining the Development System Problem During machine operation as the photoconductor transverses the system it requires clearance to pass by each system to complete the Electrophotographic process. The developer system on the machine was not intended for this machine and was designed in such a way that does not allow the photoconductor to traverse the machine without impact. Two ideas were proposed by the team that were experimented with and the results discussed with the internal and external consultants. Discussion Due to the fragility of the machine and the uncertain results of the experiment, along with the Susan Farnands recommendation, it was decided that the developer will be machined. Susan suggested this because the developer system integrity is not fully known and if the developer were to be tilted the stability would come into question during machine operation. 14.2 Development System Toner Uniformity Problem During experimentation with the development system it was discovered that toner and developer were not being applied uniformly to the development roller. The development roller is responsible for applying toner to the photoconductor. If the uniformity of toner on the development roller is not consistent, the toner deposited on the photoconductor system will not be consistent resulting in an image where toner deposition is not uniform. Discussion The customer informed the team that the primary focus of the project is to make the EDTS operational and to enhance the usability. It was also informed of us not to focus too much on this issue since it lies outside the customer needs as some toner will still be placed on the EDTS. 14.3 Documentation of a user manual Problem One customer need calls out for a user manual. The user manual will include instructions for operation, troubleshooting, maintenance and parameter settings. SDI did not focus very much on this need. Discussion The senior design two schedule incorporates the writing of a user manual during the first few weeks of senior design. This time was selected since parts for other activates will not begin to arrive for the first week. 14.4 Identification of a DAQ for purchase Problem Several Data Acquisition devices met the criteria that were needed to control the EDTS. Help was needed on how to decide which data acquisition device to purchase. 64 Discussion John Wellin of the Mechanical Engineering department, who is very familiar with Data Acquisition Devices and Labview, was able to clarify the unknown issues. Mr. Wellin also donated a secondary data acquisition device that will assist in reading data from the encoders. 14.5 Test Plan with Critical Parameters Table Problem After the controls of the machine are operational the appropriate parameters for the Corona Wires, Grid, Photonconductor speed, etc will need to be optimized. Discussion A list of critical parameters will appear in the detailed test plan in the coming weeks of Senior Design two. Research by the team is being done on each parameter. A designed experiment will be conducted to optimize the parameters. 14.6 Transfer Roller Height Restriction Problem During the transfer step, the transfer roller must be raised pneumatically to come into contact with the photoconductor. It is critical to the process that the roller must come into contact with the PC as this is where the toner is transferred from the PC to the paper. The issue during this stage is that there are currently brackets restricting the height that the transfer roller can attain. It is still unknown at this time weather this height restriction will limit the ability of the roller to contact the PC. Discussion Further testing will be done during critical parameters experimentation to determine if the brackets are in fact restricting the roller. If they are, simple drilling of new holes to increase the height that the rollers can attain will be performed. 14.7 Air Filtration System Problem When operating the machine, toner and developer will be circulating through the air around the device. The toner and developer may cause an inhalant hazard since they are considered fine particulate matter. Discussion After discussion with the customer about this issue, a filtration system will be provided to the team to address this issue. The air filtration system will be attached to the machine via cardboard and tape. 14.8 Toner Bias Problem Four pieces of equipment on the device require large amounts of voltage. The corona should be biased around 7 kV, the transfer drum needs around 1 kV, the toner roller needs ‐500 V, and the grid requires several hundred volts. It is desirable to save space on the machine by using three supplies to provide the voltage levels for each subsystem. This problem can be solved by designating one supply to power both the corona and the drum. Equation 1 shows the 1:7 ratio between the corona and drum can be achieved by implementing the resistive voltage division circuit in 65 figure 1. The other two supplies would take care of the roller and the grid respectively. A more simple but less efficient way of providing power would be to use the fourth power supply. V drum = 1000 = 7000( R 2) ( R 2) 1 → = ( R 2 + R1) ( R 2 + R1) 7 (1) FIGURE 1: Voltage Divider Necessary to Bias the Corona and Drum with One Supply Discussion It is advantageous in terms of space and power consumption to us the network in figure 1 to establish the required voltage levels, however it may allocate additional space for wires on the machine. It may also require disassembly of the corona circuitry to connect the corona wires in series with the resistance needed. Another aspect of the power divider is a constant ratio of voltages between the drum and the corona which may or may not be beneficial. The main goal the circuit would accomplish is the ability to provide the appropriate levels on the grid and the toning station without adding another supply.