1
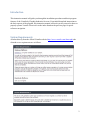
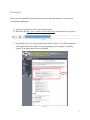
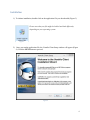
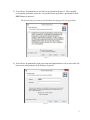
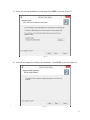
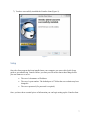
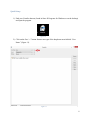
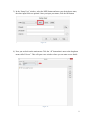
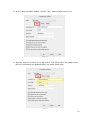
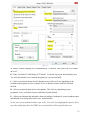
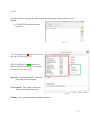
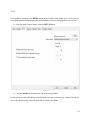
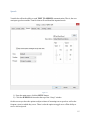
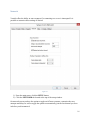
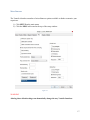
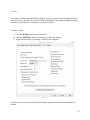
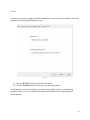
INSTRUCTION MANUAL Andrew Thompson FOR TWC 444 15 November 2013 Contents Introduction ..................................................................................................................................... 2 System Requirements...................................................................................................................... 2 Download ........................................................................................................................................ 3 Installation....................................................................................................................................... 4 Setup ............................................................................................................................................... 7 Quick Setup ................................................................................................................................. 8 ................................................................................................................................................... 11 Voice Setup ............................................................................................................................... 11 Events ........................................................................................................................................ 13 Binds ......................................................................................................................................... 14 Speech ....................................................................................................................................... 15 Network..................................................................................................................................... 16 Miscellaneous ........................................................................................................................... 17 Overlay...................................................................................................................................... 18 Global ........................................................................................................................................ 19 Troubleshooting ........................................................................................................................ 20 1 Introduction This instruction manual will guide you through the installation procedures and basic program features of the Ventrilo by Flagship Industries freeware. From initial download instructions to the basic aspects of the program, this instruction manual will teach you all you need to know to properly operate Ventrilo. Please refer to the index found on the previous page for quickreference navigation. System Requirements As taken directly from the official Ventrilo website (http://www.ventrilo.com/about.php) the client & server requirements are as follows: 2 Download Before you can install the Ventrilo software onto your personal computer, you must first download the application: 1.) Open your web browser on your personal computer. 2.) Input the URL http://www.ventrilo.com/download.php (as shown below in Figure 1). Figure 1 3.) You should now be at a webpage that looks similar to Figure 2. Click the appropriate client application version (this will vary depending on your computer’s operating system). Your application will now download. Figure 2 3 Installation 1.) To initiate installation, double-click on the application file you downloaded (Figure 3). Please note that your file might be labeled and look differently depending on your operating system. Figure 3 2.) Once you run the application file, the Ventrilo Client Setup window will appear (Figure 4). Click the NEXT button to proceed. Figure 4 4 3.) You will now be prompted to review the license agreement (Figure 5). After carefully reviewing the agreement, select the “I accept the license agreement” option and click the NEXT button to proceed. Please note that you cannot proceed without accepting the license agreement. Figure 5 4.) You will now be prompted to input your name and organization as well as select who will have access to the program (if on Windows, Figure 6). Figure 6 5 5.) Select your desired installation location then click NEXT to proceed (Figure 7). Figure 7 6.) You will be prompted to confirm your installation. Click NEXT to proceed (Figure 8). \ Figure 8 6 7.) You have successfully installed the Ventrilo client (Figure 9). Figure 9 Setup Once the client program has been installed onto your computer you can use this Quick Setup guide to get started using Ventrilo. Before you start you will need to know these things before you can connect to a server: The server’s hostname or IP address. The server’s port number. The default port is 3784 but the server admin may have changed it. The server password (if a password is required). Once you have these essential pieces of information you can begin setting up the Ventrilo client: 7 Quick Setup 1.) Find your Ventrilo shortcut (found in Start Programs for Windows or on the desktop) and open the program. Figure 10 2.) Click on the first “->” button found to the right of the dropdown menu labeled “User Name” (Figure 11). Figure 11 8 3.) In the “Setup User” window, select the NEW button and enter your desired user name, the other input fields are optional. Once you input your name, click the OK button. Figure 12 4.) Now you are back on the main menu. Click the “” button that is next to the dropdown menu called “Server”. This will open a new window where you can enter server details. Figure 13 9 5.) In the Connection Editor window, click the “New” button to input a new server. Figure 14 6.) Input any name for your new server and click ok. You will now have the option to input the server information you gathered before you started Quick Setup. Figure 15 10 7.) Click the OK button to return to the main menu. You can now click “Connect” to Voice Figure 16 Voice Setup 1.) For microphone and input settings, click the SETUP button found on the main menu. Figure 18 Figure 17 11 Figure 18 A - Ensure “Enable outgoing voice communications” is checked. This cycles your voice output on or off. B - If the “Use Push To Talk Hotkey (PTT Mode)” is selected, input your desired hotkey here. You will only transmit voice when the assigned key is pressed and held. C – Select your desired output from the dropdown menu. This will vary depending on the available output options on your computer. Leave as default if unsure with Direct Sound checked. D – Select your desired input device (microphone). This will vary depending on your peripherals. Leave as default if unsure with Direct Sound checked. E – Adjust your inbound and outbound volume accordingly. Outbound is your microphone input and inbound is incoming audio (other users’ transmissions). To test your current outbound volume, refer to the “Test with” box (highlighted in green). Select any codec and format, then click TEST. Any recorded audio will be played back to you. 12 Events You can customize and adjust the audio announcement that plays when a particular event happens: 1.) Click SETUP from the main menu (Figure 21). Figure 19 The box highlighted in red is the list of events that can be edited (Figure 22). The box highlighted in green contains the different options available when customizing the selected event (Figure 22). Wave File – Predetermined audio event that plays when an event happens. Text to speech – The Ventrilo client reads the text aloud with a male voice. Figure 20 Nothing - The event does not have an audio component. 13 Binds It is possible to customize your BINDS option in the Ventrilo client. Binds are a way for users to create predetermined audio queues that can be bound to a hot key and played for users to hear. 1.) From the main Ventrilo menu, click the SETUP button. Figure 20 2.) Click the BINDS tab located at the top of the setup window. On this screen you have the option to disable binds, increase or decrease the volume of binds, as well as the option to play a specific audio file if a bind is not found. 14 Speech Ventrilo also offers the ability to send TEXT TO SPEECH communication. That is, the user can input typed text and the Ventrilo client will read aloud the inputted words. Figure 21 1.) From the main menu, click the SETUP button. 2.) Click the SPEECH tab located at the top of the “Setup” window. On this screen you have the option to adjust volume of incoming text to speech as well as the frequency (rate) at which they occur. There is also the option to toggle on or off the ability to receive text-to-speech. 15 Network Ventrilo offers the ability to auto-reconnect if a connecting to a server is interrupted. It is possible to customize these settings if desired. Figure 22 1.) From the main menu, click the SETUP button. 2.) Click the NETWORK tab located at the top of the setup window. On network screen you have the option to toggle on/off auto reconnect, customize the retry attempts and delays as well as toggle the option to automatically join the last channel you were in before you disconnected. 16 Miscellaneous The Ventrilo client has a number of miscellaneous options available to further customize your experience. 1.) Click SETUP on the main menu. 2.) Click the MISC tab located at the top of the setup window. Figure 23 WARNING Altering these default settings can dramatically change the way Ventrilo functions. 17 Overlay As a feature, Ventrilo offers the ability to display an overlay in any full screen application you may run on your computer. An overly will show information in game/application that wouldn’t normally be seen otherwise if the game is in full screen mode. To enable overlay: 1.) Click the SETUP button on the main menu. 2.) Click the OVERLAY tab located at the top of the setup window. 3.) Toggle on/off overlay by checking “Enable Overlay Support” Figure 24 Customize your overlay by checking/unchecking the provided options found throughout the window. 18 Global Ventrilo has an option to toggle on/off the notification for a new client be available as well as the support for external gaming hardware devices. Figure 25 1.) Click the SETUP button located on the main menu. 2.) Click the GLOBAL tab located at the top of the setup window. Check/uncheck your desired settings. If you are having trouble with any external gaming peripheral. Please refer to the individual manufacturer’s handbook for compatibility and troubleshooting. 19 Troubleshooting In case the event occurs that you are having technical difficulty with any feature or the setup of your Ventrilo client. Please refer to the below common problems and solutions which is located on the main Ventrilo website (www.ventrilo.com). For the latest patches and updates, be sure to frequent www.ventrilo.com. 20