1
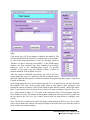
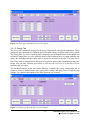
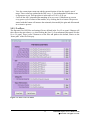
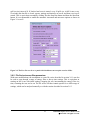
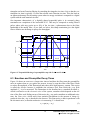
Figure 2.1: The Pixie Viewer START UP panel (above) and MAIN Panel (right) Click on the Start Up System button to initialize the modules. This will download DSP code and FPGA configuration to the modules, as well as the module parameters. If you see messages similar to “Module 0 in slot 5 started up successfully!” in the IGOR history window, the Pixie modules have been initialized successfully. Otherwise, refer to the troubleshooting section for possible solutions. If you want to try the software without a chassis or modules attached, click on Offline Analysis. After the system is initialized successfully, you will see the MAIN control panel that serves as a shortcut to the most common actions and from which all other panels are called. Its controls are organized in three groups: Setup, Run Control, and Results. In the Setup group, the Start System button opens the START UP panel in case you need to reboot the modules. The Open Panels popup menu leads to four panels where parameters and acquisition options are entered. They are described in more detail in section 3 and in the online help. To get started, select Parameter Setup, which will open (or bring to front) the PARAMETER SETUP panel shown in Figure 2.2. For most of the actions the Pixie Viewer interacts with one Pixie module at a time. The number of that module is displayed at the top of the MAIN panel and the top right of the PARAMETER SETUP panel. Proceed with the steps below to configure your system. Note: The More/Less button next to the Help button on the bottom of the PARAMETER SETUP panel can be used to hide some controls. This may be helpful to first-time Pixie users who only want to focus on the most essential settings. 7 PIXIE-500 Express User’s Manual V3.20 XIA 2014. All rights reserved.