1
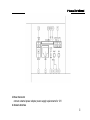
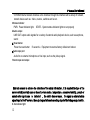
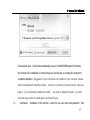
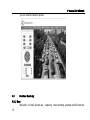
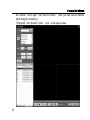
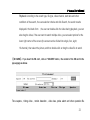
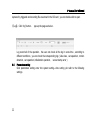
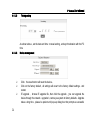
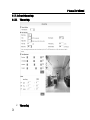
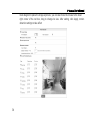
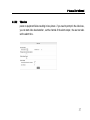
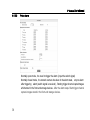
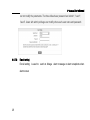
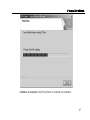
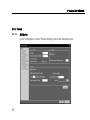
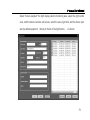
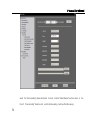
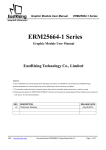
IP Camera User’sManual IP Camera User’s Manual IP Camera Version V1.0 1 IP Camera User’sManual State: This manual may not exactly be described in some technology details or exist error printing, if you have problems in operating according to our manual, please call to our technology department .This manual have regular update, The information is subject to changes without prior notice. Matters need attention 1、 Installation environment Away from heat source of heat and the environment;Avoid direct sunlight To ensure camera normal thermal,Should avoid poor ventilation places,Note waterproof, moisture proof, lightning protection. If need to install to outdoor,Requires placed need the water tank, and fix the camera in it. The machine should be installed horizontally or hanging installation, avoid installed in the place which will be violent vibration ,not to put other equipment on this machine 2、To avoid electric shocks and fire 2 Remember that don’t use wet hand touch power and camera IP Camera User’sManual Do not put the liquid splashed down on the camera , lest cause the machines internal short circuit or fire Do not put other equipment on this camera directly Non-professional workers can’t take apart enclosure to avoid damaging and electric shocks 3、Transportation and handling The packing of machine pass seismic design and experiment, by ensuring the cameras will not be accidentally damaged, so during the handling of the machine, we’d better use original packaging materials and cartons. Avoid moving the camera in extreme cold, heat places, lest machine generated internal condensation, influence the machine service life; Move the machine strictly when charged, otherwise it will damage the mainboard 3 IP Camera User’sManual DIRECTORY 1 1.1 PRODUCT INTRODUCTION…………………………………………………………………………………………7 1.2 FUNCTION BRIEF………………………………………………………………………………………………………9 1.3 TECHNICAL SPECIFICTION………………………………………………………………………………………10 2 INTERFACE DESCRIPTION…………………………………………………………………………………………………11 3 DEVICE INSTALLATION………………………………………………………………………………………………………15 4 4 PRODUCT BRIEF INTRODUCTION…………………………………………………………………………………………7 3.1 WORKING ENVIRONMENT………………………………………………………………………………………15 3.2 DEVICE INSTALLATION……………………………………………………………………………………………15 IE OPERATION INTRODUCTION …………………………………………………………………………………………15 4.1 NETWORK PREPARATION ………………………………………………………………………………………15 4.2 LOGIN……………………………………………………………………………………………………………………16 4.3 REAL-TIME MONITORING ………………………………………………………………………………………19 4.3.1 Menu……………………………………………………………………………………………………………………19 4.4 PARAMETERS SETTING ………………………………………………………………………………………23 IP Camera User’sManual 4.4.5 4.4.1 System setting……………………………………………………………………………………………… 23 4.4.1.1 Device information………………………………………………………………………………………… 23 4.4.1.2 Timing setting…………………………………………………………………………………………………24 4.4.1.3 Device management……………………………………………………………………………………… 24 4.4.2 Audio and video settings…………………………………………………………………………………26 4.4.2.1 Video settings ……………………………………………………………………………………………… 26 4.4.3 Timing setting……………………………………………………………………………………………… 29 4.4.3.1 Timing captured…………………………………………………………………………………………… 29 4.4.3.2 Timing recording…………………………………………………………………………………………30 4.4.4 Network setting……………………………………………………………………………………………32 4.4.4.1 Network setting ……………………………………………………………………………………………32 4.4.4.2 WIFI Setting …………………………………………………………………………………………………33 4.4.4.3 3G setting …………………………………………………………………………………………………… 34 4.4.4.4 Platform setting…………………………………………………………………………………………… 35 Alarm setting ……………………………………………………………………………………………………………… 35 5 IP Camera User’sManual 4.4.5.1 Motion detection ………………………………………………………………………………………35 4.4.5.2 Video loss …………………………………………………………………………………………………37 4.4.5.3 Probe alarm………………………………………………………………………………………………38 4.4.6 4.4.6.1 4.4.7 4.4.8 4.4.7.1 User management……………………………………………………………………………………40 4.4.7.2 E-mail setting……………………………………………………………………………………………40 4.4.7.3 FTP setting ………………………………………………………………………………………………41 Frint-end storage…………………………………………………………………………………………………………42 Client software installation ………………………………………………………………………43 Parameters configuration through the client software …………………………………………………50 5.2.1 6 SD card management………………………………………………………………………………42 CLIENT INSTRUCTION…………………………………………………………………………………………………43 5.1 5.2 PTZ Setting ………………………………………………………………………………………………39 Advanced setting …………………………………………………………………………………………………………40 4.4.8.1 5 PTZ Setting…………………………………………………………………………………………………39 Preview …………………………………………………………………………………………………… 50 IP Camera User’sManual 5.2.1.1 Add device………………………………………………………………………………………………50 5.2.1.2 Timing recording setting …………………………………………………………………………53 5.2.2 Playback…………………………………………………………………………………………………55 5.2.2.1 6 Local playback………………………………………………………………………………………55 FREQUENT ASKED QUESTION ……………………………………………………………………………………57 1 Product brief introduction 1.1 Product introduction IP Camera is based built-in Web server product, IP Camera have multifunction image effects, it is an independent installation monitoring system, bulit-in CPU and network server, through the network to carry high quality images 。IP Camera can watch the video and remote control through personal computer or laptop computer model through LAN or Internet web browsers。Simple installation process and interactive web browser interface let IP can do a very good job Camera whether in general cable network environment or wireless network 7 IP Camera User’sManual environment .IP Camera can carry many alarm tools at the same time an can inform user to take action to abnormal condition. It can applied in market, shop, school, factory, home and a series of places. IP Camera support using mobile phone remote monitoring watch image Notice1:Before opening the package, please read this manual carefully, and check the content and manual packing list, whether it is consistent with content, check whether the fuselage coding tag stuck fall off on the equipment base . Notice 2:If need to choose Wifi wireless function device, please select /w model product, this product with built-in wifi wireless module, and equiped with transmitting antenna 1.2 8 Function brief Using h.264 Main [email protected] compression format, image is more clear streaming IP Camera User’sManual smaller, facilitate network transmits and save storage space; 32-bit processor and a million pixels processing power professional video decoding chips D1/CIF/QCIF three kinds of video resolution optional, 720P (1280*720) support max resolution support various video parameters,adjustment, adapted to user various browsing requirements; Support mobile watch; Support 10 users to monitor at same time Support external microphones, simultaneously also support external audio collection devices (such as pick-up),Realize voice acquisition, remote monitoring site voice; Also can external speakers, remote transmission of voice to the scene, realize two-way talkback function Built-in WEB SERVER,Support IE browsing and parameter Settings, and one port to transmit all data and is convenient for the user to network Settings; Support 802.11 b/g protocol , can built-in wifi module, flexible form wireless monitoring environment; Maximum support 32G SD card storage, can realize alarm photograph and alarm video; Support motion detective , and external alarm detector, achieve all-round protection Support DHCP、TCP/IP、HTTP、UDP、RTSP、SMTP、FTP ; SD card, mail, FTP ways to save local alarm records, external alarm warning notice, implements multiple alarms linkage; 9 IP Camera User’sManual Support 3 level user permissions Settings Supports remote escalation Manufacturers provide free client software, provide more pictures looking, timing video, video playback, alarm information query functions 1.3 Technical specification Video compression:H.264/MJPEG; Encoded output rate bite:32~4000kbps; Audio compression:G.711; Audio output code rate:64Kbps; Max frame rate:PAL:25 F/S NTSC :30F/S; Image settings:saturation, brightness, contrast, hue Audio port:In/out*1; Working temperature and humidity:-10℃~65℃、85%RH below ; Voltage:DC12V; 2 Interface description 2.1 Tail plate 10 IP Camera User’sManual 1.Power Connector connect external power adapter power supply requirements for 12V 2. Network Interface 11 IP Camera User’sManual 10/100M Ethernet network interface is the interface through the interface with a variety of network , network device such as : hubs , routers , switches and so on . 3.Status indicator PWR:Power indicator light; STATE:System status indicator lights to run properly 4.Audio output LINE OUT output audio signals for a variety of external audio playback device ,such as earphone , sound 5. Reset button Press the reset button (5 seconds) ,Equipment to restore factory default and reboot. 6.Audio input port Audio for an external microphone or line input ,such as the pickup signal. 7.Alarm input and output External sensors to achieve the collection of the alarm information , it is required the type of the sensor switch ( normally open or closed ). when smoke , temperature , excessive humidity , people or animal enter signal zone is detected , the switch close or open , the signal as external alarm signal input to the IP camera , the output signal is based on setting signal of the linkage output switch . 8. 3G indicator light 12 IP Camera User’sManual Flicker is indicator that 3G date is transmiting 9 . WIFI indicator light Flicker is indicator that WIFI date is transmiting 10. SD Card interface SD card storage interface 11. 485 communication port 2.2 Lead interface description 13 IP Camera User’sManual 1 . Power Connector connect external power adapter power supply requirements for 12V 2 . Network Interface 10/100M Ethernet network interface is the interface through the interface with a variety of network , network device such as : hubs , routers , switches and so on . 3 . Audio output LINE OUT output audio signals for a variety of external audio playback device。 4 . Audio input audio for an external microphone or line input ,such as the pickup signa. If the wiring of the audio input signal , you need to place the audio settings , select the line input . 3 3.1 Device installation working environment Operation system: Windows2000server/professional/XP/Windows7; Internet protocol: TCP/IP; Client PC:P4/128MRAM/40GHD/ support zoom of the video card,DirectX8.0 above 3.2 Device installation 1. .IP Camera into your network or with a crossover cable directly connected into the PC。 2. Connected to the DC12 Power。 4 IE operation introduction 4.1 Network preparation The default of IP address of the IP device is 192.168.1.88, Default Subnet mask is 14 IP Camera User’sManual 255.255.255.0,you can modify the network camera IP address , the IP address of your computer to the network camera in the same network segment and the same subnet mask IP Camera start normal test . In accordance with <Start→run→command>operating under Windows, open a command window type Ping 192.168.1.88-t,if not show ―Request time out‖ it indicates that the normal start When the browser (Internet Explore) for the first time to access the network camera , you must temporarily reduce the safety .All set for a one-time install the ActiveX component to the network,selecting the tools from the browser menu . Internet Options—Security –Custom Level-ActiveX controls and plug-in>, set the security level to low and click Reset. 4.2 Login (1) Enter http://192.168.1.88 on the IE and then Pop-up login screen 。 The default user name and password are: admin , admin 15 IP Camera User’sManual (2) 16 Click ― download and install control‖ ,Pop-up download dialog box , select the way you need to download , as the blow shown IP Camera User’sManual Choice direct open . Control will automatically unzip to C:\WINDOWS\system32 directory . the controls of the installation is named video.exe, the last pop up a dialog box prompts to complete installation . (Suggestion: If your controls is not installed on your computer, please click to download and install the controls or there is no picture in the main screen , when you login in . if you previously installed the control , you need to update this space , you must close the page, and then install space) as follows Figure: (3) Completed installation of the controls . enter into you user name and password , then 17 IP Camera User’sManual you can view the real-time picture . 4.3 Real-time Monitoring 4.3.1 Menu Menu Bar:the main function are Capturing , video recording , playback and SD card and 18 IP Camera User’sManual so 【snapshot】 :Click―Snapshot‖ button, the captured image are saved in the format of *.jpg on the local D:\ Snap\IP address\ channel\time。 example:D:\Snap\192.168.1.88\01\20110505。 The snapshot is named as:[date][time][channel][capture mode] such as ‖[20110505][153208001][01][IE_MAN].bmp‖, the image file size should be conformity with the image resolution,If the pre-view images with superimposed characters and time display , the captured picture also have the characters and time display overlay .(Note : Image is stored in the D drive firstly , if the D drive memory is full , it will stored at the next drive)。 【Video】 :Click― recording‖Button ,Button icon into red, the system began to video, the system will automatically generate such a directory:D:\Record\IP address\channel\time , such as :\Record\192.168.1.88\01\20110505,and the video files stored as *.evd formats in the directory ,If the disk D space is full are already , will automatically skip to the next disk storage video files. If there is not disk space , it will delete the oldest video files , reset the new video file. Click the button again to stop recording video , the buttons will change the white 【talkback】:Click ―talkback‖ button can transmitted the sound captured by the computer to the equipment , and play out by the audio Sound device which connected the device . click again , then turn off this function (Note : open the monitoring before the talkback ) 【Monitoring】 :Click― monitoring ‖button , you can play out the sound collected by the device on 19 IP Camera User’sManual the computer . click it again , then close the function . (Note: you must close the talkback before closing the monitoring )。 【Playback】:Click ―playback ‖ button ,pops up the page as below : 20 IP Camera User’sManual Playback: According to the record type, file type, video channel, start date and other conditions of the search, the user selection criteria and click Search, the search results displayed in the blank form , the user can double-click the video during playback, you can also drag the video, if the user want to watch multiple video, you can select options for the lower right corner of the screen (the screen can be divided into single, four, eight, 16-channel), then select the picture, and then double-click or drag the video file to watch. 【SD CARD】:If you insert the SD card , click on “SDCARD” button , the content of the SD card in the pop-up page as below . Time capture , timing video , motion detection , video loss, probe alarm and other operation file 21 IP Camera User’sManual captured by triggered and recording file are stored in the SD card , you can double-click to open 【Log】:Click ―log‖ button , pop-up the page as below . 4.4 22 Log record all of the operation , the user can check all the log in some time , according to different conditions , you can check the corresponding log ( video loss , set operation , motion detection , set operation ,initialization operation , server startup error ) Parameters setting Click parameters setting enter into system setting---time setting .plz refer to the following settings IP Camera User’sManual 4.4.1 System setting 4.4.1.1 Device information Device information shows the basic information of the connected device ,such as device number , name ,format , channels , sensors and version number . 23 IP Camera User’sManual 4.4.1.2 4.4.1.3 24 Timing setting As shown above , set the date and time : manual setting , and synchronization with the PC time Device management Click the reset button will reset the device; Click on the factory default , all settings will revert to the factory default settings . and restart; IE upgrade , browse IE upgrade file ,then click the upgrade , you can upgrade the device through the network . upgraded , restore you system to factory defaults . Upgrade takes a long time , please be patient until pop-up dialog box that prompts a successful IP Camera User’sManual upgrade BIN upgrade , browse BIN upgrade file ,then click the upgrade.please be patient until pop-up dialog box that prompts a successful upgrade(Bin upgrade is mainly to upgrade the back-end decoder.) 25 IP Camera User’sManual 4.4.2 Audio and video settings 4.4.2.1 Video settings 26 Video coding IP Camera User’sManual Stream sharpness adjustment Dive support three kinds of resolution \:D1(704*576)、CIF(352*288)、QCIF(176*144); second stream : CIF(352*288)、QCIF(176*144) two kinds of resolution . The greater the resolution, the picture becomes clearer,but the stream the greater the need for greater network bandwidth Stream regulation Users can specify the stream, generally speaking, the larger stream, the picture becomes clearer. However, the configuration of bit stream to be combined with the network bandwidth when the network bandwidth is very narrow, and configuring a large stream, it will cause the video stream can not be delivered normally, visual effects even worse. Note: the range of the stream setting:32~4000Kpbs。 Maximum frame rate adjustment Set the maximum transmission frame per second . it is recommended to reduce frame rate when the network bandwidth is limited . Typically , above 15 fps , the basic image is smooth. Stream control Stream control has two modes ,namely , fixed-stream ( CBR) , variable bit rate (VBR)。When you choose a fixed stream , the video encoder will be coded according to the stream speeds 27 IP Camera User’sManual set in the encoded stream;in changes stream mode, the video encoder will take into account the image quality , based on the set stream speed but not in full accordance with this rate code. Color adjustment Drag the slider above the image , you can adjust the brightness , saturation , contrast , color to meet the users visual preferences . OSD setting With this option set, you can be loaded into the device name and time on the video screen. 28 IP Camera User’sManual 4.4.3 Timing setting 4.4.3.1 Timing captured ―Time interval‖: interval between captured images ; Limit the number of sheets ": If selected the number of sheets , it will capture according to the number of sheets filled . otherwise it will have been captured . Storage Settings": optional "SD Card", "upload FTP", "Send EMail"; Timing capture divide into ―date‖ and ―weeks ‖ 29 IP Camera User’sManual 4.4.3.2 Timing recording Channel setting Users choose to checked the different channels of the device , if the "timer recording " is checked ,time recording starts . 30 Parameters setting IP Camera User’sManual ―Disk full" optional automatic overwrite or stop video "Storage Type" optional "main stream" or "sub-stream"; "Storage Media" optional "SD Card" or "Upload to FTP"; "Alarm recording time" Alarm recording time setting " recording time " to set each day and specific time in week 31 IP Camera User’sManual 4.4.4 Network setting 4.4.4.1 Network setting 32 Network parameter IP Camera User’sManual 4.4.4.2 Equipment the factory default IP address 192.168.1.88 ; User can customize the configuration settings of network parameters IPCAM PPPOE parameter Check the start , fill in PPPOE username and password ,click the "Apply." DDNS parameter DDNS setting ok , IPC will report regularly to the DDNS server such as dial-up own router equipment to obtain the dynamic IP address . DHCP parameters Automatically obtain IP, check the Startup check box and click the application will restart the device, the device will automatically Get an IP address after the device restart . (router DHCP function must be open WIFI Setting When enabled the WIFI ,the set interface as below , the user firstly check the "wireless network ",click Apply , restart device , then wireless is enabled . enter into the wireless screen , click the "Search button " ( Note:the user should set up the wireless router firstly , mainly including wireless-enabled and wireless connection setting, etc.) selected the set router name in the search results pane, and then do the corresponding setting , according to the set router parameters , click Apply to restart , use the set up IP address to access after the device restart . (Note : set the IP network and wireless router segment should be the same 33 IP Camera User’sManual 4.4.4.3 3G setting After connecting the device , the client will automatically indentify whether there is 3G card , if there have 3G card , "sim card status " is working normally ( machine halt , then it will 34 IP Camera User’sManual display the shutdown status)"3G card status" didn't connected , it display the card type in the connection type . ( such as : Unicom 3G), users can choose different dial-up according to their needs . ( here we choose " Manual Dial " ), Click to dial ( Dial-up process may take some time , please be patient ), when the dial-up is ok , , the state of the 3G status is connected . then the IP address has been assigned , can be transmitted through the platform (note: if you set the power-on dial-up , equipment will dial automatically when power on again ) 4.4.4.4 Platform setting open platform setting , the server will connect to the server initiatively 4.4.5 Alarm setting 4.4.5.1 Motion detection If you want to monitor an area of fixed, when an exception occurs within the region, that started the alarm, you can select motion detection. Motion detection settings interface as shown below, the device supports four regional settings, check the bottom of the page of the options box to enable the appropriate area. Start a region, will be displayed area box on the screen and list the area code, move the mouse to the area frame, you can drag the 35 IP Camera User’sManual block diagram to place the image anywhere, you can also move the mouse to the lower right corner of the red box, drag to change its size. After setting, click Apply, motion detection settings to take effect 36 IP Camera User’sManual 4.4.5.2 Video loss power or equipment failure resulting in loss picture . if you need to prompt in the video loss , you can start video loss detection , set the channel of the alarm output , the user can also set the alarm time . 37 IP Camera User’sManual 4.4.5.3 Probe alarm Normally open mode , the need to trigger the alarm ( input the switch signal) Normally closed mode , the network camera has been in the alarm state, stop to alarm after triggering alarm (switch signal is received) , Starting trigger channel capturimages whichstored in the front-end storage devices . After the alarm stops. Start trigger channel capture images stored in the front-end storage devices. 38 IP Camera User’sManual 4.4.6 PTZ Setting 4.4.6.1 PTZ Setting IP camera supports the standard 485 protocol , you should to choose the PTZ protocol , address code and Baud rate , IP camera just support the PELCO-D and PELCO-P protocols . 4.4.7 Advanced setting 4.4.7.1 User management System System can be set for three users, admin users with the highest authority, can be any set. Other users can not enter the parameter setting, you can perform basic operations, 39 IP Camera User’sManual can not modify the parameters. The three default user password are "admin", "user1", "user2". Users with admin privileges can modify other user's user name and password. 4.4.7.2 E-mail setting E-mail setting is used to send an linkage alarm message or alarm snapshots when alarm occurs 40 IP Camera User’sManual 4.4.7.3 FTP setting 41 IP Camera User’sManual linkage upload will take effect after the server set OK 4.4.8 Front-end storage 4.4.8.1 SD card management Click the SD card management on the left menu bar , all the information about the SD card appear in the list on the right. files in the SD card can be view and delete, if users want file 42 to view the files in the SD card, you must to download the file firstly before opening IP Camera User’sManual 5 5.1 Client Instruction Client software installation Double click the installer, as shown below : 43 IP Camera User’sManual Click [Next], the pop-up installation interface, click [Next] as shown below: 44 IP Camera User’sManual Click [Next], as shown: 45 IP Camera User’sManual Select the installation language and click [Next]: s Click [Install] button to start the installation: 46 IP Camera User’sManual Installation is completed, click [Finish] button to complete the installation. 47 IP Camera User’sManual 5.2 Parameters configuration through the client software Running Software: After installing the client software Client "IPC Client ", Open Client software in the system's "Start" "Programs" "IPC Client" (if generate a shortcut on the desktop, then double-click the icon directly), run the software, the following dialogue box: Enter the user name and password (default username: admin, password is blank), click on "Login", then enter the preview screen: 48 IP Camera User’sManual 49 IP Camera User’sManual 5.2.1 Preview 5.2.1.1 Add device In the "Configuration" Select "System Settings" pop-up the following screen 50 IP Camera User’sManual Select "Server assigned" the right display column monitoring area, select the right control zone, add the device can also add a zone, select the area, right click, add the device (can also be added equipment directly in the list of the right button , . As shown 51 IP Camera User’sManual Enter the server name, IP address, click [OK], then successfully added the server. In addition, you can also add through a search server, in particular: Click on [search], all the devices appears within the network , select the appropriate device, click [OK], then added successfully; can also select multiple devices, click to add bulk without the input can be added successfully. Click [OK] to return to real-time monitoring page, select the channel, double-click the device name, show the relevant channel images can be displayed image by dragging the device to the channel . shown as below : 52 IP Camera User’sManual 5.2.1.2 Timing recording setting Configuration -> Local Settings -> Timer recording 53 IP Camera User’sManual select the "timer recording" device which need to be set from the "Select Device" box, then check in front of "timer recording" check box tick and do the time setting , it will be effect after saving 54 the IP Camera User’sManual 5.2.2 Playback 5.2.2.1 Local playback The extent permitted by the authority, the client can retrieve and playback the video file in the server, as shown. 55 IP Camera User’sManual 56 IP Camera User’sManual Retrieval and video playback functions include: EVD format, ASF format, MJPEG format, H264 format document retrieval and playback, video playback server, the local video playback. Video playback based on the video type, file type, video channel, start date and other conditions of the search, the user select criteria and click Search, the search results displayed in the blank form , user can double-click the video during playback, you can also drag the video, if the user want to watch multiple video, you can select options for the lower right corner of the screen (the screen can be divided into single, four, eight, 16-channel), then select the picture, and then double-click or drag the video , then the file process of watching can be viewed , Users can crop the video in the according to their needing (Note: The cut pieces are cut from the beginning to click Save so far) can also click on the button for single-frame playback. Users can also click on icon, playing other video files. Note: If the video file stored in less than one Video frame, double-click or drag the video files will not play. 57 IP Camera User’sManual 6 Frequent asked question ◆ Fail to access the IP Camera through the browser Possible Cause : The network is disconnected Solution : Connect PC to network to test whether the network work normally . Firstly clear the cable fault and network fault caused virus till Ping the network between PCs successfully. Possible Cause : IP address is occupied by other equipment. Solution : Disconnect the IP camera and network ,and then connected camera to the PC solely . Also , reset the IP address according to appropriate recommended operations Possible Cause :IP address is located in different subnets Solution :Check the setting of IP address of IP camera , the address and getaway . Possible Cause :Uknown Solution : Restore the factory-set default by pressing the restore button behind the IP camera . ◆ Can not play Video after Program Updating Solution : Close all the browser ; search NetClient.dll、NetViewX.cab、NetViewX.ocx.file delete it . Then connect the IP camera by the browser again , the IP Camera will automatically display after install the plug-in again . ◆ Cannot Get Date Pass Through Switch impossible reason : Layer Switch , the address is written wrong ? 58 IP Camera User’sManual ◆ ◆ Three switches , The binding of port and physical address are done or not ? When configuring the firewall rule , whether take IP camera into account ? Solution: Before searching the network fault , please make sure to use the ping command in command mode to connect the IP address . To check the message returned from ping is very important step . If no message is returned , it indicates that some faults must exist in the network If the IP address and Mac address are bound , adding a new binding of IP address and Mac address of the IP camera within the exchanger is required inside switch。 Errors Occur After Updating Delete the buffer of the browser . The detailed steps are as follows : open the tool menu of browser to open the internet option ,and then click the " Delete File " button in the second item ( temporary file of Internet ) and check the " Delete All Offline Contents " . then confirm , and login the IP camera again . factory default network parameters: 59 IP Camera User’sManual parameter Default IP address subnet mask gateway Web port DDNS motion detection Probe alarm PPPOE WIFI 192.168.1.88 255.255.255.0 192.168.1.1 80 close close close not start close ◆ users and passward parameter user name/password administrator admin/admin use name ordinary users 1 user1/user1 ordinary users 2 user2/user2 ordinary users cannot set parameter 60 IP Camera User’sManual Thanks for using our network camera . If the appearance or function didn't in accordance with our handbook, which may be caused by the differentia between different models or update of system software, you can contact with our company anytime. We apologize for haven't informed you about these changes in time. 61