1
XT-LITE satellite phone
USER GUIDE
THURAYA {()
ENGLISH
DELITSCH
ESPAfilOL
ITALIANO
PORTUGU
PYCCKlllLil
Certification/Compliance/Waminty
Limitation of Liability
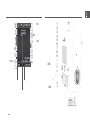
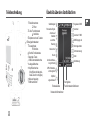
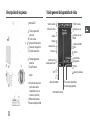
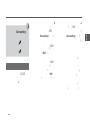
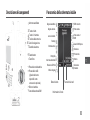
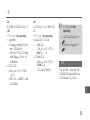
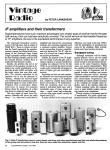
Parts Description
1.
2.
13.
14.
3. 6.
4. 7.
15.
9.
10.
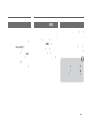
Overview of the Home Screen
1.
Satellite antenna
2.
3.
4.
5.
6.
7.
8.
9.
10.
11.
12.
13.
Receiver
Left soft key
Call key
Alphanumeric keypad
Navigation keys
Selection key
Microphone
Right soft key
End key
USB/Data cable jack
Charger jack
Earphone jack
(Earphones are
available as an
optional accessory)
Battery release
SIM card holder
5.
8.
11.
12.
14.
15.
Satellite signal
Weak signal. Point
satellite.
Roaming
Active call
Mute
Ciphering (call
Unread SMS
Voice mail
Voice mail + SMS
SMS inbox full
Silent
Schedule reminder
Alarm
Call divert
Receiving GPS-fix
Earphone connected
Status bar
Network information
Available soft key
functions
1
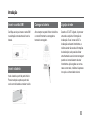
Getting Started
Inserting the SIM card
Charging the battery
Network connection
Make sure to insert the SIM card in the
shown direction before inserting the
battery.
Open the cover at the bottom of the
phone and firmly connect the charger to
the charger jack.
When the XT-LITE is powered on, the
phone will search for the network and
acquire location information. If the SAT
and location icons are lashing, the phone
is yet to receive the location information
and you will be able to make a call
or send a message once the lashing
stops. Upon successful registration to
the network, the phone will display the
country and the signal strength.
Inserting the battery
Insert the battery from the bottom end
first. Then push down the top end until
you hear it click in place.
Calls
Making a call
Swapping calls
To make a call, enter a phone number
using the keypad or choose a saved
contact and then press the Call key.
While receiving an incoming call during
an already active call, select Swap. This
will allow you to connect with up to 6
users.
Receiving a call
To receive a call, press the Call key or
any key on the keypad.
During a call
During a call, you can mute the call or put
the call on hold from the Options menu.
2
Note
During a conference call, you may
choose to speak with a user in private.
Select the user and go to Options >
Private, and then all other calls are put
on hold automatically.
Conference calls
1 During an active call, go to Options >
New call. The first call is automatically
put on hold.
2 Call the other user’s phone number.
3 To add the first user into the
conference call, go to Options >
Multiparty.
You can include up to 6 users in the
conference call by repeating steps
1 to 3.
3
Messaging
Features
Sending messages
SMS to email
Navigation
1 Go to Menu > Messages > New
message.
2 Enter the message.
3 Add the phone numbers of the
recipient(s).
4 Select Options > Send.
While writing a message, you can change
the sending format to email.
• Find your current coordinates
• Enter waypoints to navigate to a
specific position with the electronic
compass
• Geo reporting can be used to send
your coordinates to pre-defined
numbers via SMS. Follow Option A to
send only the coordinates and Option
B to send coordinates plus a userdefined message (see next page).
Tips
Press the key for symbol entry, the
# key for switching between number
and text, and Options > AutoText for
predictive text entry.
*
4
1 Select Options > Sending options >
Format > SMS to email.
2 Select Options > Send > enter an
email address > OK > enter an email
center number > Send.
Features
Option A
To send only the GPS coordinates (without
user-defined message):
Go to Menu > Navigation > Geo
reporting.
Option B
To send a user-defined message along
with the GPS coordinates:
Go to Menu > Navigation > Geo
reporting.
1 Enter recipient(s):
• Enter up to four recipients, one for
each of the empty slots.
• Select the slot, go to Options >
Add recipient, and choose to input
the number or select from contacts.
• Follow steps 1 and 2 from above.
• Turn on SOS message:
- Select any of the four slots and go
to Options > SOS message > On.
2 Set the interval:
• Select any of the four slots and go
to Options > Message intervals.
• Choose frequency of outgoing
messages (every 3 minutes to
every 2 hours).
• Set the SOS message:
- Select any of the four slots. and
go to Options > Setup SOS
message.
- Write the message and press the
Selection key to save.
How to activate and
deactivate Geo reporting:
• To activate from the home screen,
long press the right soft key
.
• To deactivate while in use, short
press the right soft key
.
Organizer
Use the Organizer of your XT-LITE for
a range of convenient features such as
setting alarms, scheduling appointments,
using the built-in calculator, stopwatch
and world time.
5
Call notification
Software Upgrades
Your Thuraya XT-LITE allows you to
receive a notification of an incoming call
even if your satellite signal is too weak to
receive the call itself. This is particularly
useful when the Thuraya XT-LITE is in
your pocket with the antenna stowed, and
only has a weak signal.
A software upgrade is only required
if Thuraya releases a newer software
version. Before performing an upgrade
please check your current software
version under Security > S/W version to
see if an upgrade is required.
1 Fully extend the antenna of your
Thuraya XT-LITE.
2 Ensure that you have direct line of
sight to the satellite.
3 As soon as the signal strength
is strong enough, the warning
disappears from the display. You
can now accept the call as usual by
pressing the Call key.
6
1 Download and install the latest XTLITE upgrader file from www.thuraya.
com.
2 Download the latest XT-LITE software
from www.thuraya.com.
3 Power on your Thuraya XT-LITE with
a fully charged battery.
4 Connect the PC and the Thuraya XTLITE using the USB cable.
5 Double click the XT-LITE upgrader
icon on the desktop and the program
will guide you through the upgrade
process.
How to connect the data cable for a
software upgrade:
Open the cover at the bottom of the
phone and firmly connect the USB cable
to the UDC jack.
Afterwards attach the other side of the
data cable to your PC.
Useful Tips
Maintaining your XT-LITE
Function
Operation
Keypad Lock/Unlock
Press and hold the # key to lock the keypad.
To unlock press the right soft key followed by the # key
within 3 seconds.
Adding Contacts
1. Enter a phone number and press the Selection key.
Or go to Contacts > Add contact.
2. Select the storing location (phone or SIM card) and
phone number information.
Silent Mode
Long pressing the
Normal mode.
Checking your current
location
Go to Menu > Navigation > Current position.
Changing text input
mode
Long press of the
Normal mode.
Changing languages
Go to Menu > 7.Settings > 3.Language.
Call logs
To see your recently called numbers press the Call key (or
go to Call logs).
key will switch between Silent and
key will switch between AutoText and
Your satellite phone needs to be in
optimal working condition when you need
it. To ensure your phone is prepared,
a regular Thuraya phone test provides
you with peace of mind that ensures
your satellite phone is working when it is
needed:
• Test your Thuraya phone regularly,
especially if you have not used it for
some time (dial the free number
11 11 2 from your XT-LITE to test if it
is working properly)
• Charge the XT-LITE's battery once a
month to have the phone ready when
you need it
• Check your subscription or credit
balance regularly
7
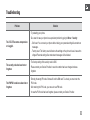
Troubleshooting
Problem
Solution
The XT-LITE cannot connect to the
network and ‘No Network’ is shown
on the screen.
• Try to update the SAT registration manually by going to Menu > Network > SAT
registration.
• Ensure the line of sight to the satellite is not obstructed by high buildings, trees, or mountains.
Location icon is lashing or the XTLITE shows ‘Position too old’.
• The XT-LITE's location information is being updated. This is done automatically once the
phone is powered on.
• Ensure the line of sight to the satellite is not obstructed by high buildings, trees, or mountains.
The XT-LITE shows ‘Insert SIM’.
8
•
•
•
•
Try to remove and reinsert the SIM card.
Check if the SIM card is dirty or damaged.
Entering a wrong PUK code may deactivate the SIM card.
When using a different SIM card (other than a Thuraya SIM card) in the XT-LITE while
abroad, roaming service must be enabled (please contact your Service Provider to check if
roaming is active).
Troubleshooting
Problem
Solution
The XT-LITE becomes unresponsive
or sluggish.
• Try restarting your phone.
• Do a reset in case your phone has a persistent problem by going to Menu > Security.
- Soft reset: You can reset your phone without losing your personal settings like contacts or
messages.
- Factory reset: The factory reset will restore the settings on the phone to be as it was when
shipped. Personal settings like contacts and messages will be deleted.
The security code has been lost or
forgotten.
• The factory setting of the security code is 0000.
• Please contact your Service Provider in case the number has been changed and was
forgotten.
The PIN/PUK codes have been lost or
forgotten.
• Entering the wrong PIN code 3 times will lock the SIM card. To unlock, you must enter the
PUK code.
• After entering the PUK code, you can set a new PIN code.
• In case the PUK code has been forgotten, please contact your Service Provider.
9
10
1
2
3
4
5
6
7
8
9
:
;
>
=
SMS
!
.
SMS
+
SMS
(
GPS-fix ?)L
)
USB
)
2
=
<
3
4
6
7
<
?
?
9
:
5
(
SIM
1
8
;
>
MIS
XT-LITE
.
.
?
SIM
.
.
.
)L
.
?
?
.
.
.
?
<
.
.
<
.
.
.
.
?
?
.
<
.
.
SMS
,
.
?
Geo reporting ?
?
""
<
.
SMS
<
.SMS
" "
.
<
<
.
<
<
.(
<
<
)
.
<
.
<
)?
.(
?
?
.
?
*
#
<
<
""
"•"
?
:GPS
:Geo reporting
.Geo reporting <
.
?
<
)
:(?
.Geo reporting <
.
.
< SOS
.SOS
?
<
.
<
:
-
?
.
.
)
.
<
:SOS
-
XT-LITE
<
:(
. )L
:SOS
-
)L
GPS
.
<
)
.(
)L
:
Thuraya XT-LITE
.
.UDC
Thuraya
USB
.
?
.
.
Thuraya XT-LITE
.
<
. ?
XT-LITE _
www.thuraya.com
XT-LITE _
.www.thuraya.com
Thuraya XT-LITE
.
Thuraya XT-LITE
.USB
?
XT-LITE
.
.
Thuraya XT-LITE
.
.
.
XT-LITE
.
?
)L
.
Thuraya
.
?
Thuraya
)
XT-LITE
( ?
XT-LITE
#
#
.
.
.
.
.
<
(SIM
)
.
.
.
<
<
?
.
.
)
. <
. <
?
.(
/
.SAT
<
<
SAT
"
XT-LITE
.
"
.
.
.XT-LITE
XT-LITE
."
.
.
XT-LITE
.(
.SIM
(Thuraya _
SIM
)L )
.
SIM
PUK
SIM
)
SIM
."SIM
?
"
XT-LITE
"
.
.
<
.
:
.
:
.
-
XT-LITE
.
.
.
.PUK
.SIM
)L
.
.
PIN
PIN
PUK
PUK
.
.PIN/PUK
edcba
Teilebeschreibung
1 Satellitenantenne
2 Hörer
3 Linke Funktionstaste
4 Anruftaste
5 Alphanumerische Tastatur
1
2
>
3
4
6
7
?
9
= 6 Navigationstasten
7 Auswahltaste
8 Mikrofon
9 Rechte Funktionstaste
: Beenden-Taste
; USB-/Datenkabelbuchse
< Ladegerätbuchse
= Kopfhörerbuchse
(Kopfhörer sind als optionales Zubehör verfügbar.)
> Akkuverriegelung
? SIM-Kartenfach
:
5
Überblick über den Startbildschirm
8
Satellitensignal
Schwaches Signal.
Antenne auf
Satelliten
ausrichten.
21
Voicemail + SMS
SMS-Eingang voll
Stummgeschaltet
Aktiver Anruf
Terminerinnerung
Stumm
Anrufverschlüsselung nicht aktiv
Alarm
Rufumleitung
GPS-Positionsbestimmung läuft
Kopfhörer
angeschlossen
Netzwerkinformationen
<
Voicemail
Roaming
Statusleiste
;
Ungelesene SMS
Verfügbare
Funktionstastenfunktionen
Erste Schritte
Einlegen der SIM-Karte
Auladen des Akkus
Netzwerkverbindung
Stellen Sie sicher, dass Sie die SIM-Karte in
der abgebildeten Richtung einsetzen, bevor
Sie den Akku einlegen.
Öffnen Sie die Abdeckung an der unteren
Seite des Telefons und schließen Sie das
Ladegerät an die Ladegerätbuchse an.
Wenn das XT-LITE eingeschaltet ist, sucht
das Telefon nach einem Netzwerk und ruft
Standortinformationen ab. Wenn die SATund Standortsymbole blinken, empfängt das
Telefon gerade die Standortinformationen.
Sie können einen Anruft tätigen oder eine
SMS versenden, sobald die Symbole nicht
mehr blinken. Wenn die Registrierung im
Netzwerk abgeschlossen ist, zeigt das Telefon das Land und die Signalstärke an.
Einlegen des Akkus
Legen Sie den Akku mit der unteren Seite
zuerst ein. Drücken Sie dann das obere
Ende nach unten, bis es hörbar einrastet.
1
Anrufe
Anruf tätigen
Wechseln von Anrufen
Um einen Anruf zu tätigen, geben Sie eine
Telefonnummer über die Tastatur ein oder
wählen Sie einen gespeicherten Kontakt
aus und drücken Sie dann die Anruftaste.
Wenn Sie während eines aktiven Anrufs
einen weiteren Anruf erhalten, wählen Sie
Wechseln. Sie können sich so mit bis zu 6
Benutzern verbinden.
Anruf annehmen
Konferenzgespräche
Um einen Anruf anzunehmen, drücken Sie
die Anruftaste oder eine andere Taste auf
der Tastatur.
1 Gehen Sie während eines aktiven
Anrufs zu Optionen > Neuer Anruf.
Der erste Anruf wird automatisch in die
Warteschleife verschoben.
2 Rufen Sie die Telefonnummer des
anderen Benutzers an.
3 Um den ersten Benutzer zum Konferenzgespräch hinzuzufügen, gehen Sie
zu Optionen > Mehrere Teilnehmer.
Sie können bis zu 6 Benutzer zu dem
Konferenzgespräch hinzufügen, indem
Sie die Schritte 1 bis 3 wiederholen.
Während eines Anrufs
Während eines Anrufs können Sie den
Anruf stummschalten oder über das Menü
Optionen in die Warteschleife verschieben.
23
Hinweis
Während eines Konferenzgesprächs
möchten Sie womöglich privat mit
einem Benutzer sprechen. Wählen
Sie den Benutzer aus und gehen Sie
zu Optionen > Privat. Alle anderen
Anrufe werden dann automatisch in
die Warteschleife verschoben.
3
Nachrichten
Funktionen
Versenden von Nachrichten
SMS zu E-Mail
Navigation
1 Gehen Sie zu Menü > Nachrichten >
Neue Nachricht.
2 Geben Sie die Nachricht ein.
3 Geben Sie die Telefonnummer(n) für
den/die Empfänger ein.
4 Wählen Sie Optionen > Senden.
Während Sie eine Nachricht schreiben,
können Sie als Sendeformat auch E-Mail
festlegen.
• Ermitteln Sie Ihre Koordinaten.
• Geben Sie Wegpunkte ein, um mit
dem elektronischen Kompass zu einer
bestimmten Position zu navigieren.
• Sie können Geo reporting verwenden,
um Ihre Koordinaten per SMS an
vordefinierte Nummern zu senden.
Verwenden Sie Option A, um nur die
Koordinaten zu senden, und Option
B, um die Koordinaten und eine
benutzerdefinierte Nachricht zu senden
(siehe nächste Seite).
Tipps
Drücken Sie die Taste für die
Symboleingabe, die Taste #, um
zwischen Zahlen und Buchstaben zu
wechseln, und Optionen > AutoText
für die Eingabe mit Texterkennung.
*
4
1 Wählen Sie Optionen > Sendeoptionen > Format > SMS zu E-Mail.
2 Wählen Sie Optionen > Senden >
E-Mailadresse eingeben > OK > E-MailCenternummer eingeben > Senden.
Funktionen
Option A
Um nur GPS-Koordinaten zu senden (ohne
benutzerdefinierte Nachricht):
Gehen Sie zu Menü > Navigation > Geo
reporting.
1 Nachrichtenempfanger eingeben:
• Geben Sie bis zu vier Empfänger ein,
einen in jedem leeren Feld.
• Wählen Sie das Feld, gehen Sie zu
Optionen > Empfänger hinzufügen
und geben Sie die Nummer ein oder
wählen Sie sie aus den Kontakten
aus.
2 Intervall festlegen:
• Wählen Sie eines der Felder aus und
gehen Sie zu Optionen > Nachrichtenint.
• Wählen Sie die Frequenz der ausgehenden Nachrichten (alle 3 Minuten
bis alle 2 Stunden).
Option B
Um eine benutzerdefinierte Nachricht mit
den GPS-Koordinaten zu senden:
Gehen Sie zu Menü > Navigation > Geo
reporting.
• Befolgen Sie die Schritte 1 und 2 oben.
• Notrufnachricht aktivieren:
- Wählen Sie eines der Felder aus und
gehen Sie zu Optionen > Notrufnachricht > Ein.
• Notrufnachricht festlegen:
- Wählen Sie eines der Felder aus und
gehen Sie zu Optionen > Notrufnachricht einrichten.
- Geben Sie die Nachricht ein und
drücken Sie zum Speichern die
Auswahltaste.
So aktivieren und deaktivieren Sie Geo reporting:
• Um die Aktivierung aus dem HomeBildschirm durchzuführen, halten
Sie die rechte Funktionstaste
gedrückt.
• Um die Deaktivierung während
der Verwendung durchzuführen,
drücken Sie kurz auf die rechte
Funktionstaste
.
Organizer
Verwenden Sie den Organizer des XT-LITE
für eine Reihe komfortabler Funktionen wie
das Festlegen von Alarmen und Terminen,
den integrierten Rechner, die Stoppuhr oder
die Weltzeit.
5
Anrufbenachrichtigung
Software-Upgrades
Mit Ihrem Thuraya XT-LITE können Sie eine
Benachrichtigung über einen eingehenden
Anruf erhalten, auch wenn das Satellitensignal zu schwach ist, um den Anruf
anzunehmen. Das ist sehr hilfreich, wenn
sich das Thuraya XT-LITE mit nicht ausgefahrener Antenne in Ihrer Tasche befindet
und das Signal schwach ist.
1 Ziehen Sie die Antenne des Thuraya
XT-LITE ganz heraus.
2 Stellen Sie sicher, dass Sie sich in
direkter Sichtlinie zu dem Satelliten
befinden.
3 Sobald das Signal stark genug ist, wird
die Warnung nicht mehr auf dem Display angezeigt. Sie können den Anruf
nun wie gehabt annehmen, indem Sie
die Anruf taste drücken.
Ein Software-Upgrade ist nur dann
verfügbar, wenn Thuraya eine neuere
Softwareversion veröffentlicht. Bevor Sie
ein Upgrade durchführen, überprüfen Sie
Ihre momentane Softwareversion unter
Sicherheit > SW-Version, um zu ermitteln,
ob ein Upgrade erforderlich ist.
1 Laden Sie die neue Upgrader-Datei für
XT-LITE von www.thuraya.com herunter
und installieren Sie sie.
2 Laden Sie die neue XT-LITE-Software
von www.thuraya.com herunter.
3 Schalten Sie das Thuraya XT-LITE ein,
der Akku sollte voll geladen sein.
4 Stellen Sie mit dem USB-Kabel eine
Verbindung zwischen dem PC und dem
Thuraya XT-LITE her.
5 Doppelklicken Sie auf dem Desktop auf
das Symbol für den XT-LITE-Upgrader.
Das Programm führt Sie durch den
Upgrade-Vorgang.
6
So schließen Sie das Datenkabel für
ein Software-Upgrade an:
Öffnen Sie die Abdeckung an der unteren
Seite des Telefons und schließen Sie das
Ladegerät sicher an die UDC-Buchse an.
Schließen Sie dann das andere Ende des
Kabels an den PC an.
Nützliche Tipps
Pflege des XT-LITE
Funktion
Vorgang
Tastatur
ent-/sperren
Halten Sie die Taste # gedrückt, um die Tastatur zu sperren.
Zum Entsperren drücken Sie innerhalb von drei Sekunden die
rechte Funktionstaste und die Taste #.
Hinzufügen von
Kontakten
1. Geben Sie eine Telefonnummer ein und drücken Sie die
Auswahltaste.
Oder gehen Sie zu Kontakte > Kontakt hinzufügen.
2. Wählen Sie den Speicherort (Telefon oder SIM-Karte)
und die Telefonnummerninformationen aus.
Stummmodus
Wenn Sie die Taste gedrückt halten, wechseln Sie zwischen
dem Modus Stumm und Normal.
Überprüfen der
aktuellen Position
Gehen Sie zu Menü > Navigation > Aktuelle Position.
Ändern der Texteingabemethode
Wenn Sie die Taste gedrückt halten, wechseln Sie zwischen
dem Modus AutoText und Normal.
Ändern der
Sprache
Gehen Sie zu Menü > 7.Einstellungen > 3.Sprache.
Anrufprotokolle
Um die zuletzt angerufenen Nummern anzuzeigen, drücken
Sie die Anruftaste (oder gehen Sie zu Anrufprotokolle).
Ihr Satellitentelefon muss sich in einem
optimalen Betriebszustand befinden,
wenn immer Sie es benötigen. Um sicherzustellen, dass Ihr Telefon betriebsbereit
ist, empfiehlt sich ein regelmal3iger Telefontest. Dies sorgt dafür, dass Ihr Telefon
funktioniert, wenn Sie es benotigen:
• Testen Sie Ihr Thuraya Telefon regelmäßig, besonders wenn Sie es einige
Zeit nicht verwendet haben (wählen
Sie die kostenlose Nummer 11 11 2
auf Ihrem XT-LITE, um zu überprüfen,
ob es korrekt funktioniert).
• Laden Sie den Akku des XT-LITE einmal pro Monat, um es betriebsbereit
zu halten.
• Überprüfen Sie regelmäßig die Freischaltung und Ihr Guthaben.
7
Fehlersuche und -behebung
Problem
Lösung
Das XT-LITE kann keine Netzwerkverbindung herstellen und "Kein Netz"
wird auf dem Bildschirm angezeigt.
• Versuchen Sie, die SAT-Registrierung manuell durchzuführen, und gehen Sie dafür zu Menü
> Netz > SAT-Registrierung.
• Achten Sie darauf, dass der Sichtkontakt zum Satelliten nicht durch hohe Gebäude, Bäume
oder Berge eingeschränkt ist.
Das Standortsymbol blinkt oder das
XT-LITE zeigt "Position too old" an.
• Die Standortinformationen des XT-LITE werden aktualisiert. Dies geschieht automatisch,
sobald Sie das Telefon einschalten.
• Achten Sie darauf, dass der Sichtkontakt zum Satelliten nicht durch hohe Gebäude, Bäume
oder Berge eingeschränkt ist.
Das XT-LITE zeigt "SIM einlegen".
8
•
•
•
•
Entnehmen Sie die SIM-Karte und setzen Sie sie wieder ein.
Prüfen Sie, ob die SIM-Karte verschmutzt oder beschädigt ist.
Wenn Sie einen falschen PUK-Code eingeben, wird die SIM-Karte deaktiviert.
Wenn Sie im Ausland eine andere SIM-Karte (keine SIM-Karte von Thuraya) für das XT-LITE
verwenden, muss Roaming aktiviert sein (informieren Sie sich bei Ihrem Service-Provider, ob
Roaming aktiviert ist).
Fehlersuche und -behebung
Problem
Lösung
Das XT-LITE reagiert langsam oder
gar nicht.
• Starten Sie das Telefon neu.
• Wenn das Problem weiterhin besteht, setzen Sie es zurück. Gehen Sie zu Menü > Sicherheit.
- Warmstart: Sie konnen Ihr Telefon zurOcksetzen, ohne dass dabei Ihre personlichen
Einstellungen wie Kontakte oder Nachrichten verloren gehen.
- ZurOcksetzen auf Werkseinstellungen: Beim ZurOcksetzen auf Werkseinstellungen werden
alle Telefoneinstellungen auf den Auslieferungszustand zurückgesetzt. Persönliche Einstellungen wie Kontakte oder Nachrichten gehen verloren.
Der Sicherheitscode ist verloren
gegangen oder wurde vergessen.
• Die Werkseinstellung des Sicherheitscodes ist 0000.
• Wenden Sie sich an Ihren Service-Provider falls die Nummer geändert und dann vergessen
wurde.
PIN-/PUK-Codes sind verloren
gegangen oder wurden vergessen.
• Wenn Sie den PIN-Code dreimal falsch eingeben, wird die SIM-Karte gesperrt. Zum Entsperren müssen Sie den PUK-Code eingeben.
• Nachdem Sie den PUK-Code eingegeben haben, können Sie einen neuen PIN-Code festlegen.
• Falls der PUK-Code vergessen wurde, wenden Sie sich an lhnen Service-Provider.
9
10
Descripción de las piezas
1
Visión general de la pantalla de inicio
1 Antena SAT
3 Tecla programable
izquierda
4 Tecla Llamar
= 5 Teclado alfanumérico
6 Teclas de navegación
7 Tecla de selección
2
9 Tecla programable
3
6
?
Mensaje de voz
satélite.
Roaming
Llamada activa
Silencioso
(codificaci6n de
lamada) desactivado
;
<
= Conector del auricular
(Auriculares están
disponibles como un
accesorio opcional)
> Salida de la batería
? Soporte de tarjeta SIM
Mensaje de voz +
SMS
Bandeja de SMS
llena
Silencio
Recordatorio
programado
Alarma
datos
8
11
SMS no leídos
GPS
:
5
derecha
: Tecla Finalizar
Señal de satélite
Señal débil. Dirija
Barra de estado
Información de red
Desvío de llamadas
Funciones disponibles
de tecla programable
Puesta en marcha
Inserción de la tarjeta SIM
Carga de la batería
Conexión de red
Asegúrese de introducir la tarjeta SIM en
la dirección indicada antes de insertar la
batería.
Abra la tapa de la parte inferior del
teléfono e inserte el conector del cargador
en el conector del teléfono.
Cuando su teléfono XT-LITE está
encendido, busca una red y adquiere
información de ubicación. Si los iconos
SAT y de ubicación parpadean, indican
que el teléfono todavía no dispone de
información de ubicación. Podrá realizar
llamadas o enviar mensajes cuando
dejen de parpadear. Cuando se haya
registrado correctamente en la red, el
teléfono mostrará el país y la intensidad
de la señal.
Inserción de la batería
Inserte la batería empezando por el
extremo inferior. Presione la parte
superior hasta que encaje en su sitio.
1
Llamadas
Realización de llamadas
Llamada en espera
Para realizar una llamada, introduzca
un número telefónico con el teclado
numérico o bien seleccione un contacto
guardado y presione la tecla Llamada.
Si recibe una nueva llamada entrante
mientras está en una llamada activa,
seleccione Cambiar. Podrá conectar
de esta manera con un máximo de 6
usuarios.
Recepción de llamadas
Para recibir una llamada, presione la
tecla Llamada o cualquier otra tecla del
teclado.
Al recibir una llamada
Podrá silenciar una llamada activa
o ponerla en espera desde el menú
Opciones.
13
Llamadas en conferencia
1 Durante una llamada activa, diríjase
a Opciones > Nueva llamada.
La primera llamada se pondrá
automáticamente en espera.
2 Llame al número telefónico del otro
usuario.
3 Para añadir al primer usuario a la
llamada en conferencia, diríjase a
Opciones > Multiparty.
Puede incluir hasta 6 usuarios en la
llamada en conferencia si repite los
pasos 1 a 3.
Nota
Si lo desea, puede hablar en privado
con un usuario durante una llamada
en conferencia. Seleccione el usuario
y diríjase a Opciones > Privado.
Las demás llamadas se pondrán en
espera automáticamente.
3
Mensajes
Funciones
Enviar mensajes
SMS a email
Navegación
1 Menú > Mensajes > Nuevo mensaje.
2 Escriba el mensaje.
3 Añada el número telefónico del
destinatario o destinatarios.
4 Opciones > Enviar.
Cuando escriba un mensaje, podrá
cambiar el formato de envío a email.
• Busque sus coordenadas actuales
• Introduzca puntos de avance para
navegar hasta una posición concreta
con la brújula electrónica.
• Puede enviar sus coordenadas por
SMS a numeros predefinidos mediante
Geo reporting. Siga la Opción A para
enviar únicamente las coordenadas
y la Opción B si desea enviar las
coordenadas con un mensaje definido
por el usuario (consultar página
siguiente).
Consejos
Presione la tecla para introducir
símbolos, # para alternar entre
números y texto, y Opciones >
Autotexto para escribir con texto
predictivo.
*
4
1 Opciones > Opciones de envío >
Formato > SMS a email.
2 Opciones > Enviar > escriba una
dirección de e-mail > OK > escriba un
número de centro de email > Enviar.
Funciones
Opción A
Para enviar únicamente las coordenadas
GPS (sin mensaje definido por el
usuario):
Menú > Navegación > Geo reporting.
1 Añada destinatario(s):
• Añada hasta cuatro destinatarios,
uno en cada entrada vacía.
• Seleccione la entrada y presione
en Opciones > Añ. destinat., y
elija si quiere introducir el número
o seleccionarlo en los contactos.
2 Defina el intervalo:
• Seleccione uno de los cuatro
espacios y presione en Opciones
> Intervalo mensajes.
• Escoja la frecuencia de los
mensajes salientes (entre 3
minutos y 2 horas).
Opción B
Para enviar un mensaje definido por el
usuario con las coordenadas GPS:
Menú > Navegación > Geo reporting.
• Siga los pasos 1 y 2 arriba indicados.
• Active el mensaje SOS:
- Seleccione uno de los cuatro
espacios y presione en Opciones
> Mensaje SOS > Activar.
• Defina el mensaje SOS:
- Seleccione uno de los cuatro
espacios y presione en Opciones
> Definir mensaje SOS.
- Escriba el mensaje y presione la
Tecla de selección para guardarlo.
Cómo activar y desactivar
Geo reporting:
• Puede activarlo en la pantalla de
inicio manteniendo presionada la
tecla programable izquierda
.
• Para desactivarlo mientras lo
está usando, presione la
tecla programable derecha .
Organizador
Utilice el Organizador de su XT-LITE para
una serie de prácticas funciones como
definir alarmas, programar citas, usar la
calculadora integrada, cronómetro y hora
mundial.
5
Alerta de llamada
Actualizaciones de software
Su Thuraya XT-LITE le permite recibir
notificaciones de llamadas entrantes
incluso cuando la señal del satélite es
demasiado débil para recibir llamadas.
Esta función resulta muy útil si lleva su
Thuraya XT-LITE en el bolsillo con la
antena recogida y la señal es muy débil.
Solo necesita aplicar actualizaciones de
software cuando Thuraya publique una
versión nueva del software. Antes de
proceder con la actualizaci6n, verifique la
versión actual del software en Seguridad
> Ver. s/w para comprobar si necesita
actualizar.
1 Extienda por completo la antena de su
Thuraya XT-LITE.
2 Compruebe que tenga una "línea de
visión" despejada hacia el satélite.
3 Cuando la intensidad de la señal sea
suficiente, desaparecera la alerta de
la pantalla. Entonces podrá aceptar
la llamada presionando la tecla
Llamada.
1 Descargue e instale la actualización
más reciente de XT-LITE en www.
thuraya.com.
2 Descargue el software más reciente
de XT-LITE en www.thuraya.com.
3 Encienda su Thuraya XT-LITE con la
batería completamente cargada.
4 Conecte su Thuraya XT-LITE al PC
mediante el cable USB.
5 Haga doble clic en el icono de la
actualización de XT-LITE situada en
el Escritorio y el programa le llevará
por el proceso de actualización.
6
Cómo conectar el cable de datos para
una actualización de software:
Abra la tapa de la parte inferior del
teléfono e inserte el conector del cable
USB al conector del teléfono.
Después, conecte el otro extremo del
cable de datos al PC.
Consejos prácticos
Mantenimiento de su XT-LITE
Función
Operación
Bloqueo/desbloqueo
de teclado
Mantenga presionada la tecla # para bloquear el teclado.
Para desbloquearlo, presione la tecla programable derecha y,
antes de 3 segundos, presione también la tecla #.
Añadir contactos
1. Introduzca un número de teléfono y presione la
Tecla de selección.
También puede hacerlo desde Contactos > Añ. cont.
2. Seleccione el lugar de almacenamiento (teléfono o
tarjeta SIM) y la información del número telefónico.
Modo Silencio
Mantenga presionada la tecla
modos Silencio y Normal.
Comprobar la
ubicación actual
Menú > Navegación > Posición actual.
Cambiar el modo de
entrada de texto
Mantenga presionada la tecla
modos Autotexto y Normal.
Cambiar idioma
Menú > 7.Ajustes > 3.Idioma.
Registros de llamadas
Para consultar las llamadas más recientes, presione la
tecla Llamada (o vaya a Registro de llamada).
para alternar entre los
para alternar entre los
Su teléfono por satélite debe estar en
óptimas condiciones de funcionamiento
para cuando lo necesite. Para garantizar
que el teléfono esté preparado, realice
una prueba telefónica estándar de
Thuraya para saber con certeza que su
teléfono por satélite funciona:
• Compruebe con regularidad su
teléfono Thuraya, en particular si
hace tiempo que no lo usa (teclee el
número gratuito 11 11 2 en su XTLITE para comprobar si funciona
correctamente).
• Cargue la batería de su XT-LITE una
vez al mes para que esté disponible
siempre que lo necesite.
• Revise su suscripción o saldo con
regularidad.
7
Solución de problemas
Problema
Solución
Mi XT-LITE no puede conectarse a la
red y en la pantalla se muestra ‘No
hay red’.
• Pruebe a actualizar manualmente el registro SAT a través de Menú > Red > Registro de
SAT.
• Asegurese de que la linea de visi6n con el satelite no se encuentre obstruida por edificios
elevados, árboles o montañas.
El icono de localización parpadea o
mi XT-LITE muestra ‘Pos. muy antig.’.
• La información de posición de su XT-LITE se está actualizando. Lo hace de manera
automática tras encender el teléfono.
• Asegurese de que la linea de visi6n con el satelite no se encuentre obstruida por edificios
elevados, árboles o montañas.
XT-LITE muestra el mensaje ‘Insertar
SIM’.
8
•
•
•
•
Pruebe a extraer y volver a colocar la tarjeta SIM.
Compruebe si la tarjeta SIM está sucia o dañada.
Si teclea un código PUK erróneo podría desactivar la tarjeta SIM.
Cuando use una tarjeta SIM distinta a su tarjeta SIM Thuraya con su XT-LITE en el
extranjero, deberá habilitar el servicio roaming (itinerancia). Consulte con su proveedor
de servicios si tiene el roaming activo.
Solución de problemas
Problema
Solución
XT-LITE no responde o se ralentiza.
• Pruebe a reiniciar el teléfono.
• Reinicie el teléfono si presenta un problema persistente a través de Menú > Seguridad.
- Soft reset o reinicio suave: puede reiniciar el telefono sin perder su configuraci6n personal,
como contactos o mensajes.
- Reinicio de fábrica: el reinicio de fábrica restaurará las opciones de fábrica del teléfono.
Perdera la configuraci6n personal, como contactos y mensajes.
He perdido u olvidado mi código de
seguridad.
• El código de seguridad predeterminado es 0000.
• Consulte con su proveedor de servicios si ha cambiado el número y lo ha olvidado.
He perdido u olvidado los códigos
PIN/PUK.
• Si escribe de manera errónea el código PIN 3 veces, se bloqueará la tarjeta SIM. Para
desbloquearla deberá introducir el código PUK.
• Despues de introducir el c6digo PUK podra definir un nuevo c6digo PIN.
• Si ha olvidado el código PUK, consulte con su proveedor de servicios.
9
10
1
2
3
4
5
6
7
8
9
:
;
>
=
SMS
.
.
SIM
SMS +
SMS
(
-
)
GPS-fix
/USB
)
2
=
<
3
4
6
7
<
?
?
9
:
5
(
)L
1
8
;
>
XT-LITE
)L
SAT
)L
.
?
.
?
.
.
?
.
.
.
.
.
<
.
.
?
.
<
?
.
.
.
.
.
<
.
.
SMS
<
.
Geo reporting
?
.
<
<
.
SMS
<
.
<
<
.
( )
.
.
?
<
SMS
.
.
*
A
?
)
#
<
B
.(
.
B
?
:GPS
Geo reporting <
<
:Geo reporting
.
.
.
:
A
?
) GPS
:(
.
Geo reporting <
:
<
( )
SOS ?
?
-
.
< SOS
.
<
.
:
<
.
SOS ?
?
-
:
<
.
XT-LITE
•
)L
?
SOS
? -
<
.
.
.
?
.(
)
HPA
:
?
.
?
UDC
.
.
.
.
?
Thuraya
?
.
<
?
XT-LITE
www.thuraya.com
.
XT-LITE
?
www.thuraya.com
Thuraya
(
) HPA
XT-LITE
?
USB
.
Thuraya XT-LITE
Thuraya XT-LITE
USB
XT-LITE
)L
.
Thuraya XT-LITE
.
:HPA
Thuraya XT-LITE
.
.
.
HPA
.
.
XT-LITE
?
?
.
.
Thuraya
?
:
Thuraya
.
#
#
.
•
.
.
)
)L
(
<
)
.
.
XT-LITE
.(
XT-LITE
.
?
.
<
<
.
.
. <
.(
. <
)
/
.
SAT
<
<
?
?
No"
SAT
XT-LITE
) "Network
(
.
.
?
.
XT-LITE
)L
XT-LITE
.
(
) "Position too old"
.
.
.
.
.
(Thuraya
.(
)
PUK
XT-LITE
)
(
.
) "Insert SIM"
XT-LITE
.
.
<
?
:?
XT-LITE
.
.
:
.
?
.
.
.
.
PUK
.
.
.
PUK
PUK
.
PIN/PUK
.
edcba
Description des pièces
1
2
>
3
4
6
7
?
9
:
5
8
;
21
<
Aperçu de l’écran d’accueil
1 Antenne satellite
2 Récepteur
3 Touche gauche
4 Touche d'appel
5 Clavier alphanumérique
= 6 Touches de navigation
7 Touche de sélection
8 Microphone
9 Touche droite
: Touche fin
; Prise USB/câble de
données
< Prise chargeur
= Prise pour écouteurs
(Les écouteurs sont
disponibles en tant
qu’accessoire optionnel)
> Ouverture cache batterie
? Support de carte SIM
Signal satellite
SMS non lu(s)
Signal faible.
Pointez l’antenne
en direction du
satellite.
Messagerie vocale
Itinérance
Boîte de réception
SMS pleine
Appel actif
Muet
Chiffrage (cryptage
de l'appel) désactivé
Réception des
coordonnées GPS
Écouteurs
connectés
Barre d'état
Informations réseau
Messagerie vocale
+ SMS
Silencieux
Rappel du planning
Alarme
Renvoi d'appel
Fonctions des touches
disponibles
Démarrage
Insertion de la carte SIM
Chargement de la batterie
Connexion réseau
Assurez-vous d'insérer la carte SIM dans
la direction indiquée avant de mettre la
batterie.
Ouvrez le couvercle situé dans la partie
inférieure du téléphone et raccordez
fermement le chargeur à la prise du
chargeur.
Lorsque le XT-LITE est allumé, le téléphone recherchera le réseau et obtiendra
les informations de localisation. Si le SAT
et les icônes de localisation clignotent, le
téléphone n'a pas encore reçu les informations de localisation. Vous ne serez en
mesure de passer un appel ou d'envoyer
un message que lorsque le clignotement
cesse. Une fois l'enregistrement sur le
réseau effectué avec succès, le téléphone affichera le pays et la puissance
du signal.
Insertion de la batterie
Insérez la batterie en commençant par la
partie inférieure. Poussez ensuite la partie
supérieure jusqu'à ce qu'elle s'enclenche.
1
Appels
Passer un appel
Permuter des appels
Pour passer un appel, saisissez le
numéro à l'aide du clavier ou choisissez
un contact enregistré puis appuyez sur la
touche Appel.
Lors de la réception d'un appel entrant
pendant un appel déjà actif, sélectionnez
Permuter. Cela vous permettra de vous
connecter jusqu'à 6 utilisateurs.
Recevoir un appel
Conférences téléphoniques
Pour recevoir un appel, appuyez sur la
touche Appel ou toute autre touche du
clavier.
1 Durant un appel actif, allez dans Options > Nouvel appel. Le premier appel
est automatiquement mis en attente.
2 Appelez le numéro de l'autre utilisateur.
3 Pour ajouter le premier utilisateur
à la conférence téléphonique, allez
dans Options > Conversation à
plusieurs.
Vous pouvez inclure jusqu'à six utilisateurs à la conférence téléphonique en
répétant les étapes 1 à 3.
Pendant un appel
Pendant un appel, vous pouvez mettre
l'appel en sourdine ou en attente à partir
du menu Options.
23
Remarque
Lors d'une conférence téléphonique,
vous pouvez choisir de parler à un
utilisateur en privé. Sélectionnez
l'utilisateur et allez dans Options
> Privé, tous les autres appels
sont alors mis automatiquement en
attente.
3
Messagerie
Fonctionnalités
Envoyer des messages
SMS vers email
Navigation
1 Allez dans Menu > Messages >
Nouveau message.
2 Saisissez le message.
3 Ajoutez les numéros de téléphone du
ou des destinataires.
4 Sélectionnez Options > Envoyer.
Lors de la rédaction d'un message, vous
pouvez modifier le format d'envoi sur
« e-mail ».
• Trouvez vos coordonnées actuelles
• Saisissez les repères pour naviguer
vers une position specifique a l'aide du
compas électronique.
• Geo reporting peut être utilisé pour
envoyer vos coordonnées à des
numeros predefinis via SMS. Suivez
l'option A pour envoyer uniquement
les coordonnées et l'option B pour
envoyer les coordonnées ainsi qu'un
message defini par l'utilisateur (se
référer à la page suivante).
Astuces
Appuyez sur la touche pour la
saisie de symboles, la touche # pour
basculer entre les chiffres et le texte
et Options > TexteAuto pour la
saisie intuitive.
*
4
1 Sélectionnez Options > Options
d'envoi > Format > SMS vers email.
2 Sélectionner Options > Envoyer >
Saisir une adresse e-mail > OK >
Saisir un numéro de centre e-mail >
Envoyer.
Fonctionnalités
Option A
Pour envoyer uniquement les coordonnees GPS (sans le message defini par
l'utilisateur) :
Allez dans Menu > Navigation > Geo
reporting.
1 Saisissez le ou les destinataires :
• Saisissez jusqu'à quatre destinataires, un pour chacun des
emplacements libres.
• Sélectionnez l'emplacement, allez
dans Options > Ajouter un destinataire et choisissez la saisie du numéro
ou la sélection parmi les contacts.
2 Definissez l'intervalle :
• Sélectionnez l'un des quatre emplacements et allez dans Options >
Intervalles des messages.
• Choisissez la fréquence des messages sortants (de toutes les trois
minutes à toutes les deux heures)
Option B
Pour envoyer un message defini par l'utilisateur ainsi que les coordonnées GPS :
Allez dans Menu > Navigation > Geo
reporting.
• Suivez les étapes 1 et 2 ci-dessus.
• Activez le message SOS :
- Sélectionnez l'un des quatre emplacements et allez dans Options
> Message SOS > Activé.
• Definissez le message SOS :
- Sélectionnez l'un des quatre emplacements et allez dans Options
> Message SOS.
- Rédigez le message et appuyez
sur la Touche de sélection pour
enregistrer.
Comment activer et
désactiver Geo reporting :
• Pour l'activer à partir de l'écran
d'accueil, appuyez longuement sur
la touche droite
.
• Pour le désactiver en cours d'utilisation, appuyez brièvement sur la
touche droite
.
Organisateur
Utilisez l'organisateur de votre XT-LITE
pour tout un ensemble de fonctionnalités
pratiques comme le réglage d'alarmes, la
planification des rendez-vous, l'utilisation
de la calculatrice intégrée, du chronomètre ainsi que de l'horloge mondiale.
5
Notification d’appel
Mises à jour logicielles
Votre Thuraya XT-LITE vous permet de
recevoir une notification d'appel entrant
même si votre signal satellite est trop
faible pour recevoir l’appel. Elle s'avère
particulièrement utile lorsque le Thuraya
XT-LITE est dans votre poche avec
l'antenne rangée et que seul un signal
faible est détecté.
1 Déployez entièrement l'antenne de
votre Thuraya XT-LITE.
2 Assurez-vous que vous êtes dans le
champ visuel direct d'un satellite.
3 Dès que la puissance du signal est
suffisamment elevee, l'avertissement
disparaît de l'écran. Vous pouvez
désormais accepter l'appel comme
d'habitude en appuyant sur la touche
Appel.
Une mise à jour logicielle est uniquement
nécessaire dans le cas de la sortie par
Thuraya d'une nouvelle version logicielle.
Avant de réaliser une mise à jour, veuillez
verifier la version de votre logiciel actuel
dans Sécurité > Version du logiciel
pour voir si une mise à jour est requise.
6
1 Telechargez et installez le fichier de
mise à jour XT-LITE le plus récent sur
www.thuraya.com
2 Téléchargez le logiciel XT-LITE le plus
récent sur www.thuraya.com
3 Allumez votre Thuraya XT-LITE avec
une batterie pleinement chargée.
4 Raccordez le PC et le Thuraya XTLITE au moyen d'un câble USB.
5 Faites un double-clic sur l'icône de
mise à jour XT-LITE sur le bureau et
le programme vous guidera à travers
la phase de mise à jour.
Comment raccorder le câble de données pour une mise à jour logicielle :
Ouvrez le couvercle situé dans la partie
inférieure du téléphone et raccordez
fermement le câble USB à la prise UDC.
Branchez ensuite l'autre extrémité du
câble de données sur votre PC.
Conseils pratiques
Entretenir votre XT-LITE
Fonction
Utilisation
Verrouillage du clavier/déverrouillage
Appuyez et maintenez enfoncée la touche # pour verrouiller le
clavier.
Pour déverrouiller, appuyez sur la touche droite suivie de la
touche # dans les 3 secondes.
Ajouter le Contact
1. Saisissez un numéro de téléphone et appuyez sur
la Touche de sélection.
Ou allez dans Contacts > Ajouter le Contact.
2. Sélectionnez l'emplacement de stockage (téléphone
ou carte SIM) et le numéro de téléphone.
Mode silencieux
Appuyez longuement sur la touche permet de basculer entre
le mode Silencieux et le mode Normal.
Verifier votre localisation actuelle
Allez dans Menu > Navigation > Position actuelle.
Changer le mode
de saisie du texte
Appuyer longuement sur la touche
TexteAuto et le mode Normal.
Changer les
langues
Allez dans Menu > 7.Paramètres > 3.Langue.
Journal d'appels
Pour consulter les numéros récemment appelés, appuyez sur
la touche Appel (ou allez dans Journal d'appels).
basculera entre le mode
Votre téléphone par satellite nécessite
d'être en parfait état de fonctionnement
lorsque vous en avez besoin. Pour
s'assurer que votre téléphone est prêt
à l'emploi, un test régulier du téléphone
Thuraya est nécessaire. Il vous permet
d'avoir l'esprit tranquille et la certitude que
votre téléphone par satellite fonctionne
lorsque vous en avez besoin :
• Testez régulièrement votre téléphone
Thuraya, en particulier si vous ne
l'avez pas utilisé pendant un certain
temps (composez le numéro gratuit
11 11 2 à partir de votre XT-LITE pour
tester s'il fonctionne correctement)
• Rechargez la batterie XT-LITE une
fois par mois pour avoir un téléphone
prêt à l'emploi.
• Verifiez regulierement votre abonnement ou solde créditeur.
7
Dépannage
Problème
Solution
Le XT-LITE ne peut pas être connecté
au réseau et « Aucun réseau »
s'affiche a l'ecran.
• Essayez de mettre à jour l'enregistrement SAT manuellement en allant dans Menu > Réseau
> Enregistrement SAT.
• Verifier que la ligne de visee vers le satellite n'est pas bloquee par de grands immeubles,
des arbres ou des montagnes.
L'icône de localisation clignote ou
le XT-LITE affiche « Position trop
ancienne ».
• Les informations de localisation du XT-LITE sont en train d'être mises à jour. L'opération
s'effectue automatiquement une fois que le téléphone est allumé.
• Verifier que la ligne de visee vers le satellite n'est pas bloquee par de grands immeubles,
des arbres ou des montagnes.
Le XT-LITE affiche « Inserer SIM ».
8
•
•
•
•
Essayez de retirer et de remettre la carte SIM.
Verifiez si la carte SIM est sale ou endommagee.
La saisie d'un code PUK incorrect peut désactiver la carte SIM.
Lorsque vous utilisez une carte SIM différente (autre qu'une carte SIM Thuraya) dans le XTLITE quand vous êtes à l'étranger, le service d'itinérance doit être activé (veuillez contacter
votre prestataire de service pour verifier si l'itinerance est active).
Dépannage
Problème
Solution
Le XT-LITE ne répond plus ou
connaît des lenteurs.
• Essayez de redémarrer votre téléphone.
• Réinitialisez votre téléphone au cas où celui-ci rencontre un problème persistant en allant
dans Menu > Sécurité.
- Réinitialisation logicielle : Vous pouvez réinitialiser votre téléphone sans perdre vos
para- mètres personnels tels que les contacts ou les messages.
- Réinitialisation aux réglages d'usine : La réinitialisation aux réglages d'usine rétablira les
paramètres du téléphone tels qu'ils étaient lors de son expédition. Les paramètres personnels tels que les contacts et les messages seront effacés.
Le code de sécurité a été perdu ou
oublié.
• Le paramètre d'usine du code de sécurité est 0000.
• Veuillez contacter votre prestataire de service au cas où le numéro a été changé et que
celui-ci a été oublié.
Les codes PIN/PUK ont été perdus
ou oubliés.
• La saisie à trois reprises d'un code PIN incorrect verrouillera la carte SIM. Pour la déverrouiller, vous devez saisir le code PUK.
• Apres avoir saisi le code PUK, vous pouvez definir un nouveau code PIN.
• Au cas où le code PUK a été oublié, veuillez contacter votre prestataire de service.
9
10
*t =
Oiitlilr
o o""'
o•Ftt
Olii!.""9'. l.111' "
o
O'flllil' pt
o
o P
w...,,, oe
-i;i D
GPS-fixlllll- ?
SMS
1'tr
1'fr+SMS
fR
SMS JR"'1'1!
$111'ilif
iji)Jif,m j;;ft
GI USB I iTZI'
Gh
I!'!]
.
lllil
3lilRt
l+ ffir !!lllilt
;\tcJ;
ID'fl13R
IDR
-1'1! # ,
1 !1 5
mh3
'°SIM
ililt flroli
a
SIM d llililT
'llr.1' f.tfr.t
ill't
!.
lR
...,.
J!R
q\11X'f-LITE ll>'l' <11iJ. fll;irr ;.;irar t ffi,
;Jlij;
'llr.'!
r.N
•
l
illl'
t.
SAT J!R
'llr.1' a 3l1lt
ililil>
t ;:ft",
•;;n;mrtr '!Ill!' l!liVIT
ilJiflt t J!R l;!ili" '"' """ WlifiilT ""
cit 3lr<r cli1or
it J!R 00!
it
IR
;;n9" IR, 'llr.1'
J!R fv.r.r
;,;irar
tdt ill't
!ll;t .rl°t
lil; 3lr<r
if WI' "#.
f.tfr.t fcliillt
a
Slit.
;;!ll
lR
!\tilili illt 3ll<1Nr
illt
ill't
-
El
II
SMS *°
'
m> m> 11t m.
l
.
.I 'lllHififfi (lit) ij;f 1l>'lir
.. ¥
fl;
*" *·
r
vctPlr llfllft
¥ hPl' >
1IAl'I' > SMS
hi['I' > t#.
o...
l11tr.r
lltll
row * pilil1V.
_. 3'R
lfttr ftilwr lll{;Ur
row I .p't. 3'R "-° > AutaTllld
ll;Rlll
.
31TQ'
il;" m;qif>t
.
*"
l
*'hPI' >
t th'.
lllt hi'f > t# >
> ,.,., t >
.t > tt.
•
i,t.
'lrcbn;r
•
Iii l!l1f l!lli fltftnr
llirow
<li row
.t.
• SMS "" "'1\:1131'
'R"
JnW
* \*
Iii
row Gao
111porUng'llll'
flli'lr oir
i
<li row
Q' 'llll' 'Cllilil' lilt l!R
ITU
'l.ll' W>
'Cllilil' .
<li Rlll'
(llmt
*'llll'
""-'"
v
$ !illr
<Rir'GPS
mr
>
GPS
=
(31f) di!i't:
'IR"
2
•
"' **lil r
l'l"lli dlll't.
•w
"!lit.
thii"1 >
'R;ni
.·
1illl iiiR ¥ ii1<1'1hU
"flllil° lll't.
Jitlmr
lR:
• <IR"
# *N- w
"llit
llk hPr > ""l'R;ni >
•
Jicmw.
URT
fll" !illr:
> r.ritt ftltll'bl" > Geo
> Geo
r9p0rtln9.
J
ril!i $
mr
19portlng.
• 3itR 'iR"T ,•2 iii! llTilif
*
i!i't.
• SOS mT "ilr.l,i!i't:
. "'l" l"lr.l't # "*
w
ii;t
Jlk hPl" > SOS >
""lq{ ;;rrri.
• sos mr m- ilit:
. "'l" l"lr.l't # *
w
i!i't.Jlk """"'" > ft3l'I" 808
- 00..
llr lillr llk
lillr 1Plir jafl"
.
am "'* mll 2 Eit "°
-3
· ¥-
II
n
lr.jilfcl aar t;"
wr
r.w
t!I' JINlliT 3'l:l1ll"
111\'or wr
Thuraya XT·LITE
Cli'fer <lll"
ll<li
<IJ!t
-.q,
illt
·Qlll"
1 www.thuraya.com
LI
TE 'l!illfl
imrar i-.
t >II i!f >If
*
-
.
ilit
2 www.thuraya.com
· it .
3* · *
r.i. l!Tll'
2
mi- tt .
'1Tl>lil' mt. .JR llTll'
j;;lt
f.
J ipi;
iflt br
*
ilffi;r f<llil;R
illf.11!'
>SM
Thuraya XT-l..ITE ill ttlilr
""' *
•fff
*
$ f.W
t.>If
*
CliJ 3'Q$lt t;" ;;fi!Thuraya XT-UTE lRlliflt
;;liJ 11" 311.- 3Wlil' iitlilr il1R f.liliOIT t;,
1
t;
;;ii!Thiey&Q<li"
illt ;;llilili{ '#.
* if-CTtilClif
""' "' 'ilr.\t
XT·
·
XT-LITE
tat ill
Thuraya XT LITE
""l<R.
.. USB
ilil
i1AAf pc31!.
ThurayaXT-LITE
5
mm'Qt XT-LITEupgrader
ilit 311.<!ll" ll1lli>l! $111Q11r 1'°
'1' POI
llTll'ilil
ilitm.
...-th --
aw 'IMlw film
'lili! r...ra ftlt "' llttR w 1't# •
usellnli!" lll)'uoc ill
*
!.
....
I
-....
-$HN t
pr ?;1l11t 3l'lt
1'r HN ;:i>!'t
1. 1!11i m oilR
3 - lfl<R • <ll't
.rt.
plflt•"T&"
•
-
P'
-
Ill"
q;');J <ll't $1C!if llilil"
illt
il
HN
't
lil>lf.ller
t-
31111i!'iT q;');J
3f1q$ 3'Rli'i
-* · Thuraya
mllfl"'1r
"1t.
'I'!
>
'R lllli
2. il'iT ?IJif
illt
* <ll't
vitR •
mW
*<IM
•9"11t t
""f.
'I'! SIM
il'i!
om) •m <toR:
-
tlllf
<l:I"
• lil>lf.ller
lll'IT 'QWllT
'lh<lh
> 'R <Di.
> 'dJn;r
1111 2
• Jmtt
Long press of the* klly will switch between AutoText and
*·
ill m 111;1r mr .mt Ill!'
('IT•.,;q lR ;;mi).
f!ri'l'T
•
"1t llfl"'1r
XT-LITE
lilt <toR:
-
m
•
* HN
XT-LITE>llt
•1IM it Qqo; ilR
Wit-
• lil>lf.ller
'I'! llsfR:
> 7>3.lll'IT 'R i.
3INll; (RT ""
3l1R
-
HN
•;i;;;lt illt
l
Thurayamil'iT
trtlUUT <lit.
JU
*
t (llf
-·
lITT-f
.pqnJIR
Wt-
"'1111" •
3lltlilit
*" HN
<lit.
Jmft
;;ri"tt.
a
6'41<(01
I
a
• XT-LITE -
t
•
l
XT-UTE bm '81110 D.
lllt ,_
3'1R
1111' ;;ir
tit •
3ift
• SIM>m" W
'jil':
<l\'l"
•
!ll;"
SIMq;d;
• 1!i1i '1JiffiPUKill'ls
*SIM
•
t. 1llll" 1IR"
;;ncrr t.
.
.
- 'fr.l \II' ;;im tR" 1lt:
*
- '1ftltr
*·
l!ft.
cit ilt.'t t.
t.
m
1t XT-LITE 1t 1!i1i 31iP1 SIM -.;It (Thuraya SIM im- - JlillllT J'"') ii;r
• llilT ij;f
""1l(')f.IPr mll;lr fol; i!tl
;l; !ill!'
*
.
qj<(Uj
...11\'t
.
•
-
t
lt1rJ t • lljill
JIQift
'IT
t <It *l >
3lllr$ ...1l iP11<'IR"
fl&
ill{
PIN/ PUKU Wt
-
fl&: 3ITtl <iti>it
'-
l);;ir 'l'IT tlT
• 3 ilR" m;r.r PINil>'l5
fl& ...
:re
illt lmr
SIM i1iJt
;;mrnr
· m· - 31Tt! t.<It •h
PUK"llft!;
•
ftirr
"!It
Jl1!ill PUK$'@' 'IV
...illt
lilt -Iii\".
illt ;rpor "lfi\>rr ;;iv 'll'ln 3ITtlillt
3lk
d i!AA
lll't.
lll:l<IT
i!AA
t lift.
;;mmr.
f;ro, 3ITtlillt
Descrizione dei componenti
1
1 Antenna satellitare
3 Tasto sinistro
4 Tasto di chiamata
5 Tastiera alfanumerica
= 6 Tasti di navigazione
7 Tasto di selezione
2
>
3
4
6
7
?
9
< Presa del caricabatteria
= Presa delle cuffie
(gli auricolari sono
disponibili come
accessorio opzionale)
> Sblocco batteria
? Vano della scheda SIM
:
5
9 Tasto destro
: Tasto fine
8
;
Panoramica della schermata iniziale
Segnale satellitare
SMS non letto
Segnale debole.
Posta vocale
verso il satellite.
Posta vocale +
SMS
Roaming
Casella SMS piena
Chiamata attiva
Silenzioso
Promemoria
Crittografia
chiamate disattivata
Allarme
Ricezione GPS-fix
Deviazione
chiamata
Cuffia collegata
Barra di stato
Funzioni dei tasti
Informazioni di rete
<
1
Informazioni preliminari
Inserimento della scheda SIM
Ricarica della batteria
Connessione di rete
Inserire la scheda SIM nel senso indicato
prima di inserire la batteria.
Aprire il coperchio inferiore del telefono
e collegare saldamente il caricatore alla
relativa presa.
Quando si accende XT-LITE, il telefono
esegue una ricerca della rete e acquisisce
informazioni sulla posizione. Se le icone
SAT e posizione lampeggiano, il telefono
non ha ancora ricevuto informazioni sulla
posizione, per cui è possibile effettuare
una chiamata o inviare un messaggio
solo quando non lampeggiano più. Una
volta eseguita la registrazione nella rete,
il telefono visualizza il paese e l'intensità
del segnale.
Inserimento della batteria
Inserire la batteria dalla parte inferiore.
Spingere la parte superiore fino a sentire
uno scatto che indica che la batteria è in
posizione.
2
Chiamate
Esecuzione di una chiamata
Condivisione della chiamata
Per effettuare una chiamata, digitare
un numero telefonico con la tastiera o
scegliere un contatto salvato e premere il
tasto di Chiamata.
Quando si riceve una nuova chiamata
durante una chiamata in corso, selezionare Condividi. In tal modo è possibile
collegare fino a 6 utenti.
Ricezione di una chiamata
Conferenza telefonica
Per ricevere una chiamata, premere il
tasto di Chiamata o un tasto qualunque
sulla tastiera.
1 Durante una chiamata in corso, accedere a Opzioni > Nuova chiamata.
La prima chiamata viene collocata
automaticamente in attesa.
2 Chiamare un altro numero telefonico.
3 Per aggiungere il primo utente alla
conferenza telefonica, accedere a
Opzioni > Chiamata multipla.
Ripetendo i passi da 1 a 3, in una
conferenza telefonica è possibile
includere fino a 6 utenti.
Durante una chiamata
Durante una chiamata è possibile non
far sentire la propria voce o mettere la
chiamata in attesa dal menu Opzioni.
Nota
Durante una conferenza telefonica, è
possibile parlare con un utente in privato. Selezionare l’utente e accedere
a Opzioni > Privato; in tal modo,
tutte le altre chiamate vengono collocate automaticamente in attesa.
3
Messaggi
Caratteristiche
Invio di messaggi
Da SMS a e-mail
Navigazione
1 Accedere a Menu > Messaggi >
Nuovo messaggio.
2 Inserire il messaggio.
3 Aggiungere i numeri di telefono dei
destinatari.
4 Selezionare Opzioni > Invio.
Mentre si scrive un messaggio è possibile
trasformarlo in formato email.
• Individuazione delle coordinate correnti
• Inserire i waypoint per navigare fino a
una localita specifica con la bussola
elettronica
• Per inviare le proprie coordinate
tramite SMS a numeri predefiniti,
utilizzare Geo reporting. L'opzione A
consente di inviare solo le coordinate,
mentre l'opzione B consente di inviare
le coordinate e un messaggio definito
dall'utente (v. pag. successiva).
Suggerimenti
Premere il tasto per inserire simboli, il tasto # per passare dal numero
al testo e viceversa, e Opzioni >
AutoText per l’immissione predittiva
di testo.
*
4
1 Selezionare Opzioni > Opzioni di
invio > Formato > Da SMS a e-mail.
2 Selezionare Opzioni > Invio > inserire
un indirizzo email > OK > inserire un
numero centro email > Invio.
Caratteristiche
Opzione A
Per inviare solo le coordinate GPS (senza
un messaggio definito dall'utente):
Accedere a Menu > Navigazione > Geo
reporting.
Opzione B
Per inviare un messaggio definito dall'utente assieme alle coordinate GPS:
Accedere a Menu > Navigazione > Geo
reporting.
1 Digitare i destinatari:
• Digitare fino a quattro destinatari,
uno per ogni spazio vuoto.
• Selezionare lo spazio, accedere a
Opzioni > Aggiungi destinatario
e digitare il numero, o selezionarlo
dai contatti.
• Seguire i passi 1 e 2 precedenti.
• Attivare il messaggio SOS:
- Selezionare uno dei quattro vani e
accedere a Opzioni > Messaggio
SOS > Attivo.
• Impostare il messaggio SOS:
- Selezionare uno dei quattro vani e
accedere a Opzioni > Messaggio
SOS.
- Scrivere il messaggio e premere il
tasto di selezione per salvarlo.
2 Impostare l'intervallo:
• Selezionare uno dei quattro spazi
e accedere a Opzioni > Intervalli
messaggi.
• Scegliere la frequenza dei messaggi in uscita (da 3 minuti a 2 ore).
Come attivare e disattivare
Geo reporting:
• Per attivarlo dalla schermata iniziale, premere a lungo il tasto destro
.
• Per disattivarlo quando è utilizzato,
premere brevemente il tasto destro
.
Organizer
L'Organizer del telefono XT-LITE comprende varie comode funzioni, ad esempio impostazione di allarmi, pianificazione
di appuntamenti, calcolatrice, cronometro
e ora mondiale.
5
Notifica di chiamata
Aggiornamenti del software
Notifica di chiamata e una funzione del
telefono Thuraya XT-LITE che consente
di ricevere una notifica di una chiamata
in arrivo se il segnale satellitare è troppo
debole per poter ricevere la chiamata.
Questa funzione è particolarmente utile
quando il telefono Thuraya XT-LITE viene
tenuto in tasca con l'antenna ritratta, per cui
il segnale è debole.
L’aggiornamento del software è necessario solo quando Thuraya rilascia una
nuova versione del software. Prima di
eseguire un aggiornamento, controllare
la versione corrente del software in Sicurezza > Versione S/W per scoprire se è
necessario un aggiornamento.
1 Scaricare e installare il programma di
aggiornamento XT-LITE più recente
dal sito www.thuraya.com.
2 Scaricare il software XT-LITE più
recente dal sito www.thuraya.com.
3 Accendere il telefono Thuraya XTLITE con la batteria totalmente carica.
4 Collegare il telefono Thuraya XT-LITE
al PC tramite il cavo USB.
5 Fare doppio clic sull'icona del programma di aggiornamento XT-LITE
sul desktop; il programma fornirà
le istruzioni in tutto il processo di
aggiornamento.
1 Estendere tutta l'antenna del telefono
Thuraya XT-LITE.
2 Orientare il telefono verso il satellite
senza ostacoli frapposti.
3 Non appena l’intensità del segnale
e sufficiente, l'avviso ad alta penetrazione scompare dal display. A
questo punto è possibile accettare
normalmente la chiamata premendo il
tasto di Chiamata.
6
Come collegare il cavo dati per un
aggiornamento del software:
Aprire il coperchio inferiore del telefono
e collegare saldamente il cavo USB alla
presa UDC.
Collegare l'altra estremità del cavo al PC.
Suggerimenti utili
Manutenzione del telefono XT-LITE
Funzione
Funzionamento
Blocco/sblocco
tastiera
Tenere premuto il tasto # per bloccare la tastiera.
Per sbloccarla, premere il tasto destro e quindi il tasto #
entro 3 secondi.
Aggiunta di contatti
1. Inserire un numero di telefono e premere il tasto di
selezione.
In alternativa, accedere a Contatti > Aggiungi contatto.
2. Selezionare la posizione di memorizzazione (telefono o
scheda SIM) e le informazioni sul numero di telefono.
Modalità Silenzioso
Premere a lungo il tasto per passare dalla modalità
Normale alla modalità Silenzioso e viceversa.
Controllo della
posizione corrente
Accedere a Menu > Navigazione > Posizione corrente.
Modifica della modalita
di immissione testo
Premere a lungo il tasto per passare dalla modalità
Normale alla modalità AutoText e viceversa.
Modifica della lingua
Accedere a Menu > 7.Impostazioni > 3.Lingua.
Registro chiamate
Per controllare i numeri chiamati recentemente, premere il
tasto di Chiamata (o accedere al Registro chiamate).
Le condizioni di funzionamento del
telefono satellitare devono essere ottimali
quando è necessario utilizzarlo. Per mantenerlo in buone condizioni, effettuare
regolarmente il test del telefono Thuraya
per accertarsi che il telefono satellitare
funzioni perfettamente quando occorre
utilizzarlo:
• Eseguire regolarmente il test del
telefono Thuraya, specialmente se
non è stato utilizzato per lungo tempo
(comporre il numero gratuito
11 11 2 dal telefono XT-LITE per
controllare se funziona correttamente)
• Caricare la batteria del telefono XTLITE una volta al mese in modo che
il telefono sia sempre pronto quando
occorre utilizzarlo
• Controllare regolarmente lo stato dell'abbonamento e il credito disponibile
7
Guida alla risoluzione dei problemi
Problema
Soluzione
Il telefono XT-LITE non si collega
alla rete e sullo schermo appare il
messaggio ‘Nessuna rete’.
• Provare ad aggiornare manualmente la registrazione SAT accedendo a Menu > Rete >
Registrazione SAT.
• Assicurarsi che la linea diretta di collegamento con il satellite non sia ostruita da edifici alti,
alberi alti o montagne.
L'icona della posizione lampeggia o
il telefono XT-LITE visualizza il
messaggio ‘Posizione troppo
vecchia’.
• Le informazioni sulla posizione del telefono XT-LITE vengono aggiornate. L'operazione
avviene automaticamente all'accensione del telefono.
• Assicurarsi che la linea diretta di collegamento con il satellite non sia ostruita da edifici alti,
alberi alti o montagne.
Il telefono XT-LITE visualizza il
messaggio ‘Inserire SIM’.
•
•
•
•
8
Provare a rimuovere e reinserire la scheda SIM.
Accertarsi che la scheda SIM non sia sporca o danneggiata.
Se si immette un codice PUK errato, la scheda SIM potrebbe disattivarsi.
Quando si utilizza all'estero una scheda SIM diversa (non Thuraya) nel telefono XT-LITE, è
necessario abilitare il servizio di roaming (per controllare se il roaming è attivo, rivolgersi al
fornitore del servizio).
Guida alla risoluzione dei problemi
Problema
Soluzione
Il telefono XT-LITE è lento o non
risponde.
• Provare a riavviare il telefono.
• Se il problema non si risolve, effettuare un ripristino accedendo a Menu > Sicurezza.
- Ripristino morbido: questo tipo di ripristino non elimina le impostazioni personali, ad
esempio contatti o messaggi.
- Ripristino delle impostazioni di fabbrica: questo tipo di ripristino azzera le impostazioni del
telefono a quando è uscito di fabbrica. Le impostazioni personali, ad esempio contatti e
messaggi, vengono eliminate.
Smarrimento del codice di sicurezza.
• Il codice di sicurezza impostato in fabbrica è 0000.
• Se il numero è stato cambiato o dimenticato, rivolgersi al fornitore del servizio.
Smarrimento dei codici PIN/PUK.
• Se si immette per tre volte un codice PIN errato, la scheda SIM si blocca. Per sbloccarla
occorre inserire il codice PUK.
• Dopo l'immissione del codice PUK, è possibile impostare un nuovo codice PIN.
• In caso di smarrimento del codice PUK, rivolgersi al fornitore del servizio.
9
10
Descrição das peças
1
1 Antena de satélite
3 Tecla esquerda
4 Tecla de chamada
5 Teclado alfanumérico
= 6 Teclas de navegação
7 Tecla de seleção
8 Microfone
2
3
4
Descrição geral do ecrã principal
: Tecla Terminar
; Tomada do cabo de
6
7
?
9
:
5
8
;
11
<
dados/USB
< Tomada do carregador
= Tomada do auricular
(Os auriculares estão
disponíveis enquanto
acessórios opcionais)
> Patilha para libertar a
bateria
? Suporte do cartão SIM
Sinal de satélite
SMS não lidas
Sinal fraco. Aponte
Correio de voz
direcção do satélite.
Roaming
Chamada ativa
S/ som
ção de chamada)
desligada
Receber GPS-fix
Auricular conectado
Barra de estado
Informação de rede
Correio de voz +
SMS
Caixa de SMS
cheia
Em silêncio
Lembrete de
eventos
Alarme
Desvio de chamada
Funções de teclas
disponíveis
Introdução
Inserir o cartão SIM
Carregar a bateria
Ligação à rede
Certifique-se de que insere o cartao SIM
na orientação correta antes de inserir a
bateria.
Abra a tampa na parte inferior do telefone
e conecte firmemente o carregador a
tomada do carregador.
Quando o XT-LITE é ligado, irá procurar
uma rede e adquirir a informação de
localização. Se os ícones de SAT e
localização estiverem intermitentes, o
telefone ainda não recebeu informações
de localização; será possível efetuar
uma chamada ou enviar uma mensagem
quando os icones deixarem de estar
intermitentes. Após registar-se com sucesso a uma rede, o telefone irá apresentar o país e a intensidade do sinal.
Inserir a bateria
Insira a bateria a partir da parte inferior.
Pressione depois a parte superior até
ouvir o som da bateria a encaixar no sitio.
1
Chamadas
Fazer uma chamada
Alternar chamadas
Para fazer uma chamada, introduza um
número de telefone utilizando o teclado
ou selecione um contacto gravado e
prima a Tecla de chamada.
Ao receber uma chamada durante uma
chamada ativa, selecione Alternar. Esta
opção permite conectar até 6 utilizadores.
Chamadas de conferência
Receber uma chamada
Para receber uma chamada, prima a
Tecla de chamada ou qualquer outra
tecla no teclado.
Durante uma chamada
Durante uma chamada, é possível silenciar a chamada ou colocá-la em espera a
partir do menu Opções.
13
1 Durante uma chamada ativa, aceda a
Opções > Nova chamada. A primeira
chamada é automaticamente colocada em espera.
2 Ligue para o número de telefone do
outro utilizador.
3 Para adicionar o primeiro utilizador
a chamada de conferencia, aceda a
Opções > Múltiplos intervenientes.
É possível incluir até 6 utilizadores na
chamada de conferência repetindo os
passos 1 a 3.
Nota
Durante uma chamada de conferência, é possível optar por falar em
privado com um utilizador. Selecione
o utilizador e aceda a Opções > Privada e todas as restantes chamadas
são automaticamente colocadas em
espera.
3
Mensagens
Funcionalidades
Enviar mensagens
SMS para e-mail
Navegação
1 Aceda a Menu > Mensagens > Nova
mensagem.
2 Introduza a mensagem.
3 Adicione os números de telefone
do(s) destinatário(s).
4 Selecione Opções > Enviar.
Enquanto escreve uma mensagem, é
possível alterar o formato de envio para
e-mail.
• Encontre as suas coordenadas atuais.
• Introduza pontos de referência para
navegar ate uma posicao especifica
com a bússola eletrónica.
• O Geo reporting pode ser utilizado
para enviar as suas coordenadas
para numeros pre-definidos atraves
de SMS. Siga a opção A para enviar
apenas as coordenadas e a Opção
B para enviar as coordenadas e uma
mensagem definida pelo utilizador
(consultar página seguinte).
Dicas
Pressione a tecla para introduzir
símbolos, a tecla # para alternar
entre numeros e texto e Opções
> Texto Automático para escrita
inteligente.
*
4
1 Selecione Opções > Opções de
envio > Formato > SMS para e-mail.
2 Selecione Opções > Enviar >
introduza um endereço de e-mail >
OK > introduza um número de um
centro de e-mail > Enviar.
Funcionalidades
Opção A
Para enviar apenas as coordenadas GPS
(sem a mensagem definida pelo utilizador):
Aceda a Menu > Navegação > Geo
reporting.
1 Inserir o(s) destinatario(s):
• Insira até quatro destinatários, um
por cada campo vazio.
• Selecione o campo, aceda a
Opções > Adicionar destinatário
e opte entre introduzir o número ou
selecionar um contacto.
2 Definir o intervalo:
• Selecione qualquer um dos quatro
campos e aceda a Opções > Intervalos de mensagem.
• Escolha a frequência de envio das
mensagens (de cada 3 minutos até
cada 2 horas).
Opção B
Para enviar uma mensagem definida pelo
utilizador juntamente com as coordenadas GPS:
Aceda a Menu > Navegação > Geo
reporting.
• Siga os passos 1 a 2 anteriormente
mencionados.
• Ativar mensagem SOS:
- Selecione qualquer um dos quatro
campos e aceda a Opções >
Mensagem SOS > Ativada.
• Definir a mensagem SOS:
- Selecione qualquer um dos quatro
campos e aceda a Opções >
Definir mensagem SOS.
- Escreva a mensagem e pressione
a Tecla de seleção para guardá-la.
Como ativar e desativar o
Geo reporting:
• Para ativar a partir do ecrã principal, mantenha pressionada a tecla
direita
.
• Para desativar durante a utilização,
pressione durante alguns segundos
a tecla direita
.
Agenda
Utilize a Agenda do XT-LITE para uma
gama de funcionalidades convenientes
tais como definir alarmes, agendar compromissos, utilizar a calculadora, o cronómetro e o relógio mundial integrados.
5
Notificação de chamada
Atualizações de software
O Thuraya XT-LITE permite receber uma
notificacao de chamada recebida mesmo
quando o sinal do satellite seja demasiado fraco para realizar essa ligação.
Esta funcionalidade é particularmente
útil quando o Thuraya XT-LITE está num
bolso com a antena recolhida e recebe
apenas um sinal fraco.
A atualização do software é necessária
apenas se a Thuraya lançar uma nova
versão do software. Antes de realizar
uma atualizacao verifique a sua versao
de software atual em Segurança > Versão S/W para saber se é necessária uma
atualização.
1 Estenda totalmente a antena do
Thuraya XT-LITE.
2 Certifique-se de que tem uma linha de
comunicação direta com o satélite.
3 Assim que o sinal se tornar forte o suficiente, a notificacao de desaparece
do ecrã. Agora já será possível aceitar
normalmente a chamada pressionando a tecla Chamada.
6
1 Descarregue e instale o ficheiro de
atualização mais recente para o XT-LITE em www.thuraya.com.
2 Descarregue o software mais recente
para o XT-LITE em www.thuraya.com.
3 Ligue o XT-LITE com a bateria totalmente carregada.
4 Conecte o PC e o Thuraya XT-LITE
utilizando o cabo USB.
5 Faça duplo clique no ícone do
atualizador XT-LITE no ambiente de
trabalho e o programa irá guiá-lo ao
longo do processo de atualização.
Como conectar o cabo de dados para
uma atualização de software:
Abra a tampa na parte inferior do telefone
e conecte firmemente o cabo USB a
tomada UDC.
Conecte depois a outra ponta do cabo de
dados ao PC.
Dicas úteis
Manutenção do XT-LITE
Função
Operação
Bloquear/
Desbloquear o
teclado
Pressione a tecla # durante alguns segundos para bloquear o
teclado.
Para desbloquear, pressione a tecla direita seguida da tecla #
durante 3 segundos.
Adicionar
contactos
1. Introduza um número de telefone e pressione a Tecla de seleção.
Ou aceda a Contactos > Adicionar contacto.
2. Selecione o local para guardar (telefone ou cartão SIM) e a
informação do número de telefone.
Modo de Silêncio
Manter a tecla pressionada irá alternar entre os modos de
Silêncio e Normal.
Verificar a sua
localização atual
Aceda a Menu > Navegação > Localização atual.
Mudar o modo de
introdução de texto
Manter a tecla pressionada irá alternar entre os modos de
Texto Automático e Normal.
Mudar idioma
Aceda a Menu > 7.Defini�oes > 3.Idioma.
Registo de
chamadas
Para visualizar as chamadas efetuadas mais recentes pressione
a tecla Telefonar (ou aceda a Registo de chamadas).
O telefone por satélite deve estar a
funcionar perfeitamente quando precisar
de utiliza-lo. Para garantir que o telefone
está preparado, testa-lo regularmente assegura que o telefone por satélite estará
a funcionar quando for necessario:
• Teste o telefone regularmente, especialmente se não o utilizar durante algum
tempo (ligue para o número grátis 11 11
2 a partir do XT-LITE para testar o seu
funcionamento)
• Mude a bateria do XT-LITE uma vez
por mês para garantir que o telefone
estará pronto quando necessário.
• Verifique a sua assinatura ou saldo de
créditos regularmente
7
Resolução de problemas
Problema
Solução
O XT-LITE não se consegue ligar a
uma rede e "Sem rede" é apresentado no ecrã.
• Tente atualizar o registo de SAT manualmente acedendo a Menu > Rede > Registo de
SAT.
• Certifique-se de que a linha de comunicacao do satelite nao esta obstruida por edificios,
árvores ou montanhas.
Ícone de localização intermitente
ou o XT-LITE apresenta "Posição
demasiado antiga".
• A informação de localização do XT-LITE está a ser atualizada. Isto acontece automaticamente quando o telefone é ligado.
• Certifique-se de que a linha de comunicacao do satelite nao esta obstruida por edificios,
árvores ou montanhas.
O XT-LITE apresenta "Inserir SIM".
8
•
•
•
•
Tente remover e voltar a inserir o cartão SIM.
Verifique se o cartao SIM esta sujo ou danificado.
Inserir o código PUK errado poderá desativar o cartão SIM.
Quando utilizar um cartão SIM diferente (além de um cartão SIM Thuraya) no XT-LITE no
estrangeiro, o serviço de roaming deve ser ativado (contacte o seu Operador de Serviços
para verificar se o roaming esta ativado).
Resolução de problemas
Problema
Solução
O XT-LITE torna-se lento ou não
responde.
• Experimente reiniciar o seu telefone.
• Reponha o sistema no caso do telefone apresentar um problema persistente, acedendo a
Menu > Segurança.
- Reposicao normal: E possivel repor o sistema do telefone sem perder as suas definicoes
pessoais tais como contactos ou mensagens.
- Reposicao de fabrica: A reposicao de fabrica ira restaurar as definicoes do telefone para
que sejam as mesmas com que o telefone foi enviado. Definicoes pessoais como contactos e mensagens serão apagadas.
Perdeu ou esqueceu o seu código de
segurança.
• A definicao de fabrica do c6digo de seguranca e 0000.
• Contacte o seu Operador de Serviço caso o número tenha sido alterado ou esquecido.
Perdeu ou esqueceu os seus códigos
PIN/PUK.
• Introduzir o código PIN errado 3 vezes irá bloquear o cartão SIM. Para desbloqueá-lo deve
introduzir o código PUK.
• Ap6s introduzir o c6digo PUK, podera definir um novo c6digo PIN.
• No caso de ter esquecido o código PUK, contacte o seu Operador de Serviço.
9
10
Описание деталей
1
Обзор главного экрана
1 CnyTH1KoBas: aHTeHHa
3 neBas: cpyHKL.1oHanbHas:
KnaB1wa
4 KnaB1wa Bl3oBa
2
KnaB1aTypa
>
6 HaB1raL.1oHHle KnaB1w1
7 KnaB1wa Bl6opa
8 M1KpocpoH
CnyTH1KoBlV c1rHan
Cna6lV c1rHan.
7
9
Bl3oBa
; Pa3beM USB/Ka6ens:
:
5
lonocoBas: no4Ta 1
SMS
AKT1BHlV Bl3oB
naMs:Tb BXoAs:Ll.1X
SMS 3anonHeHa
3ByK oTKnl04eH
W1cppoBaH1e
Bl3oBa oTKnl04eHo
6e33By4HlV pe>K1M
Pacn1caH1e
6yA1nbH1K
lapH1Typa
noAKnl04eHa
nepeaApecaL.1s:
nepeAa41 AaHHlX
< Pa3beM Ans: 3aps:AHoro
8
;
11
lonocoBas: no4Ta
Ha cnyTH1K.
KnaB1wa
4
Henpo41TaHHle SMS
<
ycTpoVcTBa
= Pa3beM Ans: rapH1Typl
(HaywH1K1 He BXoAs:T B
KoMnneKT)
> <D1KcaTop 6aTape1
? ep>KaTenb SIM-KapTl
CTpoKa cocTos:H1s:
CBeAeH1s: o ceT1
ocTynHle KoMaHAl
cpyHKL.1oHanbHlX KnaB1w
Начало работы
YcTaHOBKa SIM-KapTl
3apHAKa 6aTap M
npe>KAe 4eM BcTaB1Tb 6aTapel0, y6eA1Tecb, 4To SIM-KapTa BcTaBneHa, KaK
noKa3aHo Ha p1cyHKe.
0TKpoVTe KplwKy B H1>KHeV 4acT1 TenecpoHa 1 BcTaBbTe 3aps:AHoe ycTpoVcTBo
B cooTBeTcTByl0Ll.1V pa3beM.
YcTaHOBKa 6aTap M
BcTaBbTe 6aTapel0, Ha41Has: c H1>KHero
KoHL.a. 3aTeM HaAaB1Te Ha BepXH1V KoHeL.
6aTape1, noKa He ycnlw1Te Ll.en4oK.
OAK
HM K c TM
KorAa TenecpoH XT-LITE BKnl04eH, oH
aBToMaT14ecK1 ocyLl.ecTBns:eT no1cK
ceT1 1 3anpaw1BaeT cBeAeH1s: o nono>KeH11. Ecn1 3Ha4K1 cnyTH1KoBoro
noAKnl04eH1s: 1 nono>KeH1s: M1ral0T,
TenecpoH eLl.e He nony41n cBeAeH1s: o
nono>KeH11. 0cyLl.ecTB1Tb Bl3oB 1n1 oTnpaB1Tb coo6Ll.eH1e Mo>KHo 6yAeT TorAa,
KorAa 3Ha4K1 nepecTaHyT M1raTb. nocne
noAKnl04eH1s: K ceT1 Ha 3KpaHe TenecpoHa oTo6pa3s:Tcs: cBeAeH1s: o cTpaHe 1
ypoBHe c1rHana.
1
Вызовы
Ocy� cTB HM BlJOBa
ns: ocyLl.ecTBneH1s: Bl3oBa Ha6ep1Te
HoMep TenecpoHa Ha KnaB1aType n16o
Bl6ep1Te coXpaHeHHlV KoHTaKT, a 3aTeM Ha>KM1Te KnaB1wy 8lJOB.
pM M BlJOBa
ns: np1eMa Bl3oBa Ha>KM1Te KnaB1wy
8lJOB n16o nl06yl0 Apyryl0 KnaB1wy Ha
KnaB1aType.
8O Bp MH BlJOBa
Bo BpeMs: Bl3oBa Mo>KHo oTKnl041Tb
M1KpocpoH n16o nocTaB1Tb Bl3oB Ha
yAep>KaH1e c noMoLl.bl0 MeHl0 apaM.
13
pK
HM M >KAy
BlJOBaMM
LlTo6l nepeKnl041Tbcs: c aKT1BHoro
Bl3oBa Ha BXOAH�MM Bl3oB, Ha>KM1Te
p BOA BlJOBa. TaK1M o6pa3oM Mo>KHo noAKnl041Tbcs: MaKc1MyM K wecT1
a6oHeHTaM.
pMM aHM
Bo BpeMs: KoHcpepeHL.-Bl3oBa
Mo>KHo Bl6paTb oAHoro a6oHeHTa
1 roBop1Tb TonbKo c H1M. Bl6ep1Te a6oHeHTa, a 3aTeM Bl6ep1Te
apaM. > bM HlM. Bce npo41e
a6oHeHTl aBToMaT14ecK1 nepeBoAs:Tcs: B pe>K1M yAep>KaH1s:.
KOH<t> p H._-BlJOBl
1 Bo BpeMs: aKT1BHoro Bl3oBa Bl6ep1Te apaM. > HOB. BlJOB. nepBlV
Bl3oB aBToMaT14ecK1 nepeBoA1Tcs: B
pe>K1M yAep>KaH1s:.
2 Ha6ep1Te HoMep Apyroro a6oHeHTa.
3 ns: Ao6aBneH1s: nepBoro a6oHeHTa
K KoHcpepeHL.-Bl3oBy Bl6ep1Te
apaM. > rpyn. BlJOB.
noBTops:s: war1 c 1 no 3, Mo>KHo
Ao6aB1Tb K KoHcpepeHL.-Bl3oBy
MaKc1MyM wecTb a6oHeHToB.
3
Отправка и получение сообщений
Функции
OTnpaBKa cOO6� HMM
SMS nO 3 . nO T
HaBMra._MH
1 Bl6ep1Te M H > COO6� HMH >
HOB.cOO6�.
2 BBeA1Te coo6Ll.eH1e.
3 o6aBbTe HoMepa TenecpoHoB nony4aTeneV.
4 Bl6ep1Te apaM. > OTnpaBMTb.
nocne Toro KaK Bl Ha6pan1 coo6Ll.eH1e, ero Mo>KHo oTnpaB1Tb B cpopMaTe
coo6Ll.eH1s: 3n. no4Tl.
• 0npeAen1Te cBo1 TeKyLl.1e KoopA1HaTl.
• YKa>K1Te nyTeBle To4K1 Ans: ocyLl.ecTBneH1s: HaB1raL.11 K onpeAeneHHoMy nono>KeH1l0 c noMoLl.bl0
3neKTpoHHoro KoMnaca.
• C noMoLl.bl0 cpyHKL.11 Geo reporting
Mo>KHo oTnpaB1Tb SMS co cBo1M1
KoopA1HaTaM1 3apaHee yKa3aHHlM
a6oHeHTaM. LlTo6l oTnpaB1Tb TonbKo
KoopA1HaTl, cneAyVTe Bap1aHTy A.
LlTo6l oTnpaB1Tb KoopA1HaTl 1 AononH1TenbHoe coo6Ll.eH1e, cneAyVTe Bap1aHTy 6 (cM. cneAyl0Ll.yl0 cTpaH1L.y).
COB Tl
ns: BBoAa c1MBonoB Ha>KM1Te KnaB1wy . ns: nepeKnl04eH1s: Me>KAy
6yKBeHHoV 1 L.1cppoBoV KnaB1aTypoV Ha>KM1Te KnaB1wy #. ns: aBToMaT14ecKoV noAcTaHoBK1 TeKcTa
Bl6ep1Te apaM. > ABTOT KcT.
*
4
1 Bl6ep1Te apaM. > apaM. OTnp. >
<lOpMaT > SMS nO 3 . nO T .
2 Bl6ep1Te apaM. > OTnpaBMTb
> yKa>K1Te aApec 3n. no4Tl > OK >
yKa>K1Te HoMep nocTaBLl.1Ka ycnyr 3n.
no4Tl > OTnpaBMTb.
Функции
8apMaHT A
0TnpaBKa TonbKo KoopA1HaT GPS (6e3
AononH1TenbHoro coo6Ll.eH1s:)
Bl6ep1Te M H > HaBMra._MH > Geo
reporting.
1 YKa>K1Te nony4aTeneV.
• B Ka>KAoV nycToV s:4eVKe Mo>KHo
yKa3aTb oAHoro nony4aTens:.
Bcero Mo>KHo yKa3aTb MaKc1MyM
4eTlpeX nony4aTeneV.
• Bl6ep1Te s:4eVKy, 3aTeM Bl6ep1Te apaM. > .QO6aB. nO y aT. 1
BBeA1Te HoMep nony4aTens: n16o
Bl6ep1Te ero B cn1cKe KoHTaKToB.
2 3aAaVTe 4acToTy oTnpaBK1 coo6Ll.eH1V.
• Bl6ep1Te oAHy 13 4eTlpeX s:4eeK,
a 3aTeM Bl6ep1Te apaM. >
l.lacTOTa OTnp. cOO6�.
• 3aAaVTe 4acToTy oTnpaBK1 coo6Ll.eH1V (M1H1ManbHoe 3Ha4eH1e
- Ka>KAle Tp1 M1HyTl, MaKc1ManbHoe - Ka>KAle ABa 4aca).
8apMaHT 5
0TnpaBKa KoopA1HaT GPS c AononH1TenbHlM coo6Ll.eH1eM
Bl6ep1Te M H > HaBMra._MH > Geo
reporting.
• BlnonH1Te war1 1 1 2, on1caHHle
Blwe.
• BKnl041Te cpyHKL.1l0 oTnpaBK1 3KcTpeHHlX coo6Ll.eH1V.
- Bl6ep1Te oAHy 13 4eTlpeX s:4eeK,
a 3aTeM Bl6ep1Te apaM. >
3KcTp. cOO6�. > 8K .
• HacTpoVTe 3KcTpeHHoe coo6Ll.eH1e.
- Bl6ep1Te oAHy 13 4eTlpeX s:4eeK,
a 3aTeM Bl6ep1Te apaM. >
HacTp. 3KcTp. cOO6�.
- BBeA1Te coo6Ll.eH1e 1 coXpaH1Te
ero, Ha>KaB KnaB1wa Bl6Opa.
8K
HM M OTK HM
<t>yHK._MM Geo reporting:
• ns: aKT1BaL.11 nepeVA1Te Ha
rnaBHlV 3KpaH, a 3aTeM Ha>KM1Te
1 yAep>K1BaVTe npaByl0 cpyHKL.1oHanbHyl0 KnaB1wy
.
• ns: oTKnl04eH1s: AaHHoV cpyHKL.11
Ha>KM1Te npaByl0 cpyHKL.1oHanbHyl0 KnaB1wy
.
OpraHaMJ p
B MeHl0 «0praHaV3ep» TenecpoHa XTLITE AocTynHl TaK1e none3Hle
cpyHKL.11, KaK 6yA1nbH1K, pacn1caH1s:,
BcTpoeHHlV KanbKyns:Top, ceKyHAoMep 1
M1poBoe BpeMs:.
5
Уведомление о звонках
Обновления программного обеспечения
Baw Thuraya XT-LITE no3Bons:eT BaM nony4aTb yBeAoMneH1e o BXoAs:Ll.eM 3BoHKe,
Aa>Ke ecn1 c1rHan cnyTH1Ka cn1wKoM cna6
Ans: np1eMa 3Toro Bl3oBa. 3Ta cpyHKL.1s:
oco6eHHo none3Ha B cny4ae, KorAa TenecpoH Thuraya XT-LITE HaXoA1Tcs: B KapMaHe co cno>KeHHoV aHTeHHoV 1 np1H1MaeT
TonbKo cna6lV c1rHan.
Heo6XoA1MocTb B o6HoBneH11 nporpaMMHoro o6ecne4eH1s: Bo3H1KaeT, TonbKo
KorAa KoMnaH1s: Thuraya BlnycKaeT ero
HoByl0 Bepc1l0. npe>KAe 4eM BlnonHs:Tb
o6HoBneH1e, y6eA1Tecb B ero Heo6XoA1MocT1, npoBep1B TeKyLl.yl0 Bepc1l0 B MeHl0
5 JOn-Tb > 8 pcMH O.
1 3arpy31Te nocneAHl0l0 Bepc1l0 nporpaMMl o6HoBneH1s: Ans: XT-LITE
c Be6-caVTa www.thuraya.com 1
ycTaHoB1Te ee.
2 3arpy31Te nocneAHl0l0 Bepc1l0 nporpaMMHoro o6ecne4eH1s: XT-LITE c
Be6-caVTa www.thuraya.com.
3 nonHocTbl0 3aps:A1Te 6aTapel0 TenecpoHa Thuraya XT-LITE 1 BKnl041Te
ero.
4 noAKnl041Te Thuraya XT-LITE K nK c
noMoLl.bl0 USB-Ka6ens:.
5 Ba>KAl Ll.enKH1Te 3Ha4oK nporpaMMl o6HoBneH1s: XT-LITE Ha pa6o4eM
cTone 1 cneAyVTe ee 1HcTpyKL.1s:M.
1 nonHocTbl0 BlAB1HbTe aHTeHHy
Thuraya XT-LITE.
2 Y6eA1Tecb, 4To cnyTH1K HaXoA1Tcs:
Ha n1H11 nps:MoV B1A1MocT1.
3 KaK TonbKo MoLl.HocTb c1rHana
AocT1raeT AocTaTo4Horo ypoBHs:,
npeAynpe>KAeH1e nponaAaeT c 3KpaHa. nocne 3Toro Mo>KHo np1H1MaTb
Bl3oBl nyTeM Ha>KaT1s: KnaB1w1
8lJOB, KaK o6l4Ho.
6
OAK
HM Ka6 H n p Aa M AaHHlX A H O6HOB HMH npOrpaMMHOrO
O6 cn HMH
0TKpoVTe KplwKy B H1>KHeV 4acT1
TenecpoHa 1 BcTaBbTe USB-Ka6enb B
cooTBeTcTByl0Ll.1V pa3beM.
nocne 3Toro BcTaBbTe ApyroV KoHeL.
Ka6ens: B pa3beM Ha nK.
Полезные советы
<lyHK._MH
.Q McTBMH
5 OKMpOBKa/
paJ6 OKMpOBKa
K aBMaTypl
ns: 6noK1poBK1 KnaB1aTypl Ha>KM1Te 1 yAep>K1BaVTe
KnaB1wy #.
ns: pa36noK1poBK1 KnaB1aTypl cHa4ana Ha>KM1Te npaByl0
cpyHKL.1oHanbHyl0 KnaB1wy, a 3aTeM B Te4eH1e TpeX ceKyHA
Ha>KM1Te KnaB1wy #.
.QO6aB
HM KOHTaKTOB
1. BBeA1Te HoMep TenecpoHa 1 Ha>KM1Te KnaB1wa Bl6Opa.
n16o Bl6ep1Te KOHTaKTl > .QO6aBMTb KOHTaKT.
2. Bl6ep1Te MecTo coXpaHeH1s: KoHTaKTa (naMs:Tb TenecpoHa
1n1 SIM-KapTa) 1 yKa>K1Te cBeAeH1s: o HoMepe TenecpoHa.
5 JJBy HlM p >KMM
Ha>KM1Te 1 yAep>K1BaVTe KnaB1wy Ans: nepeKnl04eH1s:
Me>KAy 6 JJBy HlM 1 O6l HlM pe>K1MaM1.
pOB pKa T Ky� rO
nO O>K HMH
Bl6ep1Te M H > HaBMra._MH > T Ky�. nO O>K HM .
JM H HM p >KMMa
BBOAa T KcTa
Ha>KM1Te 1 yAep>K1BaVTe KnaB1wy Ans: nepeKnl04eH1s:
Me>KAy pe>K1MoM ABTOT KcT 1 O6l HlM pe>K1MoM.
CM Ha HJlKa
Bl6ep1Te M H > 7.HacTpOMKM > 3.s:JlK.
>KypHa BlJOBOB
ns: npocMoTpa nocneAH1X Ha6paHHlX HoMepoB Ha>KM1Te
KnaB1wy 8lJOB (1n1 nepeVA1Te B MeHl0 >KypHa BlJOBOB).
Обслуживание телефона XT-LITE
04eHb Ba>KHo, 4To6l Baw cnyTH1KoBlV
TenecpoH BcerAa 6ln B Ha1ny4weM pa6o4eM cocTos:H11. LlTo6l rapaHT1poBaTb
pa6o4ee cocTos:H1e TenecpoHa Thuraya,
cneAyeT BlnonHs:Tb peryns:pHle npoBepK1.
• Peryns:pHo npoBeps:VTe TenecpoH
Thuraya, oco6eHHo ecn1 oH He 1cnonb3oBancs: KaKoe-To BpeMs: (Ans:
npoBepK1 TenecpoHa XT-LITE Ha6ep1Te Ha HeM HoMep 11 11 2, 3BoHoK
6ecnnaTHlV).
• 3aps:>KaVTe 6aTapel0 TenecpoHa
XT-LITE pa3 B Mecs:L., 4To6l oH He
pa3ps:A1ncs: B caMlV HenoAXoAs:Ll.1V
MoMeHT.
• Peryns:pHo npoBeps:VTe cocTos:H1e
c4eTa 1n1 noAn1cK1.
7
Устранение неисправностей
pO6 Ma
P w HM
T <t>OHy XT-LITE H yAa TcH nOAK MTbcH K c TM. Ha 3KpaH OTO6pa>Ka TcH cOO6� HM «H T c TM».
• ns: o6HoBneH1s: per1cTpaL.11 cnyTH1Ka Bpy4Hyl0 Bl6ep1Te M H > C Tb > P rMcTpa._.
cnyT.
• Y6eA1Tecb, 4To nps:MoV cBs:31 co cnyTH1KaM1 He npens:TcTByl0T BlcoTHle 3AaH1s:, AepeBbs: 1n1 ropl.
3Ha OK nO O>K HMH MMra T, M6O
Ha 3KpaH XT-LITE OTO6pa>Ka TcH
cOO6� HM « O O>K HM ycTap O».
• TenecpoH XT-LITE o6HoBns:eT cBeAeH1s: o nono>KeH11. 3To npo1cXoA1T aBToMaT14ecK1
np1 BKnl04eH11 TenecpoHa.
• Y6eA1Tecb, 4To nps:MoV cBs:31 co cnyTH1KaM1 He npens:TcTByl0T BlcoTHle 3AaH1s:, AepeBbs: 1n1 ropl.
Ha 3KpaH XT-LITE OTO6pa>Ka TcH
cOO6� HM «8cTaBbT SIM-KapTy».
8
•
•
•
•
nonpo6yVTe 13Bne4b 1 cHoBa ycTaHoB1Tb SIM-KapTy.
Y6eA1Tecb, 4To SIM-KapTa He noBpe>KAeHa 1 He 1MeeT 3arps:3HeH1V.
Bo3Mo>KHo, Bl AeaKT1B1poBan1 SIM-KapTy, BBeAs: HenpaB1nbHlV PUK-KoA.
Ecn1 np1 HaXo>KAeH11 3a rpaH1L.eV Bl 1cnonb3yeTe B TenecpoHe XT-LITE SIM-KapTy, He
npeAocTaBneHHyl0 KoMnaH1eV Thuraya, Heo6XoA1Mo noAKnl041Tb ycnyry poyM1Hra. LlTo6l
y6eA1Tbcs: B Han1411 ycnyr1 poyM1Hra, cBs:>K1Tecb c nocTaBLl.1KoM ycnyr.
Устранение неисправностей
pO6 Ma
P w HM
T <t>OH XT-LITE H OTB a T Ha
KOMaHAl M M JaBMca T.
• nonpo6yVTe nepe3anycT1Tb TenecpoH.
• Ecn1 npo6neMa He ycTpaHs:eTcs:, BlnonH1Tb c6poc Mo>KHo, Bl6paB M H > 5 JOnacHOcTb.
- nporpaMMHlV c6poc Mo>KHo BlnonH1Tb nporpaMMHlV c6poc TenecpoHa 6e3 yAaneH1s:
n14HlX HacTpoeK, TaK1X KaK KoHTaKTl 1 coo6Ll.eH1s:.
- BoccTaHoBneH1e 3aBoAcK1X HacTpoeK np1 BoccTaHoBneH11 3aBoAcK1X HacTpoeK BoccTaHaBn1Bal0Tcs: HacTpoVK1 TenecpoHa, 3aAaHHle np1 nocTaBKe. n14Hle HacTpoVK1, TaK1e
KaK KoHTaKTl 1 coo6Ll.eH1s:, yAans:l0Tcs:.
8l Ja6l M M M nOT pH M Ja�MTHlM KOA.
• 3Ha4eH1e 3aLl.1THoro KoAa no yMon4aH1l0 - 0000.
• Ecn1 Bl 13MeH1n1 3aLl.1THlV KoA 1 3a6ln1 ero, cBs:>K1Tecb c nocTaBLl.1KoM ycnyr.
8l Ja6l M M M nOT pH M PIN-KOA
M M PUK-KOA.
• Ecn1 Tp1>KAl BBecT1 HenpaB1nbHlV PIN-KoA, SIM-KapTa 6noK1pyeTcs:. ns: pa36noK1poBK1 Heo6XoA1Mo BBecT1 PUK-KoA.
• nocne BBoAa PUK-KoAa Mo>KHo 3aAaTb HoBlV PIN-KoA.
• Ecn1 Bl 3a6ln1 PUK-KoA, cBs:>K1Tecb c nocTaBLl.1KoM ycnyr.
9
10
Parça Açıklaması
Giriş Ekranına Genel Bakış
1
1 Uydu anteni
3 Sol i�lev tu�u
4 Cagr1 tu�u
= 6 Gezinme tu�lar1
7 Secim tu�u
>
3
4
6
7
?
9
< $arj cihaz1 jak1
= Kulakl1k jak1
(Kulakl1klar istege bagl1
aksesuar olarak mevcuttur)
Pil
> açma
? SIM kart tutucu
:
5
9 Sag i�lev tu�u
: Son tu�u
8
Uydu sinyali
Okunmam1� SMS
Zay1f sinyal.
Sesli posta
Sesli posta + SMS
dogru cevirin.
SMS gelen kutusu
Dola�1m
Etkin cagr1
Sessiz
Program hat1rlat1c1
Kriptolama (cagr1
�ifreleme) kapal1
Alarm
GPS dOzeltmesi
al1n1yor
Cagr1y1 yonlendir
Kulakl1k bagl1
Durum cubugu
Kullan1labilir i�lev tu�u fonksiyonlar1
Ag bilgisi
;
11
<
Başlarken
SIM kart1 takma
Pili degi�tirme
Ag baglant1s1
Pili takmadan once SIM kart1 gosterilen
yonde takt1g1n1zdan emin olun.
Telefonun alt1ndan kapag1 ac1n ve �arj
cihaz1n1 �arj cihaz1 jak1na s1k1ca baglay1n.
XT-LITE'a gOc verildiginde, telefon ag1
arar ve konum bilgisini edinir. SAT ve
konum simgeleri yan1p sonOyorsa, telefon
henOz konum bilgisini almam1�t1r ve
yan1p sonme durdugunda cagr1 yapabilir
veya mesaj gonderebilirsiniz. Aga ba�ar1l1
kay1t ile, telefon Olkeyi ve sinyal gOcOnO
gosterir.
Pili takma
Pili alt ucundan ba�layarak tak1n. Ard1ndan yerine t1klad1g1n1 duyuncaya dek Ost
ucunu bast1r1n.
1
Çağrılar
Bir �agr1 yapma
Cagr1lar1 degi�tirme
Bir cagr1 yapmak icin, tu� tak1m1n1
kullanarak bir telefon numaras1 girin veya
kaydedilmi� bir ki�iyi secip Ara tu�una
bas1n.
Mevcut etkin cagr1 s1ras1ndaki gelen
cagr1y1 al1rken, Degi�tir secenegini secin.
Bu, en cok 6 kullan1c1ya baglanman1z1
saglar.
Bir �agr1y1 alma
Konferans �agr1lar
Bir cagr1y1 almak icin, Ara tu�una veya
tu� tak1m1ndaki herhangi bir tu�a bas1n.
1 Etkin bir cagr1 s1ras1nda, Se�enekler
> Yeni �agr1'ya gidin. Birinci cagr1
otomatik olarak beklemeye al1n1r.
2 Diger kullan1c1n1n telefon numaras1n1
aray1n.
3 Konferans cagr1s1na ilk kullan1c1y1
eklemek icin, Se�enekler > Çoklu
taraf'a gidin.
Ad1m 1 ila 3'O tekrarlayarak konferans
cagr1ya en cok 6 kullan1c1 ekleyebilirsiniz.
Bir �agr1 s1ras1nda
Bir cagr1 s1ras1nda, cagr1n1n sesini kapatabilir veya Se�enekler menOsOnden
cagr1y1 beklemeye alabilirsiniz.
13
Not
Bir konferans cagr1 s1ras1nda, bir
kullan1c1yla ozel olarak konu�may1
secebilirsiniz. Kullan1c1y1 secin ve Se�enekler > Özel'e gidin ve tOm diger
cagr1lar otomatik olarak beklemeye
al1n1r.
3
Mesajlaşma
Özellikler
Mesajlar1 gonderme
SMS ila e-posta
Gezinme
1 Menu > Mesajlar > Yeni mesaj'a
gidin.
2 Mesaj1 girin.
3 Al1c1n1n (al1c1lar1n) telefon numaralar1n1 ekleyin.
4 Se�enekler > Gonder'i secin.
Bir mesaj yazarken, gonderme format1n1
e-posta olarak degi�tirebilirsiniz.
• Gecerli koordinatlar1n1z1 bulun
• Elektronik pusula ile spesifik bir pozisyona gitmek icin yol noktalar1n1 girin
• Geo reporting SMS yoluyla onceden
tan1ml1 numaralara koordinatlar1n1z1
gondermek icin kullan1labilir. Sadece
koordinatlar1 gondermek icin Secenek
A'y1 ve koordinatlar1 ve kullan1c1 tan1ml1 bir mesaj1 gondermek icin Secenek
B'yi izleyin (bkz. sonraki sayfa)
ipu�lar1
Sembol giri�i icin tu�una bas1n, say1
ve metin aras1nda geci� yapmak için #
tu�una bas1n ve tahmine dayal1 metin
giri�i icin Se�enekler > Oto- matik
Metin'e bas1n.
*
4
1 Se�enekler > Gonderme se�enekleri > Format > SMS ila e-posta'y1
secin.
2 Se�enekler > Gonder > bir e-posta
adresi yaz > Tamam > bir e-posta
merkez numaras1 yaz > Gonder'i
secin.
Özellikler
Se�enek A
Sadece GPS koordinatlar1n1 gondermek
icin (kullan1c1 tan1ml1 mesaj olmaks1z1n):
Menu > Gezinme > Geo reporting'e
gidin.
1 Al1c1y1 (al1c1lar1) girin:
• Her bo� alana bir adet olmak Ozere,
en cok dort al1c1 secin.
• Yuvay1 secin, Se�enekler > Al1c1
ekle'ye gidin ve say1y1 girmek icin
secin veya ki�ilerden secin.
2 Aral1g1 ayarlay1n:
• Dort yuvadan herhangi birini secip
Se�enekler > Mesaj aral1klar1'na
gidin.
• Giden mesajlar1n s1kl1g1n1 secin (her
3 dakikada bir ila her 2 saatte bir).
Se�enek B
GPS koordinatlar1 ile birlikte kullan1c1
tan1ml1 bir mesaj gondermek icin:
Menu > Gezinme > Geo reporting'e
gidin.
• Yukar1daki ad1m 1'i ve 2'yi izleyin.
• SOS mesaj1n1 ac1n:
- Dort yuvadan herhangi birini secip
Se�enekler > SOS mesaj1 >
A�1k'a gidin.
• SOS mesaj1n1 ayarlay1n:
- Dort yuvadan herhangi birini secip
Se�enekler > SOS mesaj1n1 kur'a
gidin.
- Mesaj1 yaz1n ve kaydetmek icin
Se�im tu�u bas1n.
Geo reporting nas1l
etkinle�tirilir ve devre d1�1
b1rak1l1r:
• Giri� ekran1ndan etkinle�tirmek icin,
sag i�lev tu�una uzun bas1n
.
• Kullan1mdayken devre d1�1 b1rakmak icin, sag i�lev tu�una k1sa
bas1n
.
Duzenleyici
XT-LITE'1n1z1n DOzenleyicisini alarm kurmak, randevular1 planlamak, dahili hesap
makinesini kullanmak, kronometre ve
dOnya saati gibi bir dizi kullan1�l1 ozellik
icin kullan1n.
5
HPA
Yazılım Yükseltmeleri
Thuraya XT-LITE'1n1zdaki HPA (YOksek
Penetrasyon Uyar1s1), uydunuz cagr1n1n
kendisini almak icin cok zay1f olsa bile,
gelen bir cagr1n1n bildirimini alman1z1
saglayan bir ozelliktir. Bu, ozellikle anten
kapal1 olarak Thuraya XT-LITE cebinizdeyken ve sadece zay1f sinyale sahip
oldugunda yararl1d1r.
Bir yaz1l1m yOkseltmesi sadece Thuraya
yeni bir yaz1l1m sOrOmO piyasaya sOrdOgOnde gereklidir. Bir yOkseltme gercekle�tirmeden once lOtfen bir yOkseltmenin
gerekli olup olmad1g1n1 gormek icin
Guvenlik > S/W surumu alt1ndaki gecerli
yaz1l1m sOrOmOnOzO kontrol edin.
Cagr1lar1 HPA modunda almak icin:
1 Thuraya XT-LITE'1n1z1n antenini tam
olarak ac1n.
2 Uyduya ili�kin dogrudan gorO� hatt1n1z
oldugundan emin olun.
3 Sinyal gOcO yeterince gOclO olur
olmaz, HPA uyar1s1 ekrandan silinir.
Art1k Ara tu�una basarak normal
�ekilde cagr1y1 kabul edebilirsiniz.
6
1 www.thuraya.com adresinden en son
XT-LITE yOkseltici dosyas1n1 indirin
ve kurun.
2 www.thuraya.com adresinden en son
XT-LITE yaz1l1m1n1 indirin.
3 Tam �arj edilmi� pil ile Thuraya XTLITE'1n gOcOnO ac1n.
4 USB kablosunu kullanarak PC'yi ve
Thuraya XT-LITE'1 baglay1n.
5 MasaOstOndeki XT-LITE yOkseltici
simgesine cift t1klay1n ve program size
yOkseltme sOreci boyunca rehberlik
eder.
Yaz1l1m yukseltmesi i�in veri kablosu
nas1l tak1l1r:
Telefonun alt1ndan kapag1 ac1n ve USB
kablosunu UDC jak1na s1k1ca tak1n.
Sonras1nda veri kablosunun diger ucnuu
PC'nize tak1n.
Yararlı İpuçları
XT-LITE'ınızın bakımını yapma
Fonksiyon
i�lem
Tu� Tak1m1 Kilitleme/
Kilidi A�ma
Tu� tak1m1n1 kilitlemek icin # tu�unu bas1l1 tutun.
Kilit acmak icin, 3 saniye icinde sag i�lev tu�una ve ard1ndan # tu�una bas1n.
Ki�ileri Ekleme
1. Bir telefon numaras1 girin ve Se�im tu�u bas1n.
Veya Ki�iler > Ki�i ekle'ye gidin.
2. Saklama konumunu (telefon veya SIM kart) ve telefon
numaras1 bilgisini secin.
Sessiz Mod
tu�una uzun bas1ld1g1nda Sessiz ve Normal mod aras1nda geci� yap1l1r.
Ge�erli konumunuzu
kontrol etme
Menu > Gezinme > Ge�erli pozisyon'a gidin.
Metin giri� modunu
degi�tirme
tu�una uzun bas1ld1g1nda Otomatik Metin ve Normal
mod aras1nda geci� yap1l1r.
Dilleri degi�tirme
Menu > 7.Ayarlar > 3.Dil'e gidin.
Cagr1 kay1tlar1
Yeni aranan numaralar1n1z1 gormek icin Ara tu�una bas1n
(veya Cagr1 kay1tlar1'na gidin).
Uydu telefonunuz, ona ihtiyac duydugunuzda optimum cal1�ma ko�ulunda olmas1
gerekir. Telefonunuzun haz1r olmas1n1
saglamak icin dOzenli bir Thuraya telefonu testi, uydu telefonunuzun gerektiginde
cal1�mas1n1 saglayacak ak1l rahatl1g1n1
saglar.
• Ozellikle bir sOre kullanmad1ysan1z,
Thuraya telefonunuzu dOzenli olarak
test edin (dOzgOn cal1�1p
cal1�mad1g1n1 test etmek icin XTLITE'1n1zdan 11 11 2'yi cevirin)
• Telefona ihtiyac duydugunuzda haz1r
olmas1 icin XT-LITE'1n pilini ayda bir
kez degi�tirin
• Aboneliginizi veya kontorOnOzO dOzenli olarak kontrol edin
7
Sorun Giderme
Sorun
XT-LITE aga baglanam1yor ve ekranda 'Ag Yok' gosteriliyor.
Cozum
• Menu > Ag > SAT kayd1'na giderek, SAT kayd1n1 manuel olarak gOncellemeyi deneyin.
• Uydu gorO�OnOn yOksek binalar, agaclar veya daglar ile engellenmediginden emin olun.
Konum simgesi yan1yor veya XTLITE 'Pozisyon �ok eski' mesaj1n1
gosteriyor.
• XT-LITE'1n konum bilgisi gOncelleniyor. Telefona gOc verildiginde bu otomatik olarak yap1l1r.
• Uydu gorO�OnOn yOksek binalar, agaclar veya daglar ile engellenmediginden emin olun.
XT-LITE 'SIM'i Tak' mesaj1n1 gosteriyor.
•
•
•
•
8
SIM kart1 c1kartmay1 ve tekrar takmay1 deneyin.
SIM kart1n kirli veya hasarl1 olup olmad1g1n1 kontrol edin.
Yanl1� bir PUK kodunun girilmesi SIM kart1n1 devre d1�1 b1rakabilir.
Yurt d1�1ndayken XT-LITE'ta farkl1 bir SIM kart (Thuraya SIM kart d1�1nda) kullan1ld1g1nda,
hizmet etkinle�tirilmelidir (lOtfen dola�1m1n etkin olup olmad1g1n1 kontrol etmek icin Hizmet
Saglay1c1n1zla ileti�im kurun).
Sorun Giderme
Sorun
Cozum
XT-LITE tepkisiz veya hantal hale
geliyor.
• Telefonunuzu tekrar ba�latmay1 deneyin.
• Telefonunuzda 1srarc1 bir sorun olmas1 durumunda Menu > Guvenlik'e giderek bir s1f1rlama
yap1n.
- Yumu�ak s1f1rlama: Ki�iler veya mesajlar gibi ki�isel ayarlar1n1z1 kaybetmeksizin telefonunuzu s1f1rlayabilirsiniz.
- Fabrika s1f1rlamas1: Fabrika s1f1rlamas1, telefondaki ayarlar1 tedarik edildigi haline geri
yOkler. Ki�iler ve mesajlar gibi ki�isel ayarlar silinir.
Guvenlik kodu kay1p veya unutulmu�.
• GOvenlik kodunun fabrika ayar1 0000'd1r.
• LOtfen numaran1z1n degi�mesi ve unutulmas1 durumunda Hizmet Saglay1c1n1zla ileti�im
kurun.
PIN/PUK kodlar1 kay1p veya unutulmu�.
• Yanl1�PIN kodunun 3 kere girilmesi SIM kart1n1 kilitler. Kilidi acmak icin PUK kodunu girmelisiniz.
• PUK kodunu girdikten sonra, yeni bir PIN kodu ayarlayabilirsiniz.
• PUK kodunun unutulmas1 durumunda, lOtfen Hizmet Saglay1c1n1zla ileti�im kurun.
9
10
Ԡऋไ
ነ౺Ԡ�
1 �໙
1
3 Ԡ�उ
4 ࡅԠउ
5 ውவฮውဆउధ
2
7 ၤᇎउ
8
ཀྵ���
ཝ ښSMS
ဪ�൪ăख໙ڭ
ᅮᄕᅉऋ
ᅮᄕᅉऋ + SMS
ିᅍ
SMS ฆऋჲ
Ԡᄕ
Ԡᄕ
ൊ���
Ԡҫ
�Ә
3
4
6
7
?
9
? SIM Լ
8
ࢩۓჲએा
ৰᅂ�उ�
ካນ
གྷନ �
�
;
11
ࡅԠኡყ
�ฆGPS-fix
(ࢩۓৰዮནһၤ�ऋԠి)
:
5
; USB/ฮদՆ�
< ֣٢ರՆ�
= ࢩۓՆ�
<
ಭڈ
Նൠ SIM
٢٢֣֗٢ލ
Նൠ٢֗ԠೇബҦჵ෯�۴Նൠ SIM
ă
��ཤᅙง ◌
ࢩ
ْ Ԡ�٢֗�Ljख ֣٢ರय़
�એाᆷ ֣٢ರՆ�ජă
གྷନ �
ಭ ڈXT-LITE Ljง ࢩ
खԠຆགྷନԃࢠഖ
ཤቜԠྩă൜� SAT �ཤቜ༇ӭԠ็Ljᇏ
Ӱ෯ง ࢩ
ඣཝाฆظཤቜԠྩLjቒԠ็
ࡄLj௷Ӧৰჵԇ�٢ࢡ◌
ۙ ԠԠྩăֈ�
ኙՂظགྷନࡄ Ljง ࢩ
ख෯�ࣟ�ဪ�ೖ
ڡă
Նൠ٢֗
࿏ ◌װ
ْ ԠՆൠ ٢֗ăരࡄ ༑ﭬﭙﻆLjቊظ
௷ظᗯნă
1
ਹ٢
ԇ�
೧ࡪ
൩ԇ�Lj෪ᅂउధࢡ �ၤᇎჲҦ��
ઍ�ീตൠ٢�ବLjരࡄ љ࿉ࡅԠउă
ሸᆷ൜Ԡाဧਹ٢Ljৰၤᇎ೧
ࡪăӁ�ቀ֕Ԡाቚ ڹ6 �ᅂࡖ
ă
ा٢
൩Ԡा٢Ljљ࿉ࡅԠउԠउధජ�ൃ
ᄃउă
ಓࣱ
ಓࣱLj௷ৰჵװၤԬ�खԠᄕ
ࢡҦ֕ă
13
٢ᄊ
ംኙᄃ
ᆷ٢ᄊቩLj௷ৰჵၤᇎᅪᅂࡖ
࿉दລăၤᇎ�ᅂࡖԠೇངၤ >
ീLjᇏຈᅏಝຊखዋڈኡནҦ
֕ă
1 ሸᆷLjೇངၤ > ဧࡅԠă
จ�खዋڈኡནҦ֕ă
2 ԇ�ಭᅂᅂࡖ�٢�ବă
3 ൩࣠จ�ᅂࡖቚ٢ᄊLjೇང
ၤ > ڹ۴ă
ቱ�Ԟኁ 1 - 3Lj௷ቚڹৰჵ࣠ 6 ཤ
ᅂࡖቚ٢ᄊă
3
�
��
ۙ◌�
SMS ቚ٢ዊᅉऋ
ࠎط
1 ◌ೇངԬ� > Ԡྩ > ԠԠྩă
ԠԠྩLj௷ৰჵखಝ��ན٢ዊᅉऋ�
◌
ۙ Ԡ�෮ă
1 ၤᇎၤ > ۙ◌Ԡၤ > �෮ > ٢ዊ
SMS ቚ٢ዊᅉऋă
2 ၤᇎ ၤ > ◌
ۙ Ԡ > ตൠ٢ዊᅉऋٓ
ቐ > ബ > ځตൠ٢ዊᅉऋቩဩ�ବ
> ◌
ۙ Ԡă
• Պል◌جೇཤቜዯӭ
2
3
ตൠԠྩă
࣠ฆऋീ�٢�ବă
4 ၤᇎၤ > ◌
ۙ Ԡă
�෯
љ࿉ उৰउൠ��Lj# उৰᆷฮው
�Ӂቇࣱ೧ࡪLjၤ > ዋڈӁৰ
ॣ�ᆁරӁตൠă
*
4
• ෪ᅂ٢ዊଟధตൠ�ৰظ�طځཤ
ቜ
• Geo reporting ৰᅂᅙ� SMS ۙ◌Ԡ
ཤቜዯӭቚᆁځᄆ��ବăსሐၤ A
ॡৰ◌
ۙ ԠཤቜዯӭLjსሐၤ B
ৰ◌
ۙ
Ԡཤቜዯӭࢽᅂࡖځᄆ�ԠྩDŽई࿉ნ
ეDžă
�
ၤ A
ॡۙ◌Ԡ GPS ཤቜዯӭDŽ྇ᅂࡖځᄆ�ဂ
ྩDžǖ
ၤ B
൩ۙ◌Ԡᅂࡖځᄆ�Ԡྩࢽ GPS ཤቜዯ
ӭǖ
◌ೇངԬ� > > �طGeo reportingă
1 ตൠฆऋീǖ
• ቚڹৰตൠ๓ཤฆऋീLjནཤฆ
ऋീ�࿉ৼѼԼཤă
• ၤᇎԼཤLj◌ೇངၤ > ࣠ฆऋ
ീLjᆶၤᇎตൠ�ବࢡ װઍ�ീቩ
ၤᇎฆऋീă
2 රቜࣱ�ࣱǖ
• ၤᇎൃᄃ๓�ԼཤԠ◌ೇངၤ >
ྩࣱ�ă
• ၤᇎ◌
ۙ ԠԠྩ�౮ଋDŽ 3 �ቬظ
2 ဆDžă
◌ೇངԬ� > > �طGeo reportingă
• სሐჵජԞኁ 1 �Ԟኁ 2ă
• �� SOS Ԡྩǖ
- ၤᇎൃᄃ๓�ԼཤԠ◌ೇངၤ >
SOS Ԡྩ > ��ă
• රቜ SOS Ԡྩǖ
- ၤᇎൃᄃ๓�ԼཤԠ◌ೇངၤ >
ቜ SOS Ԡྩă
- ԠԠྩԃљ࿉ၤᇎउҦ�ă
൜�ࢱ࢝ࢽ०ᅂ Geo
reportingǖ
• ൩װነ౺ஸࢱ࢝Ljգљᅑ�उ
ă
• ൩ᆷ෪ᅂ०ᅂLjڥљᅑ�उ
ă
�ੲರ
෪ᅂ XT-LITE �ੲರৰᅂᅙნ�ળӦै�
Ljં൜ǖරቜԠҫĂїఠᆁᆙĂ෪ᅂௗ
ቜ࣓ԠರĂஊӰ�Ԡ◌ࣱ॒ă
5
ਹ٢
ቃ
�ऋ�ࣃ
Thuraya XT-LITE ᆷཀྵ���ཋ൪◌྇ۑ
۟
ሸբा٢��Ԡाฆظਹ٢ቃăר
�ᆷ Thuraya XT-LITE ቜᅙ��ቩ೩໙
ཝኧൠDŽרॡᅏཋ൪ဪ�Džӳᅏ
ᅂă
ॡ جThuraya ۙ◌ԝ�ဧ��ऋҋӁ၍
ॣ��ऋ�ࣃăԠ��Ԡ◌ೇLjംᆷїഠ >
S/W ҋӁ࿉ࣹՊ௷◌جೇ��ऋҋӁჵՊ
�၍Ԡ�ࣃă
1 ༵ഠֵ Thuraya XT-LITE �໙ă
2 ബҦᅪཀྵ�ቊคă
3
Ԡ�ăר௷ৰჵངբნႼ�љ࿉
ࡅԠउाਹ٢ă
6
1 װwww.thuraya.com ࿉ᆵԃїኧዥဧ
� XT-LITE �ࣃԠ�ऋă
2 װwww.thuraya.com ࿉ᆵԃїኧዥဧ
� XT-LITE �ऋă
3 ج٢༵֗ഠ֣ዚ٢ಭ ڈThuraya
XT-LITEă
4 ෪ᅂ USB ٢ੇએा PC � Thuraya XTLITEă
5 ฺࢦཤᅙஅජ� XT-LITE �ࣃԠ�
༇ӭLj�Ԡ�खቑطԠ༵Ԡ�ࣃ�ă
൜�એाฮদჵॣ��ऋ�ࣃǖ
��ཤᅙง ◌
ࢩ
ْ Ԡ�٢֗�Ljख USB ٢
ੇय़�એाᆷ UDC Ն�ජă
രࡄ खฮদ�ૐნځ�ڤᆷ PC ජă
ᅏᅂ��
෯
XT-LITE ཕࡓ
�
Ժዮ
उధງځ/�ງ
љኘ # उৰ◌्ງउధă
൩Ԡ◌्ງLjᆷ 3 ஊௗљ࿉ # उᆶљ࿉ᅑ�ऋă
࣠ઍ�ീ
ตൠ٢�ବԃљ࿉ၤᇎउă
Ԡೇངઍ�ീ > ࣠ઍ�ീă
2. ၤᇎ�ֿཤቜDŽง �
ࢩSIM Džࢽ٢�ବԠྩă
Ԡᄕ෮
գљ उৰᆷԠᄕ�ӭኳ෮ቇࣱ೧ࡪă
Պ௷�جೇཤቜ
ೇངԬ� > ج > �طೇཤቜă
��Ӂตൠ෮
գљ
��ᅮ႗
ೇངԬ� > 7.රቜ > 3.ᅮ႗ă
ࣔ૽
൩Պ௷ዥ१ჲԇ�ବLjљ࿉ࡅԠउDŽԠೇངࣔ૽Džă
1.
उৰᆷዋڈӁ�ӭኳ෮ቇࣱ೧ࡪă
௷�ཀྵ�٢ᆷ෪ᅂ၍׃ᅙዥࣞ�ዮ
ካນăബҦ௷�ง ࢩ
׃ᅙዥࣞ�ዮካ
ນLjځಓ� Thuraya ง ࢩ
Ճฅ�ബҦ௷
�ཀྵ�٢ᆷ၍෪ᅂ�ሸբᆨኡǖ
• ځಓՃฅ Thuraya ง
ӳ൜�
ࢩLj
௷ᅏნڧࣱᅏ෪ᅂDŽৰ෪ᅂ
XT-LITE Ԡ���ବ 11 11 2 Ճฅಝ
��ሸբ�ዮDž
• ᆟ� XT-LITE ٢֣֗ნ�٢Lj෪ಝ
Ҧ֕෪ᅂካນ
• ځಓࣹՊ ࢡ�ڂဪ�ᅟۇ
7
�ሊఠּ
◌्ি۴ѝ
�ሊ
XT-LITE
Đ྇གྷନđă
• աฅ�ೇངԬ� > གྷନ > SAT ኙՂง�ڈဧ SAT ኙՂă
ཤቜ༇ӭԠ็ࢡ XT-LITE ෯Đཤቜຘ
đă
• ሸᆷ�ဧ XT-LITE �ཤቜԠྩă�ಭง
• ംബҦཀྵ���Ԝญ�ओԠ�Ă�ศ
• ംബҦཀྵ���Ԝญ�ओԠ�Ă�ศ
ඐ�ዟђă
ࢡ
खዋڈԠ�ӁԺዮă
ࢩ
ඐ�ዟђă
ࢡ
• աฅყּԃቱဧՆൠ SIM ă
XT-LITE ෯ĐՆൠ SIM đă
8
• ࣹՊ SIM �అᆽࢡԠԠă
• ตൠ�ྜ� PUK ବख०ᅂ SIM ă
• ᆷ�༭Lj൜�ᆷ XT-LITE ቩ෪ᅂԜ� SIMDŽ ۾Thuraya SIM DžLjᇏӛၐಭᅂିᅍ�
ྚDŽംઍ�௷��ྚ��ඟჵࣹՊିᅍ��ჲࢱ࢝Džă
�ሊఠּ
◌्ি۴ѝ
�ሊ
• աฅቱಭง
XT-LITE ◌
۫ ᄥ֘ڴԠԠାă
їഠ�ବჲࢡ�ڃღཇă
ࢩă
• ൜�ง ࢩ
֕ၝֵ�ሊLjৰೇངԬ� > їഠ◌ॣ�ቱቜă
��ཤǖ௷ৰჵቱቜ௷�ง ࢩ
ۑԜ��௷�ڃീරቜLjં൜ǖઍ�ീࢡԠྩă
ࢅ�ֵզරቜǖ ࢅ
�ֵզරቜखࡨᆊན◌
ۙ ࢤ�ง ࢩ
රቜăखඑּ�ീරቜLjં൜ઍ�ീ� Ԡྩă
Ԡྩă
• ֵզරቜ�їഠ�ବ 0000ă
• ൜��ବჲԠ��ԃҾღཇLjംઍ�௷��ྚ��ඟă
• 3 �ตൠ�ྜ� PIN ବखງ ځSIM ă൩Ԡ◌्ງLjӛၐตൠ PUK ବă
PIN/PUK ବჲࢡ�ڃღཇă
• ตൠ PUK ବࡄ Lj௷ৰჵරቜဧ� PIN ବă
• ൜�ཇࣔ PUK ବLjംઍ�௷��ྚ��ඟă
9
10
)L
.
)L
1
2
3
4
5
6
7
8
9
:
/USB q
<
=
SMS +
SMS
)
(
1
)L
SMS o
?
GPS-fix
)
2
=
<
3
4
6
7
:
5
(
>
?
?
9
8
;
>
1
)L
XT-LITE
SAT
?
2
o
o
6
?
o
<
1
<
2
3
<
3
1
6
3
)L
SMS
o
<
<
?
?
o
SMS
?
(
)L
)
<
SMS <
<
<
<
<
(
1
<
<
)o
4
<
2
#
*
)L
<
4
1
2
3
•
GPS
?
o
:
<
:
<
?
2
)
<
:
1
:
?
)L
GPS
:(? o
<
)o
1
(
)L
)L
SOS
-
<
<
<
SOS
? SOS
)L
-
:
XT-LITE
?
o
)L
<
SOS
? -
)L
•
2
:
<
(
2
3 )
5
HPA
Thuraya XT-LITE
:
USB
UDC
o
(o
)L
)L
Thuraya
?
o
S/W <
) HPA
o
Thuraya XT-LITE
XT-LITE
1
www.thuraya.com
XT-LITE
2
www.thuraya.com
Thuraya XT-LITE o
3
4
Thuraya XT-LITE
USB
XT-LITE
?
6
5
:
Thuraya XT-LITE
HPA
1
2
)L
o
3
o
HPA
XT-LITE
?
)L
#
#
Thuraya o
3
•
:
.1
<
?
(
Thuraya
SIM
)
.2
)
?
11112
<
<
XT-LITE
(
XT-LITE
.3 <
)
.7 <
o
(
7
SAT
SAT <
o
)L
o
o
)L
<
‘
XT-LITE
(
o
SIM
Thuraya
SIM
SIM
)
XT-LITE
‘
o
’
SIM
PUK
XT-LITE
‘
)
(
8
XT-LITE
’
SIM’
XT-LITE
<
:
-
:
0000
XT-LITE
)L
o
PUK
SIM
PIN
o
PIN
3
PUK
PIN/PUK
PUK
9
Certification / Compliance / Warranty
SAR Information
Your wireless Thuraya XT-LITE phone
is a radio transmitter and receiver. It is
designed and manufactured not to exceed
the limits for exposure to radio frequency
(RF) recommended by international
guidelines (ICNIRP). These limits are
part of comprehensive guidelines and
establish permitted levels of RF energy
for the general population. The guidelines
include a substantial safety margin
designed to assure the safety of all
persons, regardless of age and health.
The exposure guidelines for mobile
devices employ a unit of measurement
known as the Specific Absorption Rate or
SAR. The SAR limit stated in the ICNIRP
guidelines is 2.0 watts/kilogram (W/kg)
averaged over ten grams of tissue. Tests
for SAR are conducted using standard
1
operating positions with the device
transmitting at its highest certified power
level in all tested frequency bands.
The actual SAR level of an operating
device can be below the maximum
value because the device is designed
to use only the power required to reach
the network. That amount changes
depending on a number of factors such
as how close you are to a network base
station. The highest SAR value under the
ICNIRP guidelines for use of the device
at the ear is 0.324W/kg.
This satellite mobile phone cannot be
used in a body-worn position because in
this position the phone cannot properly
receive and transmit the satellite signal
therefore in this mode of operation is not
practical and restricted in use.
Use of device accessories and
enhancements may result in different
SAR values. SAR values may vary
depending on national reporting and
testing requirements and the network
band. Additional SAR information may
be provided under product information at
www.apsi.co.kr.
Certification / Compliance / Warranty
FCC Compliance
Your mobile device is also designed
to meet the requirements for exposure
to radio waves established by the
Federal Communications Commission
(USA) and Industry Canada. These
requirements set a SAR limit of 1.6W/kg
averaged over one gram of tissue and
the Thuraya XT-LITE complies with these
requirements. Although not intended to
support operations when body-worn (in
this position the phone cannot properly
receive and transmit the satellite signal
therefore in this mode of operation is
not practical) the use of body-worn
accessories is limited to belt-clips,
holsters, or similar accessories that have
no metallic component in the assembly
and which provide at least 0.5cm
separation between the device, including
its antenna, and your body.
It is not possible to acquire an FCC ID
because of existing FCC regulation 25.129
(d), but the product has passed all FCC
standard tests. XT-LITE also complies with
FCC SAR standards. The SAR value (head)
of the Thuraya XT-LITE is 0.360 W/kg.
LIMITED WARRANTY
This Limited Warranty is provided to the
original end-user purchaser (the ‘Buyer’)
of any new Thuraya XT-LITE Satellite
Handheld Phone. This Limited Warranty
is non-transferable.
Caution
This equipment generates or uses
radio frequency energy. Changes or
modifications to this equipment may
cause harmful interference unless the
modifications are expressly approved
in the instruction manual.The user
could lose the authority to operate this
equipment if an unauthorized change
or modification is made.
RoHS Compliance
This product is in compliance with EU
RoHS Directives and manufactured using
lead-free solder paste and parts.
Warranty Coverage and Service
Thuraya warrants all new Thuraya XT-LITE
Satellite Handheld Phones (the ‘Product’)
under normal use and wear to be free
from defects in material and workmanship
for a period of one (1) year from the date
of purchase by the original Buyer (the
‘Warranty Period’). If, under normal use
and wear, the Product becomes defective
in materials or workmanship and is returned
at Buyer's expense to a Thuraya Authorized
Service Center during the Warranty Period,
the Product will be repaired or replaced, at
2
Certification / Compliance / Warranty
Thuraya’ sole and exclusive option, and at
no charge to Buyer. Buyer will be required
to provide reasonable proof of date of
purchase. Reconditioned replacement
components, parts, units or materials
may be used if the Product is repaired or
replaced. Costs incurred in the removal, deinstallation or reinstallation of the Product
are not covered.
THIS LIMITED WARRANTY DOES
NOT COVER AND THURAYA WILL
NOT BE RESPONSIBLE FOR THE
FOLLOWING:
This Limited Warranty will be void in
its entirety if the Product is serviced by
anyone other than Thuraya or a Thuraya
Authorized Service Centre. Buyer's sole
and exclusive remedy shall be the repair
or replacement of the defective product,
3
as specifically described above. Thuraya
neither assumes nor authorizes any
Authorized Service Centre or any other
person or entity to assume any other
obligation or liability beyond that which is
provided for in this Limited Warranty.
This Limited Warranty is conditioned
upon proper use of the Product and does
not cover the following:
• products or accessory equipment not
manufactured or provided by Thuraya
• failures or defects caused by misuse,
abuse, accident, alteration, dampness,
sand, unusual physical, electrical or
electromechanical stress or neglect
• unauthorized installation, removal or
repair
• failure to follow instructions
• fire, lood or other nature caused
accidents
• spills of food or liquids; moisture
• normal wear and tear
• scratches, dents and cosmetic
damage
• improper installation, maintenance or
improper storage
• operation or repair; performance of
the Product when used in combination
with other products or equipment not
manufactured or provided by Thuraya
• payments for labor or service to
representatives or service centers not
authorized by Thuraya.
This limited Warranty of the Product
does not cover the operation, availability,
coverage, range or grade of service
provided by the satellite systems.
Limitation of Liability
THIS LIMITED WARRANTY IS IN LIEU OF
ALL OTHER WARRANTIES, WHETHER
EXPRESSED, IMPLIED OR STATUTORY,
INCLUDING, WITHOUT LIMITATION,
THE IMPLIED WARRANTIES OF
MERCHANTABILITY AND FITNESS FOR
A PARTICULAR PURPOSE. THURAYA
SHALL NOT BE LIABLE FOR DAMAGES
IN EXCESS OF THE PURCHASE PRICE
OF THE PRODUCT, LESS REASONABLE
AMOUNT FOR USE AND WEAR, OR FOR
ANY INCIDENTAL, SPECIAL, PUNITIVE
OR CONSEQUENTIAL DAMAGES OF
ANY NATURE WHATSOEVER, OR FOR
ANY DELAYS, LOSS OF USE, TIME,
PROFITS, REVENUE OR SAVINGS, ANY
COMMERCIAL LOSS, INCONVENIENCE,
MILEAGE, DAMAGE TO BUYER'S OR TO
OTHER PERSON'S VEHICLE OR ANY
OTHER PROPERTY, ARISING FROM
THE USE OR INABILITY TO USE THE
PRODUCT, OR OTHERWISE FOR ANY
FAILURE TO PERFORM.
All liability and obligations of Thuraya
under this Limited Warranty shall terminate
upon the expiration of the applicable
Warranty Period provided herein. This
Limited Warranty sets forth the entire
responsibility of Thuraya with respect to
the Product. There are no other liabilities
of Thuraya arising from the sale of the
Product whether based on warranty,
contract, negligence or other theories
of liability. No employee, agent, dealer,
representative, distributor, service partner
or reseller is authorized to modify or extend
this Limited Warranty or to make binding
representations, whether in advertising,
presentations or otherwise, in the name
and/or on behalf of Thuraya regarding the
Product or this Limited Warranty.
In no event shall Thuraya liability exceed
the cost of correcting defects as provided
herein.
This Limited Warranty gives specific
legal rights to Buyer, and Buyer also may
have other rights which may vary from
jurisdiction to jurisdiction, as this Limited
Warranty does not affect the Buyer’s
legal rights under the relevant applicable
national laws in respect of the sale of
consumer goods or the Buyer’s rights visà-vis the retail seller/dealer of the Product.
1
4
Asia Pacific Satellite
communications Inc (APSI), a
company duly incorporated and
validly existing under the laws of
South Korea, hereby declares
that the Product is in compliance with
the essential requirements and other
relevant provisions of Directive 1999/5/
EC, Directive 2013/35/EC and EU RoHS
Directives, as well as any other applicable
regulations, including but not limited to
those related to (i) telecommunications
terminal equipment; (ii) use of hazardous
substances in electrical and electronic
equipment; and (iii) safety requirements
in respect of electromagnetic fields
which are in force in the countries
listed in the Appendix A of the warranty
service program for the Product at the
moment this Limited Warranty is issued.
In addition, the Product complies with
international standards and specifications
0984
5
2
(among others, the CE marking and the
ITU GMPCS MoU mark).
No reproduction in whole or in part allowed
without Thuraya’s prior written approval.
The crossed-out wheeled bin means that
within the European Union the product
must be taken to separate collection at
the product end-of-life. Do not dispose
of these products as unsorted municipal
waste.
If any part of this Limited Warranty is held
to be illegal or unenforceable, such partial
illegality or unenforceability shall not affect
the enforceability of the remainder of the
limited warranty.
THURAYA trademark is the sole
and exclusive property of Thuraya
Telecommunications Company.
Printed in South Korea.
Copyright © 2015 Thuraya
Telecommunications Company. All rights
reserved.
This manual is published by Thuraya
Telecommunications Company without any
warranty. Thuraya Telecommunications
Company reserves the right to make
changes and improvements to any of the
products described in this manual without
prior notice.
Caution
THERE IS A RISK OF EXPLOSION
IF THE BATTERY IS REPLACED BY
AN INCORRECT TYPE. DISPOSE OF
USED BATTERIES ACCORDING TO
THE INSTRUCTIONS.
www.thuraya.com