1
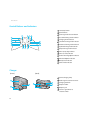
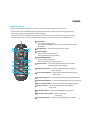
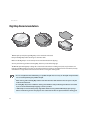
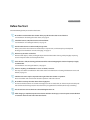
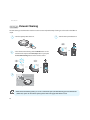
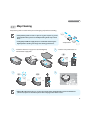
Ver 1.0
Robot Cleaner
.&4UZMF
6TFS.BOVBM
ME7704UZMF
.37.
Thank you for purchasing the ME770 4UZMF robot cleaner.
Before using the product, please read this User Manual carefully, and keep it for future reference.
Depending on your model, some contents of this User Manual may differ from the actual product.
The contents of this User Manual are subject to change without notice.
Overview
Robot Cleaner
ǘTopǘ
3
1
2
4
5
ǘRearǘ
7
8
9
1 Control buttons and indicators
2 $BNFSB
3 %VTU#JO$PWFS
4 Bumper
6
5
10
11
Obstacle and signal detection
sensors
6 Air outlet
7 Adaptor jack
ǘBottomǘ
14
13
10
8 Power switch
12
13
9 Signal receiving sensor
10
10 Cliff detection sensors
11 Charging terminals
12
12
15
16
12 Wheels
13 Side brush installation pins
14 Dust inlet
15 Main brush
1 Mop plate installation holes
11
Robot Cleaner
Control Buttons and Indicators
1 Start/stop button
2 Power button
11
10
3 Cleaning mode selection button
9 8 7
4 7BDVVN$MFBOJOHNPEFJOEJDBUPS
12
13
14
15
5 $IBSHJOHNPEF indicator
6
5
4
1
2
6 4IBEPX$MFBOJOHNPEF indicator
7 *OUFOTJWF$MFBOJOH mode indicator
8 )ZCSJE$MFBOJOHNPEF indicator
3
9 .PQ$MFBOJOHNPEF indicator
10 5JNFSFWFSZEBZ
JOEJDBUPS
11 5JNFSIPVS
JOEJDBUPS
12 %PVCMF$MFBOJOH0QUJPOJOEJDBUPS
13 5ISFTIPME0QUJPOJOEJDBUPS
14 #BUUFSZMFWFMJOEJDBUPS
15 5VSCPNPEFJOEJDBUPS
Charger
ǘFrontǘ
ǘBackǘ
1 Power/charging lamp
2 Guide signal transmission sensor
1
2
3
4
5
6
3 Charging terminals
4 Adaptor holder
5 Adaptor jack
6 Sensor’s signal distance
selection switch
12
Before Use
Remote Control
You can conveniently access the various functions of the robot cleaner with your remote control.
Functions that can be controlled through the control panel on the robot cleaner: WBDVVNDMFBOJOHIZCSJEDMFBOJOH
mop cleaning, TIBEPXDMFBOJOHJOUFOTFDMFBOJOHand charging.
Þ
F unctions that can be controlled through the remote control: WBDVVNcleaning, IZCSJE cleaning, NPQ cleaning,
TIBEPX cleaning, JOUFOTFcleaningNBOVBMDMFBOJOHcharging, control suction power, scheduled cleaning
Þ
1 Power Button
1
Press to turn the power on/off.
Þ
Press to return the .&4UZMF to operation mode when it has stopped
due to failure.
2 Charging ButtonÞPress to move SPCPUDMFBOFSUPDIBSHFS
Þ
2
3
4
5
3 Start/Stop Button
Þ
Press to startUIFTFMFDUFEPQFSBUJPO
Þ
1SFTTUPTUBSUTUPQDMFBOJOHBOEESJWJOH
4 SELECT/MANUAL Button
ÞPress to confirm your selection.
Þ
Press to start Manual Cleaning (see page 3).
6
7
8
9
11
12
13
14
6 Hybrid Cleaning ButtonÞPress to start Hybrid Cleaning (see page 2).
10
7 Vacuum Cleaning ButtonÞPress to start Vacuum Cleaning (see page 2).
5 Direction buttonsÞPress to drive the robot cleaner in manual mode
(forward, backward, left, and right).
(Mop + Vacuum)
(Vacuum only)
8 Mop Cleaning ButtonÞPress to start Mop Cleaning (see page 2). (Mop only)
9 Shadow Cleaning ButtonÞPress to start VOEFSGVSOJUVSFDMFBOJOH (see page 3).
10 Intensive Cleaning ButtonÞPress to start Intensive Cleaning (see page ).
11 Double CL. ButtonÞPress to select Double Deep Cleaning Option
(see page 3).
12 Turbo Option ButtonÞPress to select Turbo Option (see page 3).
13 Reservation Cleaning ButtonÞPress to set the UJNFS
(see page 3).
1 5SFTIPME0QUJPOButtonÞPress to sFMFDU5SFTIPME0QUJPOTFFQBHF
13
Installing the Charger
1
Connect the power adaptor.
Þ
Set the robot cleaner detection distance (5 m or 8 m).
Þ
Place the power adaptor in the holder of the charger.
Þ
2
Þ
3
Þ
Check the power connection (blue lamp).
Check the location of the charger.
Clear all obstacles in the area within 1 m
in front, left, and right of the charger
ĚIf
you install the robot cleaner in a place where it will be exposed to direct sunlight, the heat of the sun may
interfere with the auto charging, and the robot cleaner may become discolored over time.
ĚIf
your robot cleaner can’t return to the charger, reset the detection distance.
In
If
14
a narrow area, set it to 5 m, and in a wide area, set it to 8 m.
you set the detection distance to 8 m in a narrow area, the auto charging may be interfered with.
*OTUBMMJOH
Charging
If you have prepared the charger, main body, and remote control, you must then charge the battery of the robot
cleaner to use it. To charge the robot cleaner, follow these steps:
1
Þ
2
Þ
Turn the power switch on.
Hold the robot cleaner with both hands and put it on the charger.
Match the terminals of the robot cleaner with the terminals of the charger.
Put the robot cleaner in the front center of the charger and push the robot
cleaner toward the charger slowly until the status indicator turns red.
3
Use the robot cleaner after charging.
Þ
It takes about 1 hour to charge the battery fully.
(For 2800mAh battery models, it takes about 2 hours.)
After charging for 1 hour, you can use the robot cleaner in normal
suction mode for about 1 hour. (Depending on conditions,
the battery usage time may vary.)
Battery status indicator Charging
Charging completed
Low battery
Blinking every second
On
Blinking 4 times every second
ĚYou
can charge the robot cleaner using connecting the power
adaptor directly to the power jack on the lower-rear side of
the robot cleaner.
17
Robot Cleaner
Installing the Water Supply Big Mop Kit
1
�
3
2
Supply water into the mop plate and attach
the mop to it.
Þ
�
Attach the mop plate.
Fit the joint parts well to the holes of
the robot cleaner.
Þ
ĚIf
you apply excessive force to the
mop plate when you install it on the
robot cleaner, the joint parts of the
mop plate may be damaged.
4
�
Flip it over and turn the system power switch on.
Þ
�
1
Turn the power switch off
(on the lower rear side of the
robot cleaner).
Þ
Robot Cleaner
Product Operation
Big Mop Recommendation
.&4UZMF’s specially designed Big Mop can be rewashed and reused.
Þ
Dampen the Big Mop before attaching it to the XBUFSTank.
Þ
Make sure the Big Mop is not excessively wet to avoid the wheels from slipping.
Þ
You may add cleaning solution to the Big Mop, but it may create wheel slippage.
Þ
The .&4UZMF with Big Mop is designed to clean hard surface floors including wood, tile, vinyl, linoleum and
laminate. The .&4UZMF cleans best on smooth hard surfaces and may not perform well on uneven tiles, heavily
waxed floors or rough surfaces like slate or brick which can snag the cleaning cloth.
Þ
ĚDo
not use Hybrid and Vacuum Cleaning in a puddle of liquid. Please use only on dried spills or liquid residue.
You can use Mop Cleaning for puddles of liquid.
ĚAfter
cleaning, remove the Big Mop and the water from the XBUFSTank and leave the cover open to dry the
inside of the XBUFSTank.
ĚA
wet Big Mop may not be suitable for cleaning unsealed floors. Ask your flooring manufacturer or installer
if you are unsure whether damp mopping is safe for your floor.
Ě .&4UZMF
is not intended to pick up large debris. Before cleaning with the .&4UZMF, pick up large
debris and check for gravel or sharp objects that could scratch the floor if captured under the cleaning pad.
Product Operation
Before You Start
Check the following before you start the robot cleaner.
1
Be careful not to break the robot cleaner when you pull the robot cleaner out of the box.
For information of installing the robot cleaner, see page 14.
2
Check the location (L/R) of the brushes and install them.
For information on installing the brushes, see page 15.
3
Pull the robot cleaner out and manually charge it first.
When you start the robot cleaner for the first time, it may not work, as the battery has probably been
discharged. For information on manual charging, see page 1.
4
Remove any obstacles on the floor.
Remove small objects, clothes, and fragile objects from the floor before cleaning. Fold up lengthy carpet/rug
tassels or keep the robot cleaner away from them.
5
If the dust bin is full, the cleaning performance will be reduced. Emptying the dust bin frequently is highly
recommended.
For information on cleaning the dust bin, see page .
6
If there is anything on cliff detection sensors or wheels, remove it.
This may cause failure or malfunction of the robot cleaner. For information on cleaning cliff detection sensors and
wheels, see page 3.
7
Children and seniors may be surprised at the sight of the robot cleaner in operation.
Please let children and seniors know about the operation of the robot cleaner.
8
Be careful not to drop the robot cleaner from a high place.
Do not use the robot cleaner on a narrow and a high place such as a desk, table, etc. If shoes are placed side by side
at the entrance to the living room, the robot cleaner may recognize them as the floor, which may cause falling.
9
10
The robot cleaner cannot climb over a threshold higher than 1cm.
After charging is complete, keep the robot cleaner docked in the charger, or turn the power switch off which
is located on the lower rear side of the robot cleaner.
1SP
Robot Cleaner
Starting & Stopping Cleaning
Starting Cleaning
1
Turn the power switch on.
Þ
2
3
or
4
or
If you are cleaning an area that is difficult to clean using auto cleaning mode, change to the proper cleaning mode.
Þ
Stopping Cleaning
After cleaning, the robot cleaner returns to the
charger or stops on the spot according to the
cleaning mode.
�
If you press the Start/stop (ⶺĦ ) button when
the robot cleaner is operating, the cleaning will
be stopped.
or
2
Product Operation
Changing the Cleaning Mode
User can set the cleaning mode to match the cleaning environment.
C
leaning modes that you can select using the Mode (M) button on the robot cleaner:
Þ
Hybrid
Cleaning
Vacuum
Cleaning
Mop
Cleaning
Intensive
Cleaning
Shadow
Cleaning
C
leaning modes that you can select using the remote control:
Þ
Hybrid
Cleaning
Vacuum
Cleaning
Manual
Cleaning
Scheduled
Cleaning
Mop
Cleaning
Intensive
Cleaning
Shadow
Cleaning
ĚYou
can’t change the cleaning mode during operation. Select the cleaning mode before starting the robot
cleaner, or select it after stopping the robot cleaner by pressing the Start/stop (ĚĦ ) button on the robot
cleaner or the remote control, then selecting the cleaning mode.
2
Product Operation
Hybrid Cleaning
In Hybrid Cleaning, the robot cleaner performs the Vacuum Cleaning and Mop Cleaning at the same time.
Hybrid Cleaning offers a comprehensive floor care solution because of the use of the twin side brushes, the main brush,
the BLDC suction, and the reusable microfiber Big Mop with the Water Supply Tank all together. The Hybrid Cleaning is
recommended for comprehensive cleaning on your hard floors.
ĚPlease
do not use Hybrid Cleaning mode on the carpet or rug because the carpet or rug can be damaged by
the Hybrid Cleaning mode. Use Hybrid Cleaning mode only on the hard floor.
1
Follow the directions on page 1 to attach the Big Mop
with the Water Supply Tank.
Þ
�
�
2
Turn the main power button on.
Þ
2
or
1
3
S
�
or
4
ĚWhile
in Hybrid Cleaning mode, you can also select
Double Cleaning Option and Threshold (climb over) Option.
ĚTo
select these options, please refer to the pages that
reference each.
2
Product Operation
Robot Cleaner
Vacuum Cleaning
Vacuum cleaning is used where the needs are vacuum suction only without mop cleaning. It can be used on hard floor or
carpet.
1
3
2
Turn the system power switch on.
Þ
Select the Vacuum Cleaning with the Mode button on the
Control Panel and press the Start/Stop button or just press
the Vacuum Cleaning button on the remote control.
Þ
�
Turn the main power button on.
Þ
or
or
4
ĚWhile
in Vacuum Cleaning mode, you can also select Turbo option, Double Cleaning option and Threshold
(climb over) option. To select these options, please refer to the pages that reference each.
2
Product Operation
Mop Cleaning
Mop Cleaning mode is used for when you need mopping only without vacuuming.
ĚIf
Mop Cleaning mode is used on carpet or rug, the carpet or rug can be
damaged. Therefore, please use the Mop Cleaning mode only on hard
floor.
ĚFor
Big Mop with Water Supply Tank, we recommend moistening the
Big Mop before attaching it for longer wet cleaning performance.
1
Follow the directions on page 1to attach the Big Mop
with the Water Supply Tank.
Þ
�
�
2
Sweep Pattern
Turn the main power button on.
Þ
2
or
1
3
4
�
or
ĚWhile
in Mop Cleaning mode, you can also select Turbo option, Double Cleaning option and Threshold
(climb over) option. To select these please refer to the pages that reference each.
27
Product Operation
Intensive Cleaning
The robot cleaner intensively cleans the surrounding area relative to its current location.
1
2
Turn the power switch on.
Þ
or
3
�
or
4
ĚIn
Auto Cleaning mode, the robot cleaner stops on the spot after it has finished the cleaning.
ĚIn
the area in which there are many obstacles, the robot cleaner may not operate in normal cleaning modes.
2
Product Operation
Robot Cleaner
Shadow Cleaning
You can clean under your bed or furniture.
ĚTo
use shadow cleaning mode, turn the room light on. In a dark room, the robot cleaner can’t detect the
space under the bed or furniture.
ĚThe robot cleaner moves to a place under the bed or furniture to start shadow cleaning. To reduce the time
spent moving through the room, put the robot cleaner in front of the bed or furniture under which you want to
perform shadow cleaning.
1
3
Turn the power switch on.
Þ
2
Put the robot cleaner in front of
a bed or furniture.
Þ
4
or
or
�
or
5
ĚWhen
Shadow Cleaning is completed, the robot cleaner
comes out under a furniture and stops.
Product Operation
Manual Cleaning
You can control the robot cleaner directly using the remote control.
1
Stop the robot cleaner that is operating by pressing the
Start/stop (ĚĦ) button.
Þ
or
2
Press the Manual button on the remote control.
Þ
Air suction will start in its current place.
If you press the Manual button again, air suction will be
stopped.
3
By pressing direction keys on the remote control, you can
move the robot cleaner where you want it to go.
Þ
ĚDuring
ĚYou
charging, you can’t move the robot cleaner manually.
can use this mode when you want to move the robot cleaner without air suction.
Robot Cleaner
Scheduled Cleaning (Reservation Cleaning)
For daily efficient hands free cleaning, the robot cleaner provides 2 Reservation Cleaning modes. One starts cleaning after
1 hour from the time you set it and the other starts at the same time everyday.
ĚReservation
Cleaning only works from the charging station after you set the Reservation Cleaning.
You must put the robot cleaner on the charging station to begin at the scheduled time.
ĚYou
ĚIf
can only set the Reservation Cleaning mode using your remote control.
the robot cleaner is charging at the scheduled time, it will start the cleaning after finishing the charging.
ĚIf
the cleaning time is scheduled to ˄1 hour˅, your setting will be cleared after completing the ˄1 hour˅
scheduled cleaning.
1
Turn the system power switch on.
Þ
2
Turn the main power button on.
Þ
or
2
3
Þ
5
Þ
Press the Reservation mode
either 1 hour or Daily by
pressing the Reservation
button on the remote control.
The robot cleaner will be cleaning at the time
of your Reservation setting.
4
Press the Select button
to confirm the Reservation
setting.
Þ
Product Operation
Turbo Option
While you are using the Hybrid / Vacuum / Intensive / Shadow / Manual Cleaning, by pressing the Turbo button on the
remote controller you can control suction power.
ĚTurbo
option is not available in Hybrid Cleaning mode and Mop Cleaning mode.
or
�
Power off
Power on
Threshold Option
For less than a 1cm threshold height of threshold or carpet, rug and etc, the user is able to choose threshold climbing over
ON/OFF option by the remote control.
ĚWe
recommend not to climb over while in Mop Cleaning mode and Hybrid Cleaning mode due to the Big Mop
with the Water Supply System.
ĚWe
also recommend that you select the Threshold option (climb over) ON while in Vacuum Cleaning mode.
ĚFactory
default is set to not climb over for Hybrid, Vacuum and Mop Cleaning mode.
1
3
2
2
1
�
or
3
Power on
Climbing over Threshold
Power off
Not climbing over Threshold
Robot Cleaner
Double Deep Cleaning Option
The Double Deep Cleaning Option performs 2 cleaning sessions of the vertical pattern overlapped by the horizontal pattern.
Deep Cleaning Pattern
Vertical pattern overlapped by
the horizontal pattern
ĚThe
1
factory default is set to Deep Cleaning Pattern in Hybrid / Vacuum / Mop / Shadow Cleaning modes.
Turn the system power switch on.
Þ
Double Deep Cleaning Option
Performs 2 cleaning sessions of the vertical
pattern overlapped by the horizontal pattern.
2
Turn the main power button on.
Þ
or
Product Operation
3
Select any one of Hybrid / Vacuum / Mop / Shadow Cleaning. To learn how to select these options,
you may refer to the relevant sections on the User Manual.
Þ
or
4
or
Press the Double CL button on the remote control.
The Double Deep Cleaning Option indicator is
now turned on.
Þ
or
5
The robot cleaner will perform 2 cleaning
sessions of the vertical pattern overlapped
by the horizontal pattern.
Þ
�
ĚDouble
Deep Cleaning option is available for Hybrid Cleaning, Mop Cleaning, Vacuum Cleaning and Shadow
Cleaning modes. Double Deep Cleaning option is not available in Scheduled Cleaning, Intensive Cleaning,
and Manual Cleaning modes.
3
Product Operation
.BJOUFOBODF
Cleaning Sensors and Wheels
Cleaning Sensors
Clean (blow or wipe) the three sensors with the included cleaning brush or a cotton swab.
Þ
If sensors are severely contaminated, wipe with a moistened
cotton swab.
Do not wipe directly with water, and do not use benzene or
alcohol to clean sensors.
Cleaning Wheels
Clean wheels using the brush.
Þ
To clean the front wheel, remove the screws and remove the wheel, and clean it with the brush.
To clean the two main wheels, clean them with the brush while rotating slightly by hand.
Remove foreign objects such as hair that obstruct the wheel’s operation.
Robot Cleaner
Cleaning the Dust Inlet
2
1
�
Remove the dust inlet cover.
3
Remove the main brush.
4
Clean the removed main brush
with the cleaning brush.
5
�
To reinstall the dust inlet cover, insert the 2 tips to the
matching holes on the robot cleaner.
Check the groove’s shape and
insert the main brush into the
fixing hole, and then secure
the wing of the fixing pin to
the fixing pin.
.BJOUFOBODF
Using and Managing the Battery
The battery is a consumable item. The more you use the battery, the shorter the battery’s lifetime.
Battery Lifetime
We guarantee 6 months of use in a normal environment.
Þ
Always charge the battery for the best use experience.
Þ
The battery lifetime may vary depending on the use environment.
Þ
Charging Battery
If you are using the robot cleaner for the first time, please fully charge the battery first.
Þ
It takes about 1 hour to charge the battery fully. (For 2800mAh battery models, it takes about 2 hours.)
Þ
To Extend Battery Life
If you don’t intend to use the robot cleaner for an extended period of time, turn off the power switch after charging the
battery fully.
Þ
Clean the dust inlet, dust bin, main brush, and side brushes frequently. If you use the robot cleaner with the dust bin full,
the rotation of the internal motor will be increased, which may shorten the battery lifetime.
Þ
Always use the robot cleaner after charging.
Þ
Do not use the robot cleaner in a place where it will be exposed to direct sunlight or near the heating source.
Þ
4
Robot Cleaner
Battery Replacement
If you notice that the operating time has been significantly reduced, you may need to replace the battery.
Þ
You must use a battery that is manufactured by Moneual.
Þ
Remove the battery from the robot cleaner when the system power is off.
Þ
Dispose of your old batteries according to the local laws and regulations of your region.
To purchase an extra battery, please contact our customer service.
Þ
If it is difficult to replace the battery by yourself, please contact our customer service.
Þ
1
2
Turn the power switch off.
�
Remove four screws and remove
the battery cover.
3
Disconnect the battery cable connector and remove the battery.
(Press and hold the lock clip to disconnect the battery cable connector.)
�
4
.BJOUFOBODF
Maintenance
4
Install the new battery
and connect the battery
cable connector.
Replace the battery cover and
tighten with four screws.
�
Battery Handling and Safety Information
If you leave the fully discharged battery for a long time, the battery may become damaged and you may not be able to
use it.
Þ
If you use a battery other than Moneual’s for use with the robot cleaner or the battery may be damaged.
Þ
R
emove the battery before disposing of the robot cleaner.
Þ
4