1
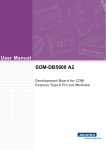
User Manual SOM-AB5500 Copyright The documentation and the software included with this product are copyrighted 2011 by Advantech Co., Ltd. All rights are reserved. Advantech Co., Ltd. reserves the right to make improvements in the products described in this manual at any time without notice. No part of this manual may be reproduced, copied, translated or transmitted in any form or by any means without the prior written permission of Advantech Co., Ltd. Information provided in this manual is intended to be accurate and reliable. However, Advantech Co., Ltd. assumes no responsibility for its use, nor for any infringements of the rights of third parties, which may result from its use. Acknowledgements AMI is a trademark of American Megatrends Inc. VIA is a trademark of VIA Technologies, Inc. IBM, PC/AT, PS/2 and VGA are trademarks of International Business Machines Corporation. Intel and Pentium are trademarks of Intel Corporation. Microsoft Windows® is a registered trademark of Microsoft Corp. RTL is a trademark of Realtek Semi-Conductor Co., Ltd. ESS is a trademark of ESS Technology, Inc. UMC is a trademark of United Microelectronics Corporation. SMI is a trademark of Silicon Motion, Inc. Creative is a trademark of Creative Technology LTD. CHRONTEL is a trademark of Chrontel Inc. All other product names or trademarks are properties of their respective owners. SOM-AB5500 User Manual Part No. 2006AB5500 Edition 1 Printed in Taiwan December 2011 ii COM Design Support A Series of Value-Added Services for Carrier Board Development Advantech COM Design Support Services help customers to reduce the time and work involved with designing new carrier boards. We handle the complexities of technical research and greatly minimize the development risk associated with carrier boards. COM Product & Support Services Full Range of COM Product Offerings Comprehensive Document Support Design Assistance Services Schematic Review Placement and Layout Review Debugging Assistance Services General/Special Reference Design Database Thermal Solution Services Standard Thermal Solutions Customized Thermal Solutions Embedded Software Services Embedded OS BIOS Customization Application Library: SUSI (Secure and Unified Smart Interface) iii SOM-AB5500 User Manual A Series of Value-Added Services for Carrier Board Development Advantech COM Design Support Services help customers to reduce the time and work involved with designing new carrier boards. We handle the complexities of technical research and greatly minimize the development risk associated with carrier boards. COM Product & Support Services Advantech provides a full range of Computer on Modules including COM-Express, ETX, XTX and COM-Express Compact and COM-Ultra to fulfill diverse customer applications. Advantech also serves comprehensive document support to clients for project development. Design Assistance Services The Design Assistance Service is created to offer essential help to complete crucial development tasks: schematic review, placement review, debugging and a general/ special database of technologies for reference purposes. All services reduce design risks associated with completing customer carrier boards. Thermal Solution Services In order to provide quicker and more flexible solutions for customer's thermal designs. Advantech provides thermal solution services including modularized thermal solutions and customized thermal solutions. Embedded Software Services Advantech provides embedded software services to customers who integrate Advantech hardware products. Advantech embedded software services include Embedded BIOS services, OS services and API Library iManager. Embedded software services help decrease design effort and project complexity, and accelerate product development. COM Design Support Zone: http://com.advantech.com/ Advantech reserves the right to determine, on a case by case basis, whether or not COM Design Support Services are appropriate. Technical Support and Assistance 1. 2. Visit the Advantech web site at www.advantech.com/support where you can find the latest information about the product. Contact your distributor, sales representative, or Advantech's customer service center for technical support if you need additional assistance. Please have the following information ready before you call: – Product name and serial number – Description of your peripheral attachments – Description of your software (operating system, version, application software, etc.) – A complete description of the problem – The exact wording of any error messages SOM-AB5500 User Manual iv Safety Instructions 1. 2. 3. 4. 5. 6. 7. 8. 9. 10. 11. 12. 13. 14. Read these safety instructions carefully. Keep this User Manual for later reference. Disconnect this equipment from any AC outlet before cleaning. Use a damp cloth. Do not use liquid or spray detergents for cleaning. For plug-in equipment, the power outlet socket must be located near the equipment and must be easily accessible. Keep this equipment away from humidity. Put this equipment on a reliable surface during installation. Dropping it or letting it fall may cause damage. The openings on the enclosure are for air convection. Protect the equipment from overheating. DO NOT COVER THE OPENINGS. Make sure the voltage of the power source is correct before connecting the equipment to the power outlet. Position the power cord so that people cannot step on it. Do not place anything over the power cord. All cautions and warnings on the equipment should be noted. If the equipment is not used for a long time, disconnect it from the power source to avoid damage by transient overvoltage. Never pour any liquid into an opening. This may cause fire or electrical shock. Never open the equipment. For safety reasons, the equipment should be opened only by qualified service personnel. If one of the following situations arises, get the equipment checked by service personnel: – The power cord or plug is damaged. – Liquid has penetrated into the equipment. – The equipment has been exposed to moisture. – The equipment does not work well, or you cannot get it to work according to the user's manual. – The equipment has been dropped and damaged. – The equipment has obvious signs of breakage. Safety Precaution - Static Electricity Follow these simple precautions to protect yourself from harm and the products from damage. To avoid electrical shock, always disconnect the power from your PC chassis before you work on it. Don't touch any components on the CPU card or other cards while the PC is on. Disconnect power before making any configuration changes. Electrostatic discharge as you connect a jumper or install a card may damage sensitive electronic components. Packing List Before you begin installing your card, please make sure that the following materials have been shipped: 1 SOM-AB5500 Carrier Board v SOM-AB5500 User Manual SOM-AB5500 User Manual vi Contents Chapter 1 Connector and Jumper Setting ..........1 1.1 Connectors and Jumper Setting................................................................ 2 Figure 1.1 SOM-AB5500 PCB Top View ..................................... 2 Figure 1.2 SOM-AB5500 Bottom View ........................................ 2 Connector List ........................................................................................... 3 Jumper Setting and Switch List................................................................. 3 Connector Pin Name Definition................................................................. 4 Table 1.1: LAN1: LAN RJ45 Connector #: low active............. 4 Table 1.2: USB1:USB Connector ................................................ 4 Table 1.3: USB2: USB Connector ............................................... 4 Table 1.4: CN15: CRT Connector ............................................... 5 Table 1.5: COM3: COM Port Connector #: low active............ 5 Table 1.6: COM4: COM Port Connector...................................... 5 Table 1.7: COM5: COM Port Connector...................................... 6 Table 1.8: COM6: COM Port Connector...................................... 6 Table 1.9: SATA0: SATA0 Connector (TopCliff) ......................... 6 Table 1.10: SATA1: SATA1 Connector (TopCliff) ......................... 6 Table 1.11: USB3&4: USB3 & USB4 Connector .......................... 7 Table 1.12: USB5: USB5 Connector ............................................. 7 Table 1.13: CN19: USB Client Connector ..................................... 7 Table 1.14: Audio1: Audio Connector............................................ 8 Table 1.15: LVDS1: LVDS Connector .......................................... 8 Table 1.16: PWR_INVT1: IINVERTER Power Connector ............. 9 Table 1.17: LPC1: LPC Connector #: low active ................... 9 Table 1.18: BH1: RTC Battery Connector ..................................... 9 Table 1.19: GPIO1: GPIO Connector .......................................... 10 Table 1.20: WDT1: Watchdog Test Connector............................ 10 Table 1.21: ATX12V_1: ATX Power input Connector.................. 10 Table 1.22: DC_JACK1 DC Power Input Connector .................. 10 Table 1.23: RST1: Rest Button Test Connector #: low active 10 Table 1.24: BTN1: Power Button Test Connector #: low active . 10 Table 1.25: BAT1: Battery Input Connector1............................... 11 Table 1.26: BAT2: Battery Input Connector2............................... 11 Table 1.27: CN17: Mini PCIe Connector #: low active ........... 11 Table 1.28: CN18: Mini PCIe Connector ..................................... 12 Table 1.29: JLCDVCC1: LVDS Power Setting Connector........... 12 Jumper Setting Function ......................................................................... 12 Table 1.30: JBIOS_DIS0: BIOS0 Disable Connector #: low active 12 Table 1.31: JBIOS_DIS1: BIOS1 Disable Connector #: low active 12 Table 1.32: J5: CMOS Clear Connector...................................... 12 Table 1.33: BTN1: Power Button Connector #: low active ..... 13 Table 1.34: RST1: Power Button Connector #: low active ..... 13 Table 1.35: J4: AT/ATX Mode Jumper ........................................ 13 1.2 1.3 1.4 1.5 vii SOM-AB5500 User Manual SOM-AB5500 User Manual viii Chapter 1 Connector and Jumper Setting 1 1.1 Connectors and Jumper Setting COM4 COM5 COM6 SATA1 SATA0 BAT1 RST1 BAT2 DC_JACK1 RST2BTN2 ATX12V_1 J5 BTN1 AUDIO1 CAN1 SD1 BH1 I2C1 WDT1 GPIO1 JLCDVCC1 LPC1 LVDS1 JBIOS_DIS1 JBIOS_DIS0 J4 SPI_CN1 PWR_INVT1 USB5 COM3 USB2 LAN1 USB1 USB3&4 CN15 Figure 1.1 SOM-AB5500 PCB Top View CN19 CN17 SP12 CN18 Figure 1.2 SOM-AB5500 Bottom View SOM-AB5500 User Manual 2 1.2 Connector List LAN1 LAN RJ45 connector USB1 USB1 connector USB2 USB2 connector CN15 CRT output COM3 COM port3 connector COM4 COM port4 connector COM5 COM port5 connector COM6 COM port6 connector CAN1 CAN BUS connector SATA0 SATA 0 connector SATA1 SATA1 connector USB 3&4 USB3 and USB4 connector USB5 USB5 connector CN19 USB_CLIENT connector AUDIO1 Audio Connector LVDS1 LVDS1 Connector PWR_INVT1 INVERTER power connector LPC1 LPC connector BH1 RTC battery connector GPIO1 GPIO connector WDT1 Watch dog test connector ATX12V_1 ATX power input DC_JACK1 DC power input RST1 RST test connector BTN1 Power Button test connector BAT1 Battery input connector 1 BAT2 Battery input connector 2 CN17& CN18 Mini PCIE connector 1.3 Jumper Setting and Switch List JLCDVCC1 LVDS power setting connector JBIOS_DIS0 BIOS0 disable connector JBIOS_DIS1 BIOS1 disable connector J5 CLEAR CMOS connector BTN1 Power button RST1 Reset button J4 AT/ATX mode jumper 3 SOM-AB5500 User Manual 1.4 Connector Pin Name Definition Table 1.1: LAN1: LAN RJ45 Connector Pin Pin name 1 LAN1_MDI0+ 2 LAN1_MDI0- 3 LAN1_MDI1+ 4 LAN1_MDI1- 5 GBE_CTREF 6 GBE_CTREF 7 LAN1_MDI2+ 8 LAN1_MDI2- 9 LAN1_MDI3+ 10 LAN1_MDI3- 11 LAN1_ACT# 12 +V3.3SB 13 LAN1_LINK100# 14 LAN1_LINK1000# H3 GND_F H4 GND_F Table 1.2: USB1:USB Connector Pin Pin name 1 +V5SB_USB01 2 USB0_z_P- 3 USB0_z_P+ 4 GND 5 GND_F 6 GND_F 7 GND_F Table 1.3: USB2: USB Connector Pin Pin name 1 +V5SB_USB01 2 USB1_z_P- 3 USB1_z_P+ 4 GND 5 GND_F 6 GND_F 7 GND_F SOM-AB5500 User Manual 4 #: low active Table 1.4: CN15: CRT Connector Pin Pin name 1 VGA_z_R 2 VGA_z_G 3 VGA_z_B 4 NC 5 GND 6 GND 7 GND 8 GND 9 +V5_VGA 10 GND 11 NC 12 VGA_y_DDAT 13 VGA_x_HS 14 VGA_x_VS 15 VGA_y_DCLK 16 NC 17 NC 18 GND_FRAME2 19 GND_FRAME1 Table 1.5: COM3: COM Port Connector Pin Pin name 1 COM0_z_DCD# 2 COM0_z_RXD 3 COM0_z_TXD 4 COM0_z_DTR# 5 GND 6 COM0_z_DSR# 7 COM0_z_RTS# 8 COM0_z_CTS# 9 COM0_z_RI# 10 NC 11 NC 12 GND_FRAME 13 GND_FRAME1 #: low active Table 1.6: COM4: COM Port Connector Pin Pin name 1 NC 2 COM1_z_RXD 3 COM1_z_TXD 4 NC 5 SOM-AB5500 User Manual Table 1.7: COM5: COM Port Connector Pin Pin name 1 NC 2 COM2_z_RXD 3 COM2_z_TXD 4 NC Table 1.8: COM6: COM Port Connector Pin Pin name 1 NC 2 COM3_z_RXD 3 COM3_z_TXD 4 NC Table 1.9: SATA0: SATA0 Connector (TopCliff) Pin Pin name 1 GND 2 SATA2_z_TX+ 3 SATA2_z_TX- 4 GND 5 SATA2_z_RX- 6 SATA2_z_RX+ 7 GND Table 1.10: SATA1: SATA1 Connector (TopCliff) Pin Pin name 1 GND 2 SATA3_z_TX+ 3 SATA3_z_TX- 4 GND 5 SATA3_z_RX- 6 SATA3_z_RX+ 7 GND SOM-AB5500 User Manual 6 Table 1.11: USB3&4: USB3 & USB4 Connector Pin Pin name 1 +V5SB_USB23 2 +V5SB_USB23 3 USB2_z_P- 4 USB3_z_P- 5 USB2_z_P+ 6 USB3_z_P+ 7 GND 8 GND 9 GND_FRAME Table 1.12: USB5: USB5 Connector Pin Pin name 1 +V5SB_USB4 2 NC 3 USB4_z_P- 4 NC 5 USB4_z_P+ 6 NC 7 GND 8 GND 9 GND_FRAME Table 1.13: CN19: USB Client Connector Pin Pin name 1 +V5_USB1_CLIENT 2 USB_z_Client_P- 3 USB_z_Client_P+ 4 GND_FRAME_USB 5 GND_FRAME_USB 7 SOM-AB5500 User Manual Table 1.14: Audio1: Audio Connector Pin Pin name 1 LOUTR 2 LINR 3 GND_AUD 4 GND_AUD 5 LOUTL 6 LINL 7 GND_AUD 8 GND_AUD 9 MIC1R 10 MIC1L Table 1.15: LVDS1: LVDS Connector Pin Pin name 1 +V_LCD 2 +V_LCD 3 GND 4 GND 5 +V_LCD 6 +V_LCD 7 LVDS0_D0- 8 NC 9 LVDS0_D0+ 10 NC 11 GND 12 GND 13 LVDS0_D1- 14 NC 15 LVDS0_D1+ 16 NC 17 GND 18 GND 19 LVDS0_D2- 20 NC 21 LVDS0_D2+ 22 NC 23 GND 24 GND 25 LVDS0_CLK- 26 NC 27 LVDS0_CLK+ 28 NC 29 GND 30 GND SOM-AB5500 User Manual 8 Table 1.15: LVDS1: LVDS Connector 31 LVDS_DDC_CLK 32 LVDS_DDC_DAT 33 GND 34 GND 35 LVDS0_D3- 36 NC 37 LVDS0_D3+ 38 NC 39 GND 40 NC Table 1.16: PWR_INVT1: IINVERTER Power Connector Pin Pin name 1 +V12_INV0 2 GND 3 LVDS_BKLTEN 4 LVDS0_VBR 5 +V5_INV0 Table 1.17: LPC1: LPC Connector Pin Pin name 1 CLK33M_LPC 2 LPC_AD1 3 RST_LPC# 4 LPC_AD0 5 LPC_FRAME# 6 +V3.3 7 LPC_AD3 8 GND 9 LPC_AD2 10 +V3.3 11 LPC_SIRQ 12 RST_PLC# 13 +V5SB 14 +V5 #: low active Table 1.18: BH1: RTC Battery Connector Pin Pin name 1 +VBATT 2 GND 9 SOM-AB5500 User Manual Table 1.19: GPIO1: GPIO Connector Pin Pin name 1 GPI0 2 GPO0 3 GPI1 4 GPO1 5 GPI2 6 GPO2 7 GPI3 8 GPO3 9 GND 10 GND Table 1.20: WDT1: Watchdog Test Connector Pin Pin name 1 WDT 2 GND Table 1.21: ATX12V_1: ATX Power input Connector Pin Pin name 1 GND 2 GND 3 +VIN 4. +VIN Table 1.22: DC_JACK1 DC Power Input Connector Pin Pin name 1 +VIN 2 GND 3 GND Table 1.23: RST1: Rest Button Test Connector Pin Pin name 1 PM_EXTRST# 2 GND Table 1.24: BTN1: Power Button Test Connector Pin Pin name 1 PM_PWRBTN# 2 GND SOM-AB5500 User Manual 10 #: low active #: low active Table 1.25: BAT1: Battery Input Connector1 Pin Pin name 1 GND 2 BAT_THER1 3 BAT1_ID_CN 4 SDA1_LTC1760 5 SCL1_LTC1760 6 BAT1 Table 1.26: BAT2: Battery Input Connector2 Pin Pin name 1 GND 2 BAT_THER2 3 BAT2_ID_CN 4 SDA2_LTC1760 5 SCL2_LTC1760 6 BAT2 Table 1.27: CN17: Mini PCIe Connector #: low active Pin Pin name Pin Pin name 1 PCIE_WAKE# 2 +V3.3_MPCIE1 3 MPCIE1_BTDATA 4 GND 5 MPCIE1_BTCLK 6 +V1.5 7 NC 8 NC 9 GND 10 NC 11 CLK_MINI_PCIE- 12 NC 13 CLK_MINI_PCIE+ 14 NC 15 GND 16 NC 17 NC 18 GND 19 NC 20 MINI_DISABLE# 21 GND 22 RST_MINI# 23 PCIE1X1_MINI_RX- 24 +V3.3SB 25 PCIE1X1_MINI_RX+ 26 GND 27 GND 28 +V1.5 29 GND 30 SMB_CLK 31 PCIE1X1_MINI_TX- 32 SMB_DAT 33 PCIE1X1_MINI_TX+ 34 GND 35 GND 36 USB_Mini_P- 37 NC 38 USB_Mini_P+ 39 NC 40 GND 41 NC 42 NC 43 NC 44 NC 45 NC 46 NC 47 NC 48 +V1.5 11 SOM-AB5500 User Manual Table 1.27: CN17: Mini PCIe Connector #: low active 49 NC 50 GND 51 NC 52 +V3.3_MPCIE1 53 NC 54 NC 55 GND 56 GND Table 1.28: CN18: Mini PCIe Connector Pin Pin name 1 GND 2 GND 3 GND 4 GND 5 NC 6 NC Table 1.29: JLCDVCC1: LVDS Power Setting Connector Pin Pin name 1 +V3.3 2 +V_LCDVCC0 3 +V5 1.5 Jumper Setting Function Table 1.30: JBIOS_DIS0: BIOS0 Disable Connector Pin Function 1 BIOS_DIS0# 2 GND 4 NC Table 1.31: JBIOS_DIS1: BIOS1 Disable Connector Pin Function 1 BIOS_DIS1# 2 GND 5 NC Table 1.32: J5: CMOS Clear Connector Pin Function 1 GND 2 +VBAT_C 3 +VBATT SOM-AB5500 User Manual 12 #: low active #: low active Table 1.33: BTN1: Power Button Connector Pin Function 1 PM_PWRBTN# 2 GND Table 1.34: RST1: Power Button Connector Pin Function 1 PM_EXTRST# 2 GND #: low active #: low active Table 1.35: J4: AT/ATX Mode Jumper Pin Function 1 NC 2 PS_ON2 3 +V3.3SB 13 SOM-AB5500 User Manual www.advantech.com Please verify specifications before quoting. This guide is intended for reference purposes only. All product specifications are subject to change without notice. No part of this publication may be reproduced in any form or by any means, electronic, photocopying, recording or otherwise, without prior written permission of the publisher. All brand and product names are trademarks or registered trademarks of their respective companies. © Advantech Co., Ltd. 2011


![[U7.03.41] Procédure MACR_ECREVISSE](http://vs1.manualzilla.com/store/data/006357801_1-c0143633884180ca091f10f4d65de8cd-150x150.png)