1
Demo Builder
User Manual
Copyright © Tanida. All Rights Reserved.
Demo Builder
copyright © Tanida. All rights reserved.
http://www.demo‐builder.com
The information contained in this document is subject to change without notice.
This document contains proprietary information which is protected by copyright.
All rights are reserved. No part of this document may be photocopied, reproduced,
or translated to another language without the prior written consent of Tanida.
Table of Contents
1
Chapter 1: Welcome
Chapter 2: Introduction
Overview
System Requirements
Chapter 3: Create new movie
Blank
Record the screen
Import Images
Import Video
Chapter 4: Record the screen
Take screen shots
FullMotion Recording
Help me choose
Chapter 5: Movie
Resize your movie
StartEnd
Add menu bar
Add player bar
Link your movies
Background audio
Translate your movie
Chapter 6: Scenes
Thumbnails View
Quick preview
Change order
Insert additional scenes
Merge multiple scenes
Split a scene
Copy/Paste different movies
Keystroke
Chapter 7: Cursors
Edit cursor path
Split/Merge cursors
Free Move and Free Resize
Chapter 8: Tools
Balloon
Note
2
2
3
4
4
5
5
6
8
9
10
11
12
13
14
14
15
16
17
17
19
20
21
21
22
22
23
23
24
26
27
28
28
30
30
32
Text
Animated Text
Rectangle
Ellipse
Image
Animation
Flash Video
Zoom Area
33
34
36
37
38
39
40
41
Chapter 9: Timeline
43
44
44
45
46
46
47
47
48
Insert extra time
Delete/Erase Selection
Transition per object
Transition per scene
Marks
Context Menu
Hide/Attach/Lock Object
Adjust Playback speed
Chapter 10: Transformations
Automatic Keyframing
Duration
Mouse Functions
Context Menu
Chapter 11: Interactivity
Edit Zone
Button
Click Zone
Events Example
Chapter 12: Add voiceover narration
Narrate Timeline
Record at capture time
Record at preview time
Insert audio per scene
Builtin audio editor
Chapter 13: Security
Domain lock
Expiration date
Password protect
Chapter 14: Auto
AutoText
AutoHighlight
AutoInteract
AutoZoom
AutoRotate
49
50
50
50
51
52
52
54
55
57
58
58
58
59
59
60
61
61
62
62
64
64
65
66
67
68
Reset Timeline
69
Chapter 15: Export
70
70
70
72
75
75
77
77
78
79
80
81
82
82
83
83
Format
Flash
H264/AAC
Audio Video Interleave
Windows Media Video
MPEG4
Standalone
Video
Image Files
Word Document
Help me choose
Destination
Save To Disk
Upload To FTP Server
Send EMail
Chapter 16: Miscellaneous
Personalize
TextToSpeech
Preferences
Upload to YouTube
Keyboard Shortcuts
85
85
86
86
88
89
License
Edit
Interactivity
Export
91
91
92
92
93
Chapter 18: Contact
94
Chapter 19: Index
95
Chapter 17: FAQ
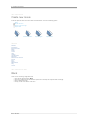
Welcome . 1
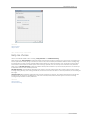
Welcome to Demo Builder
Demo Builder is a powerful Flash‐based tool that allows you to create eye‐catching and professionally‐looking interactive presentations that do not
require any programming skills.
Demo Builder's simple interface was designed with the user in mind. Taking but a few minutes to become familiar with, it provides users with
everything needed to capture their activities on‐screen in a running application. Further yet, it then allows one to edit the recorded material and add
elements such as voice‐over narration, background music, breath‐taking visual effects, annotations, text, and countless other items designed to make
your tutorials as efficient and effective as possible. Demo Builder also supports events for a whole new level of interaction with the viewer, that is,
you may add buttons clickable by the end‐users, determine the behavior of your movie, jump to markers and do much more that you can possibly
imagine !
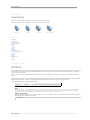
View PDF Manual
Download a fully functional version of Demo Builder free for a 15‐day trial period.
Demo Builder
2 . Introduction
Home > Introduction
Introduction
Welcome to Demo Builder
Tanida Demo Builder creates interactive demonstrations and software simulations in Flash format by taking a series of screenshots of a running
application. It offers a simple, convenient and fast way to build professional flash demos/tutorials in just a few minutes ‐ No programming
knowledge required!
This guide is designed to introduce you to using Demo Builder, all of its features, functions and tools. The guidelines in this help file will take you
through the features of the application and lead you through the process of creating a functional tutorial/demo.
The picture quality taken by Demo Builder is outstanding and the visual editing available lets you quickly incorporate unlimited detail in your
demonstrations.
Overview
System Requirements
See also
Welcome
Create new movie
Record the screen
Movie
Scenes
Cursors
Tools
Timeline
Transformations
Interactivity
Add voice‐over narration
Security
Auto
Export
Miscellaneous
FAQ
Contact
Home > Introduction > Overview
Overview
Demo Builder is a powerful tool that allows you to create professional quality demos and tutorials with no programming knowledge. There are no
complicated interfaces and your demonstration or presentation can be made in a matter of minutes!
How Does Demo Builder Work?
Demo Builder works by taking a series of screenshots of a running application. It records the actions being taken on the application and so is able to
demonstrate a simulation of these actions. Each screenshot taken by Demo Builder constitutes a 'Scene' that can then be edited to suit your required
demo/tutorial.
Starting with Demo Builder 6, users will be able to take full‐motion recordings. That is, no longer will you be limited to taking screenshots of the
buttons clicked and the keys pressed in the application you are showcasing. Using this new feature you can take full‐motion recordings that result in
smooth, fluid demonstrations able to showcase everything from drag and drop operations, to window resizing, and real cursor movements easier
than ever.
After recording a running application and the actions taken on that application, employ Demo Builder's 'Editing Window' to add specific details,
annotations and visual aids to your movie with the use of 'Objects' and the manipulation of your tutorial's time sequencing.
How Easy and Flexible!
Demo Builder
Introduction . 3
Demo Builder is extremely flexible and easy to use. The Editing tools available allow total control of the scene's behaviour and all visual aids and
objects within that scene.
See also
System Requirements
Home > Introduction > System Requirements
System Requirements
Minimum system configuration
Windows 2000/XP/2003/Vista/7
DirectX 9
Intel P4, Intel Centrino, Intel Xeon, or Intel Core Duo ﴾or compatible﴿
512+ MB RAM ﴾1GB Recommended﴿
800x600 minimum screen resolution ﴾1024x768 recommended﴿
See also
Overview
Demo Builder
4 . Create new movie
Home > Create new movie
Create new movie
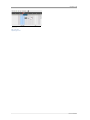
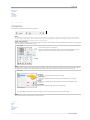
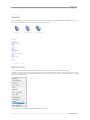
In the Start‐Up Screen locate the column titled 'Create New Movie'. You have the following options :
Blank
Record the screen
Import a series of images
Import Video
Blank
Record the screen
Import Images
Import Video
See also
Welcome
Introduction
Record the screen
Movie
Scenes
Cursors
Tools
Timeline
Transformations
Interactivity
Add voice‐over narration
Security
Auto
Export
Miscellaneous
FAQ
Contact
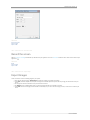
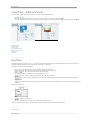
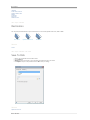
Home > Create new movie > Blank
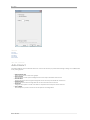
Blank
Create a movie containing a single blank scene.
1.
2.
3.
4.
From the Start‐Up screen select 'Blank'
Select your preferred size for the Movie from preset sizes or manually enter required 'Width' and 'Height'
Select a 'Background Color'
Finally, click 'OK' at the bottom of the menu
Demo Builder
Create new movie . 5
See also
Record the screen
Import Images
Import Video
Home > Create new movie > Record the screen
Record the screen
Use the full motion recording method while you demonstrate your application or use the screenshot method to take a series of screen‐shots of your
application.
See also
Blank
Import Images
Import Video
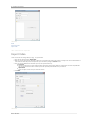
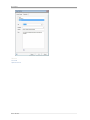
Home > Create new movie > Import Images
Import Images
Create a movie from a series of existing images on your system.
1. From the Start‐Up screen select 'Import Images' to browse for images on your disk or hard drive
2. Click 'Open' ﴾the folder shaped icon﴿ to import an image into the wizard. Repeat this process for every image you need to insert into your
movie.
3. The image's title and size is shown in the top left corner of the wizard.
4. The 'Remove' button is enabled when there is at least one image selected. This is shaped as an eraser.
5. Click 'Finish' and the new image﴾s﴿ will be inserted as screenshot﴾s﴿ in your movie. For each image you insert, a new scene is created in your
movie.
Demo Builder
6 . Create new movie
See also
Blank
Record the screen
Import Video
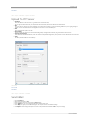
Home > Create new movie > Import Video
Import Video
Create a movie from an existing Video ﴾avi, mpeg ...etc.﴿ presentation.
1. From the Start‐Up screen select 'Import Video'
2. When you create a new movie by importing a Video file, it is imported as an entire scene, and not as an object that can be controlled within a
scene. Select the Video file you wish to import from your hard drive by clicking the 'Browse' button
3. Once you click the Browse button and select your file, two options will show up :
Frame Rate
Initially, the frame rate is set to the original number of frames per second of the video file. To decrease the size of the exported SWF
file, you can decrease the number of frames per second captured by Demo Builder from your video file.
Import Audio
Check this option in order to import audio from the file
4. Click Finish
See also
Demo Builder
Create new movie . 7
Blank
Record the screen
Import Images
Demo Builder
8 . Record the screen
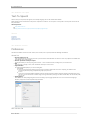
Home > Record the screen
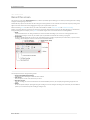
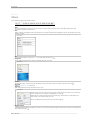
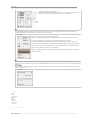
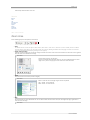
Record the screen
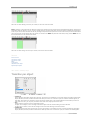
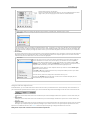
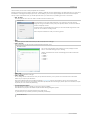
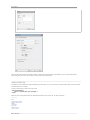
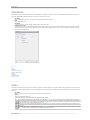
From the start‐up screen select 'Record the Screen'. Next, a 'Wizard' ﴾see below﴿ appears allowing you to customize your settings and start recording.
Change the recording settings as necessary.
Demo Builder only captures activities within the red markings of the settings wizard. You can extend the size of the screen capture by clicking on the
edges of the screen marker and manually dragging these to give your required screen capture size.
Select the recording method that best caters to your needs. Two methods are available: Take Screen Shots and Full‐Motion Recording .
Similarly, you have the ability to record voice‐over narration at capture time. Please note that you also have the ability add voice‐over narration later,
during the editing phase. For example, you may narrate the Timeline using the voice‐over narration feature in the Editing Window.
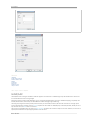
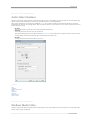
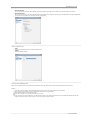
1. Record
Click the Record button to start taking screenshots ﴾or activate Full‐Motion Recording﴿ of your actions on a running application. Demo
builder starts recording. An icon sits on your taskbar system tray and blinks red to denote that recording is in progress.
2. End Recording
To end the recording session left‐click on the icon. Demo Builder will stop recording, compile and import screens‐shots ﴾or your full‐motion
recording﴿, and then display the movie as a series of scenes in the Movie Window.
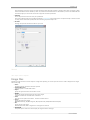
Click the Options button to change recording options.
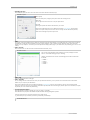
1. Camera sound audible during recording
Available only when choosing the 'Take Screen‐shots' method.
2. Insert Cursors
Select this option to insert cursor motion into your movie.
3. Hide system tray icon
If you are recording your entire screen and do not want the Demo Builder system tray icon to display during recording, simply select this
option.
4. Hotkeys
You can set specific hotkeys for pausing/resuming the recording, as well as for ending the recording ﴾in the case where you have hidden the
system tray icon and cannot stop the recording by clicking on this﴿.
Demo Builder
Record the screen . 9
Take screen shots
Full‐Motion
Recording
Help me choose
See also
Welcome
Introduction
Create new movie
Movie
Scenes
Cursors
Tools
Timeline
Transformations
Interactivity
Add voice‐over narration
Security
Auto
Export
Miscellaneous
FAQ
Contact
Home > Record the screen > Take screen shots
Take screen shots
Take screen‐shots of a running application.
1. Enable Auto Recording
When enabled, Demo Builder automatically takes screen‐shots every time an action is taken using the mouse or the keyboard.
2. Record Keystrokes
This option specifies whether or not to have Demo Builder take screenshots when keyboard actions are undertaken.
3. Hotkey
To manually take screen‐shots of an application, uncheck 'Auto‐Recording', fit Demo Builder's screen capture wizard to the desired
application's window and then press 'PRINT SCREEN' to take screen‐shots.
Demo Builder
10 . Record the screen
See also
Full‐Motion Recording
Help me choose
Home > Record the screen > FullMotion Recording
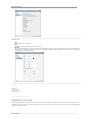
Full‐Motion Recording
Record screen activity in full‐motion video.
1. Capture Rate
Set how many frames per second are to be captured, from 1 to 20. Note that although a higher frames per second rate will result in a larger
file size, this will also make the playback motion smoother.
2. Enable Auto‐Mark
Selecting this option will automatically place Marks within the scenes during recording
Marks are useful for:
Jumping to a certain location within a movie/scene, Executing ﴾or not﴿ a certain action, Adding balloons ﴾if the mark was added automatically
during recording﴿
You do not have to add marks automatically during recording, but it is an available option. You can always add ﴾or delete﴿ marks manually in
the Editing Window, after the recording has been taken.
3. Capture semi‐transparent windows
Select this option if you will be recording an application or software that has semi‐transparent windows. This will ensure proper recording of
such windows.﴾i.e. 'drag and drop' demonstrations ﴿
Demo Builder
Record the screen . 11
See also
Take screen shots
Help me choose
Home > Record the screen > Help me choose
Help me choose
There are two methods available to take a recording: 'Taking Screenshots' and 'Full Motion Recording'.
When employing the 'Taking Screenshots' method, Demo Builder captures images only when a change occurs on the screen you are recording. You
have the option of also manually forcing a screenshot, but other than that, there are relatively few screenshots needed to make a recording using
this method. When you finish recording, an Editing Window appears allowing you to add notes, balloons, cursor movements and extra images to
each screenshot. Each screenshot can remain open or active for as long as you need, that is, so all activity on that screenshot can be performed.
When using the 'Full Motion Recording' method, Demo Builder continually takes screenshots at pre‐set intervals ﴾anywhere from 1 to 20 frames per
second﴿ which results in a much smoother presentation.
Full Motion Recording : Recommended for applications where changes in the screen happen quickly and for instances where you want to capture
such things as drag and drop, screen resizing, animated GIFs, or even full motion movies. The result is a more fluid presentation, but the resulting file
size is larger.
Taking Screenshots: Recommended for applications where full motion recording is not necessary. The screenshot method results in small file sizes
that open quickly. The appearance and disappearance of all cursor movements, notes, balloons and other objects is set so that the resulting
recording still relays the effect of a video presentation.
See also
Take screen shots
Full‐Motion Recording
Demo Builder
12 . Movie
Home > Movie
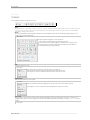
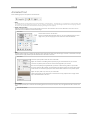
Movie
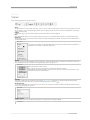
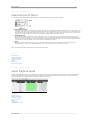
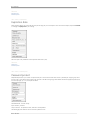
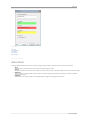
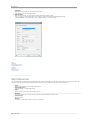
Set the following properties and options for Movie:
1 2 3 4 5 6 7 8
1. Name
The name property allows you to specify the movie's name, its author's name, a company's name, E‐mail address, website and a brief
description of the demo, tutorial or movie.
2. Info
Author, Company, E‐Mail, Website and movie description. Your personal information will be displayed in the 'Info' box should a player bar be
added to the movie
Learn more...
3. Size
The size property allows you to specify a new size ﴾in screen pixels﴿ for your movie.
4. Background
Select a personal background color, gradient or wallpaper image for your movie.
Learn more
5. Start‐End
The start‐end property is used to specify the load behavior of the movie and the actions to be taken at the end of the movie.
6. Navigation
Add a player bar or menu bar to your movie.
7. Watermark
Add a custom watermark ﴾or logo﴿ to all scenes of your movie.
Learn more...
A watermark can be altered in terms of physical location, within all scenes, and opacity. You can optionally
make it 'clickable' so that it hyperlinks to a webpage of your choosing.
Watermarks can be used to automatically insert a company logo, phone number, or email address in the
same location across all scenes within your movie.
Use it as a branding tool, but also to protect your work from plagiarism.
8. Background Audio
Add background audio effects, including voice narration, to your movie by importing existing sound files on your system or by recording new
ones using Demo Builder.
Demo Builder
Movie . 13
Resize your movie
Start‐End
Add menu bar
Add player bar
Link your movies
Background audio
Translate your movie
See also
Welcome
Introduction
Create new movie
Record the screen
Scenes
Cursors
Tools
Timeline
Transformations
Interactivity
Add voice‐over narration
Security
Auto
Export
Miscellaneous
FAQ
Contact
Home > Movie > Resize your movie
Resize your movie
Select the Size option from the movie properties panel in order to specify the new dimensions of your movie.
1. Width x Height
Click the drop‐down box and choose a preset size﴾Web, CD, Blog, iPhone, HD﴿ or select the Custom menu item to enter custom dimensions.
2. Anchor
Click an 'Anchor' button to specify which sides of the canvas Demo Builder should add to or delete from.
3. Original and Design labels
Click on the 'Original Size' label to restore the movie to its original size﴾the dimensions at capture time﴿. Click on the 'Design Size' label to set
the movie's output size equal to its size during editing﴾this feature is only applicable when the design‐time scale is less than 100%﴿.
Note: By default, the center anchor is selected, indicating that changes to the size of the canvas are made on all sides.
Demo Builder
14 . Movie
See also
Start‐End
Add menu bar
Add player bar
Link your movies
Background audio
Translate your movie
Home > Movie > StartEnd
Start‐End
The Start‐End property is used to specify the load behaviour of the movie and the actions to be taken at the end of the movie.
1. Preloader
Customize the image to be displayed, optionally, as the movie loads. You can also adjust the load percentage that must be reached before the
movie begins playing.
2. Show Play button
Add a 'Play' button at the beginning of your movie. The movie will only start playing when the 'Play' button is clicked. Without a 'Play' button,
the movie will start playing as soon as it is loaded ‐ without asking for any confirmation from the viewer.
3. Domain Lock
Tick the Domain Lock check box to restrict the accessibility of a movie to a specific domain ﴾e.g mydomain.com﴿.
4. Expiration Date
Add an expiration date to your movies so that these can't be played after a predetermined date. If users attempts to view an expired movie,
they will be redirected to a webpage or displayed text explaining the situation.
5. Ask Password
Add password protection to your movies. This option allows you to create movies that will ask users for a password in order to be able to
view the movie.
6. At End‐ Action
Add one of the following behaviors to the end of your movie : Stop Movie , Loop Movie, Close Movie, Go To URL, Run EXE, Go To Movie,
Execute JavaScript
7. Show Replay button
Add a 'Replay' button at the end of your movie by ticking this check‐box.
See also
Resize your movie
Add menu bar
Add player bar
Link your movies
Background audio
Translate your movie
Home > Movie > Add menu bar
Add menu bar
Add an interactive menu at the top of your movie to link additional content or to create a table of contents for large projects. You may add any
number of menu and sub‐menu items. Menu items are displayed across the top of the movie, while sub‐menu items are displayed as drop‐down
choices below their respective parent menu item.
Each menu item can be renamed to suit your needs and may also have an action associated with it. You can use menu items to jump to specific
locations within your movie ﴾marks and/or scenes﴿, jump to new movies, open a web page, run an EXE file, send an email or close the movie. The
Menu Bar is therefore a handy feature for creating quick and easy links to other parts of your movie, or if you are building a large library of movies. It
Demo Builder
Movie . 15
may also be exported and imported into any other movies you would like it added to.
See also
Resize your movie
Start‐End
Add player bar
Link your movies
Background audio
Translate your movie
Home > Movie > Add player bar
Add player bar
Used to control basic playback tasks such as playing, pausing, stopping, rewinding, and forwarding.
Its 'Seek' feature indicates the playback progress of the movie. When the Seek feature is available, your end‐users can drag the progress indicator to
any point in the movie to start playback from there. This also shows which scene is being viewed in relation to the total number of scenes in the
movie.
The Player Bar also includes an 'Audio On/Off' button to 'mute' sound during playback, if desired, at any point. The Player Bar now also supports the
following keyboard shortcuts :
Back to First Scene
Home key
Pause/Play
Space bar
Previous Scene
Left Arrow key
Next Scene
Right Arrow key
Audio On/Off
M key
Info
I key
Demo Builder
16 . Movie
See also
Resize your movie
Start‐End
Add menu bar
Link your movies
Background audio
Translate your movie
Home > Movie > Link your movies
Link your movies
We strongly recommend breaking up your demonstration or tutorial into individual 'chapters' and creating separate, shorter movies for each of these
instead of a single, very long tutorial. These individual movies can be 'linked' together to give the appearance of a single movie if desired.
This can be achieved as follows :
1. Open the first movie in 'Thumbnail View'.
2. From the 'Movie Properties' panel, select the 'Start ‐ End' button and click on the 'At end' drop‐down menu.
3. Select Go To Movie or Go To URL from the list of available actions and then choose the next movie file ﴾or chapter﴿ in the sequence. ﴾e.g.
http://mydomain.com/movie2.swf or http://mydomain.com/movie2.html﴿.
4. Repeat the above steps for each individual chapter movie file in your sequence.
Note: This option is only available for movies exported as a Flash Movie ﴾*.swf﴿ or H264﴾*.mp4﴿.
See also
Resize your movie
Start‐End
Add menu bar
Add player bar
Background audio
Translate your movie
Demo Builder
Movie . 17
Home > Movie > Background audio
Background audio
Add audio effects, including voice narration, to your movie by importing existing sound files or recording new ones using Demo Builder. You can add
background audio to your movie in a number of ways :
Record voice‐over narration while initially capturing your screenshots ﴾at capture time﴿.
Record voice‐over narration while previewing and editing your movie by selecting the 'Background Audio' button in the properties panel and
then clicking on the 'Record' ﴾+﴿ button to record your voice‐over narration.
Likewise, you can also add background audio to your movie by Importing *.wav and *.mp3 files, either from your computer, a network drive or
from Demo Builder's built‐in 'Audio Collection'.
When an Audio effect is included in the movie, the background audio properties expand to include additional properties.
1. Loop
Check the Loop box to have this audio clip repeat continuously throughout your movie.
2. Fade In/Out
Use these to add fade effects to your background audio. The music can be faded in or out in 'short', 'medium' or 'long' modes, or you can
choose 'none' to have audio play without a fade effect.
3. Volume
Use this to adjust the volume of your background audio for scenes with added background audio. For example, if you insert music as the
movie's background audio and then also insert voice‐over narration in one of your scenes, this property allows you to lower the volume of
the movie's background audio so that the voice‐over is dominant during this scene.
See also
Resize your movie
Start‐End
Add menu bar
Add player bar
Link your movies
Translate your movie
Home > Movie > Translate your movie
Translate your movie
Translate your movie's text and distribute these internationally !
The Localize Wizard allows you to update the language of your movies for international distribution by exporting your movie's caption text ﴾found in
balloons, notes, text boxes﴿ to a MS Word document ﴾*.doc﴿. Here, you translate the text in the desired language and then import it back to update
your movie with the help of the 'Localize Wizard'. Start by selecting Localize... from the Demo Builder 'File' menu to bring up the Localize Wizard and
then follow these steps :
1.
2.
3.
4.
5.
Select the desired Operation ‐ either Export or Import.
Enter or select the name and location of the export file that will contain the text to be 'localized'.
Open MS Word and update the second column of the document generated to translate your original text into the desired language.
Save the updated MS Word document.
Run the Localize Wizard in Demo Builder again, but this time Import the translated text back into your movie.
Demo Builder
18 . Movie
6. ﴾Re‐﴿Build your movie.
Note: Please note that Microsoft Word 2003 or later must be installed on your machine.
See also
Resize your movie
Start‐End
Add menu bar
Add player bar
Link your movies
Background audio
Demo Builder
Scenes . 19
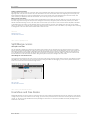
Home > Scenes
Scenes
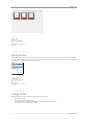
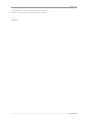
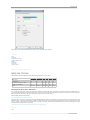
Set the following properties and options for Scenes :
1 2 3 4 5 6 7 8
1. Name
The default name for a scene is 'Scene X' ﴾'Scene 1', 'Scene 2', 'Scene 3', and so onward﴿, and this is visible in the name property of the movie.
You can change a scene's name by deleting the default name and typing in another one. Ensure the scene is selected before attempting to
change its name property.
2. Visibility
If Visibility is ON, then the scene will be included in the movie when this is Previewed or Exported.
3. Note
Insert desired details about your scene. These will appear only if the movie is exported as either 'Image Files' or 'Word Document' format.
4. Background
Select a border, the color of this border and then customize the width and padding of this border. You may also choose to add a reflection
and drop shadow effect.
Learn more...
If the image is of substantial size ﴾eg. 1000x1000﴿, please be aware that the reflection effect may slowdown the
playback of the movie when it is exported in Flash format.
5. Position
Select the scene's initial rotational angles, scale and transparency. These will be retained until a Transformation is added. These values may
only be modified by moving the Playhead to the beginning of the scene and using the mouse.
Learn more
Click the Eraser button to clear all values.
Select 'Apply to all scenes' if you would like to retain the same values for all scenes.
Clicking the individual labels will display a menu which offers the option to either reset the parameter or copy
this parameter's value to all Transformations.
6. Keystroke
This option is visible only if you created your movie using the Take screen shots method.You can enable or disable the typing sound by
selecting the 'Mute' option. Also, you can choose to remove the keystroke from the scene.
7. End Of Scene Action
You can add the following actions at the end of a scene: Continue, Go To Scene, Go To Movie, Go To URL, Close Movie, Run EXE or Execute
JavaScript. The default action is 'Continue'.
Learn more...
8. Background Audio
Add audio clips to your scene by importing existing files or recording new ones using Demo Builder.
Learn more...
Demo Builder
20 . Scenes
Click on the '+' sign to add audio or the '‐‐' sign to remove a selected audio clip.
Click on the Audio Settings button ﴾in the top right corner﴿ to change audio settings or to select
and calibrate your audio input device.
Each individual audio clip can be edited to your needs. To do this, click on the button next to
the audio clip to be edited. The Audio Clip Editor appears.
Thumbnails View
Quick preview
Copy/Paste ‐
different movies
Keystroke
Change order
Insert additional
scenes
Merge multiple
scenes
Split a scene
See also
Welcome
Introduction
Create new movie
Record the screen
Movie
Cursors
Tools
Timeline
Transformations
Interactivity
Add voice‐over narration
Security
Auto
Export
Miscellaneous
FAQ
Contact
Home > Scenes > Thumbnails View
Thumbnails View
The 'Thumbnail View' section is the area in which all of the scenes of your movie are displayed. You may re‐order, delete, duplicate or merge scenes
here.
Demo Builder
Scenes . 21
See also
Quick preview
Change order
Insert additional scenes
Merge multiple scenes
Split a scene
Copy/Paste ‐ different movies
Keystroke
Home > Scenes > Quick preview
Quick preview
Demo Builder offers you the possibility to preview your movie. To do this, select the 'scene' item, hold down the left mouse button and drag
horizontally in either direction‐‐an action that is similar to moving the Playhead along the Timeline. When the effect is successfully triggered, a red
line appears to denote the Playhead's position in the Timeline.
See also
Thumbnails View
Change order
Insert additional scenes
Merge multiple scenes
Split a scene
Copy/Paste ‐ different movies
Keystroke
Home > Scenes > Change order
Change order
Below are instructions on how to change the order of the scenes in your movie.
1. Go to Thumbnail View
2. Select the scene that you want to move.
You can select multiple scenes by holding down the CTRL key while clicking on each scene.
3. Drag the selection to a new location, as desired.
Demo Builder
22 . Scenes
See also
Thumbnails View
Quick preview
Insert additional scenes
Merge multiple scenes
Split a scene
Copy/Paste ‐ different movies
Keystroke
Home > Scenes > Insert additional scenes
Insert additional scenes
To add a new scene, go to Thumbnails View, click the 'Insert New Scenes' ﴾+ sign﴿ button and follow the steps depending on what it is you wish to
do.
See also
Thumbnails View
Quick preview
Change order
Merge multiple scenes
Split a scene
Copy/Paste ‐ different movies
Keystroke
Home > Scenes > Merge multiple scenes
Merge multiple scenes
You can merge multiple scenes into one scene with Demo Builder. To merge scenes together, in Thumbnail View, select all of the scenes to be merged.
Demo Builder
Scenes . 23
You can select multiple scenes by holding down the CTRL key while clicking on each scene. Once all desired scenes are selected, right‐click on one of
the scenes, and select "Merge" from the resulting menu. The selected scenes will be merged into one longer scene.
You cannot merge two differently sized scenes. For example, should you record a scene 800x600 in size and then also record a scene 1024x768 in size,
these two scenes can't be merged. Scenes must be corresponding in size. In this case, these must be either both 800x600 or 1024x768 in size to be
merged.
Note: This operation cannot be undone.
See also
Thumbnails View
Quick preview
Change order
Insert additional scenes
Split a scene
Copy/Paste ‐ different movies
Keystroke
Home > Scenes > Split a scene
Split a scene
To split a scene into two separate scenes, first drag the Playhead to the location in the Timeline where you wish the split to occur. Then right click in
the Timeline area and select "Split". The existing scene will be split at precisely the location where the Playhead was located.
Note: This operation cannot be undone.
See also
Thumbnails View
Quick preview
Change order
Insert additional scenes
Merge multiple scenes
Copy/Paste ‐ different movies
Keystroke
Home > Scenes > Copy/Paste different movies
Demo Builder
24 . Scenes
Copy/Paste ‐ different movies
In order to copy a scene﴾or scenes﴿ from one movie into another, please follow these steps :
1. Open both movies.
2. From the Thumbnail View of the source movie, right click on the scene you want to copy and select Copy.
Select the destination movie from the movie panel on the left, right click in the Thumbnails area of the destination movie and select Paste.
See also
Thumbnails View
Quick preview
Change order
Insert additional scenes
Merge multiple scenes
Split a scene
Keystroke
Home > Scenes > Keystroke
Keystroke
The Keystroke object is only visible in the Timeline and not visible in the Objects Panel of the movie's Editing Window. It represents any keyboard
actions taken during movie recording and is indicated in the Timeline as a 'Keystroke'.
How to Use the Keystroke Object ﴾an Example﴿
1.
2.
3.
4.
5.
6.
7.
Open your usual text editing application ﴾e.g. NotePad, MS Word, WordPerfect, etc.﴿
Create a new movie and fit the screen capture area to the chosen text editing application.
Start recording and type a few characters in the text editing application.
Stop recording.
The movie's properties should display the scenes created for your movie.
Double click a scene to view its properties. In the Timeline, the type object is indicated.
Position
You can adjust the position of the type object within the Timeline by clicking, dragging and dropping it in the desired location within the
Timeline.
8. Typing Speed
Adjust the typing speed visible in your movie by clicking on the edge of the object and extending it to cover a longer or shorter time period as
necessary.
Keystroke's property panel
1. Mute
Enable or disable the typing sound.
2. Remove
Remove the keystroke from the scene. Note: This operation cannot be undone.
Note: The Keystroke's property panel is only visible when a scene is in editing mode and no other object is selected.
See also
Thumbnails View
Demo Builder
Scenes . 25
Quick preview
Change order
Insert additional scenes
Merge multiple scenes
Split a scene
Copy/Paste ‐ different movies
Demo Builder
26 . Cursors
Home > Cursors
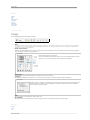
Cursors
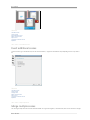
Set the following properties and options for Cursors:
1 2 3 4 5 6 7
1. Name
The default name for a cursor object is 'Cursor X' ﴾'Cursor 1', 'Cursor 2', 'Cursor 3', and so onward﴿, and this is visible in the name property of
the movie. You can change a cursor's name by deleting the default name and typing in another one. Ensure the cursor is selected before
attempting to change its name property.
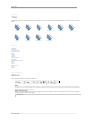
2. Pointer
There are several different images available to represent the cursor. Regardless of what the cursor looked like during recording, you can
change it to any of the available images.
Learn more...
The three options for changing the cursor's symbol are:
'Movie' shows all cursor images being used within your movie.
'Current Theme' contains cursor images with a similar theme to the default cursor.
'Custom' gives you the option of selecting existing clipart from Demo Builder, or
browsing and inserting an image from disk.
3. Scale
Change the scale of the cursor.
Learn more...
Click the leftmost cursor symbol to restore the cursor to its original size.
Click the second cursor symbol ﴾rightmost﴿ to double the size of the present cursor.
Check 'Apply to all cursors' to maintain the above scale for all cursors in the movie.
4. Highlight Effect
Draw a circle underneath the cursor symbol.
Learn more...
Select the checkbox to enable the highlight effect. Then you may choose a color, radius and opacity.
Check 'Apply to all cursors' to maintain the above preferences for all cursors in the movie.
5. Cursor paths
When you have a cursor motion in a scene, you have the option of setting that motion as a straight line, a concave arc, a convex arc, or a
completely custom motion. To create a straight or arc motion, simply select the appropriate icon. However, creating a custom motion is more
complex.
Learn more...
Demo Builder
Cursors . 27
6. Click/Double‐Click effect
Effects are used to determine the sound and visual effect made by the cursor at clicking point. These icons can either be selected ﴾lit up﴿ or
not. If neither icon is selected, then there will be no sound effect ﴾click or double click audio﴿ or visual cue at the ending of the cursor path.
Learn more...
Color
Sets the color of the click/double click effect.
Radius
The size of the click/double click effect.
Mute
Disables the sound effect.
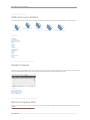
7. Align Cursors
There are two additional icons available, the "Cursor Align" icons. These icons align the cursor's position in one scene to another cursor's
position in the following or previous scene to give consistent flow to cursor movements from scene to scene. These icons are only available if
the action is possible. For example, if there is no cursor in the following scene, then there will be no "Align Forward" icon. Also, if there is no
cursor in the scene prior to the current one, then there will be no "Align Backward" icon. These align icons are only available for the first and
last cursors inserted in a scene.
Example...
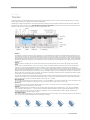
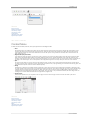
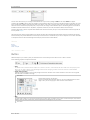
Create a movie with three blank scenes.
Insert one cursor in Scene 1, two cursors in Scene 2 and one cursor in Scene 3.
Select the cursor in Scene 1 and notice that it only has one align property, the "Align Forward" icon. This is because it is located in the
first scene of the movie. Since there are no scenes prior to it, there are also no cursors it can be aligned with but those ones ahead of it.
Click the 'Align Forward' icon and you'll notice that the cursor's position is adjusted so that it matches up with the position of the first
cursor in Scene 2.
When you select either the beginning or ending cursor in Scene 2, you'll notice that two align icons become available, 'Align Forward'
and 'Align Backward'. This is because other cursors exist both prior to the current scene and after it.
In Scene 3 only the 'Align Backward' icon will appear since no scene, and thus no forward cursor to align to, exists after it.
See also
Welcome
Introduction
Create new movie
Record the screen
Movie
Scenes
Tools
Timeline
Transformations
Interactivity
Add voice‐over narration
Security
Auto
Export
Miscellaneous
FAQ
Contact
Home > Cursors > Edit cursor path
Edit cursor path
Demo Builder
28 . Cursors
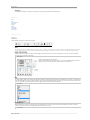
Creating a custom cursor motion:
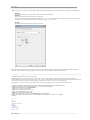
After selecting the custom motion icon as the cursor path, you have to define exactly what that custom motion is to be. Position the playhead at the
beginning of the cursor path in the Timeline. Then, click and hold the cursor in the canvas ﴾which will be at the beginning of the cursor path﴿, and
drag it towards the ending of the cursor path, taking whatever route you wish to take ﴾all the time holding down your left mouse button﴿. Once
you've arrived at your destination, release the mouse button. That's it! You've just set your custom cursor motion.
Editing a custom cursor motion:
If you want to change your custom cursor motion, position the playhead at the point where you want the change to occur ﴾in the Timeline﴿, then in
the canvas, drag the cursor along some new path to the ending point. This will only change that portion of the custom path that you've redone.
Note: Be careful when selecting a cursor, in the canvas, with a custom motion. If you click on the cursor to select it while the Playhead is somewhere
in the middle of the cursor motion, you will effectively erase the custom motion from the cursor to the ending point. This action can't be undone‐‐
and thus, you will have to re‐create the cursor's custom path. Always make sure to select the cursor in the Timeline, or by clicking on either its starting
or ending points in the canvas. Never click in between these to select the cursor.
See also
Split/Merge cursors
Free Move and Free Resize
Home > Cursors > Split/Merge cursors
Split/Merge cursors
How to Split a cursor motion
You can easily split an existing cursor motion into two separate cursor motions. You may wish to do this if you want one motion to occur, and the
have the motion stop while something else is going on in the scene, then have the cursor motion resume afterbwards. To split a cursor motion into
two motions, first select a cursor motion in the Timeline. Move the playhead inside the cursor motion, to the position where you want the split to
occur. Hold down the CTRL key and drag the right side of the cursor motion. It is important to drag the "middle" of the new cursor motion and not
the small arrow that's at the end of the cursor motion. Doing so will split the motion, thus creating a new cursor motion.
How to Merge two cursor motions into one
To merge two cursor motions into one cursor motion, you first have to make sure the first cursor motion does not have any click or double‐click event
associated with it. In the Timeline, move the first cursor motion by clicking the middle of it and dragging it, until it meets up with the second cursor
motion. You'll notice that the two motions will merge into one.
See also
Edit cursor path
Free Move and Free Resize
Home > Cursors > Free Move and Free Resize
Free Move and Free Resize
Demo Builder allows you to move or resize the cursor motion only if the cursor is always synchronized with the movie. For example, if a scene has two
"changes" and you have a cursor motion in the first "change", you'll notice that you cannot move the cursor motion to overlap the start of the second
"change". To "free move", simply hold down the CTRL key and drag the cursor motion. To "free resize", hold down the CTRL key and drag the small
arrow cursor in the Timeline.
Demo Builder
Cursors . 29
See also
Edit cursor path
Split/Merge cursors
Demo Builder
30 . Tools
Home > Tools
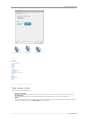
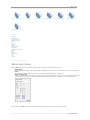
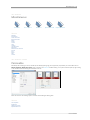
Tools
The following 'Objects' are available and can be found in both the Tools Panel and Timeline in Demo Builder. Click on an 'Object' below to view full
details.
Balloon
Note
Text
Animated Text
Image
Animation
Flash Video
Zoom Area
Rectangle
Ellipse
See also
Welcome
Introduction
Create new movie
Record the screen
Movie
Scenes
Cursors
Timeline
Transformations
Interactivity
Add voice‐over narration
Security
Auto
Export
Miscellaneous
FAQ
Contact
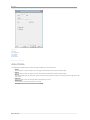
Home > Tools > Balloon
Balloon
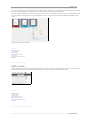
Set the following properties and options for Balloons:
1 2 3 4 5 6 7
1. Name
The default name for a balloon is 'Balloon X' ﴾'Balloon 1', 'Balloon 2', 'Balloon 3', and so onward﴿, and this is visible in the name property of
the object. You can change a balloon's name by deleting the default name and typing in another one. Ensure the balloon is selected before
attempting to change its name property.
2. Rotate, Scale and Location
Adjust the rotational angles, scale or manually change the location of the balloon on the Canvas. Rotations on the X and Y‐axis are ignored
when the balloon is attached to the image.
Learn more...
Demo Builder
Tools . 31
Click the Eraser button to clear all values.
Click on the individual labels and select 'Reset' to clear the corresponding value or select
'Apply to all' if you want to apply your chosen values to all other balloons.
3. Style
The style property allows you to change the appearance ﴾shape, style and color﴿ of the Balloon tooltip. The default style is 'Classic'. A new
balloon style, "Custom" has been added in version 7 which allows you to fully customize a balloon in terms of color and shape
Learn more...
Border Color
Determines the color for the balloon's edges
Border Width
Changes the thickness of the balloon's edges
Fill Color
Used to specify a color for the balloon
Bevel
Add a 3D beveled edge to the balloon
Drop Shadow
Visual effect consisting of drawing what looks like the
shadow of an object, giving the impression that the object is
raised above the objects behind it
Rounded Corners
Use rounded corners instead of square ones
Shapes
Either a Rectangle or a Ellipse can be employed.
4. Click To Continue
When this option is checked, a 'Continue' button will be placed on the balloon. The movie will be paused, allowing the viewer to read the
content of the balloon and to continue playing only when this button is clicked.
Learn more...
5. Text
The text property allows you to customize font, font size, font color, text alignment and also edit the text that is visible on the Balloon tooltip.
Click on the 'Text' button in the property panel or double‐click the body of the balloon to display the 'Text editor'. You can also check the
spelling of the entered text.
6. Text‐To‐Speech
For the text to be converted into speech, select the 'Text‐To‐Speech' option. Note : Microsoft Text‐To‐Speech is not required on the computer
used to view your movie.
Learn more...
Demo Builder
32 . Tools
7. Orientation
Clicking and spinning the 'Angle wheel' allows you to change the orientation of the balloon's tip.
See also
Note
Text
Animated Text
Rectangle
Ellipse
Image
Animation
Flash Video
Zoom Area
Home > Tools > Note
Note
Set the following properties and options for Notes:
1 2 3 4 5 6
1. Name
The default name for a note pad is 'Note X' ﴾'Note 1', 'Note 2', 'Note 3', and so onward﴿, and this is visible in the name property of the object.
You can change a note's name by deleting the default name and typing in another one. Ensure the note is selected before attempting to
change its name property.
2. Rotate, Scale and Location
Adjust the rotational angles, scale or manually change the location of the note on the Canvas. Rotations on the X and Y‐axis are ignored
when the note is attached to the image.
Learn more...
Click the Eraser button to clear all values.
Click on the individual labels and select 'Reset' to clear the corresponding value or select
'Apply to all' if you want to apply your chosen values to all other notes.
3. Style
The style property allows you to change the appearance ﴾shape, style and color﴿ of the Note Pad. The default style is 'Classic'. A new note style,
"Soft" has been added in version 5.0 which provides a very smooth and professional looking note for your movies. Check the box 'Apply to all
notes' at the bottom of the style properties menu to apply the chosen style to all notes in the movie.
Learn more...
4. Click To Continue
When this option is checked, a 'Continue' button will be placed on the note. The movie will be paused, allowing the viewer to read the
content of the note and to continue playing only when this button is clicked.
Learn more...
Demo Builder
Tools . 33
5. Text
The text property allows you to customize font, font size, font color, text alignment and also edit the text that is visible on the note. Click on
the 'Text' button on the property panel or double‐click the body of the note to display the 'Text editor'. You can also check the spelling of the
entered text.
6. Text‐To‐Speech
For the text to be converted into speech, select the 'Text‐To‐Speech' option. Note : Microsoft Text‐To‐Speech is not required on the computer
used to view your movie.
Learn more...
See also
Balloon
Text
Animated Text
Rectangle
Ellipse
Image
Animation
Flash Video
Zoom Area
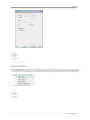
Home > Tools > Text
Text
Set the following properties and options for Texts:
1 2 3 4 5
1. Name
The default name for a text object is 'Text X' ﴾'Text 1', 'Text 2', 'Text 3', and so onward﴿, and this is visible in the name property of the object.
You can change a text's name by deleting the default name and typing in another one. Ensure the text is selected before attempting to
change its name property.
2. Rotate, Scale and Location
Adjust the rotational angles, scale or manually change the location of the text on the Canvas. Rotations on the X and Y‐axis are ignored when
the text is attached to the image.
Learn more...
Demo Builder
34 . Tools
Click the Eraser button to clear all values.
Click on the individual labels and select 'Reset' to clear the corresponding value or select
'Apply to all' if you want to apply your chosen values to all other texts.
3. Style
The style property allows you to change the appearance of the Text Area. Check the box 'Apply to all texts' at the bottom of the style
properties menu to apply chosen style to all Text areas in all scenes in the movie.
Learn more...
Click on the pencil symbol to select the color of the border.
Adjust the 'Thickness' and 'Padding' sliders respectively to gain the desired effect for your text box.
Click on the top bucket symbol to select the color of the background of your text box.
Press the arrow symbol ﴾pointing downwards﴿ if you desire to add a vertical gradient to your textbox.
If you have chosen to add a gradient, click the bottom bucket symbol to select the color of lower portion
of the text box. The color of the upper portion of the textbox will be taken from the top bucket symbol.
Adjust the opacity slider as you see fit for your new textbox.
Check the box 'Apply to all texts' at the bottom of the style properties menu to apply the chosen style to
all Texts in the movie.
4. Text
The text property allows you to customize text formatting options such as font, font size, font color, text alignment and also edit the text that
is visible in the Text area. Double‐click the body of the Text Properties Menu to edit or insert a Text area. You can also check the spelling of the
entered text.
5. Text‐To‐Speech
For the text to be converted into speech, select the 'Text‐To‐Speech' option. Note : Microsoft Text‐To‐Speech is not required on the computer
used to view your movie.
Learn more...
See also
Balloon
Note
Animated Text
Rectangle
Ellipse
Image
Animation
Flash Video
Zoom Area
Home > Tools > Animated Text
Demo Builder
Tools . 35
Animated Text
Set the following properties and options for Animated Texts:
1 2 3 4
1. Name
The default name for an animated text area is 'Text Animation X' ﴾'Text Animation 1', 'Text Animation 2', 'Text Animation 3', and so onward﴿, and
this is visible in the name property of the object. You can change an animated text's name by deleting the default name and typing in another
one. Ensure the animated text is selected before attempting to change its name property.
2. Rotate, Scale and Location
Adjust the rotational angles, scale or manually change the location of the animated text on the Canvas. Rotations on the X and Y‐axis are
ignored when the animated text is attached to the image.
Learn more...
Click the Eraser button to clear all values.
Click on the individual labels and select 'Reset' to clear the corresponding value or select
'Apply to all' if you want to apply your chosen values to all other animated texts.
3. Style
The style property allows you to change the appearance of the Animated Text Area. Check the box 'Apply to all texts' at the bottom of the style
properties menu to apply chosen style to all Animated Texts in all scenes in the movie.
Learn more...
Click on the pencil symbol to select the color of the border.
Adjust the 'Thickness' and 'Padding' sliders respectively to gain the desired effect for your text box.
Click on the top bucket symbol to select the color of the background of your text box.
Press the arrow symbol ﴾pointing downwards﴿ if you desire to add a vertical gradient to your textbox.
If you have chosen to add a gradient, click the bottom bucket symbol to select the color of lower portion
of the text box. The color of the upper portion of the textbox will be taken from the top bucket symbol.
Adjust the opacity slider as you see fit for your new textbox.
Check the box 'Apply to all text animations' at the bottom of the style properties menu to apply chosen
style to all Animated Texts in the movie.
4. Text and Effect
The text property allows you to customize text formatting options such as font, font size, font color, text alignment and also to choose a text
effect.
Text Animator Wizard...
Demo Builder
36 . Tools
Text Effect
To apply animation effects to your Text, select the animated text effect desired from the
list on the left and view a preview of the selected effect in the Text Animator Wizard's
Preview Window.
Text Editor
Use the Text editor to enter your desired text.
Spell Check
Use this tool to check and correct any spelling errors in your text. When clicked, the
Spelling Wizard appears if Demo Builder detects any spelling errors in your text. If Demo
Builder does not detect any spelling errors, it simple confirms that spelling check is
complete.
Font
To customise your font, font style and size, click on font's name and the Font Wizard
appears. Change Font properties as required and click OK.
Align
Horizontally align your text to the Left, Right or Center. Vertically align your text to the
Top, Middle or Bottom.
Animation Speed
Adjust the speed of your animation by sliding the speed indicator from left to right as
needed. To slide the speed indicator, left‐click on the triangle and drag in either
direction.
See also
Balloon
Note
Text
Rectangle
Ellipse
Image
Animation
Flash Video
Zoom Area
Home > Tools > Rectangle
Rectangle
Set the following properties and options for Rectangles:
1 2 3 1. Name
The default name for a shape object is 'Shape X' ﴾'Shape 1', 'Shape 2', 'Shape 3', and so onward﴿, and this is visible in the name property of
the object. You can change a shape's name by deleting the default name and typing in another one. Ensure the shape is selected before
attempting to change its name property.
2. Rotate, Scale and Location
Adjust the rotational angles, scale or manually change the location of the rectangle on the Canvas. Rotations on the X and Y‐axis are ignored
when the rectangle is attached to the image.
Learn more...
Click the Eraser button to clear all values.
Click on the individual labels and select 'Reset' to clear the corresponding value or select
'Apply to all' if you want to apply your chosen values to all other rectangles.
Note : The rectangle cannot be rotated on the Z‐axis when the 'Fill outer area' option is
selected.
3. Style
The style property allows you to change the appearance of the Shape. For Rectangle shapes: Check the box 'Apply To all rectangles' at the
bottom of the style properties menu to apply chosen style to all Rectangles in all scenes in the movie.
Learn more...
Demo Builder
Tools . 37
Border Color
Determines the color for the Rectangle's edges
Border Width
changes the thickness of the Rectangle's edges.
Fill Color
Used to specify a color for the Rectangle.
Fill Opacity
Adjust the transparency of the chosen color.
Fill Outer Area
This allows you to fill the 'outside' of the rectangle with the fill color, instead of the inside of the
Rectangle.
See also
Balloon
Note
Text
Animated Text
Ellipse
Image
Animation
Flash Video
Zoom Area
Home > Tools > Ellipse
Ellipse
Set the following properties and options for Ellipses :
1 2 3
1. Name
The default name for a shape object is 'Shape X' ﴾'Shape 1', 'Shape 2', 'Shape 3', and so onward﴿, and this is visible in the name property of
the object. You can change a shape's name by deleting the default name and typing in another one. Ensure the shape is selected before
attempting to change its name property.
2. Rotate, Scale and Location
Adjust the rotational angles, scale or manually change the location of the ellipse on the Canvas. Rotations on the X and Y‐axis are ignored
when the ellipse is attached to the image.
Learn more...
Click the Eraser button to clear all values.
Click on the individual labels and select 'Reset' to clear the corresponding value or select
'Apply to all' if you want to apply your chosen values to all other ellipses.
Note : The ellipse cannot be rotated on the Z‐axis when the 'Fill outer area' option is
selected.
3. Style
The style property allows you to change the appearance of the Shape. For Ellipse shapes: Check the box 'Apply to all ellipses' at the bottom of
the style properties menu to apply chosen style to all Ellipses in all scenes in the movie.
Learn more...
Border Color
Determines the color for the Ellipse's edges
Border Width
Change the thickness of the Ellipse's edges.
Fill Color
Used to specify a color for the Ellipse.
Fill Opacity
Adjust the transparency of the chosen color.
Fill Outer Area
It allows you to fill the 'outside' of the ellipse with the fill color, instead of the inside of the ellipse.
Demo Builder
38 . Tools
See also
Balloon
Note
Text
Animated Text
Rectangle
Image
Animation
Flash Video
Zoom Area
Home > Tools > Image
Image
Set the following properties and options for Images:
1 2 3 4 5 6
1. Name
The default name for an image object is 'Image X' ﴾'Image 1', 'Image 2', 'Image 3', and so onward﴿, and this is visible in the name property of
the object. You can change a image's name by deleting the default name and typing in another one. Ensure the image is selected before
attempting to change its name property.
2. Rotate, Scale and Location
Adjust the rotational angles, scale or manually change the location of the image on the Canvas. Rotations on the X and Y‐axis are ignored
when the image is attached to the image ﴾scene﴿.
Learn more...
Click the Eraser button to clear all values.
Click on the individual labels and select 'Reset' to clear the corresponding value or select
'Apply to all' if you want to apply your chosen values to all other images.
3. Replace Image
The replace image icon differs depending on the method used to insert the image.
4. Transparent
This property is enabled for insert options‐ 'From File' and 'Take Screenshot'. It is used to adjust the image's transparency.
Learn more...
The left‐top pixel is considered a 'transparent' pixel. Checking the transparency box makes it possible to see
through the image. Transparency cannot be applied to an image from cliparts, the checkbox is disabled
when an image is taken from cliparts.
5. Reset
To reset the image to its original size, click the 'Reset' icon.
6. Flip and Rotate
The 'Flip and Rotate' property allows you to flip the image vertically or horizontally and rotate the image by angle.
See also
Balloon
Note
Text
Demo Builder
Tools . 39
Animated Text
Rectangle
Ellipse
Animation
Flash Video
Zoom Area
Home > Tools > Animation
Animation
Set the following properties and options for Animations:
1 2 3 4
1. Name
The default name for an animation object is 'Animation X' ﴾'Animation 1', 'Animation 2', 'Animation 3', and so onward﴿, and this is visible in
the name property of the object. You can change an animation's name by deleting the default name and typing in another one. Ensure the
animation is selected before attempting to change its name property.
2. Rotate, Scale and Location
Adjust the rotational angles, scale or manually change the location of the animation on the Canvas. Rotations on the X and Y‐axis are ignored
when the animation is attached to the image.
Learn more...
Click the Eraser button to clear all values.
Click on the individual labels and select 'Reset' to clear the corresponding value or select
'Apply to all' if you want to apply your chosen values to all other animations.
3. Style
The style property allows you to change the category, subcategory, color and/or orientation of the Animation object. Check the box 'Apply to
all animations' at the bottom of the style properties menu to apply chosen style to all Animation Objects in all scenes in the movie.
Learn more...
Category
Choose from arrow, ellipse, hand, marker or rectangle.
Subcategory
Choose from additional options that will be shown depending on your Category
selection.
Color
Choose your preferred color for the Animation from the color palette ﴾green, red or
yellow﴿.
Orientation
Choose the desired direction of motion for the Animation.
Note: Depending on the Animation chosen, some options may not be available ﴾e.g. the 'Hand' Animation object﴿.
4. Reset
To reset the animation to its original size, click the 'Reset' icon
See also
Balloon
Note
Text
Animated Text
Rectangle
Ellipse
Demo Builder
40 . Tools
Image
Flash Video
Zoom Area
Home > Tools > Flash Video
Flash Video
Set the following properties and options for Flash Videos:
1 2 3 4 5 6 7 8
1. Name
The default name for a flash video object is 'Flash Video X' ﴾'Flash Video 1', 'Flash Video 2', 'Flash Video 3', and so onward﴿, and this is visible
in the name property of the object. You can change a flash video's name by deleting the default name and typing in another one. Ensure the
flash video is selected before attempting to change its name property.
2. Rotate, Scale and Location
Adjust the rotational angles, scale or manually change the location of the flash video on the Canvas. Rotations on the X and Y‐axis are
ignored when the flash video is attached to the image.
Learn more...
Click the Eraser button to clear all values.
Click on the individual labels and select 'Reset' to clear the corresponding value or select
'Apply to all' if you want to apply your chosen values to all other flash videos.
3. Source
As with most other internet video and audio formats, Flash provides two different ways to deliver AV media from a web page: 'Progressive
Download Video' and 'Streaming Video'.
Learn more...
Progressive Download Video
Progressive downloading is the easiest way to display Flash Video on a web page. Although it is
not as powerful and flexible as true streaming, it simulates streaming fairly well and most end‐
users will not know the difference. Please note that the end‐user cannot jump ahead to a later
part of the video until it has fully downloaded.
Path: Browse to the relative or absolute path of the FLV or MP4 file. For example:
c:\path\to\video.flv OR http://domain.com/video.flv
Streaming Video
To stream Flash video you need to use a special type of server application called Flash Media
Server ﴾FMS﴿. The Adobe Flash Media Server ﴾FMS, formerly Flash Communication Server﴿ is the
powerhouse solution for Flash streaming. The FMS is basically a software package which runs on
a normal web server and provides extra functionality for the Flash format ﴾e.g. live streaming,
chat, etc﴿.
In technical terms, the FMS works by opening a 'persistent connection' between the server and
client ﴾end‐user﴿. In a normal server/client relationship the client sends periodic requests to the
server as required. With a persistent connection the server and client are in constant, controlled
contact.
URI: Enter the server name, application name, and instance name . For example,
rtmp://server/app/instance. Stream: Enter the stream name.
In the 'Width'/'Height' box, specify the width/height of the Flash Video. Click 'Detect Size' if you want to detect the original size of the
FLV or MP4 file.
4. Skin
Select the skin you want to use in your video. 'Skin' refers to the way the video playbar appears within your movie.
5. Reset to original size
To reset to the size of the original Flash Video, click this button.
6. Maintain aspect ratio
To preserve the aspect ratio of the original Flash Video, click this button.
7. Auto‐Play
Start playing the video file automatically.
8. Auto‐Rewind
Demo Builder
Tools . 41
Automatically rewind the video at the end.
See also
Balloon
Note
Text
Animated Text
Rectangle
Ellipse
Image
Animation
Zoom Area
Home > Tools > Zoom Area
Zoom Area
Set the following properties and options for Zoom Areas:
1 2 3 4 5
1. Name
The default name for a zoom area object is 'Zoom Area X' ﴾'Zoom Area 1', 'Zoom Area 2', 'Zoom Area 3', and so onward﴿, and this is visible in
the name property of the object. You can change a zoom area's name by deleting the default name and typing in another one. Ensure the
zoom area is selected before attempting to change its name property.
2. Rotate, Scale and Location
Adjust the rotational angles, scale or manually change the location of the zoom area on the Canvas. Rotations on the X and Y‐axis are ignored
when the zoom area is attached to the image.
Learn more...
Click the Eraser button to clear all values.
Click on the individual labels and select 'Reset' to clear the corresponding value or select
'Apply to all' if you want to apply your chosen values to all other zoom areas.
3. Source
Select the area of the scene that you want to magnify.
Learn more...
Select or resize the source rectangle using the mouse or keyboard.
CTRL + Arrows ‐ to move selection
SHIFT+ Arrows ‐ to resize selection
4. Style
Set the properties for a zoom destination area. You can draw a border around the zoom area, dim the background, apply a glow effect or
cover the source rectangle.
Learn more...
Demo Builder
42 . Tools
Border ‐ Color and Width
Dim Background ‐ Color and Opacity
Glow Effect ‐ Color
Cover ‐ Encircles your source area in the colour of your choosing.
5. Live
The 'zoom destination' may be used to display a static image, or exactly what’s happening on the Canvas, in real‐time ﴾live﴿, including the
cursor.
See also
Balloon
Note
Text
Animated Text
Rectangle
Ellipse
Image
Animation
Flash Video
Demo Builder
Timeline . 43
Home > Timeline
Timeline
An object's position in the Timeline determines when that object becomes visible in the scene at runtime. 'Timeline Properties' allow you to specify
when the object appears, how it appears and how long it is displayed for.
Depending on the object being worked on, the Timeline's appearance will adapt to show the options available for that specific object. Please note
that objects with 'Events' are unique in that each individual event will have its own Timeline to enable you to precisely control the appearance and
behaviour of the event and the particular objects and actions making up that event.
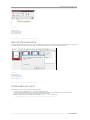
1. Playhead
The Playhead is a red vertical line with a red rectangle at the top, and is displayed in the Timeline. The Playhead indicates the location of the
movie within the Timeline. You can drag the Playhead with your mouse to the left or the right, and as you do, you will be advancing the play
of the movie in the Canvas area. Alternatively, you can click the green arrow above the Timeline to automatically 'play' the movie, watching the
Playhead advance automatically. There are also 'beginning' and 'end' icons on either side of the play button, that when clicked, automatically
advances the Playhead to the beginning or to the end of the scene. The playhead is an extremely effective tool for going to a precise location
within a movie.
2. Changes
Only for full‐motion recordings. You can choose to show consecutive strips with alternate colors to better view 'changes' in the Timeline.
3. Tracks
You can have an unlimited number of 'tracks' in your Timeline. A track is a horizontal location that runs from time zero to some time in the
future and it is in these tracks that objects will exist. For example, if you want an image to display for 3 seconds, starting 1 second into a
theme, then that image will be displayed in a track on the Timeline, and it's length will be from the 1 second point to the 4 second point. The
object will therefore be displayed for 3 seconds﴾see Preferences , Defaults Tab﴿. If you then want another object to display after the first object
disappears, you can place this object in the same track, after the first object. However, you can also display the new object in a second track,
below the first track. You would do this if, for example, you wanted the second object to display before the first object had vanished. In other
words, objects can 'overlap' when placed in separate tracks.
4.
5.
6.
7.
The track that an object is in has no bearing on the resulting movie. Therefore, it is often good practice to limit the number of tracks in use or
otherwise you may end up with a Timeline that is difficult to navigate.... having to often scroll up and down more than would otherwise be
necessary. An easy way to limit the number of required tracks is to use the Float feature.
Zoom In/Zoom Out
At the far right of the Timeline, there are two icons: a PLUS ﴾'+'﴿ icon and a MINUS ﴾'‐'﴿ icon. These icons allow you to zoom the Timeline in and
out, or in other words, to change the timing scale so that you can see more or less of the Timeline on your screen.
Cursor Lock
At the far right of the Timeline, just below the Zoom In/Zoom Out icons, is a LOCK icon. If the Lock is turned on ﴾pressed﴿, then you cannot
move any cursor motion in the Timeline or in the Canvas.
Add Mark
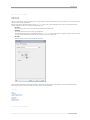
Above the Timeline and near the left side ﴾but to the right of the green play button﴿ there is another PLUS ﴾'+'﴿ icon. This is the 'Add Mark'
icon, and when clicked, will add a Mark to the Timeline in the location where the Playhead is located. A 'Mark' will be displayed as a small
number at the bottom of the Timeline. You can add as many Marks to a scene as you like. Marks are useful to identify locations within a
scene/movie and can also be tied to specific actions.
Select Multiple Objects
If you want to select multiple objects in the Timeline, perhaps because you want to move them all at the same time and by the same amount of
time, you can do so simply by holding the CTRL and clicking on each object.
Insert extra time
Delete/Erase
Selection
Transition per object
Transition per scene
Marks
Context Menu
Demo Builder
44 . Timeline
Hide/Attach/Lock
Object
Adjust Playback
speed
See also
Welcome
Introduction
Create new movie
Record the screen
Movie
Scenes
Cursors
Tools
Transformations
Interactivity
Add voice‐over narration
Security
Auto
Export
Miscellaneous
FAQ
Contact
Home > Timeline > Insert extra time
Insert extra time
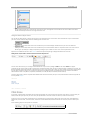
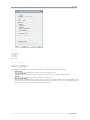
In order to insert space in the Timeline, drag the Playhead extension rightwards ﴾found on the top right side of the Playhead﴿, as shown below.
See also
Delete/Erase Selection
Transition per object
Transition per scene
Marks
Context Menu
Hide/Attach/Lock Object
Adjust Playback speed
Home > Timeline > Delete/Erase Selection
Delete/Erase Selection
The 'delete' function serves to delete an entire section, as chosen by you, of the Timeline. This includes everything in that section, such as all of the
objects present. This is different from 'erasing' in that unlike 'deleting', 'erasing' will not resize or delete any objects or cursors.
Deleting a selection in the Timeline will delete that entire section, and everything in it. For example, it will delete any objects that existed in that
section. To delete a selection within the Timeline, follow these instructions. Position the Playhead at the beginning of the area you wish to delete,
hold down the CTRL key and drag the Playhead from this position to the end of the selection you wish to delete. As you do this, two new icons will
appear above the Timeline, one of which is the DELETE icon ﴾a red X﴿. Simply click the DELETE icon and the entire selected area in the Timeline will be
deleted.
Demo Builder
Timeline . 45
Note: Take care when deleting a section of your Timeline, as this action cannot be undone.
Erasing a selection in the Timeline will only delete the changes in the selected area, and not affect the timing. Unlike deleting ﴾above﴿, erasing will not
resize and/or delete any objects or cursors. To erase a selection within the Timeline, follow these instructions. Position the Playhead at the beginning
of the area you wish to erase, hold down the CTRL key and drag the Playhead from this position to the end of the selection you wish to delete. When
you do this, two new icons will appear above the Timeline, one of which is the ERASE icon ﴾looks like a white eraser﴿. Simply click the ERASE icon and
the entire selected area in the Timeline will be erased.
Note: Take care when erasing a section of your Timeline, as this action cannot be undone.
See also
Insert extra time
Transition per object
Transition per scene
Marks
Context Menu
Hide/Attach/Lock Object
Adjust Playback speed
Home > Timeline > Transition per object
Transition per object
1 2 3
1. Transition In
Used to determine how Objects appear within the movie. This property is not available for Cursor motion objects, Animated Texts, Rectangles,
Ellipses, Edit Zones, Buttons, Click Zones and Animations. When you click on the 'Transition In' panel, the Transition In wizard appears ﴾as
seen above﴿. Select from the list of effects on the left and view the chosen effect in the preview window of the wizard. When you select an
effect other than 'none', you can specify the duration of the effect as the object phases into the scene.
2. Time
Displays how long an object or scene is visible during runtime.
To adjust 'Time for Objects', click on the edge of the relevant object within the Timeline and drag to extend or decrease.
To adjust 'Time for Scenes', click on the line marking the end on the scene and drag to increase or decrease.
3. Transition Out
Used to determine how an object exits the scene at runtime. This property is not available for Cursor's motions, Animated Texts, Rectangles,
Ellipses, Edit Zones, Buttons, Click Zones and Animations. When you click on the 'Transition Out' panel, the Transition Out wizard appears.
Demo Builder
46 . Timeline
Select from the list of effects on the right and view the chosen effect in the preview window of the wizard. When you select an effect other
than 'none', you can specify the duration of the effect as the object phases out of the scene.
See also
Insert extra time
Delete/Erase Selection
Transition per scene
Marks
Context Menu
Hide/Attach/Lock Object
Adjust Playback speed
Home > Timeline > Transition per scene
Transition per scene
Transitions are used to determine how a Scene will appear in the movie at runtime. When you click on the 'Transitions panel', the Transition wizard
appears. Select from the list of effects on the left and view the chosen effect in the preview window of the wizard. When you select an effect other
than 'none', you can also specify the duration of the transition.
See also
Insert extra time
Delete/Erase Selection
Transition per object
Marks
Context Menu
Hide/Attach/Lock Object
Adjust Playback speed
Home > Timeline > Marks
Marks
Marks are essentially bookmarks within a scene. These can be used to specify actions and where you want an action to occur. Marks can either be
added to a scene automatically during the recording process, or manually during the editing phase after recording. For example: You can use marks
to make the movie jump from Scene 1/Mark 1 to Scene 3/Mark 4 if Scene 1/Mark 1 has Action "Go To Scene" with Scene3/Mark4 as the parameters.
To manually add a Mark to a scene, place the Playhead at the location where you want the mark added, then click the "+" button above the Timeline
next to the Play button. To remove a Mark from a scene, position the Playhead over the mark to be deleted or select the Mark's number from below
the Timeline. You'll notice that the "+" button changes to "‐‐" . Press this button in order to remove the Mark. To move a Mark, move the mouse over
it, or select it by clicking on its number, and drag it to a new location.
To change the Action for a Mark, select it ﴾move the Playhead to its position or click on it in the Timeline﴿, and then click the drop‐down menu
immediately to the right of the "+" or "‐‐" icons above the Timeline. You'll notice that there are several actions to choose from : Stop Movie , Loop
Movie, Close Movie, Go To URL, Run EXE,Go To Movie, Execute JavaScript
Demo Builder
Timeline . 47
See also
Insert extra time
Delete/Erase Selection
Transition per object
Transition per scene
Context Menu
Hide/Attach/Lock Object
Adjust Playback speed
Home > Timeline > Context Menu
Context Menu
It allows functions like Undo, Select All, Float, Split, Equalize Scenes and Magnetic Ride.
1. Float
Use the Float feature to condense your objects into the least number of required tracks in the Timeline. Simply right‐click anywhere in the
Timeline, and select the Float option from the resulting menu. Doing so will automatically condense the objects into the least number of
tracks required. Another way to access the Float feature is to click the 'Options' icon just above the Timeline, and to select Float from the
drop‐down menu here.
2. Magnetic Ride ﴾Snap‐to Timeline﴿
If you have more than one object in a given scene, and if it's important to you that this object begins to play right after the previous object
ends, activate the 'Magnetic Ride' feature. Simply select 'Magnetic Ride' from the 'Options' drop down menu ﴾or by right‐clicking in the
Timeline﴿. Then, when you click on an object in the Timeline and drag it to the position you want, you'll notice that it "snaps" into position as
you drag it near another object. This is a handy feature that helps position objects in the exactly where you want them in the Timeline.
3. Split
The 'Split' feature allows you to split a scene into two separate scenes. To split a scene, simply position the Playhead in the location where
you wish to split the scene. Then select the 'Split' option from the Options menu ﴾or by right‐clicking on the Timeline and selecting 'Split'﴿. The
result will be two separate scenes that must be edited separately.
4. Merge
Although not an option in the Timeline options, merging two or more scenes into one scene is essentially the opposite of 'Splitting' scenes.
To merge multiple scenes into one scene, you need to go to Thumbnail View.You can do this by clicking on your movie's title in the left margin
in Design View or by pressing the home‐shaped icon. Here, select the scenes you wish to merge by holding down CTRL and clicking the
individual scenes ﴾or by drag‐selecting all scenes to be merged﴿. Then, right‐click on any of the selected scenes, and select 'Merge' from the
resulting menu. All of the selected scenes will be merged into one, longer scene.
5. Equalize Scenes
Located in the Options menu, use "equalize scenes" to apply the current scene's length to all of the scenes that make up the movie.
See also
Insert extra time
Delete/Erase Selection
Transition per object
Transition per scene
Marks
Hide/Attach/Lock Object
Adjust Playback speed
Demo Builder
48 . Timeline
Home > Timeline > Hide/Attach/Lock Object
Hide/Attach/Lock Object
Go to Transformations/Objects/Marks window and select the Objects tab to adjust any of the following options:
Lock﴾Canvas and Timeline﴿
In the Objects tab, you can "lock" the objects in a scene so that they cannot be edited or moved accidentally.Click on the "Objects" icon at the
top and all of the objects in your scene will be displayed. Select the object to be locked by clicking on it in the list‐‐"lock" it by clicking on the
lock‐shaped icon next to its description. With this lock in place, you can no longer move, adjust or edit this the object on the canvas or in the
Timeline. This is a safety measure to prevent you from accidentally moving something you didn't intend to.
Visibility﴾Design time﴿
You can also set an object's visibility in a scene to either 'ON' or 'OFF' ‐‐ for example, you can have an object not display, without actually
deleting it. Click on the "Objects" icon at the top and all objects in your scene will be displayed. Select the object you want by clicking on it in
the list, then click on the first black dot next to its description‐‐ turning this into a red X. By doing so, you'll notice that the object disappears
in the canvas. This is how the visibility is set to 'OFF' without actually deleting the object.
Attach
Selecting the 'Attach' dot will cause any object ﴾eg. a balloon﴿ to be attached to the scene. 'Attaching' an object will stick this to the
background image ‐‐ such that the coordinates ﴾left, top﴿ of the object will be relative to image and not the canvas.
Note : The 'visibility' and 'attach' properties are not available with audio objects.
See also
Insert extra time
Delete/Erase Selection
Transition per object
Transition per scene
Marks
Context Menu
Adjust Playback speed
Home > Timeline > Adjust Playback speed
Adjust Playback speed
To adjust the playback speed of a specific selection in the Timeline, hold down the CTRL key and place the Playhead at the selection's ending point.
Your selection will be denoted on the Timeline by a green colored area. To speed‐up the playback, decrease the size of this area. To slow‐down
playback drag rightwards, as displayed below, increasing the length of this new area.
See also
Insert extra time
Delete/Erase Selection
Transition per object
Transition per scene
Marks
Context Menu
Hide/Attach/Lock Object
Demo Builder
Transformations . 49
Home > Transformations
Transformations
A transformation modifies a movie’s properties over time. For example, if you want to slowly scale up your movie, you add a transformation on the
scene, then modify the Scale property in the 'Transformation Properties' panel.
Transformations are represented in the Timeline with a shaded rectangle.
A transformation may be added either manually or automatically. To add manually, first, click the Add Transformation button in the Transformations
panel, then adjust the individual parameters: rotation on x,y and z, scale, and zoom‐n‐pan. If you don't wish to keep pressing the 'Add
Transformation' button, you may enable the Automatic Keyframing option to add these for you as you use your mouse.
Transformations cannot be added onto a blank scene. The scene must first be created by either recording the screen or by importing an existing
image or video file.
Listed below are explanations for each option found in the 'Transformations properties' panel.
1. Toolbar
The toolbar contains the following buttons : 'Play'﴾preview your transformation﴿, 'Copy past values'﴾restore defined values from previous
transformations﴿, 'Reset'﴾clear all values﴿
2. Rotate
Choose your desired values on the x,y, and z axis, respectively.
3. Spin
Rotate your image 360 degrees on the x,y, and z axis, respectively.
4. Scale
Scale your image either up or down.
5. Transparency
Modify the transparency of your image.
6. Zoom‐n‐Pan
The Zoom‐n‐Pan feature allows you to focus your audience's attention on key aspects of your recording.
Drag the 'Zoom' slider to select the zoom percentage‐‐ this will select the percentage of the original image that is to be displayed after.
Use the Pan tool to drag the image to the particular location you wish to showcase.
Clicking the individual labels will display a menu which offers the option to either 'Reset' the parameter or copy the specific parameter's values to all
Transformations ﴾'Apply to all' or 'Apply from here to end' depending on required needs﴿
Automatic
Keyframing
Duration
Mouse Functions
Context Menu
See also
Welcome
Introduction
Create new movie
Record the screen
Movie
Scenes
Cursors
Demo Builder
50 . Transformations
Tools
Timeline
Interactivity
Add voice‐over narration
Security
Auto
Export
Miscellaneous
FAQ
Contact
Home > Transformations > Automatic Keyframing
Automatic Keyframing
Enabling 'Automatic Keyframing' allows you to add a new transformation with only the use of the mouse. 'Automatic Keyframing' is ON when the
square shape appears beside the cursor symbol above the Timeline ﴾in the top left side of the cursor symbol﴿
Example :
Let's suppose that you want to add a Transformation, during the third second, that rotates the image on the Y‐axis and then scales it. To do this,
follow these steps:
1. Position the Playhead at the third second.
2. Click on the image, hold down the right mouse button and then move the mouse horizontally to rotate the background image on the Y‐axis.
3. To scale the image frontwards or backwards use only the mouse wheel.
Check the Timeline afterwards to see that a new Transformation has been added. You may further tweak this transformation by adjusting the
transformation's individual properties as found in the 'Transformations' panel.
See also
Duration
Mouse Functions
Context Menu
Home > Transformations > Duration
Duration
You are able to see the duration of a Transformation by looking on the Timeline.
1. Position
This position represents the place on the Timeline where the Transformation ends.
2. Duration
The duration of a Transformation defines how long the transition is in effect for.
See also
Automatic Keyframing
Mouse Functions
Context Menu
Home > Transformations > Mouse Functions
Mouse Functions
Demo Builder
Transformations . 51
Transformation properties may be modified with only the use the mouse and CTRL key as follows below.
Move
Press and hold the left mouse button and move the
mouse.
Rotate X/Y
Press and hold the right mouse button and move the
move the mouse horizontally/vertically in order to
modify the rotation on the Y/X‐axis.
Scale
Use the mouse wheel to scale up or down the image.
Zoom In/Out
Press and hold the CTRL key, then use the mouse wheel
to zoom in or zoom out the image.
Pan
Press and hold the CTRL key, then press and hold the
left mouse button to pan the image.
See also
Automatic Keyframing
Duration
Context Menu
Home > Transformations > Context Menu
Context Menu
To bring up the context menu, right‐click on a Transformation on the Timeline. This feature allows functions such as 'Delete' and 'Equalize
Transformations' in terms of duration.
1. Delete Transformation
Select this option to delete the particular transformation.
2. Equalize Transformations﴾duration﴿
Use "equalize transformations" to apply the duration from the current transformation to all transformation from the same scene.
See also
Automatic Keyframing
Duration
Mouse Functions
Demo Builder
52 . Interactivity
Home > Interactivity
Interactivity
Learn how to use Demo Builder's interactive objects to interact with your end user.
Note: These options are only available for movies exported as a Flash Movie ﴾*.swf﴿ .
Edit Zone
Button
Click Zone
Events ‐ Example
See also
Welcome
Introduction
Create new movie
Record the screen
Movie
Scenes
Cursors
Tools
Timeline
Transformations
Add voice‐over narration
Security
Auto
Export
Miscellaneous
FAQ
Contact
Home > Interactivity > Edit Zone
Edit Zone
Edit Zone objects are extremely useful in creating high quality presentations and tutorials as they allow two‐way interactivity between your movie and
your end‐users. For example, in conjunction with Demo Builder's other objects, you can use an Edit Zone to hold the correct answer to a question
that you want to ask your users.
At movie run‐time, the user will be presented with the question and the movie will pause, awaiting the user's response to be typed into the Edit
Zone.
Demo Builder will then check the user's response against the correct answer as specified by you when you built the movie. Demo Builder then offers
Events ﴾'On Pass', 'On Error', 'On RollOver' as described below﴿ which determine the next action ﴾or path﴿ taken by the movie.
Set the following properties and options for Edit Zones:
1 2 3 4
1. Name
The default name for an Animated Text Area is 'Text Animation X' ﴾'Text Animation 1', 'Text Animation 2', 'Text Animation 3', and so onward﴿,
and this is visible in the name property of the object. You can change a text animation's name by deleting the default name and typing in
another one. Ensure the text animation is selected before attempting to change its name property.
2. Rotate, Scale and Location
Adjust the rotational angles, scale or manually change the location of the Edit Zone on the Canvas. Rotations on the X and Y‐axis are ignored
when the edit zones is attached to the image.
Learn more...
Demo Builder
Interactivity . 53
Click the Eraser button to clear all values.
Click on the individual labels and select 'Reset' to clear the corresponding value or select
'Apply to all' if you want to apply your chosen values to all other Edit Zones.
3. Style
The style property allows you to change the appearance ﴾style and color﴿ of the Edit Zone. The default style is 'Classic'.
Learn more...
Note: Demo Builder version 5.0 introduces an additional Edit Zone style ‐ 'Transparent'. You might use an Edit Zone with a transparent border
style when you want it to blend in ﴾invisibly﴿ with the rest of your scene's background image. You could then use the new 'On RollOver' Edit
Zone event ﴾see below﴿ to display a message ﴾in a balloon or text﴿ to your users when they position the mouse cursor over your 'transparent'
Edit Zone.
4. Correct Entries
The correct entries property is were you specify the list of correct responses expected from your users. When a user enters text and presses the
defined Shortcut key on the keyboard ﴾either Enter or Tab﴿, Demo Builder checks the user's response against the correct list of entries and
takes the action for the 'On Pass' event or the 'On Error' event as appropriate.
Learn more...
To enter the correct entry ﴾or list of correct entries﴿ expected from your users in order to trigger the
actions contained in the 'On Pass' event, click the plus ﴾+﴿ icon and enter the correct response﴾s﴿.
From the Correct Entries properties panel, you can choose whether users' responses must be Case
Sensitive to match. Likewise, by checking the Password box, you can choose for user responses to be
displayed hidden as asterisks ﴾*﴿ rather than the actual characters typed by the user.
Demo Builder can also check your users' responses character‐by‐character. Check the Check as you
type box to activate this feature.
Either Enter or Tab can be used as the Shortcut Key to accept and validate your users' inputs. Select
your choice from the drop‐down box.
To remove an entry from the list, simply select it and click the minus ﴾‐﴿ icon.
To change the Text font style of the Edit Zone, click on the text icon which will display the font
wizard and allow you to customize as desired.
Using the Edit Zone Object Events
As described above, you can use Edit Zone Events to interact with the users of your demonstration or tutorial and totally control the behaviour of
your movie based on responses and entries made by your users. The Edit Zone object offers the following 3 events that can be used to achieve this.
1. On Pass Event
Add objects, actions and/or audio to this event to define how your movie will display and behave in response to a correct answer from your
user.
2. On Error Event
Add objects, actions and/or audio to this event to define how your movie will display and behave in response to an incorrect answer from
your user.
3. On RollOver Event
Add objects, actions and/or audio to this event to define how your movie will behave when the user positions the mouse cursor over the Edit
Zone object. ﴾For example to display an explanatory message or tip in a balloon or text as to the type of response required from the user﴿.
Important: Each individual Event has its own Timeline to define the separate sequencing of display and behaviors for that event.
Adding Actions and/or Audio to control the behaviour of Edit Zone Object Events.
Demo Builder
54 . Interactivity
For each of the above events, you can assign the desired behaviour of your movie by adding an Action to take and/or Audio to be played.
To add ﴾or edit﴿ the action to take or audio to be played for a certain Edit Zone object event, ensure that the Edit Zone object is selected in your movie
scene. This Edit Zone's individual TimeLine will be shown at the bottom of the screen. Click on the event to which you want to add an action and/or
audio and note that the Edit Zone properties panel ﴾at top of screen﴿ will change to show additional options. The following options are available to
be added or edited for Edit Zone events : Stop Movie , Loop Movie, Close Movie, Go To URL, Run EXE,Go To Movie, Execute JavaScript
For further information on how to incorporate Demo Builder Events and user interactivity into your movies, demonstrations and tutorials, please see
this fully worked Example .
Note: Users of earlier versions of Demo Builder may be familiar with Error and Success Messages. Demo Builder version 5.0 introduces fully featured
Event functionality that provides additional user interactivity and total control over the behavior of your movie in response to user actions. This builds
on and replaces the Error and Success Messages functionality of previous versions of Demo Builder.
See also
Button
Click Zone
Events ‐ Example
Home > Interactivity > Button
Button
Use Button objects in your scenes to pause your demonstration or tutorial and require action from the user in order to continue.
Set the following properties and options for Buttons:
1 2 3 4
1. Name
The default name for a Button is 'Button X' ﴾'Button 1', 'Button 2', 'Button 3', and so onward﴿, and this is visible in the name property of the
object. You can change a button's name by deleting the default name and typing in another one. Ensure the button is selected before
attempting to change its name property.
2. Rotate, Scale and Location
Adjust the rotational angles, scale or manually change the location of the button on the Canvas. Rotations on the X and Y‐axis are ignored
when the button is attached to the image.
Learn more...
Click the Eraser button to clear all values.
Click on the individual labels and select 'Reset' to clear the corresponding value or select
'Apply to all' if you want to apply your chosen values to all other buttons.
3. Style
The style property allows you to change the appearance of the button object. The default style is 'Classic'. A new button style, 'Soft,' has been
added in version 5.0 which provides a very smooth and professional looking button for your scenes.
Learn more...
Demo Builder
Interactivity . 55
4. Text
The text property allows you to customize font, font size, font color, text alignment and to also edit the text that is visible on the button.
Double‐click the body of the button to change the button's text.
Using the Button Object Events
You can also use 'Button Events' to interact with the users of your demonstration or tutorial and to control the behaviour of your movie based on
your users' actions. The Button object offers the following events to achieve this.
1. On Press Event
Add objects, actions and/or audio to this event to define how your movie will display and behave when your users click this Button.
2. On RollOver Event
Add objects, actions and/or audio to this event to define how your movie will behave when the user positions their mouse cursor over the
Button object. ﴾For example, to display an explanatory message or tip in a balloon or text as to the action required from the user﴿.
Important: Each individual Event has its own Timeline to define the separate sequencing of display and behaviors for that event.
Adding Actions and/or Audio to control the behaviour of Button Object Events.
For each of the above events, you can assign the desired behaviour of your movie by adding an Action to take and/or Audio to be played.
To add ﴾or edit﴿ the action to take or audio to be played for a certain Button object event, ensure that the Button object is selected in your scene. This
Button's individual TimeLine will be shown at the bottom of the screen. Click on the event to which you want to add an action and/or audio and note
that the 'Button properties' panel ﴾at top of screen﴿ will change to show additional options. The following options are available to be added or
edited for Button events : Stop Movie , Loop Movie, Close Movie, Go To URL, Run EXE, Go To Movie, Execute JavaScript.
For further information on how to incorporate Demo Builder Events and user interactivity into your movies, demonstrations and tutorials, please see
this fully worked Example .
See also
Edit Zone
Click Zone
Events ‐ Example
Home > Interactivity > Click Zone
Click Zone
A 'Click Zone' is another object that allows two‐way interactivity between your movie and your end‐users. Use a Click Zone in a scene to pause your
Demo/Tutorial and require your that your users click a pre‐specified zone on the screen in order to continue ﴾or take some other action﴿.
At movie run‐time, the user will be presented with your Click Zone and the movie will pause, awaiting the user's action ﴾click﴿. Demo Builder then
offers Events ﴾'On Click Inside', 'On Click Outside', 'On RollOver' as described below﴿ which determine the next action ﴾or path﴿ to be taken by the
movie.
Set the following properties and options for Click Zones:
1 2 3 4 5
Demo Builder
56 . Interactivity
1. Name
The default name for a Click Zone is 'Click Zone X' ﴾'Click Zone 1', 'Click Zone 2', 'Click Zone 3', and so onward﴿, and this is visible in the name
property of the object. You can change a click zone's name by deleting the default name and typing in another one. Ensure the click zone is
selected before attempting to change its name property.
2. Rotate, Scale and Location
Adjust the rotational angles, scale or manually change the location of the click zone on the Canvas. Rotations on the X and Y‐axis are ignored
when the click zone is attached to the image.
Learn more...
Click the Eraser button to clear all values.
Click on the individual labels and select 'Reset' to clear the corresponding value or select
'Apply to all' if you want to apply your chosen values to all other click zones.
3. Hand Cursor
Change the mouse pointer to a hand cursor when a user positions the mouse pointer over the Click Zone.
4. Style
The style property allows you to change the appearance ﴾style and color﴿ of the Edit Zone.
Learn more...
Border Color
Determines the color for the Rectangle's edges.
Border Width
Change the thickness of the Rectangle's edges.
Fill Color
Used to specify a color for the Rectangle.
Fill Opacity
Adjust the transparency of the chosen color.
Eraser
Makes the click zone fully transparent and the borders invisible.
5. Trigger﴾event﴿
Select 'OnClick', 'OnDblClick' or 'OnRightClick' event.
Using the Click Zone Object Events
As described above, you can use Click Zone Events to interact with the users of your demonstration or tutorial and to control the behavior of your
movie based on your end‐users actions. The Click Zone object offers the following 3 events to achieve this:
1. On Success Event
Add objects, actions, effects and/or audio to this event to define how your movie will display and behave in response to your users clicking
inside the borders of the Click Zone.
2. On Failure Event
Add objects, actions, effects and/or audio to this event to define how your movie will display and behave in response to your users clicking
outside the borders of the Click Zone.
3. On RollOver Event
Add objects, actions and/or audio to this event to define how your movie will behave when users positions their mouse cursor over the Click
Zone object. ﴾For example to display an explanatory message or tip in a balloon or text as to the action required by the user﴿.
Important: Each individual Event has its own Timeline to define the separate sequencing of display and behaviors for that event.
Adding Actions and/or Audio to control the behaviour of Click Zone Object Events.
For each of the above events, you can assign the desired behavior of your movie by adding an Action to take, an Effect to show and/or Audio to be
played.
To add ﴾or edit﴿ the action to take or audio to be played for a certain Click Zone object event, ensure that the Click Zone object is selected in your
movie scene. This Click Zone's individual TimeLine will be shown at the bottom of the screen. Click on the event to which you want to add an action
and/or audio and note that the Click Zone properties panel ﴾at top of screen﴿ will change to show additional options. The following options are
Demo Builder
Interactivity . 57
available to be added or edited for Click Zone events : Stop Movie, Loop Movie, Close Movie, Go To URL, Run EXE,Go To Movie, Execute JavaScript.
For further information on how to incorporate Demo Builder Events and user interactivity into your movies, demonstrations and tutorials, please see
this fully worked Example .
See also
Edit Zone
Button
Events ‐ Example
Home > Interactivity > Events Example
Events ‐ Example
Let's say that you want to use Demo Builder Events to add user interactivity to your movie, demonstration or tutorial and/or define how it behaves
based on different user actions. Below is a worked example based on a simple situation.
We have created scenes in our tutorial explaining our subject and at this point we want to ask the user a question ﴾or questions﴿ to ascertain their
level of comprehension of the concepts covered in the previous scenes. ﴾For the purpose of the exercise, we'll assume that the actual question text is
contained in a separate Balloon or Text object that has already been inserted into this scene﴿.
In this example, we'll illustrate Demo Builder's Events and User Interactivity functionality through the use of an Edit Zone object, but note that the
principles are the same for other interactive objects ﴾e.g. Buttons and Click Zones ﴿.
Let's proceed as follows :
1. From the object toolbar, select the Edit Zone object.
2. Click on the Scene's canvas to insert the Edit Zone object at the desired position on the scene. ﴾Set style and format as desired and as
described in the object's help topic ‐ or just leave these settings as default﴿.
3. Enter the correct answer to your question by clicking on the Correct Entries settings tab ﴾'thumbs up' icon﴿ in the Style Properties panel ﴾top
of screen﴿ and typing in the correct answer. ﴾Set other options or properties as or if desired﴿.
4. At this point, you will note that the TimeLine panel ﴾at the bottom of the screen﴿ has changed to include additional buttons for the events
that apply to the selected object and for which Actions and/or Audio can be added or edited based on users' response﴾s﴿.﴾In the case of the
Edit Zone object, the applicable events available are 'On Pass', 'On Error' and 'On RollOver'. See the help topic for the relevant Object you
want to work with to see the applicable events available for that object.﴿
5. In the TimeLine panel, click on the OnPass button to add actions and audio for this event of the Edit Zone object. i.e. The behaviour﴾s﴿ that
you want the movie to follow when the user answers your question correctly.
6. You will note that the TimeLine is now empty. Please also note that each individual event has its own TimeLine so that you may precisely define
and control the separate sequencing of display and behaviours for that event.
7. From the Event Actions settings tab ﴾next to the Correct Entries settings tab at the top of the screen﴿, select the action that you would like the
movie to take in the event of a correct answer from the user. In this example, we'll choose 'Continue' to have the rest of the scene or
movie continue playing.
8. Add the text "Congratulations, you answered correctly!" in a note to be displayed to the user by selecting the Note object ﴾from the object
toolbar﴿ and inserting it onto the scene's canvas in the desired position.
9. We would also like to add an audio clip of applause to be played when the user answers correctly. Select the Audio settings tab ﴾next to the
Event Actions settings tab at the top of the screen﴿.
10. Click on +/Audio Collection and choose the Applause sound clip from the catalogue of audio clips included as standard with Demo Builder.
Click on OK ﴾'tick'﴿ to add this sound to the event. ﴾Voice‐over narration could also be recorded just as easily here to be played when an event
is triggered﴿.
11. We're done! Preview the movie and adjust any settings ﴾or timings﴿ as desired.
The above is just one brief example to illustrate the functionality available and get you started with Demo Builder's Events and User Interactivity.
We're sure that as you progress, you'll not only find a myriad of applications for this functionality, but discover its usefulness in creating professional
movies, demonstrations and tutorials that your users will obtain real benefit from.
See also
Edit Zone
Button
Click Zone
Demo Builder
58 . Add voiceover narration
Home > Add voiceover narration
Add voice‐over narration
Learn how to add voice‐over narration to your movie by recording this at capture time, preview time or by personally narrating the Timeline.
Narrate Timeline
Record at capture
time
Record at preview
time
Insert audio per scene Built‐in audio editor
See also
Welcome
Introduction
Create new movie
Record the screen
Movie
Scenes
Cursors
Tools
Timeline
Transformations
Interactivity
Security
Auto
Export
Miscellaneous
FAQ
Contact
Home > Add voiceover narration > Narrate Timeline
Narrate Timeline
Narrate the movie using the playback in the preview window as your guide. The audio clip created appears on the Timeline when the voice narration
ends. The recording will automatically stop when the movie reaches the end of your selection or the end of the scene.
See also
Record at capture time
Record at preview time
Insert audio per scene
Built‐in audio editor
Home > Add voiceover narration > Record at capture time
Record at capture time
In order to be able to record voice narration at capture time, the 'Record Voice‐Over Narration' option ﴾denoted by the microphone symbol﴿ must be
enabled.
Demo Builder
Add voiceover narration . 59
See also
Narrate Timeline
Record at preview time
Insert audio per scene
Built‐in audio editor
Home > Add voiceover narration > Record at preview time
Record at preview time
To record audio while previewing your movie, go to Thumbnails View and select from the movie's properties panel the Audio Property. Click the +
﴾plus﴿ sign and select the 'Record' menu item. Next, it is important that you press 'Yes' when the dialogue box appears.
See also
Narrate Timeline
Record at capture time
Insert audio per scene
Built‐in audio editor
Home > Add voiceover narration > Insert audio per scene
Insert audio per scene
Use Audio Editor property panel to record or import audio clips.
Click on the '+' to add audio or the '‐‐' to remove a selected audio clip.
Click on the Audio Settings button ﴾at top right﴿ to change audio settings or to select and calibrate your audio input device.
Each individual audio clip can be edited and tailored to your specific needs.
Click on the button next to the audio clip to be edited. The Audio Clip Editor will be shown.
Demo Builder
60 . Add voiceover narration
See also
Narrate Timeline
Record at capture time
Record at preview time
Built‐in audio editor
Home > Add voiceover narration > Builtin audio editor
Built‐in audio editor
Adjust volume, insert silence, edit mistakes or add an external audio file to a presentation with the built‐in audio clip editor.
See also
Narrate Timeline
Record at capture time
Record at preview time
Insert audio per scene
Demo Builder
Security . 61
Home > Security
Security
Restrict the accessibility of a movie to a specific domain, indicate the latest date by which a movie may be viewed or password protect your movies.
Note: These options are only available for movies exported as a Flash Movie ﴾*.swf﴿ .
Domain lock
Expiration date
Password protect
See also
Welcome
Introduction
Create new movie
Record the screen
Movie
Scenes
Cursors
Tools
Timeline
Transformations
Interactivity
Add voice‐over narration
Auto
Export
Miscellaneous
FAQ
Contact
Home > Security > Domain lock
Domain lock
Tick the 'Domain Lock' check box to restrict the accessibility of a movie to a specific domain. Then enter the domain's address.
The Domain Lock prevents a movie from being hosted on a domain other than what's specified in this field. If a user tries to access the movie on a
domain other than the one specified, the flash movie will display a message with the 'Display Text' option, or it will redirect the user to a web page
specified in the 'Redirect option'.
Note: This option is only available for movies exported in Flash format ﴾*.swf﴿ .
Demo Builder
62 . Security
See also
Expiration date
Password protect
Home > Security > Expiration date
Expiration date
Add an expiration date to your movies after which they will no longer play. If a user attempts to view a movie that has expired, they will be redirected
to a webpage or displayed text of your choosing.
Note: This option is only available for movies exported in Flash format ﴾*.swf﴿ .
See also
Domain lock
Password protect
Home > Security > Password protect
Password protect
Add password protection to your movies. This option allows you to create movies that will ask the user for a password prior to playing. If you need
the user to log in on the Internet, select 'Server Script' and enter in the URL of the login page. Demo Builder will send the appropriate parameters to
the server script ﴾php, asp ...etc.﴿. See sample code below.
Ask Password ‐ Server Script
Input: username , password
Output: valid=true ‐ The password is valid , valid=false ‐ Invalid password
The following php code allows the movie to continue if password is "test".
Demo Builder
Security . 63
<?php if ﴾ $ password == "test" ﴿ { echo "valid=true";} else { echo "valid=false";}; ?>
Note: This option is only available for movies exported in Flash format ﴾*.swf﴿ .
See also
Domain lock
Expiration date
Demo Builder
64 . Auto
Home > Auto
Auto
Auto functions reduce the time spent editing by automatically adding balloons, text and the zoom‐n‐pan feature to your movie.
Auto‐Text
Auto‐Highlight
Auto‐Interact
Auto‐Zoom
Auto‐Rotate
Reset Timeline
See also
Welcome
Introduction
Create new movie
Record the screen
Movie
Scenes
Cursors
Tools
Timeline
Transformations
Interactivity
Add voice‐over narration
Security
Export
Miscellaneous
FAQ
Contact
Home > Auto > AutoText
Auto‐Text
During recording Demo Builder captures relevant information about your actions. 'Auto‐Text' then automatically adds balloons or texts describing
these actions.
1. Add Balloons
Select this option to add balloons attached to the image.
2. Add Texts
Select this option to add text that can be located on the left or right side of the canvas, aligned to the bottom of the canvas or attached to
the image under the mouse cursor.
3. Language
Select the language in which you would like the text to be displayed in.
4. Reader Profile
Select "words per minute" in the reader profile. This option adjusts the amount of time each balloon or text item is displayed for during the
movie.
5. Text‐To‐Speech
Select this option to convert the text into speech.
6. Add 'Click To Continue' button
Select this option to add a "click to continue" button. This option will pause the movie until the user clicks the button to continue.
7. Make space in the Timeline
Select this option to allow Demo Builder to adjust the Timeline as required for the reader to be able to read the text displayed. In the case
that you do not choose this option, it is likely that the text shown will be out of tune with the movie. It is not recommended to select this
option if your scene contains a voice‐over naration recorded at capture time.
Demo Builder
Auto . 65
See also
Auto‐Highlight
Auto‐Interact
Auto‐Zoom
Auto‐Rotate
Reset Timeline
Home > Auto > AutoHighlight
Auto‐Highlight
Auto‐highlight adds rectangles or "hand" animations to highlight the areas which you clicked on during capture time.
1. Add Rectangles
Select this option to add rectangles over areas which you clicked on during capture time.
2. Add 'Hand' Animations
Select this option to add "hand" animations which point, from the right, to the area you clicked on during capture time.
3. Duration
Enter the number of seconds that you want your rectangles or animations to last.
4. Make space in the Timeline
Select this option to allow Demo Builder to adjust the Timeline as required for the reader to be able to read the text displayed. In the case
that you do not choose this option, it is likely that the text shown will be out of tune with the movie. It is not recommended to select this
option if your scene contains a voice‐over narration recorded at capture time.
Demo Builder
66 . Auto
See also
Auto‐Text
Auto‐Interact
Auto‐Zoom
Auto‐Rotate
Reset Timeline
Home > Auto > AutoInteract
Auto‐Interact
Auto‐Interact adds click zone areas which will ask the user to click on the areas that you yourself clicked on during recording. This is a GREAT feature
for any training purposes.
1. Add instructional notes
Used to instruct the user to click on the right spot.
2. On Success Event
Select this option to show a positive message when the user correctly clicks inside the click zone area.
3. On Failure Event
Selection this option to show a negative message when the user incorrectly clicks outside the click zone area.
4. On Rollover Event
Selection this option to show a message when the user moves the mouse over the click zone.
5. Hand Cursor
Change the mouse pointer to a hand cursor when the user positions the mouse pointer over the click zone.
6. Text‐To‐Speech
Select this option if you want to convert the text into speech for all messages above.
Demo Builder
Auto . 67
See also
Auto‐Text
Auto‐Highlight
Auto‐Zoom
Auto‐Rotate
Reset Timeline
Home > Auto > AutoZoom
Auto‐Zoom
Auto‐Zoom adds Transformations which zoom‐n‐pan the image in order to draw your audience's attention to what is most important.
1. Zoom
Select the amount ﴾measured in terms of percent﴿ of the original image to be shown.
2. Animate
Select the animation level. The 'follow cursor' option ﴾at one extreme of the spectrum﴿ attempts to always center the cursor within the image.
3. Adjust Scale
Select this option to let Demo Builder choose the best scale. When doing this Demo Builder always attempts to prevent any undesired
stretching of the image.
4. Add Border
Add a border to your image. A border is useful to distinguish the image from the background of the movie.
Demo Builder
68 . Auto
See also
Auto‐Text
Auto‐Highlight
Auto‐Interact
Auto‐Rotate
Reset Timeline
Home > Auto > AutoRotate
Auto‐Rotate
Auto‐Rotate adds Transformations which rotate the image according to your mouse movements.
1. Rotate Y
Select this option to rotate the image on the Y‐axis. Drag the slider to determine the maximum rotational angle.
2. Rotate X
Select this option to rotate the image on the X‐axis. Drag the slider to determine the maximum rotational angle.
3. Animate
Select the animation level. The 'follow cursor' option ﴾at one extreme of the spectrum﴿ attempts to constantly rotate the image wherever the
cursor moves.
4. Adjust Scale
Select this option to assure that the image always remains within the Canvas.
5. Add Reflection
Select this option to add a reflection effect to the image.
Demo Builder
Auto . 69
See also
Auto‐Text
Auto‐Highlight
Auto‐Interact
Auto‐Zoom
Reset Timeline
Home > Auto > Reset Timeline
Reset Timeline
Click the Reset Timeline menu item to delete all objects and transformations. Resetting the Timeline will also restore the original length ﴾timing﴿ as
established at capture time. This is helpful if you are testing any Auto‐Functions features. For example, imagine that you had added Balloons with the
Auto‐Text function and then decided that you no longer desired these. Resetting the Timeline will eliminate these and restore the original values.
Note: This operation cannot be undone.
See also
Auto‐Text
Auto‐Highlight
Auto‐Interact
Auto‐Zoom
Auto‐Rotate
Demo Builder
70 . Export
Home > Export
Export
Demo Builder offers multiple Build and Export options for your movies. Save, Share and Distribute in multiple formats to make sure that you get your
message across to the widest audience possible.
Format
Destination
See also
Welcome
Introduction
Create new movie
Record the screen
Movie
Scenes
Cursors
Tools
Timeline
Transformations
Interactivity
Add voice‐over narration
Security
Auto
Miscellaneous
FAQ
Contact
Home > Export > Format
Format
Demo Builder allows you to export movies in the following file formats : Flash, H264, Audio Video Interleave, Windows Media Video, MPEG4 ,
Standalone, Image Files and Word Document.
Flash
H264/AAC
Audio Video
Interleave
Image Files
Word Document
Help me choose
Windows Media
Video
MPEG4
Standalone
See also
Destination
Home > Export > Format > Flash
Flash
Flash is an extremely popular format for playing animated video, particularly over the internet. The Flash player plugin is installed in virtually all
Demo Builder
Export . 71
internet browsers, so this format is widely compatible with PC and Macs.
Exporting in Flash format actually creates 3 separate files: a SWF file, a HTML file and a file called swfobject.js. The SWF ﴾Flash﴿ file is your actual movie,
the HTML file is a web page that will display your movie, and the swfobject .js file is used to properly display the Flash movie in Internet Explorer.
Once you export in Flash Movie format, you should upload all 3 files to your web server, thus publishing your movie on the internet.
1. SWF ‐ File Name
Enter flash﴾.swf﴿ file name. You do not need to include the filename extension ﴾.swf﴿.
Flash Options...
You should select the first option ﴾JPEG Compression﴿ if you created your movie by importing
image files. Doing so will render the best quality movie possible, however, the size of the Flash file
will also consequently increase.
The second option is recommended in the case that your movie was created using either the 'Take
screen shot' or 'Full‐Motion recording' method.
Select 'Grayscale' if would like to render your movie in grayscale.
2. HTML
This option exports the HTML code necessary to add a Flash﴾.swf﴿ file to a web page.
3. HTML ‐ File Name
Enter html file name. You do not need to include the filename extension ﴾.html﴿.
Edit HTML Content
You are free to edit the HTML content however you see fit ﴾to display the movie
within a custom HTML web page of your choosing﴿.
However, the HTML file also contains the following special code that should not
be altered:
<!‐‐NAME‐‐>
<!‐‐STYLE‐‐>
<!‐‐SCRIPT‐‐>
<!‐‐FLASH‐‐>
4. HTML ‐ Color
Select the background color of the page.
5. HTML ‐ Adjust Size
You can change the size of the flash movie to fit your specifications. Moreover, you may choose to have the flash movie fit the browser
window or you can specify new dimensions.
Note: Please understand that there are differences between 'movie resizing' and 'html movie resizing'. The 'html movie resizing' option
attempts to stretch the movie to comply with the dimensions specified, while also maintaining the previous aspect ratio. However, this option
may distort your movie if drastically downscaling.
6. Learning Management System
Select this option if you want to upload your movie to an LMS. ﴾e.g. Moodle﴿
Demo Builder is fully compliant with SCORM 1.2/2004 and AICC Learning Management Systems.
Check the 'Zip Files' box to compress all the files into a single zip file.
e.g. moviename_aicc.zip, moviename_scorm12.zip, moviename_scorm2004.zip
SCORM Manifest file
Demo Builder
72 . Export
See also
H264/AAC
Audio Video Interleave
Windows Media Video
MPEG4
Standalone
Image Files
Word Document
Help me choose
Home > Export > Format > H264/AAC
H264/AAC
The H264/AAC format is setting the standard for video files played on the internet due to its added image clarity and reduced file size. This format is
thus recommended for movies of a longer length.
Exporting in this format brings multiple advantages, such as: a progressive download feature ﴾the movie is loaded while playing﴿, compatibility with
the iPad, iPod and iPhone, and its ability to be embedded into a HTML 5 webpage using the VIDEO tag.
That being said, using this format does partially reduce interactivity. In other words, the buttons, edit zones and click zones can no longer capture
mouse or keyboard inputs, although all of the Start‐End properties are still available if a HTML/SWF player is attached ﴾see below﴿. Should you want a
fully interactive movie, the Flash format is still the best.
Note: Those running Windows XP or Vista must have Apple QuickTime installed on their machines to export in this format. However, once the movie is
exported, the end‐user does not require Apple QuickTime to view the movie.
Demo Builder
Export . 73
1. H264/AAC‐ File Name
Enter H264/AAC﴾.mp4﴿ file name. You do not need to include the filename extension ﴾.mp4﴿.
H264/AAC Options...
Video Quality
Select the video quality. A higher quality will increase the resulting file size.
Adjust Size
You can adjust the size of the movie to fit your specifications.
No Audio
Selecting this option will eliminate all audio from your movie
Note: Please understand that there are differences between 'movie resizing' and the above
option. This option attempts to stretch the movie to comply with the dimensions specified,
while also maintaining the previous aspect ratio.
2. HTML
This option creates three additional files: a SWF file, a HTML file and a file called swfobject.js. The SWF ﴾Flash﴿ file is used to play the mp4 file,
the HTML file is a web page that will display your movie, and the swfobject .js file is used to properly display the Flash movie in Internet
Explorer. Once you export in this format, you should upload all 4 files﴾mp4,html,swf,js﴿ to your web server, thus publishing your movie on the
internet.
3. HTML ‐ File Name
Enter html file name. You do not need to include the filename extension ﴾.html﴿.
Edit HTML Content
You are free to edit the HTML content however you see fit ﴾to display the movie
within a custom HTML web page of your choosing﴿.
However, the HTML file also contains the following special code that should not
be altered:
<!‐‐NAME‐‐>
<!‐‐STYLE‐‐>
<!‐‐SCRIPT‐‐>
<!‐‐FLASH‐‐>
4. HTML ‐ Color
Select the background color of the page.
5. HTML ‐ Adjust Size
You can change the size of the flash movie to fit your specifications. Moreover, you may choose to have the flash movie fit the browser
window or you can specify new dimensions.
Note: Please understand that there are differences between 'movie resizing' and 'html movie resizing'. The 'html movie resizing' option
attempts to stretch the movie to comply with the dimensions specified, while also maintaining the previous aspect ratio. However, this option
may distort your movie if drastically downscaling.
6. Learning Management System
Select this option if you want to upload your movie to a LMS. ﴾e.g. Moodle﴿
Demo Builder is fully compliant with SCORM 1.2/2004 and AICC Learning Management Systems.
Check the 'Zip Files' box to compress all the files into a single zip file.
e.g. moviename_aicc.zip, moviename_scorm12.zip, moviename_scorm2004.zip
SCORM Manifest file
Demo Builder
74 . Export
Note: The video's dimensions will be adjusted as follows: in MP4 format the dimensions must be divisible by a factor of 16. Demo Builder will
automatically adjust your movie's size if it does not comply with the above specifications.
HTML5 and Video Tag
A H264/AAC file may be played into a HTML 5 webpage using a video tag. That is, it is not necessary to use Demo Builder's player to embed a file with
the MP4 extension into a webpage.
To show a video in HTML 5, simple use this line of code:
<video controls autoplay>
<source src="mymovie.mp4" type="video/mp4" />
</video>
Please note that not all browsers support the HTML5/H264 combination. Those that do are: IE9, Safari and Chrome.
See also
Flash
Audio Video Interleave
Windows Media Video
MPEG4
Standalone
Image Files
Word Document
Help me choose
Demo Builder
Export . 75
Home > Export > Format > Audio Video Interleave
Audio Video Interleave
This option is particularly useful for exporting movies of longer length. It is also recommended if you intend to publish your movie on video sharing
websites, such as YouTube and Metacafe or if you want to import the video file in a video editing software.
AVI is a popular video file format. Each AVI file is encoded with a 'codec' ﴾such as DivX or Cinepak﴿ that compresses the video data on export and
decompresses it for viewing in movie playing software. When you export in AVI format, you will also have to pick a codec to encode with from the list
of those installed on your PC.
1. File Name
Enter the video file name. You do not need to include the filename extension﴾.avi﴿.
2. Adjust Size
You can adjust the size of the movie to fit your specifications.
Note: Please understand that there are differences between 'movie resizing' and the above option. This option attempts to stretch the movie
to comply with the dimensions specified, while also maintaining the previous aspect ratio.
3. No Audio
Selecting this option will eliminate all audio from your movie.
See also
Flash
H264/AAC
Windows Media Video
MPEG4
Standalone
Image Files
Word Document
Help me choose
Home > Export > Format > Windows Media Video
Windows Media Video
This option is particularly useful for exporting movies of longer length. It is also recommended if you intend to publish your movie on video sharing
websites, such as YouTube and Metacafe.
Demo Builder
76 . Export
WMV format is commonly used for movie playback on Windows PCs. The software required to playback WMV files is installed on most Windows PCs.
1. File Name
Enter the video file name. You do not need to include the filename extension﴾.wmv﴿.
2. Adjust Size
You can adjust the size of the movie to fit your specifications.
Note: Please understand that there are differences between 'movie resizing' and the above option. This option attempts to stretch the movie
to comply with the dimensions specified, while also maintaining the previous aspect ratio.
3. No Audio
Selecting this option will eliminate all audio from your movie.
Note: Depending on the option chosen, the video's dimensions will be adjusted as follows: in WMV format the dimensions must be divisible by a
factor of 2. Demo Builder will automatically adjust your movie's size if it does not comply with the above specifications.
Embedding a wmv file in your web page
Embedding a video file is achieved by inserting a block of code in the web page's HTM. The example below shows the code for embedding a
Windows Media file. Note that it uses two tags: <object> and <embed>. This is to enable maximum browser compatibility.You will need to set the file
name ﴾and other attributes if required﴿ for both tags. Use true or false for the <object> tag, 1 or 0 for the <embed> tag.
To get started, all you have to do is copy the code below into your web page and replace 'mymovie.wmv' with your own file name.
<OBJECT ID="MediaPlayer" WIDTH="800" HEIGHT="600" CLASSID="CLSID:22D6F312‐B0F6‐11D0‐94AB‐0080C74C7E95"
STANDBY="Loading Windows Media Player components..." TYPE="application/x‐oleobject">
<PARAM NAME="FileName" VALUE="mymovie.wmv">
<PARAM name="autostart" VALUE="false">
<PARAM name="ShowControls" VALUE="true">
<param name="ShowStatusBar" value="false">
<PARAM name="ShowDisplay" VALUE="false">
<EMBED TYPE="application/x‐mplayer2" SRC="mymovie.wmv" NAME="MediaPlayer"
WIDTH="800" HEIGHT="600" ShowControls="1" ShowStatusBar="0" ShowDisplay="0" autostart="0"> </EMBED>
</OBJECT>
See also
Flash
H264/AAC
Audio Video Interleave
MPEG4
Standalone
Image Files
Word Document
Help me choose
Demo Builder
Export . 77
Home > Export > Format > MPEG4
MPEG4
This option is particularly useful for exporting movies of longer length. It is also recommended if you intend to publish your movie on video sharing
websites, such as YouTube and Metacafe.
MP4 can be played back on Windows PCs that have the QuickTime player, which is often installed with iTunes. They can also be played back on
virtually all Macs, but the format is not widely compatible with Linux.
1. File Name
Enter the video file name. You do not need to include the filename extension﴾.mp4﴿.
2. Adjust Size
You can adjust the size of the movie to fit your specifications.
Note: Please understand that there are differences between 'movie resizing' and the above option. This option attempts to stretch the movie
to comply with the dimensions specified, while also maintaining the previous aspect ratio.
3. No Audio
Selecting this option will eliminate all audio from your movie.
Note: The video's dimensions will be adjusted as follows: in MP4 format the dimensions must be divisible by a factor of 16. Demo Builder will
automatically adjust your movie's size if it does not comply with the above specifications.
See also
Flash
H264/AAC
Audio Video Interleave
Windows Media Video
Standalone
Image Files
Word Document
Help me choose
Home > Export > Format > Standalone
Demo Builder
78 . Export
Standalone
Demo Builder exports an executable file that runs on Windows PCs to display the movie. It requires no extra software to be installed on a PC and is
compatible with Windows 2000 and above, but it will not run on Mac OS X or Linux.
1. File Name
Enter the standalone file name. You do not need to include the filename extension.
2. Title
Enter the window's title.
3. Full Screen
Check this option to execute running the application in full screen mode.
4. Create autorun for CD
AutoRun is a feature of the Microsoft Windows operating system. When users insert an AutoRun‐enabled compact disc into their CD‐ROM
drive, AutoRun automatically runs an application on the CD‐ROM. This option creates an 'autorun.inf' file that has to be burned on the CD
along with the standalone file.
See also
Flash
H264/AAC
Audio Video Interleave
Windows Media Video
MPEG4
Image Files
Word Document
Help me choose
Home > Contact
Video
The release of Version 8.0 also brings with it a new feature! Now you are able to export your movie in Video format. This option is particularly useful
for exporting movies of longer length. It is also recommended if you intend to publish your movie on video sharing websites, such as YouTube and
Metacafe.
1. File Name
Enter the video file name. You do not need to include the filename extension.
2. Format
Select your desired movie format :
Audio Video Interleave﴾AVI﴿, Windows Media Video﴾WMV﴿, MPEG‐4﴾MP4﴿
AVI
AVI is a popular video file format. Each AVI file is encoded with a 'codec' ﴾such as DivX or Cinepak﴿ that compresses the video data on
export and decompresses it for viewing in movie playing software. When you export in AVI format, you will also have to pick a codec to
encode with from the list of those installed on your PC.
WMV WMV format is commonly used for movie playback on Windows PCs. The software required to playback WMV files is installed on most
Windows PCs.
MP4 MP4 can be played back on Windows PCs that have the QuickTime player, which is often installed with iTunes. They can also be played
back on virtually all Macs, but the format is not widely compatible with Linux.
Demo Builder
Export . 79
Note: Depending on the option chosen, the video's dimensions will be adjusted as follows: in AVI fomat there will be no changes, in WMV
format the dimensions must be divisible by a factor of 2, in MP4 format the dimensions must be divisible by a factor of 16. Demo Builder will
automatically adjust your movie's size if it does not comply with the above specifications.
3. Adjust Size
You can adjust the size of the movie to fit your specifications.
Note: Please understand that there are differences between 'movie resizing' and the above option. This option attempts to stretch the movie
to comply with the dimensions specified, while also maintaining the previous aspect ratio.
4. No Audio
Selecting this option will eliminate all audio from your movie.
See also
Home > Export > Format > Image Files
Image Files
Exporting in 'Image Files' format creates a sequence of image files. Optionally, you can also export an html file in order to display all of the images
within a web page.
1. Scenes
Specifies the specific scenes that need to be exported.
2. Include hidden scenes
Check this option to include hidden scenes.
3. Objects
Specify the objects that need to be included in a scene.
4. Method
Specify the method of generating the file names of the images.
'Automatic File Name' or 'Use Scene Name as File Name'
5. Prefix
Enter the file name prefix if the method is : 'Automatic File Name Format'
6. Format
Specify the format for all images.
BMP﴾Windows Bitmap﴿, JPG﴾JPEG Image File﴿, GIF﴾CompuServe GIF﴿, PNG﴾Portable Network Graphics﴿
7. Size
Specify the size of the images.
Maintain Aspect Ratio, Reset To Original Size : set image size to movie size
8. Export HTML
This option exports a html file in order to display the image files within a web page.
Demo Builder
80 . Export
9. HTML Style
Specifies the style in which you want to display the images.
'One image per page' or 'All images on page'
10. HTML File Name
Enter the html file name. You do not need to include the filename extension ﴾.html﴿.
Click '<>' button to edit the HTML content. The HTML file contains html code with the following special tags :
<% MOVIE NAME%> ‐ Your Movie's Name ‐ and ‐ <%IMAGE FILES%> ‐ An array of images
See also
Flash
H264/AAC
Audio Video Interleave
Windows Media Video
MPEG4
Standalone
Word Document
Help me choose
Home > Export > Format > Word Document
Word Document
You can also publish your project in 'Microsoft Word DOC' format which will display your slides on printable pages in the format of your choosing.
Choose to include cursor movements, text boxes and even blank lines so that students can take notes. Great for handouts !
1. Scenes
Determine the specific scenes that need to be exported.
2. Include hidden scenes
Check this option to include hidden scenes.
3. Objects
Specify the objects that need to be included in a scene.
4. File Name
Enter the document﴾.doc﴿ file name. You do not need to include the filename extension ﴾.doc﴿.
5. Frames per page
Rows by Columns
6. Elements
'Scene Name', 'Blank lines for notes', 'Captions', 'Scene Notes'
Demo Builder
Export . 81
Note: Please note that Microsoft Word 2003 or later must be installed on your machine.
See also
Flash
H264/AAC
Audio Video Interleave
Windows Media Video
MPEG4
Standalone
Image Files
Help me choose
Home > Export > Format > Help me choose
Help me choose
The best format to choose depends on the end purpose and audience of your movie.
High quality
Small file size
Can contain 'interactive' objects
Suitable for the Internet
Limits
Flash
Yes
Yes
Yes
Yes
15‐20 mins
EXE
Yes
Yes
Yes
No
15‐20 mins
H264
Yes
No
No
Yes
None
AVI
Yes
No
No
No
None
WMV
Yes
No
No
Yes
None
MPEG4
Yes
No
No
No
None
Should I Export My Movie in Flash or H264 Format?
If it is quality you desire, Flash remains your best option. However, you should be aware that exporting in Flash format also has its drawbacks. We
only recommend the export in Flash format option if your movie is less than 20 minutes in length and a maximum of 8 minutes per scene. For movies
that are longer than 20 minutes, the export in H264 format option is often a better choice.
More in‐depth explanation from Adobe :
http://kb2.adobe.com/cps/144/tn_14437.html
That being said, if your movie is longer than the recommended length for exports in Flash format yet you wish to export this in Flash format, it is still
possible to do so — please see the link below to find out exactly how this can be done. In general, we advise that you do not create one overly long
movie — instead, try to divide your movies into smaller 'sections' or 'chapters'. These smaller, individual movies can then be 'linked' together to give
the appearance of a single movie if so desired.
How to link your movies together to give the appearance of a single movie
See also
Flash
Demo Builder
82 . Export
H264/AAC
Audio Video Interleave
Windows Media Video
MPEG4
Standalone
Image Files
Word Document
Home > Export > Destination
Destination
You can specify three destinations for your chosen file format : Save To Disk, Upload to FTP Server, Send To EMail.
Save To Disk
Upload To FTP Server
Send EMail
See also
Format
Home > Export > Destination > Save To Disk
Save To Disk
1.
2.
3.
4.
Ensure your required file format has been ticked.
Tick the Disk box.
Browse and select the location on your hard drive or disk where the file is to be saved.
Click Export to export to the specified location or OK to save your settings.
See also
Upload To FTP Server
Demo Builder
Export . 83
Send EMail
Home > Export > Destination > Upload To FTP Server
Upload To FTP Server
1. FTP Server
Enter the address for the FTP server. ﴾e.g. hostname.com or 02.352.67.162﴿
You can get this information from your ISP ﴾Internet Service Provider﴿ OR from the web server's administrator.
2. Port
This is the port to connect to on the FTP website. This is normally 21, however, it may be something different if you are going through a
firewall, or if the site administrator has assigned the FTP service to a non‐standard port.
3. Path
Enter the destination path for the file.
4. Passive Mode
Passive transfers are necessary for some firewall and gateway configurations and when you get failed data channel errors.
5. Username and Password
In the Username and Password boxes, enter the username and password assigned to you by the ISP or server administrator of the FTP site.
6. Proxy
The Proxy and Port fields are not mandatory.
See also
Save To Disk
Send EMail
Home > Export > Destination > Send EMail
Send EMail
1.
2.
3.
4.
5.
6.
Tick the E‐Mail box.
Select the E‐Mail client to Use.
In the recipient's box, enter the recipient's email address.
In the Subject box, you can change Demo Builder's default subject title.
In the Body box, type your intended message for the recipient or leave the default message.
Click Export to save settings and export the movie to the specified email address or OK to save your settings.
Demo Builder
84 . Export
See also
Save To Disk
Upload To FTP Server
Demo Builder
Miscellaneous . 85
Home > Miscellaneous
Miscellaneous
Personalize
Text‐To‐Speech
Preferences
Upload to YouTube
Keyboard Shortcuts
See also
Welcome
Introduction
Create new movie
Record the screen
Movie
Scenes
Cursors
Tools
Timeline
Transformations
Interactivity
Add voice‐over narration
Security
Auto
Export
FAQ
Contact
Home > Miscellaneous > Personalize
Personalize
Immediately after recording your movie, a window ﴾as seen below﴿ appears giving you the opportunity to personalize your movie. Make sure that
Show the Personalize' Wizard Upon Capture option is selected in the Preferences window. Similarly, you may also choose this option by right‐clicking
in the Thumbnails view and selecting the 'Personalize' menu item.
Please note that all of the following options can also be selected during the editing phase.
See also
Text‐To‐Speech
Preferences
Upload to YouTube
Keyboard Shortcuts
Demo Builder
86 . Miscellaneous
Home > Miscellaneous > TextToSpeech
Text‐To‐Speech
There are many text‐to‐speech ﴾TTS﴿ engines, across multiple languages, that can be used with Demo Builder.
When exporting in Flash or Video format the speech is captured as a sound file. 'Text‐to‐Speech' is not required on the computer used to view the
final presentation.
Third Party Products:
http://www.ivona.com
http://www.microsoft.com/speech/evaluation/thirdparty/engines.mspx
See also
Personalize
Preferences
Upload to YouTube
Keyboard Shortcuts
Home > Miscellaneous > Preferences
Preferences
The Preferences window contains five tabs : General, Auto‐Calculate, Text‐To‐Speech,Confirmation Messages and Defaults.
General Tab
1. Check for update at start‐up
Verify automatically that you are using the most up‐to‐date version of Demo Builder! Tick this box to check if any updates are available when
Demo Builder starts ﴾recommended﴿.
2. Show the 'personalize' wizard upon capture
Quickly personalize your movie by using 'Auto functions'‐‐ insert a introduction scene,a ending scene, auto‐text and more.
3. Grid
Using for lining up images, cursors, notes and balloons within your movie's scenes.
4. Progress Window
The Progress Window displays as your movie is being built.
Expanded
In this case the progress bar, display logs, errors logs and tasks are shown while the movie is compiling. The window closes
automatically when compiling is complete and jumps to play the movie.
As a Pin
In this case, the progress window ﴾collapsed﴿ continues to display after Demo builder completes compiling and stands ready to play
the movie. You can then choose to view the logs, errors logs and tasks by clicking on the 'More' button and/or the relevant tab ﴾Tasks,
Error or Log﴿.
5. Spelling Options
Demo Builder can check spelling and grammar errors according to your language specification. You can use more than one language
dictionary. Simply tick the relevant option box﴾es﴿ as desired.
Auto‐Calculate Tab
Demo Builder
Miscellaneous . 87
1. Auto‐Calculate Size
You can use this option to have Demo Builder automatically estimate how large the text boxes ﴾e.g. notes and balloons﴿ should be.
2. Auto‐Calculate Time
You can use this option to have Demo Builder automatically estimate how long each text box ﴾e.g. notes and balloons﴿ should be displayed in
the Timeline. This is based on the "words per minute" reader profile.
Text‐To‐Speech Tab
1. Voice
Click on this combination box to change the default voice.
2. Volume
Determine volume. ﴾0‐100﴿
Confirmation Message Tab
When a box is checked from the list of options, Demo Builder will ask for confirmation of the corresponding actions when necessary.
Example:
From the Preferences Wizard, Confirmation Messages tab, ensure that the 'Delete scenes' option is checked.
Then click on a Scene within your movie and press the Delete key on your keyboard.
Demo Builder displays a confirmation message.
Click 'Yes' to confirm or 'No' to leave the scene in your movie.
If you check the box 'Don't Show Again', the Delete Scenes option in the preference wizard is auto‐unchecked and Demo Builder will not
request confirmation of this action until you re‐check this in your preference wizard.
Demo Builder
88 . Miscellaneous
Defaults Tab
1. Font
Set the default font name and size.
2. Style
Set the default balloon, note, edit zone and button style.
3. Duration
This sets the default duration a new Scene or Object will be displayed for during a movie. For example, if the initial interval in preferences is
set to 3 seconds, it means that objects you insert in your movies' scenes will be displayed for 3 seconds when the movie runs. You can adjust
this default time manually in the Timeline.
See also
Personalize
Text‐To‐Speech
Upload to YouTube
Keyboard Shortcuts
Home > Miscellaneous > Upload to YouTube
Upload to YouTube
In order to publish your movie to YouTube, we recommend that you first export your movie in MP4 format‐‐ however, other video formats are also
acceptable. Once you have done this, click the "Publish To YouTube" button found on the summary screen. Enter your username and password here
and then click the "Next" button.
Demo Builder
Miscellaneous . 89
See also
Personalize
Text‐To‐Speech
Preferences
Keyboard Shortcuts
Home > Miscellaneous > Keyboard Shortcuts
Keyboard Shortcuts
The following Keyboard Shortcuts are available throughout Demo Builder :
Key
Action
CTRL‐O
CTRL‐S
F10
CTRL‐Z
SHIFT‐CTRL‐Z
CTRL‐C
CTRL‐V
Del
CTRL‐A
Open Project
Save Project
Export Project
Undo
Redo
Copy object or scene
Paste object or scene
Delete object or scene
Select all objects or scenes
F5
ENTER
F8
F9
F6
F7
Home﴾see all scenes﴿
Edit Scene
Preview Scene﴾s﴿
Preview Movie
Previous Scene
Next Scene
B
N
T
X
R
L
F
P
H
C
E
U
Z
A
Insert Balloon
Insert Note
Insert Text Area
Insert Animated Text
Insert Rectangle
Insert Ellipse
Insert Image ﴾from file﴿
Insert Image ﴾from cliparts﴿
Insert Image ﴾take screenshot﴿
Insert Cursor
Insert Edit Zone
Insert Button
Insert Click Zone
Insert Animation
Demo Builder
90 . Miscellaneous
V
Insert Flash Video
When playing a movie the following PlayerBar keyboard shortcuts are available :
Key
Action
Home
Space
Left Arrow
Right Arrow
M
I
Back to First Scene
Pause/Play
Previous Scene
Next Scene
Audio On/Off
Info
See also
Personalize
Text‐To‐Speech
Preferences
Upload to YouTube
Demo Builder
FAQ . 91
Home > FAQ
FAQ
The 'FAQ' section includes answers to common questions, 'tips and tricks' and solutions to difficulties that users have previously encountered.
License
Edit
Interactivity
Export
See also
Welcome
Introduction
Create new movie
Record the screen
Movie
Scenes
Cursors
Tools
Timeline
Transformations
Interactivity
Add voice‐over narration
Security
Auto
Export
Miscellaneous
Contact
Home > FAQ > License
License
Can demonstrations and tutorials that I have created with a fully licensed version of Demo Builder be sold and freely distributed by me?
Any exported movies, demonstrations, tutorials and so forth that you have made with a fully licensed version of Demo Builder are considered to be
your own ﴾intellectual﴿ property. You are free to sell and/or distribute your own exported works as you desire.
I just purchased Demo Builder. How do I get the program and install it?
To install the full version of Demo Builder, please follow these steps:
1. Go to the customer area and enter the email and the password you received at the time you purchased Demo Builder.
2. Download the program and license key file. Remember to put both files in the same folder after downloading them.
3. Begin the setup process and follow the instructions on screen.
I have purchased the full version. Will I still be able to use the samples I have already created?
The movies, demonstrations and tutorials that you have created with a trial version of Demo Builder will still be fully usable. Opening and re‐
exporting these samples with a fully licensed version of Demo Builder will also remove the watermark from these movies.
What do I need to do with license key file ?
You do not have to open or view the product license key file. You must only save it in the same folder as the setup files of the full version of Demo
Builder.
In this manner, Demo Builder's setup process will automatically locate it and you will not be asked for it. Should the product key not be co‐located
with the setup files, you will be asked to provide the correct path to the license key file during the installation process.
See also
Edit
Demo Builder
92 . FAQ
Interactivity
Export
Home > FAQ > Edit
Edit
How do I remove the 'info' button from the PlayerBar?
The PlayerBar Information button can be removed ﴾hidden﴿ from your frame/movie by clicking on the PlayerBar button in the movie's properties panel.
Deselect the Info Button checkbox.
How can I change the details shown in the movie's 'info' panel?
Go to the Thumbnails View of the movie. In the Movie Properties bar, click on the double downward pointing arrows button to the immediate right
of the movie's title. This will open a panel in which you can enter the details you want shown in the 'info' panel.
Can users pause my movie during playback? How?
With Demo Builder's PlayerBar, your users can have full control of the movie's playback ﴾e.g. Pause/Play, Stop, Rewind﴿.
What is 'Preloader'?
If you export a movie with 'Preloader' checked, the movie will load fully before it commences playing.
To employ this feature, check the 'Preloader' button from the Start‐End options in the Movie Properties panel.
How do I get the mouse cursor to change to the 'hand' when over a Click Zone?
Select the relevant Click Zone object and click on the Hand Cursor button on the Click Zone Property panel ﴾top of screen﴿.
Can I translate my movie captions for international distribution?
New in Demo Builder Version 5.0, the Localize Wizard allows you to update the language in your movies for international distribution. Use the
Localize Wizard to export your movies' caption text ﴾found in balloons, notes, text boxes and so forth﴿ to a Word Document, update this with text in
the desired language and then import it back into your movie. Start by selecting "Localize" from Demo Builder's File menu to bring up the Localize
Wizard and then follow the wizard's simple steps.
What is AutoCalculate Time/Size?
Two additional options for objects have been introduced in Demo Builder Version 5.0 to make it even easier to create professional looking
demonstrations and tutorials quickly.
1. AutoCalculate Size
Automatically size your text area to fit the amount of entered text.
2. AutoCalculate Time
Automatically adjust the timing in the Timeline based on the 'Reading Speed' property in Preferences.
See also
License
Interactivity
Export
Home > FAQ > Interactivity
Interactivity
How do I create a transparent button?
A transparent button can be a simple Click Zone object. You should activate the 'Hand Cursor' to indicate to the user where the button is located and
that some action is available or required from him or her.
How do I play audio when an event occurs?
Each of Demo Builder's interactive objects ﴾Button, Click Zone, Edit Zone ﴿ have events that are triggered by users' actions. To play audio when these
events occur, simply select the relevant interactive object and follow these steps:
Demo Builder
FAQ . 93
1. From the TimeLine ﴾bottom of screen﴿, select the event that the audio is to be added to and choose when this will be played. ﴾For example, the
On Pass event of the Edit Zone object﴿.
2. Add the desired audio clip to be played within the event in the same manner as you add audio to a frame. ﴾See here for further details﴿.
3. Repeat as desired for any other events/objects.
4. Preview, test and amend if necessary.
Note: Each individual Event has its own TimeLine to define the separate sequencing of display and behaviours for that event.
See also
License
Edit
Export
Home > FAQ > Export
Export
Is the Macromedia Flash Player plug‐in required to view my demos﴾Flash format﴿?
The Adobe Flash Player plug‐in is required to view a SWF file. Please note that the browser will automatically try to download and install this if it is
not already present. The user will only have to confirm the installation of the plug‐in.
Almost 99% of browsers already have the Adobe Flash Player installed.
See this survey for more information : http://www.adobe.com/products/player_census/flashplayer/
What is needed to distribute my movies? On the web? On CD?
To share your movies over the web, you will need the SWF file and the HTML file that was created along with it.
To distribute the movies on CD, you will need the EXE file and ﴾optionally﴿ the 'autorun.inf' file that were created when the movie was exported in
Standalone format. The autorun.inf file is only required if you want the movie to play automatically when the CD is inserted into the drive.
For movies burned to CD, how do I add 'autoplay' so that movie playback starts automatically when the CD is inserted in the player?
When you export and burn a movie to CD in Standalone format, check the 'Create autorun' for CD option. The movie will be created along with a file
named 'autorun.inf' that you must include on the CD with the movie ﴾*.exe﴿ file in order for the movie to start automatically upon insertion in the CD
drive.
Produced H264/SWF Flash plays on local computer, but not from server.
You may need to update the server's MIME types to support the MP4 format. The following instructions walk through configuring IIS and Apache for
the MP4 MIME type.
Internet Information Services (IIS) 7
1.
2.
3.
4.
5.
6.
Open IIS Manager
Click on the computer name of the server
Double click on MIME Types.
Select Add from the right and enter in Extension: .mp4 and MIME Type: video/mp4.
Right click on Default Web Site > Stop.
Right click on Default Web Site > Start.
Internet Information Services (IIS) 6
1.
2.
3.
4.
5.
Open IIS Manager
Access computer name of the server > HTTP Headers > MIME Types.
Click on New and enter in Extension: .mp4 and MIME Type: video/mp4.
Right click on Default Web Site > Stop.
Right click on Default Web Site > Start.
Apache
1. Locate and open Mime.types file ﴾normally contained within /etc/httpd/conf/﴿ in an text editor.
2. Add a new line to this file of video/mp4 .mp4
3. Save file and restart Apache.
See also
License
Edit
Interactivity
Demo Builder
94 . Contact
Home > Contact
Contact
Founded in 2000, Tanida Software is an Information Technology company, developing e‐learning software for home and office use. Tanida’s clients
include thousands of corporate, government, academic organizations and many individual users worldwide who use their software to quickly create
rich, interactive learning content resources. The company currently offers two premier products, Demo Builder and Quiz Builder, that enable learning
professionals and subject‐matter experts to create e‐learning tutorials, demos, quizzes and tests.
Web Site
www.demo‐builder.com
General Inquiries
info@demo‐builder.com
Sales
sales@demo‐builder.com
Tech
tech@demo‐builder.com
Customer Support
support@demo‐builder.com ‐ http://www.demo‐builder.com/support.html
Demo Builder
Index
A
add menu bar 14
add player bar 15
adjust playback speed 48
align cursors 26
animated text 34
animation 39
Attach Object 47
AutoHighlight 65
AutoInteract 66
Automatic Keyframing 50
AutoRotate 68
AutoText 64
AutoZoom 67
avi 75
B
balloon 30
Builtin audio editor 60
Button 54
C
Click Zone 55
copy/paste scenes 23
create blank movie 4
cursor click/dblclick effect 26
cursor highlight effect 26
cursor path 26
cursor pointer 26
cursor scale 26
cursors 26
D
delete selection 44
Domain lock 61
E
edit cursor path 27
Edit Zone 52
ellipse 37
erase selection 44
Expiration date 62
Export 70
export destination 82
export format 70
F
Flash 70
flash video 40
fullmotion recording 10
H
H264 72
Hide Object 47
I
image 38
Image Files 79
import images 5
import video 6
insert additional scenes 22
insert extra time 44
Interactivity 52
K
keystroke 24
L
link movies 16
Lock Object 47
M
marks 46
merge cursors 28
merge scenes 22
movie background 12
movie background audio ,
17 12
movie info 12
movie navigation 12
movie properties 12
movie size 12
movie startend ,
12 14
movie watermark 12
mp4 ,
72 77
mpeg4 77
N
Narrate Timeline 58
note 32
P
Password protect 62
Personalize 85
Preferences 86
R
record the screen 5
rectangle 36
Reset Timeline 69
resize movie 13
S
Save To Disk 82
scene quick preview 21
scene properties 19
scenes change order 21
Send EMail 83
split cursor 28
split scene 23
Standalone 77
System Requirements 3
T
take screenshots 9
text 33
thumbnails view 20
timeline 43
Timeline Context Menu 47
Transformation Context Menu 51
Transformation Duration 50
Transformation Mouse Functions 50
Transformations 49
transition per object 45
transition per scene 46
translate movie 17
U
Upload To FTP Server 83
Upload to YouTube 88
W
wmv 75
Word Document 80
Z
zoom area 41