1
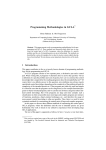
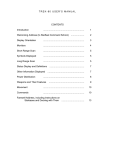
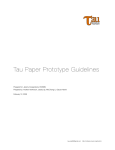
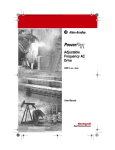
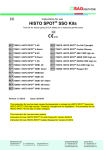
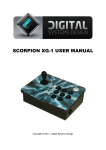
MultiPac 24 in 1 Installation Guide and User’s Manual
MultiPac Documentation
Rev. 1.2
OEM Version
Notice Regarding this Upgrade
Warning!
Although this upgrade has been tested and the
techniques used will not directly cause harm to your
video game, if you do something wrong you can very
seriously damage the game electronics!
To perform this upgrade you should:
• Be familiar with safe handling procedures for electronic components.
• Be able to remove and replace socketed IC’s (chips) without causing damage.
• Be able to follow directions.
Arcade games are rugged equipment, but anytime you start messing around with something (particularly
something electronic) you accept a certain amount of risk that you may break something.
This kit carries with it no guaranty of compatibility to your particular game. Although this kit has been
tested in numerous Pacman and Ms. Pacman arcade games and CPU boards, there’s a remote possibility
that some of them are different. If you carefully follow these instructions, you’ll do fine and everything
will work. I’ll try to help walk you through any problems you have, but if this looks like it’s above your
confidence level please recruit someone locally to install the kit for you!
Please read these instructions completely through before starting. If at any point your PCB looks
significantly different than what you see in here, contact the dealer your purchased it from for assistance!
This upgrade should ONLY be used on a genuine Pacman or Ms. Pacman game circuit board. A different
version of this kit is used for various “pirate” Pacman boardsets. If you’re unsure if your board is genuine
or not, compare it to the pictures in this manual. Original Pacman (or Ms. Pacman) boards are green in
color and clearly bear the name “PAC-MAN” (A082-91375-xxxx). Pirate boards are often blue in color
and smaller than a genuine board.
Throughout this manual “Pacman” will be used as a generic term to refer to both Pacman and Ms. Pacman
boards.
MultiPac Documentation
Rev. 1.2
OEM Version
Introduction:
The MultiPac consists of a daughter card and three smaller satellite boards that plug into your Pacman
boardset. When used with a Ms. Pacman boardset the MultiPac eliminates the need for the “Ms. Pacman”
daughtercard (A084-91415-B617).
Once the MultiPac is installed in your boardset you will have an on-screen menu built into your game with
which you can select any of 24 different games to play!
These instructions describe how to install the kit into a working Pacman arcade game. No soldering is
required and all operations are fully reversible. Please read all these instructions thoroughly before starting
the conversion.
Games Included with MultiPac
Pacman
Pacman Fast
Ms. Pacman
Ms. Pac Fast
Pacman Plus
Pacman Plus Fast
Ms. Pac Plus
Ms. Pac Plus Fast
Ms. Pac Atk
Ms. Pac RIP
Ms. Indy Pac
Ms. YakPac
Puckman
Hanglyman
Pacman Mod
PacAfterDark
NamcoSil
Pacmini2
PengoMan
Pacman3D
Piranha
Eyes
Crush Roller
Lizard Wizard
Description
Classic Pacman
Pacman, but with fast Pacman and normal speed Ghosts
Classic Ms. Pacman
Ms. Pacman, but with fast Pacman and normal speed Ghosts
Classic Pacman Plus
Pacman Plus, but with fast Pacman and normal speed Ghosts
Ms. Pacman Plus (new mazes)
Ms. Pacman Plus, but with fast Pacman and normal speed Ghosts
Ms. Pacman Attacks! (Ms. Pacman Plus with reversed maze order)
Ms. Pacman “Rest In Piece” - horror theme Ms. Pac!
Ms. Pacman with race cars
Ms. Pacman with “Beasties” (tribute to Jeff Mintner)
Puckman (Pacman with different maze)
Hanglyman (Pacman with different maze)
Pacman (original) modified for more difficulty
Pacman After Dark (new gameplay and graphics)
Namco Pacman with different mazes
Pacman with new maze and “tiny” characters
Pacman with new maze and Pengo game graphics
Pacman with 3D look and feel
Pacman like game with ocean theme
Eyes- use P1 button to fire, shoot other eyes and objects in maze
Crush Roller- paint the floor, but look out for bad guys
Lizard Wizard- use P1 button to fire, directions on screen
Notes:
Lizard Wizard will not operate in 2-player mode due to lack of controls on a Pacman game.
Eyes in two player mode on cocktail machines will only be playable by Player 1.
Lizard Wizard and Eyes use the P1 Start button as the “fire” button.
Crush Roller will not allow two-player mode as a compromise for upright/cocktail games.
MultiPac Documentation
Rev. 1.2
OEM Version
Getting Started:
First, let’s cover what you’ll need in some detail. The kit is designed to be installed into any genuine
Pacman Arcade Game (“game” or “machine”).
Preparing the game board:
Start with the machine turned off and unplugged from the wall. Open your game to gain access to the
game circuit board. You will need to remove the cable connected to the game board. Make SURE you
mark or somehow identify where the cable needs to re-connect to the board!
Remove any screws or other fasteners holding the game board in place. Remove the board from the
machine. Depending on the game you should have something that looks like this:
Only original Ms. Pacman game boards will have the daughtercard pictured on the right of the image
above.
MultiPac Documentation
Rev. 1.2
OEM Version
Upgrading the board:
We’ll be removing several items from the Pacman board in preparation for installing the MultiPac
modification. Follow the steps outlined on the next page.
•
•
•
•
•
•
•
Remove the “Z-80 Sync Bus Controller” board. You may need to cut a plastic “zip tie” holding
the board on. Some boards may have a “285” chip at this location. It’s the functional
equivalent of the “Z-80 Sync Bus Controller” board.
Remove the 40 pin chip (or ribbon-cable connector) at location 6B. It’s a Z-80
microprocessor. Set the chip or daughtercard aside, we’ll need it in a minute.
(If your game had a “MS. PAC-MAN AUX P.C.” board plugged into location 6B, remove the
Z-80 from location U4 on the board and set it aside.)
Remove the PROM at location 4A. (a small 16 pin chip)
Remove the PROM at location 7F. (a small 16 pin chip)
Remove the EPROMs at locations 5E and 5F. (these are 24 pin chips)
Remove the EPROMs at locations 6E, 6F, 6H, 6J. (these are 24 pin chips)
Using a small-blade standard screwdriver or chip puller, remove the chips listed above and place them in a
static-safe area. (Be sure you didn’t bend any pins—if you did, bend them back carefully.) You can store
the EPROMs and PROMs in case you ever want to convert the board back to “normal”. They will be
replaced by the MultiPac. (The picture below shows the board with the above chips removed, and shows
where the MultiPac plugs in.)
MultiPac Documentation
Rev. 1.2
OEM Version
If your board has more EPROMs on it than the list above, it’s probably a Pacman board that has been
modified to play Ms. Pacman without the Ms. Pacman daughtercard. Remove any additional EPROMs
(usually by “K”, “L”, and “M” on the board). If the Z-80 at location 6B has been soldered onto the board,
the board has been modified by someone. You’ll need to remove the Z-80 and place a socket at 6B. You
may want to have a qualified electronics technician remove the chip and replace the socket since it can be a
difficult task for a beginner.
Installing the Z-80:
You need to put a Z-80 into the 40-pin socket on the MultiPac. You can use the Z-80 you removed from
socket 6B on the game board (or U4 on a Ms. Pacman daughtercard) or any other known-good Z-80.
Locate the notch on the end of the Z-80 chip and match it up to the notch at the end of the 40-pin socket
on the MultiPac daughtercard. Gently press the Z-80 into the socket on the MultiPac. Be careful to get all
the pins in the socket and not to bend any pins out.
Install the MultiPac boards:
You’re now ready to install the MultiPac boards onto your game board. Take the largest MultiPac board
(with the Z-80 on it) and orient it so that the board hangs over the edge of the game board about two
inches and the pins at 6B on the MultiPac line up to the socket at 6B on the game board. Press down
carefully and the MultiPac board should seat into the socket on the Pacman board.
Satellite board “7F” comes off the right-side of the MultiPac board. Carefully press the “7F” board into
socket 7F on the Pacman board. Be sure to line the pins up properly.
Satellite board “4A” comes off the left-side of the MultiPac board. Carefully press the “4A” board into
socket 4A on the Pacman board. Be sure to line the pins up properly.
Satellite board “5E” comes off the left-side of the MultiPac board. Carefully press the “5E” board into
socket 5E on the Pacman board. Be sure to line the pins up properly.
The picture on the next page shows the MultiPac installed without the “Z-80 Sync Bus Controller” in
place.
MultiPac Documentation
Rev. 1.2
OEM Version
Once all the MultiPac boards are installed, replace the “Z-80 Sync Bus Controller” board at location 6D.
The chips on the “Z-80 Sync Bus Controller” board should all have their notches facing the same direction
as the chips on the game Board. The chips on the MultiPac boards should also be facing the same
direction as the chips on the game board. Be careful to keep the wire going to “7F” away from the socket
at 6D.
The MultiPac is designed to sit underneath the “Z-80 Sync Bus Controller” without touching. Some
Pacman boards may have been modified in the past and have the “Z-80 Sync Bus Controller” mounted
lower than “normal”. If the MultiPac and the “Z-80 Sync Bus Controller” touch, you can insert another 28
pin dual-wipe socket (not included) into the socket at 6D to get some addtional height.
Reassemble and Test:
At this point the upgrade is complete! You should have something that looks like the picture on the
following page.
MultiPac Documentation
Rev. 1.2
OEM Version
Double check that all the MultiPac boards are fully plugged in, and that there are no pins bent out or
missing the sockets.
You can now put the game board back into the cabinet, reconnect the cable and turn the power on. When
the game comes up, you should see the MultiPac menu screen. If you do not see the menu screen, press
the red “reset” button on the game board. If the menu still doesn’t appear, turn the power off, remove the
board and re-check the installation. Make sure that no pins are bent over or missing the holes on the
sockets of the game board. Also make sure that no pins on the Z-80 are bent or broken on the MultiPac
board.
If everything checks out OK but you still don’t get a menu when you power up the game, remove the
MultiPac and reverse the installation steps to replace all the PROMs, EPROMs, and Z-80 in your board to
return it to it’s original state. Verify that the board indeed works, and repeat the installation of the
MultiPac. If still doesn’t work, contact the dealer you purchased the MultiPac from for help.
Remember that most problems will be traced to either failed sockets on the gameboard or bent/broken pins
on the MultiPac!
MultiPac Documentation
Rev. 1.2
OEM Version
Adding a “menu” button:
If everything seems to be working at this point you should be able select games from the menu by using the
joystick and pressing the P1 Start button. Pressing the red reset button on the game board will return you
to the game menu, or turning the power on and off your machine will accomplish the same thing. If you
want to be able to call the menu without turning the power off and on (or hitting “reset”) you can add a
“menu” button to your game.
All that is needed is a “normally open, push-button momentary switch”. You can get one from Radio
Shack, or use pretty much any “push-button” switch you desire. (No not use a “toggle” type switch.)
There is a two-pin header on the MultiPac daughtercard that you can attach your switch to. (The header is
located on the right hand side of the MultiPac daughtercard by the Z-80 and the plug to 6B. The two pins
are visible from under the “Z-80 Sync Bus Controller”.) Most people will want to run several feet of wire
from the two pins and connect it to the switch. I find that mounting the switch inside the coin-door is
convenient, although you can place it anywhere you want. You can solder the wires directly to the pins on
the MultiPac, or use a .1” header to connect to the MultiPac.
With the “menu” button installed, the MultiPac menu will appear whenever the menu button is pressed.
Note that any game in progress or any credits on the machine are lost when the menu is called. For
operator use, most locations will do best to keep the menu button hidden and just select a new game
during collections or whenever the machine is powered up. Some locations will do fine with brief
instructions posted on the machine (“Press Menu, select game, insert coin(s), play game. Pressing Menu
during a game will lose all credits!”)
Troubleshooting:
Given a 100% working Pacman board to start with, so far every problem installing MultiPacs has been
either bent/broken/misaligned pins or bad sockets on the Pacman board. Use to following table to help
troubleshoot. Remember that all the MultiPacs are 100% tested working before shipping, so getting a
“bad card” is VERY unlikely!
Problem
Screen full of “garbage”. Nothing happens.
Wrong graphics, “screwy” graphics.
Missing or wrong colors.
Graphics “shimmer” look semi-random.
Solution
Check alignment/seating of main MultiPac board (6B).
Check Sync Bus Controller for proper seating. Check
seating/alignment of cards at 5E and 4A.
Check seating/alignment of card at 7F.
Check seating/alignment of 5E.
Getting a couple bent pins or missing a couple pins of the socket shouldn’t harm the MultiPac. Just bend
the pins back and/or carefully re-install the card in the proper location. If you do manage to kill part of the
MultiPac by improper installation, however, it’s NOT a free “in-warranty” type repair! Be careful!
You’re done!
That’s it. Your MultiPac should now be installed and working properly. Because the MultiPac board
extends over the edge of the Pacman board a hard bump or hit to the machine can bump the MultiPac
loose. If your machine is going to be operated or moved frequently you may want to secure the MultiPac
to the main Pacman board with some hot-glue or some “zip-ties”. (Zip-tying the board on will require
drilling through the main Pacman board—be careful!)
MultiPac Documentation
Rev. 1.2
OEM Version