1
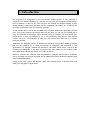
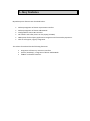
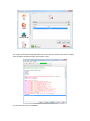
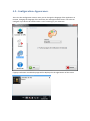
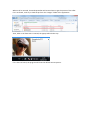
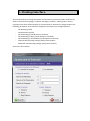
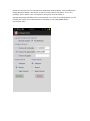
My Extension Edition – Desktop Connect User Manual Versión 1.1 © 2013 EuropeSIP Communications SL Index 1.- Introduction ................................................................................................................. 3 2.- Key features................................................................................................................. 4 3.- MyExtension Connect – Main Installation ................................................................. 5 3.1- MyExtension Connect – Installation from ZIP file ................................................... 5 3.1- MyExtension Connect – Installation from RPM ....................................................... 6 4.- My Extension Desktop Connect Config ..................................................................... 7 4.1 Configuration. AMI Parameters ................................................................................. 8 4.2.- Configuration. Elastix user....................................................................................... 9 4.3.- Configuration. URL Launcher. .............................................................................. 10 4.4.- Configuration. Scripts. ........................................................................................... 11 4.5.- Configuration. Appearance. ................................................................................... 13 5.- Desktop interface....................................................................................................... 15 6.- Click to call support. ................................................................................................. 17 Apendices y Información Adicional Apéndice A Api…………………………………………………………………..…20 1.- Introduction This program is an enlargement of the “myextension” Elastix module. Its main objective is expand it to the windows desktop, so a specific user may change his extension details directly from his desktop. In this way any user may from the desktop and without needing of open Elastix interface, make some operative over the forwarding, call waiting, do not disturb and recording configuration of his own extension in Elastix. All the settings above, can be also modified using a specific smartphone application (Android App). This is very powerful, since being away from the office, you can use your smartphone to setup your extension to forward the calls to another phone, for example, your home phone, your mobile phone, or even your hotel phone. So, if you are traveling away, and you have a direct number coming to your extension (a DID), you may forward that calls even to a foreign temporary number.. Addtionally, the Windows Release of MyExtension Desktop connect adds additional features that are very practical on an office environment for integrating with backoffice or crm applications. For example, desktop also includes a call notifier, which shows a popup in the incoming call. Additionally, it can show the picture of the caller (putting it in the “images” folder of the application and whit the number of the caller as name). Moreover, it has an URL Launcher, with the possibility of configure diferent URL for 3 different events, Incoming call, HangUp and CDR, and an VBScript API which allows the integration with other desktop applications. Finally, it also adds “click-to-call” features, either using context menus, or special HTML tags inside your web pages or applications. 2.- Key features My Desktop main features are described below: Desktop integration of Elastix myextension interface. Desktop integration of Elastix AddressBook. Configurable 3 events URL Launcher. Call notifier with caller picture on the popup (vía EWS). VBScript API for third party applications integration and functionality expansion. Click to call support, registry integration. The release for Android has the following feautures: Integration of Elastix my extension interface (Futute / Roadmap) Integration of Elastix AddressBook CallBack and Dialer feautures 3.- MyExtension Connect – Main Installation 3.1 - Installation using RPM (suggested way) First of all download the package with: Then install the package: 3.2 – Manual Installation using ZIP file: On this case, you need to have the standar my extensions module files that cames with lates 2.4 elastix distribution. That files would be then overwritten with the new specific files related to WebServices needed for additional feautures added on the my extension modules. You only have to overwrite contents of your “myex_config” directory (usually in /var/www/html/modules) with the contents of the zip file. Then download the desktop client and configure it. Once one of the methods above is used to install the core my-extension module, you will have a similar screen to this one: As you can see, you have now new options on my extension module, allowing you to download both, the Windows and Android Releases. Please note that in order to be able to download the BETA for Android Release directly from Google Market you need first to be enrolled as an official tester (otherwise links would not work). In order to do so, please go to the “Elastix Connect BETA testers” at Google Communities at https://plus.google.com/u/0/communities/103801558238724085988 On that community, you can also give us feedback that would allow us to improve the product, as well receive basic support. If for whatever reason you prefer do not join that testing community , you still can directly download the APK Android package (and do a manual install) directly from the module. 4.- My Extension Desktop Connect Config Once we download the desktop release, we run the Setup program and after the main install finish, configuration wizard will launch automatically for initial config. With this parameters, the aplication will be already ready to start working. If you did any mistake on the users/password or basic configuration, you would see and error message (see screenshoot below) and you would have to modify the initial values. On this case you only have to check the icon in the taskbar, right click over it and you will see a menu displayed, where you will be able to access to the configuration window to change connection parameters. 4.1 Configuration. AMI Parameters The configuration window allows to set all the parameters of the application, beginning with connection params. These params are: the IP of the elastix server The port the server is listening by The user of the manager you will use (*1) The password of the user The context. By default “from-internal” You can change the parameters of the connection here and make a test of them. Any change made in any of these parameters will result in an attempt of reconnect AMI. (*1) Adding a user to the Manager: Edit /etc/asterisk/manager.conf. The input the following lines: Then save and close the file. Open Asterisk CLI (Command Line Interface) and make “manager reload”. Now the new user is ready to be used. 4.2.- Configuration. Elastix user The only params related with Elastix you have to input are the user name and the password of the Elastix user. The window will show the extension related to this user if exists. 4.3.- Configuration. URL Launcher. A powerful tool to expand functionality is as simple as a browser. Myextension, gots a URL launcher able to parse a variable related to the current call and open a parametrized URL. At the same time would be possible to wish open different URLs in different events, these are Call, HangUp and CDR. To set a URL for each event, right click on the list and a menu will be displayed offering the events. The variable parsed by URL Launcher is: %CALLERID% Any apparition of this string in the url set for any event will be parsed whit the number of the callee (CALLERID(num) in Asterisk). 4.4.- Configuration. Scripts. This section is for advanced users. Via Scripts you can expand the application functionality. The Scripts syntax is VBScript (Visual Basic Script) and it gots a custom DOM to allow a easy form creation and allow integration with myextension objects and functions (*2). A good and very simple sample of Scripts power may be the following, a simple script to log an agent in a queue on load, and other to unlog the agent on close. The scripts can be edited making double click on the element of the list we want to modify. Then the editor window will open and load the script: (*2) The API reference is in APENDIX I. 4.5.- Configuration. Appearance. This is the last configuration section. Here you can change the language of the application at runtime, changing the language of the interface, the messages and the menus. You also can configure if you wish to be notified when a call is incoming to your extension. If popup notification is enabled a popup will be displayed in the right bottom of the screen. When a call is received, the Desktop Notifier will access Elastix to get the picture of the caller. If it’s not found, it will try to load the pic from the “images” folder of the application Then, when a call from 915 is received, the popup will look this way: If it is also not found, the program will show the default contact picture. 5.- Desktop interface. This interface allows to change the options of the Elastix my extension Addon, withouth the needs to have the users going to a specific web page / interface, allowing them a closed integration with their indows Desktop. It communicates to Asterisk any changes made to the following parameters of the extension assigned to the Elastix user configured before: - Call Waiting (on/off) Do Not Disturb (on/off) Call forwarding (on/off & where to forward) Call forwarding on Busy (on/off & where to forward) Call forwarding on Unavailable (on/off & where to forward) Inbound calls Rocording settings (always/never/adhoc) Outbound calls Rocording settings (always/never/adhoc) And here is the interface: Please note that there is also a SmartPhone Application (Android APPS), freely available from Google PlayStore Market, that allows us to do the same options that above. This is very powerful, since it allows, from a smartphone, being away from the office, to activate/deactivate calls addressed to your extension (so, if you are traveling aboard, you can forward your calls to your mobile phone, for example, or even using SIMM specific international calls). 6.- Click to call support. Myextension is prepared to be used as a click to call application. This means that once the application is installed, it writes the registry to set myextension as the default application to be used on special tags callto:XXXXXX or tel:XXXXXX (similar to mailto:) protocol, so any web link using this tag will open myextension to make a dial to XXXXXX via Elastix Web Services You can also make a dial just using the menu (typing the number and pressing Enter): This features allows you to integrate on internal CRM or Intranet Applications, so, for example, you may have your own corporate directory on your intranet using “callto” tags, and be able to call your college just clicking the corresponding link. A similar feature is also available at the Android Elastix Connect APP, that feature is called “callback” and allows a transparent integration of your mobile extension with your PBX. When used, you can dial any external party using the included Android dialer. The Android APP would contact the Elastix PBX; and would send a request to the PBX to call both you, and the other party, and bridge both calls. Using this method, your mobile phone can bypass any VoIP restriction. Additional features (CallTrought, Elastix Contacts integration, etc) are under development for future releases. Please note that before being able to use the callback feature, you need to specify the phone number that you cellular uses. APENDIX I Introduction: Many times I wished some application to do any more than it did. But the app vas “closed”, and I had to settle with it “as is”. Now we can “open” the apps and insert new code to get many new functionality. This may be do adding scripting support to the application. The Interface: The interface is composed by a COM class, which is exposed via COM to the control MSScriptControl inserted in myextension. In fact it becomes a DOM (Document Object Model) for the MSScriptControl and allows myextension to execute VBScripts with access to the application objects. Interface functions: Database functions: Public Function SQLiteConn(ByVal sDBPath As String) As Object Public Function SQLQuery(ByVal conn As Object, ByVal sSql As String) As String() Public Function SQLGetValue(ByVal conn As Object, ByVal sTable As String, ByVal sField As String, Optional ByVal sCond As String = "") As String Public Function SQLNonQuery(ByVal conn As Object, ByVal sSql As String) As Boolean Public Function SQLUpdateField(ByVal conn As Object, ByVal sTable As String, ByVal sField As String, ByVal sValue As String, ByVal sWhere As String) As Boolean Form & Controls subs: Public Sub CreateForm(ByVal sName As String, _ Optional ByVal Xpos As String = "1000", _ Optional ByVal Ypos As String = "1000", _ Optional ByVal w As String = "600", _ Optional ByVal h As String = "500", _ Optional ByVal sFormStyle As String = "fixedsingle", Optional ByVal sCtlBoxStyle As String = "both", _ Optional ByVal sStartUpPos As String = "centredscreen", _ Optional ByVal sText As String = "Título del Form") Public Sub AddControl(ByVal sForm As String, _ ByVal sControlType As String, _ ByVal sControlName As String, _ Optional ByVal Xpos As String = "400", _ Optional ByVal Ypos As String = "400", _ Optional ByVal w As String = "%def%", _ Optional ByVal h As String = "%def%", _ Optional ByVal sText As String = "Text", _ Optional ByVal oConn As Object = Nothing, _ Optional ByVal oLvSql As String = "") Public Sub sLoadLv(ByVal conn As Object, ByVal lv As Object, ByVal sSql As String) Other functions & subs: Public Function AppPath() As String Public Function fGetUserDomain() As String Public Function fSearchInLDAP(ByVal sPath As String, ByVal sUser As String, ByVal sPass As String, ByVal sSearchBase As String, ByVal sLDAPtype As String, Optional ByVal sMyFilter As String = "", Optional ByVal bOneUserSearch As Boolean = False) As String() Public Function fGetMachineName() As String Public Function fGetWinUserName() As String Public Sub Reset() Public Function fLogAgentInQueue(ByVal sExtension As String, ByVal sQueue As String, Optional ByVal bPaused As Boolean = True) As Boolean Public Function fUnLogAgentInQueue(ByVal sExtension As String, ByVal sQueue As String) As Boolean The Forms & Controls Events: The COM class has a Form Array which handles all the forms created by scripts. In the same way, the controls are handled by an abstract layer of controls which launches their own events over a generic handler, in which we select the source to render the Event string to raise over the script. So the events are raised in the script in the following format: Sub [control_name]_[event_name] (arrParams) Example: we create a form named frmMain. To catch the Load event in the script we have to code the event in the following format: Sub frmMain_Load() [code here…] End Sub Some controls pass some arguments to the events. This is the case of ListView. The myextension Events: Not all the events of myextension are exposed to the script control. It should be a very heavy task. Only few of AMI Connector 1.8 events are scriptable. Theese are the followings: Call( arrParams(0) arrParams(1) arrParams(2) arrParams(3) arrParams(4) arrParams(5) = = = = = = sOriginChannel sDestionationChannel sOrigUniqueID sDestUniqueID sOrigCallerID sDestCallerID arrParams(0) arrParams(1) arrParams(2) arrParams(3) arrParams(4) arrParams(5) arrParams(6) arrParams(7) arrParams(8) arrParams(9) = = = = = = = = = = Privilege SubEvent Channel Destination CallerIDNum ConnectedLineNum ConnectedLineName UniqueID DestUniqueID DialString ) Dial( ) Cdr( arrParams(0) = AccountCode arrParams(1) = Source arrParams(2) = Destination arrParams(3) = DestinationContext arrParams(4) = CallerID arrParams(5) = DestinationChannel arrParams(6) = LastApplication arrParams(7) = LastData arrParams(8) = StartTime arrParams(9) = AnswerTime arrParams(10) = EndTime arrParams(11) = Duration arrParams(12) = BillableSeconds arrParams(13) = Disposition arrParams(14) = AMAFlags arrParams(15) = UserField ) HangUp( arrParams(0) arrParams(1) arrParams(2) arrParams(3) arrParams(4) arrParams(5) arrParams(6) arrParams(7) arrParams(8) ) = = = = = = = = = Privilege Channel Uniqueid CallerIDNum CallerIDName ConnectedLineNum ConnectedLineName Cause Cause_txt