1
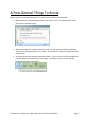
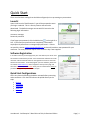
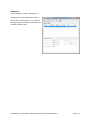
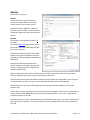
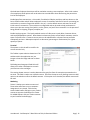
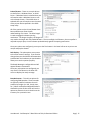
CashFootprint™ Retail Point-of-Sale, Professional Edition User Manual Copyright © 2011-2013, LotHill Solutions, LLC. All rights reserved. LotHill Solutions, LLC 8616 Kell Ave. S. Minneapolis, MN 55437 Toll: Direct: Email: Web: 855-LOTHILL (568-4455) 651-691-4534 [email protected] lothill.com Table of Contents A Few General Things To Know..................................................................................................................... 3 Quick Start..................................................................................................................................................... 4 Launch!...................................................................................................................................................... 4 Software Registration ............................................................................................................................... 4 Quick Start Configurations ........................................................................................................................ 4 Configuration ................................................................................................................................................ 5 Customers ................................................................................................................................................. 5 Loyalty Tab ............................................................................................................................................ 5 Import Customers ..................................................................................................................................... 6 Employees ................................................................................................................................................. 7 Permissions (abbreviated list) ............................................................................................................... 7 Inventory ................................................................................................................................................... 8 Item Filter .............................................................................................................................................. 8 Attributes (Department, Category, etc.) ............................................................................................... 8 Extended and Promotional Pricing ....................................................................................................... 9 Ordering ................................................................................................................................................ 9 Global Price Adjustment ........................................................................................................................... 9 Receive Inventory ................................................................................................................................... 10 Import Inventory ..................................................................................................................................... 10 Sales Tax .................................................................................................................................................. 11 Vendors ................................................................................................................................................... 11 Loyalty ..................................................................................................................................................... 12 Point Assignment Rules....................................................................................................................... 12 Redemption......................................................................................................................................... 13 Options .................................................................................................................................................... 14 General................................................................................................................................................ 14 Business............................................................................................................................................... 14 Terminal .............................................................................................................................................. 15 Marketing ............................................................................................................................................ 15 Merchant Account .............................................................................................................................. 16 User Manual - CashFootprint™ Retail Point-of-Sale, Professional Edition Page | 1 Data Source ......................................................................................................................................... 16 Receipt/Hardware ............................................................................................................................... 16 Reporting............................................................................................................................................. 18 Server/Database ..................................................................................................................................... 18 Backup Database................................................................................................................................. 18 Restore Database ................................................................................................................................ 18 Export Data ......................................................................................................................................... 18 Purge Transaction By Date .................................................................................................................. 18 Point-of-Sale................................................................................................................................................ 19 Transactions ............................................................................................................................................ 19 General................................................................................................................................................ 19 Sale ...................................................................................................................................................... 20 Refund ................................................................................................................................................. 21 How-To process a basic cash sale or refund ....................................................................................... 21 History ................................................................................................................................................. 22 End-of-Shift ............................................................................................................................................. 23 Cash Drawer Adjustments (Add, Remove, Cash Check) ..................................................................... 23 Close/Reconciliation Cash Drawer ...................................................................................................... 23 End-of-Day .............................................................................................................................................. 23 Session Close ....................................................................................................................................... 23 Reports .................................................................................................................................................... 24 User Manual - CashFootprint™ Retail Point-of-Sale, Professional Edition Page | 2 A Few General Things To Know When using this manual and CashFootprint™, please keep in mind the following things: Menu references will be displayed as follows (menu: File > Exit). This example refers to the menu item in the below image. Most screens will have a toolbar located at the top. You will typically see Refresh, Add, Edit, Save, Cancel, and Delete buttons in the toolbar. These buttons are used to modify the currently selected item. All toolbar buttons have a tooltip associated to them. If you are not sure of the intended use of a toolbar button, mouse over it to see the tooltip. The tooltip may also reveal a shortcut keyboard command as seen below. User Manual - CashFootprint™ Retail Point-of-Sale, Professional Edition Page | 3 Quick Start There are a few basic settings that should be configured prior to processing any transactions. Launch! Upon initial launch of CashFootprint™ you will be prompted to enter your login credential. This is a security feature and cannot be deactivated. The default manager account with full access has the following login information: Username: manager Password: password If you forget your password, click the bubble icon to the right for a hint. If you need your password reset completely, have another employee with permissions to manage employees reset it. If that is not possible, contact [email protected] and we will provide a reset password for your username. The reset password expires at the end of the day it was supplied. Software Registration In an effort to ensure you are happy with your new software, we do not send the activation code with the product. Once activated the software cannot be returned. Click the Evaluate button on the registration screen to access the software until activated. To activate/register your new software, please visit our website www.lothill.com, click on Support at the top of the page and then click Activate my software now! Enter your store information exactly as you want it to appear on your customer receipts. Quick Start Configurations At the very least the following should be reviewed before processing and transactions. Click the links below to be pulled directly to the topic. Options Customers Employees Sales Tax Inventory User Manual - CashFootprint™ Retail Point-of-Sale, Professional Edition Page | 4 Configuration Customers (menu: Manage > Customers…) Customers are managed through the screen show to the right. To manage the customer list, use the toolbar located at the top of the form. Many fields are self-explanatory; however, the Customer Number field is unique and cannot be used for more than one customer. Most businesses will use a customer’s phone number as their Customer number. Loyalty Tab Loyalty Discount% is a fixed discount percentage that the customer will receive for all transactions. Loyalty Points are the total points a customer has earned to date. This field is only visible if the Loyalty module is turned on within the program Options > Business tab. Store Credit Balance reflects the amount of credit the customer has available to use towards purchases. The History toolbar button will allow you to view all transactions processed where the selected customer has been assigned. User Manual - CashFootprint™ Retail Point-of-Sale, Professional Edition Page | 5 Import Customers (menu: Manage > Customers > Import Customers …) There are two major file types that can be imported: Excel (.xls or .xlsx) and Text. If a Text file is selected then the Alignment and Field Separator options are enabled. Check the ‘First row contains field names’ option if your data’s first row is a column header and not actual data. Once the options have been set, click the Refresh Preview button to see the result of your configuration in the preview window. If everything looks accurate, you are ready for the mapping step (click Next). On the Destination Column Mapping screen, match up the Item Properties with the source column containing the corresponding data. Once you have matched all desired columns, click Finish. If there are any invalid data matches, existing items, missing information, you will be notified and given an opportunity to address the issues. User Manual - CashFootprint™ Retail Point-of-Sale, Professional Edition Page | 6 Employees (menu: Manage > Employees…) Employees are managed through the screen show to the right. The first and last name fields are combined and displayed in the lower left corner of the POS screen. The employee’s username will appear on the customer’s receipt providing accountability should the need arise. To manage the employee list, use the toolbar located at the top of the form. The features of concern on this screen are on the Security and Permissions tabs. The employee’s Username and Password are located on the Security tab and controls the employee’s access to login to the application and approve POS overrides. There are various employee permissions. These permissions are outlined below. The defaults for new employees can be set under the application’s Options. Permissions (abbreviated list) General - Deny or grant access to specific features and tasks o Allow user to login o Allow user to use Point-of-Sale screen o Allow user to void transactions o Allow user to change pricing during a transaction o Allow user to run reports Manage - Deny or grant access to management features (controls modification of core data) o Allow user to manage Employees o Allow user to manage Inventory o Allow user to manage Options o Allow user to manage Sales Tax o Allow user to manage Vendors User Manual - CashFootprint™ Retail Point-of-Sale, Professional Edition Page | 7 Inventory (menu: Manage > Inventory > Inventory…) Inventory items are managed through the screen show to the right. Use the toolbar buttons at the top of the form to manage the selected item. Item Filter The Item Filter is used to quickly search for items. The search can be conducted by Item Number (SKU) or Description. Upon entering the search criteria, you can simply hit the enter key, or click the Add Filter toolbar button. The search result will be shown in the Item list below the filter. Special fields Sales Tax – This field is used to assign the Sales Tax group used to determine the amount of tax to charge for a given item. If this field is left as Default Tax then the tax assigned under the application’s Options will be used. Average Item Cost – This field can be populated manually upon initial load, however, when the item is Received, it will be automatically updated to reflect the actual average cost. Items on Hand - This field can be populated manually upon initial load. Items Received will add to the current value. If the ‘Auto-update after transaction’ option is checked, the On Hand value will be automatically adjusted to reflect the number of items used in a transaction (Sales, Refund, etc.). Reasons not to use this option may include Shipping, Coupons, Services Offered, etc. Attributes (Department, Category, etc.) Item Attributes take the industry standard Department and Category in a new direction. Item Attributes can be used to link items together in a wide variety of ways (tire size, shirt color, music genre, manufacturer, snowboard length, coffee style, etc.). There is a limit, however. CashFootprint™ allows only 10 attribute groups total at this time. Department and Category are hardcoded item attributes, but the rest are up to your imagination. We have provided Consignor as an example. Only one attribute can be selected per group, therefore one item can have up to 10 attributes assigned at a time. Inventory search allows use of any item attributes available. Reporting is tied to the Department and Category attributes at this time, but custom reporting is coming and will take advantage of all available attributes. User Manual - CashFootprint™ Retail Point-of-Sale, Professional Edition Page | 8 Extended and Promotional Pricing Extended pricing allows your business to define quantity discounts and promotional periods for additional discounts. Quantity Trigger is the quantity of items the must be sold before the discount price is used. In order for the discount to count all quantities must be on the same line-item on the POS screen. Promotional Data Range – The Use Date Range option allows you to set a Begin and End Date for the specific Price Level. If the date of the transaction is outside the date range, the discount will not be used. Ordering Item On Hand Levels are used to flag an item for reordering based on the On Hand quantity. The Reorder Point field is used to indicate the minimum number of items allowed to be on hand before the item is flagged for reordering. The Max In Stock field is max number of items desired to be on hand after reordering and is used when calculating the number items to order (ex: 15 items on hand. 15 is the Reorder point. 25 is the Max In Stock. Since the On Hand value is at or less than the Reorder point, the item will appear on the Reorder Report the next time it is run. For this example the number to order shown on the Reorder Report will be 10 (25 – 15). Case Number/SKU and Items per Case are used by Inventory Receiving to properly calculate the amount of individual items received. Global Price Adjustment (menu: Manage > Inventory > Global Price Adjustment…) Price adjustments are often a headache and CashFootprint has taken that into consideration by offering a feature called Global Price Adjustment. This feature allows you to quickly identify a population of items by Attribute and adjust the retail price by markup or margin. Markup adjustments can be made as a fixed amount or as a percentage. Margin adjustments are simply made as a percentage; this percentage is the amount of the sales price that is profit. The retail price is adjusted over cost to allow for that percentage to net you the desired profit. User Manual - CashFootprint™ Retail Point-of-Sale, Professional Edition Page | 9 Receive Inventory (menu: Manage > Inventory > Receive Inventory…) To receive items, enter or scan an item. The Description, Cost and Vendor will auto-fill where applicable. If the item entered does not exist, you will be prompted to add it. Enter the quantity of items received and hit enter or click the Add toolbar button. There is no import feature for receiving at this time. If you need to save the list for future additions, or are receiving a large amount of items, you may do so by clicking (menu: File > Save Current Receiving). To open a previously saved receiving, click (menu: File > Open Receiving) and select the desired receiving. Once items are received their Average Item Cost and On Hand quantities will be adjusted. Import Inventory (menu: Manage > Inventory > Import Inventory …) Currently the only import available for CashFootprint™ is for inventory. There are two major file types that can be imported: Excel (.xls or .xlsx) and Text. If a Text file is selected then the Alignment and Field Separator options are enabled. Check the ‘First row contains field names’ option if your data’s first row is a column header and not actual data. Once the options have been set, click the Refresh Preview button to see the result of your configuration in the preview window. If everything looks accurate, you are ready for the mapping step (click Next). User Manual - CashFootprint™ Retail Point-of-Sale, Professional Edition Page | 10 On the Destination Column Mapping screen, match up the Item Properties with the source column containing the corresponding data. Once you have matched all desired columns, click Finish. If there are any invalid data matches, existing items, missing information, you will be notified and given an opportunity to address the issues. Any Sales Taxes or Attributes that do not exist will be created to accommodate the import request. It is recommended that you create the taxes and attributes prior to importing data. This procedure could expose existing entries that could be leveraged instead of letting the system create new ones. Sales Tax (menu: Manage > Sales Tax…) Taxes are managed through the screen show to the right. Use the toolbar buttons at the top of the form to manage the selected tax. For ease of use, grouping contains multiple taxes. This allows one selection at the Business Default and Item levels where applicable. Sales Taxes can be left as individual root entries. To make a root level tax group select None as the Tax Group. The individual tax Description will be printed on the POS receipt, not the group tax Description. The % will not be printed. Vendors (menu: Manage > Vendors…) Vendors are managed through the screen show to the right. Use the toolbar buttons at the top of the form to manage the selected vendor. Vendors are used during Inventory Receiving to tie an item to a particular vendor. Note: At this time there is little reporting tied to the vendor, but future releases will make greater use of this feature. User Manual - CashFootprint™ Retail Point-of-Sale, Professional Edition Page | 11 Loyalty Point Assignment Rules (menu: Manage > Loyalty > Point Assignment Rules…) Point assignment rules are used to determine how points are awarded for items sold. The example to the right shows that for every one dollar spent, one point is earned. Points are only awarded for items that are either specifically targeted or have been assigned a targeted Attribute. Click Manage Targets to adjust which items or attributes will earn points. The screen to the right is an example where all items in the General department will earn points. In this example, no other items in the system will earn points if they are not part of this department. User Manual - CashFootprint™ Retail Point-of-Sale, Professional Edition Page | 12 Redemption (menu: Manage > Loyalty > Redemption…) Loyalty points can be redeemed as either a percent off or a fixed amount. The screen to the right shows how 100 points will award the customer a 10% discount. User Manual - CashFootprint™ Retail Point-of-Sale, Professional Edition Page | 13 Options (menu: Tools > Options…) General The General tab has all of the business contact information fields as well as the friendly name of the current Terminal. The Business Name, Address 1, Address 2 fields cannot be modified. These are used to validate the registration code and cannot be altered. Business The options on this tab will be used for all terminals. The selected Sales Tax group will be used as the active tax, for items that specify Default Tax as their tax option. Price Decimal Places represents the number of digits to the right of the decimal point for all currency values throughout the application (Default=2). Quantity Decimal Places represents the number of digits to the right of the decimal point for all quantity values throughout the application (Default=0). Require confirmation when items as sold below cost and Show stock alerts when sold control what alerts are displayed at the point of sale screen during a transaction. The Accepted Payment Types will determine which payment buttons are displayed for use at the point of sale and refund screens. If a type is not checked then the button will not be displayed. Always allow Cash refund will enable employees to always give cash back regardless of the initial payment type. System idle is a security setting that will cause the login screen to appear if the system has been idle to a specific period of time. Note: Idle means no mouse or keyboard activity. If the user is using another program the system is not idle. If the Login does not require a password option is checked then employees can access the application by entering only their username. This can be used for ID cards or badges where only an ID is provided on the card. User Manual - CashFootprint™ Retail Point-of-Sale, Professional Edition Page | 14 Checked New Employee Permissions will be used when creating a new employee. After initial creation of an employee, these options will not be taken into consideration when determining the permission level of the employee. Enable Open/Save transactions – this module, if enabled, will display and Open and Save button on the Point-of-Sale toolbar and will allow employees to save a transaction and recall it later for processing (ex: work orders or customer forgot their wallet in the car). Use the default source and status to set the initial state of a transaction. These values are configurable and can be used to help you determine where your sales are coming from (walk-in, online, phone, etc) and if the transaction is in the process of being packed for shipping, shipped, complete, etc. Enable Loyalty program – The loyalty module consists of a few parts: Loyalty Rules, Customer Points, and Loyalty Redemption options. Rules determine how many points are earned per monetary amount spent on specific items. Customers accrue points to be redeemed for a discount amount toward a subsequent purchase. Redemption options are discounts (percentage or fixed amount) for a given quantity of points. Terminal The options on this tab will be used for the current terminal only. The Toolbar Layout selection determines if all toolbars within the application are just images or have the image and text as shown below. POS Background Image and Fade Color will allow you to tailor CashFootprint to match your business colors and logos. The starting drawer amount is used to determine the gain/loss from all transaction processed on the terminal. This field is used to set a default amount. Check the Prompt to verify Starting Amount as POS option to be asked to confirm the default amount. If this option is not checked, the default amount will be used. Marketing Twitter! Hookup your twitter account and Tweet sales and events to your customers. Integration is very simple. Click the Get Access Codes button and login to your Twitter account to approve CashFootprint to Tweet. For added exposure link your Twitter account to your business Facebook page. User Manual - CashFootprint™ Retail Point-of-Sale, Professional Edition Page | 15 Merchant Account By default the Processor is set to None and you will be required to process credit card transactions using an external credit card machine. Once the card has been processed you can enter the last 4 of the card number and the authorization code into the Manual Credit Card form. The input information will be printed on the POS receipt. Should you decide to use integrated credit card processing, we have 2 options available: Assure Secure Processing by Signature Processing, Inc and Element Payment Solutions. Once you have contacted Signature Processing or Element and had your merchant account setup, you will be able to populate the required security fields. The labels above the fields correspond directly to the same naming convention you will receive from the processor. Enter the information and you are ready to process credit cards. Data Source This tab is where you will control which terminals have accessed the database. You will also see which server/database you are connected to on this tab. There are many reasons to install software on another computer (you got a new computer, the old one is in repair, etc.). CashFootprint™ monitors how many terminals are accessing the database. If you attempt to exceed that amount, the terminal trying to connect will be blocked. If you need to remove a terminal for any reason, select the terminal to remove and click Remove Selected. The new terminal will now be able to access the database. Receipt/Hardware Before configuring these options, please have your printer driver installed and hardware plugged in and turned on. Receipt Layout – The receipt header and foot information can be adjusted. The header will appear just below the business information and the footer will appear at the bottom of the receipt. User Manual - CashFootprint™ Retail Point-of-Sale, Professional Edition Page | 16 Printer/Drawer – There are a couple drivers to choose from. Windows Driver, or OPOS Driver. If Windows Driver is selected then you will need to select a Windows Printer to use as the Receipt Printer. If the OPOS driver is selected then you will need to enter the name of the printer device specified in the OPOS setup utility. All of the options on the Printer/Drawer have been spelled out to allow a better understanding of its intent. The Pulse length is used to engage the drawer opening mechanism. The longer the pulse, the longer the mechanism pushes to open the drawer. This pulse may need to be longer with fully loaded drawers. The more weight in the drawer, the more power is required to pop it open, since the drawer pushed directly against the opening mechanism. Once your options are configured, you may use the Test button in the lower left corner to print a test receipt and pop the drawer. Pole Display – The pole options come preset to the most common settings. If you need to change these you should have documentation provided with the hardware you purchased to allow you to set the options properly. The Ready Message is configurable and will appear between transactions. Once your pole options are configured, you may use the Test button in the lower left corner to display the ready message. Barcode Scanner – This tab has options for configuring EAN barcodes. These barcodes are typically used for businesses that sell products by weight. (ex: Deli, Candy, Nuts, etc.) When Use Random Weight Barcodes is checked the point of sale screen will use the options to determine how it should scan the inventory for a particular item. User Manual - CashFootprint™ Retail Point-of-Sale, Professional Edition Page | 17 Reporting There is only one setting on this tab, Printer. This is the printer that all reports will be sent to. If it is set to none, no reports will print. Server/Database (menu: Tools > Server/Database…) Backup Database – Save a backup of the database to a location on your computer or backup device. Restore Database – Select a backup from your computer or backup device to restore. Export Data – Allows you to export any of your data to a generic file (XML or Text file). Purge Transaction By Date – This feature will purge all transaction data between a range of dates. Purging is commonly used to reset the database after initial testing or after a yearly backup has been made and the size of the database needs to be reduced. This process is permanent and cannot be undone without restoring a backup! User Manual - CashFootprint™ Retail Point-of-Sale, Professional Edition Page | 18 Point-of-Sale Transactions General There are three types of transactions available (Sale, Refund, Void). Refunds and Voids can only be processed for existing sales that have not already been fully refunded or voided. There are 4 payment methods available for a Sale or Refund, however, in order to use/credit Store Credit, a customer must be assigned to the transaction. Each payment method will display the on-screen number pad. You will enter the amount of the payment and click OK. The number pad on your keyboard can also be used to enter the amount. Upon completion of the transaction and assignment of the payment types, click Process transaction. If Credit is among the assigned payment types then you will be prompted to swipe or enter the credit card information. If you choose to manually key in the credit card information you will need to check the Manual Card Entry option in the lower left corner of the card processing screen. If you receive a Duplicate transaction error, you will need to check the Force Duplicates option. This error means that a transaction with the same card number and amount were previously processed within the same day or merchant batch cycle. To assign a customer to a Sale or Refund transaction, enter the customer’s number in the customer search box as seen to the right. Hit enter to initiate the search. If the customer is found, the customer icon will display a green background. If the customer is invalid, you will be prompted to add them. If you decline to add the customer, the icon’s background will turn red and you will not be able to exit the search box until you either enter a valid customer number or clear the contents of the box. Use the search button to the right of the entry field to display the Customer Search screen. The selected customer number from the search screen will be returned and displayed in the customer search box. To add an item to a Sale or Refund transaction, scan or enter the item number (SKU) in the inventory search box as seen to the right. If the item is found in your inventory, it will be added to the transaction. If the item does not exist, you will be prompted to add it. If you decline to add the item, the background of the inventory icon will turn red and will remain so until you enter a valid item number or clear the contents of the box. Use the search button [F1] to the right of the entry field to display the Inventory Search screen. The selected item number from the search screen will be returned and displayed in the inventory search box. User Manual - CashFootprint™ Retail Point-of-Sale, Professional Edition Page | 19 If the currently logged in user does not have proper permissions to perform certain tasks, they may be prompted for a manager override (see at right). If this happens the manager, or emplyee with proper permissions will need to enter their login credentials to approve the task be performed. Sale When processing a sale, the Store Credit payment method is only active if the assigned customer has available credit. Toolbar Buttons Keyboard – Displays the onscreen keyboard for the box with focus. Open – Open a saved transaction. Save – Save a transaction for later. History – Displays the Transaction History screen. See History. Sale [F5] – Sell items Credit [F5] – Issue a credit to the customer. If the returned payment is Credit Card then you must perform a refund instead. Refund [F8] – Displays the Refund Search screen. Scan or enter the transaction number for the transaction you would like to process a refund for. This button is only displayed if there is not a transaction already in progress. Delete [Del] – Deleted an item from the transaction after confirmation. Quantity [F2] – Change the quantity of items to sell for the selected item. Displays number pad. Price [F3] – Change the price of the selected item. Displays number pad. Discount [F4] – Used to apply a discount to the selected items. (Multiple selected items allowed). Discount can be either a percentage or a fixed amount. Adjustment direction can be either up or down. The image to the right shows a discount of 10% for the selected items. Details – Modify notes for selected item. (Uses include serial numbers, sim card numbers, etc.). This note appears directly below the item on the receipt. Notes [F7] – This is a transaction level note and will appear at the bottom of the receipt. Void – Void the current transaction. Void receipt will be printed. Apply Tax – This is the default transaction option. When this option is selected, all items are taxed based on their individual tax setting. This option turns the whole transaction into a NonTax transaction. (Used for resellers and those who are tax exempt) User Manual - CashFootprint™ Retail Point-of-Sale, Professional Edition Page | 20 Tracking – Change the Source and Status of a transaction. The defaults for these settings are set in Options > Business tab. Refund When processing a refund, only the original payment type can be used as the refund payment method. If you want to give a customer store credit, enter their customer number and select Store Credit as the Payment method. Toolbar Buttons Keyboard – Displays the onscreen keyboard for the box with focus. Orig Receipt – View the original transaction’s receipt. Quantity [F2] – Change the quantity of items to refund for the selected item. Displays number pad. Clear Qty [F3] – Sets quantity of items to zero for the selected items. Full Qty [F4] – Sets quantity of items to the full quantity of items originally sold for the selected items. Tracking – Change the Source and Status of a transaction. The defaults for these settings are set in Options > Business tab. How-To process a basic cash sale or refund 1. Assuming you are at the POS or Refund screen 2. Ensure the focus/cursor is in the inventory search box. 3. Scan or enter the desired item number for the item you wish to sell. 4. Hit the Enter key if you manually entered the item number. The item should have been added to the transaction list or the Quantity should have been incremented. 5. Hit [F9] or click the Cash button on the right side of the screen. 6. Using the number pad or your keyboard, enter the payment amount. 7. Hit [F12] or click Process Transaction. The transaction will be processed and all information recorded to the database. If your hardware is setup the receipt should print and the drawer should pop open. User Manual - CashFootprint™ Retail Point-of-Sale, Professional Edition Page | 21 History Transaction History is used to search past transactions, reprint receipts, view notes, initiate Voids or Refunds, and update tracking status. The transaction search can be performed by Transaction Number or Customer Number and/or Data Range. If you don’t want to see voided transactions then uncheck the Show Voids box and click Search. User Manual - CashFootprint™ Retail Point-of-Sale, Professional Edition Page | 22 End-of-Shift Cash Drawer Adjustments (Add, Remove, Cash Check) (menu: File > Cash Drawer Adjustments) Everyone has run out of Ones at one time or another. This adjustment screen will allow you to add or remove cash (cash drop) and cash checks. Select the adjustment type, enter the amount, and click OK. If you have a receipt printer hooked up a receipt will print detailing the adjustment. Close/Reconciliation Cash Drawer (menu: File > Close Terminal/Reconciliation Cash Drawer (X-Out)) Cash drawer reconciliation is a daunting task, especially after a long day. CashFootprint™ will allow you to simply count the number of coins and bills received and input them into an easy to read screen. Checks can be entered individually to allow automatic calculation of all checks received. Credit card funds received automatically populated and can be compared against the report generated using the merchant’s batch receipt, or website report. Total Sales, Credits, Refunds, Voids, and Drawer adjustments will be displayed as well as who opened the drawer. Once your entry has completed, click the OK button to send the reconciliation report to the receipt printer. End-of-Day Session Close (menu: File > Close Store (Z-Out)) Close will check the database for any open terminals. If there are open terminals they must be closed our prior to attempting to close the session again. Once all terminals have had their drawers reconciled and they have been closed, the session close will log the session end time to the database and print the Sales and Void reports for the current session. If for any reason you need to reprint the session’s reports, you may do so by using (menu: Reports > Session History). User Manual - CashFootprint™ Retail Point-of-Sale, Professional Edition Page | 23 Reports There are numerous reports and they are all found within the Reports menu. The reports are broken down by type, summary or detail, and list or group. The names of the reporting menu items are very descriptive to assist in finding the report you’re looking for. Customer Reports List by Name List by Outstanding Store Credit Sales History by Customer Employee Reports List by Name List by Username List by Login Inventory Reports Summary - Group by Department & Category Detail - Group by Department & Category Detail - List by SKU/Item# Zero On Hand Report – List by SKU/Item# Inventory Reorder Report Group by Department & Category List by SKU/Item# Inventory Receiving Report Reprint Group by Vendor List by SKU/Item# Gift Card Report Account Information – Specific Card# Accounts – List by Card# Payment Reports Summary - List by Payment Type Detail - List by Transaction# Detail - List by Payment Type Sales Reports Summary - Group by Department & Category Summary - List by Transaction# Detail - Group by Department & Category Detail - Group by Transaction# Sales Tax Breakdown Profit Breakdown Void Reports Summary - List by Transaction# Detail - Group by Transaction# Session History This menu item will display a form for you to choose a session to reprint the closing reports for. User Manual - CashFootprint™ Retail Point-of-Sale, Professional Edition Page | 24