1
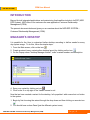
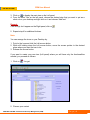
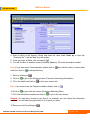
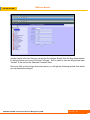
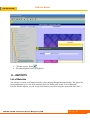
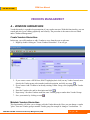
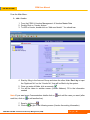
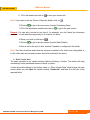
User Manual NSD ERP SYSTEM Customers Relationship Management (CRM) www.nsdarabia.com Copyright © 2009, NSD all rights reserved NSD ERP SYSTEM CRM User Manual Table of Contents Introduction .................................................................5 MANAGER’S DESKTOP ............................................5 CUSTOMER RELATIONSHIP MANAGEMENT .........9 A - Customer Hierarchy .......................................................................................................................... 9 Creating a Customer ........................................................................................................................... 9 Deleting a Customer from the Hierarchy ............................................................................................ 9 CUSTOMER MASTER DATA ...................................10 A – Customer Action ............................................................................................................................ 10 Add a Customer ................................................................................................................................ 10 Block Customer Account .................................................................................................................. 12 B – Maintain Customer Data ................................................................................................................ 12 C – Customer File ................................................................................................................................. 14 UTILITIES .................................................................15 A – Customer Creation ......................................................................................................................... 15 B – Change Customer Status ................................................................................................................ 15 C – Customer Management .................................................................................................................. 16 Creating s Search criteria: ................................................................................................................. 17 Updating (changing) a Search Criteria: ............................................................................................ 17 Deleting Search Criteria:................................................................................................................... 17 Maintaining Customer Data: ............................................................................................................. 18 Displaying Customer Data: ............................................................................................................... 18 Creating a Template for Quotation ...........................18 A- Creating the Template variant ..................................................................................................... 18 B - Creating the Template ................................................................................................................. 20 C - Creating a report header with a LOGO ....................................................................................... 22 EMPLOYEES ............................................................24 Hire New Employee .......................................................................................................................... 24 Organization Assignment.................................................................................................................. 25 Maintain Employee Data .................................................................................................................. 26 Display Employee Data .................................................................................................................... 27 Employee Management .................................................................................................................... 27 Employee Reports ............................................................................................................................. 28 A - Employee List ............................................................................................................................. 28 B – Employee Comments ................................................................................................................. 29 NSD ERP SYSTEM / Customer Relationship Management (CRM) Page |2 NSD ERP SYSTEM CRM User Manual PRODUCTS MANAGEMENT ...................................31 A – Products Hierarchy......................................................................................................................... 31 Create Products Hierarchy ................................................................................................................ 31 Maintain Products Hierarchy ............................................................................................................ 31 Display Products Hierarchy .............................................................................................................. 33 Delete Products Hierarchy ................................................................................................................ 33 B - Products Master Data ...................................................................................................................... 34 Product Action .................................................................................................................................. 34 Maintain Product Data ...................................................................................................................... 36 Display Product Data ........................................................................................................................ 37 Product File ....................................................................................................................................... 37 Product Management ........................................................................................................................ 38 C - UTILITIES ...................................................................................................................................... 39 Quick Material Creation ................................................................................................................... 39 Material Status Management ............................................................................................................ 40 Material Status Changing History..................................................................................................... 40 D – REPORTS ...................................................................................................................................... 41 List of Materials ................................................................................................................................ 41 VENDORS MANAGEMENT .....................................42 A – VENDORS HIERARCHIES ......................................................................................................... 42 Create Vendors Hierarchies .............................................................................................................. 42 Maintain Vendors Hierarchies .......................................................................................................... 42 Display Vendors Hierarchies ............................................................................................................ 44 Delete Vendors Hierarchies .............................................................................................................. 44 B - VENDORS MASTER DATA ........................................................................................................ 44 Vendor Action ................................................................................................................................... 44 Add a Vendor.......................................................................................................................... 45 Block Vendor Data ................................................................................................................. 46 Hold Vendor Data ................................................................................................................... 47 Maintain Vendors Data ..................................................................................................................... 47 Display Vendor Data......................................................................................................................... 49 Vendors Management ....................................................................................................................... 50 Creating Search criteria: ......................................................................................................... 51 Updating (changing) a Search Criteria: .................................................................................. 51 Deleting Search Criteria: ........................................................................................................ 51 Maintaining Vendor Data: ...................................................................................................... 52 Displaying Vendor Data: ........................................................................................................ 52 C – UTILITIES ..................................................................................................................................... 52 Quick Creation .................................................................................................................................. 52 Vendor Status Management .............................................................................................................. 53 Status History .................................................................................................................................... 54 D – REPORTS ...................................................................................................................................... 55 List of Vendors ................................................................................................................................. 55 Vendors Structure ............................................................................................................................. 56 NSD ERP SYSTEM / Customer Relationship Management (CRM) Page |3 NSD ERP SYSTEM CRM User Manual Vendors Comments Evaluation ........................................................................................................ 56 Vendors Communication .................................................................................................................. 56 E – PURCHASE ORDER..................................................................................................................... 57 Create Purchase Order ...................................................................................................................... 57 Maintain Purchase Order .................................................................................................................. 58 Display Purchase Order .................................................................................................................... 59 SALES DOCUMENTS ..............................................60 A – SALES QUOTATIONS................................................................................................................. 60 Create Sales Quotation...................................................................................................................... 60 Maintain Quotation Data................................................................................................................... 62 Display Sales Quotation .................................................................................................................... 63 Reject Sales Quotation ...................................................................................................................... 64 Sales Quotation Management ........................................................................................................... 65 B – SALES ORDERS ........................................................................................................................... 67 Create Sales Order Manually ............................................................................................................ 67 Create Sales Order with Reference ................................................................................................... 68 Maintain Sales Order ........................................................................................................................ 69 Display Sales order ........................................................................................................................... 70 Sales Order Management .................................................................................................................. 70 C – SHIPPING and TRANSPORTATION .......................................................................................... 71 Create Delivery Document ............................................................................................................... 71 Maintain Delivery Document ........................................................................................................... 74 Display Delivery Document ............................................................................................................. 75 Delivery List – by Material ............................................................................................................... 75 Delivery List – by Order ................................................................................................................... 77 Delivery Document Posting .............................................................................................................. 77 D - BILLING ........................................................................................................................................ 79 Create Billing Document .................................................................................................................. 79 Maintain Billing Document .............................................................................................................. 80 Display Billing Document ................................................................................................................ 82 Post Billing Document ...................................................................................................................... 82 NSD ERP SYSTEM / Customer Relationship Management (CRM) Page |4 NSD ERP SYSTEM CRM User Manual INTRODUCTION Beyond its rich integrated applications and customizing functionalities include in its ERP (NSD ERP System), NSD offers to its customers the new application Customer Relationship Management (CRM). The present document deals and gives you an overview about the NSD ERP SYSTEM – Customer Relationship Management (CRM). MANAGER’S DESKTOP It is possible for the User to customize his/her desktop according to his/her needs for every day system usage. To do this, follow the simple steps: 1. From the Main screen, click on the icon 2. Create a variant (every variant calls a desktop layout) by clicking on the icon 3. On the Popup screen “desktop Manager Variant”, enter a variant number and description 4. Save your variant by clicking on icon 5. Click on the X on top right of the Variant screen to exit Now that we have created a variant for the desktop, let’s populate it with some short cut button to the system. 1. Begin by first choosing the variant through the drop down and then clicking on execute icon 2. You should have a clean Panel (just the different system icons) NSD ERP SYSTEM / Customer Relationship Management (CRM) Page |5 CRM User Manual NSD ERP SYSTEM 3. Click on to display the main tree on the Left panel 4. From the Main Tree on the left panel, choose the desired step that you want to put as a short cut on your desktop and right-click on it and choose “Add Icon” Remark: If the icon(s) don’t appear on the Right panel, click on 5. Repeat step 4 for additional buttons. Note: You can arrange the icons on your Desktop by: 1. Point to the Icon and click the Left mouse button 2. While still holding down the Left mouse button, move the mouse pointer to the desired place where you want the icon to be. 3. Release the mouse button If you want to create your own tree (Left panel) where you will have only the functionalities needed, you proceed as follows: 1. Click on . You get 2. Choose your variant NSD ERP SYSTEM / Customer Relationship Management (CRM) Page |6 NSD ERP SYSTEM CRM User Manual 3. Next, you create a node name by clicking on and then filling in the description on the pop up window “Create New Tree Node/Maintain” and then click 4. Highlight the Node under which you want to transpose from right panel to left panel as shown 5. Choose the step you want in your Tree and click NSD ERP SYSTEM / Customer Relationship Management (CRM) Page |7 NSD ERP SYSTEM CRM User Manual 6. Repeat step 5 to populate your node 7. If needed, create other nodes by repeating steps 3 to 5 Remark: You can create sub-nodes by clicking on the root node then 8. Save your work by clicking on 9. Get back to the previous screen (Desktop Manager) by clicking on Note: You can toggle between the Main screen and the Manager desktop by clicking on screen) or (Desktop Manager) NSD ERP SYSTEM / Customer Relationship Management (CRM) Page |8 (Main NSD ERP SYSTEM CRM User Manual CUSTOMER RELATIONSHIP MANAGEMENT A - Customer Hierarchy Creating a Customer Customer hierarchy consists of a graphical tree display of customers. You can create your customers graphically in this step and later on manage their data. This is how we can add (create) a customer to the hierarchy. 1. From the Main Menu and in the “Customer Hierarchy”, double click on “Create Customers Hierarchy” 2. On the “Create Customer Hierarchy” screen, highlight the Customer group (left Pan Tree) where you want your customer to belong to (in our example it will be under “Charter/Logistics” of “Chartering” group. 3. Enter the Code and Customer Name 4. Click on “create” icon 5. Save by clicking on 6. Repeat steps 2 to 5 for other customers 7. Exit the Create screen by clicking on Deleting a Customer from the Hierarchy Deleting a Customer from the Hierarchy DOES NOT delete the customer from the database. It only deletes it from the graphical display. To do so, proceed as follows: NSD ERP SYSTEM / Customer Relationship Management (CRM) Page |9 NSD ERP SYSTEM CRM User Manual 1. From the Main Menu and in the “Customer Hierarchy”, double-click on “Delete Customers Hierarchy” 2. Choose (click on) the customer you want to delete from the left pan tree 3. The fields on the right pan “Delete Customer Hierarchy” should be filled up 4. Click on 5. Exit from the delete screen by clicking Remark: At any time if you want to display the customers along with their codes, click on CUSTOMER MASTER DATA Customer master data constitutes the heart of the CRM. It is all about the information which will be shared by the different functions in the system. The 4 functions in the Master data are: ¾ Customer Actions: to be used when creating a NEW customer ¾ Maintain Customer Data: to be used to change the data about an EXISTING customer ¾ Display Customer Data: as the name implies it, this is to be used just for viewing customer data (you cannot change any information in this functionality). This mode will show all the infotypes (screens) containing data that are either complete or not complete. ¾ Customers Files: this is less enriching but faster than “Display Customer Data” A – Customer Action To ADD or BLOCK a customer, we perform an Action. From the Main Menu: Add a Customer 1. From the CRM Æ Customer Management Æ Customers Master Data 2. Double Click on “Customers Actions 3. To ADD a customer, double-click on “Add new Customer”. You should see the Title (Add New Customer) above the customer fields NSD ERP SYSTEM / Customer Relationship Management (CRM) P a g e | 10 CRM User Manual NSD ERP SYSTEM 4. Start by filling in the Account Group and down the other fields. Don’t try to input the “Customer No”; it will be filled in by the system. 5. Once you enter all fields, click on execute 6. You will be taken to another screen (Customer Address). Fill in the information needed Note: If you want more Communication details click on each line, click on and add the ones you want (after to add another line). 7. Save by clicking on 8. Click on to get on the following screen (Customer Accounting Information) 9. Fill in the details and click on to save your screen info Note: If you want to see the Payment condition details, click on 10. Click on to get to the next screen (Customer Marketing Data) 11. Fill in the information needed and click on to get to the next screen. Remark: You can skip a screen at any time if, for example, you don’t have the information available. You will have the opportunity to do it later if you want. 12. Save your work by clicking on NSD ERP SYSTEM / Customer Relationship Management (CRM) P a g e | 11 CRM User Manual NSD ERP SYSTEM 13. Click on 14. to get to the next screen (Customer Contact Employees) and then fill in the To be able to add a contact, You have to click on create icon information. You can also add a contact picture by clicking on To correct an entry, choose the contact and then click on To display a contact detail, click on 15. And so on for the rest of the screens. Note: The User should be aware that the screens contained in the Action are configurable ie, it’s the client who sets out what screens should be included in the action. Block Customer Account The same principle as for Customer Actions, this action will bring successively some predefined screens to block a customer. It starts by double clicking on the Action name ie, “Block Customer Account” which brings the main screen where you will input the customer number “Customer No” and then fill in the rest of the required fields. Notice this time: you input the customer No and NOT the system which is quite obvious. B – Maintain Customer Data This functionality gives you the opportunity to add, change or delete any data related to a Customer. This is where you can take over the screens you “missed” (didn’t complete) in “Customer Actions” above. The tree for maintaining customer data is also configurable. The good thing about this functionality among others is that, once you enter the customer number, the system will inform you immediately about the infotypes (screens) already maintained (icon ) or not (icon ) in front of the corresponding infotype. NSD ERP SYSTEM / Customer Relationship Management (CRM) P a g e | 12 NSD ERP SYSTEM CRM User Manual Another facility is the fact that you can choose the infotype directly from the drop down window by clicking the arrow in front of the field “Infotype”. This is useful in case an infotype has been “omitted” in the tree for the “Maintain Customer Data”. Once you click on the Infotype drop down arrow, you will get the following window from which you can choose the infotype. NSD ERP SYSTEM / Customer Relationship Management (CRM) P a g e | 13 NSD ERP SYSTEM CRM User Manual C – Customer File This functionality will let you display (search for) customer information. Notice the difference between this functionality and the “Display Customer Data” is the fact that ONLY the infotypes maintained for a given customer will be displayed (available) on the tree in the left pan. To display a Customer file, 1. Double click on “Customer File” 2. Using the Drop down menu for “Customer No”, choose the customer Number Note: The “Search Customer” window will let you search using three facilities: ¾ Search customer using a General structure (you can hit the Execute button entering any data in the fields to display ALL customers. ¾ Search customer using the “Structure” or ¾ Search customer using the communication data (telephone, Fax , Web or email. NSD ERP SYSTEM / Customer Relationship Management (CRM) P a g e | 14 without NSD ERP SYSTEM CRM User Manual 3. Once you have chosen the customer, double click on the desired infotype (on the left tree) and you will get the display information 4. Click on to get back to the Customer file and you can repeat step 3 for other infotypes. UTILITIES A – Customer Creation This functionality is called “Quick Customer Creation”. It is different from the “Customer Actions” in that no other screens will follow this one. The Quick Customer creation summarizes the most important fields (information) that are needed to create a customer. You can later go to the “Maintain customer data” to add other data about the customer. Here again, you don’t enter the customer number but leave it rather to the system to assign it. B – Change Customer Status When a customer is created the system will assign him automatically the status 3 (Customer) ie, active. If you want to change his status (for example Block him, or black-list him etc…), it is with this functionality that you can do it. For any change in status there is a reason and the system will keep a history of the customer status changes along with the reason. NSD ERP SYSTEM / Customer Relationship Management (CRM) P a g e | 15 NSD ERP SYSTEM CRM User Manual C – Customer Management This functionality represents the cockpit of the Customer management. From this you can access any data about the customer or make search besides other functionalities that we will see in the following. The main screen appears as NSD ERP SYSTEM / Customer Relationship Management (CRM) P a g e | 16 CRM User Manual NSD ERP SYSTEM Creating s Search criteria: You can create one or many search criteria and save them for later use. You can for example create one search criteria for ALL your customers, another search for all customers in GCC and another one for all BLOCKED customers etc… This is how you do it: 1. First enter the search criteria by choosing and filling the fields needed. Examples: • • To search for all blocked customers, fill in ONLY the status field by choosing through the drop down menu “Block” and leave all other fields blank. To search for all customers in GCC countries, fill in only the “Area” field and leave the rest blank. 2. Once you search criteria are filled in, click execute 3. To SAVE this search criteria, click name you want to give to the search. . You will have a list of customers. . A pop up window appears to ask you about the 4. Type the name (description) of the search criteria and hit Updating (changing) a Search Criteria: You can change an ALREADY SAVED search criteria by: 1. Click on 2. A pop up window appears. Click on the green arrow to select the Search Criteria from the drop down menu 3. Click 4. Fill in the desired search fields and click 5. Once satisfied with the search criteria, click on to update your Search Criteria Deleting Search Criteria: You can delete already saved Search Criteria from the list by: 1. Clicking on the name of the Search Criteria you want to delete 2. Click on NSD ERP SYSTEM / Customer Relationship Management (CRM) P a g e | 17 CRM User Manual NSD ERP SYSTEM Maintaining Customer Data: You can maintain Customer data directly right from this screen as follows: 1. Click on your customer in the customers list (choose the customer) 2. Here you have the option either: ¾ Maintain data through the infotypes (screens) by choosing them through the drop down infotypes menu and then performing the change (click on ¾ Click on ) or create or which will take you to “Maintain Customer Data” tree screen Displaying Customer Data: You can display Customer data directly right from this screen as follows: 1. Click on your customer in the customers list (choose the customer) 2. Here you have the option either: ¾ Display data through the infotypes (screens) by choosing them through the drop down infotypes menu and then clicking on or ¾ Click on either which will take you to “Display Customer Data” tree screen or which will take you to “Display Customer File” screen Creating a Template for Quotation Creating a template for quotation is a 2 steps procedure: 1. First we have to use the IMG to create the “Template Variant” 2. Then we will use the regular system to create the content (Header, Body (material), and the Tail) of the template. A- Creating the Template variant 1. From the Main Menu, Click on “System” and choose “IMG” NSD ERP SYSTEM / Customer Relationship Management (CRM) P a g e | 18 NSD ERP SYSTEM CRM User Manual 2. From “CRM” and “General Configurations”, double-click on “Sales Documents Print Variants” 3. Enter Code number and Description for your variant (“Training Template in our example”) NSD ERP SYSTEM / Customer Relationship Management (CRM) P a g e | 19 NSD ERP SYSTEM CRM User Manual 4. Save your variant by clicking on icon 5. Repeat step 3 and 4 for other Templates 6. Exit the variant creation by clicking on “Exit icon” 7. Exit from the IMG by clicking on B - Creating the Template From the Main Menu “Sales Documents” and “Sales Quotation”: 1. Double-click on “Create Sales Quotation” 2. On the screen “Creation of price Quote”, click on “Output design” icon NSD ERP SYSTEM / Customer Relationship Management (CRM) P a g e | 20 NSD ERP SYSTEM CRM User Manual 3. On the “Flexible Sales Document Report Variants” screen, click on the Pull down menu to select the Report variant 4. In the “Head text”, type in, for EACH LINE, the header content by choosing the different formatting options (Underline, Font style, Font size and Font color) NSD ERP SYSTEM / Customer Relationship Management (CRM) P a g e | 21 NSD ERP SYSTEM CRM User Manual 5. Move on to the “Sales Documents Details” and do the same thing for the style formatting. Use each time the drop down menu to make a choice for each field. 6. Save your work by clicking on 7. Exit to the Quotation screen by clicking on 8. On the Sales Quotation screen, choose the layout template you want through the drop down menu as shown C - Creating a report header with a LOGO If you want to create a report header (for quotation) with company logo, you will have to do it through the IMG. This is how you do it: 1. Go to the IMG (see step A-1 above) 2. From “General Settings”, choose NSD ERP reports Servers 3. Double click on “Report Head Configurations” NSD ERP SYSTEM / Customer Relationship Management (CRM) P a g e | 22 NSD ERP SYSTEM CRM User Manual 4. On the Report Header screen, Choose the company through the drop down menu (1) 5. In the “Head Formatting Mode” section, choose through the drop down menu “Image” (if you want to paste a logo” or “Text” (if you want just plain text). 6. Click on the “Import image” icon (2) 7. Brows to the file where the image is and insert it (3) 8. Add text in the Text area 9. repeat steps 5 to 8 for the “Tail Formatting Mode” 10. Save your work by clicking on 11. Exit the configuration screen by clicking on 12. Exit the IMG by clicking on NSD ERP SYSTEM / Customer Relationship Management (CRM) P a g e | 23 NSD ERP SYSTEM CRM User Manual EMPLOYEES Hire New Employee 1. Hiring an employee is to be done for all permanent, salesmen or contractual personnel. The Payroll area determines if the employee will be paid or not and how this can be done (monthly, hourly …) To hire a new employee, proceed as follows: 1. Double click “Hire new Employees” NSD ERP SYSTEM / Customer Relationship Management (CRM) P a g e | 24 NSD ERP SYSTEM CRM User Manual 2. Enter all data but employee number (the system will assign it automatically) Note: If you don’t specify a Hiring date, the system will default it to the actual date 3. Save your data by clicking on Organization Assignment This functionality allows to assign an employee to a structure in the company whether it be to a Sales organization or to a Personnel organization. This is done by: 1. Double clicking on the "Organization Assignment" tree element NSD ERP SYSTEM / Customer Relationship Management (CRM) P a g e | 25 NSD ERP SYSTEM CRM User Manual 2. Enter the Employee number through the drop down menu. Some of the fields may be filled in by the system if they contain data otherwise fill the empty ones through the drop down menus (you can change the existing ones). 3. save your entries by clicking on Maintain Employee Data You only can perform the maintenance on already existing (created) employees. This functionality allows you to change the data entered in Hiring. 1. Double click on "Maintain Employee Data" 2. Enter the Employee number through the drop down menu 3. Click on change icon . That brings to the "Hiring screen" but this time filled by data. 4. Change the fields you want 5. If you want to change or load Employee picture, click on 6. If you want to do Employee Assignment (reassignment), click on 7. If you want to load scanned documents (passport, driver license….), click on NSD ERP SYSTEM / Customer Relationship Management (CRM) . P a g e | 26 NSD ERP SYSTEM CRM User Manual to download the scanned doc 8. Click on 9. Add any comments on the right side section (Doc Memo) of the loaded picture 10. Click on to add another scanned doc 11. Repeat steps 8 to 10 for other additional documents NOTE: To upload scanned documents ie, put the scanned documents in the database, click on the instructions. and follow Display Employee Data The "Display Employee Data" functionality will allow you to display ONLY the Employee data. The screen is similar to "Maintain Employee Data" with the difference that you cannot change the data. Employee Management This functionality is similar to the "Customer Management" utility wise. It represents an Employee management console ie, you can manage all employee data from this screen using infotypes. You can also search employees and save search criteria (just as in customer management). 1. Double click on "Employee Management" NSD ERP SYSTEM / Customer Relationship Management (CRM) P a g e | 27 NSD ERP SYSTEM CRM User Manual 2. Enter the Search Criteria wanted by filling the fields 3. Click on execute and then entering a 4. If satisfied, you can save this Search Criteria by clicking on save description for the Search Criteria 5. Refer to "Customer Management" for how to change or delete a Search Criteria 6. Click on the employee Line 7. Choose the infotype that you want to maintain for the selected employee through the drop down menu "Infotype" 8. Click on either (to change/maintain) or (to display data only) Employee Reports The reports here are of two kinds: • A kind of Query reports (Employee List) where you can determine the columns of data that you want to report on • A sort of grading or commenting on the employee (Employee Comments) A - Employee List 1. Double click on "Employee List" NSD ERP SYSTEM / Customer Relationship Management (CRM) P a g e | 28 NSD ERP SYSTEM CRM User Manual 2. Fill in the search criteria 3. Write a description for your report in field "Report Title" 4. Click on drop down menu for "Output Column 1" to choose the first data to report on Remark: At any time, if you make a mistake or want to delete a chosen data for a column, click on 5. Repeat step 4 for other columns 6. Choose the report support that you want (PDF, HTML….) through the dropdown menu 7. Save your Query by clicking on 8. Click on Print Preview to print your report B – Employee Comments If you want to search employees by score or by comment class and comment type (for promotion or just for any particular comment for example) this reporting functionality is just what you need. 1. Double click on "Employee Comments" NSD ERP SYSTEM / Customer Relationship Management (CRM) P a g e | 29 NSD ERP SYSTEM CRM User Manual 2. Fill in the fields especially fields Comment Class , Comment Type and Score 3. Choose the report support that you want (PDF, HTML….) through the dropdown menu 4. Save your Query by clicking on 5. Click on Print Preview to print your report NSD ERP SYSTEM / Customer Relationship Management (CRM) P a g e | 30 NSD ERP SYSTEM CRM User Manual PRODUCTS MANAGEMENT A – Products Hierarchy Products hierarchy is used to give a user a tree wise structure for the products to be sold or purchased. In this graphical representation of products, you can search a product visually. This functionality is optional and as stated earlier, it is made to ease user's reading of products structure. Create Products Hierarchy In this step, you will learn how to add a product to a tree from the root or sub-roots. 1. Begin by double clicking on "Create Products Hierarchy". You will get 2. If you want to create a NEW Root, DON'T highlight (don't click) on any product. Instead, enter directly the Variant code (number) and the description of the Root product and click on create 3. If you want to Add a product to an already existing Product category, click (highlight) the Product Category 4. Enter the variant code and its description and click 5. Repeat step 4 for other products under the same Product Category or step 3 for other Products 6. Save your entries by clicking on save Maintain Products Hierarchy This functionality will allow you to change (edit) the product hierarchy. Here you can change a product "place" from one Product category to another product category for example or make a product as "a NSD ERP SYSTEM / Customer Relationship Management (CRM) P a g e | 31 NSD ERP SYSTEM CRM User Manual product category". To illustrate this, let's take an example. We want to move the product "Under Test Product" from Product Category "8mtrs pipes" to Product Category "Test Product". 1. Double click "Maintain Products Hierarchy" 2. Double click on the Product you want to move (in our example "Under Test Product") (the section on right "Material hierarchy Information" should be filled with the product information 3. Click on the Master drop down menu and choose where you want to displace the product you have chosen (in our example to "Test Product" Variant code ) NSD ERP SYSTEM / Customer Relationship Management (CRM) P a g e | 32 NSD ERP SYSTEM CRM User Manual 4. Click on change 5. You should see the change immediately on the tree 6. If you want the chosen product to be a Root product (change it From a sub-product To a Product Category, choose a null value (no value) in the Master drop down menu. NOTE: At any time if you want to display the Hierarchy Tree with the Variant codes, click on Display Products Hierarchy As in all Display functionalities, you can ONLY see the Products information and you cannot change any thing. 1. Double click on "Display Products Hierarchy" 2. If you want to display the information on any product, double click on it and it will be displayed in the section on the right pan. 3. Here again if you want to display the Variant codes along with the products, click on Delete Products Hierarchy You can delete a product or a Product category (Product root) from the product hierarchy by: 1. Double click on "Delete Products Hierarchy" 2. Double click on the Product or Product Root 3. Click on 4. Confirm the deletion NSD ERP SYSTEM / Customer Relationship Management (CRM) P a g e | 33 NSD ERP SYSTEM CRM User Manual B - Products Master Data The master data represents the heart of a product in that it contains all essential information pertaining to it. Creating a master data for a product is like creating a master data for a customer. You can do it through an Action (where all the defined screens will come one after the other) or do it through the Product Management where you have to call the infotype (screen) that you want to populate. Product Action The Action types were defined in the IMG during configuration. This is why the action tree might change from one system to another. In this tutorial, there were 4 action types defined: • Add New Material • Block Material Usage • Change Material Structure, and • Hold Material for sales Since the concept is the same, let's review in detail the "Add New Material" 1. Double click on "Product Action". You get a screen similar to this NSD ERP SYSTEM / Customer Relationship Management (CRM) P a g e | 34 NSD ERP SYSTEM CRM User Manual 2. Double click on "Add New Material". You will get the first screen for material Information which will look like 3. After completing the fields (Material No is given by the system), click on execute be taken to the second screen such as NSD ERP SYSTEM / Customer Relationship Management (CRM) . You will P a g e | 35 CRM User Manual NSD ERP SYSTEM 4. Save by clicking on 5. Click on continue with the rest of the screens (don't forget to save your entries at each step) Maintain Product Data As in all maintenance functionalities, you can do this only on already existing (created) material. This functionality will allow you to change or complete missing data (screens). 1. Double click on "Maintain Product data". You will get a screen similar to the following (keep in mind that the tree on the left pan is CONFIGURABLE ie, it's the client who determines what infotypes (screens of data) have to be in the tree). 2. Choose the material to be maintained through the drop down menu "Material No". Notice that if you want to have a list of all material, click on execute Search sub-screen (pop up window) 3. Click on without entering any parameter in the next to the Material to be maintained NSD ERP SYSTEM / Customer Relationship Management (CRM) P a g e | 36 NSD ERP SYSTEM CRM User Manual 4. You will notice on the left pan that the "empty" infotypes have a red cross while those who contain data have the mark 5. To choose an infotype to maintain, you have 2 options: either choose it through the drop down menu "Screen" in Material Forms section or just double click on the infotype in the tree (if it shows there). 6. Fill in the data needed and save 7. Go back to the main maintenance screen by clicking on 8. Repeat step 4 to 6 for other infotypes Display Product Data This functionality is similar to Maintain Product Data with the difference that you cannot change or maintain any data for a material; just display it. Product File Similar to Display Product Data with the difference that you (as a client) specify what infotypes are to be displayed or important for a material information. NSD ERP SYSTEM / Customer Relationship Management (CRM) P a g e | 37 CRM User Manual NSD ERP SYSTEM Product Management This functionality as in Customer or Employee management constitutes the cockpit from where you can search for a material or group of material and can save your Search Criteria for later use. From here also you can maintain a material through the choices of diverse infotypes. 1. Double click on "Product Management" 2. Fill in the Search parameters you want 3. Click Execute 4. Check your results and if satisfied, you can save this Search Criteria by clicking on 5. Enter a description for your Search Criteria and hit 6. Click on a material to select it 7. Choose an infotype to maintain for the selected material through the drop down menu "Infotype" 8. Here you have the options to either Create , Change or Display the infotype for the material. Don't forget to save your data if you Create or Change it by clicking on 9. Hit to go back to the main screen "Product Management" NSD ERP SYSTEM / Customer Relationship Management (CRM) P a g e | 38 NSD ERP SYSTEM CRM User Manual C - UTILITIES The utilities section will allow you to create a Material rapidly (instead of doing it through an Action) and then later on, you can maintain the other data. In addition, you can change the material status (block it, hold it for sale or hold it for purchase etc…) or display the history for a material status changes. Quick Material Creation To quickly create a material 1. Double click on "Quick Material Creation" 2. Enter the code which came with the material if you desire in the field "Old Material Code" (this is just for references and is optional) 3. Enter a description for the Material and fill in the rest of the fields as needed 4. You can add comments on the material in the section "Remarks" 5. Save your entries 6. Go back to the main screen by clicking on NSD ERP SYSTEM / Customer Relationship Management (CRM) P a g e | 39 NSD ERP SYSTEM CRM User Manual Material Status Management You can change the status for a material (block it for example) by: 1. Double click on "Material Status Management" 2. Choose the new status through the drop down menu "new Status" 3. Give a reason (this is for reporting purposes) 4. Save Material Status Changing History This functionality will display all the statuses the selected material went through. Using this history, you will know who changed what for all material. To get to this: 1. Double click the "Material Status Changing History" under "Products Management's Utilities" 2. Select the material through the Drop down menu NSD ERP SYSTEM / Customer Relationship Management (CRM) P a g e | 40 NSD ERP SYSTEM CRM User Manual 3. Click the execute button 4. The material status history is displayed D – REPORTS List of Materials You can have a report on all material used by your company through this functionality. This report has been configured to give a list of all materials used. Just double click on the "List of Materials". Like for all other reports, you can set up which format you will be using the report with (Pdf, Xml…) NSD ERP SYSTEM / Customer Relationship Management (CRM) P a g e | 41 NSD ERP SYSTEM CRM User Manual VENDORS MANAGEMENT A – VENDORS HIERARCHIES Vendor hierarchy is a graphical representation of your vendor structure. With this functionality, you can search and select your vendors graphically and visually. The procedure is the same as the one found under "Products Management" Create Vendors Hierarchies In this step, you will learn how to add a Vendor to a tree from the root or sub-roots. 1. Begin by double clicking on "Create Vendors Hierarchies". You will get 2. If you want to create a NEW Root, DON'T highlight (don't click) on any Vendor. Instead, enter directly the Vendor group code (number) and its description and click on create 3. If you want to Add a Vendor to an already existing Vendor Group, click (highlight) the Vendor Group 4. Enter the Vendor code and its description and click 5. Repeat step 3 for other Vendors under the same Vendor group or under other Vendor Groups 7. Save your entries by clicking on save Maintain Vendors Hierarchies This functionality will allow you to change (edit) the Vendor hierarchy. Here you can change a vendor "place" from one Vendor group to another Vendor group for example or change a Vendor name . To NSD ERP SYSTEM / Customer Relationship Management (CRM) P a g e | 42 NSD ERP SYSTEM CRM User Manual illustrate this, let's take an example. We want to move the Vendor "Test" from Vendor group "For Oil" to Vendor group "For Plant Supplies". 1. Double click "Maintain Vendors Hierarchies" 2. Double click on the Vendor you want to move (in our example "Test") (the section on right "Maintain Vendor hierarchy " should be filled with the Vendor information 7. Click on the Master drop down menu and choose where you want to displace the Vendor you have chosen (in our example to "For Plant Supplies" Vendor code ) NSD ERP SYSTEM / Customer Relationship Management (CRM) P a g e | 43 NSD ERP SYSTEM CRM User Manual 8. Click on change 9. You should see the change immediately on the tree 10. If you want the chosen Vendor to be a Vendor Group instead (change it From a sub-vendor To a vendor Group, choose a null value (no value) in the Master drop down menu. NOTE: At any time if you want to display the Hierarchy Tree with the Vendor codes, click on Display Vendors Hierarchies As in all Display functionalities, you can ONLY see the Vendors information and you cannot change any thing. 1. Double click on "Display Vendors Hierarchies" 2. If you want to display the information on any Vendor, double click on it and it will be displayed in the section on the right pan. 3. Here again if you want to display the Vendor codes along with the Vendors, click on Delete Vendors Hierarchies You can delete a vendor or a Vendor Group (Vendor root) from the Vendors hierarchies by: 1. Double click on "Delete Vendors Hierarchies" 2. Double click on the Vendor or Vendor Root 3. Click on 4. Confirm the deletion B - VENDORS MASTER DATA Customer master data contains the shared information about Vendors. The 4 functionalities of the Master data are: ¾ Vendor Actions: to be used when creating a NEW Vendor ¾ Maintain Vendor Data: to be used to change the data about an EXISTING Vendor ¾ Display Vendor Data: as the name implies it, this is to be used just for viewing Vendor data (you cannot change any information in this functionality). This mode will show all the infotypes (screens) containing data that are either complete or not complete. ¾ Management Vendors Data: This functionality represents the cockpit of the Vendor management. From this you can access any data about the Vendor or make search besides other functionalities that we will see in the following. Vendor Action To ADD, BLOCK or HOLD Temporarily a Vendor, we perform an Action. NSD ERP SYSTEM / Customer Relationship Management (CRM) P a g e | 44 CRM User Manual NSD ERP SYSTEM From the Main Menu: Add a Vendor 1. From the CRM Æ Vendors Management Æ Vendors Master Data 2. Double Click on “Vendor Actions 3. To ADD a Vendor, double-click on “Add new Vendor”. You should see 4. Start by filling in the Account Group and down the other fields. Don’t try to input the "Applicant No" nor the “Vendor No”; that will be filled in by the system. 5. Once you enter all fields, click on execute 6. You will be taken to another screen (Vendor Address). Fill in the information needed Note: If you want more Communication details click on each line, click on and add the ones you want (after to add another line). 7. Save by clicking on 8. Click on to get on the following screen (Vendor Accounting Information) NSD ERP SYSTEM / Customer Relationship Management (CRM) P a g e | 45 CRM User Manual NSD ERP SYSTEM 9. Fill in the details and click on to save your screen info Note: If you want to see the Terms of Payment details, click on 10. Click on to get to the next screen (Vendor Purchasing Data) 11. Fill in the information needed and click on to get to the next screen. Remark: You can skip a screen at any time if, for example, you don’t have the information available. You will have the opportunity to do it later if you want. 12. Save your work by clicking on 13. Click on to get to the next screen (Vendor Bank Details) 14. And so on for the rest of other screens if needed or configured in the Action. Note: The User should be aware that the screens contained in the Action are configurable ie, it’s the client who sets out what screens should be included in the action. Block Vendor Data The same principle as for Vendor Actions holds for blocking a Vendor. This action will bring successively some predefined screens to block a Vendor. It starts by double clicking on the Action name i.e. “Block Vendor Data” which brings the main screen where you will input the Vendor number “Vendor No” and then fill in the rest of the required fields. NSD ERP SYSTEM / Customer Relationship Management (CRM) P a g e | 46 NSD ERP SYSTEM CRM User Manual Notice this time: you input the Vendor No and NOT the system which is quite obvious. Hold Vendor Data The same principle as for blocking a Vendor data holds for Holding temporarily a Vendor data. This action will bring successively some predefined screens to Hold a Vendor data. You start by double clicking on the Action name i.e. “Hold Vendor Data” which brings the main screen where you will input the Vendor number “Vendor No” and then fill in the rest of the required fields. Notice also here that YOU input the Vendor No and NOT the system. Maintain Vendors Data This functionality gives you the opportunity to add, change or delete any data related to a Vendor. This is where you can take over the screens you “missed” (didn’t complete) in “Vendor Actions” above. The tree for maintaining Vendor data is also configurable. NSD ERP SYSTEM / Customer Relationship Management (CRM) P a g e | 47 NSD ERP SYSTEM CRM User Manual The good thing about this functionality among others is that, once you enter the Vendor number, the system will inform you immediately about the infotypes (screens) already maintained (icon ) or not (icon ) in front of the corresponding infotype. Another facility is the fact that you can choose the infotype directly from the drop down window by clicking the arrow in front of the field “Screen”. This is useful in case an infotype has been skipped in the tree for the “Maintain Vendor Data”. Once you click on the Screen drop down arrow, you will get the following window from which you can choose the screen (infotype). NSD ERP SYSTEM / Customer Relationship Management (CRM) P a g e | 48 CRM User Manual NSD ERP SYSTEM Display Vendor Data This functionality presents the same screen and procedure as in the "Maintain Vendor Data" with the only difference is that we CANNOT change any data. Based on the left pan, we can tell if the vendor's infotype contains information (marked with (marked with ). Therefore you can display only the existing information. NSD ERP SYSTEM / Customer Relationship Management (CRM) P a g e | 49 ) or not NSD ERP SYSTEM CRM User Manual Vendors Management This functionality works exactly as the "Customer Management". It represents a cockpit from where we can search and manage Vendors data. NSD ERP SYSTEM / Customer Relationship Management (CRM) P a g e | 50 NSD ERP SYSTEM CRM User Manual Creating Search criteria: You can create one or many search criteria and save them for later use. You can for example create one search criteria for ALL your Vendors, another search for all Vendors in GCC and another one for all BLOCKED Vendors etc… This is how you do it: 1. First enter the search criteria by choosing and filling the fields needed. Examples: • To search for all Active Vendors, fill in ONLY the status field by choosing through the drop down menu “Active” and leave all other fields blank. • To search for all Vendors in GCC countries, fill in only the “Area” field and leave the rest blank. 2. Once you search criteria are filled in, click execute . You will have a list of Vendors. . A pop up window appears to ask you about the 3. To SAVE this search criteria, click name you want to give to the search. 4. Type the name (description) of the search criteria and hit Updating (changing) a Search Criteria: You can change an ALREADY SAVED search criteria by: 1. Click on 2. A pop up window appears. Click on the green arrow to select the Search Criteria from the drop down menu 3. Click 4. Fill in the desired search fields and click 5. Once satisfied with the search criteria, click on to update your Search Criteria Deleting Search Criteria: You can delete already saved Search Criteria from the list by: 1. Clicking on the name of the Search Criteria you want to delete 2. Click on NSD ERP SYSTEM / Customer Relationship Management (CRM) P a g e | 51 CRM User Manual NSD ERP SYSTEM Maintaining Vendor Data: You can maintain Vendor data directly right from this screen as follows: 1. Click on your Vendor in the Vendors list (choose the Vendor) 2. Here you have the option either: ¾ Maintain data through the infotypes (screens) by choosing them through the drop down infotypes menu and then performing the change (click on ¾ Click on ) or create or which will take you to “Maintain Vendor Data” tree screen Displaying Vendor Data: You can display Vendor data directly right from this screen as follows: 1. Click on your Vendor in the Vendors list (choose the Vendor) 2. Here you have the option either: ¾ Display data through the infotypes (screens) by choosing them through the drop down infotypes menu and then clicking on ¾ Click on or which will take you to “Display Vendor Data” tree screen. C – UTILITIES In this section you can create a Vendor rapidly (instead of doing it through an Action) and then later on, you can maintain the other data. In addition, you can change the Vendor status or display the history for a Vendor status changes. Quick Creation To quickly create a Vendor 1. Double click on "Quick Creation" NSD ERP SYSTEM / Customer Relationship Management (CRM) P a g e | 52 NSD ERP SYSTEM CRM User Manual 2. Fill in the fields of "Account group" and "Hierarchy" for the Vendor. 3. Enter a description for the Vendor and fill in the rest of the fields as needed 4. You can add comments on the Vendor in the section "Remarks" 5. Save your entries 6. Go back to the main screen by clicking on Vendor Status Management You can change the status for a Vendor (black list him for example) by: 1. Double clicking on "Change Vendor Status" NSD ERP SYSTEM / Customer Relationship Management (CRM) P a g e | 53 NSD ERP SYSTEM CRM User Manual 2. Choose the new status through the drop down menu "new Status" 3. Give a reason (this is for reporting purposes) 4. Click on execute . You will see the status change From - To 5. Save Status History This functionality will display all the statuses the selected Vendor went through. Using this history, you will know who changed what for all Vendors. To get to this: 1. Double click the "Vendor Status Changing History" under "Products Management's Utilities" 2. Select the Vendor through the Drop down menu NSD ERP SYSTEM / Customer Relationship Management (CRM) P a g e | 54 NSD ERP SYSTEM CRM User Manual D – REPORTS List of Vendors We can obtain a list of Vendors by specifying any or all of the Vendors, by Group or Sub-group, by Account Group, by Status, by Country or by Area or Sub-area. NSD ERP SYSTEM / Customer Relationship Management (CRM) P a g e | 55 NSD ERP SYSTEM CRM User Manual 1. Fill in the desired fields to list the Vendors 2. Choose the format you desire your report will use from the drop down menu as in the figure above 3. Click on Print Preview Notice that for this report, you get an output with vendor's code, name and country and status Vendors Structure This report uses the same screen as the one above (List of vendors). However, the output will have columns about vendor's code, name , group , subgroup , area and sub area. Vendors Comments Evaluation This report contains in addition to the "List of Vendors" report, the fields about the Administrator (who evaluates the Vendor) and the Score comparison. Therefore in this kind of report you can display the comments made by a given Admin or a set of Admins and also by giving a reference score. The output of this report will contain information about the vendor's code, name and total evaluation score from comments on vendor infotype. Vendors Communication The output of this report will include vendor's code, name , tel , fax, web and email. NSD ERP SYSTEM / Customer Relationship Management (CRM) P a g e | 56 NSD ERP SYSTEM CRM User Manual E – PURCHASE ORDER Create Purchase Order To create a PO, proceed as follow: 1. From "Vendor Management Æ Purchase Order", double click on "Create Purchase Order" 2. Fill in the fields and then click create NSD ERP SYSTEM / Customer Relationship Management (CRM) P a g e | 57 NSD ERP SYSTEM CRM User Manual 3. Choose the Layout template from the drop down menu "Layout". (See the chapter on "Creating a Template for Quotation" if you need to create other templates) 4. Choose the format for your template (PDF, XML…) 5. Fill in the necessary fields for every Tab (Delivery Invoice, Vendor Reference, Head Text, Validity Date and Term Conditions 6. If necessary Add additional costs in the Tab "Additional Costs" below the Material list. 7. Click Run Preview button on top of the screen (besides the layout output format) Maintain Purchase Order This functionality will allow you to change or complete an already existing Purchase Order. 1. Double click on "Maintain Purchase Order" 2. Enter the PO number or search for it using the different filters shown in the following picture NSD ERP SYSTEM / Customer Relationship Management (CRM) P a g e | 58 NSD ERP SYSTEM CRM User Manual 3. Click execute 4. Double click on the PO to be maintained from the PO list 5. Click on the change icon 6. Fill or change the desired fields (do the same as in "Create PO") 7. Save Display Purchase Order This functionality works exactly as the Maintain Purchase Order with the difference that here you CANNOT change or update the data and hence the change icon NSD ERP SYSTEM / Customer Relationship Management (CRM) is replaced by the display icon P a g e | 59 CRM User Manual NSD ERP SYSTEM SALES DOCUMENTS A – SALES QUOTATIONS Create Sales Quotation To make a Sales Quotation proceed as follows: 1. From the CRM "Sales Documents Æ Sales Quotations" double click on "Create Sales Quotation" 2. Enter "Document Type". A number is automatically assigned to the Sales Quotation 3. Fill in the rest of the Sales Organization fields and delivery plant 4. Dates for the Quotation and the Quotation validity are filled in automatically by default. You can change them by using the calendar icon 5. Fill in the shipping information. Remark you can search for recipients by clicking in front of field "Remark". The editor opens and 6. To write a remark about the Quotation, click you can start writing your remark. Click "Ok" when finished. NSD ERP SYSTEM / Customer Relationship Management (CRM) P a g e | 60 CRM User Manual NSD ERP SYSTEM 7. Enter the product by using the drop down menu. Some values are defaulted. You can change them by overwriting them. Fill in the rest of the information. Note: When the pop up window opens to search for Material, you can either enter some specific search criteria to narrow the search or click to list all materials. 8. To add another product click 9. To delete a product select the product line and click 10. At any time you can select a product (click on it) and lick on the following icons at the bottom let of the screen to: * see information about a product (material) click * see material sales information, click * see notes about a material, click * see the material picture, click * see all deadline (due) dates about a material, click 11. You can also maintain or display directly from this screen by clicking on the following icons on the top left of the screen: • Show Quotation history, click • Show Quotation Conditions, click NSD ERP SYSTEM / Customer Relationship Management (CRM) P a g e | 61 CRM User Manual NSD ERP SYSTEM • Show Shipping Modes, click • • Show Customer Pricing, click Show all credits used by the customer from his quota in all sales organization with details, click • Show the credit granted for the customer in all sales organization, click • Show the exchange rates used, click 12. Choose the layout that you want to use for the Quotation through the "Layout" drop down menu or edit it by clicking 13. Run preview by clicking . Note that if you save BEFORE you run preview, the Quotation will be closed and you 14. Save have to preview it in "Maintain Quotation" Maintain Quotation Data To add or change data in an ALREADY saved Quotation, proceed as follows: 1. From the CRM "Sales Documents Æ Sales Quotations" double click on "Maintain Quotation Data" NSD ERP SYSTEM / Customer Relationship Management (CRM) P a g e | 62 CRM User Manual NSD ERP SYSTEM 2. Click on in front of "Number" to search for the Quotation. 3. A search screen pops up. Fill in the desired parameters to filter the quotations or click ALL quotations. to list 4. From the list of Quotations obtained, click on in front of the quotation you want to maintain 5. Proceed as in steps 3 to 14 in "Create Sales Quotation" to add or change data. Display Sales Quotation To display an ALREADY SAVED Sales Quotation, Proceed as in steps 1 to 4 in "Maintain Quotation Data" with the exception this time that you have a display icon NSD ERP SYSTEM / Customer Relationship Management (CRM) instead of . P a g e | 63 NSD ERP SYSTEM CRM User Manual Reject Sales Quotation By discarding or closing for any reason a whole quotation or just some materials in the quotation and hence change the status to closed, we use this functionality. 1. Start by double clicking "Reject Sales Quotation" from the CRM ""Sales Documents Æ Sales Quotations" NSD ERP SYSTEM / Customer Relationship Management (CRM) P a g e | 64 NSD ERP SYSTEM CRM User Manual to search for the quotation 2. Click 3. Proceed as in steps 3 and 4 in "Maintain Sales Quotation" to list and select the desired quotation 4. Here you have 2 options: either you reject some given material(s) or you reject the whole Quotation: • To reject materials one by one, select a material by clicking on the line it contains and select the reason through the drop down menu. If you leave the reason blank, it will be filled by the reason given to the whole Quotation at the bottom of the screen • To reject the whole Quotation, select the reason at the bottom of the screen, then tick "Replace Existing Reject Reasons" and click execute 5. This will give status "Closed" to the material or the quotation Sales Quotation Management This represents the cockpit of the Sales Quotation. From here you can manage (Create, Maintain or Display) a Sales Quotation. 1. From the CRM "Sales Documents Æ Sales Quotations" double click on "Sales Quotation Management" NSD ERP SYSTEM / Customer Relationship Management (CRM) P a g e | 65 NSD ERP SYSTEM CRM User Manual 2. You can either filter your quotations by entering different parameters or click ALL your quotations NSD ERP SYSTEM / Customer Relationship Management (CRM) to have a list of P a g e | 66 CRM User Manual NSD ERP SYSTEM 3. The Quotations are listed with colors. Please refer to color meanings at the bottom right of the screen. 4. Click the line containing the Quotation you want to use. 5. From the bottom left side of the screen: • Click on to Display the Quotation or • Click on to Maintain the Quotation or • Click on to Create a new Quotation or • Click on to Reject sales Quotation or a Material in a Quotation. B – SALES ORDERS Create Sales Order Manually This functionality is normally used when NO Quotation has been made or we don't want to refer to a Sale Quotation. 1. From the CRM "Sales Documents Æ Sales Orders", double click on "Create Sales Order Manually" 2. You will notice that this screen is the SAME screen as the one used to create a Sales Quotation. So proceed as in steps 2 to 14 in "Create Sales Quotations" NSD ERP SYSTEM / Customer Relationship Management (CRM) P a g e | 67 NSD ERP SYSTEM CRM User Manual Create Sales Order with Reference This functionality will allow you to create a Sales Order from a Quotation. That will save you time from entering all data that you normally do when you create a sales order manually. 1. From the CRM "Sales Documents Æ Sales Orders", double click on "Create Sales Order With Reference" 2. Select the Order Type through the drop down menu 3. Select the Reference Quotation through the drop down menu 4. Click execute NSD ERP SYSTEM / Customer Relationship Management (CRM) P a g e | 68 NSD ERP SYSTEM CRM User Manual 5. Make any changes you want (refer to "Create Sales Quotations" explanations). 6. Proceed as in steps 12 to 14 in "Create Sales Quotations" Maintain Sales Order Here you can add or change data in an already saved Sales Order. 1. From the CRM "Sales Documents Æ Sales Orders", double click on "Maintain Sales Order" NSD ERP SYSTEM / Customer Relationship Management (CRM) P a g e | 69 NSD ERP SYSTEM CRM User Manual 2. Click in front of "Number" to choose the Sales Order 3. Proceed as in steps 2 and 3 in "Maintain Sales Quotation" to select the Sales Order to be maintained 4. Proceed as in steps 3 to 14 in "Create Sales Quotations" to maintain the Sales Order. Display Sales order To display a Sales Order: 1. From the CRM "Sales Documents Æ Sales Orders", double click on "Display Sales Order" 2. Click in front of "Number" to choose the Sales Order to be displayed 3. Choose the layout or create one if you want to have the selected Sales Order on a report form Sales Order Management This represents the cockpit for Sales Orders ie, you manage Sales Orders (Create, Maintain, Display Sales Orders). Here you can also check the Delivery dates for a Sales Order. 1. From the CRM "Sales Documents Æ Sales Orders", double click on "Sales Order Management" NSD ERP SYSTEM / Customer Relationship Management (CRM) P a g e | 70 CRM User Manual NSD ERP SYSTEM 2. Enter the filter parameters t narrow the search for Sales Orders or click to list ALL Sales Orders 3. To maintain a Sales Order, click (elect) on the line containing the Order 4. Choose one of the 4 actions represented by the icons at the bottom left of the screen: • Click on to Display the Sales Order or • Click on to Maintain the Sales Order or • Click on to Create a new Sales Order or • Click on to Display the Sales Order Delivery Schedule C – SHIPPING and TRANSPORTATION Create Delivery Document Also known as Outbound Delivery Document, this functionality will allow to document your Sales Order delivery. 1. From the CRM "Sales Documents Æ Shipping and Transportation", double click on "Create Delivery Document" NSD ERP SYSTEM / Customer Relationship Management (CRM) P a g e | 71 NSD ERP SYSTEM CRM User Manual 2. Select the Shipping Point from the drop down menu 3. Select the Sales Order from the drop down menu 4. If you want to see the delivery schedule, click NSD ERP SYSTEM / Customer Relationship Management (CRM) . You will get something like P a g e | 72 NSD ERP SYSTEM 5. Click CRM User Manual to go back to the initial screen "Create Sales Order Delivery" 6. If you want to see the Sales Order Delivery Status, click . You will get something like 7. Click to go back to the initial screen "Create Sales Order Delivery" 8. Click to start creating the SO Delivery. You will get something like NSD ERP SYSTEM / Customer Relationship Management (CRM) P a g e | 73 CRM User Manual NSD ERP SYSTEM 9. Fill in the "Delivery on" date 10. For each material verify the quantity delivered, picked, packed loaded, issued, the Storage Location (SL) and the Route 11. You can delete a material from the Delivery Document by selecting the material line and clicking 12. Save your entries by clicking Maintain Delivery Document This functionality like any other maintenance functionality will allow to edit (add or change) an already saved Delivery Document. 1. From the CRM "Sales Documents Æ Shipping and Transportation", double click on "Maintain Delivery Document" NSD ERP SYSTEM / Customer Relationship Management (CRM) P a g e | 74 NSD ERP SYSTEM CRM User Manual 2. Select the Delivery Document through the drop down menu and search screen 3. From the list of Delivery Documents obtained, click on maintain in front of the document you want to 4. Click 5. Make any changes you want to the Delivery date or to material parameters 6. Save your entries Display Delivery Document This functionality works the same as the "Maintain Delivery Document" with the exception that you cannot change or add any data. 1. From the CRM "Sales Documents Æ Shipping and Transportation", double click on "Display Delivery Document" 2. Proceed as in steps 2 and 3 in "Maintain Delivery Document" 3. Click 4. To display another delivery document, click and proceed as in steps 2 and 3 above. Delivery List – by Material This functionality allows you to make a list of deliveries by using different filters which are: NSD ERP SYSTEM / Customer Relationship Management (CRM) P a g e | 75 CRM User Manual NSD ERP SYSTEM • • • • • By Due or number of days By Order number By Order reference By Customer or By Ship To recipient 1. From the CRM "Sales Documents Æ Shipping and Transportation", double click on "Delivery List- by Material" 2. Enter the Shipping Point through the drop down menu 3. Fill in the parameter(s) you want to as a Search filter 4. Click execute 5. Select the line containing a Material. You can either Display or maintain a material in a Sales order: 6. Click to Display the Sales Order or 7. Click to maintain a Sales Order NSD ERP SYSTEM / Customer Relationship Management (CRM) P a g e | 76 CRM User Manual NSD ERP SYSTEM Delivery List – by Order 1. From the CRM "Sales Documents Æ Shipping and Transportation", double click on "Delivery List- by Order" 2. Enter the Shipping Point through the drop down menu 3. Click 4. Select the line containing an Order. You can either Display or maintain a Sales order: 5. Click to Display the Sales Order or 6. Click to maintain a Sales Order Delivery Document Posting This is the last step in a Sales Order process. After the Delivery Document has been made, we are ready to post it so to close the Sales Order and then the system will follow to Finance if available. 1. From the CRM "Sales Documents Æ Shipping and Transportation", double click on "Delivery List- by Order" NSD ERP SYSTEM / Customer Relationship Management (CRM) P a g e | 77 CRM User Manual NSD ERP SYSTEM 2. Enter the Shipping Point through the drop down menu 3. You can list the Delivery documents available by: • Ready to post (delivery documents finished) • Already posted (this is just to display the Sales orders closed) • Under Processing (documents not finished), or • All documents available 4. Click 5. Select a document by clicking on the line it contains 6. You can choose either to: • Post the selected document by clicking on • Display the selected document by clicking on • Maintain the selected document by clicking on or • Create right from this screen a Delivery Document by clicking on and follow the procedure described in "Create Delivery Document" Notice the color codes in front of each Delivery document line and their meaning explained in the bottom of the screen. NSD ERP SYSTEM / Customer Relationship Management (CRM) P a g e | 78 CRM User Manual NSD ERP SYSTEM D - BILLING Create Billing Document 1. From the CRM "Sales Documents Æ Billing", double click on "Create Billing Document" 2. Enter the billing type you will be using with your customer through the drop down menu 3. Depending on the billing type you have chosen, you will be prompted to enter one of the parameters (Sales Order or Delivery Reference). NOTE: If you choose Billing Type "Manual Billing", a blank screen will pop up and you will have to enter all materials and other fields manually (usually not recommended because it's time consuming) 4. At this stage, You will have the possibility to Display the: • Sales Order status (if the field "Sales Order" was activated by the Billing Type) by clicking • on Sales Order Delivery Schedule (if the field "Sales Order" was activated by the Billing Type) by clicking on NSD ERP SYSTEM / Customer Relationship Management (CRM) P a g e | 79 CRM User Manual NSD ERP SYSTEM • Delivery Document view (if the field "Delivery Ref" was activated by the Billing Type) by • clicking on Delivery Document (if the field "Delivery Ref" was activated by the Billing Type) by clicking on 5. Click on 6. The billing document is filled with data (it will be blank if "manual" Billing Type was chosen) 7. Make any necessary changes if you want or create a New billing document by clicking on 8. Save Maintain Billing Document You can change data to an already saved Billing Document by: 1. From the CRM "Sales Documents Æ Billing", double click on "Maintain Billing Document" NSD ERP SYSTEM / Customer Relationship Management (CRM) P a g e | 80 NSD ERP SYSTEM CRM User Manual 2. Select the Billing Document you want to maintain through the drop down menu 3. Click on 4. You will be taken to the screen "Create Billing Document" 5. Proceed as in "Create Billing Document" above to change or add data NSD ERP SYSTEM / Customer Relationship Management (CRM) P a g e | 81 NSD ERP SYSTEM CRM User Manual 6. Save your entries Display Billing Document You can display an already saved Billing Document by: 1. From the CRM "Sales Documents Æ Billing", double click on "Display Billing Document" 2. Proceed as in steps 2 to 4 in "Maintain Billing Document" Post Billing Document 1. From the CRM "Sales Documents Æ Billing", double click on "Post Billing Document" 2. On this screen you have 4 search filters (Posted, Unposted, All and by Customer). 3. Choose the filter you want an click (you can change filters as much as you want) 4. Select the line (billing document) you want to post and click 5. You can also Display or Maintain a selected document or create a new billing document from this screen as in "Post Delivery Document" above. NSD ERP SYSTEM / Customer Relationship Management (CRM) P a g e | 82