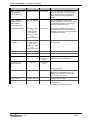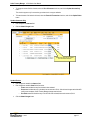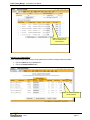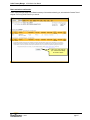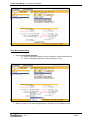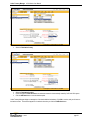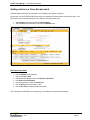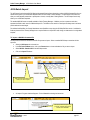
1
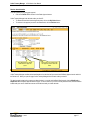
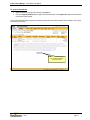
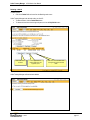
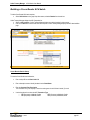
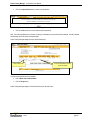
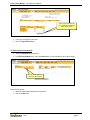
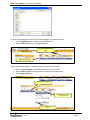
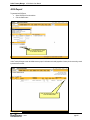
User Manual
Online Treasury Manager:
ACH Initiation
Online Treasury Manager ACH Initiation User Manual
Table of Contents
OVERVIEW ..........................................................................................................................................................1
System Access........................................................................................................................................................................................ 1
Login/Logout Procedures .................................................................................................................................................................... 2
Online Treasury Manager Modules ..................................................................................................................................................... 2
Accessing Images................................................................................................................................................................................... 3
System Availability and Cut-Off Times ................................................................................................................................................. 3
ACH INITIATION .................................................................................................................................................6
Building an ACH batch........................................................................................................................................................................... 7
Adding entries to a batch..................................................................................................................................................................... 9
Change or delete batch entries ......................................................................................................................................................... 10
Activating an ACH batch...................................................................................................................................................................... 11
Activating a batch as-is...................................................................................................................................................................... 12
Activating a batch with changes ........................................................................................................................................................ 12
Batch activation confirmation............................................................................................................................................................. 15
Approving an ACH batch ..................................................................................................................................................................... 16
Review batch details.......................................................................................................................................................................... 17
To approve the batches..................................................................................................................................................................... 18
Deleting a batch................................................................................................................................................................................. 19
Building a Cross Border ACH batch ................................................................................................................................................... 20
Cross Border Batch Setup................................................................................................................................................................. 20
Cross Border Batch Setup................................................................................................................................................................. 21
Adding entries to a Cross Border batch............................................................................................................................................. 23
Participant Entry Detail ...................................................................................................................................................................... 23
ACH Batch Import................................................................................................................................................................................. 24
To import a NACHA-formatted file..................................................................................................................................................... 24
ACH Report............................................................................................................................................................................................ 30
v. 092206
page i
Online Treasury Manager ACH Initiation User Manual
OVERVIEW
With Online Treasury Manager, you can stay connected to SunTrust over the Internet. There’s no software to load, no security
devices to install and no intensive programming efforts to send and receive files. Just link to SunTrust using a standard web browser,
and you’re connected to the source for you treasury management needs.
To ensure the privacy of your company’s financial information, SunTrust provides multiple levels of security. From firewalls to
passwords and encryption, the system is designed to safeguard your privacy. In addition, your Security Administrator determines who
in your company can access information, as well as who can initiate and approve transactions.
System Access
Online Treasury Manager can be accessed on the Internet at this address: https://onlinetreasurymanager.suntrust.com.
IDs and Passwords
A combination of 4 elements (Customer ID, Customer Password, User ID, User Password) is required to access Online Treasury
Manager.
You will be required to create a new password when you access the system for the first time. Your password must be changed every
30 days. Online Treasury Manager prohibits the re-use of your previous 12 passwords.
Inactivity Time Out
The system will time out, suspending access, if your session is idle for more than 15 minutes. However, during a timeout period, your
browser can remain connected to Online Treasury Manager. Access can be regained by re-entering your user password.
Activity in Online Treasury Manager is recorded by screen changes or the use of the Submit button. If inactivity exceeds 30 minutes,
you will have to re-enter all login information to sign back into the system. Please note that data entry alone is not considered activity.
When entering large blocks of data, click on “Submit Changes” periodically, to avoid inactivity time-out.
Important Notes
When using Online Treasury Manager, please do not use your browser’s “Refresh” button. In some cases, this could cause a form to
be submitted twice.
Do not use the “Back” button, unless specifically instructed. While clicking the back button will return you to the previous page, it will
not reverse any transactions performed prior to your clicking the back button.
Required fields
With exception to the login screen, required data entry fields for Online Treasury Manager are noted in red.
v. 092206
page 1
Online Treasury Manager ACH Initiation User Manual
Login/Logout Procedures
After entering your Customer ID, customer Password, your User ID, and your user Password click on the Login button.
Customer ID
your User ID
customer password
your user password
To exit the system you must click Logout, found at the top of the screen after this logon page.
Online Treasury Manager Modules
Each module of Online Treasury Manager is accessible from the drop down box at the top left of your screen.
You will only see those groups that your user ID has permission to access.
v. 092206
page 2
Online Treasury Manager ACH Initiation User Manual
Accessing Images
Online Treasury Manager utilizes the ImageInsight java applet, distributed by CheckWorks, Inc, to retrieve and distribute images to
your desktop. When you click on an Image icon for the first time, the java applet downloads to your desktop dynamically.
This “Java Plug-in Security Warning” window appears.
Click Grant Always
•
Click on the Grant Always button
Within a few seconds, you should see your image.
•
If you do not see the image within a few minutes, close the image window and start over.
•
If you still do not see an image within the next 5 minutes, contact your IT department, as you may not have admin rights to
install software on your PC. If so, your Administrator will have to logon and install the Java applet for you.
If you continue to have problems, contact the Technical Services Group at 1-877-785-6925
System Availability and Cut-Off Times
Online Treasury Manager can be accessed 24 hours a day, seven days a week for information reporting and transaction initiation
services. Specific account information is updated at various times throughout the day.
When new features and functions become available, these releases are introduced on weekends during non-business hours to
minimize any disruption to your usage of the service.
Function
ACH Initiate
Cutoff Time
Retention
10:30 A.M., 2:30 P.M.,
5:30 P.M., and 7:30
P.M.
Notes
The cut-off for both Debits and Credits is 7:30
P.M. ET two days prior to effective date. Files
received by 10:30 A.M. ET one-day prior will be
processed on a best effort basis.
ACH Batches
ACH Batches can be sent a max of 14 calendar
days in advance.
ACH Pass-Thru
7:00 P.M.
Follow same guidelines as ACH Initiate.
ACH Reversal
4:00 P.M.
In order for an ACH batch to meet the 4:00
P.M. deadline it will have to have been
received prior to the 2:30 P.M. cutoff time.
ACH Reports
186 Cal. Days
v. 092206
OTM ACH initiated activity (about 6 months)
page 3
Online Treasury Manager ACH Initiation User Manual
Function
Cutoff Time
Audit Activity
Retention
Notes
93 Cal. Days
Account Transfer
5:30 P.M.
If it is done before 5:30pm, it is the Same Day.
If it is after 5:30, it is Next Day. Account
Transfers are processed by the ACH system.
Account Transfers
Account Transfers can be sent a max of 14
calendar days in advance.
Account Transfer Reports
Balance Reporting Previous Day
7:00 A.M.
Balance Reporting –
Previous Day (Images)
186 Cal. Days
(about 6 months)
93 Cal. Days
Date range inquiries limited to 45 days at a
time.
93 Cal. Days
Balance Reporting Same Day
Vary upon service
ERD Special Reports
93 Cal. Days
ACH Transactions - 7:30 a.m.
Account Transfers – Real-time
Controlled Disbursement, Late Presentment –
10:00 a.m.
Lockbox - 8:30 a.m.
Wire Transfers – Real-time
7 Cal. Days
5 Business Days
ERD (CAR)
8:00 a.m.
7 Cal. Days
ERD (ACH/EDI
Receiving)
9:00 a.m.
7 Cal. Days
Image
7 Years
Image (Transit Items)
5 Years
Positive Payment Report Exceptions/Images
(Pos Pay accounts only)
Positive Payment
Exception Pay/Return
Decision-Making
Available at 9 A.M.
93 Cal. Days
12:00 P.M. Same Day
Positive Payment Report
Reverse Positive
Payment and Payable
Thru Draft (Check Return)
Available at 9 A.M.
This is the earliest time the Positive Payment
reports are available for exception decisionmaking.
This is the deadline to notify the Bank
regarding the validity of the current business
day’s mismatched checks. A Pay or Return
decision is required by this time.
93 Cal. Days
Positive Payment Return 12:00 P.M. Same Day
Decision-Making
Reverse Positive
Payment and Payable
Thru Draft (Check Return)
Manual Issue/Void Input
Deadline
Paid items, deposits
This is the earliest time the Positive Payment
reports are available for exception decisionmaking. Images of checks or draft items are
available through the Image or Balance
Reporting modules.
This is the deadline to notify the Bank
regarding the validity of the previous business
day’s paid checks. Return decisions are
required by this time.
5:00 P.M.
Positive Payment Images Available at 7:00 A.M. Current Month +
- PREV DAY
One Month of
History
(CPR accounts only)
v. 092206
page 4
Online Treasury Manager ACH Initiation User Manual
Function
Cutoff Time
Positive Payment Report - Available at 1:00 P.M.
Images/Exceptions
(CPR accounts only)
Retention
93 Cal. Days
Notes
This is the earliest time the Positive Payment
reports are available for exception decisionmaking. Bank provides on-line access to
images of the current day's mismatched
checks.
Positive Payment
Exception Pay/Return
Decision-Making
(CPR accounts only)
12:00 P.M. Next day
Stop Payments Placed
8:00 A.M. – 10:00
P.M.
(DDA and ARP
Accounts Only)
12:00 P.M. - 10:00
P.M.
(CPR Accounts Only)
186 Cal. Days
Stop should be available to tellers within
seconds during normal bank business hours.
Otherwise, the stop is in queued status. Stops
are effective for 6 months.
Stop Payment and Paid
Item Inquiry
ARP and DDA
accounts – no time
constraints
12:00 P.M. - 10:00
P.M.
(CPR Accounts Only)
93 Cal. Days
Information is stored for 186 calendar days
(about 6 months).
186 Cal. Days
(about 6 months)
Stop Payment Reports
Stop Payment Summary
No limit.
Stop (Images) Availability
11:00 A.M.
Stop (Images - Mid
Atlantic Accounts)
11:00 A.M.
Wire
This is the deadline to notify the Bank
regarding the validity of the previous business
day’s mismatched checks. A Pay or Return
decision is required by this time.
Current Month + Bank provides on-line access to images of paid
One Month of checks from previous business day.
History
45 Calendar
Days
8:00 A.M. – 5:30 P.M.
Wires received after 5:30 P.M. are subject to
next-day processing.
Wire
Wire (By Phone)
Domestic wires and international wires in US
Dollars can be future dated a max of 30
calendar days in advance. Foreign currency
wires cannot be future dated.
8:30 A.M. – 4:30 P.M.
Wire Report
Wires done by phone ONLY.
186 Cal. Days
This is only for the Wire Report under the Wire
Transfer module.
** All times are in Eastern time zone
v. 092206
page 5
Online Treasury Manager ACH Initiation User Manual
ACH INITIATION
ACH is a cost-effective way to streamline your disbursement and collections processes. ACH services reduce your handling and
processing costs and help mitigate fraudulent activity. ACH options include paying employees through Direct Deposit, Federal and
State Tax payments, Cash Concentration (concentration of deposits into one account for improved liquidity and control), Direct
Payment (collect recurring bills efficiently by debiting your customer’s accounts).
Online Treasury Manager allows you to easily build files that conform with the supported ACH file records formats, in accordance to
the NACHA rules and standards. Within the ACH Initiation module, you can build batches (i.e. payroll batches include employee
payee information such as employee account number, transit routing number of employee’s bank and other pertinent information),
activate and approve batches, run ACH reports, and send reversal requests.
Online Treasury Manager can import files from an outside source to create batch templates. This guide contains instructions for
importing files in standard NACHA, delimited, and fixed formats.
The ACH Report can be exported in two formats: NACHA and CSV (comma delimited). Note: Only active participants will be
exported.
Online Treasury Manager allows you to send batches of ACH transactions directly through to SunTrust without the need to manipulate
the transactions in OTM. This is helpful if you want to export out of a back-office accounting or other application. For further
instructions on the ACH Pass-thru function, please consult the ACH Pass-Thru User Manual.
For ACH cut-off times, retention, and other processing notes, please refer to System Availability and Cut-off Times in the Overview
section of this user manual.
Feature Functionality
The ACH module is labeled ACH Initiation in the group drop-down menu. The following features are available:
Feature
Function
ACH Activation
ACH Batch Approval
Batches
ACH Import
ACH Map Definition
v. 092206
•
Activate Batch Selections
•
Review Batch
•
Delete Batch
•
Update Entries and Activate Batch
•
Update Entry Amounts and Activate Batch
•
Approve Batch
•
Review Batch
•
Delete Batch
•
Add Batch
•
Change Batch
•
Delete Batch
•
Display Batch
•
Copy Batch
•
Add Batch Entries
•
Update Batch Entry Amounts
•
Import File
•
Review Imported File
•
Add ACH Map
•
Change ACH Map
•
Delete ACH Map
•
Display ACH Map
page 6
Online Treasury Manager ACH Initiation User Manual
Feature
Function
Participants
•
Change Participant Entry
•
Delete Participant and Entries
•
Load Pass-Thru File
•
Clear File
•
Review Pending File
•
Review Accepted File
ACH PT Report
•
Access PT Report
ACH Reversal
•
Batch Reversal Request
•
Transaction Reversal Request
•
Access ACH Report
•
Export ACH Report Data
ACH Pass-Thru
ACH Report
Building an ACH batch
To build an ACH batch template,
•
Select ACH Initiation on the group drop-down menu, and select Batches from the task bar.
Online Treasury Manager displays the ACH Companies list.
Select an ACH
Company
Click the Add
button
•
Select an ACH company. Online Treasury Manager displays any existing batches for this company.
•
Click on the Add button to build a new ACH batch template Online Treasury Manager displays the ACH batch addition
page.
v. 092206
page 7
Online Treasury Manager ACH Initiation User Manual
Enter a Batch
Code
Enter the Batch
Name
Select the ACH
Transaction Type
Enter the Company
Entry Description
To enter the batch information,
•
Enter a unique ID into the Batch Code field
•
Enter a descriptive name to identify the batch into the Batch Name
•
Enter the Company Entry Description.
This information is for internal use for your company, and appears in the ACH batch header record (5 record.)
•
Use the drop-down list to select the ACH Transaction Type
See the table below for commonly used ACH transaction types
•
If desired, enter any additional information that describes the batch template in the Company Discretionary Data field.
The information you enter in this field appears in the ACH batch header record (5 record).
•
For certain transactions types, the Create Prenote check box will default the prenote setting when selected for all entries
added to this batch template.
A prenote is an optional zero dollar entry that is sent through the ACH system prior to sending an actual transaction, and
provides verification from the receiving bank that the transaction settled according to the instructions. Prenotes are
recommended when creating new batches or participants. Commonly used when setting up a new employee for Direct
Deposit. You should allow a 10-day turn-around for a prenote acknowledgement.
•
•
Please disregard the Offset Account, as the settlement transaction is automatically created by SunTrust’s ACH system.
Click the Add Batch button to save the batch template
Online Treasury Manager displays a message box of the batch added to the database. Click OK to continue, and you will return to
the batches screen. The new batch appears in the selection box when you click the Find/Refresh button.
ACH Transaction Type Codes
Transaction Type Code
Description
Addenda
CCD+CD
Cash Concentration or Disbursement, mixed credits and debits
Yes
v. 092206
page 8
Online Treasury Manager ACH Initiation User Manual
Transaction Type Code
Description
Addenda
CCD+CO
Cash Concentration or Disbursement, credits only (tax payments included)
Yes
CCD +DO
Cash Concentration or Disbursement, debits only
Yes
CCDCD
Cash Concentration or Disbursement, mixed credits and debits
No
CCDCO
Cash Concentration or Disbursement, credits only
No
CCDDO
Cash Concentration or Disbursement, debits only
No
PPD+CD
Pre-arranged Payment and Deposit, mixed credits and debits
Yes
PPD+CO
Pre-arranged Payment and Deposit, credits only
Yes
PPD+DO
Pre-arranged Payment and Deposit, debits only
Yes
PPDCD
Pre-arranged Payment and Deposit, mixed credits and debits
No
PPDCO
Pre-arranged Payment and Deposit, credits only
No
PPDDO
Pre-arranged Payment and Deposit, debits only
No
RCK
Re-presented Check Entry, debits only
No
TELCO
Telephone Initiated Entry, credits only
No
TELDO
Telephone Initiated Entry, debits only
Yes
WEB+DO
Internet Initiated Entry with addenda, debits only
Yes
Adding entries to a batch
Used when adding a participant to an existing batch, such as adding a new employee to the payroll.
•
Select Batches from the task bar and select an ACH company
•
Select the batch from the selection box, and click the Add Entries button
Enter participant’s
ID Number
Enter participant’s
Name
Enter participant’s
Account Number
Enter Bank ABA
routing/transit number
v. 092206
Select the participant’s
Account Type
Enter Amount of
the entry
page 9
Online Treasury Manager ACH Initiation User Manual
To add an entry to this batch,
•
Enter an ID number for this participant (for example, an employee ID, SSN, or client ID)
•
Enter the participant’s Name
•
Enter the bank routing/transit number into the Bank ABA
•
Enter the Account Number
•
Use the drop-down box to select the Account Type
Note: Gen Ledger and Loan types are not available with some transaction types. SunTrust originates Gen Ledger ACH
transactions, but does not accept them at this time. You should confirm that the receiving depository financial institution
would accept these transactions.
•
Enter the Amount of the entry to debit or credit
•
Enter Disc. Data as needed (client discretionary data, limited to 2 characters)
•
Depending on the ACH transaction type of the batch, these entry fields may also apply: Addenda, Payment Type
(applicable to the WEB+DO transaction type only), and Credit/Debit Type
•
Click the Add Entry button to save the entry to the batch
When you have entered all of the participant entries for the batch,
•
Click the Submit Changes button
Change or delete batch entries
As participant entries are added to a batch, they append to the template’s list of entries at the bottom of the screen. From here, you
can make changes and delete entries as needed.
Make changes to the Name, ID
Number, Bank, Account, Type,
Amount, Disc Data, State as needed
Check box to
Delete entry
•
Make changes to the field entries as needed. To delete an entry, select the Delete check box.
Do not click the Delete Batch button unless you want to delete the entire batch. This button deletes the entire batch and
there is no recovery.
•
Click the Submit Changes button
v. 092206
page 10
Online Treasury Manager ACH Initiation User Manual
Activating an ACH batch
You can either activate a batch as is, or access the batch entries and change the amount, effective entry date, addenda information,
or status for one or more entries, before you activate the batch.
To activate a batch:
•
Click on ACH Batch Activation from the task bar.
•
Select a company and click the Display Available Batches button
Select an ACH Company or
Display All
Online Treasury Manager displays the Available Batches for the selected company.
Check boxes to select one or
more batches, as is without
changes, and click the Activate
Selections button
or click the Activate
All button for all
batches with no
changes
Click the Review/Update icon
to update batch entries prior to
activation
v. 092206
page 11
Online Treasury Manager ACH Initiation User Manual
Activating a batch as-is
•
Select one or more batches by clicking on its Select box.
•
Click on the Activate Selections button. (Clicking Activate All will automatically activate all batches listed.)
Activating a batch with changes
When activating a batch, you can make changes to the amount and/or the status of entries within that batch. The Freeze All
Transactions and Zero All Amounts options are useful when you need to make changes across the board for all entries. Freeze All
changes the status of all entries in the batch; frozen entries are excluded from a batch when activated. This feature might be used
when you need to send transactions for only 1 or 2 participants in the batch. Zero All is a timesaving feature when you need to
change the amount field for all entries in a batch, or to send a prenote.
When you change the entry information for a batch template, Online Treasury Manager saves a changed version of the batch
template and changes the batch status in the ACH Batch Activation service to Updated, which indicates the batch does not exactly
match the batch template. The batch status remains Updated until you activate the batch.
Note: If someone uses the Batches service to change the header or entry information for a batch template, the changes will appear in
the ACH Batch Activation service.
Template changes do not affect any batch with an Updated status in the ACH Batch Activation service. You must first delete the
updated batch to remove the Updated status, before the template changes appear in the ACH Batch Activation service.
To make changes to a batch template before activating,
•
Click on the Review/Update red arrow for the selected batch from the Available Batches page
Online Treasury Manager displays the batch screen.
Check Zero All when changing
amounts of all entries
Check to Freeze the status of
all entries
Click Update Amounts Only to
change entry amounts
•
Click Update Entries to make
changes to amounts and/or
entry status
Click on the Update Amounts Only or Update Entries button to make your changes
v. 092206
page 12
Online Treasury Manager ACH Initiation User Manual
•
To change the amount field for all entries, select the Zero All Amounts check box, and click the Update Amounts Only
button.
This check box appears only for transaction type codes that do not support addenda.
•
To freeze the status of all entries in the batch, select the Freeze All Transactions check box, and click the Update Entries
button.
Update Amounts Only
•
Enter changes to the Amount field
•
Click the Submit Changes button
Update entry Amounts as needed
and click Submit Changes
Update Entries
•
Enter changes as needed to the Amount fields
•
Enter changes as needed to State field of the entries.
o Frozen state excludes the entry from the batch when activated.
o Prenote state includes the entry in the batch, but sets amount to $0.00. After the batch is approved and the ACH
cutoff process completes, Online Treasury Manager changes state to Active.
o Zero Dollar status will include the entry in the ACH file when activated, but sets the amount to $0.00
•
Click the Submit Changes button
v. 092206
page 13
Online Treasury Manager ACH Initiation User Manual
Update entry Amounts and
State as needed and click
Submit Changes
Activating an updated Batch
Online Treasury Manager displays the batch with an Updated status to indicate the changes made to the template
•
Click on the Select box on your updated batch
•
Click on the Activate Selections button.
Check the Select box and click
Activate Selections
v. 092206
page 14
Online Treasury Manager ACH Initiation User Manual
Batch activation confirmation
Online Treasury Manager displays the confirmation summary of the batches activated by you, and contains the Customer Trace #
assigned. Print a copy of this screen for your records.
Print a copy of this page for
your records before clicking
the Continue button
v. 092206
page 15
Online Treasury Manager ACH Initiation User Manual
Approving an ACH batch
•
Click ACH Batch Approval on the task bar
•
Online Treasury Manager displays all batches available for your approval
Check Select boxes to approve
batches and click the Approve
Selections button
Click the Review icon to
see the batch details
Click Approval All to approve
all batches
v. 092206
Click the Delete icon
to delete a batch
page 16
Online Treasury Manager ACH Initiation User Manual
Review batch details
To review a batch prior to giving your approval,
•
Click on the Review field’s red arrow on the Batch Approval screen
Online Treasury Manager locks the batch under your User ID.
•
To release the batch back into the Approval queue, click on the Skip/Unlock button.
•
To continue in the approval process for the locked batch, click the Previous button
Click Skip/Unlock to release
batch back into approval
queue
Click Previous to continue with
the Approval process with this
batch
Online Treasury Manager considers all activated batches to be unlocked until you access the ACH Batch Approval service and click
the Review icon. When you open this page, Online Treasury Manager locks the batch under your user ID.
The batch remains locked until you approve or delete the batch, or correctly exit the Batch Detail page by clicking Skip/Unlock or
Skip/Unlock All on the Batch Approval Selection page. On rare occasions, if you do not correctly exit the service, the batch remains
locked under your user ID. Other users cannot access the batch until you unlock the batch.
v. 092206
page 17
Online Treasury Manager ACH Initiation User Manual
To approve the batches
•
Select the batches for your approval by clicking on its Select box
•
Click on the Approve Selections button to approve the batches checked, or click Approve All to approve all valid batches
(check boxes must be cleared)
Online Treasury Manager displays the approval confirmation screen, which also contains the Bank Trace # assigned. Print a copy of
this screen for your records.
Print a copy of this page for
your records before clicking
the Continue button
v. 092206
page 18
Online Treasury Manager ACH Initiation User Manual
Deleting a batch
To delete a batch,
•
Click on the Delete field’s red arrow from the Batch Approval screen
Online Treasury Manager locks the batch under your User ID.
1
1
•
To delete the batch, click the Delete Batch button
•
To release the batch back into the approval queue, click on the Skip/Unlock button
C
C
Jane Doe
Jane Doe
1234
1234
Click Delete Batch
to delete
123456789 1234566
123456789 1234566
$12.34
$12.34
Prenote
Prenote
Click Skip/Unlock to
release batch back into
approval queue
Click Previous to continue with
the Approval process with this
batch
Online Treasury Manager confirms the batch deletion.
v. 092206
page 19
Online Treasury Manager ACH Initiation User Manual
Building a Cross Border ACH batch
To build a Cross Border ACH batch template,
• Select ACH Initiation on the group drop-down menu, and select Batches from the task bar.
Online Treasury Manager displays the ACH Companies list.
• Select an ACH company. Online Treasury Manager displays any existing batches for this company.
• Click on the Add button to build a new ACH batch template. Online Treasury Manager displays the ACH batch addition
page.
Cross Border Batch Setup
To enter the Cross Border batch information,
•
Enter a unique ID into the Batch Code field
•
Enter a descriptive name to identify the batch into the Batch Name
•
Enter the Company Entry Description.
This information is for your company’s internal use and appears in the ACH batch header (5) record.
•
Use the drop-down list to select the ACH Transaction Type
o CBR (Corporate) w/Addenda, Credits
PBR (Consumer) w/Addenda, Credits
o CBR (Corporate) w/Addenda, Debits
PBR (Consumer) w/Addenda, Debits
v. 092206
page 20
Online Treasury Manager ACH Initiation User Manual
Cross Border Batch Setup
•
Select the Foreign Exchange Indicator.
o FF – Fixed to Fixed (transactions settle in US dollars, available for Canadian Cross Border only)
o FV – Fixed to Variable (transactions settle in currency of destination country)
•
Select the Transaction Type Code in the Type field which is populated in the ACH Addenda (7) record.
v. 092206
page 21
Online Treasury Manager ACH Initiation User Manual
•
Select the Destination Country
•
•
•
Select the Destination Currency
Please disregard the Offset Account as the settlement transaction is automatically created by SunTrust’s ACH system.
Click the Add Batch button to save the batch template.
Online Treasury Manager displays a message box of the batch added to the database. Click OK to continue, and you will return to
the batches screen. The new batch appears in the selection box when you click the Find/Refresh button.
v. 092206
page 22
Online Treasury Manager ACH Initiation User Manual
Adding entries to a Cross Border batch
Used when adding a participant to an existing batch, such as adding a new employee to the payroll.
Important note: cross border (CBR and PBR) entries cannot be commingled with standard domestic ACH transaction types. Cross
Border entries must be batched separately due to key differences in the batch header record.
•
•
Select Batches from the task bar and select an ACH Company
Select the batch from the selection box, and click the Add Entries button.
Participant Entry Detail
•
•
•
•
•
•
•
Enter an ID Number for this participant.
Enter the participant’s Name
Enter the bank routing/transit number into the Receiver’s Bank ID field
Enter Receiver’s Account Number
Use the drop-down box to select the Account Type
Enter the Amount of the entry to debit or credit
Enter the Disc. Data as needed (client discretionary data)
See “Activating an ACH Batch” and “Approving an ACH Batch” for associated information.
v. 092206
page 23
Online Treasury Manager ACH Initiation User Manual
ACH Batch Import
The ACH Import function imports NACHA (National Automated Clearing House Association) and non-NACHA formatted files from an
outside source (local PC) to create batch templates within SunTrust Online Treasury Manager. The ACH Import function does not
allow you to add (append) transactions or participants to a batch; or modify data in existing batches. The ACH Import function only
allows you to create batch templates.
The standard NACHA formats are readily available in Online Treasury Manager. A delimiter, such as a comma or semi-colon,
separates the fields on each record in a delimited import file. The fields on each record in a fixed import file always start in the same
position and are the same length.
For delimited and fixed files, the Security Administrator must first define a map using the ACH Map Definition service. A delimited or
fixed map instructs Online Treasury Manager how to map the fields on an import file to add, change, or delete entries in a single batch
template.
To import a NACHA-formatted file
Use this screen to browse for and retrieve the ACH file you want to import. Select a standard NACHA map to associate with the
import file.
•
Select the ACH Import tab on the task bar
•
In the File Path and Name section, click on the Browse button to locate and select the file you want to import
•
Select NACHA – Standard ACH in the ACH Maps section
•
Click on the Import File button
Click on the Browse button and
select your file for import
•
Select the NACHA map and click
the Import File button
An Import in Progress window will appear. Click on Close after reviewing the instructions.
Click Close while the import is in
progress, and then click Import
Review when available.
v. 092206
page 24
Online Treasury Manager ACH Initiation User Manual
•
Click on the Import Review button to review your imported file.
There is 1 File/Batch import requests that require your review.
To review the detail report and accept a File/Batch, select the Review arrow to the right.
To delete the File/Batch, select the Delete arrow to the right.
Import in Process must complete before a File/Batch can be further processed.
Online Treasury Manager displays the ACH Import Review page.
•
Click on the Rev arrow icon to review and accept the imported file.
Note: If you select the Del arrow icon, there is no warning or intermediary screen and the file will be deleted. If the file is deleted
unintentionally, the file will need to be imported again.
Online Treasury Manager displays the Import Review Detail page.
Enter a Batch Code
Enter the Batch Name and click
the Accept button
To accept the imported file as a batch template,
•
Enter a Batch Code and Batch Name
•
Click the Accept button
Online Treasury Manager displays a Confirmation Summary for the batch import.
v. 092206
page 25
Online Treasury Manager ACH Initiation User Manual
Print a copy of this screen for
your records before clicking the
Import Review button
•
Print a copy of this page for your records
•
Click on the Import Review button
To import fixed or delimited file
•
Select the ACH Import tab on the task bar
•
In the File Path and Name section, click on the Browse button to locate and select the file you want to import
Click the Browse button to
access your file to import
In the choose file window,
•
Select the Select the path and file name for the import file
•
Click on the Open button
v. 092206
page 26
Online Treasury Manager ACH Initiation User Manual
This places the import file path and name into Online Treasury Manager. Next, select the ACH Map
•
Click the Find/Refresh button to display your available ACH Maps
•
Select the ACH map defined by your Security Administrator
first, Click the Find/Refresh
button
Select your ACH map
Online Treasury Manager displays your available Companies on the lower half of the screen.
•
Select your ACH Company. All available batches for this Company will display.
•
Select the Batch template for the import file that you created in the create batches step.
•
Click the Import File button
Select the ACH Company
Select the Batch template
for the import file
then, Click the Import File
button
v. 092206
page 27
Online Treasury Manager ACH Initiation User Manual
An Import in Progress window will appear.
•
Click on the Close button.
Click Close while the import is in
progress, and then click Import
Review when available.
Online Treasury Manager returns to you the Import screen.
•
Click on the Import Review button to review your imported file.
Click the
Import Review button
Online Treasury Manager displays the ACH Import Review page.
•
Click on the Rev arrow icon to review and accept the imported file
Note: If you select the Del arrow icon, there is no warning or intermediary screen and the file will be deleted. If the file is
deleted unintentionally, the file will need to be imported again.
Click the Rev icon
Online Treasury Manager displays the Import Review Detail page.
•
Click the Accept button
v. 092206
page 28
Online Treasury Manager ACH Initiation User Manual
Click the Accept
button
Online Treasury Manager displays a Confirmation Summary for the batch import. This page displays any import errors or warnings.
The Summary Totals display your total records added, updated and bypassed with their respective total dollar amount.
If no warnings display you have successfully imported your ACH file.
v. 092206
page 29
Online Treasury Manager ACH Initiation User Manual
ACH Report
To generate the ACH Report,
•
Select ACH Report from the task bar
•
Click the Submit button
Click the Submit button to report
on all batches activated
Online Treasury Manager returns the default summary report for all batches activated (regardless of status) for the current day, sorted
by the bank trace number.
1234567 987654321
Click the Magnifying Glass icon to
review the batch details
v. 092206
page 30
Online Treasury Manager ACH Initiation User Manual
To review the details of a batch, click on the magnifying glass icon under the Details field.
Jane Doe
John Doe
1234
1234
123456789 1234566 Checking
123456789 1234566 Savings
C
C
$12.34
$12.34
Prenote
Prenote
Click Finished to return
Report options
You can customize this report by selecting specific batches, and query by date or date range for Activation, Approval, File Creation, or
Effective Entry Dates. You can also query on Bank Trace or Customer Trace range.
Sort the ACH report by Bank Trace Number, Customer Trace Number, or ACH COMPANY ID. You can further define the report to list
a specific status: All Statuses, Activated, Approved, Locked, or File Created status. You can also export the report to a NACHA or
CSV formatted file.
For additional report examples, please see the Online Treasury Manager Report Guide.
v. 092206
page 31