1
MU Beta
Real-Time In-Circuit Emulator
for the Microchip PIC microcontrollers
User's Manual
CONTENTS:
1. MU Beta
1.1 Technical specification
1.2 Packing list
3
3
3
2. Hardware installation
4
3. Hardware operation
5
4. Software installation
6
5. Quick Start
7
6. Further information
8
7. Contact
8
Page 2 / 8
1. MU Beta
MU Beta is a Real-Time In-Circuit Emulator for the most popular 6-pin to 18pin Microchip PIC12 and PIC16 microcontrollers with up to 2 kilowords of
program memory including devices with A/D converter and two analog
comparators.
Integrated
development
environment
95/98/ME/2K/XP/Vista is available.
software
IDEA
for
Windows
Recent list of supported parts, latest software version and possible changes to
this manual can be found at http://tools.asix.net/.
1.1 Technical specification
•
•
•
•
•
Connects to PC using standard parallel port (LPT) or USB (using EMUSB)
Power: 9 V DC, 300 mA
Dimensions: 13.5 × 6.5 × 3 cm
Operation temperature range: +10° to +40°C
Operation relative humidity: max. 90 %
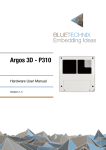
1.2 Packing list
MU Beta
BT CABLE
Emulator base unit
PC connection cable: 25-pin parallel port (LPT),
9-pin MU Beta
Note: EMUSB (MU Beta USB Interface) can be used instead of BT CABLE.
PROTAB
HMU10F2xx
HMUB8
HMU12F6xx
HMU16F6xx
HMU10
HMU16
HMU20
CD-ROM ASIX
MW903GS
MANMUBETA
Pin protection device - connect to target connector
PIC10F2xx (6-pin) devices emulation header: board
PIC12C5xx (8-pin) devices emulation header: board
PIC12F6xx (8-pin) devices emulation header: board
PIC16F6xx (14-pin) devices emulation header: board
6 / 8-pin devices emulation header: target application cable
14-pin devices emulation header: target application cable
18-pin devices emulation header: target application cable
Complete electronic manual, software installation files
and other information
Power supply, Euro type (PRI: 230VAC, 50Hz,
SEC: 9 V DC, 300 mA, 2.1 mm connector diameter)
Shipped only to continental Europe countries.
This User's Manual
Page 3 / 8
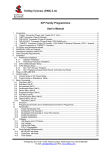
2. Hardware installation
• Turn off your computer.
• Connect the communication cable - there are two options:
•
•
Parallel port
Use BT CABLE (Sub-D 25 to 9 pins cable) and connect it to emulator to the
connector labeled LPT and to parallel port of computer.
USB (using EMUSB)
Use EMUSB (MU Beta USB Interface) and connect it to the USB port at your
computer (or USB hub). Windows then founds a new hardware and will ask
you to install drivers. Drivers are available on installation CD-ROM (in
\drivers\EMUSB\ directory) or from tools.asix.net website. Please note that
drivers are not digitally signed and you will have to click a "Continue
anyway" button during installation. After successful driver installation you
will find that the green EMUS LED will lite.
• Connect power adapter (9 V DC, 300 mA, non-stabilized) to emulator via the
connector labeled 9V DC and then connect to the mains. Power is indicated
by green LED labeled POWER. (See Note 1).
• Connect the protection module PROTAB to the TARGET emulator connector.
(See Note 2).
• Plug the emulation header of your choice to PROTAB and to your application
to the microcontroller socket. Pin #1 is indicated by a red point on the
header. (See Notes 3, 4 and 5).
• Turn the computer back on.
NOTES:
1. MU Beta has no power switch. Do not let the emulator switched on if you do
not use it for the extended period. Emulator can be connected to PC even with
no external power turned on for unlimited period.
2. Use the protection module PROTAB between emulator and emulation header
whenever possible. Its purpose is to avoid damaging the emulator output
buffer by eventual short circuit. These I/O pin output buffers are capable to
sink/source relatively high current (to be compatible with real PIC MCUs) but
the short circuit to the ground or power supply can cause permanent damage.
Only applications requiring full output current should be debugged without
PROTAB but even for those applications use PROTAB in the beginning of
development.
3. Emulation headers usage for various PIC MCU types:
Device
All 18-pin types
PIC10F2xx
PIC12C50x
PIC12F6xx
PIC16F6xx
Emulation Header
HMU20
HMU10F2xx + HMU10
HMUB8 + HMU10
HMU12F6xx + HMU10
HMU16F6xx + HMU16
Page 4 / 8
4. Any header contains the emulation socket and two clips labeled TriggerIn
and TriggerOut which function is described later in this document.
5. The standard emulation headers support devices in DIP packages, DIP to
SOIC converters (XLT08SO and XLT18SO) are available as an option.
3. Hardware operation
• The MU Beta emulator is intended for operation on common conditions. Avoid
increased humidity, dust, impurity and explosive atmosphere. Do not operate
this product in ambient temperature exceeding the range +10° to +40°C.
Storage temperature range is -10° to +60°C. Removing covers is not
allowed.
• Emulators are not intended to be connected directly into mains. Use only the
proper power adapter. This must be in good condition.
• Turn off both the computer and MU Beta any time you are about to connect
or disconnect the emulator.
• Use only the communication cable shipped with the product. Use only
PC parallel port, do not attempt to connect emulator to PC via other port
types.
• Only 0 to 5.5 V voltage is allowed to be connected to the emulation header.
If a pin is configured as an output, it must not be driven from the target
application (short circuit to GND or Vdd). Exceeding these conditions can
result in substantial damage of the equipment.
• Use PROTAB I/O protection device whenever possible! Insert PROTAB
between emulator and emulation header. The only reason for removing
PROTAB is that you need to exploit full device I/O output current, which
should be rare case.
• Insert/remove emulation header to/from target application circuitry only
with target power turned off!
• It is not necessary to hold target application supply voltage turned off when
MU Beta is powered off. The emulator core and application circuitry I/O
interface are powered separately. The emulator core is able to continue
emulation even when target power is off but the I/Os cannot work.
• The Trigger Out signal (the wire with red hook) is an output. It must not
be overload (e. g. by grounding or connecting to target power).
• The TriggerIn signal is a digital input with allowed voltage range 0 to 5.5V.
• Emulation header must be protected from damage. To improve this
lifetime, it is recommended to operate the emulator with another (nonprecise) DIP socket inserted into this all the time. In case of damage the
socket can be easily replaced. The header is shipped with this socket.
Page 5 / 8
4. Software installation
If you use EMUSB (MU Beta USB Interface) please install its USB drivers first
(as described in Hardware Installation chapter).
Download an installation file from http://tools.asix.net/dwnld_idea.htm or
insert the installation CD-ROM ASIX and run installation program
idea_xxx.exe where 'xxx' means version number. The installation uses
standard "wizzard" style installator (InnoSetup) you should be familiar with.
Default destination directory (or folder) is C:\Program Files\ASIX\IDEA.
Advanced users can use another base directory than "Program Files". The
program icon will be placed on desktop, but you can supress this option.
Now you can run the IDEA.EXE for the first time. Note, that if you use Windows
NT/2K/XP/Vista, you must use the administrator mode because the parallel
port
driver
asixio.sys
will
be
installed
(typically
to
C:\Windows\System32\Drivers directory) when performing first access to
hardware. Also, you must have write access rights for the directory where
IDEA.EXE is installed to allow the IDEA application store here the global
parameter file IDEA.INI.
You may find convenient to associate the IDP file extension with program
IDEA, because it allows you to start projects using file managers like Windows
Commander, ZTreeWin, FAR or even Explorer.
NOTES:
1. If you have already installed any previous version of IDEA, please un-install
it before new installation to remove old unnecessary files. Your projects and
source
files
will
remain
unchanged,
only
{IDEA
directory}\Projects\Examples\Example.* files will be rewritten.
2. You must have the write access in directories (folders), where IDEA is
installed and in project target directories. Thus, is not possible to run the
software from e.g. CD-ROM. The settings cannot be saved in such case and
software gives an error message.
3. Software IDEA requires correct date and time setup on your computer
(IDEA compares the date/time information of .ASM source files and .COD debug
file and decides whether the source files must be compiled before using the
information contained in the debug file).
Page 6 / 8
5. Quick Start
Step 1
Install MU Beta hardware as described in chapter 2. Hardware installation.
Step 2
Install the IDEA software as described in the chapter 4. Software installation.
Windows NT/2K/XP/Vista users should have administrator rights for first access
to hardware. Then, after automatic driver installation, the standard user rights
are sufficient.
Step 3
If hardware and software are installed and emulator is switched on, run the
program IDEA, e.g. by click on its desktop icon. In the very beginning,
MPASMWIN assembler will be invoked first to build the project Example. Then
you are asked to select action, choose the default "Continue to use an
EXAMPLE project" button. Now you see IDEA desktop with Program Memory
window and Console window opened.
Step 4
Now it is necessary to setup hardware communication. Select menu
Options → Global, a Global Options dialog will be opened. Then, select the
tab with your equipment name (MU Beta) and set-up the communication
parameters. Typical setting is LPT1 with base address address 0378h.
Step 5
Change the project equipment to MU Beta: Using menu Project → Edit
Project open the Edit Project dialog and set up equipment from default DEMO
to MU Beta. Do not change the part type (PIC16F84A). Confirm change by
pressing OK, then select Yes to next question. Project will be rebuilt using
MPASMWIN and then hardware initialization of emulator (FPGA configuration
and complete internal set-up) is invoked. You can see that emulator LEDs are
now active and indicating hardware status.
Step 6
Now place another window on IDEA desktop - Watches window by menu
View → Watches command. You see the variables HUNDREDS, SECONDS,
MINUTES and HOURS in Watches window.
Then, start the application by menu Run → Run command. You can see the
application running, and the variables incrementing. This simple application
does not access PIC ports and does not require any target application
connected.
Now you can "play" with this project - Run, Halt, Step, Edit source, Build,
open and close various windows, etc.
Page 7 / 8
6. Further information
[1] http://tools.asix.net/
[2] http://www.microchip.com/
7. Contact
Address:
ASIX s.r.o.
Staropramenna 4
15000 Prague
Czech Republic
E-Mail:
[email protected] (sales inquiries, orders)
[email protected] (technical support)
WWW:
tools.asix.net (development tools, English)
www.asix.net (main site, English)
www.asix.cz (Czech site)
Tel.:
(+420) 257 312 378
Fax:
(+420) 257 329 116
MU-BETA_MAN_EN, 2008-06-27
All rights reserved. Copyright 1991-2008, ASIX s.r.o.
All trademarks used in this document are properties of their respective owners. This
information is provided in the hope that it will be useful, but without any warranty. We
disclaim any liability for the accuracy of this information. We are not responsible for the
contents of web pages referenced by this document.
Page 8 / 8