1
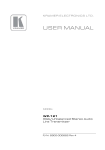
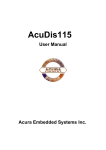
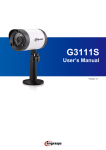
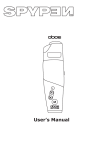
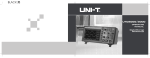
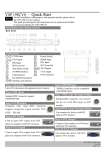
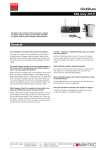
UP-1080p
HDMI, VGA, YUV, S-Video and Composite Switcher with Scaler
User Manual
COMM-TEC GmbH
Siemensstr. 14
D-73066 Uhingen
Tel.: +49-7161-3000-0
Fax: +49-7161-3000-333
www.comm-tec.de
Version 1.0 – April 2010
© Copyright by COMM-TEC
User Manual
COMM-TEC
UP-1080p
Caution:
This manual mainly introduces the functions, dimensions, accessories, technical
parameters and some common FAQ etc.
This manual only provides an instruction for user’s operation, and should not be used
as the reference for after service. The mentioned functions inside the manual are in
consistence with the hardware version till April 2010. Future changes will be
supplemented accordingly.
All rights regarding this manual are reserved by COMM-TEC. Without paper
authorization from COMM-TEC, no organization or individual can use all or part of the
content for commercial purposes.
Safety Cautions:
In order to keep the normal function of the equipment and the user’s safety, the
following instructions should be followed during the installation, operation and
maintenance:
1. The equipment should be well grounded during the installation, and no two-pin plug
should be used for power supply. The power supply should be AC and within the range
of 100V – 240 VAC, 50/60 Hz.
2. Please do not place the equipment in over-heat or over-cold places.
3. Please keep the equipment in good ventilation, so that the heat can be emitted on time
to avoid being overheated.
4. The general power supply should be switched off if the equipment are in humid
environment with condensation or are not in use in extended periods.
5. The power supply plug must be unplugged from the socket under the following
conditions:
a: Remove or reinstall any components of the equipment
b: Cut off or re-connect the power supply or other circuit
6. There is high voltage component inside the equipment, please do not dismantle the
equipment without professional knowledge to avoid electric shock and further damage
to the equipment.
7. Please keep eroding chemicals and fluid far away from the equipment.
COMM-TEC GMBH
www.comm-tec.de
2 of 21
User Manual
COMM-TEC
UP-1080p
Content
1
Product introduction ..................................................................................................4
1.1
Product Overview................................................................................................4
1.2
Main function.......................................................................................................4
2
Dimensions ...............................................................................................................5
3
Functions...................................................................................................................5
3.1
UP-1080p Front Panel ........................................................................................5
3.2
UP-1080p Rare Panel .........................................................................................7
3.3
UP-1080p System Connection Diagram .............................................................7
4
Remote control ..........................................................................................................8
5
RS-232 Control code.................................................................................................9
6
CV Settings .............................................................................................................13
7
COMP Settings........................................................................................................13
8
Y/C Settings ............................................................................................................13
9
VGA Settings...........................................................................................................13
10 HDMI Settings .........................................................................................................13
11 Menu Settings .........................................................................................................14
11.1 VGA Channel Menu ..........................................................................................14
11.2 HDMI, Video, S-Video, Component Channel Menu ..........................................17
12 Technical specifications...........................................................................................20
13 Troubleshooting.......................................................................................................21
COMM-TEC GMBH
www.comm-tec.de
3 of 21
User Manual
COMM-TEC
UP-1080p
1 Product introduction
1.1
Product Overview
UP-1080p is a scaler/switcher designed for multi-signal processing, signals of composite Video, S-Video,
Component, VGA and HDMI can be scaled to be high-resolution VGA/HDMI format and switched out.
New generation has added HDMI in/out, more suitable to the increasing AV market where high resolution
signal prevails.
This product is mainly used by radio and television broadcasting, multimedia conference room, large
screen display works, television instruction, command and control centers and other occasions.
1.2
Main function
Video/Audio Input
• 2 x Composite(RCA) with stereo audio (Phoenix balanced Audio)
• 2 x S-Video (4-pin mini DIN) with stereo audio (Phoenix balanced Audio)
• 2 x Component (RCA) with stereo audio (Phoenix balanced Audio)
• 2 x VGA (D-Sub HD15 female) with stereo audio (Phoenix balanced Audio)
• 4 x HDMI with digital audio (HDMI connector)
• 1 Microphone (6,3 mm Jack)
Video/Audio Output
• 1 HDMI (HDMI connector)
• 1 VGA (D-Sub HD15 female)
• 1 stereo audio (2 x RCA)
• HDMI, VGA and Audio outputs work simultaneous
Features
• LCD Display: Real-time monitor of the operating status
• Control Port: RS232, female 9-pin D connector
• Compatible with composite video, S-video, component video, VGA, HDMI, and/or
balanced/unbalanced stereo audio
• HDCP conform
• Compatible with NTSC 3.58, NTSC 4.43, PAL and SECAM video
• Resolution: support 480P, 720P, 1080i, 1080p, and XGA, SXGA, SXGA+, WXGA
• 250 MHz (-3dB) bandwidth, fully loaded
• Adjustable luminance, contrast and color
• Seamlessly switching between video signals and from video signal to S-Video signal
• Higher resolution output signal with integrated scaler
• Adopting the gain-compensation and synchronization signal proofread technology
• Power-fail protection
• Rack-mountable enclosure
• Conversion into a VGA / HDMI / DVI video signals, support the following 12 kinds of resolutions to
make the output in either.
• 800×600 @60Hz
• 1024×768@60Hz
• 1280×720@60Hz
• 1280×800@60Hz
• 1280×1024@60Hz
• 1366×768@60Hz
• 1440×900@60Hz
• 1440x1050@60Hz
• 1600×900@60Hz
• 1600×1200@60Hz
• 1680×1050@60Hz
• 1920×1080@60Hz
COMM-TEC GMBH
www.comm-tec.de
4 of 21
User Manual
COMM-TEC
UP-1080p
43.60 mm
430.50 mm
0
23
.
m
00
m
42.00 mm
2 Dimensions
465.90m m
482.60 mm
3 Functions
3.1
UP-1080p Front Panel
j
Input MIC
k
LCD display
l
IR Sensor
m
Signal Source Selection Button
Used to selection the signal source input type, works together with n
• CV Signal Switch button, used to select CV signal input. Long-press for 1 second to enter the
adjusting mode of brightness, contrast, saturation, sharpness and color. For the detailed
operation, please refer to Chapter 6 “CV Settings”
• COMP Signal switch button, used to select VOMP signal input. Long-press for 1 second to enter
the adjusting mode of brightness, contrast, saturation, sharpness and color. For the detailed
operation, please refer to Chapter 7 “COMP Settings”
COMM-TEC GMBH
www.comm-tec.de
5 of 21
User Manual
•
•
•
COMM-TEC
UP-1080p
Y/C Signal switch button, used to select Y/C signal input. Long-press for 1 second to enter the
adjusting mode of brightness, contrast, saturation, sharpness and color. For the detailed
operation, please refer to Chapter 8 “Y/C Settings”
VGA Signal switch button, used to select VGA signal input. Long-press for 1 second to enter the
adjusting mode of brightness, contrast, saturation, sharpness and color. For the detailed
operation, please refer to Chapter 9 “VGA Settings
HDMI Signal switch button, used to select DVI/HDMI signal input. Long-press for 1 second to
enter the adjusting mode of brightness, contrast, saturation, sharpness and color. For the detailed
operation, please refer to Chapter 10 “HDMI Settings”
n
Signal Source Switch Button
Used to select the corresponding input channel of the signal sources (e.g. 1, 2, 3, 4). Please select
the signal source before switching. When choosing DVI/HDMI signal input, short-press the signal
source switch button (e.g. 1, 2, 3, 4) to choose HDMI signal source input channel; long- press the
signal source switch button (e.g. 1, 2, 3, 4) to choose HDMI (DIV) video signal + Y/C audio
signal/VGA audio signal as the corresponding input channel.( E.g. long-press 1/2 button to choose
HDMI (DVI) channel 1/2 video signal + Y/C channel 1/2 audio signal as the input signal channels;
long-press 3/4 button to choose HDMI(DVI) channel 3/4 video signal + VGA channel 1/2 audio signal
as the input channels)
o
Display resolution Selection Button
Press the button to enter the resolution setting mode. After entered the resolution setting mode, each
press will change a resolution. The LCD displays the current operation information and changes to
the selected resolution after 1 second after the press. Under the adjusting mode of brightness,
contrast, saturation, sharpness and color, this button can also be used to confirm operation (Enter
button).
p
MIC Volume adjust button
During the adjustment, there are volume indicating bar on the LCD. The initial value is set to be
medium every time the machine is turned on.
Press VOL-:turn down the volume
Press VOL+:turn up the volume
q
Mute button and main volume adjust button
Mute button works on MIC and the main volume at the same time
Main volume button
Press VOL-:turn down the volume
Press VOL+:turn up the volume
r
Signal Source Indicator
There are indicator respectively for CV signal, COMP signal, Y/C signal, VGA signal and HDMI
signal. When there is signal passes by, the corresponding indicator will be lighten up.
COMM-TEC GMBH
www.comm-tec.de
6 of 21
User Manual
3.2
COMM-TEC
UP-1080p Rare Panel
4
1
2
3
j
8 AUDIO INPUTS
2 for Composite Audio inputs, 2 for Component Audio input,
2 for S-Video Audio input, 2 for VGA Audio input.
k
6 VIDEO INPUTS
2 Composite Video, 2 S-Video Video, 2 Component Video
l
2 VGA INPUTS
m
4 HDMI INPUTS
n
OUTPUTS
1 VGA output, 1 HDMI output, 1 Stereo output
o
RS-232 Control port
p
Power connector, AC100V-240V, 50Hz/60Hz
3.3
UP-1080p
7
5
6
UP-1080p System Connection Diagram
COMM-TEC GMBH
www.comm-tec.de
7 of 21
User Manual
COMM-TEC
UP-1080p
4 Remote control
1
2
3
4
5
6
7
Remote control operation and function the same as with the front panel.
j
Model and channel selection button
By using the remote controller, the user can more swiftly choose the corresponding channels for CV,
COMP, Y/C, VGA and DVI/HDMI signals.
When selecting the HDMI signal input, short-press the signal source switch button ( e.g.1,2, 3, 4) to
choose HDMI signal source input channel; long-press signal source switch button (E.g. 1, 2, 3, 4) to
choose HDMI(DVI) video signal + Y/C audio signal/VGA audio signal as the corresponding input
channels (E.g. long-press 1/2 button to choose HDMI (DVI) channel 1/2 video signal + Y/C channel
1/2 audio signal as the input signal channels; long-press 3/4 button to choose HDMI(DVI) channel
3/4 video signal + VGA channel 1/2 audio signal as the input channels)
k
Resolution Selection Button
Press the resolution selection button can cycle select in both directions of the following resolutions:
800×600 @60Hz, 1024×768@60Hz, 1280×720@60Hz, 1280×800@60Hz, 1280×1024@60Hz,
1366×768@60Hz, 1440×900@60Hz, 1440×1050@60Hz, 1600×900@60Hz, 1600×1200@60Hz,
1680×1050@60Hz, 1920×1080@60Hz
l
Microphone volume adjust button, picture zooming selection button
m
Main volume adjust selection button, MUTE button
n
Enter button
o
Picture mode button
Press the picture zooming selection button to select FULL/Normal/Auto three modes, and output
16:9/4:3 pictures.
p
Menu function selection button
For detailed operation instructions, please refer to Chapter 11 “Menu Settings”.
COMM-TEC GMBH
www.comm-tec.de
8 of 21
User Manual
COMM-TEC
UP-1080p
5 RS-232 Control code
One code includes 6 characters, please strictly follow the content in the following table:
The command must be send in one string !
RS-232 command code for UP-1080p
Baud: 9600 bps, 8, n, 1 format: ASCII
Code
Video and Audio Switch Out:
01*01!
02*01!
03*01!
04*01!
05*01!
06*01!
07*01!
08*01!
09*01!
10*01!
11*01!
12*01!
Video Switch Out:
01*02!
02*02!
03*02!
04*02!
05*02!
06*02!
07*02!
08*02!
09*02!
10*02!
11*02!
12*02!
Audio Switch Out:
01*03!
02*03!
03*03!
04*03!
05*03!
06*03!
07*03!
08*03!
HDMI Sound Style:
01*04!
02*04!
HDMI Output Mode:
01*05!
02*05!
COMM-TEC GMBH
Function
CV1 with audio switch out
CV2 with audio switch out
COMP1 with audio switch out
COMP2 with audio switch out
Y/C1 with audio switch out
Y/C2 with audio switch out
VGA1 with audio switch out
VGA2 with audio switch out
HDMI1 with audio switch out
HDMI2 with audio switch out
HDMi3 with audio switch out
HDMI4 with audio switch out
CV1 video switch out
CV2 video switch out
COMP1 video switch out
COMP2 video switch out
Y/C1 video switch out
Y/C2 video switch out
VGA1 video switch out
VGA2 video switch out
HDMI1 (DVI) video switch out
HDMI2 (DVI) video switch out
HDMI3 (DVI) video switch out
HDMI4 (DVI) video switch out
CV1 audio switch out
CV2 audio switch out
COMP1 audio switch out
COMP2 audio switch out
Y/C1 audio switch out
Y/C2 audio switch out
VGA1 audio switch out
VGA2 audio switch out
HDMI switch out with the Sound of MIC
HDMI switch out without the Sound of MIC
HDMI Output is DVI mode (disable audio on HDMI plug)
HDMI Output is HDMI mode
www.comm-tec.de
9 of 21
User Manual
General Command:
01$01!
02$01!
03$01!
04$01!
05$01!
06$01!
Video Output Command:
01$02!
02$02!
03$02!
04$02!
05$02!
06$02!
07$02!
08$02!
09$02!
10$02!
11$02!
12$02!
13$02!
14$02!
15$02!
16$02!
17$02!
18$02!
19$02!
20$02!
OSD Command:
01$03!
02$03!
03$03!
04$03!
xx$04!
xx$05!
xx$06!
Sound Command:
01$07!
02$07!
03$07!
04$07!
05$07!
06$07!
xx$08!
xx$09!
xx$10!
COMM-TEC GMBH
COMM-TEC
UP-1080p
MIC volume level up
MIC volume level down
Master volume level up
Master volume level down
Mute on
Mute off
800 x 600(SVGA) at 60 Hz
1024 x 768 (XGA) at 60 Hz (default)
1280 x 720 (HDTV 720p) at 60 Hz
1280 x 800 at 60 Hz
1280 x 1024 (SXGA) at 60 Hz
1366 x 768 (HDTV 768p) at 60 Hz
1400 x 1050 (SXGA+) at 60 Hz
1440 x 900 at 60 Hz
1600 x 900 at 60 Hz
1600 x 1200 (UXGA) at 60 Hz
1680 x 1050 at 60 Hz
1920 x 1080 (HDTV 1080p) at 60 Hz
Noise Reduce:Off
Noise Reduce:Low
Noise Reduce:Mid
Noise Reduce:High
Noise Reduce:Auto
Scale Full 16:9
Scale Normal 4:3
Scale Auto
OSD Duration 5s
OSD Duration 15s
OSD Duration 30s
OSD Duration 60s
select the OSD h-position, 00--99% (0<= xx <100)
select the OSD v-position, 00--99% (0<= xx <100)
select the OSD halftone, 0--8 (0<= xx <=8)
Sound Mode: Standard
Sound Mode: News
Sound Mode: Music
Sound Mode: Personal
Sound AVC off
Sound AVC on
select the Sound BASS, 00--99% (0<= xx <100)
select the Sound TREBLE, 00--99% (0<= xx <100)
select the Sound BALANCE, 00--99% (0<=xx <100)
www.comm-tec.de
10 of 21
User Manual
CV Channel Command:
01$11!
02$11!
03$11!
04$11!
05$11!
06$11!
07$11!
08$11!
xx$12!
xx$13!
xx$14!
xx$15!
xx$16!
COMP Channel Command:
01$17!
02$17!
03$17!
04$17!
05$17!
06$17!
07$17!
08$17!
xx$18!
xx$19!
xx$20!
xx$21!
xx$22!
Y/C Channel Command:
01$23!
02$23!
03$23!
04$23!
05$23!
06$23!
07$23!
08$23!
xx$24!
xx$25!
xx$26!
xx$27!
xx$28!
COMM-TEC GMBH
COMM-TEC
UP-1080p
CV Picture Mode: Standard
CV Picture Mode: Dynamic
CV Picture Mode: Soft
CV Picture Mode: Personal
CV Color Temp: Normal
CV Color Temp: Warm
CV Color Temp: Cold
restore the CV settings to the default value
select the CV brightness, 00--99% (0< =xx <100)
select the CV contrast, 00--99% (0<= xx <100)
select the CV saturation, 00--99% (0<=xx <100)
select the CV sharpness, 00--20 (0<= xx <=20)
select the CV hue, 00--99% (0<= xx <100)
COMP Picture Mode: Standard
COMP Picture Mode: Dynamic
COMP Picture Mode: Soft
COMP Picture Mode: Personal
COMP Color Temp: Normal
COMP Color Temp: Warm
COMP Color Temp: Cold
restore the COMP settings to the default value
select the COMP brightness, 00--99% (0<=xx <100)
select the COMP contrast, 00--99% (0<= xx <100)
select the COMP saturation, 00--99% (0<=xx <100)
select the COMP sharpness, 00--20 (0<= xx <=20)
select the COMP hue, 00--99% (0<= xx <100)
Y/C Picture Mode: Standard
Y/C Picture Mode: Dynamic
Y/C Picture Mode: Soft
Y/C Picture Mode: Personal
Y/C Color Temp: Normal
Y/C Color Temp: Warm
Y/C Color Temp: Cold
restore the Y/C settings to the default value
select the Y/C brightness, 00--99% (0<= xx <100)
select the Y/C contrast, 00--99% (0<= xx <100)
select the Y/C saturation, 00--99% (0<= xx <100)
select the Y/C sharpness, 00--20 (0<= xx <=20)
select the Y/C hue, 00--99%
(0<=xx <100)
www.comm-tec.de
11 of 21
User Manual
VGA Channel Command:
01$29!
02$29!
03$29!
04$29!
05$29!
06$29!
07$29!
08$29!
09$29!
10$29!
xx$30!
xx$31!
xx$32!
xx$33!
xx$34!
xx$35!
xx$36!
xx$37!
xx$38!
HDMI Channel Command :
01$39!
02$39!
03$39!
04$39!
05$39!
06$39!
07$39!
08$39!
xx$40!
xx$41!
xx$42!
xx$43!
xx$44!
LCD light time command:
xx$45!
EDID command:
01$46!
Special Command:
01#01!
02#01!
04#01!
COMM-TEC GMBH
COMM-TEC
UP-1080p
VGA Picture Mode: Standard
VGA Picture Mode: Dynamic
VGA Picture Mode: Soft
VGA Picture Mode: Personal
VGA Color Temp: Normal
VGA Color Temp: Warm
VGA Color Temp: Cold
VGA Color Temp: User
select VGA Auto Adjust
restore the VGA settings to the default value
select the VGA Color temp user-R, 00--99%
(0<= xx <100)
select the VGA Color temp user-G, 00--99%
(0<= xx <100)
select the VGA Color temp user-B, 00--99%
(0<= xx <100)
select the VGA H-Position, 00--99% (0<= xx <100)
select the VGA V-Position, 00--99% (0<=xx <100)
select the VGA Clock, 00--99% (0<= xx <100)
select the VGA Phase, 00--99% (0<= xx <100)
select the VGA brightness, 00--99% (0<=xx <100)
select the VGA contrast, 00--99% (0<= xx <100)
HDMI Picture Mode: Standard
HDMI Picture Mode: Dynamic
HDMI Picture Mode: Soft
HDMI Picture Mode: Personal
HDMI Color Temp: Normal
HDMI Color Temp: Warm
HDMI Color Temp: Cold
restore the HDMI settings to the default value
select the HDMI brightness, 00--99% (0<= xx <100)
select the HDMI contrast, 00--99% (0<= xx <100)
select the HDMI saturation, 00--99% (0<= xx <100)
select the HDMI sharpness, 00--20 (0<= xx <=20)
select the HDMI hue, 00--99% (0<= xx <100)
select LCD light time. (0<= xx <=60)
Read EDID from HDMI sink device.
read present state
read present Firmware Version
Reset to factory value
www.comm-tec.de
12 of 21
User Manual
COMM-TEC
UP-1080p
6 CV Settings
•
•
•
•
Press the CV button longer than one second to enter the picture adjustment menu
With a short button press you can toggle between
brightness - contrast - saturation - sharpness - hue - restore CVBS default values
change the value with the parameter + or – button
press the Enter button to save the changes to the system
7 COMP Settings
•
•
•
•
Press the COMP button longer than one second to enter the picture adjustment menu
With a short button press you can toggle between
brightness - contrast - saturation - sharpness - hue - restore COMP default values
change the value with the parameter + or – button
press the Enter button to save the changes to the system
8 Y/C Settings
•
•
•
•
Press the Y/C button longer than one second to enter the picture adjustment menu
With a short button press you can toggle between
brightness - contrast - saturation - sharpness - hue - restore Y/C default values
change the value with the parameter + or – button
press the Enter button to save the changes to the system
9 VGA Settings
•
•
•
•
Press the VGA button longer than one second to enter the picture adjustment menu
With a short button press you can toggle between
brightness - contrast - restore VGA default values
change the value with the parameter + or – button
press the Enter button to save the changes to the system
10 HDMI Settings
•
•
•
•
Press the HDMI button longer than one second to enter the picture adjustment menu
With a short button press you can toggle between
brightness - contrast - saturation - sharpness - hue - restore HDMI default values
change the value with the parameter + or – button
press the Enter button to save the changes to the system
COMM-TEC GMBH
www.comm-tec.de
13 of 21
User Manual
COMM-TEC
UP-1080p
11 Menu Settings
11.1 VGA Channel Menu
First select a VGA input and than press the “MENU” button on the remote control to enter the main menu.
The menu options include: PICTURE, SOUND, ADVANCE, OSD, GEOMETRY.
In the menu interface, press the function key "-","+" to select the appropriate menu option, and then the
"ENTER" key to enter the appropriate menu option.
The option can be adjusted by "-","+" key.
Press "MENU" to return or to exit the menu setting.
PICTURE Menu settings:
•
•
•
•
•
•
•
PICTURE MODE: choose display mode, including STANDARD, Dynamic, Soft and Personal
CONTRAST: Contrast Adjustment
BRIGHTNESS: Brightness adjustment
COLOR TEMP: color temperature mode selection, including Normal, Warm, Cold, User
USER-R: when the COLOR TEMP is under User mode, R value can be set
USER-G: when the COLOR TEMP is under User mode, G value can be set
USER-B: when the COLOR TEMP is under User mode, B value can be set
COMM-TEC GMBH
www.comm-tec.de
14 of 21
User Manual
COMM-TEC
UP-1080p
SOUND Menu settings:
•
•
•
•
•
SOUND MODE: select sound modes, including Standard, News, Music, Personal
BASS: BASS adjustment
TREBLE: TREBLE adjustment
BALANCE: BALANCE adjustment
AVC: AVC ON/OFF
ADVANCE Menu settings:
•
•
RESOLUTION: Display resolution selection
SCALE: display scale mode selections, including FULL, Normal, Auto
COMM-TEC GMBH
www.comm-tec.de
15 of 21
User Manual
COMM-TEC
UP-1080p
OSD Menu settings:
•
•
•
•
OSD H-POSITION: OSD horizontal position adjust
OSD V-POSITION: OSD vertical position adjust
OSD HALFTONE: OSD Opacity adjustment
OSD DURATION: OSD display duration time adjustment
GEOMETRY Menu settings:
•
•
•
•
•
H-POS: display horizontal position manual adjust
V-POS: display vertical position manual adjust
CLOCK: clock manual adjust
PHASE: phase manual adjust
AUTO ADJUST: display automatic adjust
COMM-TEC GMBH
www.comm-tec.de
16 of 21
User Manual
COMM-TEC
UP-1080p
11.2 HDMI, Video, S-Video, Component Channel Menu
First select a HDMI, Video, S-Video or a Component input and than press the “MENU” button on the
remote control to enter the main menu.
The menu options include: PICTURE, SOUND, ADVANCE, OSD
In the menu interface, press the function key "-","+" to select the appropriate menu option, and then the
"ENTER" key to enter the appropriate menu option.
The option can be adjusted by "-","+" key.
Press "MENU" to return or to exit the menu setting.
Picture Menu settings:
•
•
•
•
•
•
•
PICTURE MODE: Including STANDARD, Dynamic, Soft, Personal option
CONTRAST: Contrast adjustment
BRIGHTNESS: Brightness adjustment
HUE: Hue adjustment
SATURATION: saturation adjustment
SHARPNESS: acutance adjustment
COLOR TEMP: Color temperature mode selector, including Normal, Warm, Cold, User
COMM-TEC GMBH
www.comm-tec.de
17 of 21
User Manual
COMM-TEC
UP-1080p
SOUND Menu function settings:
•
•
•
•
•
SOUND MODE: select sound modes, including Standard, News, Music, Personal
BASS: BASS adjustment
TREBLE: TREBLE adjustment
BALANCE: BALANCE adjustment
AVC: AVC ON/OFF
ADVANCE Menu function settings:
•
•
•
RESOLUTION: resolution selection
NOISE REDUCE: noise reduction selection, including Off, Low, Mid, High, Auto
SCALE: display scale modes selection, including FULL, Normal, Auto
COMM-TEC GMBH
www.comm-tec.de
18 of 21
User Manual
COMM-TEC
UP-1080p
OSD Menu function settings:
•
•
•
•
OSD H-POSITION: OSD horizontal position adjust
OSD V-POSITION: OSD vertical position adjust
OSD HALFTONE: OSD Opacity adjustment
OSD DURATION: OSD display duration time adjustment
COMM-TEC GMBH
www.comm-tec.de
19 of 21
User Manual
COMM-TEC
UP-1080p
12 Technical specifications
Video Inputs
2 x Composite
2 x S-Video
2 x Component
2 x VGA
4 x HDMI
Audio Input
8 x Audio Stereo
1 x Microphone
Video Output
1 x VGA
1 x HDMI
Audio Output
1 x digital Audio
1 x analog Audio
Connector: Cinch
Video standard: PAL, SECAM, NTSC 3.58, NTSC 4.43
Connector: 4pin MiniDIN
Video standard: PAL, SECAM, NTSC 3.58, NTSC 4.43
Connector: 3 x Cinch
Type: (YPbPr/YCbCr)
Resolution: up to 1080i
Connector: D-Sub HD 15 pin (female)
Sync input: Separate, Composite, Sync-on-green
Resolution: up to 1600x1200
Horizontal scan range: 30 - 81 kHz
Vertical scan range: 56 – 75 Hz
Bandwidth: 170 MHz
Connector: HDMI-A
Support protocol: HDMI 1.3a, DVI 1.0, HDCP 1.3, x. v. Color, True HD, DTS-HD
Pixel bandwidth: 165 MHz
Bandwidth:2.25 Gbps
Resolution: up to 1600x1200@60_24bit Color depth / HDTV
1920x1080p@60_24bit Color depth
Input EDID: Use the system default EDID, EDID support for the terminal is mapped
to the input
Maximum input cable lenght: Less than 25 meter, 1920x1080p @ 60Hz
Recommend to use a HDMI certified cable
Connector: 4 x Phoenix 10pin connector balanced audio input
Bandwidth: 20 Hz ~ 20 kHz
Impedance: Input: >10 kΩ (Balance/ Unbalanced)
Max input level:+19.5 dBu, (Balance/ Unbalance)
Input mapped by default to the analog video inputs
Connector :6,3 mm jack
MIC Type: Dynamic Sensor
Input Sensitivity: 25 mV
Bandwidth: 50 Hz ~ 16 KHz
Connector: D-Sub HD 15 pin (female)
Signal type: RGBHV
Connector: HDMI-A
Resolution:
800×600
@60Hz,
1024×768@60Hz,
1280×720@60Hz,
1280×800@60Hz, 1280×1024@60Hz, 1366×768@60Hz, 1440×900@60Hz,
1440×1050@60Hz, 1600×900@60Hz, 1600×1200@60Hz, 1680×1050@60Hz,
1920×1080@60Hz
Audio: Audio output on HDMI can be switched off
Maximum output cable length: Less than 10 meter, 1920x1080p @ 60Hz
Recommend to use a HDMI certified cable
On HDMI output, Audio can be switched off
Connector:2 x RCA
Impedance: 50 Ω
Max output level:+19.5dBu
COMM-TEC GMBH
www.comm-tec.de
20 of 21
User Manual
COMM-TEC
UP-1080p
Functions
All inputs will be scaled to the defined output resolution
Parallel video output by HDMI and VGA
Parallel audio output by HDMI and analog stereo
Volume control of the Microphone
Master volume
Switching: Audio follows Video and Break away
Control
RS-232
Front panel
IR Remote
Connector: RS-232, D-Sub 9-pin
Input selection, Output resolution selection, Volume control
Input selection, Output resolution selection, Volume control, Aspect ratio control,
Menu
Other
Power: 100 – 240 VAC, 50/60 Hz
Temperature: -20 to +70° C
Humidity: 10% - 90%
Dimension: 483 x 230 x 44 mm (L x W x H), 19” / 1 RU
Product weight: 1.9 kg
Mean time between failure: 30,000 hour
Guarantee:1 year warranty
13 Troubleshooting
•
•
•
•
•
•
•
•
•
•
When the peripheral equipment connected to UP-1080p displays ghost image, eg. the projected
ghost image, the reason might be that the projector has not been correctly adjusted or the cable’s
quality does not meet the requirements. The user can re-adjust the projector’s settings and replace
the cables.
When there is color loss or no video signal output, the reason might be that the VGA cable has not
been correctly connected or there is open circuit (short circuit) on the cable.
When the remote controller cannot control the UP-1080p:
• Change the battery
• The remote controller is broken, please repair the remote controller
When the serial ports (generally refer to the PC’s serial ports) cannot control the UP-1080p, please
check if the communication port set by the control program is correspond to the equipment’s serial
port, and if the PC’s communication port is in proper status or if the protocol is right.
UP-1080p returns code but no video signal output:
Please check if there is a signal input (oscillograph or multimeter can be used for the inspection).
If there is no signal input, it might because that the input cable is loose or broken. Please fix the cable
or replace it.
When the POWER indicator is off, no display on the LCD screen and no response to the operation,
please check the power supply to the equipment.
When the output image is interfered, the reason might be that the I/O equipment has not been well
grounded.
When plug or unplug the AV connectors, if the user feels obvious static electric, it might because that
the equipment has not been well grounded. The user should ground the equipment properly, or the
equipment might be damaged, and its useful life can be shortened.
When LCD displays normally and there is return code, but no video or audio output:
• The AV connectors might be loose, please check and replace
• Maybe there is short circuit, please check and replace
• Maybe there is open circuit, please check and replace
When the front panel, serial ports and remote controller cannot control the UP-1080p, the reason
might be that the equipment inside is broken, please send the equipment to COMM-TEC for repair.
COMM-TEC GMBH
www.comm-tec.de
21 of 21