1
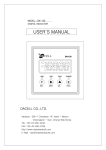
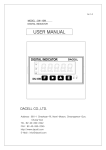
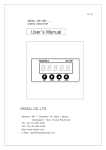
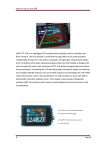
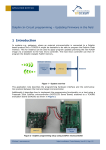
MODEL : DN-9000
OVER LOAD LIMITER
User Manual
DACELL CO., LTD.
ADDRESS : 681-1, Cheoksan-Ri, Namyi-Myeon,
Cheongwon-Gun, Choongbuk
TEL : 043-260-2242
FAX : 043-260-2245
http://www.dacell.com
E-Mail : [email protected]
Contents
1. Characteristics ⋅⋅⋅⋅⋅⋅⋅⋅⋅⋅⋅⋅⋅⋅⋅⋅⋅⋅⋅⋅⋅⋅⋅⋅⋅⋅⋅⋅⋅⋅⋅⋅⋅⋅⋅⋅⋅⋅⋅⋅⋅⋅⋅⋅⋅⋅⋅⋅⋅⋅⋅⋅⋅⋅⋅⋅⋅⋅⋅⋅⋅⋅⋅⋅⋅⋅⋅⋅⋅⋅⋅⋅⋅⋅⋅⋅⋅⋅⋅⋅⋅⋅⋅⋅⋅⋅⋅⋅⋅⋅⋅⋅⋅⋅⋅⋅⋅⋅⋅⋅⋅⋅⋅⋅⋅⋅⋅⋅⋅⋅⋅⋅⋅⋅⋅⋅⋅ 2
1-1. Mid-High Speed Changing Method ⋅⋅⋅⋅⋅⋅⋅⋅⋅⋅⋅⋅⋅⋅⋅⋅⋅⋅⋅⋅⋅⋅⋅⋅⋅⋅⋅⋅⋅⋅⋅⋅⋅⋅⋅⋅⋅⋅⋅⋅⋅⋅⋅⋅⋅⋅⋅⋅⋅⋅⋅⋅⋅⋅⋅⋅⋅⋅⋅⋅⋅⋅⋅⋅⋅⋅⋅⋅⋅⋅⋅⋅⋅⋅⋅⋅⋅⋅⋅ 2
1-2. Correction Method ⋅⋅⋅⋅⋅⋅⋅⋅⋅⋅⋅⋅⋅⋅⋅⋅⋅⋅⋅⋅⋅⋅⋅⋅⋅⋅⋅⋅⋅⋅⋅⋅⋅⋅⋅⋅⋅⋅⋅⋅⋅⋅⋅⋅⋅⋅⋅⋅⋅⋅⋅⋅⋅⋅⋅⋅⋅⋅⋅⋅⋅⋅⋅⋅⋅⋅⋅⋅⋅⋅⋅⋅⋅⋅⋅⋅⋅⋅⋅⋅⋅⋅⋅⋅ 2
1-3. Output ⋅⋅⋅⋅⋅⋅⋅⋅⋅⋅⋅⋅⋅⋅⋅⋅⋅⋅⋅⋅⋅⋅⋅⋅⋅⋅⋅⋅⋅⋅⋅⋅⋅⋅⋅⋅⋅⋅⋅⋅⋅⋅⋅⋅⋅⋅⋅⋅⋅⋅⋅⋅⋅⋅⋅⋅⋅⋅⋅⋅⋅⋅⋅⋅⋅⋅⋅⋅⋅⋅⋅⋅⋅⋅⋅⋅⋅⋅⋅⋅⋅⋅⋅⋅⋅⋅⋅⋅⋅⋅⋅⋅⋅⋅⋅⋅⋅⋅⋅⋅⋅ 2
1-4. Data Back-up ⋅⋅⋅⋅⋅⋅⋅⋅⋅⋅⋅⋅⋅⋅⋅⋅⋅⋅⋅⋅⋅⋅⋅⋅⋅⋅⋅⋅⋅⋅⋅⋅⋅⋅⋅⋅⋅⋅⋅⋅⋅⋅⋅⋅⋅⋅⋅⋅⋅⋅⋅⋅⋅⋅⋅⋅⋅⋅⋅⋅⋅⋅⋅⋅⋅⋅⋅⋅⋅⋅⋅⋅⋅⋅⋅⋅⋅⋅⋅⋅⋅⋅⋅⋅⋅⋅⋅⋅⋅⋅⋅ 2
1-5. Watch dog
⋅⋅⋅⋅⋅⋅⋅⋅⋅⋅⋅⋅⋅⋅⋅⋅⋅⋅⋅⋅⋅⋅⋅⋅⋅⋅⋅⋅⋅⋅⋅⋅⋅⋅⋅⋅⋅⋅⋅⋅⋅⋅⋅⋅⋅⋅⋅⋅⋅⋅⋅⋅⋅⋅⋅⋅⋅⋅⋅⋅⋅⋅⋅⋅⋅⋅⋅⋅⋅⋅⋅⋅⋅⋅⋅⋅⋅⋅⋅⋅⋅⋅⋅⋅⋅⋅⋅⋅⋅⋅⋅⋅⋅⋅⋅⋅⋅⋅⋅⋅⋅⋅⋅⋅ 2
1-6. Option ⋅⋅⋅⋅⋅⋅⋅⋅⋅⋅⋅⋅⋅⋅⋅⋅⋅⋅⋅⋅⋅⋅⋅⋅⋅⋅⋅⋅⋅⋅⋅⋅⋅⋅⋅⋅⋅⋅⋅⋅⋅⋅⋅⋅⋅⋅⋅⋅⋅⋅⋅⋅⋅⋅⋅⋅⋅⋅⋅⋅⋅⋅⋅⋅⋅⋅⋅⋅⋅⋅⋅⋅⋅⋅⋅⋅⋅⋅⋅⋅⋅⋅⋅⋅⋅⋅⋅⋅⋅⋅⋅⋅⋅⋅⋅⋅⋅ 2
1-7. Detection function for LOAD CELL LINE ERROR⋅⋅⋅⋅⋅⋅⋅⋅⋅⋅⋅⋅⋅⋅⋅⋅⋅⋅⋅⋅⋅⋅⋅⋅⋅⋅⋅⋅⋅⋅⋅⋅⋅⋅⋅⋅⋅⋅⋅⋅⋅⋅⋅⋅⋅⋅⋅⋅⋅⋅⋅⋅⋅⋅⋅⋅⋅⋅⋅ 2
1-8. Power ⋅⋅⋅⋅⋅⋅⋅⋅⋅⋅⋅⋅⋅⋅⋅⋅⋅⋅⋅⋅⋅⋅⋅⋅⋅⋅⋅⋅⋅⋅⋅⋅⋅⋅⋅⋅⋅⋅⋅⋅⋅⋅⋅⋅⋅⋅⋅⋅⋅⋅⋅⋅⋅⋅⋅⋅⋅⋅⋅⋅⋅⋅⋅⋅⋅⋅⋅⋅⋅⋅⋅⋅⋅⋅⋅⋅⋅⋅⋅⋅⋅⋅⋅⋅⋅⋅⋅⋅⋅⋅⋅⋅⋅⋅⋅⋅⋅ 2
2. Specification ⋅⋅⋅⋅⋅⋅⋅⋅⋅⋅⋅⋅⋅⋅⋅⋅⋅⋅⋅⋅⋅⋅⋅⋅⋅⋅⋅⋅⋅⋅⋅⋅⋅⋅⋅⋅⋅⋅⋅⋅⋅⋅⋅⋅⋅⋅⋅⋅⋅⋅⋅⋅⋅⋅⋅⋅⋅⋅⋅⋅⋅⋅⋅⋅⋅⋅⋅⋅⋅⋅⋅⋅⋅⋅⋅⋅⋅⋅⋅⋅⋅⋅⋅⋅⋅⋅⋅⋅⋅⋅⋅⋅⋅⋅⋅⋅⋅⋅⋅⋅⋅⋅⋅⋅⋅⋅⋅⋅⋅⋅⋅⋅⋅⋅⋅⋅⋅⋅⋅ 3
3. Front Face Panel ⋅⋅⋅⋅⋅⋅⋅⋅⋅⋅⋅⋅⋅⋅⋅⋅⋅⋅⋅⋅⋅⋅⋅⋅⋅⋅⋅⋅⋅⋅⋅⋅⋅⋅⋅⋅⋅⋅⋅⋅⋅⋅⋅⋅⋅⋅⋅⋅⋅⋅⋅⋅⋅⋅⋅⋅⋅⋅⋅⋅⋅⋅⋅⋅⋅⋅⋅⋅⋅⋅⋅⋅⋅⋅⋅⋅⋅⋅⋅⋅⋅⋅⋅⋅⋅⋅⋅⋅⋅⋅⋅⋅⋅⋅⋅⋅⋅⋅⋅⋅⋅⋅⋅⋅⋅⋅⋅⋅⋅ 4
4. Terminal Board⋅⋅⋅⋅⋅⋅⋅⋅⋅⋅⋅⋅⋅⋅⋅⋅⋅⋅⋅⋅⋅⋅⋅⋅⋅⋅⋅⋅⋅⋅⋅⋅⋅⋅⋅⋅⋅⋅⋅⋅⋅⋅⋅⋅⋅⋅⋅⋅⋅⋅⋅⋅⋅⋅⋅⋅⋅⋅⋅⋅⋅⋅⋅⋅⋅⋅⋅⋅⋅⋅⋅⋅⋅⋅⋅⋅⋅⋅⋅⋅⋅⋅⋅⋅⋅⋅⋅⋅⋅⋅⋅⋅⋅ 5
5. Cabling Draw⋅⋅⋅⋅⋅⋅⋅⋅⋅⋅⋅⋅⋅⋅⋅⋅⋅⋅⋅⋅⋅⋅⋅⋅⋅⋅⋅⋅⋅⋅⋅⋅⋅⋅⋅⋅⋅⋅⋅⋅⋅⋅⋅⋅⋅⋅⋅⋅⋅⋅⋅⋅⋅⋅⋅⋅⋅⋅⋅⋅⋅⋅⋅⋅⋅⋅⋅⋅⋅⋅⋅⋅⋅⋅⋅⋅⋅⋅⋅⋅⋅⋅⋅⋅⋅⋅⋅⋅⋅⋅⋅⋅⋅ 6
6. Setting mode ⋅⋅⋅⋅⋅⋅⋅⋅⋅⋅⋅⋅⋅⋅⋅⋅⋅⋅⋅⋅⋅⋅⋅⋅⋅⋅⋅⋅⋅⋅⋅⋅⋅⋅⋅⋅⋅⋅⋅⋅⋅⋅⋅⋅⋅⋅⋅⋅⋅⋅⋅⋅⋅⋅⋅⋅⋅⋅⋅⋅⋅⋅⋅⋅⋅⋅⋅⋅⋅⋅⋅⋅⋅⋅⋅⋅⋅⋅⋅⋅⋅⋅⋅⋅⋅⋅⋅⋅⋅⋅⋅⋅⋅⋅⋅ 7
6-1. Function mode ⋅⋅⋅⋅⋅⋅⋅⋅⋅⋅⋅⋅⋅⋅⋅⋅⋅⋅⋅⋅⋅⋅⋅⋅⋅⋅⋅⋅⋅⋅⋅⋅⋅⋅⋅⋅⋅⋅⋅⋅⋅⋅⋅⋅⋅⋅⋅⋅⋅⋅⋅⋅⋅⋅⋅⋅⋅⋅⋅⋅⋅⋅⋅⋅⋅⋅⋅⋅ 7
6-2. Actual load calibration ⋅⋅⋅⋅⋅⋅⋅⋅⋅⋅⋅⋅⋅⋅⋅⋅⋅⋅⋅⋅⋅⋅⋅⋅⋅⋅⋅⋅⋅⋅⋅⋅⋅⋅⋅⋅⋅⋅⋅⋅⋅⋅⋅⋅⋅⋅⋅⋅⋅⋅⋅ 12
7. Product Inspection ⋅⋅⋅⋅⋅⋅⋅⋅⋅⋅⋅⋅⋅⋅⋅⋅⋅⋅⋅⋅⋅⋅⋅⋅⋅⋅⋅⋅⋅⋅⋅⋅⋅⋅⋅⋅⋅⋅⋅⋅⋅⋅⋅⋅⋅⋅⋅⋅⋅⋅⋅⋅⋅⋅⋅⋅⋅⋅⋅⋅⋅⋅⋅⋅⋅⋅⋅⋅⋅⋅⋅⋅⋅⋅⋅⋅⋅⋅⋅⋅⋅⋅⋅⋅⋅⋅⋅⋅⋅⋅⋅⋅⋅⋅⋅⋅⋅⋅⋅⋅⋅⋅⋅ 13
8. OPTION (OP-02, OP-03)
Option 02 (RS232C) ⋅⋅⋅⋅⋅⋅⋅⋅⋅⋅⋅⋅⋅⋅⋅⋅⋅⋅⋅⋅⋅⋅⋅⋅⋅⋅⋅⋅⋅⋅⋅⋅⋅⋅⋅⋅⋅⋅⋅⋅⋅⋅⋅⋅⋅⋅⋅⋅⋅⋅⋅⋅⋅⋅⋅⋅⋅⋅⋅⋅⋅⋅⋅⋅⋅⋅⋅⋅⋅⋅⋅⋅⋅⋅⋅⋅⋅⋅⋅⋅⋅⋅⋅⋅⋅⋅⋅⋅⋅⋅⋅⋅⋅⋅⋅⋅⋅⋅⋅⋅⋅⋅⋅ 14
Option 03 (RS485) ⋅⋅⋅⋅⋅⋅⋅⋅⋅⋅⋅⋅⋅⋅⋅⋅⋅⋅⋅⋅⋅⋅⋅⋅⋅⋅⋅⋅⋅⋅⋅⋅⋅⋅⋅⋅⋅⋅⋅⋅⋅⋅⋅⋅⋅⋅⋅⋅⋅⋅⋅⋅⋅⋅⋅⋅⋅⋅⋅⋅⋅⋅⋅⋅⋅⋅⋅⋅⋅⋅⋅⋅⋅⋅⋅⋅⋅⋅⋅⋅⋅⋅⋅⋅⋅⋅⋅⋅⋅⋅⋅⋅⋅⋅⋅⋅⋅⋅⋅⋅⋅⋅⋅ 16
1
1. Characteristics
Thank you for choosing our product. Please refer to the User Manual or contact us
when you have any problem while you are using our product.
1-1. Mid-High Speed Changing Method
24bit high speed A/D changing equipment which could detect input signal of sensor at
the speed of 1,000 times per second is being used.
1-2. Correction Method
Correction method as actual load (Standard load) has applied.
1-3. Output
The value of alarm & stop relay could be settled from the Key under over load, and the
signal of contact point shall be output.
1-4. Data Back-up
Input data shall not be restored due to power failure, because all the setting values
shall be stored on flash memory.
1-5. Watch dog
This is automatic reset function when the system has stopped by external causes such
as noise and etc.
1-6. Option
As addition options, RS232C, RS485 and Analog output could be used.
1-7. Detection function for LOAD CELL LINE ERROR
Contact point of Buzzer and Relay shall be output when cable line of load cell is being
disconnected.
2
1-8. Power
The power is AC 85 ~ 265V 50/60Hz as Free voltage.
3
2. Specifications
•
•
•
•
Usable Sensor
: Strain gauge type sensor (Bridge 120Ω, 350Ω, 700Ω)
Max. Indication
: -19999 ~ +99999
A/D Changer
: 24bit, 1000 times/sec
Temperature Characteristic (Amp Characteristic)
Zero
: 0.5μV/℃
Span
: 50ppm/℃
• Front Face Panel
Measuring Value Indication
: 7 segment 5 Digit, Height of Letter 14mm
Status Indicating LED
: Red LED 5 EA
Key Switch
: 4 EA
• Output
Comparison Output
•
•
•
•
: Output from RELAY1, RELAY2 and RELAY3
Contact Point Capacity AC 250V 5A
Range of Using Temperature
: -10℃~ 60, Under 82% RH (No freezing)
Exterior Dimensions
: 197 × 220 × 80 mm (W × H × D)
Power
: AC 85 ~ 265V, 50/60㎐ free voltage
Option
: RS232C (OP-01), RS485 (OP-02), 4~20mA or 0~10V (OP-03)
4
3. Front Face Panel
①
②
③
④
⑤
⑥
⑦
POWER
: Power Indicating Lamp
SET1
: RELAY1 Operation
SET2
: RELAY2 Operation
SET3
: RELAY3 Operation
TXD
: Communication Status Lamp
Measuring Value Indication: It indicates measuring value and other values.
ZERO KEY
Measuring Mode: If you push the Key for over 3 seconds, the current value shall be
changed as Zero.
Set Mode: If you push the Key on the function setting mode, the measuring mode shall
be recovered.
⑧ ▶
Measuring Mode: If you push the Key, the setting value of Relay is being shown and
could be changed.
Set Mode: The line as location for flash figures shall be moved.
⑨ ▲
Measuring Mode: If you push the Key, the mode for actual load correction shall be
operated.
Set Mode: The flash figure shall be increased by 1 figure (number).
⑩ ENT
Measuring Mode: If you push the Key, the function mode shall be operated.
Set Mode: The setting value shall be saved.
5
4. Terminal Board
Please make sure of the location of terminal and its purpose, and then while you
push the button on the terminal board, you could connect by putting the cable into the
bottom hole. Please confirm the solid connection by pulling it out softly.
(In this case, the cable size of Φ 0.5~1 shall be reasonable, and please take lead
welding or use one terminal for connecting cables in particular for several cable lines.)
① AC IN
②
: Power Cable Connection Terminal
: Earth Terminal (Please contact earth separately)
③ COM
: RELAY output common terminal
④ RY1
: RELAY1 output terminal
⑤ RY2
: RELAY2 output terminal
⑥ RY3
: RELAY3 output terminal
⑦ DG : ZERO GND terminal
⑧ ZERO
: ZERO input terminal
⑨ ~⑪ DG, TXD, RXD : RS232C SERIAL INTERFACE (RS485 : TXD → TX+, RXD → TX-).
⑫ AG
: Analog output GND terminal
⑬ OUT
: Analog output terminal (OP-03)
⑭ EXC+
: Sensor supply voltage + connection terminal
⑮ EXC: Sensor supply voltage – connection terminal
16 SIG+
○
: Sensor output signal + connection terminal
17 SIG○
: Sensor output signal – connection terminal
18 SH
○
: SHIELD of Sensor connection terminal
6
◀ Notice▶
1. Please plug the power out during the cabling.
2. The earth ( terminal) shall be made by big size of cable to protect shock voltage
or obstacle against surge, and the earth shall be made separately if possible.
(It shall be used in the place of high level of noise, and if the earth is being made with
other machine, the noise will be affected.)
3. Please confirm the function of terminal and connect cables to protect failure of
operation in advance.
4. In the event of accident which has made by intentionally disjoint and modification
without consent of the Company, the responsibility shall be borne by the User and
A/S shall not be made.
5. Cabling Draw
<Cabling Draw>
7
6. Setting Modes
6-1. Function mode (Function Setting)
1) Function setting method
Measuring Mode Status
Push the ENT key
ENT
ENT
ENT
ENT
ENT
ZERO
END
ENT
ENT
ENT
ENT
ENT
ENT
ENT
ENT
ENT
ENT
8
2) RELAY Output Value Setting Method
Measuring Mode Status
Push the key
ENT
Setting
ENT
ZERO
Value
END
ENT
ENT
→ SET1 (RELAY1) Setting Value
→ SET2 (RELAY2) Setting Value
→ SET3 (RELAY3) Setting Value
9
# Function mode list #
Name
Function
Standard Setting
Setting
Value at Ex Work
F-01 Division
1, 2, 5, 10, 20, 50
1
F-02 Display filter
5, 10, 20, 30, 40
5
F-03 Buzzer setting
0, 1, 2, 3
0
F-04 Relay mode setting
A Contact Point, B Contact Point
F-05 Relay Delay time
0 ~ 9.9 sec
F-06 DAC capacity
-19999 ~ +99999 (option)
F-07 ID Number
0 ~ 32
F-08 Baud rate
2400, 4800, 9600
9600
F-09 Pass word
0 ~ 9999
0000
000
0
10000
0
F-01. Division (Setting of Indication as Minimum Unit)
(Standard Setting Value: 1)
Display data
Setting
1
Indicates as1 unit
(0, 1, 2, 3, 4 …….)
2
Indicates as 2 unit
(0, 2, 4, 6, 8 …….)
5
Indicates as 5 unit
(0, 5, 10, 15 …….)
10
Indicates as 10 unit
(0, 10, 20, 30 …….)
20
Indicates as 20 unit
(0, 20, 40, 60 …….)
50
Indicates as 50 unit
(0, 50, 100, 150 …….)
F-02. Display filter (표시 속도 설정)
(Standard Setting Value: 5)
Display data
Setting
5
Speedy
10
20
30
Slow
40
10
F-03. Buzzer setting mode
(Standard Setting Value: 0)
Display data
Setting
0
Not being interlocked with Relay
1
Being interlocked with Relay1
2
Being interlocked with Relay2
3
Being interlocked with Relay3
F-04. Relay mode setting mode
(Standard Setting Value: 000)
Display data
Setting
000
Relay 1~3
A Contact point operation (N.O)
001
Relay 3
A Contact point operation (N.O) Relay1,Relay2
B Contact point operation (N.C)
010
Relay 2
A Contact point operation (N.O) Relay1,Relay3
B Contact point operation (N.C)
100
Relay 1
A Contact point operation (N.O) Relay2,Relay3
B Contact point operation (N.C)
F-05. Relay Delay time mode
(Standard Setting Value: 00)
Display data
00
~
9.9
Setting
00
: N/A
0.1 ~ 9.9
: Unit as sec for setting of delayed time of output
operation (0.1 sec ~9.9 sec)
F-06. DAC capacity (Analog Output value Setting) (option)
(Standard Setting Value: 10000)
Display data
-19999
Setting
Setting of rating capacity for analog output
<Cases of Setting Value and Output>
~
+99999
Setting
Value
+10000
-10000
Voltage Output (±10V)
Current Output (4 ~20mA)
Indicating
Value
Output
Indicating
Value
Output
-10000
-10V
-10000
-
0
0V
0
4mA
+10000
+10V
+10000
20mA
-10000
+10V
-10000
20mA
0
0V
0
4mA
+10000
-10V
+10000
-
1
11
F-07. ID Number (Number Setting for Communication Equipment)
(Standard Setting Value: 00)
Display data
00
~
32
Setting
00
: No setting of equipment number (Stream mode : always
data transmission)
01 ~32
: Setting of equipment number (Command mode : Data
transmission by command)
F-8. Baud rate & Print (Communication speed and setting of print output)
(Standard Setting Value: 9600)
Display data
Setting
Stream mode
Command mode
2400
2400 bps
O
O
4800
4800 bps
O
O
9600
9600 bps
O
O
F-9. Pass word setting
(Standard Setting Value: 0000)
Display data
0000
~
9999
Setting
0000
: No use pass word function.
0001 ~9999
: Use pass word function
※ If you set the pass word function, you should input pass word to get into the
Relay setting, Actual load correction and Function mode.
But, Zero function may be used.
12
6-2. Actual load calibration
Measuring mode status
Push the key
Point mark (0)
(0.0)
(0.00)
(0.000)
ENT
ENT
Indicating Zero
Push the ENT key without load on the sensor
ENT
Indicating after 2 seconds
Indicating the status of actual load calibration
ENT
Key &
key shall be used for input of actual output value,
and then push the ENT key.
ENT
After input actual load on the sensor, push the ENT key.
ENT
Indicating after 2 seconds
Indicating current load value
13
7. Product Inspection
Defects
Trembling of
Display
When the weight
is being
increased or is
not being
returned to
Zero.
Causes
Corrections
• Load cell Broken
• Load cell insulation
resistance
• Interference
• Load cell input,
output
• Check resistance
• Check load cell
insulation resistance
• Defects of load cell
• Check loadcell
insulation resistance
Note
• Insulation
resistance
(Cable & Case,
Over 1000
Mohm)
• Check cable
connection between
loadcell and the body
• Contact failure of
load cell
• Check disconnection
of load cell cable
The weight has
changed to (-)
• Wrong cable
connection of load
cell
• Check connection of • Output: (+SIG)
load cell output cable
(-SIG)
Indicated as
“OVER” or
“UNDER”
• Load cell damaged
• Unstable connection
of load cell
• Check status of load
cell and cable
connection
14
8. OPTION
#Option-02 (RS232C)
RS232C Interface shall be arranged as separated cabling from AC Power and electric
cablings, because it is sensitive against electric noise. The cable shall be used as
Shield Cable.
1.
2.
3.
4.
5.
6.
7.
Indicator
Host PC
TX(Transmission Data)
RXD(Receiving Data), Pin No.2
RX(Receiving Data)
TXD(Transmission Data), Pin No.3
GN(Ground)
GND(Ground), Pin No.5
TYPE
Method
Baud-rate
Parity
Data bit
Stop bit
Stream mode
: EIA-232C
: Half duplex, Asynchronous type
: Selection of 2400, 4800, 9600bps
: No Parity
: 8 bit
: 1bit
(Ex. Data +1234.5 Transmission)
CODE
BYTE1
BYTE2
BYTE3
BYTE4
BYTE5
BYTE6
BYTE7
BYTE8
ASCII
S
T
,
N
T
,
+
0
HEX
53H
54H
2CH
4EH
54H
2CH
2BH
30H
CODE
BYTE9
ASCII
1
2
3
4
.
5
CR
LF
HEX
31H
32H
33H
34H
2EH
35H
0DH
0AH
BYTE10 BYTE11 BYTE12 BYTE13 BYTE14 BYTE15 BYTE16
1) BYTE1, BYTE2
. DATA Stable
:ST
. DATA Unstable: U S
. DATA OVERFLOW: O L
. DATA UNDERFLOW: U L
2) BYTE3 ~ BYTE6 : Fixed Letter (, N T ,)
15
3) BYTE7 ~ BYTE14
: DATA 8 BYTE(+/- included)
4) BYTE15
: CARRIAGE RETURN
5) BYTE16
: LINE FEED
8. Command mode
OP-03 : Refer to RS485
16
#Option-03 (RS485)
RS485 Interface shall be arranged as separated cabling from AC Power and electric
cablings, because it is sensitive against electric noise. The cable shall be used as
Shield Cable.
1. TYPE
: RS485
2. Method
: Half duplex, Asynchronous type
3. Baud-rate
: Selection of 2400, 4800, 9600bps
4. Parity
: No Parity
5. Data bit
: 8 bit
6. Stop bit
: 1bit
Please set the number of equipment referring to INDICATOR Manual.
(Possible to set for 1 ~ 32 channel)
7. Command Type (PC -> INDICATOR)
CODE
BYTE1
BYTE2
BYTE3
BYTE4
BYTE5
ASCII
I
D
0
1
P
HEX
49H
44H
30H
31H
50H
1) BYTE1, BYTE2
2) BYTE3, BYTE4
3) BYTE5
: Fixed Letter (ID)
: Equipment Number (1 ~ 32)
: Order command (P, Z)
8. Command Table
Command
Command Descriptions
ASCII
HEX
P
50H
Transmission of current value of
commanded equipment
Z
5AH
Operate the current value of commanded
equipment as ZERO
17
9. Transmission DATA Type (INDICATOR -> PC)
CODE
BYTE1
BYTE2
BYTE3
BYTE4
BYTE5
BYTE6
BYTE7
BYTE8
ASCII
I
D
0
0
1
,
+
0
HEX
53H
54H
30H
30H
31H
2CH
2BH
30H
CODE
BYTE9 BYTE10 BYTE11 BYTE12 BYTE13 BYTE14 BYTE15 BYTE16
ASCII
1
2
3
4
.
5
CR
LF
HEX
31H
32H
33H
34H
2EH
35H
0DH
0AH
1) BYTE1, BYTE2
2) BYTE3 ~ BYTE5
: Fixed Letter (ID)
: Equipment Number (1 ~ 32)
3)
4)
5)
6)
:
:
:
:
BYTE6
BYTE7~BYTE14
BYTE15
BYTE16
Fixed Letter (,)
DATA 8byte (+/- included)
CARRIAGE RETURN
LINE FEED
18