1
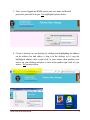
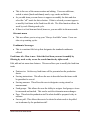
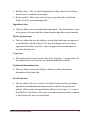
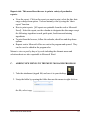
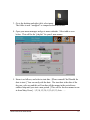
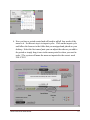
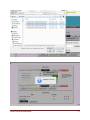
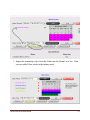
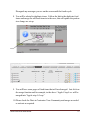
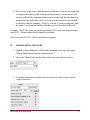
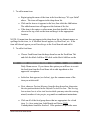
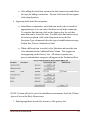
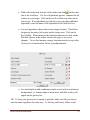
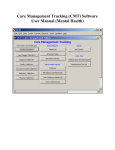
MENU MANAGER HANDBOOK Wayne Toczek, CEO Innovations Services 102 Parson Street Norwalk, Ohio 44857 419-541-7288 http://www.innovaservices.info/ MENU MANAGER HANDBOOK 3/31/2013 1 TABLE OF CONTENTS A. INSTALLING YOUR MENU MANAGER SOFTWARE ............................ 3 B. QUICK START: MENU MANAGER ............................................................. 5 C. ADDING NEW MENUS TO THE MENU MANAGER PROGRAM ........ 10 D. MAKING MENU CHANGES ......................................................................... 16 E. RECOMMENDED FOR YOUR HEALTH ................................................... 22 MENU MANAGER HANDBOOK 2 Menu Manager A. INSTALLING YOUR MENU MANAGER SOFTWARE Information needed to set up account and for any users Name :First and Last E-mail: complete e-mail address All users will have default password as :password Send information to: [email protected] 1. Log into: www.innovaservices.info 2. Click on “click here” next to RMM Login. See highlighted picture below. MENU MANAGER HANDBOOK 3 3. Once you are logged into RMM, put in your user name and default password: password to log in. See highlighted picture below. 4. Create a shortcut on your desktop by clicking and highlighting the address on the address bar and either a.) drag it to the desktop or b.) copy the highlighted address with a right click of your mouse, then position your mouse on your desktop and paste it there with another right click of your mouse. See pictures below. MENU MANAGER HANDBOOK 4 After this process is complete, you will be able to access the program directly from your desktop. If you are at a diffeerent computer, simply log into the website for InnovationsServices: www.innovaservices.info and login as you did above. The complete User Manual and Diet Manual are available on the computer as well as an assortment of customer satifaction surveys in PDF form. NOTE: Remember the Master Cook Program is needed to access the cook book and create, scale or edit recipes. B. QUICK START: MENU MANAGER Overview of program: The Menu Manager is designed to provide all the tools needed for a proper production system. Here is how it works … The program uses recipe information from the Master Cook program [consumer rated the 2nd easiest program to operate]. The recipes are exported from the program and imported into the Menu Manager. The information taken includes: Recipe name, ingredients and certain nutrition data [Calories, Fat, Protein, and Carbohydrate, trace Dietary Fiber, Cholesterol, and Sodium]. *Note this information can be edited, customized and updated as needed by using Master Cook or the Menu Manager program* Getting started: STEP ONE: Customize Your Community section: Meal names You can rename meal names if needed. Review the diets. You can add, edit and copy [use save as function]. The difference between Adding and Save As: “Adding” is for a new diet. “Save As” allows you to copy the diet over and make adjustments to diets; this is best used for creating combination diets from the basic list. MENU MANAGER HANDBOOK 5 Edit simply changes the name only. Have more than 3 meals; please see section to follow on how to set up. Diets/ Meal categories If there are diets you are not using or have in house at the present time you can make “Inactive” or if the diet will never be used under any circumstance it can be deleted. If you have more categories such as Assisted living, Independent or others or if you want to include additional information on the production report regarding production amounts, please see section to follow for how to set up. Dining locations This section allows you to set up the diet census by area such as main dining room or floor dining rooms. The production sheet will allow the production staff to see the total diets need and then how it is distributed by area. Food Groups and Carbohydrates This area is preset with daily requirements per group; this is based on the electronic diet manual on the book shelf. Nutritional information This area shows what nutritional information can be presented if selected in Report function. You can add, edit or delete the amount of information you would like to change. MENU MANAGER HANDBOOK 6 STEP TWO: How to Use: Create a menu period and then create cycles to add into the period. Menu calendar Menu period Set up a menu period; this will be the starting point of your menu. It is the range that runs your cycle within the period. The menu will run until you set up another starting point. Menu cycle Develop menu cycles and determine the days it will run. Use traditional seven days or you can set your own length. Remember the menus just need added to the beginning. They will then cycle through until either a new menu period is created or if a special menu is triggered. This program has preloaded menus and they are available for viewing in the report section under: QUICK PRINT. These can be edited and renamed and then added to your menu period. Simply decide on the weeks that you desire or that best fit your community and edit and add them to the menu period. Special menus can be added also by date amounts. Please refer to section below on how to set up and use. STEP THREE: Menu - How to use: Click on the day you want to modify and use the icons to the right to perform the editing functions. Daily menu Use the calendar or drop down box to edit the day you want to work on. The view allows you to see three days before and three days after. Simply add in food items by using the drop down box before adding in the menu. You can change portion size and measure or designate as an alternate item. [Note alternate items are not counted in the menu food groups.] MENU MANAGER HANDBOOK 7 This is the core of the menu creation and editing. Users can add items, switch or rotate [lunch and dinner] meals, copy meals and delete. As you add items you can choose to approve or modify for diets and also select the “off” mode for diet selection. If this is selected you must approve or modify food items in the Food item file tab. The filter function allows for week by week filtering each cycle. If there is a food item not listed, however, you can add it in the menu mode Alternate menu This area allows you to set up your “Always Available” menu. Users can also set up rotating cycles. Condiments/ beverages This is a onetime field set up that designates the standard condiments offered. Food items tab - How to use: Select the food item you want to modify by filtering by week or day or use the search function by alpha recall. Edit, add and set menu item features. This area allows you to modify the food item traits: Portion size: Set the way food items will be presented on the production sheets. Serving instructions: This allows the user to describe how the items could be garnished or served. Serving measure: This allows the user to designate serving utensil or measurement. Food groups: This allows the user the ability to assign a food group so it can be measured and tracked. This can be useful to determine menu changes. Prep: This alerts the production staff to what should be prepared a day in advance. Freezer pull: This allows the user to be alerted to what needs to be pulled out in advance by the production staff. MENU MANAGER HANDBOOK 8 Healthy choice: This is used to designate the healthy choice for food items that are lower in sodium, fat and sugar. Recipe needed: This creates a list of recipes you will need to print from Master Cook for your production staff. Ingredients icon: This area allows you to edit and add in ingredients. This information is used in the grocery list report and also when using the ingredient search function. Diet Exceptions icon: This area allows the user the ability to review what food items are approved or modified for each diet offered. The user can change and review menu approvals for the diets you offer. Once set approvals are marked they are saved for all future use. Copy icon: This function allows copies to be made of the food item. Copying allows all the characteristics to be copied over and then modified as needed. Nutritional information icon: This area allows the user the ability to adjust or confirm the nutrient information of the food item. Food Label icon: This area allows the user to create a food label for the food item, including ingredients and nutritional information such as calories, fat, protein and sodium. [These items are imported from Master Cook recipes.] To create a food label for a food item, click on the icon and information will be exported to Word where the user can create labels. MENU MANAGER HANDBOOK 9 Reports tab: This area allows the user to print a variety of productive reports. View the report: Click on the report you want to print, select the date, date range or drop down option. You can instantly view by using the “show report” function. How to print reports: [All reports are printable from the web or Microsoft Excel]. Select the report; use the calendar to designate the date range except the following: ingredient search, quick print, food items and missing ingredients To print from the browser, follow the calendar, check box and drop down options. Reports sent to Microsoft office are sent to the program and opened. They can be saved or edited in the program also. Menus to view or post by day or by week including the alternate menu and selection sheets are also exportable to Microsoft Word. C. ADDING NEW MENUS TO THE MENU MANAGER PROGRAM 1. Take the attachment (zipped file) and save it to your desktop. 2. Unzip the folder by opening the folder then use the mouse to right click on the file, select copy. MENU MANAGER HANDBOOK 10 3. Go to the desktop and right click, select paste. The folder is now “unzipped” or compressed and accessible. 4. Open your menu manager and go to menu calendar. Select add as seen below. This will be the “playlist” for your 4 new menus. 5. Name is as follows, and select a start date. [Please consult Chef Donald for date to start.] You can easily edit the date. The start date is the date of the day one cycle one and this will run thru all the menus in the period in an endless loop until you start a new period. [This will be for new menus to run in from Mary Grace]. 1,2,3,4,1,2,3,4,1,2,3,4,1,2,3,4 etc…… MENU MANAGER HANDBOOK 11 6. Now you have a period created and will need to add all four weeks of the menu to it. So the next step is to import cycles. Click on the import cycle and follow the browser to the folder that you unzipped and placed on your desktop. Select the first menu [note you can adjust the order as you add to the period or simply drag it once in the menu period to where you need in order.] The system will name the menu as imported to the correct week FALL 2012. MENU MANAGER HANDBOOK 12 MENU MANAGER HANDBOOK 13 7. Import the remaining cycles from the folder into the Menu Cycle list. Then you can add all four weeks to the menu period. MENU MANAGER HANDBOOK 14 Disregard any messages you see on the screen until the fourth cycle. 8. You will be alerted to duplicate items. Follow the link to the duplicate food items and merge the old food items in to the new; this will update the portion size change we set up. 9. You will have some pages of food items that will need merged. Just click on the merge function and for example, in the above “Apple Crisp 4 oz. will be merged into “Apple crisp 0.5 cup.” 10.Please check the Diets in Customize Your Community and merge as needed or activate as required. MENU MANAGER HANDBOOK 15 11.Now you are ready to go. Edit the menu period date if you are not ready but it is important to keep on the same week when ready to run the menu, so if you are ready and the corporate menu is in week two, edit the start date to a week earlier this will allow you to be in the second week of the period and be on track with the company. Even if it is week 4, you are going into; start the menu 3 weeks ahead and this will allow you to be in the fourth week. Example: Week Two starts next week on Sunday 10/28; edit your menu period to start 10/21. Please contact Chef Donald for start date. Feel free to call 419-541-7288 for questions or support. D. MAKING MENU CHANGES 1. Sign in to Menu Manager. Click on the menu tab at the top of the page. Click on Daily Menu from the drop down box. 2. Select the Menu Cycle and the Day of the cycle you wish to work on. 3. To delete a menu item, double click on the item or click on the X to the right of the item. MENU MANAGER HANDBOOK 16 1. To add a menu item: Begin typing the name of the item in the box that says "4 Layer Salad" above. The item will appear in the drop down list. Click on the item so it appears in the box, then click the Add button. The added menu item will appear at the bottom of the list. If the item is the entree or other menu item that should be located closer to the top, click on the item and drag it to the appropriate location. NOTE: If menu item does not appear in the drop down list try alternate names or spellings for the item, i.e. if Meatloaf doesn't appear, try Meat Loaf, etc. If the item still doesn't appear you will need to go to the Food Item tab and add it. 2. To add a food item: Choose Food Items from the drop down box on the Food Item Tab and click the black Add box OR click on the black Add box on the Daily Menu screen. If you choose this option you will have to revisit the food item from the Food Items tab to edit ingredient or diet approvals/ exceptions. In the box that appears (see below), type the common name of the item you wish to add. Next, choose a Portion Measure from the drop down box, then enter the size portion desired in the Default Portion Size box. The Serving Instructions box is a free text box in which you may enter the serving utensil, number of cuts per pie, or garnish or condiment instructions. Click on all of the food group boxes that are appropriate for a food item. I.e. for a pasta item, both Breads and Grains AND Carbohydrates would be checked. If the portion size provides more MENU MANAGER HANDBOOK 17 than one unit of the food group, i.e., for a 3 oz. portion of Meat Loaf, change the 1 to a 3 in the servings column. For the same Meat Loaf item, the ground beef would need to be pulled from the freezer in advance and the Meat Loaf would be baked the day before service in most kitchens. In this case, click on the Freezer Pull and Next Day Prep boxes. You should click on the Create Ingredient with the Same Name box when adding a food item that will have nothing added to it in the production process, i.e. Kiwi Fruit. This item would also meet the criteria for Recommended for Heart so you would also click on this box. If you were adding Meat Loaf you would click on the Recipe Needed box; if adding Kiwi Fruit, you would not. MENU MANAGER HANDBOOK 18 After adding the food item, return to the daily menu screen and follow the steps for adding a menu item. The new food item will now appear in the drop down box. 6. Approving food items/diet exceptions: In healthcare communities, each food item needs to be reviewed for appropriateness of use on each of the diets served in the community. To complete this function, click on the Approve box for each diet name than can be served the item. For those diets that cannot receive the item as produced, click on the drop down box in the Diet Exception Type column and select the type of modification necessary: Portion Size, Process, Substitute or Omit. When a different item is needed, select Substitute and enter the item to be substituted in the Additional Info Column. This triggers the item appearing on the Grocery List. All entries in portion size, process and substitute categories will appear on the Production Sheet. NOTE: If menu will not be served in a healthcare environment, check the Without Approval box on the Daily Menu screen. 7. Entering ingredients (needed for accuracy of the grocery list) MENU MANAGER HANDBOOK 19 While still in the food item tab, click on the icon fruit on the same line as the food item. If a list of ingredients appears, compare the list to those in your recipe. Click on the red X to delete any items not in your recipe. If no ingredients are listed or your recipe has additional ingredients, enter the name of the ingredient in the Add New box. For each ingredient, choose the correct storage location. This allows the grocery/inventory list to print out by storage area. Click on the Save bubble. When editing in this function make sure to click on the blue disk (shown in the picture on the next page) to save your changes. To use this function, storage locations must be set-up in the Grocery List Customization Tab by your administrator. It is also helpful to add condiments usually served with a food item as an ingredient, i.e. lemon wedge or tartar sauce with fish, so they will appear on the grocery list. TIP: To keep your grocery list as simple as possible, make sure that you always enter the same ingredient, the same way. I.e. Parsley and Parsley Flakes could MENU MANAGER HANDBOOK 20 both be used for dried parsley. Decide which one you want to use and then use it consistently. Your menu change is now complete using all capabilities of the Menu Manager program. MENU MANAGER HANDBOOK 21 What is a healthy choice? Let’s begin with the scientific stuff that sets the standards for eating choices that meet the guidelines of the American Heart, Cancer and Dietetic Associations as well as those of the FDA/USDA. The three things that make food taste good are fat, salt and sugar. However, when recommending food items for wellness eating, we choose items that are low to moderate in fat, salt and sugar content. Fat: There are good fats and bad fats with bad fats being primarily those of animal origin or solid vegetable fats containing Trans fat. Good fats include for example, olive oil, and the oils contained in some fish and nuts. Entrees earning the healthy symbol have 15 grams of fat or less per serving. Cream soups, mashed potatoes, entrees with cream sauces, and puddings at BRC are all made with heavy cream so cannot be included. You can make them at home using 1% milk and have a tasty item that is also healthy for you. Ice Cream averages 10 grams of fat per ½ cup serving, so enjoy it occasionally. If you are a fan of potato chips and other snack chips, choose the baked varieties. Salt (sodium): The recommended daily sodium guideline has been reduced to 1500 mg. That is less than half the amount consumed by the average American on a daily basis. Several of our favorite foods – ham, bacon, sausage, cheeses, soups, gravies and nearly all processed foods are too high in sodium to eat daily. Although you can have small amounts of these foods, the healthy choice would be to choose them occasionally rather than daily. Always taste your food first and skip the salt shaker. Generally, food that is well seasoned doesn’t need salt added even if it is “no added salt.” MENU MANAGER HANDBOOK 22 Sugar (Carbohydrates): Desserts are the obvious source of sugar; however, beverages contribute more sugar to the American diet than desserts. Like salt, sugar is added to processed foods during the production process to improve flavor – i.e. ketchup. Pop contains an average of 8 tsp. of sugar per 12 oz can. Coffee beverages (those enticing ones in coffee houses and their look-alikes everywhere) are loaded with added sugar and fat and can contain as many as 1,800 calories in ONE beverage! Ask for low-fat and skip the sweetener and you will save hundreds of calories. Enjoy a cookie before getting to the point that you “just have to have” a whole bag of cookies. For a healthy sweet treat, choose fresh fruits that are in season. Introducing a new symbol - (Recommended for your Health) When you see the symbol, it means that food item is a better choice than other items on the menu for healthy eating. Of course, you may choose whatever you wish; this just allows you to make an informed choice. If you choose healthier foods 80% of the time (17 meals per week) you can enjoy those other things that you love, but are not quite so good for you, without guilt. This process is called the “80/20 Rule.” It is important to note that this information is for wellness eating. If you follow a diet that is prescribed by your physician for therapeutic reasons, you will probably have additional restrictions that you need to follow. Some of the items indentified with therapeutic diet without modification. will work with your Think moderation. Portion size is key to healthy eating; if we choose only foods that are good for us but eat them in large quantities, the overeating will negate the health benefits. All fried items and grilled sandwiches are occasional choices and should be included in the 80/20 rule. Salad Bar: All greens and fresh vegetables -1 cup - avg. 40 kcal 21 mg sodium Low-fat cottage cheese – ½ cup - 101 kcal 409 mg sodium Low-fat dressings - 1 pkt. - 2 kcal 430 mg sodium Pasta and potato salads – ½ cup serving occasionally. 310 kcal 580 mg sodium MENU MANAGER HANDBOOK 23 Kidney, black and other beans - ½ cup - 105 kcal 330 mg sodium Fresh and canned fruits - 1 pc or ½ cup – avg. 60 kcal 0 mg sodium Daily Menu: Plain whole muscle meats (3 oz) Plain starches and vegetables (½ cup) 80/20 Rule: Processed meats - ham, bologna, sausage, etc. Casseroles and seasoned vegetables A program of Innovations Services provided to assist you with making healthy eating choices from any menu. Visit us at www.innovaservices.info Follow this to a link to a report from Lindsay Vickroy from the Center for Science in the Public Interest: http://www.cspinet.org/restaurantreport.pdf Choose Super Foods Look for these foods and choose them often – these are on most of the super foods lists making the news these days. Beans - a low-fat source of protein, a great source of soluble fiber. Blueberries – excellent source of antioxidants, low in calories. Broccoli – rich source of Vitamin A, Vitamin C, Vitamin K – good for your bones. Nuts – great source of heart healthy fats, antioxidants, fiber and protein – with walnuts packing the biggest punch, all nuts are healthy in small amounts. Oats – tasty sources of fiber, help lower cholesterol. Peanut Butter – packed with omega-3 fatty acids that help fight heart disease. Salmon – excellent source of omega-3 fatty acids, good for your heart. Sweet Potato – best source of Vitamin A with high C content as well – a best source of Vitamin A with high C content as well. Turkey – skinless breast is one of the leanest sources of protein and also contains Vitamins B6 and B12, niacin, selenium, zinc – nutrients needed for heart health and help fight cancer. Yogurt – low fat or plain – higher in calcium and protein than other dairy products, almost a complete food. MENU MANAGER HANDBOOK 24