1
EzyScript
TRANSACTION SCRIPTING TOOL
EzyScript v.1.0
SAP Transaction
Scripting
&
Table Querying
Tool
User Manual version 1.0b
Z Option Inc.
Page 1 of 59
Last Updated: 14-Nov-2014 [1411141620]
EzyScript
TRANSACTION SCRIPTING TOOL
Table of Contents
I.
Getting Started for Premium Users ................................................................................................ 4
Introduction ................................................................................................................................................................... 4
Getting Started ............................................................................................................................................................. 5
Step 1: Unlock the EzyScript License ......................................................................................................................... 5
Step 2: Register a Premium User ................................................................................................................................ 9
Step 3: Maintain Standard Users ................................................................................................................................ 9
II.
SCRIPT Sheets............................................................................................................................ 11
Introduction ................................................................................................................................................................. 11
Getting Started ........................................................................................................................................................... 11
Overview .................................................................................................................................................................. 11
Preparation .............................................................................................................................................................. 11
Understand the EzyScript SCRIPT Sheet Structure ................................................................................................ 12
Enabling Fields (Columns A to C) ........................................................................................................................ 12
User Defined Field (Column D) ............................................................................................................................. 13
Key Value Fields (Columns E to …) ..................................................................................................................... 13
Understanding SCRIPT Sheet Execution Modes ................................................................................................... 13
Build Your SCRIPT Sheet ............................................................................................................................................. 14
Step 1: Create a new Script Recording ............................................................................................................ 14
Click 'Recordings' Button to Run ‘Maintain Scripted Recordings' ........................................................ 14
Create New User Maintenance Template Set-up ...................................................................................... 15
Select the Recordings Function .................................................................................................................. 15
Configure the Script Actions ....................................................................................................................... 15
Log on to SAP ................................................................................................................................................. 17
Begin Screen Recording .............................................................................................................................. 18
Customize Script Recording ........................................................................................................................ 22
Step 2: Use an EzyScript Scripted Template ......................................................................................................... 24
Option 1: Load via Template .......................................................................................................................... 24
Select the Template Function ..................................................................................................................... 24
Add the First Script ID .................................................................................................................................... 24
Enter the Required Data .............................................................................................................................. 25
Add Another Script ID to the same sheet (optional).............................................................................. 27
Enter Required Data ..................................................................................................................................... 29
Built-In Features and Functionality .......................................................................................................................... 29
Mandatory Fields ........................................................................................................................................... 29
Hide Columns/Rows ...................................................................................................................................... 31
Exclude Rows from Upload .......................................................................................................................... 31
Enter Formulas ................................................................................................................................................ 32
Disable Attributes........................................................................................................................................... 32
Return Field ..................................................................................................................................................... 32
Reference Other Worksheets ...................................................................................................................... 34
Constant Values ............................................................................................................................................ 35
Assign Key Fields ............................................................................................................................................ 35
Schedule Processing and Process Multiple Sheets .............................................................................................. 36
Z Option Inc.
Page 2 of 59
Last Updated: 14-Nov-2014 [1411141620]
EzyScript
TRANSACTION SCRIPTING TOOL
Select the Batch function: Process Multiple EzyScript Sheets ........................................................................ 36
Select the Worksheets to be Processed ............................................................................................................. 37
Execute Processing Immediately or Select Schedule Processing ................................................................. 39
Log on to SAP .......................................................................................................................................................... 40
Enter Scheduling Details........................................................................................................................................ 41
III.
QUERY Sheets ........................................................................................................................... 42
Introduction ................................................................................................................................................................. 42
Getting Started ........................................................................................................................................................... 42
Overview .................................................................................................................................................................. 42
Preparation .............................................................................................................................................................. 42
Understand the EzyScript QUERY Sheet Structure ................................................................................................ 42
EzyScript Ribbon Menu: QUERY Menu Group ................................................................................................... 42
Enabling Fields (Columns A to C) ........................................................................................................................ 43
Key Values (Columns I to …) ................................................................................................................................ 44
Build Your Reader Sheet ........................................................................................................................................... 44
Configure Query Sheets ............................................................................................................................................ 44
Select the Configure Table Reader .................................................................................................................... 44
Configure Table Reader Actions ......................................................................................................................... 46
Built-In Features and Functionality .......................................................................................................................... 47
Key Fields .................................................................................................................................................................. 47
Reference Other Worksheets ............................................................................................................................... 48
Hide Columns/Rows ............................................................................................................................................... 49
Exclude Rows from Upload ................................................................................................................................... 49
Download data with EzyScript Query .................................................................................................................... 50
Download Data using a Prepared Query Sheet .............................................................................................. 50
Log on to SAP .......................................................................................................................................................... 50
Create a New QUERY Sheet .................................................................................................................................... 50
Select Create Query Sheet Menu Option ......................................................................................................... 50
Schedule Processing and Process Multiple Sheets .............................................................................................. 51
Select the Process Multiple EzyScript Sheets Function .................................................................................... 51
Select the Worksheets to be Processed ............................................................................................................. 52
Enter Key Data ........................................................................................................................................................ 53
Check Processing Details and Make Changes if Required ........................................................................... 54
Execute Processing Immediately or Select Schedule Processing ................................................................. 56
Log on to SAP .......................................................................................................................................................... 57
Enter Scheduling Details........................................................................................................................................ 58
Z Option Inc.
Page 3 of 59
Last Updated: 14-Nov-2014 [1411141620]
EzyScript
I.
TRANSACTION SCRIPTING TOOL
Getting Started for Premium Users
Introduction
This section covers initial Premium User tasks:
Unlocking the EzyScript License for your site
Registering the Premium Users for EzyScript
Maintaining Standard Users
Premium users at your site will be responsible for maintaining the users who will be using EzyScript.
!
Critical Notes:
SAP Component
Your BASIS team must have already completed installing the transports for
EzyScript on your SAP systems before any of the Premium User tasks can be
completed.
PC Component
The EzyScript add-in for MS Office Excel must have been installed on your
desktop computer using the PC install file. Be sure to install the local
software package "as Administrator" so add-in can be fully registered.
After the EzyScript SAP transport has been properly installed on your SAP system, and the Add-in installed
on the local PC, access the EzyScript add-in ribbon menu from within MS Excel. Premium user functions
are accessed from within the EzyScript Ribbon menu → Settings → License options tab.
Z Option Inc.
Page 4 of 59
Last Updated: 14-Nov-2014 [1411141620]
EzyScript
TRANSACTION SCRIPTING TOOL
Comes from SAP
Getting Started
To get started, the Premium User(s) need to do the following tasks in order presented:
1. Unlock the EzyScript license.
This step tells your copy of EzyScript how many seats have been purchased by your company.
2. Register the Premium Users.
You will need to name at least one premium user before anyone can interact with SAP using
EzyScript.
3. Maintain the Standard Users.
You can either have EzyScript auto-register the standard users or you can name them manually.
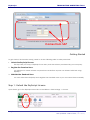
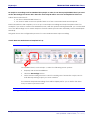
Step 1: Unlock the EzyScript License
Open Excel, go to the EzyScript menu tab on the Ribbon. Click Settings → License.
Z Option Inc.
Page 5 of 59
Last Updated: 14-Nov-2014 [1411141620]
EzyScript
TRANSACTION SCRIPTING TOOL
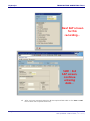
You will be prompted to log into SAP. Upon successful login to the appropriate SAP system, the license
Registration Code will load from SAP, and you will see the license Registration Code details in Excel.
Z Option Inc.
Page 6 of 59
Last Updated: 14-Nov-2014 [1411141620]
EzyScript
TRANSACTION SCRIPTING TOOL
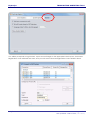
License details in EzyScript in Excel:
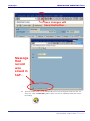
Click on the Get License button. You will be prompted for your login ID for the Z Option Support website.
Note: You must already have acquired a login ID to the Z Option Support site.
Critical Notes:
Premium User steps to obtain a login ID to the Z Option Support site:
!
1. Open an Internet Browser and go to the Z Option website at
http://www.zoption.com
2. Each Premium User should request a ticket system login ID, by selecting
Support → Support and Licensing System → Request a Ticket System ID. Fill
out all of the information.
3. Once your ticket system ID has been confirmed (you will receive an email)
you may login to the ticket system on the same support page by clicking
“Log onto Ticket System”. Select your company from the drop-down list
and enter your user ID and the password you created in step 2 (NOTE: User
IDs are not case sensitive, but passwords ARE case sensitive).
If there is an issue which requires additional support, the Premium Users
have the ability to open a support ticket through the Z Option Support
Ticket website. Standard Users should raise all first level support issues with
Z Option Inc.
Page 7 of 59
Last Updated: 14-Nov-2014 [1411141620]
EzyScript
TRANSACTION SCRIPTING TOOL
their Premium Users per the Software License Agreement signed by your
principals. All resolutions and communication must be performed through
a Premium User. This helps Z Option keep your maintenance costs below
industry averages.
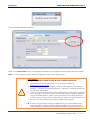
After you log in using your Z Option Support User ID, EzyScript will communicate with the Z Option Support
website from within Excel and automatically register your company's license with Z Option.
Click the Save License button to save your License Code into your SAP system and complete your
Product Registration and License Unlock.
Z Option Inc.
Page 8 of 59
Last Updated: 14-Nov-2014 [1411141620]
EzyScript
TRANSACTION SCRIPTING TOOL
Step 2: Register a Premium User
While in the EzyScript Settings → License screen, click on the Manage Users tab. Manually enter your SAP
User ID and be sure to check the "Premium User" checkbox. (NOTE: The User ID is your SAP User ID, and as
such must be entered in ALL CAPS.)
Click OK and you are now registered as an EzyScript Premium User in your SAP system. (You may need to
exit this screen and re-login to your SAP system to see the completed update.)
Step 3: Maintain Standard Users
While in the EzyScript Settings → License screen, click on the Manage Users tab. Similarly, manually enter
the SAP User ID of the Standard User, but be sure to NOT check the "Premium User" checkbox. Click OK
and they are now registered as a Standard User in the SAP system. (You may need to re-login to your SAP
system to complete the update.)
Z Option Inc.
Page 9 of 59
Last Updated: 14-Nov-2014 [1411141620]
EzyScript
TRANSACTION SCRIPTING TOOL
On the Manage License tab, there is a checkbox where you can also set the Standard Users to
conveniently automatically self-register as soon as they connect and log in to the appropriate SAP
system using EzyScript functions. The Standard Users will be able to auto-register this way until all the
standard seats for the license are filled.
Z Option Inc.
Page 10 of 59
Last Updated: 14-Nov-2014 [1411141620]
EzyScript
II.
TRANSACTION SCRIPTING TOOL
SCRIPT Sheets
Introduction
This section covers the EzyScript SCRIPT Sheet functionality. To upload data from Excel, users simply
record the path through an SAP Transaction, telling EzyScript which screens to go to and which fields to
populate. This analysis is then mapped to the user's spreadsheet, data is populated in the spreadsheet
and when ready, the user uploads the data into SAP.
Typical uses for the core functionality of EzyScript are:
Extract SAP data for use in reports, external applications
Data conversion from Legacy systems
Automate repetitive tasks in SAP
Assist with the synchronization of data between SAP Systems (e.g., DEV / TST / PRD).
Getting Started
Overview
Topics
This document will take you through a number of EzyScript SCRIPT Sheet
elements including:
Understanding Layout and Terms
Setting Up Templates
Uploading and Downloading SAP Data
Moving, Copying and Scheduling work
Preparation
Pre-Requisites
Before you can begin using this guide you must understand how to set-up
an EzyScript workbook.
You must also have the EzyScript SAP components properly installed on
your SAP system.
Z Option Inc.
Page 11 of 59
Last Updated: 14-Nov-2014 [1411141620]
EzyScript
TRANSACTION SCRIPTING TOOL
Understand the EzyScript SCRIPT Sheet Structure
Before you begin using an EzyScript SCRIPT Sheet, you need to understand how it is structured.
Enabling Fields (Columns A to C)
Columns A to C of the Script Sheet are the Enabling Fields.
Column
A
Heading
Script ID
Description
This field allows you to specify the recorded Script ID that
you want to use.
Each Script ID on a SCRIPT Sheet allows communication
with different functions in SAP.
B
Process
Flag
An "X" in this column indicates that the Script should run
using the data entered into the columns on THIS row.
X – Perform recorded functions on this line of data
C
Messages
The cells in the Messages column are display fields only.
When you download or upload from SAP, a message will
display in each row that contains data. The message will
be either the word “Successful”, or an error message
indicating a problem occurred.
EzyScript incorporates SAP error checking, so any error
messages displayed in the Messages column are the same
error messages that you would get if you tried to process
records incorrectly within SAP.
Z Option Inc.
Page 12 of 59
Last Updated: 14-Nov-2014 [1411141620]
EzyScript
TRANSACTION SCRIPTING TOOL
User Defined Field (Column D)
Columns D of a Script Sheet is a User Defined Field.
This field is not used by EzyScript, and is available for you to use in any way that you
like. Typical uses include descriptions, row totals or other formulae.
You may hide this column, but you cannot delete it.
Key Value Fields (Columns E to …)
Columns E to … of the Script Sheet represent the Fields in SAP into which data is
being entered. Each active Column of Excel represents a field in SAP for data entry.
The fields to be populated will be determined by the Script recording specified in
Column A.
Understanding SCRIPT Sheet Execution Modes
When you record a transaction in EzyScript SCRIPT there are these execution modes available:
1.
2.
Batch Input Mode
Non-Batch Input Mode
Z Option Inc.
Page 13 of 59
Last Updated: 14-Nov-2014 [1411141620]
EzyScript
TRANSACTION SCRIPTING TOOL
Batch Input Mode
Many of the transactions in SAP are optimized to run in Batch Input Mode. This is primarily for
performance reasons. Batch Input Mode is more efficient for data processing. Some transactions have
especially designed screens and fields for Batch Input Processing to facilitate automation. Here are
some of the differences you might notice in Batch Input Mode:
SAP Screens might look slightly different from the ones in Manual Entry mode.
Some of the fields or the placement of the fields might be different compared to the screens in
Manual Entry mode.
Scripts are recorded in Batch Input Mode by default. We suggest that you always run your transaction in
Batch Input Mode, unless you are unable to accomplish your desired results due to differences in
screens.
Non-Batch Input Mode
Checking the box for 'Not Batch Input Mode' refers to the regular manual/dialog mode of processing a
transaction in SAP.
A couple of things you need to know about using Non-Batch Input Mode:
You may need special authorization to run in Non-Batch Input Mode.
Use this mode if you want to download data from a transaction. Note, not all transactions will
allow download.
Build Your SCRIPT Sheet
For EzyScript to be able to communicate with SAP, you must prepare the SCRIPT Sheet by inserting the
relevant:
Script IDs
Data associated with the Script recording's SAP function
Follow these instructions if:
You are using a new EzyScript SCRIPT Sheet; or
You want to change or update the data on an existing SCRIPT Sheet.
You must have already created an EzyScript Workbook before you can proceed with this task.
There are three steps involved in preparing a SCRIPT Sheet:
Step 1: Create a new Script Recording from the EzyScript menu
Step 2: Use an EzyScript SCRIPT Template to build a data entry framework
Step 3: Populate the Template framework with data
Step 1: Create a new Script Recording
Click 'Recordings' Button to Run ‘Maintain Scripted Recordings'
The Maintain Scripted Recordings form allows you to select which data from SAP you want to include in
a worksheet. The tool allows you to customize the worksheet to your individual business process or
business need and can be saved within the workbook for use in the future. Once you have saved an
Script in a workbook you can load it as a Template.
Z Option Inc.
Page 14 of 59
Last Updated: 14-Nov-2014 [1411141620]
EzyScript
TRANSACTION SCRIPTING TOOL
No Scripts or recordings exist as standard in EzyScript. In order to use the EzyScript SCRIPT Sheet you must
run the Recordings tool. Once this is done the new Script ID will be saved as a template for future use.
Follow these instructions if:
You have a blank SCRIPT Sheet; or
You want to add or remove specific fields to or from a recorded and saved Script ID.
Each Transaction in SAP requires you to set up a new Script recording and Script Template sheet. For
example, if you wish to create new Material records, and also update existing Materials, you would need
to run the Recordings tool to create Script IDs for both MM01 (Create New Material), and for MM02 (Edit
Material).
This guide shows the configuration process for a User Maintenance script recording.
Create New User Maintenance Template Set-up
Select the Recordings Function
On a SCRIPT Sheet, such as Script 1, select the following menu options:
EzyScript tab in the Excel Ribbon
Click the Recordings button
Note: The Recordings button is used for creating new Transaction scripts, and to
edit already existing Scripts you have created.
The Maintain Scripted Recordings form will be displayed for you to define the data
that you want to process in SAP.
Configure the Script Actions
Z Option Inc.
Page 15 of 59
Last Updated: 14-Nov-2014 [1411141620]
EzyScript
TRANSACTION SCRIPTING TOOL
On the Maintain Scripted Recordings pop-up window:
1.
Enter the new Script description
2.
Select the execution Mode - Batch / Non-Batch
3.
Enter the SAP Transaction code into the Transaction Code field
4.
Select the 'Guru Mode' checkbox (optional) – this will return the SAP Field
Descriptions. Note: you may not have the appropriate security for this function to
work properly
5.
Select Start Recording.
If you have not logged on to SAP, you will need to log on to SAP now using your SAP
account details.
Z Option Inc.
Page 16 of 59
Last Updated: 14-Nov-2014 [1411141620]
EzyScript
TRANSACTION SCRIPTING TOOL
Log on to SAP
On the Connect to SAP System pop-up window:
1. Click on the appropriate SAP system
2. Type in your User Access Data
3. Press the Enter key or click on the OK button
EzyScript will now connect to your SAP system to begin the screen recording. You will
automatically be directed to the starting screen of the SAP Transaction selected, in
this case SU01.
Z Option Inc.
Page 17 of 59
Last Updated: 14-Nov-2014 [1411141620]
EzyScript
TRANSACTION SCRIPTING TOOL
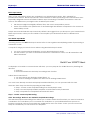
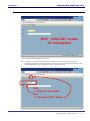
Begin Screen Recording
SU01 : initial SAP screen
for Transaction
Once SAP is loaded follow these steps
3.
You must now enter data into every field in the transaction you need to
integrate with Excel. EzyScript will record the path and return those fields to the
Excel worksheet in the order they were ‘touched’ in SAP.
SU01 :
1. Enter the User data
then
2. Click the COPY button
Z Option Inc.
Page 18 of 59
Last Updated: 14-Nov-2014 [1411141620]
EzyScript
TRANSACTION SCRIPTING TOOL
Next SAP screen
for this
recording…
SU01 : 3rd
SAP screen,
continue
entering
data…
4.
Z Option Inc.
After you have entered data into all the required fields click on the Save or Post
button finish the required data entry.
Page 19 of 59
Last Updated: 14-Nov-2014 [1411141620]
EzyScript
TRANSACTION SCRIPTING TOOL
Save changes with
Save/Post button…
Message
that
record
was
saved in
SAP…
5.
Z Option Inc.
The SAP session may not automatically exit upon saving the record in SAP. If it
does not, click the SAP Exit (yellow arrow ) button to explicitly finish the screen
recording.
Page 20 of 59
Last Updated: 14-Nov-2014 [1411141620]
EzyScript
TRANSACTION SCRIPTING TOOL
Exit
SAP
Z Option Inc.
6.
SAP will close, and the recording session will return to Excel.
7.
The Maintain Scripted Recordings pop-up window will open again in EzyScript.
Page 21 of 59
Last Updated: 14-Nov-2014 [1411141620]
EzyScript
TRANSACTION SCRIPTING TOOL
Customize Script Recording
The transaction sequence has been recorded, but the script itself has not yet been
saved as a recording. The script recording has to be saved into the spreadsheet
before it can be used as a repeatable process.
Save new scripted recording…
Z Option Inc.
Page 22 of 59
Last Updated: 14-Nov-2014 [1411141620]
EzyScript
TRANSACTION SCRIPTING TOOL
The recorded fields can now be seen in the Description and Field Names grid.
Specify any functionality including;
Specifying mandatory fields
Entering formulas
Key Fields
Disabling fields
Specifying return fields
Select Save As to save the new Script ID.
The Scripted Recording is saved in the workbook and will now be available to load
as template.
These features are further explained in the Features and Benefits section of this user
guide.
Ignore Warnings – Check this box if you want EzyScript to include only messages to
be returned from SAP that are Success and any errors.
Document Number Message – check this box if this SAP Transaction you are
recording will return a document number or similar field.
To load the new Scripted Recording into EzyScript you will have to load data via
Template as shown in the next step. Each Script recording is capable of only 1 task in
SAP. In this step we created a Script recording to create a New SAP user based on
copying an existing user.
Z Option Inc.
Page 23 of 59
Last Updated: 14-Nov-2014 [1411141620]
EzyScript
TRANSACTION SCRIPTING TOOL
Step 2: Use an EzyScript Scripted Template
Option 1: Load via Template
The Template function can be used by EzyScript users to quickly pre-format a SCRIPT Sheet for data
entry.
The Template inserts the Script ID framework, the Header and Line Item Titles and default Process Flag for
the number of rows that you specify. You then need to manually add the required data to the required
fields.
Follow these instructions if:
You would like to quickly setup the spreadsheet with a specific Script ID.
You must have initialized an EzyScript Workbook and recorded a transaction Script before you can begin
this task.
Select the Template Function
Template button in the SCRIPT group
To access the Scripted recordings to prepare for data entry, click on the Template
icon on the EzyScript toolbar.
Add the First Script ID
Z Option Inc.
Page 24 of 59
Last Updated: 14-Nov-2014 [1411141620]
EzyScript
TRANSACTION SCRIPTING TOOL
On the Load Worksheet from Script Template pop-up window:
1. Specify the following fields:
Choose a Script / Recording
Line item count as Number of Documents (how many records to be
2. Press Enter key or click on the Apply button
The current Script Sheet is pre-formatted based on the parameters you defined on
the Load Worksheet from Script Template pop-up window.
New Template, waiting for data to be entered.
Enter the Required Data
Z Option Inc.
Page 25 of 59
Last Updated: 14-Nov-2014 [1411141620]
EzyScript
TRANSACTION SCRIPTING TOOL
Depending on the Script Recording used, you now need to enter your data into the
Key Value fields. The type of data to be entered in each column is dependent
upon the Script ID specified in Column A.
All mandatory fields must be filled in order to upload to SAP.
You can change the headings of these columns to make them more
meaningful, or insert heading rows throughout the Script sheet.
If you go to the EzyScript Options group menu, click "Settings" → user's Options, and
check the box for "Add auto-comments to cells", the SAP Description and Field
definitions [Table + Field Name] will be available in a Comment box for each data
cell.
Check the box for
" Add auto-comments "
to enable hovertext Field details
In the Script - Template framework sheet, you can then hover your mouse over the
Comments Indicator (red triangles) to view how a particular column will be used for
the specified Script.
Z Option Inc.
Page 26 of 59
Last Updated: 14-Nov-2014 [1411141620]
EzyScript
TRANSACTION SCRIPTING TOOL
Add Another Script ID to the same sheet (optional)
To add another Script ID to the same SCRIPT sheet:
1. Select the following menu options:
EzyScript Ribbon
Click the Template button
2. On the Load Worksheet from Script pop-up window specify the following fields:
Script / Recording ID
Line Item Count ('Document Count')
3. Press the Enter key or click on the Apply button
4. A message will appear asking if you want to Append to or Replace existing
data. Click on the Append button to add the extra Script ID.
The Script ID is added to the bottom of the sheet.
Repeat Step 3 until you have added all the Scripted Recordings you need. The
SCRIPT Sheet is now ready for you to enter the data you want to use.
Z Option Inc.
Page 27 of 59
Last Updated: 14-Nov-2014 [1411141620]
EzyScript
Z Option Inc.
TRANSACTION SCRIPTING TOOL
Page 28 of 59
Last Updated: 14-Nov-2014 [1411141620]
EzyScript
TRANSACTION SCRIPTING TOOL
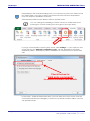
Enter Required Data
Depending on the Action Type used, you now need to enter data into the
Value fields. The type of data to be entered in each column is dependent
upon the Action Types specified in Column A.
Hover your mouse over the Comments Indicator to view how a particular
column will be used for the specified Action Type.
Once you have entered all the mandatory data your spreadsheet will be
ready to upload into SAP.
Go to the next step to see how to upload data into SAP.
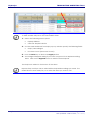
Built-In Features and Functionality
Mandatory Fields
When you create an Actual Type you can choose to make certain fields
mandatory. EzyScript will not process a sheet without these fields being
populated.
1. Click the row field in the location of the ‘M’ above to make a field
Z Option Inc.
Page 29 of 59
Last Updated: 14-Nov-2014 [1411141620]
EzyScript
TRANSACTION SCRIPTING TOOL
mandatory
The selected mandatory fields will be color coded when the Action Type is
loaded into a spreadsheet.
Z Option Inc.
Page 30 of 59
Last Updated: 14-Nov-2014 [1411141620]
EzyScript
TRANSACTION SCRIPTING TOOL
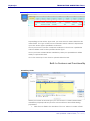
Hide Columns/Rows
To Hide a column or a row in EzyScript follow these steps;
1. Right click on the column letter or row number
2. Select ‘Hide” from the Menu
The column will now be hidden but still active. Any formulas placed in the
column will still be processed.
Exclude Rows from Upload
There are a number of ways to prevent a row of EzyScript uploading
1. Leave the interface direction indicator blank (cell B11 above).
EzyScript will now ignore all information in this row.
2. Insert a blank row into the worksheet (row 10 above). You can insert
as many blank rows as wanted. These are a good place to insert
total formulas to summarize the values in your worksheet
3. Enter a formula into the Interface direction column that will
determine what value to enter. In row 12 above the formula
entered is =IF(K12>0,"U",""). So if company code is higher than 0 the
row will upload.
Z Option Inc.
Page 31 of 59
Last Updated: 14-Nov-2014 [1411141620]
EzyScript
TRANSACTION SCRIPTING TOOL
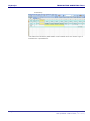
Enter Formulas
A formula in the context of EzyScript can refer to a value, whether mathematical or
otherwise, that can be set for a given field in a spreadsheet. To insert a formula for a
given field:
1. Select the fx field of the attribute row
2. In the formula window enter the formula (mathematical or not) that should
pre-populate the field.
3. Select OK or hit Enter.
When loading a Template the EzyScript field will automatically be filled with the
formula value.
Disable Attributes
On the Maintain Scripted Recordings screen:
1. Un-check the fields in the row you wish to disable
The field will no longer be shown when the EzyScript Template is loaded into a Script
Sheet.
Return Field
Z Option Inc.
Page 32 of 59
Last Updated: 14-Nov-2014 [1411141620]
EzyScript
TRANSACTION SCRIPTING TOOL
On the Maintain Scripted Recordings screen:
1. Select the Return Field in the attribute row
SAP is prompted to return the SAP value to this field after a successful upload is
made.
Z Option Inc.
Page 33 of 59
Last Updated: 14-Nov-2014 [1411141620]
EzyScript
TRANSACTION SCRIPTING TOOL
Reference Other Worksheets
Users of EzyScript are not restricted to using EzyScript templates only. It is possible to
integrate your existing spreadsheets with an EzyScript template. Operating this way
will allow you to:
1. Maintain use of your existing spreadsheets
2. Reduce training time
3. Roll-out worksheets from a central super user
4. Reduce time of installation
Using standard Excel functionality, it is possible to reference cells in another sheet.
For example, in Script 1 of a blank EzyScript workbook the equation, ='Actual
2'!B8+'Plan 1'!B6. This cell will be populated with the sum of cell B8 in sheet Actual 2
and B6 in sheet Plan 1.
It is possible to set up an EzyScript template and reference the key values of that
field with the values of an existing spreadsheet. When a user is finished working with
the usual sheet, they need only change to the EzyScript template and run the Play
function. The same process can work in reverse to populate an existing spreadsheet
from an EzyScript one.
Z Option Inc.
Page 34 of 59
Last Updated: 14-Nov-2014 [1411141620]
EzyScript
TRANSACTION SCRIPTING TOOL
Constant Values
On the Maintain Scripted Recordings window, select the constant value field of
given row. Enter the value
The Field will always be populated with this value. For example, a Company Code
could be specified as always = 100 for a KS01 Create Cost Center Script recording.
The field will then be hidden when the Script is loaded into an EzyScript Worksheet.
Assign Key Fields
Key Fields are you when processing change transactions (such as KS02 or MM02).
EzyScript will not download the information
To Hide a column or a row in EzyScript follow these steps;
3. Right click on the column letter or row number
4. Select ‘Hide” from the Menu
The column will now be hidden but still active. Any formulas placed in the column
will still be processed.
Z Option Inc.
Page 35 of 59
Last Updated: 14-Nov-2014 [1411141620]
EzyScript
TRANSACTION SCRIPTING TOOL
Schedule Processing and Process Multiple Sheets
EzyScript allows you to process multiple worksheets at the same time. You can also choose to process
immediately, or schedule processing to occur at a specific time or date.
Follow these instructions if:
You want to process multiple EzyScript worksheets simultaneously, or schedule processing for
another time.
All of the EzyScript workbooks containing the sheets that you want to process need to be open before
you select the Batch function.
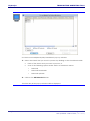
Select the Batch function: Process Multiple EzyScript Sheets
In an EzyScript workbook :
Click on the Batch icon on the EzyScript toolbar.
The Maintain and Execute Batch Processing pop-up window will be displayed listing
all the Scripts and Queries within the EzyScript Workbook that you currently have
open in Excel.
Z Option Inc.
Page 36 of 59
Last Updated: 14-Nov-2014 [1411141620]
EzyScript
TRANSACTION SCRIPTING TOOL
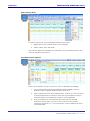
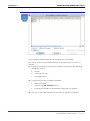
Select the Worksheets to be Processed
On the Maintain and Execute Batch Processing pop-up window:
Select the Script or Query that you want to process by clicking on the checkbox
beside:
Each of the sheets that you want to process, or
One of the following options under the list of worksheet names:
o
Select All Entries
o
Select All Worksheets
o
Select All Imports
The Enter Key Data pop-up window will be displayed.
Z Option Inc.
Page 37 of 59
Last Updated: 14-Nov-2014 [1411141620]
EzyScript
TRANSACTION SCRIPTING TOOL
Other
Functions
Description
Add Row
Allows you to add sheets to the processing
list.
Delete
Selected
Allows you to remove sheets from the
processing list.
Edit Selected
Allows you to change the Key Data
information used for uploading to, or
downloading from, SAP.
Close
Allows you to exit the pop-up window
without processing any worksheets.
Schedule
Allows you to specify when, and how often,
you want the selected sheets to be
processed.
For more information see Step 6.
Execute
Allows you to process the selected sheets
immediately.
For more information see Step 6.
You are now ready to schedule processing of the selected worksheets, or
execute processing immediately.
Z Option Inc.
Page 38 of 59
Last Updated: 14-Nov-2014 [1411141620]
EzyScript
TRANSACTION SCRIPTING TOOL
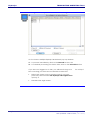
Execute Processing Immediately or Select Schedule Processing
On the Process Multiple EzyScript Worksheets pop-up window:
1. To process immediately, click on the Execute button; OR
2. To schedule processing for a later date, click on the Schedule button
If you have not logged on to SAP, you will need to log on to
SAP now using your SAP account details on either the:
Z Option Inc.
Select SAP System pop-up window (only if you have
previously activated the Use EzyScript’ SAP Login Screen
option); or
Standard SAP login screen.
Go to Step 7
Page 39 of 59
Last Updated: 14-Nov-2014 [1411141620]
EzyScript
TRANSACTION SCRIPTING TOOL
Log on to SAP
On the Select SAP System pop-up window:
Click on the appropriate SAP system
Type in your User Data
Press the Enter key or click on the OK button
You must be logged on to SAP for the EzyScript Workbook to be created
successfully. The Select SAP System pop-up window allows you to log on to
SAP from within the EzyScript workbook.
If you selected to Execute, processing begins immediately. When
processing is complete a message window will be displayed, and the Last
Processed column on the Process Multiple EzyScript Worksheets pop-up
window will be updated.
If you selected to Schedule, the Schedule Processing pop-up window will
be displayed.
Z Option Inc.
Page 40 of 59
Last Updated: 14-Nov-2014 [1411141620]
EzyScript
TRANSACTION SCRIPTING TOOL
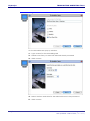
Enter Scheduling Details
On the Schedule Item pop-up window:
1. Type a name for the scheduling task
2. Define how often you want the selected sheets processed
3. Click on Next
4. Select the time and date for the selected sheets to be processed
5. Click on Next
Tip:
This screen needs to be completed by the person who has administrative
rights to the PC you are using.
6. Type the user name and password for the PC
7. Click on Next
The job has been scheduled, and following message will be displayed.
Z Option Inc.
Page 41 of 59
Last Updated: 14-Nov-2014 [1411141620]
EzyScript
TRANSACTION SCRIPTING TOOL
III. QUERY Sheets
Introduction
In this section you will learn about the basic functionality of the QUERY Sheet tool.
Uses for the core functionality of EzyScript QUERY Sheet are:
Extract SAP data for use in reports, external applications
Data conversion from Legacy systems
Automate repetitive tasks in SAP
Assist with the synchronization of data between SAP Systems (e.g., DEV / TST / PRD).
Getting Started
Overview
Topics
This section will take you through a number of EzyScript QUERY Sheet
elements including:
Understanding Layout and Terms
Setting Up Templates
Downloading SAP Data
Moving, Copying and Scheduling work
Preparation
Pre-Requisites
Before you can begin using this guide you must understand how to set up
an EzyScript workbook.
You must also have the EzyScript SAP components properly installed on
your SAP system.
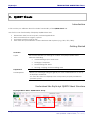
Understand the EzyScript QUERY Sheet Structure
EzyScript Ribbon Menu: QUERY Menu Group
Z Option Inc.
Page 42 of 59
Last Updated: 14-Nov-2014 [1411141620]
EzyScript
TRANSACTION SCRIPTING TOOL
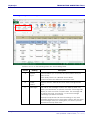
Enabling Fields (Columns A to C)
Columns A to C of the Planning Sheet are the Enabling Fields.
Column
A
Heading
Action
Type
Description
This field allows you to specify the Query Sheet that you
want to use.
Each Query Sheet on a Reader Sheet allows
communication with different functions in SAP.
B
Table
Name
Displays the SAP Table Name that data is being Reader
from.
C
Messages
The cells in the Messages column are display fields only.
When you download, or upload, from SAP a message will
display in each row that contains data. The message will
be either the word “Successful”, or an error message
indicating a problem occurred.
EzyScript incorporates SAP error checking, so any error
messages displayed in the Messages column are the same
error messages that you would get if you tried to process
records incorrectly within SAP.
Z Option Inc.
Page 43 of 59
Last Updated: 14-Nov-2014 [1411141620]
EzyScript
TRANSACTION SCRIPTING TOOL
Key Values (Columns I to …)
Columns I to … of the Reader Sheet represent the Fields in SAP that data is being
entered into. Each active Column of Excel represents a field in SAP for data to be
entered into. The fields to be populated will be determined by the Query Sheets
specified in Column A.
Build Your Reader Sheet
For EzyScript to be able to communicate with SAP, you must prepare the Reader Sheet by creating
Reader Action Types.
You must have already created an EzyScript Workbook before you can proceed with this task.
Run the Query Designer from the EzyScript Menu
Configure Query Sheets
The Query Designer option allows you to select which data from SAP you want to include in a worksheet.
The tool allows you to customize the worksheet to your individual business process or business need and
can be saved within the workbook for use in the future. Once you have saved a Query Sheet in a
workbook you can use it to download SAP data.
No Query Sheets exist as standard in EzyScript. In order to use the Reader you must run the Configure
Query Sheet tool. Once this is done the Query Sheet will be saved for future use.
Follow these instructions if:
You have a blank Reader Sheet; or
You want to add or remove specific fields to or from and Query Sheet.
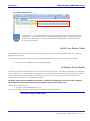
Select the Configure Table Reader
Z Option Inc.
Page 44 of 59
Last Updated: 14-Nov-2014 [1411141620]
EzyScript
TRANSACTION SCRIPTING TOOL
On an Reader Sheet, such as Reader 1, select the following menu options:
EzyScript for SAP
Configure Table Reader
The Configure Table Reader Actions pop-up window will be displayed for
you to define the data that you want to extract from SAP.
Z Option Inc.
Page 45 of 59
Last Updated: 14-Nov-2014 [1411141620]
EzyScript
TRANSACTION SCRIPTING TOOL
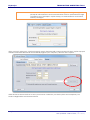
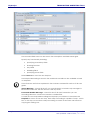
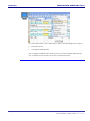
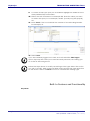
Configure Table Reader Actions
On the Configure Table Reader Actions pop-up window:
6.
7.
Select the Action. If you have not run this before you will have to enter
a new Action name with description. For example, LFA1 Vendors.
Select the SAP Table you want to download data from. For example
LFA1.
If you have not logged on to SAP, you will need to log on to SAP now using
your SAP account details on either the:
8.
Select SAP System pop-up window (only if you have previously
activated the Use EzyScript’ SAP Login Screen option); or
Standard SAP login screen.
Use the Field menu and the Add Field button to add fields to the
Selected Fields for the template.
Reader allows you to build basic SQL type queries to enable you to restrict,
or make the data more specific as part of the download. For example, a
linear selection of a single material number, or range or material numbers.
Z Option Inc.
Page 46 of 59
Last Updated: 14-Nov-2014 [1411141620]
EzyScript
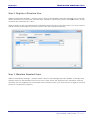
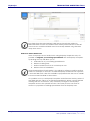
TRANSACTION SCRIPTING TOOL
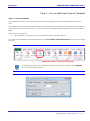
To create a SQL Type query on an attribute highlight the attribute in the
Query Builder Drop Down Menu.
10. Select the Unit of Measure. For example EQ. Enter the value you want
to restrict the query to. For example, LAND1 (Country Key) EQ (equals)
AU.
11. Enter Count. The Count will limit the number of records being Reader.
For example, 10.
9.
12. Select Save.
If you have already logged on to SAP, and activated the Silent Logon
option, EzyScript has saved your username and password, and will log you
on to SAP in the background.
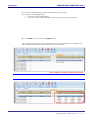
Follow the steps above to modify an existing Action Type. Select the Action
you wish to modify. Add or remove fields and/or attach SQL type restrictions
on the search. Select the Save function to overwrite the existing Type.
Built-In Features and Functionality
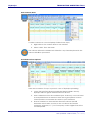
Key Fields
Z Option Inc.
Page 47 of 59
Last Updated: 14-Nov-2014 [1411141620]
EzyScript
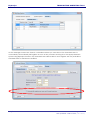
TRANSACTION SCRIPTING TOOL
Key Fields from the selected SAP Table are automatically added to
Selected Fields section and marked with the Key Field indicator in the left
hand column. Additional Fields need to manually added using the Field
drop down menu
Reference Other Worksheets
Users of EzyScript are not restricted to using EzyScript templates only. It is
possible to integrate your existing spreadsheets with an EzyScript template.
Operating this way will allow you to:
5. Maintain use of your existing spreadsheets
6. Reduce training time
7. Roll-out worksheets from a central super user
8. Reduce time of installation
Using standard Excel functionality, it is possible to reference cells in another
sheet. For example, in Actual 1 of a blank EzyScript workbook the equation,
=’Actual 2’!B8+’Plan 1’!B6. This cell will be populated with the sum of cell B8
in sheet Actual 2 and B6 in sheet Plan 1.
It is possible to set up an EzyScript template and reference the key values of
that field with the values of an existing spreadsheet. When a user is finished
working with the usual sheet, they need only change to the EzyScript
template and run the Upload function. The same process can work in
reverse to populate an existing spreadsheet from an EzyScript one.
Z Option Inc.
Page 48 of 59
Last Updated: 14-Nov-2014 [1411141620]
EzyScript
TRANSACTION SCRIPTING TOOL
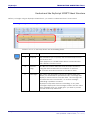
Hide Columns/Rows
To Hide a column or a row in EzyScript follow these steps;
5. Right click on the column letter or row number
6. Select ‘Hide” from the Menu
The column will now be hidden but still active. Any formulas placed in the
column will still be processed.
Exclude Rows from Upload
There are a number of ways to prevent a row of EzyScript uploading
4. Leave the interface direction indicator blank (cell B11 above).
EzyScript will now ignore all information in this row.
5. Insert a blank row into the worksheet (row 10 above). You can insert
as many blank rows as wanted. These are a good place to insert
total formulas to summarize the values in your worksheet
6. Enter a formula into the Interface direction column that will
determine what value to enter. In row 12 above the formula
entered is =IF(K12>0,"U",""). So if company code is higher than 0 the
row will upload.
Z Option Inc.
Page 49 of 59
Last Updated: 14-Nov-2014 [1411141620]
EzyScript
TRANSACTION SCRIPTING TOOL
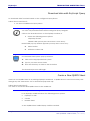
Download data with EzyScript Query
To download data from SAP based on the configured Query Sheet.
Follow these instructions if:
You have established a Query Sheet.
Download Data using a Prepared Query Sheet
You can only download data after running the Query Designer.
Click on the Download icon on the EzyScript toolbar; or
1.
Select the following menu options:
EzyScript for SAP
Read Table (formerly titled 'Download Current Sheet')
Read Table pop up window appears (formerly titled 'Load Action')
2.
Select Action
3.
Hit Enter or select OK
Log on to SAP
On the Select SAP System pop-up window:
1. Click on the appropriate SAP system
2. Type in your User Access Data
3. Press the Enter key or click on the OK button
The download process will begin.
Create a New QUERY Sheet
Create a new QUERY Sheet in an existing EzyScript Workbook. A QUERY Sheet is used to record a path
through any SAP transaction. It is for download purposed only.
Follow these instructions if:
You want to create an NEW QUERY Sheet in the workbook.
Select Create Query Sheet Menu Option
In an EzyScript workbook select the following menu options:
EzyScript for SAP
Create
Reader Sheet
A new QUERY Sheet called Query 2 will be created.
Z Option Inc.
Page 50 of 59
Last Updated: 14-Nov-2014 [1411141620]
EzyScript
TRANSACTION SCRIPTING TOOL
You are now ready to populate the new QUERY Sheet using a configured Query
recording.
Schedule Processing and Process Multiple Sheets
EzyScript allows you to process multiple worksheets at the same time. You can also choose to process
immediately, or schedule processing to occur at a specific time or date.
Follow these instructions if:
You want to process multiple EzyScript worksheets simultaneously, or schedule processing for another
time.
All of the EzyScript workbooks containing the sheets that you want to process need to be open before
you select the Process Multiple EzyScript Sheets function.
Select the Process Multiple EzyScript Sheets Function
In an EzyScript workbook either:
1. Click on the Batch icon on the EzyScript toolbar; or
2.
Select the following menu options:
EzyScript for SAP
Batch Processing
The Process Multiple EzyScript Worksheets pop-up window will be displayed listing all
the sheets within the EzyScript Workbooks that you currently have open in Excel.
Z Option Inc.
Page 51 of 59
Last Updated: 14-Nov-2014 [1411141620]
EzyScript
TRANSACTION SCRIPTING TOOL
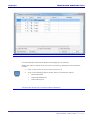
Select the Worksheets to be Processed
On the Process Multiple EzyScript Worksheets pop-up window:
1. Select the sheets that you want to process by clicking on the checkbox beside:
Each of the sheets that you want to process, or
One of the following options under the list of worksheet names:
o
Select All
o
Select All Downloads
o
Select All Uploads
2. Click on the Edit Selected button
The Enter Key Data pop-up window will be displayed.
Z Option Inc.
Page 52 of 59
Last Updated: 14-Nov-2014 [1411141620]
EzyScript
TRANSACTION SCRIPTING TOOL
Enter Key Data
On the Enter Key Data pop-up window:
1. Specify the following fields:
Functional Stream
Transaction Code
Controlling Area
2. Press the Enter key or click on the OK button
The Process Multiple EzyScript Worksheets pop-up window will be redisplayed showing the Key Data information that you have just entered.
Tip
For a quick way to do a re-forecast, combine a download of plan and
actual data by having two download rows for one sheet. The first row
would download actual data for periods 1 to X, and the second row would
download plan data for periods Y to 12.
Z Option Inc.
Page 53 of 59
Last Updated: 14-Nov-2014 [1411141620]
EzyScript
TRANSACTION SCRIPTING TOOL
Check Processing Details and Make Changes if Required
On the Process Multiple EzyScript Worksheets pop-up window:
1. Check that you have selected each of the sheets that you want to
process
2. For each worksheet that you have selected, check that the following
details are correct:
Stream
Transaction Code
Controlling Area
3. Change any incorrect details, if required:
Select the sheet
Click on the Edit Selected button
Change the details on the Enter Key Data pop-up window
4. Use any of the other functions on the pop-up window, if required
Z Option Inc.
Page 54 of 59
Last Updated: 14-Nov-2014 [1411141620]
EzyScript
TRANSACTION SCRIPTING TOOL
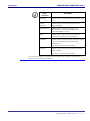
Other Functions
Description
Add Row
Allows you to add sheets to the processing
list.
Delete
Selected
Allows you to remove sheets from the
processing list.
Edit Selected
Allows you to change the Key Data
information used for uploading to, or
downloading from, SAP.
Close
Allows you to exit the pop-up window
without processing any worksheets.
Schedule
Allows you to specify when, and how often,
you want the selected sheets to be
processed.
For more information see Step 6.
Execute
Allows you to process the selected sheets
immediately.
For more information see Step 6.
You are now ready to schedule processing of the selected worksheets, or
execute processing immediately.
Z Option Inc.
Page 55 of 59
Last Updated: 14-Nov-2014 [1411141620]
EzyScript
TRANSACTION SCRIPTING TOOL
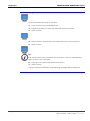
Execute Processing Immediately or Select Schedule Processing
On the Process Multiple EzyScript Worksheets pop-up window:
1. To process immediately, click on the Execute button; OR
2. To schedule processing for a later date, click on the Schedule button
If you have not logged on to SAP, you will need to log on to
SAP now using your SAP account details on either the:
Z Option Inc.
Select SAP System pop-up window (only if you have
previously activated the Use EzyScript' SAP Login Screen
option); or
Standard SAP login screen.
Go to Step 7
Page 56 of 59
Last Updated: 14-Nov-2014 [1411141620]
EzyScript
TRANSACTION SCRIPTING TOOL
Log on to SAP
On the Select SAP System pop-up window:
Click on the appropriate SAP system
Type in your User Data
Press the Enter key or click on the OK button
If you selected to Execute, processing begins immediately. When
processing is complete a message window will be displayed, and the Last
Processed column on the Process Multiple EzyScript Worksheets pop-up
window will be updated.
If you selected to Schedule, the Schedule Processing pop-up window will
be displayed.
Z Option Inc.
Page 57 of 59
Last Updated: 14-Nov-2014 [1411141620]
EzyScript
TRANSACTION SCRIPTING TOOL
Enter Scheduling Details
On the Schedule Item pop-up window:
1. Type a name for the scheduling task
2. Define how often you want the selected sheets processed
3. Click on Next
4. Select the time and date for the selected sheets to be processed
5. Click on Next
Z Option Inc.
Page 58 of 59
Last Updated: 14-Nov-2014 [1411141620]
EzyScript
TRANSACTION SCRIPTING TOOL
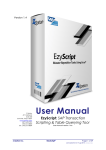
Tip:
This screen needs to be completed by the person who has administrative
rights to the PC you are using.
6. Type the user name and password for the PC
7. Click on Next
The job has been scheduled, and following message will be displayed.
Z Option Inc.
Page 59 of 59
Last Updated: 14-Nov-2014 [1411141620]