1
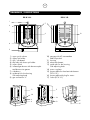
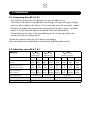
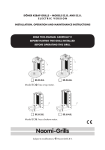
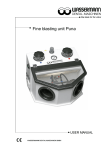
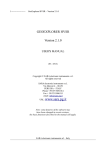
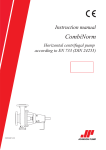
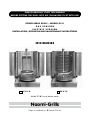
PLEASE CAREFULLY STUDY THIS MANUAL
BEFORE PUTTING THIS GRILL INTO USE (OR HAVING IT PUT INTO USE)
DÖNER KEBAP GRILLS – MODELS ec.u.
gas v ersion
elec t ric v ersion
INSTALLATION, OPERATION AND MAINTENANCE INSTRUCTIONS
CE1312BU5388
EC.U.1.G.
EC.U.1.E.
Model EC.U. has a bottom motor.
Naomi-Grills
Subject to modifications. © Naomi-Grills B.V.
2
technical data
Type
Number of burners
Rated nominal load
Gas consumption (m3/h)
Max. meat weight
Dimensioons: w x d x h
incl. gas knob
Weight
Motor
Type
Number of electrical elements
Mains
EC.U.1.G.
1
Refer to table on page 8
5 kg
37,5 x 37,5 x 51cm
11 kg
230 V • 50 Hz • 4 W
1 Revolution per minute
EC.U.1.E.
1
230 V • 50 Hz
Current
10,8 A
Power consumption
2,5 kW
Max. meat weight
Dimensions: w x d x h
incl. power regulator
Weight
Motor
5 kg
37,5 x 37,5 x 51cm
11 kg
230 V • 50 Hz • 4 W
1 Revolution per minute
3
table of contents
drawings/descriptions
Model EC.U.1.G. / Model EC.U.1.E.
page 4
Technical data
page 2
general safety regulations
page 5
1. safety instructions
1.1. Safety instructions concerning Installation
(Connecting and Locating)
1.2. Safety instructions for the User
page 6
page 7
2. Connecting
2.1. Connecting Gas (EC.U.1.G.)
2.2.Table of Gas types (EC.U.1.G.)
2.3.Connecting Mains (EC.U.1.E.)
2.4.Connecting Mains (Motor)
page
page
page
page
3.initial use
page 9
4.using tcc
4.1. Igniting the gas burner
4.2. Using the electrical element
page 10
page 10
page 11
5.positioning the spit
page 12
6.cleaning
page 13
7.maintenance page 13
8. Guarantee page 14
8
8
9
9
4
drawings / descriptions
EC.U.1.G.
1
EC.U.1.E.
7
2
3
12
6
4
5
1)
2)
3)
4)
5)
6)
7)
8)
9)
upper guide column
upper spit holder
spit / spit board
drip tray with lower spit holder
motor switch
infrared gas burner with thermocouple
and burner wire gauze
side doors
guide rails for the housing
with adjusting knob
gas connection ½”
11
10) gas tap with off, intermediate
and full position
11) housing
12) electrical element
13) guide rails for the housing
with adjusting knob
14) power regulator
15) power cable for the electrical element
(EC.U.1.E.)
16) power cable with plug for motor
17) socket (EC.U.1.E.)
11
10
9
8
14
17
13
16
15
5
general safety regulations
IMPORTANT:
-You HAVE TO STUDY this MANUAL carefully before having this
Döner Kebap grill CONNECTED and before OPERATING THIS GRILL or
allowing IT To BE OPERATED.
-THIS GRILL MAY ONLY BE MAINTAINED OR REPAIRED BY QUALIFIED
EXPERTS.
- Please also have the technician carefully read through this
manual before carrying out maintenance or repairs to this
grill.
- When you let others operate this grill, they too HAVE TO study
this MANUAL carefully before OPERATING this grill.
-YOU NEED TO COMPLY WITH ALL NATIONAL, REGIONAL AND LOCAL
REQUIREMENTS AND REGULATIONS.
- daily cleaning, regular maintenance and periodic inspection OF
THIS DEVICE ARE ESSENTIAL.
6
1. safety instructions
1.1. Safety instructions concerning Installation (Connecting and Locating)
EC.U.1.G.
- Gas and power supply have to comply with all national, regional and local
requirements and regulations.
- The grill may only be connected and used in accordance with all applicable
requirements and regulations.
- Before connecting, check if the device is suitable for the gas to use and the electricity
present. Refer first to the specifications on the type plate on the device.
- Sealing of the gas hose, couplings and connections has to be tested professionally
for leaking.
Performing a leak test with an open flame is extremely dangerous, can result in
serious injury and is strictly forbidden!
EC.U.1.E.
- Power supply have to comply with all national, regional and local requirements and
regulations.
- The grill may only be connected and used in accordance with all applicable
requirements and regulations.
- Before connecting, check if the device is suitable for the electricity present. Refer first
to the specifications on the type plate on the device.
EC.U.1.G. and EC.U.1.E.
- The radiant heat is intensive, make sure that all flammable materials are removed
within a minimum radius of 1,5 meters from the device.
- Fire regulations must be scrupulously observed.
- Always take care of optimum fire prevention, the appropriate extinguishing materials
and of adequate knowledge of how to deal with fires.
- The device has to be placed level and on a solid base.
- The device may under no circumstances be placed in the vicinity of flammable
materials.
Therefore, the device also may not be placed on flammable support (such as for
example plastic or wood; use for example stainless steel).
7
1.2. Safety instructions for the User
- This grill is to be operated by competent persons only and only after careful reading
of this complete manual.
- Please note that the grill can become very hot during use.
- Pay attention to the hygiene safety requirements and regularly clean the appliance
everyday.
- After use, turn off the main gas supply and set the motor switch to off. (EC.U.1.G.).
- Never leave a device in operation unattended.
- Repairs and maintenance on the device are to be done by qualified professionals
exclusively.
- The device is not allowed to be moved during operation.
- Movement is only allowed in cooled condition.
- The device may not be used for other purposes than it has been designed for.
- The area in which the unit is used must be well ventilated.
- If there is any problem or doubt about the operation of the unit, turn off the main gas
supply immediately (EC.U.1.G.). Disconnect all electrical connections to the unit (pull
the plug from the socket).
- Prevent overheating of the power cord. Never use damaged cords.
- Before cleaning the grill, when in doubt as to whether it is functioning properly, in the
event of defects or failures, for repairs and in the event of accidents or calamities:
- immediately close the gas tap of the main supply to the device (close it also after
use) (EC.U.1.G.),
- disconnect the electrical connections with the device (remove the plugs from the
sockets); if necessary de-activate the relevant fuses.
Insertion and removal of the spit is only allowed when the device has cooled down.
If necessary, wear insulated gloves.
8
2. connecting
2.1. Connecting Gas (EC.U.1.G.)
- First check the present gas sort/gas pressure you are about to use.
Then check if the device is equipped for connecting to this particular gas sort/gas
pressure: refer to data on the device. If the mentioned values do not match, replace
the device or adapt it by replacing low-setting controls and/or nozzles: see table
below. In the last case the data on the device have to be adjusted too.
- Check the burner function in the intermediate position. If necessary, adjust the
function with the low-setting control.
Contact the supplier where the (new) device was bought.
Have connections and modifications only done by qualified professionals.
2.3. Table Gas sorts (EC.U.1.G.)
Category
I2E & I2H
I2ELL & I2L
I3B/P & I3+
Natural gas
Natural gas
Butane / Propane
Gas sort
G-20
G-20
G-25
G-25
G-30
G-30
G-30
G-31
Connecting pressure/gas
pressure
20
mbar
25
mbar
20
mbar
25
mbar
30
mbar
36
mbar
50
mbar
37
mbar
Rated nominal load
with 1 burner (netto)
kW
3,02
kW
3,40
kW
2,90
kW
3,25
kW
2,1
kW
2,27
kW
2,72
kW
2,05
Gas consumption
with 1 burner
m /h
0,325
3
m3/h
0,363
m /h
0,361
3
m /h
0,07
3
m /h
0,082
3
m /h
0,082
Manifold/nozzle
Kleinstelschroef
Gas connection
3
1,35 mm
3
m /h
0,403
m /h
0,064
1,53 mm
0,75 mm
1,75 mm
0,75 mm
1/2 “
3
9
2.3. Connecting Mains (EC.U.1.E.)
- Before connecting the device electrically, refer first to the specifications on the type
plate on the device, the technical specifications on page 2.
- All electrical supplies to the device must be grounded.
- If the available electrical supplies are not suitable, contact an accredited installer
and/or your electricity supply company.
- The device must be connected by permanent, direct connection.
- Have connections and modifications only done by qualified professionals.
Model EC.U.1.G.
- 1 power cable (with plug) for the motor
Model EC.U.1.E.
- 1 socket (page 4, 17) to connect the motor
- 2 power cables (with plug) ,1 for the motor, 1 for the electrical element
2.4. Connecting Motor
Motor specifications
Mains
Power consumption
Revolutions : 230 V – 50 Hz
:4W
: 1 Revolution per minute
3. initial use
Warning:
Ensure that all packaging material and foils have been
removed before switching on the burner or the element for
the first time.
10
4. using the gas burner
4.1. Igniting the Gas burner (EC.U.1.G.)
The grill (EC.U.1.G.) is fitted with an infrared gas burner.
off
full
intermediate
The burner can be adjusted continiously in between fullposition and intermediate position.
The burner has a thermocouple protection, which closes off the gas supply when the
burner has gone out.
- Depress the gas knob for the burner and turn it to the fully open position: the gas
supply is opened.
- Keep the gas knob pressed (in full position) and put an open flame, for example a
match, to the burner wire gauze.
- The burner has to ignite within approx. 5 seconds. In case the burner does not ignite,
release the gas knob and put it in off-position.
- Keep the gas knob pressed after ignition until the burner wire gauze becomes red hot
(keep pressed for at least 20 seconds though).
- The gas knob then can be adjusted continuously in between full-position and
intermediate position.
- After the burner has gone out, put the gas tap in the off-position.
Before you re-ignite the burner wait for approx. 60 seconds.
By selecting the appropriate position the meat may be grilled quickly or slowly or kept
warm, taking into account:
- the kind of meat
- the thickness and height of the meat on the spit
- the distance of the meat to the gas burner
After use, turn off the main gas supply and set the motor switch to off. (EC.U.1.G.)
11
4.2. Using the electric element
The grill (EC.U.1.E.) is fitted with an electric element.
The element is regulated by a power regulator.
4 positions are stipulated on the power regulator:
0, 1, 2 and 3.
Between the 0-position (off) and the 3-position (full) every desired position may be set
continuously.
By selecting the appropriate position the meat may be grilled quickly or slowly or kept
warm, taking into account:
- the kind of meat
- the thickness and height of the meat on the spit
- the distance of the meat to the electric element
Switch the burner off after use.
12
5. positioning the spit
Slide the housing (11) as far back as possible and tighten the adjusting knob
(8) EC.U.1.G. / (13) EC.U.1.E.
Move the housing (11) to place it at
the required distance from the meat
and fasten the adjusting knob.
13
6. cleaning
Before cleaning the grill:
- close the gas tap of the main supply to the device (EC.U.1.G.)
- disconnect the electrical connections with the device (remove the plugs from the
sockets)
- wait until the grill has cooled down completely
Daily clean the entire grill very thoroughly after use.
Avoid corrosive, abrasive or other aggressive agents, using for example for the
stainless steel special grill cleaner.
Do not use hard, sharp or scratching objects.
Do not allow water or other fluids to penetrate the device.
Never use a water jet. The grill may not be immersed.
7. maintenance
It is essential to maintain the grill regularly considering hygiene, reliability in operation
and safety.
Have maintenance exclusively done by qualified professionals.
The following maintenance activities have to be done at least once a year (EC.U.1.G.):
General check considering operation and safety, among others:
- Checking the operation of the gas valve and thermocouple.
- Checking the ignition and operation of the burner.
- Checking the burner wire gauze and glow effect.
- Cleaning the air supply inlet to the burner.
14
8. guarantee
The warranty for this grill is fully transferred to the retailer from which this unit was
purchased as new. Without the original receipt of this purchase, all guarantee
obligations expire.
All obligations also expire:
- if non-qualified professionals installed, maintained or repaired this grill,
- if any part of this grill has been replaced by non-original Naomi-Grills B.V. parts,
- if the grill is not operated professionally or used for purposes other than for which it
is intended,
- if any instruction from this manual has not been observed.
Naomi-Grills
Subject to modifications.
© Naomi-Grills B.V.
Naomi-Grills B.V.
Anton Philipsweg 9 - 11 • 1422 AL Uithoorn • The Netherlands
Telephone +31 297 560 170 • Telefax +31 297 560 187
e-mail: [email protected] • www.naomi-grills.com
Naomi-Grills