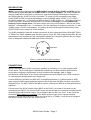
1
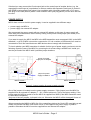
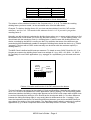
Pay attention if you open and close the MSY2 case. Use only a suitable screw driver. We cannot
take back units if the case or LEDs are damaged and the warranty will be lost during such
manipulations. If you are not sure whether your are able to do the modification send the unit to
your local dealer or to Doepfer Musikelektronik, Graefelfing (Germany).
The external power supply (AC adapter) is NOT included with the MSY2 and must be purchased
locally by the user. We recommend an VDE approved AC adapter but MSY2 will work with every
AC adapter being in accordance with the following specifications. The adapter must be able to
deliver 7-12 V DC unstabilized or stabilized voltage, as well as a minimum current of 100 mA. The
POLARITY of the low voltage plug connected to the MSY2 must be pin = +7...12V and ring = GND
(see sketch on the MSY2 housing). If the polarity is incorrect, MSY2 will not function. However,
there is no danger of damage to the circuitry since it is protected by a diode. If the MSY2 is used in
Germany the external power supply must be VDE approved.
When using an external power supply the MSY2 is SWITCHED ON by plugging the AC adapter
into a wall outlet and connecting it to the jack labeled "9V DC" of the MSY1. There is no separate
ON/OFF switch.
OPERATION
After power on (vie external AC adapter or MIDI In) the Clock LED must light up and remain on
until the first MIDI clock event occurs. During this period the Clock LED works as a power indicator.
If the Clock LED does not light up the AC adapter used is not suitable or does not work (or the
power supply via MIDI In is not possible, see preceding chapter) or the MIDI transmitter is already
sending MIDI Clock events. In the last cast you should set the MIDI transmitter to Stop mode
(normally by pressing a Stop button). Most MIDI devices stop transmission of MIDI Clock events
during stop mode.
In case of an incoming MIDI START event (normally followed by MIDI CLOCK signals) the START
LED will light up and the CLOCK LED will flash indicating the tempo. Because of the inertia of the
eye higher frequencies are not perceptible.
In case of an incoming MIDI STOP event the Start/Stop LED turns off and normally the Clock LED
as well as most of the MIDI devices stop the transmission of Clock events in Stop mode. In case
that the MIDI transmitter is sending Clock events in the stop mode too the Clock LED will continue
flashing.
If one of the two SYNC outputs of the MSY2 is connected faultless to your device equipped with a
SYNC input socket it should respond to the MIDI events, i.e. start, stop and change the tempo via
MIDI. If the two LEDs of the MSY2 display properly but your device does not respond there is
probably a fault in the connection between MSY2 and your device (unsuitable cable) or the SYNC
input of your device is not switched to SYNC-In or the SYNC input is not in accordance with the
SYNC standard.
If you want to slow down the SYNC clock frequency you may change the CLOCK DIVIDING
FACTOR. The factory setting is 1:1 conversion, i.e. each MIDI Clock trigger a SYNC Clock pulse.
To change the dividing factor you have change the setting of the first 4 DIP switches located at the
bottom of the MSY2 case. The dividing factor can be set between 1 and 16. The valences of the 4
DIP switches are 8, 4, 2, 1 (from left to right, see pictures 3 and 4).
MSY2 User's Guide – Page 3