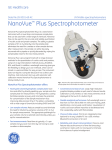
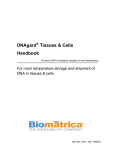
1
GE Healthcare
illustra
triplePrep Kit
See back cover for
quick reference
protocol
card
For the isolation of genomic DNA, total RNA and total
denatured protein from a single undivided sample of tissue
or cultured cells
Product booklet
Code: 28-9425-44
Page finder
1. Legal
4
2. Handling
2.1. Safety warnings and precautions
2.2. Storage
2.3. Expiry
5
5
6
6
3. Components
3.1. Kit contents
3.2. Materials to be supplied by user
3.3. Equipment needed
7
7
9
10
4. Description
4.1. Introduction
4.2. The basic principle
4.3. Product specifications
4.4. Typical output
11
11
13
18
20
5. Protocol
23
5.1. Preparation of working solutions
24
5.2. Protocol for isolation of DNA, RNA and Protein from tissue, cultured cells and cells from whole blood 26
6. Appendices
6.1. Tissue homogenization considerations
6.2. Estimation of cell density
6.3. DNA handling and quantification
6.4. RNA handling and quantification
6.5. Protein handling and quantification
6.6. DNA contamination removal in eluted RNA
6.7. RPM to RCF calculation
6.8. Troubleshooting guide
6.9. Related products
2
37
37
39
40
41
42
43
44
45
53
7. References
57
Quick Reference Protocol Card Back Cover
Tear off sheet containing protocols for the experienced user isolating DNA, RNA and protein from tissue or
cultured cells.
3
1. Legal
Product use restriction
The components of the illustra™ triplePrep Kit have been designed,
developed and sold for research purposes only. They are suitable
for in vitro use only. No claim or representation is intended for its
use to identify any specific organism or for clinical use (diagnostic,
prognostic, therapeutic, or blood banking).
It is the responsibility of the user to verify the use of illustra
triplePrep Kit for a specific application as the performance
characteristic of this kit has not been verified to any specific species.
GE, imagination at work and GE monogram are trademarks of
General Electric Company.
illustra, Ficoll-paque, PuReTaq, Ready-To-Go, HyBond, Deep Purple,
ECL, CyDye, Rainbow and NanoVue are trademarks of GE Healthcare
companies.
All third party trademarks are the property of their respective owners.
© 2008–2009 General Electric Company-All rights reserved.
Previously published 2008. Date of revision May 2009.
All goods and services are sold subject to the terms and conditions of
sales of the company within GE Healthcare which supplies them.
A copy of the terms and conditions is available upon request.
Contact your GE Representative for the most current information
http://www.gelifesciences.com
GE Healthcare UK Limited.
Amersham Place, Little Chalfont,
Buckinghamshire. HP7 9NA UK.
4
2. Handling
2.1. Safety warnings
and precautions
Warning: This protocol
requires the use of Ethanol
and Acetone.
Warning: For research use
only.
Not recommended or intended
for diagnosis of disease in
humans or animals. Do not
use internally or externally in
humans or animals.
Lysis buffer type 15 and Protein
precipitation buffer type 1 are
harmful if ingested, inhaled,
or absorbed through the skin,
and can cause nervous system
disturbances, severe irritation,
and burning. They are
destructive to the eyes, skin,
and mucous membranes of the
upper respiratory tract. Gloves
should always be worn when
handling these solutions.
All chemicals should be
considered as potentially
hazardous. Only persons
trained in laboratory techniques
and familiar with the principles
of good laboratory practice
should handle these products.
Suitable protective clothing
such as laboratory overalls,
safety glasses, and gloves
should be worn. Care should be
taken to avoid contact with skin
or eyes; if contact should occur,
wash immediately with water
(see Material Safety Data Sheet
and/or Safety Statements for
specific recommendations).
Use of this product with cells,
tissue or tissue products
should be considered
biohazardous. Follow
appropriate safety procedures
while using this kit and when
handling DNA, RNA and protein
isolated from these sources.
Waste effluents from this kit
should be decontaminated
with bleach or by a
detergent-based method.
Decontamination with bleach
may be reactive, resulting in
5
foam and emission of ammonia
gas, and should be carried out
in an exhaust hood. Consult
local safety regulations for
disposal of all waste.
2.2. Storage
Store lyophilized RNase-free
DNase I at 4°C on arrival to
extend its shelf life. Once
reconstituted in RNase-free
water, aliquot and store DNase
at -20°C. Avoid vigorous mixing
of the enzyme.
All other kit components should
be stored at room temperature
(20–25°C). Storage at lower
temperatures may cause
precipitation of salts.
2.3. Expiry
For expiry date please refer to
outer packaging label. DNase
reconstituted in RNase-free
water is stable for 6 months
when stored at -20°C
6
3. Components
3.1. Kit contents
Identification
Pack Size
Cat. No.
Lysis buffer
type 15
(blue colored
cap)
10 purifications
50 purifications
sample pack
28-9425-44
75 ml
75 ml
(Remove
(Remove
aliquot and add
aliquot and add
2-Mercaptoethanol 2-Mercaptoethanol
to aliquot before
to aliquot before
use)
use)
12 ml
12 ml
Wash buffer
(Add 48 ml Ethanol (Add 48 ml Ethanol
type 6
before 1st time
before 1st time
(yellow colored
use)
use)
cap)
Elution buffer
12 ml
12 ml
type 5
(silver colored
cap)
Elution buffer
7.5 ml
7.5 ml
type 9
(pink colored
cap)
Protein
2 × 17.5 ml
2 × 17.5 ml
precipitation
buffer type 1
(green colored
cap)
DNase I
1 vial
1 vial
(black colored
cap)
7
DNase reaction
buffer type 1
(red colored cap)
illustra mini
columns (DNA,
orange o-ring)
illustra mini
columns
(RNA, pink
o-ring)
Collection tubes
1.4 ml
1.4 ml
10
50
10
50
1 × 50
4 × 50
Refer to the Certificate of Analysis for a complete list of kit components
at http://www.gelifesciences.com.
GE Healthcare supplies a wide range of buffer types across the illustra
nucleic acid and TRAP protein purification range. The composition of
each buffer has been optimized for each application and may vary
between kits. Care must be taken to only use the buffers supplied in
the particular kit you are using and not use the buffers supplied in
other illustra kits (e.g. the Lysis buffer type 15 supplied in the illustra
triplePrep Kit is not the same as Lysis buffers type 1 & 4 supplied in the
illustra tissue & cells genomicPrep Mini Spin Kit).
In order to avoid confusion and the accidental switching of buffers
between kits, a numbering system has been adopted that relates to
the entire range of buffers available in the illustra purification range.
For example there are currently 15 Lysis buffers in the illustra range, 6
Wash buffers and 9 Elution buffers, denoted by Lysis buffer type 1–15,
Wash buffer type 1–6 and Elution buffer type 1–9 respectively. Please
ensure you use the correct type of Lysis, Wash and Elution buffer for
your purification.
8
3.2. Materials to be supplied by user
Chemicals:
• 2-Mercaptoethanol (14.3 M or >98%)
• Absolute Ethanol (molecular biology grade)
• Nuclease –free Water (molecular biology grade)
• Absolute Acetone (molecular biology grade)
• 2-D DIGE buffer (for easy protein re-suspension): 7 M Urea, 2 M
Thiourea, 4% (v/v) CHAPS, 30 mM Tris-HCl, pH 8.5 (Chemicals in 2-D
DIGE buffer are supplied by GE Healthcare; see Section 5.1 page 24
for preparation details)
Protein resuspended in 2-D DIGE buffer can be used for SDS-PAGE or
Western Blot by mixing with 1 volume of 20% SDS (Sodium dodecyl
sulfate). Add appropriate sample loading buffer (i.e. 1 volume of
2× Laemmli buffer) and incubate at 70°C for 10 minutes before gel
loading.
• Ficoll-Paque™ Plus for the in vitro isolation of lymphocytes from
freshly drawn blood (supplied by GE Healthcare)
• Optional: Phosphate buffered saline (PBS) if processing fresh
cultured cell lines
• Optional: Freshly-drawn citrated blood (>20 ml) for the preparation
of lymphocytes on Ficoll-Paque PLUS
• Optional: Balanced salt solution if processing freshly-prepared
lymphocytes
• Optional: Liquid nitrogen
• Optional: Protein concentration determination reagents e.g. 2-D
Quant Kit (supplied by GE Healthcare)
Disposables:
• 1.5 ml DNase & RNase-free microcentrifuge tubes
• DNase & RNase-free pipet tips
9
3.3. Equipment needed
• Microcentrifuge that accommodates 1.5 ml microcentrifuge tubes and
can spin at 16 000 × g or higher.
• Vortex mixer
• Rotor-stator homogenizer or mortar and pestle.
• Optional: Nuclease-free 20-gauge needle and syringe (1 ml) if using
mortar & pestle or for cell lysate homogenization.
10
4. Description
4.1. Introduction
The illustra triplePrep Kit is designed for the rapid extraction of
genomic DNA, total RNA and total denatured protein from a single
undivided sample starting from as little as 1 mg of animal tissue,
0.3 million cultured mammalian cells or 107 freshly-prepared
lymphocytes.
The protocols for extraction from both tissues and cell lines utilize
the same buffers. Although the protocols are rapid, they have been
designed to minimize shearing of genomic DNA, maintain the integrity
of the RNA and maximize proteome representation.
The entire procedure can be completed in as little as 45 minutes to
yield genomic DNA, total RNA and denatured total protein which are
compatible with most molecular biology applications. These are
summarized in Table 1.
Table 1.
Analyte
Downstream applications
Genomic DNA
Restriction enzyme digestion, PCR,
sequencing, array CGH
Total RNA
RT-PCR, cDNA synthesis, Expression array
Total Protein
SDS-PAGE, Western Blotting,
2-D DIGE, LCMS
DNA, RNA and protein have been successfully isolated from a range
of tissue types such as liver, kidney, spleen, brain, lung and intestine
and freshly-prepared lymphocytes from blood, and the cell lines HeLa,
NIH-3T3, CHO-K1 and HEK-293. Tissue amounts ranging from
1–20 mg can be used for each preparation. Cells amounts ranging
from 0.3–5 million cells can be used for each preparation. 107
lymphocytes isolated on Ficoll-Paque PLUS are required for nucleic
acid and protein preparation.
11
Although the kit is designed to isolate DNA, RNA and Protein, users
may select to only isolate 2 out of 3 analytes when following the
protocol. As shown in Fig 1, the DNA purification step does not affect
RNA and protein isolation; RNA purification step does not affect
protein isolation.
RNA in the flowthrough is stable for about 30 minutes at room
temperature or 60 minutes on ice depending on sample types.
Users may purify RNA immediately at this point by following Step 6
before returning to Step 3 for DNA purification to prevent potential
RNA degradation. DNA bound to the mini column is stable for at
least 30 minutes at room temperature. Experienced users may also
simultaneously purify DNA and RNA first to save time and ensure RNA
quality when DNase treatment is not needed.
The illustra triplePrep Kit conveniently provides a flexible lysis buffer
for the long-term storage of samples, avoiding the need for costly
stabilization reagents. Following sample disruption, samples can be
stored in Lysis buffer type 15 at -80°C for 6 months or up to 4 hours at
room temperature.
1. Sample Homogenization
& Lysis
Fig 1.
2. DNA binding
3. DNA wash 1
6. RNA binding
4. DNA wash 2
7. DNase treatment
(optional)
5. DNA elution
8. RNA wash
DNA Purification
9. RNA elution
RNA Purification
10. Protein precipitation
11. Protein wash
12. Protein resuspension
Protein Isolation
The kit contains sufficient reagents and columns for 50 (28-9425-44)
purifications of DNA, RNA and protein from 5 mg animal tissue or 1
million cultured cells.
12
4.2. The basic principle
Use of the illustra triplePrep Kit involves the following steps:
Fig 2
1.
Sample
homogenization & lysis
2.
DNA binding
3.
DNA wash 1
4.
DNA wash 2
RNA and Protein
in flowthrough
5.
DNA elution
6.
RNA binding
13
6.
RNA binding
(continued)
7.
DNase treatment
(optional)
8.
RNA wash
Protein in
flowthrough
9.
RNA elution
10.
Protein precipitation
11.
Protein wash
12. Protein resuspension
14
Table 2.
Step
Comments
Component
1. Sample
homogenization
and lysis
Tissue and cells are
lysed in presence of Lysis
buffer type 15 (with 2Mercaptoethanol)
Lysis buffer
type 15 (add 1%
2-Mercaptoethanol)
2. DNA binding
Chaotropic salt in Lysis
buffer type 15 promotes
the binding of DNA to
the silica membrane.
illustra mini columns
(DNA, orange o-ring)
3. DNA wash 1
Lysis buffer type 15
removes contaminants
from membrane bound
DNA
The ethanolic Wash
buffer type 6 removes
residual salts and dries
the silica membrane at
the same time.
DNA is eluted in a low
ionic strength buffer.
Acetone promotes the
binding of total RNA to
the silica membrane
in the presence of
chaotropic salt in Lysis
buffer type 15
On-column DNase
digestion removes
residual genomic DNA
bound to the silica
membrane
Lysis buffer type 15
4. DNA wash 2
5. DNA elution
6. RNA binding
7. DNase
treatment
(optional)
15
Wash buffer type 6
Elution buffer type 5
Acetone (user
supplied)
illustra mini columns
(RNA, pink o-ring)
DNase I and DNase
reaction buffer type 1
Step
8. RNA wash
9. RNA elution
10. Protein
precipitation
11. Protein wash
12. Protein resuspension
Comments
The ethanolic Wash
buffer type 6 removes
residual salts and dries
the silica membrane at
the same time.
RNA is eluted in RNasefree water
Acid and salt based
Protein precipitation
buffer type 1
Water solubilizes and
removes acid and salt
from protein pellet
Urea and detergent in
2-D DIGE buffer ensure
complete protein pellet
solubilization.
Component
Wash buffer type 6
Elution buffer type 9
Protein precipitation
buffer type 1
Water (user supplied)
2-D DIGE buffer (user
supplied)
1st time users of triplePrep should follow the detailed protocol in
section 5. The quick reference protocol is for experienced users only.
It is highly recommended that when processing a type of tissue or
cell for the first time, users should start with 5 mg tissue or 1 million
cells. Alter the input sample amount depending on initial results.
As shown in Fig 2, sample is lysed in Lysis buffer type 15, which
contains large amounts of chaotropic salts. This lysis buffer
immediately inactivates DNase, RNases and proteases, which are
present in virtually all biological materials, and creates appropriate
binding conditions that favor adsorption of DNA to the silica
membrane.
The DNA, RNA and protein (especially RNA) within tissue and cells are
vulnerable to attack by both endogenous enzymes and those in the
general laboratory environment.
16
Use fresh material whenever possible. Where this is not possible,
it is important that samples are flash frozen in liquid nitrogen
immediately and stored at -80°C or stored in a stabilizing agent.
Samples should always be stored at -80°C. Never allow tissues to
thaw before addition of Lysis buffer type 15 and disrupt samples in
liquid nitrogen, if possible.
DNA is bound to the 1st mini column (orange o-ring) in the presence
of a chaotropic solution. Contaminants are removed from DNA with
Lysis buffer type 15 and Wash buffer type 6. DNA is eluted with
Elution buffer type 5.
Total RNA and protein do not bind to the 1st mini column and are
collected in the flowthrough. Acetone is added to the flowthrough
and total RNA is bound to the 2nd mini column (pink o-ring). An
optional on-column DNase-digestion step may be undertaken
at this point (see Step 7, Page 33 for details of when to perform a
DNase digestion). Contaminants are removed from the total RNA
with Wash buffer type 6 and total RNA is eluted with Elution buffer
type 9.
Purified RNA should be treated with care because RNA is very
sensitive to trace contaminations of RNase, often found on general
labware, fingers and dust. Wear gloves at all times during the
preparation. Change gloves frequently. Wipe down all laboratory
surfaces with alcohol wipes regularly. To preserve stability, keep the
isolated total RNA frozen at -80°C for long-term storage.
Protein does not bind to the RNA mini column and is collected in the
flowthrough. A rapid protein precipitation step is undertaken and
the protein sample can then be washed and resuspended in 2-D
DIGE buffer for a 2-D DIGE study or SDS-PAGE and Western Blotting.
17
4.3. Product specifications
Figures shown are expected performance of illustra triplePrep Kit
shown in Table 3.
Table 3
Sample Type
Rat Liver
HeLa Cells
Sample input amount
1–20 mg
0.3–5 million
Genomic DNA yield
1–3 µg (per mg
tissue)
4–12 µg (per million
cells)
Total RNA yield
3–7 µg (per mg
tissue)
10–15 µg (per million
cells)
80–160 µg (per mg
tissue)
100–200 µg (per
million cells)
Protein yield
> = 1.7
Genomic DNA purity
(A260/A280)
Genomic DNA size
> = 15 kb
Total RNA purity
(A260/A280)
> = 1.9
Total RNA quality (RIN)
8.0–10
Total RNA quality
28s:18s
1.5–2.5
Time/preparation
(excluding lysis)
45–60 minutes
Note:The mini column with orange o-ring has a binding capacity of
20 µg for genomic DNA. About 15 µg of DNA can be eluted on 1st
elution if 20 µg or more DNA is present in the crude lysate. DNA yield
will not be increased when more than 20 µg of DNA is processed.
The mini column with pink o-ring has the binding capacity of 60 µg of
total RNA. About 45 µg of total RNA can be eluted on 1st elution if
60 µg or more total RNA is present in the flowthrough. RNA yield will
18
not be increased when more than 60 µg of RNA is processed.
Loading the system with sample containing more nucleic acids than
the columns can bind will not increase yield and sometimes may even
lower the quality and purity of purified nucleic acids.
For example, around 15 µg of genomic DNA and 45 µg of total RNA
usually can be isolated from 10 mg of rat liver, which contains
20–25 µg of genomic DNA and 50–70 µg of total RNA. However, DNA
and RNA yield will not be doubled if 20 mg of rat liver is processed due
to the capacity of DNA and RNA column being reached. Excess DNA,
that does not bind to the 1st column will flow through into the RNA
binding and elution steps.
If user has large amounts of tissue or cells, it is highly recommended
to split the samples and process as several samples for better quality
and yield of nucleic acids.
As protein is precipitated out without binding to any columns, yield
of protein is relatively linear to sample input amount (i.e. If 100 µg of
protein can be isolated from 1 mg of certain type of tissue, then
2000 µg of protein is expected from 20 mg of this type of tissue).
19
4.4. Typical output
Table 4. Typical yields and purities of genomic DNA, total RNA and
total Protein from different tissue and cells
Cell
DNA
RNA
HeLa
NIH-3T3
CHO-K1
HEK-293
Cell input
amount
(million)
1
1
1
1
Yield ( µg)
8.5
9.5
4.4
9.1
Purity (A260/
A280)
1.9
1.9
1.9
1.9
Yield ( µg)
13.7
7.9
6.6
10.1
Purity (A260/
2.1
2.1
2.0
2.0
Yield ( µg)
139
127
77
139
Tissue
Liver
Brain
Heart
Kidney
Lung
Spleen
10
10
10
10
10
10
Disruption
difficulty
Easy
Easy
Hard
Med
Med
Med
A280)
Protein
Tissue input
amount
(mg)
DNA
RNA
Yield ( µg)
14.6
6.8
9.8
17.0
15.5
18.8
Purity (A260/
A280)
1.9
1.8
1.9
1.9
1.8
1.8
Yield ( µg)
44
5.5
2.9
4.4
8.8
18.9
Purity (A260/
2.1
2.0
1.9
1.9
2.0
2.1
A280)
Need DNase
Protein
Yield ( µg)
Yes
No
No
Yes
Yes
Yes
1460
746
923
897
592
510
Yield and purities of genomic DNA total RNA and total Protein may
vary depending on nature and condition of input sample and user.
20
Fig 3. Genomic DNA from 1 million HeLa cells was isolated with
triplePrep kit and evaluated using 0.8% agarose gel electrophoresis.
2 µl of genomic DNA (100 µl elution) was loaded in each well.
Lamda
DNA
Ladder
23 kb
Fig 4. Total RNA from 10 mg rat liver was isolated with triplePrep kit
and evaluated using the Agilent 2100 bioanalyzer. The triplePrep kit
produces high quality RNA; the 28 s: 18 s = 2.2, RNA Integrity Number
(RIN) = 9.8
28s
18s
21
Fig 5. Total protein from 10 mg rat liver was isolated with triplePrep kit
and evaluated using a. Western Blot (β-Actin) and b. 2-D DIGE
Western blot (Rat liver)
β-Actin (42 kDa)
a.
b. Overlaid image (yellow) of triplePrep
(green) and reference gel (red)
As seen more spots are detected by
triplePrep method (green spots)
22
5. Protocol
Use of icons
The key below describes the purpose of the icons used throughout
the protocol booklet.
This icon is used to highlight particularly critical steps within the
protocol that must be adhered to. If this advice is not followed it will
have a detrimental impact on results.
This icon is used to highlight technical tips that will enhance the
description of the step. These tips may indicate areas of flexibility
in the protocol or give a recommendation to obtain optimum
performance of the kit.
This icon is used to highlight convenient points that the protocol can
be stopped.
Important notes
• External factors (sample nature, storage condition etc.) may affect
the quality and yield of isolated genomic DNA, total RNA and total
protein.
• 1st time users of triplePrep should follow the detailed protocol in
Section 5. The quick reference protocol is for experienced users
only.
• Do NOT overload the columns with too much starting material or
too much nucleic acid rich lysate. It is highly recommended that
when processing a type of tissue or cell for the first time, users
should start with small amount of sample input (5 mg tissue or 1
million cells). Alter the input sample amount depending on initial
results.
• It is highly recommended that users determine the amount of
starting material, especially during the first time processing certain
types of sample with triplePrep kit.
23
• It is important to load only 350 µl of initial homogenized sample in
Lysis buffer type 15 onto the genomic DNA mini column. The RNA
binding and protein precipitation have been optimized based on
350 µl of lysate being used.
• Perform all steps of the procedure (including incubation and
flowthrough storage) at room temperature, unless instructed
otherwise.
5.1. Preparation of working solutions
See Sections 3.2 & 3.3 for Materials & Equipment to be supplied by
user.
Lysis buffer type 15
For each sample being processed, aliquot 350 µl of Lysis buffer
type 15 to a fresh DNase & RNase-free tube and add 3.5 µl of
2-Mercaptoethanol. Prepare a fresh aliquot, based on total number
of samples being processed, each time the triplePrep kit is used.
2-Mercaptoethanol is not stable in Lysis buffer type 15.
Do NOT add 2-Mercaptoethanol directly to the kit bottle of Lysis
buffer type 15. Lysis buffer type 15 without 2-Mercaptoethanol is
required during the protocol
Wash buffer type 6
Add 48 ml Absolute Ethanol to Wash Buffer type 6 before use. Mix
by inversion and indicate on the label, by ticking the box, that this
step has been completed.
Store upright and at room temperature (20–25°C).
DNase I
Add 540 µl of RNase-free water to the DNase vial and incubate
for 1 minute at room temperature. Aliquot and store at -20°C.
Reconstituted DNase is stable for 6 months when stored at -20°C.
Avoid vigorous mixing of the enzyme. Do NOT vortex. Invert vial to
mix.
24
Protein pellet resuspension buffer (user supplied).
The 2-D DIGE buffer is a suitable buffer to resuspend protein pellets
obtained with the illustra triplePrep kit. Preparation instruction is
shown in Table 5.
Table 5. 2-D DIGE buffer preparation
100 ml Scale
Final concentration
Distilled water
40 ml
Urea
42.0 g
Thiourea
15.2 g
2M
Tris-HCI
0.36 g
30 mM
CHAPS (3-3-Cholamidopropyl)
4.0 g
4%
7M
dimethylammonio]-1- propanesulfonate)
Mix well (do not heat over 37°C).
Adjust final pH to 8.5 (8.0–9.0) and adjust to final volume with distilled water
Dispense into 5 ml aliquots and store at -20°C with a 3 month expiry date (if using for 2-D
DIGE study)
Protein resuspended in 2-D DIGE buffer can be used for 2-D DIGE
directly.
Protein resuspended in 2-D DIGE buffer can be used for SDSPAGE/Western Blotting by mixing with 1 volume of 20% SDS. Add
appropriate sample loading buffer (i.e. 1 volume of 2X Laemmli
buffer) and incubating at 70°C for 10 minutes before gel loading.
5% SDS or Laemmli buffer alone are not recommended for
protein resuspension due to the significant reduction in protein
solubilization efficiency.
The 2-D Quant Kit (supplied by GE Healthcare) is recommended for
protein concentration quantification. Please note 2-D DIGE buffer
is not compatible with Bicinchoninic Acid (BCA) or Bradford protein
quantification assays. Alternatively, 7 M Urea can be used for protein
resuspension and further diluted to less than 3 M to be compatible
with BCA or Bradford assays.
25
5.2. Protocol for isolation of DNA, RNA and
Protein from tissue, cultured cells and cells
from whole blood
Note: The illustra triplePrep Kit is not suitable for the preparation of
gDNA, total RNA and total protein from plasma or serum. Freshly
collected whole blood can be used for the isolation of DNA, RNA and
total protein when the lymphocytes are isolated and used as source
material.
Sample homogenization & lysis
The complete disruption and homogenization of animal tissue is
critical. Animal tissues are often solid and must therefore be broken
up mechanically as well as lysed. Depending on the disruption
method, the viscosity of the lysed sample has to be reduced further
for optimal results.
It is essential for efficient nucleic acid preparation that all the
nucleic acid contained in the sample is released from the cells
by disruption and that the viscosity of the sample is reduced by
homogenization. Following homogenization, the tissue should be
uniformly suspended in solution and free of any visible clumps.
Minimize any temperature increases at this stage. A rotor-stator
homogenizer is recommended due to its fast tissue disruption
speed, high recovery and consistency. See section 6.1 for further
information on tissue homogenization.
Fresh animal tissue should be either processed immediately or
snap frozen in liquid nitrogen. The triplePrep Kit is compatible with
available stabilization reagents, but RNA yield may be impacted.
The illustra triplePrep Kit conveniently provides a flexible solution
to the long term storage of samples, avoiding the need for costly
stabilization agents. Following sample disruption, samples can be
stored in Lysis buffer type 15 at -80°C for 6 months or up to 4 hours
at room temperature.
26
Frozen tissue should not be thawed but processed immediately
in Lysis buffer type 15 containing 2-Mercaptoethanol during
simultaneous mechanical disruption, e.g., with a rotor-stator
homogenizer. This ensures that the RNA is not degraded by RNase
before the preparation has started.
Fresh cultured cells can be lysed after pelleting or lysed directly on
the culture plate (for detailed protocol see note in Step 1 (iii)).
For the isolation of DNA, total RNA and total protein, uses are
referred to instructions included in the product insert describing
the fresh preparation of lymphocytes on Ficoll-Paque PLUS. 20 ml
of citrated whole blood should be precessed. Following lymphocyte
isolation, cells should be counted. At least 107 cells should be
used for isolating gDNA, total RNA and protein using the illustra
triplePrep Kit. Lymphocytes should be pelleted and re-suspended
in PBS as described in Step 1 (iii) (cell homogenization and lysis, see
page 28). Frozen cell pellets should not be thawed but processed
immediately in Lysis buffer type 15 containing 2-Mercaptoethanol.
Protocols are provided for use of a rotor-stator homogenizer or
a mortar and pestle combined with a needle and syringe. Either
protocol may be followed when processing tissue samples. A
separate protocol is provided when processing cultured cells.
If using any instrument for tissue disruption and homogenization,
ensure that you are familiar with the operating procedure by
referring to its user manual and handbook. Some instruments may
require use of greater than 350 µl Lysis buffer type 15. Please use
the volume recommended by your instrument and adjust sample
input accordingly. Load only 350 µl of crude lysate to the 1st mini
column (orange o-ring).
27
1 (i) Tissue homogenization & lysis using a
rotor-stator homogenizer
a. Select proper sized generator and suitable
sized tube for homogenization of a small
volume of sample (i.e., 350 µl or more)
b. Add 350 µl of Lysis buffer type 15 containing
2-Mercaptoethanol to the tube.
c. Add tissue sample (1–20 mg).
d. Homogenize the tissue according to
instrument’s user manual. Visually inspect
the prepared homogenate and ensure
thorough homogenization (No tissue pieces
should be visible).
Take care to keep the rotor tip submerged
in order to avoid excess foaming. If foaming
occurs during homogenization, let the
homogenate stand at room temperatures for
3–5 minutes.
e. Proceed immediately to Step 2 or store at
-80°C for up to 6 months.
Homogenized sample in Lysis buffer type 15
containing 2-Mercaptoethanol may be stored at
-80°C for up to 6 months.
1 (ii) Tissue homogenization & lysis using a
mortar & pestle and a needle & syringe
a. Dispense sufficient liquid nitrogen to cover
the bottom of a mortar. Immediately place
tissue (1–20 mg) in liquid nitrogen, and grind
the sample to a fine powder in the presence
of liquid nitrogen.
28
b. Allow the liquid nitrogen to evaporate but do
not allow the tissue to thaw.
c. Add 350 µl of Lysis buffer type 15 containing
2-Mercaptoethanol and grind further with
the pestle until no visible tissue pieces are
present.
d. Pass lysate at least 5 times through a DNase& RNase-free 20-gauge needle fitted with
1 ml sterile syringe.
e. Proceed immediately to Step 2 or store at
-80°C for up to 6 months.
Homogenized sample in Lysis buffer type 15
containing 2-Mercaptoethanol may be stored at
-80°C for up to 6 months.
1 (iii) Cell homogenization & lysis
a. Pellet up to 5 × 10⁶ cultured cells, or107
lymphocytes, prepared on Ficoll-Paque
PLUS in a 1.5 ml microcentrifuge tube by
centrifugation for 1 minute at 11 000 × g.
b. Completely remove the supernatant by
aspiration.
c. Wash the pellet with 500 µl PBS
d. Spin for 1 minute at 11 000 × g.
e. Completely remove the supernatant by
aspiration.
Cell pellet can be stored at -80°C for up to 12
months.
f. Add 350 µl of Lysis buffer type 15 containing
2-Mercaptoethanol.
29
g. Pipet up and down to resuspend the cell
pellet.
h. Homogenize by passing lysate at least
5 times through a DNase & RNase-free
20-gauge needle fitted with 1 ml sterile
syringe.
f. Proceed immediately to Step 2 or store at
-80°C for up to 6 months.
Homogenized sample in Lysis buffer type 15
containing 2-Mercaptoethanol may be stored at
-80°C for up to 6 months.
Cells grown in monolayer in a 6-well plate can
be lysed directly. Remove media and quickly
wash cells with 500 µl cold PBS. Remove
PBS and add 350 µl of Lysis buffer type 15
containing 2-Mercaptoethanol per well of the
6-well plate. Incubate for 1 minute at room
temperature. Pipet up and down several times
to resuspend and homogenize using a needle &
syringe as above.
Genomic DNA isolation
2 DNA binding
a. Place a new mini column (orange o-ring)
into a 2 ml Collection tube (provided).
b. Transfer the homogenized lysate from Step 1
(350 µl) to the column.
1 min 11 000 × g
c. Spin for 1 minute at 11 000 × g.
d. Save the flowthrough for RNA and Protein
30
isolation at room temperature. (Refer to Step
6 or Step 10 for further processing)
e. Transfer the column to a new 2 ml Collection
tube (provided). Proceed to Step 3.
Should the column clog, repeat Step 2c 1–2
times. If it still clogs, initial sample amount
should be reduced.
Users may purify RNA immediately at this
point by following Step 6 before returning to
Step 3 for DNA purification to prevent potential
RNA degradation. Experienced users may
also simultaneously purify DNA and RNA by
performing Steps 3 and 6, 4 and 8, 5 and 9 at
the same time when DNase treatment is not
needed.
3 DNA wash 1
a. Add 500 µl of Lysis buffer type 15
(without 2-mercaptoethanol) to the column.
b. Spin for 1 minute at 11 000 × g. Discard the
flowthrough.
500 µl Lysis buffer
type 15
1 min 11 000 × g
c. Place the column back into the same
Collection tube.
4 DNA wash 2
a. Add 500 µl of Wash buffer type 6
column.
to the
b. Spin for 1 minute at 11 000 × g. Discard the
Collection tube and its contents.
31
500 µl Wash buffer
type 6
1 min 11 000 × g
Please check that no residual flowthrough
remains in the column outlet. If any remains,
empty the Collection tube, put the column back,
repeat Step 4b.
c. Transfer the column to a fresh DNase-free
1.5 ml microcentrifuge tube (user supplied).
5 DNA elution
a. Add 100 µl of Elution buffer type 5
center of the column.
to the
b. Spin for 1 minute at 11 000 × g to collect the
purified DNA as the flowthrough in the 1.5 ml
microcentrifuge tube.
c. Discard the column and store purified DNA at
-20°C or -80°C. If not subjected to repeated
freeze-thaw cycles, DNA is stable for 12
months.
d. Proceed immediately to Step 6 to isolate RNA.
Total RNA isolation
6 RNA binding
a. Place a new mini column
new Collection tube
(pink o-ring) in a
b. Add 350 µl of Absolute Acetone to the
flowthrough from Step 2d. Mix well by
pipetting up and down several times. Transfer
the entire mixture to the mini column
.
32
1 min 11 000 × g
c. Spin for 1 minute at 11 000 × g.
d. Save the flowthrough for protein isolation
at room temperature. (Refer to Step 10 for
further processing)
1 min 11 000 × g
e. Transfer the column to a new Collection tube
(provided). Proceed to Step 7 or Step 8 as
required.
7 DNase treatment (optional)
triplePrep Kit’s mini column with orange o-ring
has the binding capacity of 20 µg DNA. Crude
lysate containing more than 20 µg DNA (for
example, when 10 mg rat liver or 3 million HeLa
Cells are processed) may require use of DNase
to remove residual genomic DNA in the isolated
RNA.
a. In a RNase-free microcentrifuge tube, add
10 µl of reconstituted DNase I
, 20 µl of
DNase reaction buffer type 1
and 70 µl
RNase-free water. Mix by flicking the tube. Do
not vortex.
b. Apply 100 µl of diluted DNase directly on the
center of membrane of the column. Incubate
for 10 minutes at room temperature. Proceed
to Step 8.
8 RNA wash
a. Add 500 µl of Wash buffer type 6
column.
33
to the
500 µl Wash buffer
type 6
b. Spin for 1 minute at 11 000 × g. Discard the
Collection tube and its contents.
1 min 11 000 × g
Please check that no residual flowthrough
remains in the column outlet. If any remains,
empty the Collection tube, put the column back,
repeat Step 8b.
c. Transfer the column to a fresh RNase-free
1.5 ml microcentrifuge tube (user supplied).
9 RNA elution
a. Add 100 µl Elution buffer type 9
center of the column.
to the
100 µl Elution
buffer type 9
50 µl or less of Elution buffer type 9 can be used
for achieving more concentrated RNA elution.
b. Spin for 1 minute at 11 000 × g to collect the
purified total RNA as the flowthrough in the
Collection tube.
c. Discard the column and store purified RNA
at -80°C. Purified RNA is stable for up to 12
months. Proceed to Step 10.
Total protein isolation
10 Protein precipitation
a. Transfer the entire flowthrough
(approximately 600 µl) from Step 6d to a new
1.5 ml microcentrifuge tube.
Flowthrough containing total protein can be
stored at -80°C for up to 6 months.
b. Add 600 µl of Protein precipitation buffer
type 1
.
34
1 min 11 000 × g
c. Mix vigorously and incubate for 5 minutes
at room temperature to precipitate the
proteins.
10 min 16 000 × g
d. Spin for 10 minutes at full speed (minimum
16 000 × g).
e. Carefully remove as much supernatant as
possible by pipetting or decanting.
11 Protein wash
a. Add 1 ml of distilled water to protein pellet
(user supplied).
b. Actively disperse protein pellet by pipetting
up and down at least 5 times.
c. Spin for 1 minute at full speed (minimum
16 000 × g).
Position tubes within the microcentrifuge with
cap hinge facing outward. Protein pellet will
then form at the bottom of the tube directly
beneath the cap hinge.
A second water wash may be repeated if
further removal of residual salt in protein pellet
is needed (e.g. 2-D DIGE or LCMS experiments)
d. Carefully remove as much supernatant as
possible by pippeting or decanting.
12 Protein resuspension
a. Add 50–500 µl of 2-D DIGE buffer (see Page
25 Table 5 for preparation instruction)
b. Incubate for 5 minutes at room temperature.
35
1 min 16 000 × g
The 2-D Quant Kit (supplied by GE Healthcare) should be used to
determine protein concentration. Please note 2-D DIGE buffer is not
compatible with BCA or Bradford assays. Alternatively, 7 M Urea can be
used for protein resuspension and further diluted to less than 3 M to be
compatible with BCA or Bradford assays
Protein resuspended in 2-D DIGE buffer can be used for SDS-PAGE by
mixing with 1 volume of 20% SDS. Add appropriate sample loading
buffer (i.e. 1 volume of 2× Laemmli buffer) and incubating at 70°C for 10
minutes before gel loading.
36
6 Appendices
6.1. Tissue homogenization considerations
The complete disruption and homogenization of animal tissue is
critical. Following homogenization, the tissue should be uniformly
suspended in solution and free of any visible clumps. It is highly
recommended that tissue is disrupted and homogenized as quickly as
possible while minimizing any temperature increase.
If using any instrument for tissue disruption and homogenization,
ensure that you are familiar with the operating procedure, by
referring to its user manual and handbook. Some instruments may
require use of greater than 350 µl Lysis buffer type 15. Please use the
volume recommended by your instruments. Load only 350 µl of crude
lysate to genomic DNA mini column.
• Rotor-stator homogenizer
A rotor-stator homogenizer can simultaneously disrupt and
homogenize most animal tissues and cells in less than 60 seconds.
It has moderate efficiency. It generates negligible heat during
operation. The major drawback for a rotor-stator homogenizer is it
does not work well with difficult-to-lyse samples.
The cell/tissue suspension is drawn into the apparatus by a rotor
sited within a stator (hollow tube). The suspension is then centrifugally
thrown outward to exit through slots or holes on the tip of the stator.
When the rotor spins, it sucks the sample up and cuts it while it is
rotating. When the sample is pushed out of the slots, it is cut further.
Outside (of the slots), the sample meets a pressure differential,
which shears the cells even further. Most laboratory rotor-stator
homogenizers are top driven at a speed of 8000–60 000 rpm. The cell
suspension is recycled several times.
• Mechanical agitation device
37
A common laboratory-scale mechanical method for cell disruption
that uses glass or ceramic beads and a high level of agitation. It is
normally used for samples are tough to disrupt (yeast, spores, and
micro algae). It has moderate efficiency. The major drawbacks for
a mechanical agitation device are it has large variability in product
yield and purity and occasional problems with foaming and sample
heating.
At the lowest levels of the technology, the beads are added to the
cell suspension in a tube and the sample is mixed on a common
laboratory vortex mixer. This process works for easily disrupted cells,
is inexpensive, and multiple samples can be conveniently processed.
The more sophisticated level, bead-based methods use a closed
container, holding the sample and the beads, with an electric motor to
provide vigorous agitation. When larger samples are processed, some
form of cooling is provided (typically liquid CO2) as the sample heats
significantly due to the extreme agitation. Another configuration uses
an inert, rapidly rotating rotor in a small container containing the cells
and beads.
• Mortar and pestle style grinders
Grinding with mortar and pestle is the most commonly used
technique for disruption of animal tissue. The technique tends to
be a gentle cell disruption method (significantly gentler than e.g.
sonication). However, this technique is laborious, slow and usually
inefficient. It generates heat so cooling is necessary.
The grinders consist of a grinding container (mortar) and a pestle. The
cells are sheared between the wall of the container and the edge of
the pestle. This method requires careful attention to conditions such
as force and cooling. Tissue shall be snap frozen in liquid nitrogen
and disrupted without thawing. Extra steps of homogenization are
required after disruption. The illustra triplePrep Kit recommends use of
a needle and syringe for homogenization after grinding.
38
6.2. Estimation of cell density
It is recommended not to exceed 5 × 10⁶ cells when purifying
genomic DNA from mammalian cultured cells. DNA yields drop when
silica columns begin to experience clogging (seen at 1 × 10⁷ cells). Cell
density should be estimated using an automated cell counter (e.g.
Coulter) or individual cells should be counted under a microscope
using a standard hemocytometer (Hausser Scientific/VWR, #1483). If
cell count exceeds 5 × 10⁶ cells/ml, cells should be split into two DNA
preparations. Below are guidelines for measuring cell density using a
hemocytometer.
1. Clean a hemocytometer and the short coverslip thoroughly and
wipe clean with ethanol.
2. If working with adherent cells, trypsinize the cells and wash once
with PBS. Otherwise pellet the cells (5000 rpm for 1 minute) such as
those grown in suspension.
3. Resuspend cells in appropriate volume of PBS to yield roughly
1 × 10⁶ cell/ml. For example, mammalian cells grown inside a
25 cm2 flask to confluence yield approximately 2.5 × 10⁶ cells
per flask (Visit Corning web site at http://catalog2.corning.com/
Lifesciences/). If a 25 cm2 flask was used add 2.5ml of PBS. Make
sure cells are completely resuspended without any visible clumps.
4. Add 10 µl of resuspended cells to two chambers of hemocytometer
separately (under a small coverslip) making sure the solution
spreads completely under the coverslip (by capillary action).
5. Place the hemocytometer under a light microscope, focus the cells
using lowest magnification and begin counting cells only at the
four corner squares and the middle square in both chambers of the
hemocytometer grid (3). Count all cells except those touching the
middle lines at the bottom and right. Aim to have 50–100 cells per
square-grid. If cell count is > 150/grid, it is advisable to dilute the
cells, clean the hemocytometer and re-count cells.
39
Add the number of cells in a total of ten chambers (five from each
side) and multiply by 1000 to give the number of cells/ml of PBS.
6.3. DNA handling and quantification
DNA should be treated with care. Elution buffer type 5 contains EDTA
to inhibit the activity of any trace amount of DNase.
DNA can be kept at room temperature for several hours or 4°C for
several days. To preserve stability, keep the isolated DNA frozen at
-20°C or -80°C for long-term storage.
Purified DNA concentration should be determined by UV
spectrophotometer (A260) and through comparison with a known
standard by agarose gel electrophoresis.
The reliable range of UV spectrophotometric data should be
determined for individual spectrophotometers. Generally, for
spectrophotometers with a 1 cm path length, A260 readings should lie
between 0.1 and 1.0 and appropriate dilutions (5 to 50 ng/µl) should
be analyzed. For NanoVue spectrophotometers, absorbance readings
between 1 and 10 provide more reliable results.
The UV spectrophotometric ratios A260/A280 provide information
regarding the purity of DNA. A purity ratio of 1.7 to 1.9 indicates that
DNA is pure for all standard molecular biology applications. If the
ratio is lower than 1.7, the purified DNA might contain some protein
impurities. Similarly, if the ratio is higher than 1.9, the DNA might
contain some RNA impurities.
1 OD unit (A260) is equivalent to approximately 50 µg/ml double
stranded DNA.
Yield = A260 × 50 µg/ml × 0.1 ml = the total µg of purified genomic DNA
in the sample.
40
6.4. RNA handling and quantification
RNA should be treated with care because RNA is very sensitive to
trace contaminations of RNases, often found on general labware,
fingers and dust.
It is necessary to create an RNase-free working environment. Wear
gloves at all times during the preparation. Change gloves frequently.
Use of sterile, disposable polypropylene tubes is recommended. Keep
tubes closed whenever possible during the preparation. Glassware
should be oven-baked for at least 2 hours at 250°C before use. Wipe
down laboratory surfaces with an alcohol wipe.
To preserve stability, always keep the isolated total RNA on ice or
frozen at -80°C for long-term storage.
Purified RNA concentration should be determined by UV
spectrophotometer (A260) and through comparison with a known
standard by denatured agarose gel electrophoresis.
The reliable range of UV spectrophotometric data should be
determined for individual spectrophotometers. Generally, for
spectrophotometers with a 1 cm path length, A260 readings should lie
between 0.1 and 1.0 and appropriate dilutions (4 to 40 ng/µl) should
be analyzed. For NanoVue spectrophotometers, absorbance readings
between 1 and 10 provide more reliable results.
The UV spectrophotometric ratios A260/A280 provide information
regarding the purity of RNA. A purity ratio of 1.9 to 2.1 indicates that
the RNA is pure for all standard molecular biology applications. If the
ratio is lower than 1.9, the purified RNA might contain some protein
impurities.
1 OD unit (A260) is equivalent to approximately 40 µg/ml RNA.
Yield = A260 × 40 µg/ml × 0.1 ml = the total µg of purified RNA in the
sample.
41
6.5. Protein handling and quantification
Protein isolated by triplePrep Kit can be directly applied to 2-D
Fluorescence Difference Gel Electrophoresis (2-D DIGE) study.
2-D DIGE is a method that labels protein samples prior to 2-D
electrophoresis, enabling accurate analysis of differences in protein
abundance between samples.
It is possible to separate up to three different samples within the
same 2-D gel. The technology is based on the specific properties
of spectrally resolvable dyes, CyDye™ DIGE Fluor dyes. As a
consequence, identical proteins labeled with each of the CyDye
DIGE Fluor dyes will migrate to the same position on a 2-D gel. This
ability to separate more than one sample on a single gel permits the
inclusion of up to two samples and an internal standard (internal
reference) in every gel. The internal standard is prepared by mixing
together equal amounts of each sample in the experiment and
including this mixture on each gel.
2-D DIGE combines confidence with reproducibility to give
dependable results to detect and analyze differences or changes in
protein levels/expression between complex protein samples.
To avoid modification of proteins, never heat a sample after adding
urea. If the sample contains urea, the solution temperature must
not exceed 37°C. Elevated temperatures cause urea to hydrolyze to
isocyanate, which modifies proteins by carbamylation, resulting in
artifactual “charge trains.”
The 2-D Quant Kit (supplied by GE Healthcare) should be used to
determine protein concentration for protein resuspended in 2-D DIGE
buffer. Please note 2-D DIGE buffer is not compatible with BCA or
Bradford assays.
Protein resuspended in 2-D DIGE buffer can be also used for SDSPAGE or Western Blot by mixing with 1 volume of 20% SDS. Add
appropriate sample loading buffer (i.e. 1 volume of 2× Laemmli buffer)
and incubating at 70°C for 10 minutes before gel loading.
42
6.6. DNA contamination removal in eluted RNA
The on-column DNase treatment procedure provided in protocol Step
7 should be followed if DNA contamination in RNA is expected. The
supplement protocol below is for DNA contamination removal in RNA
after column purification.
a. In a RNase free microcentrifuge tube, add 100 µl of RNA
(contaminated with DNA), 10 µl of DNase reaction buffer type 1
and 5 µl of reconstituted DNase I
. Mix by flicking the tube.
Do not vortex. Incubate for 20 minutes at room temperature.
b. Add 230 µl of Lysis buffer type 15
and 350 µl of Absolute
Acetone. Mix well by pipeting up and down several times. Transfer
.
the entire mixture to a new mini column
c. Spin for 1 minute at 11 000 × g. Transfer the column to a new
Collection tube.
d. Add 500 µl of Wash buffer type 6
to the column. Spin for 1
minute at 11 000 × g. Discard the Collection tube and its contents.
Please check that no residual flowthrough remains in the column
outlet. If any remains, empty the Collection tube, put the column back
for re-centrifuge.
e. Transfer the column to a fresh RNase-free 1.5 ml microcentrifuge
tube. Add 100 µl Elution buffer type 9
to the center of the
column.
50 µl or less of Elution buffer type 9 can be used for achieving more
concentrated RNA elution.
f. Spin for 1 minute at 11 000 × g to collect the purified total RNA as
the flowthrough in the Collection tube.
43
6.7. RPM to RCF calculation
The appropriate centrifugation speed for a specific rotor can be
calculated from the following formula:
RPM = 1000 × RCF/1.12r
where RCF = relative centrifugal force; r = radius in mm measured
from the center of the spindle to the bottom of the rotor bucket; and
RPM = revolutions per min.
e.g. if an RCF of 735 × g is required using a rotor with a radius of
73 mm, the corresponding RPM would be 3000.
44
6.8. Troubleshooting guide
This guide may be helpful in the first instance. However, if problems
persist, or for further information, please contact GE Healthcare
technical services. http://www.gelifesciences.com/illustra
Problem: Low genomic DNA yield
Possible cause
Suggestions
Homogenization of
tissue incomplete
• Use of rotor-stator homogenizer is
recommended.
• For difficult to lyse tissues such as mouse
or rat tails, crushing the animal tissue in
liquid nitrogen is recommended prior to
proceeding with DNA extraction.
• For best results, use fresh tissue samples.
Tissue sample old or
subjected to repeat
freeze/thaw cycles
Incorrect volume of
Lysis buffer type 15
used
• Follow the protocol carefully. The volume
of Lysis buffer type 15 is critical.
Column clogged due to
overloading
• Do not use more than 20 mg tissue as
starting material for each sample. If
necessary, split the tissue between two
preparations.
Incomplete
resuspension of
cell pellet in Lysis
buffer type 15
• Make sure cells are completely
resuspended by pipetting up and down
and vortexing. Use needle and syringe
for lysate homogenization. Check for
absence of cell pellet.
45
Problem: Low genomic DNA yield (continued)
Possible cause
Suggestions
Incorrect cell numbers
used as starting
material
• Use 1–2 million cells for optimal recovery.
• Do not exceed 5 million cells, as yields
may drop. See section 6.2 for Estimation
of Cell Density.
Problem: Poor quality of isolated genomic DNA
Possible cause
Suggestions
Too much tissue or too
many cells used per
sample
• Ensure correct amounts used.
Failed to perform first
wash with Lysis buffer
type 15
• Repeat isolation, taking care to complete
all steps.
Problem: Restriction enzymes fail to cut isolated genomic DNA
Possible cause
Suggestions
Failed to perform all
wash steps
• Repeat isolation, taking care to complete
all steps. Remove any residual Ethanol
after column wash before elution.
Sub-optimal digestion
conditions used
• Use 50–100 U of high-concentration
restriction enzyme per µg of genomic
DNA in the digest Set-up reaction in
50–100 µl volumne and incubate the
digest overnight (16 hours).
46
Problem: RNA is degraded/no RNA obtained
Possible cause
RNase contamination
Suggestions
• Create an RNase-free working
environment. Wear gloves during all
steps of the procedure, and change
gloves frequently. Use of RNase-free,
disposable polypropylene tubes is
imperative. Keep tubes closed whenever
possible during the preparation.
Glassware should be ovenbaked for at
least 2 hours at 250°C before use.
Problem: Poor RNA quality or yield
Possible cause
Reagents not prepared,
stored or applied
properly
Suggestions
• Reagents not properly stored.
• Add the indicated volume of nucleasefree water to DNase I vial and mix. Add
the indicated volume of Absolute Ethanol
to Wash buffer type 6 and mix
• Reconstitute and store lyophilized DNase
according to instructions given in
section 5.1.
• Sample and reagents have not been
mixed completely. Vortex vigorously after
each reagent has been added (except for
DNase I).
• Absolute Acetone was not added
after lysis. Binding of RNA to the silica
membrane is only effective in the
presence of Absolute Acetone.
47
Problem: Poor RNA quality or yield (continued)
Possible cause
Suggestions
• Reconstitute and store lyophilized DNase
according to instructions given in
section 5.1.
• Store other kit components at
room temperature. Storage at
low temperatures may cause salt
precipitation.
• Keep bottles tightly closed in order to
prevent evaporation or contamination.
Suboptimal elution
Sample material
• Be sure that all of the water (Elution
buffer type 9) gets into contact with the
silica membrane. No water drops should
stick to the walls of the columns. The
membrane has to be wetted completely.
• Ionic strength and pH influence A260
absorption as well as ratio A260/A280; thus,
for absorption measurement, use 10 mM
Tris-HCl pH 7 as diluent and when setting
the baseline.
• Sample material not stored properly.
Whenever possible, use fresh material.
If this is not possible, flash freeze the
samples in liquid nitrogen or treat with
a stabilizing agent. Samples should
always be kept at -80°C. Never allow
tissues to thaw before addition of Lysis
buffer type 15. Perform disruption of
samples in liquid nitrogen when using
mortar and pestle.
48
Problem: Poor RNA quality or yield (continued)
Possible cause
Suggestions
Sample material
• Insufficient disruption and/or
homogenization of starting material.
Ensure thorough sample disruption and
homogenization.
• Too much starting material may lead to
column clogging or reduced RNA quality
or yield. RNA quality and yield problems
relating to too much sample material
may be addressed by decreasing the
amount of starting material.
DNase digestion
not performed; DNA
present in RNA,
impacting RIN number
and yield
• Perform DNase digestion as per step 7
DNase treatment in protocol for optimal
results. To remove contamination
follow protocol in Section 6.6 DNA
contamination removal in eluted RNA.
49
Problem: Clogged during RNA binding
Possible cause
Suggestions
Sample material
incompletely
homogenized
• Centrifuge crude lysate at 11 000 × g to
pellet any insoluble material that may
clog the column.
• Reduce the sample amount, increase
the time for the centrifugation steps,
and/or increase the volume of Lysis
buffer type 15. (Note: only load 350 µl of
crude lysate onto the 1st mini column)
• If clogging still occurs, take the
remaining lysate off the mini column,
discard it, and proceed with the wash
step with Wash buffer type 6.
Problem: Contamination of RNA with genomic DNA
Possible cause
Suggestions
Too much starting
material (tissue or cell)
used
• Reduce quantity of cells or tissue used.
DNase not active
• Reconstitute and store lyophilized DNase
according to instructions given in section
5.1.
DNase solution not
properly applied
• Pipet DNase I solution directly onto the
center of the silica membrane
50
Problem: Contamination of RNA with genomic DNA
Possible cause
Suggestions
DNA detection system
too sensitive
• The amount of DNA contamination is
significantly reduced by binding DNA in
crude lysate to the 1st mini column.
• On-column DNase I digestion will remove
DNA that goes onto 2nd mini column.
However, residual DNA may still be
present due the amount and nature
of the starting material. Therefore in
very sensitive applications, it might be
possible to detect DNA.
The potential for DNA contamination
detection by PCR increases with:
• the number of DNA copies per
preparation: single copy target <
plastidial/mitochondrial target < plasmid
transfected into cells
• decreasing PCR amplicon size: use larger
PCR targets (e.g. >500 bp) or intronspanning primers if possible.
51
Problem: Suboptimal performance of RNA in downstream
experiments
Possible cause
Suggestions
Carry-over of Ethanol
or salt
• Do not let the flowthrough touch the
column outlet after the wash with Wash
buffer type 6. Be sure to centrifuge at the
corresponding speed for the respective
time in order to remove ethanolic buffer
Wash buffer type 6 completely.
• Check if Wash buffer type 6 has been
equilibrated to room temperature before
use. Washing at lower temperatures
lowers efficiency of salt removal by Wash
buffer type 6.
Store isolated RNA
properly
• Eluted RNA should always be kept on
ice for optimal stability since trace
contaminations of omnipresent RNases
will degrade the isolated RNA. For
storage, freeze at -80°C.
Problem: Protein pellet can not be resuspended
Possible cause
Suggestions
Wrong protein
resuspension buffer
used
• 2-D DIGE buffer is the best-tested buffer
to solubilize precipitated protein.
Incomplete salt
removal during pellet
wash step.
• Follow the protocol, break the protein
pellet with pipet tip during water wash
for effective removal of salts.
52
6.9. Related products
A full range of Molecular Biology reagents can be found in the GE
Healthcare web site and in the catalogue
Application
Product
Product
Code
Product
Code
Isolation of
lymphocytes
from blood
Ficoll Paque
17-1440-02
6 × 100 ml
Ficoll Paque
17-1440-03
6 × 500 ml
illustra tissue and
cells genomicPrep
Mini Spin Kit
28-9042-75
50 preps
illustra tissue and
cells genomicPrep
Mini Spin Kit
28-9042-76
250 preps
illustra tissue and
cells genomic Midi
Flow Kit
28-9042-73
25 preps
illustra bacteria
genomicPrep Mini
Spin Kit
28-9042-58
50 preps
illustra bacteria
genomicPrep Mini
Spin Kit
28-9042-59
250 preps
illustra blood
genomicPrep Midi
Flow Kit
28-9042-61
25 preps
Genomic DNA
purification
53
Application
RNA purification
For PCR or
RT-PCR
Product
Product
Code
Pack Size
illustra blood
genomicPrep Mini
Spin Kit
28-9042-64
50 preps
illustra blood
genomicPrep Mini
Spin Kit
28-9042-65
250 preps
illustra RNAspin
Mini RNA Isolation
Kit
25-0500-70
20 preps
illustra RNAspin
Mini RNA Isolation
Kit
25-0500-71
50 preps
illustra RNAspin
Mini RNA Isolation
Kit
25-0500-72
250 preps
illustra RNAspin
Midi RNA Isolation
Kit
25-0500-73
20 preps
illustra RNAspin 96
RNA Isolation Kit
25-0500-74
2 × 96 preps
illustra RNAspin 96
RNA Isolation Kit
25-0500-75
4 × 96 preps
Hot Start Master
Mix
25-1500-01
100
reactions
Illustra Hot Start
Mix RTG
28-9006-46
0.5 ml, 100
rxns
Illustra Hot Start
Mix RTG
28-9006-53
0.2 ml, 96 rxns
54
Application
Product
Product
Code
Pack Size
For PCR or
RT-PCR
illustra PuReTaq™
Ready-To-Go™
PCR Beads
27-9557-01
96 reactions in
0.2 ml tubes/
plate
illustra PuReTaq
Ready-To-Go PCR
Beads
27-9557-02
5 × 96
reactions in
0.2 ml tubes/
plate
FideliTaq™ PCR
Master Mix Plus
(2×1)
E71182
100 reactions
FideliTaq PCR
Master Mix Plus
E71183
100 reactions
illustra Ready-ToGo RT-PCR Beads
27-9266-01
0.5 ml, 100 rxn
tubes
illustra Ready-ToGo RT-PCR Beads
27-9267-01
0.2 ml, 96 rxn
tube
illustra Ready-ToGo RT-PCR Beads
27-9259-01
0.2 ml, 96 rxn
h-tube
DNA
Polymerization Mix
(20 mM each dATP,
dCTP, dGTP, dTTP)
27-2094-01
100 µmol
Urea
17-1319-01
500 g
Thiourea
RPN6301
100 g
CHAPS
17-1314-01
1g
For Protein
1-D or 2-D
Electrophoresis
55
Application
For Protein
1-D or 2-D
Electrophoresis
Product
Product
Code
Pack Size
Tris
17-1321-01
500 g
2-D CLEAN-UP KIT
80-6484-51
50 samples
2-D QUANT KIT
80-6483-56
500 assays
ECL™ Western
Blotting System
RPN2108
1 kit
ECL Plex
Western Blotting
Combination Pack
(Cy3, Cy5, Hybond
ECL)
RPN998
1 kit
Deep Purple™
Total Protein Stain
RPN6305
5 ml
FuII-range
Rainbow™
Molecular Weight
Markers
RPN800E
250 µl
56
7. References
1. Aljanabi, S.M. & Martinez, I., Nucl. Acids Res. 25, 4692–4693 (1997).
2. Vogelstein, B. & Gillespie, D., Proc. Natl. Acad. Sci. USA 76, 615 (1979).
3. Sambrook, J & Russell, D. W., Molecular Cloning, A Laboratory
Manual , chapter 6, (2001)
57
GE Healthcare offices:
GE Healthcare Bio-Sciences AB
Björkgatan 30 751 84, Uppsala
Sweden
GE Healthcare Europe GmbH
Munzinger Strasse 5 D-79111, Freiburg,
Germany
GE Healthcare Bio-Sciences Corp
800 Centennial Avenue, P.O. Box 1327,
Piscataway, NJ 08855-1327,
USA
GE Healthcare Bio-Sciences KK
Sanken Bldg. 3-25-1, Hyakunincho,
Shinjuku-ku, Tokyo 169-0073,
Japan
For contact information for your local office,
please visit: www.gelifesciences.com/contact
GE Healthcare UK Limited
Amersham Place, Little Chalfont, Buckinghamshire,
HP7 9NA, UK
http://www.gehealthcare.com/lifesciences
imagination at work
28940931 PL AC 05/2009
The next four pages are a
protocol card.
Please add to the back page as a
tear off addition.
Quick Reference Protocol Card
illustra™ triplePrep Kit 28-9425-44 (50 purifications)
1. Sample homogenization and lysis
5 mg tissue or 1 million cells
350 µl Lysis buffer type 15 and 3.5 µl 2-Mercaptoethanol
• Homogenize until no tissue pieces visible
2. DNA binding
6. RNA binding
• Transfer sample to DNA mini column 1 min 11 000 × g
• Transfer column to a new Collection tube
• Save the flowthrough for Step 6
350 µl Acetone to
Step 2; mix well by
• Transfer sample to
1 min 11 000 × g
• Transfer column to
• Save the flowthrou
3. DNA wash 1
500 µl Lysis buffer type 15
1 min 11 000 × g; discard the flowthrough
4. DNA wash 2
500 µl Wash buffer type 6
1 min 11 000 × g; discard the flowthrough
• Transfer column to DNase-free 1.5 ml microcentrifuge tube
5. DNA elution
100 µl Elution buffer type 5
1 min 11 000 × g
7. DNase treatment
100 µl DNase reac
DNase I, 20 µl
buffer type 1 an
10 min RT
8. RNA wash
500 µl Wash bu
1 min 11 000 × g; d
• Transfer column t
microcentrifuge tu
9. RNA elution
100 µl Elution b
1 min 11 000 × g
Standard protocol for genomic DNA, total RNA and total Protein
isolation from tissue and cultured cells
• 1st time users of triplePrep should follow the detailed protocol
in Section 5.
• The quick reference protocol is for experienced users only.
• Experienced users may simultaneously purify DNA and RNA.
:Add
:Spin
:Incubate
flowthrough from
pippeting
o RNA mini column o a new Collection tube
ugh for Step 10
t (optional)
ction mixture (10 µl
DNase reaction
d 70 µl RNase-free water)
uffer type 6
discard the flowthrough
to RNase-free 1.5 ml
ube
buffer type 9
10. Protein precipitation
600 µl Protein precipitation
buffer type 1 to flowthrough from
Step 6; mix well by vortexing
5 min RT
10 min 16 000 × g. Remove as much supernatant as possible
11. Protein wash
1 ml distilled water; disperse protein pellet by pipeting
1 min 16 000 × g. Remove as much supernatant as possible
12. Protein resuspension
50 µl–500 µl 2-D DIGE buffer
5 min RT
• Pipet up and down to disperse the pellet
GE, imagination at work and GE monogram are trademarks of General Electric Company.
illustra is a trademark of GE Healthcare companies.
All third party trademarks are the property of their respective owners.
© 2008–2009 General Electric Company-All rights reserved.
Previously published 2008. Date of revision May 2009.
All goods and services are sold subject to the terms and conditions of sale of the company within GE
Healthcare which supplies them. A copy of these terms and conditions is available upon request.
Contact your GE Healthcare representative for the most current information.
http://www.gelifesciences.com
GE Healthcare UK Limited.Amersham Place, Little Chalfont,Buckinghamshire, HP7 9NA UK
imagination at work
28940931PC AC 05/2009