1
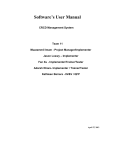
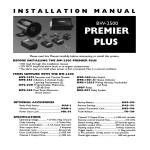
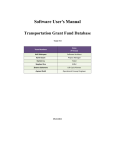
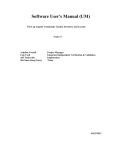
Software’s User Manual CRCD Management System Team 11 Muzzammil Imam - Project Manager/Implementer Jason Loewy – Implementer Fan Xu - Implementer/Trainer/Tester Adarsh Khare- Implementer / Trainer/Tester Kathleen Barrera - IIV&V / QFP April 4, 2012 User Manual (UM) UM_IOC2_S12_T11_V1.0 Version 1.0 ii Version Date: 04/04/12 User Manual (UM) Version 1.0 Table of Contents TABLE OF CONTENTS ......................................................................................................................... III TABLE OF TABLES .............................................................................................................................. IV TABLE OF FIGURES ..............................................................................................................................V 1. Introduction ................................................................................................................................................ 1 1.1 System Overview ................................................................................................................................ 1 1.2 System Requirements .......................................................................................................................... 2 2. Operational Procedures ............................................................................................................................... 3 4. Troubleshooting ........................................................................................................................................ 33 5. 4.1 Frequently Asked questions ............................................................................................................... 33 4.2 Error Codes and Messages ................................................................................................................. 33 4.3 Note .................................................................................................................................................. 33 Appendix……………………………………………………………………………………………………..34 UM_IOC2_S12_T11_V1.0 iii Version Date: 04/04/12 User Manual (UM) Template Version 1.0 Table of Tables No table of figures entries found. UM_IOC2_S12_T11_V1.0 iv Version Date: 03/14/12 User Manual (UM) Template Version 1.0 Table of Figures Figure 1: Login Screen………………………………………………………………………………………………….3 Figure 2: Screen showing two systems………………………………………………………………………………..2 Figure 3: Timetrex Continue Button…………………………………………………………………………………..5 Figure 4:Timetrex Employee Administration………………………………………………………………………..6 Figure 5:Breadcrumb bar demonstration……………………………………………………………………………7 Figure 6: Pay Period Schedule List………..………………………………………………………………………...8 Figure 7: Edit Pay Period Schedule…………………………………………………………………………………8 Figure 8:Main Menu Page…………………………………………………………………………………………..10 Figure 9:Employee List………………………………………………………………………………………………11 Figure 10: Employee Information Page…………………………………………………………………………..12 Figure 11: Delete Button demonstration…………………………………………………………………………14 Figure 12: Main Menu Page………………………………………………………………………………………15 Figure 13: Punch In/Out window…………………………………………………………………………………15 Figure 14: Mass Punch…………………………………………………………………………………………….17 Figure 15: Mass Punch: Select All demonstration…………………………………………………………….18 Figure 16: Submitting Mass Punch Information………………………………………………………………19 Figure 17:Report Generation Part 1……………………………………………………………………………20 Figure 18:Report Generation Part 2……………………………………………………………………………21 Figure 19:Transferring Selected Employee……………………………………………………………………21 Figure 20: Dealing with other options…………………………………………………………………………22 Figure 21: Login Screen for Inventory Management…………………………………………………………23 Figure 22:Contents Page…………………………………………………………………………………………24 Figure 23: Product List…………………………………………………………………………………………..25 UM_IOC2_S12_T11_V1.0 v Version Date: 03/14/12 User Manual Table of Contents Table of Figures (Contd..) Figure 24: Add New Product…………………………………………………………………………………………..25 Figure 25: Product Details……………………………………………………………………………………………..26 Figure 26: Users…………………………………………………………………………………………………………27 Figure 27: User Details………………………………………………………………………………………………..27 Figure 28: Administrators List……………………………………………………………………………………….28 Figure 29: Login Screen………………………………………………………………………………………………..30 Figure 30: Contents Page……………………………………………………………………………………………….30 Figure 31: Product Details………………………………………………………………………………………………31 Figure 32:My Profile……………………………………………………………………………………………………...32 Figure (A): Administrator Account……………………………………………………………………………………..34 Figure (B): Checkboxes…………………………………………………………………………………………………..35 UM_IOC2_S12_T11_V1.0 vi Version Date: 04/04/12 User Manual (UM) Version 1.0 1. Introduction 1.1 System Overview Time Trex : TimeTrex is a complete web-based payroll and time management suite which offers employee scheduling, time & attendance (timeclock, timesheet), job costing, invoicing and payroll all in tightly integrated package. The following features are taken care by Time Trex: Time and attendance Job costing Payroll Scheduling Time clock Timesheet Inventory Management System: Inventory management is the process of efficiently overseeing the constant flow of units into and out of an existing inventory. Inventory management is not limited to documenting the delivery of raw materials and the movement of those materials into operational process. The movement of those materials as they go through the various stages of the operation is also important. Typically known as a goods or work in progress inventory, tracking materials as they are used to create finished goods also helps to identify the need to adjust ordering amounts before the raw materials inventory gets dangerously low or is inflated to an unfavorable level. Inventory management has to do with keeping accurate records of finished goods that are ready for shipment. UM_IOC2_S12_T11_V1.0 1 Version Date: 04/04/12 User Manual (UM) Version 1.0 1.2 System Requirements The following are the major system requirements for Timetrex and Inventory Management Software: 1.2.1 Hardware Requirements Hard Disk Drive: Minimum 100 MB. Physical Memory(RAM): 1 GB (Recommended) 1.2.2 Software Requirements Operating System: Windows XP/Vista or newer, Linux Mac OSX PHP v5.0 or greater. Servers: IIS or Apache Web Servers, MySQLv4.1.3 or PostgreSQL v8.0+ UM_IOC2_S12_T11_V1.0 2 Version Date: 04/04/12 User Manual (UM) Version 1.0 2. Operational Procedures After successfully installing everything mentioned in the Section 2 of System Administrative Manual, the following steps must be followed in order to see the working system. Step 1: Open your Windows Server. Step 2: Open Firefox browser and type the following URL in the address bar of the browser: http://localhost:8011/loginc.html Step 3: The following page can be seen on your web browser after entering the URL mentioned in Step. Figure (1): Login Screen UM_IOC2_S12_T11_V1.0 3 Version Date: 04/04/12 User Manual (UM) Version 1.0 Step 4: Enter the following login credentials in order to access the Administrator account: Username : Password : admin1 team11 Note: The above mentioned login credentials can be treated as a default username and password. In order to create a new administrator username and password, please refer to the “Section 5: Appendix “ of the Manual. Step 5: Press the Login button.The following webpage(Figure(2)) can be seen with two options available which looks like as follows: a) Timetrex b) Inventory Management System Figure (2): Screen Showing two Systems UM_IOC2_S12_T11_V1.0 4 Version Date: 04/04/12 User Manual (UM) Version 1.0 2.1 Timetrex This section will explain all the necessary steps required to see the proper functionality of the Timetrex system. Since “Timetrex” has been selected from Figure (2), the following page (Figure(3)) will appear which has a continue button. Although, you will see a page asking for Username and Password but you don’t need to fill any information on this page. You can also see already filled username and password (Username: admin1 and Password: team11) which you entered in Step4 of Section 2. Please click on the “Continue” button to continue. Note: The Continue button is encircled in red color as shown in the Figure (3) below: Figure (3): Timetrex Continue Button After clicking on the “Continue” button, the following page(Figure 4) will appear. This page is the main Menu page as far as Timetrex is concerned. TimeTrex's primary navigation method is the drop down menu bar along the top of the screen. A brief example shown in Figure (4) will familiarize you with the navigation flow system of the Timetrex. For example, when you see the following line: UM_IOC2_S12_T11_V1.0 5 Version Date: 04/04/12 User Manual (UM) Version 1.0 Menu: Admin Company Company Information in this document, it is explaining how to find the specific item in the menu. In the above example it would mean clicking “Admin" in the menu bar along the top, then when the menu drops down, click on “Company" and then finally click on Company Information. Figure 4: Timetrex Employee Administration The secondary navigation method is the “breadcrumb" bar slightly below the drop down menu. With each page you visit, TimeTrex drops a "breadcrumb" and the breadcrumb bar displays the last 5 breadcrumbs that you have dropped. This allows you to very quickly switch back and forth between pages by simply clicking on the page in the breadcrumb bar. For example, refer to Figure 5 shown below: A typical breadcrumb bar looks like : Home Edit Employee The above navigation flow is depicted in Figure 5 and is encircled with red color. UM_IOC2_S12_T11_V1.0 6 Version Date: 04/04/12 User Manual (UM) Version 1.0 Figure 5: Breadcrumb bar demonstration The following Section 2.1.1, Section 2.1.2 will focus more on the working functionality of the system. 2.1.1 Creating a Pay Period The following path should be followed in order to create a pay period for an employee: Menu: AdminPayrollPay Period Schedules Pay period schedules are critical to the operation of TimeTrex. They determine when pay periods start, end, and the date when employees are paid (transaction date). Most companies have a single pay period schedule, however there is no limit to the amount of pay period schedules that you can have configured. It is important to note that pay period schedules are constantly repeating themselves, similar to recurring schedules for employees. Therefore when adding a new pay period schedule, all you need to do is describe one or two full pay period start/transaction dates, TimeTrex will then automatically determine the pattern and repeat it in to the future indefinitely. UM_IOC2_S12_T11_V1.0 7 Version Date: 04/04/12 User Manual (UM) Version 1.0 Another important factor is that in most cases you should have AT LEAST one day between the end of the pay period, and the transaction date if you pay by check, and at least two business days if you pay by direct deposit. This is to give supervisors and employees enough time to submit requests and complete any outstanding authorizations before payment is finalized. Press the “Add” button encircled in red color as shown in Figure(6) below in order to add an employee: Figure (6): Pay Period Schedule List The following Figure (7) can be seen after pressing “Add” button: UM_IOC2_S12_T11_V1.0 8 Version Date: 04/04/12 User Manual (UM) Version 1.0 Figure (7): Edit Pay Period Schedule For example if you wanted to create a Bi-Weekly pay period schedule that starts on Monday and has a transaction date on Friday following the end of the pay period you would select the “BiWeekly" pay period “Type", then select “Pay Period Starts On" Monday and “Transaction Date" is 5 days after the end of the pay period. If you want to create a Semi-Monthly pay period schedule, it is slightly different. For this pay period type you need to tell TimeTrex which day of the month the primary and secondary pay period starts on and which day the transaction occurs on for both. For example if the primary pay period starts on the 1st of every month, and the transaction date is the first of the FOLLOWING month, you would select “1" for the primary “Pay Period Start Day Of Month" as well as for the “Transaction Day Of Month". The transaction date is always the selected day of the month AFTER the pay period ends, so having them both set to 1 will cause the transaction date to be the 1st of the following month. The secondary “Pay Period Start Day Of Month" you would set to the 16th and the “Transaction Day Of Month" to the 15th. This is what the final pay period schedule will look like: Start 01-Nov-05 16-Nov-05 End 15-Nov-05 30-Nov-05 Transaction 01-Dec-05 15-Dec-05 “Overtime Week" is the week used by overtime policies when calculating weekly overtime. “Daily Start Time" specifies the hours from midnight that each day will start. So if your company is a 24-hour operation and your “day" starts at 6am, you would set this to 06:00. “Continuous Time" defines the amount of time after midnight where punches may be considered to be part of the previous day. For example, if an employee punches in at 11pm, out again at 3am for lunch, in at 4am, and out for the day at 7am, assuming the continuous time is set to 8 hours, TimeTrex will consider all of these punches to be on the same day as the 11pm punch. Because they all fall within 8 hours of midnight and the last punch of the previous day was also within 8 hours of the In punches. If the continuous time was set to 3 hours, TimeTrex would split up the shift on to two days. This can greatly affect how overtime policies are calculated. “Transaction Always on Business Day" ensures that the transaction date is always on a business day. If the transaction date happens to fall on a weekend or a holiday TimeTrex will automatically move the transaction date back (earlier) until it falls on a regular business day. “Create Initial Pay Periods From" tells TimeTrex what date to start creating pay periods from when you first create the pay period schedule. This is useful if you want to import historical data in to TimeTrex. UM_IOC2_S12_T11_V1.0 9 Version Date: 04/04/12 User Manual (UM) Version 1.0 Once the pay period schedule is created, you can click “View" beside it to see the dates for each pay period related to it. 2.1.2 Adding an Employee Menu: Admin Employee Administration The following Figure (8) shows the navigation flow described above. For further clarifications on the above navigation flow, refer to the Steps defined after Figure (8). Figure 8: Main Menu Page Step 1: Click on the “Admin” option and then on the “Employee Administration” option as shown in Figure 8 above. Step 2: Click on the “Add” button encircled with red color as shown in the screenshot(Figure 9) below. UM_IOC2_S12_T11_V1.0 10 Version Date: 04/04/12 User Manual (UM) Version 1.0 Figure 9: Employee List When adding employees for the first time, only a minimal amount of information is required, these fields are denoted with a red asterisk “*”. Step 3: The following page will appear after “Step 2”. UM_IOC2_S12_T11_V1.0 11 Version Date: 04/04/12 User Manual (UM) Version 1.0 Figure 10:Employee Information Page Once the employee logs in to TimeTrex for the first time, he or she will be required to fill out the remainder of the information before any other action can be carried out. Sample Data: For Example, the following data can be used in order to see the functionality of the above step or your own data : S.No 1 2 3 4 Field Name Username Password Password(confirm) Employee Number 5 6 First Name Last Name Sample Data ( Or use your own) Peter core core Enter the next available value indicated next to the value field. Peter Lewis Click on “Submit” button located on the bottom right of your screen once you are done. In order to see the new Employee added into the Employee List, please click on the “Admin” option at the top, and then “Employee Administration” (As shown in Figure 8 above). A newly added employee can be seen in the “Figure 9” mentioned above. UM_IOC2_S12_T11_V1.0 12 Version Date: 04/04/12 User Manual (UM) Version 1.0 2.1.3 Deleting an Employee For deleting an employee, similar steps should be followed up to certain point which were followed while “adding” an employee. The following navigation flow remains same as compared with Section 3.1.1: Menu: Admin Employee Administration Refer to Figure (8) mentioned above which shows the navigation flow described The following steps should be followed in order to delete an employee from the record. Step1: Select the “Checkboxes” for each of the employees you want to delete the record. Refer to Section 5.2 of Section 5:Appendix of the manual for more information about Checkboxes. Step 2: Click on the “Delete” button encircled with red color as shown in Figure 11 below. A small window will pop up and will ask you for your confirmation before deleting the employee details. Click on “Yes” if you are sure that you want to delete the employee from the record or else click on “No”. If you have clicked on “Yes” button the updated page will appear automatically as soon as the “Yes” button has been clicked and then you can see the corresponding changes on the page. UM_IOC2_S12_T11_V1.0 13 Version Date: 04/04/12 User Manual (UM) Version 1.0 Figure 11:Delete Button Demonstration 2.1.4: Punch-In/Punch-out Feature of Employees (Individual Punch-In/Punch-out) This functionality of Time Trex provides an option for an employee to Punch-In/Punch-Out of the system depending on whether they are entering the company premises or vice-versa. Before proceeding, a pay period must exist for each employee for which Punch-In/Punch-Out (In/Out) feature of Time Trex is going to be used. The steps for creating a pay period are clearly explained in Section 2.1.1 of the manual. The following navigation flow and the steps mentioned below it are required to be followed: Menu: In / Out Step 1: The sign-in and sign-out option can be accessed using the “In/Out” option, as shown in the Figure(12) below: UM_IOC2_S12_T11_V1.0 14 Version Date: 04/04/12 User Manual (UM) Version 1.0 Figure 12:Main Menu Page The following window will appear once, “In/Out” option has been clicked: UM_IOC2_S12_T11_V1.0 15 Version Date: 04/04/12 User Manual (UM) Version 1.0 Figure 13:Punch In/Out Window The “Punch Type” options like, Normal, Lunch, Break can be selected by the user and similarly “In/Out” option can be selected like In or Out depending upon whether employee is entering the premises of office or leaving from the office. Finally, the submit button can be presssed to store the information. 2.1.4: Punch-In/Punch-out Feature of Employees (Mass Punching- In/Punchingout) This section will explain how multiple employees can be selected and punched In and Out depending upon whether employees were entering the premises or vice-versa. The following navigation flow and the steps mentioned below it are required to be followed: Menu: TimesheetMass Punch The following Figure (14) shows following two sections: 1) Unselected Employees : This section is encircled with red color as shown in Figure (14) below. A list of unselected employees can be seen which can be selected all or one at a time. 2) Selected Employees: This section is encircled with green color and will show all the employees selected from the Unselected section. This section is blank since none of the employees have been selected from the Unselected section. The following steps below the figure explains how to select multiple employees and how to submit their information using the submit button. Just like Section 2.1.3, before proceeding, a pay period must exist for each employee. The steps for creating a pay period are clearly explained in Section 2.1.1 of the manual. UM_IOC2_S12_T11_V1.0 16 Version Date: 04/04/12 User Manual (UM) Version 1.0 Figure 14:Mass Punch Step1: All the employees listed can be selected by using one single button “Select All” encircled in red color in Figure(15) shown below. Please note that as soon as the button gets pressed, the section containing all the employees will turn into blue color as shown in figure below: UM_IOC2_S12_T11_V1.0 17 Version Date: 04/04/12 User Manual (UM) Version 1.0 Figure 15: Mass Punch: Select All demonstration After selecting all the employees, selected employees can be moved to the “Selected Employees” section by pressing forward arrow button “>>” which is shown in Figure (15) and encircled in green color. The result after pressing the forward button can be seen in the Figure (16) below where all the selected employees have been successfully moved to the “Selected Employee” section. UM_IOC2_S12_T11_V1.0 18 Version Date: 04/04/12 User Manual (UM) Version 1.0 Figure 16:Submitting Mass Punch Information Step 2: As clear from the above figure, all the selected employees are on the “Selected Employees” section now. The “Time” of the process can be entered in the space provided and in the format mentioned next to it. The “Start Date” and “End Date” be entered by using the calendar option present next to it and corresponding days can be selected by checking the checkboxes. The “Punch Type” options like, Normal, Lunch, Break can be selected by the user and similarly “In/Out” option can be selected like In or Out depending upon whether employee is coming to the office or leaving from the office. Finally, the “Submit” button encircled in red color can be pressed in order to store the information. UM_IOC2_S12_T11_V1.0 19 Version Date: 04/04/12 User Manual (UM) Version 1.0 2.1.5: Generating Reports The following navigation flow must be followed: Menu: Reports Payroll Export The following Steps 1 & 2 explains the above mentioned navigation flow in detail. Step 1: Click on the “Reports” option. The following options can be seen which is shown in the Figure 17 mentioned below: Figure 17: Report Generation Part 1 Step 2: Click on “Payroll Export “option. The following page can be seen: UM_IOC2_S12_T11_V1.0 20 Version Date: 04/04/12 User Manual (UM) Version 1.0 Figure 18:Report Generation Part 2 Step 3:As clear from Figure 18, lot of options can be seen like Name, Start Date, End Date, the Pay Period option can be used where all employees can be selected using the Select All button encircled in green color below and then they can be transferred to the “Selected Pay Period” section using the forward arrow button denoted by “>>” and encircled in red color. The following Figure (19) clarifies the above mentioned steps. Figure 19 Transferring Selected Employees Step 4: Similarly, Employee status and Group options can be used using the down arrows shown in green color in Figure (20) and then depending upon the user, all employees can be selected using the “Select All” button encircled in blue color and then can be transferred to “Selected Employee Statuses” of “Selected Groups” section using the forward arrow button encircled in red color in Figure 20. UM_IOC2_S12_T11_V1.0 21 Version Date: 04/04/12 User Manual (UM) Version 1.0 Figure 20:Dealing with other options Similarly other options like Default Branch, Default Department, Employee Title etc can be explored according to the steps mentioned in Step 4 above. Step 5: Click on the “Export Format”( encircled in red color in the Figure 18 above) pop down menu and then select “ADP” as the option and then finally click on “Export” (Encircled in Red in Figure 18 above) option in order to see the generated report. Step6: Click on the “Logout” in order to come out of the system. Section 3: Inventory Management System 3.1 Accessing Inventory Management System using “Administrator Account “ This section will explain how to use Inventory Management system when an end user is going to perform Administrative tasks. The following two cases could possibly exist depending upon the way user wants to use the system. CASE 1: If a user has been using Timetrex system so far and trying to switch to Inventory Management System, Logout of the Timetrex system. You will be able to see Figure (1) mentioned in Section 2 of User Manual and then perform the below mentioned step: Enter the following login credentials in order to access the Administrator Account: Username : Password : admin1 team11 CASE 2: If a user wants to use Inventory Management System right from the start then he/she needs to follow Steps 1 to Steps 4 mentioned in Section 2 of User Manual and then select “Inventory Management System “ as an option to see the proper functionality of the system. UM_IOC2_S12_T11_V1.0 22 Version Date: 04/04/12 User Manual (UM) Version 1.0 If Inventory Management System has been selected, then the following page will appear: Figure 21: Login Screen for Inventory Management Step 1: Click on the Login button to continue Step 2: The following page appears after completing Step 1: UM_IOC2_S12_T11_V1.0 23 Version Date: 04/04/12 User Manual (UM) Version 1.0 Figure 22: Contents Page As clear from the above screenshot, the user will be on the home page where the following options are available for him to use: 1) 2) 3) 4) Products Inventory Managers Inventory Admins Logout 3.1.1 Adding Products When, Products option is selected, the user can enter the product related details: UM_IOC2_S12_T11_V1.0 24 Version Date: 04/04/12 User Manual (UM) Version 1.0 Figure 23:Product List The following steps can be performed by the user: Step 1: Add New Products As user can click on the “Add New” button in order to enter new products where he can enter the name, number and description of the product where every product must have a name and number. This is clear from the following image: Figure 24: Add New Product UM_IOC2_S12_T11_V1.0 25 Version Date: 04/04/12 User Manual (UM) Version 1.0 3.1.2: Generate Reports One can see the reports by clicking on the “Reports” button. 3.1.3: Product Details The product details can be seen after clicking “Details” button which will display the following page: Figure 25: Product Details As clear from the above figure, details like name, number, count and the section user want to select and see are available for the user. 3.1.4 Delete a Record A user can delete a record by clicking the “Delete” button. As separate window will appear after clicking the “Delete” button for the first time confirming with the user whether he really wants to delete the record or not. If the button has been clicked accidently, the user can click on the “No” button so that the record will not be deleted. UM_IOC2_S12_T11_V1.0 26 Version Date: 04/04/12 User Manual (UM) Version 1.0 3.1.5 Inventory Managers Users can check the details of the Inventory Managers after clicking on the “Details” button: Figure 26: Users After clicking on “Details” button, the following details can be seen: UM_IOC2_S12_T11_V1.0 27 Version Date: 04/04/12 User Manual (UM) Version 1.0 Figure 27: User Details 3.1.6 Inventory Admins This option provides a list of all the administrators and their details can be seen after clicking on the “Details” button: Figure 28: Administrators List 3.1.7 Logout A user can Logout from the Inventory Management system by clicking “Logout” button where he will be directed to the initial login page. 3.2 Accessing Inventory Management System as an User: This section will explain how to use Inventory Management system when an end user is going to perform Normal User tasks. The following two cases could possibly exist depending upon the way user wants to use the system. UM_IOC2_S12_T11_V1.0 28 Version Date: 04/04/12 User Manual (UM) Version 1.0 CASE 1: If a user has been using Timetrex system so far and trying to switch to Inventory Management System, please follow the Step 4 of Section 2.1.5 of the User Manual to come out of the system. You will be able to see Figure(1) mentioned in Section 2 of User Manual and then perform the below mentioned step: Enter the following login credentials in order to access the Normal User Account: Username : Password : team11 team11 CASE 2: If a user wants to use Inventory Management System right from the start then he/she needs to follow Step 1 to Step 4 mentioned in Section 2 of User Manual and then select “Inventory Management System “ as an option to see the proper functionality of the system. Similar to Case 1 mentioned above, please follow the below mentioned steps for accessing the system from the normal user point of view. Step 1: Enter the following login credentials in order to access the User Account: Username : Password : team11 team11 The following image depicts the above step: UM_IOC2_S12_T11_V1.0 29 Version Date: 04/04/12 User Manual (UM) Version 1.0 Figure 29: Login Screen Step 2: Click on the Login button to proceed and select “Inventory Management system” just like we did before and then click on the “Login” button to continue. The following page will appear which is quite different from the one we saw in case of accessing the system with user account: Figure 30: Contents Page UM_IOC2_S12_T11_V1.0 30 Version Date: 04/04/12 User Manual (UM) Version 1.0 As clear from the above figure , the following three options are available for a normal user: 1) Products 2) My Account 3) Logout 3.2.1 Product Details Click on the “Product” option where the name, number, count, vendor, section required below the product details can be seen. The following screenshot depicts the above mentioned details: Figure 31: Product Details 3.2.2 My Account: A user can see his own account details by clicking on “My Account” option. UM_IOC2_S12_T11_V1.0 31 Version Date: 04/04/12 User Manual (UM) Version 1.0 Figure 32:My Profile 3.2.3 Logout A user can Logout from the Inventory Management system by clicking “Logout” button where he will be directed to the initial login page. UM_IOC2_S12_T11_V1.0 32 Version Date: 04/04/12 User Manual (UM) Version 1.0 4Troubleshooting N/A 4.1Frequently Asked questions N/A 4.2Error Codes and Messages Error Message : Incorrect Input! Date/Time is incorrect, or pay period does not exist for this date. Please create a pay period schedule if you have not done so already. Solution: Please make sure to create a pay period before using the “Punch In/Punch Out” feature of the Time Trex as explained in Section 2.1.1 of the User Manual. 4.3Note The User Manual will keep on updating as the developers are still working on the system. UM_IOC2_S12_T11_V1.0 33 Version Date: 04/04/12 User Manual (UM) Version 1.0 5. Appendix Section 5.1 Adding an Administrator Account The following path should be followed in order to create an administrator username and password: Select Timetrex as your option from the Figure (2) and then click on continue to proceed. You should be on the main menu page. Follow the navigation flow mentioned below: Menu: AdminEmployee Administration Follow the Steps until Step 3 mentioned in Section 2.1.2 and you will be on the page which will look similar to Figure (10) mentioned in the User Manual. The only change required is to select “Administrator” as an option for the “Permission Group” drop down menu as shown in Figure (A) below. The rest of the steps are same as mentioned in “Section 2.1.2 Adding an employee” of the User Manual. Figure (A): Administrator Account Section 5.2 Pictorial representation of Checkboxes The below mentioned screenshot shows check boxes which are encircled in red color. Based on the number of employees to be deleted, one can select those many number of check boxes. UM_IOC2_S12_T11_V1.0 34 Version Date: 04/04/12 User Manual (UM) Version 1.0 Figure (B): Checkboxes UM_IOC2_S12_T11_V1.0 35 Version Date: 04/04/12