1
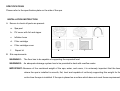
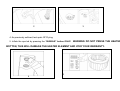
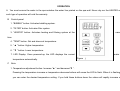
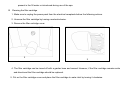
TM
www.aquaspas.com.au
USER’S MANUAL
VERY IMPORTANT: READ THIS MANUAL
BEFORE OPERATION
IMPORTANT SAFETY AND OPERATION INSTRUCTIONS
.
DO NOT LEAVE THE SPA HEATER OR FILTER RUNNING FOR MORE THAN 48 HOURS AT A TIME
RECOMMENDED HEATING FOR EVENING USE: SWITCH SPA ON IN THE MORNING OR 5 to 8
HOURS BEFORE USE, AND SWITCH OFF AFTER USE.
WARNING1:
Risk of electric shock. Insert the plug only to a properly grounded socket.
WARNING2:
Electric installations should fulfill the requirements of local standards.
WARNING3:
Replace cord immediately if damaged.
WARNING4:
This product is provided with a ground-fault circuit-interrupter on power lead.The GFCI must be tested
before each use.
WARNING5:
To reduce the risk of electric shock, do not use extension cord to connect unit to electric supply; provide a
properly located receptacle.
WARNING6:
Keep the plug of the spa more than 3.5m away from the spa.
WARNING7:
To avoid the electric shock, do not use the spa when it is raining, or leave plug or safety switch in the rain.
WARNING8:
Never operate spa if the suction fittings are broken or missing. Never replace a suction fitting with one rated
less than the flow rate marked on the original suction fitting.
WARNING9:
To reduce the risk of injury, do not permit children to use this product unless they are closely supervised at
all times.
WARNING10: Water attracts children. Always have the spa locked with its cover after each use.
WARNING11: Do not turn the bubble function on while the cover is on the spa.
WARNING12: Do not switch on if there is any possibility that the water in the spa is frozen.
WARNING13: Risk of electric shock. Never operate any electrical appliance when in your spa or when your body is wet.
Never place any electric appliance, such as a light, telephone, radio, or television, within 5 feet (1.5m) of a
spa.
WARNING14: Pets should be kept away from spa to avoid damage.
WARNING15: Risk of electric shock. Install at least 5 feet (1.5m) from all metal surfaces. As an alternative, a spa may be
installed within 5 feet of metal surfaces if each metal surface is permanently connected by 6 a minimum 8
AWG (8.4mm2) solid copper conductor to the wire connector on the terminal box that is provided for this
purpose.
WARNING16: Risk of accidental drowning. Extreme caution must be exercised to prevent unauthorized access by children.
To avoid accidents, ensure that children can not use this spa unless they are supervised at all times. Check
with your local authority for fencing laws.
WARNING17: During pregnancy, soaking in hot water may cause damage to the fetus. Limit use to 10 minutes at a time.
WARNING18: The use of alcohol, drugs, or medication before or during spa use may lead to unconsciousness with the
possibility of drowning.
WARNING19: Obese persons and persons with a history of heart disease, low or high blood pressure, circulatory system
problems, or diabetes should consult a physician before using a spa.
WARNING20: Persons using medication should consult a physician before using a spa since some medication may induce
drowsiness while other medication may affect heart rate, blood pressure, and circulation.
The water in a spa should never exceed 40°C (104°F). Water temperature between 38°C (100°F) and 40°C
(104°F) are considered safe for a healthy adult. Lower water temperatures are recommended for young
children and when spa use exceeds 10 minutes. Since excessive water temperature have a high potential
for causing fatal damage during the early months of pregnancy, pregnant or possibly pregnant women
should limit spa water temperature to38°C (100°F).
WARNING21: To reduce the risk of injury, never pour water which is higher than 40°C (104°F) into the spa directly.
WARNING22: The use of alcohol, drugs, or medication can greatly increase the risk of fatal hyperthermia. Hyperthermia
occurs when the internal temperature of the body reaches a level several degrees above the normal body
temperature of 37°C (98.6°F). The symptoms of hyperthermia include an increase in the internal
temperature of the body, dizziness, lethargy, drowsiness, and fainting. The effects of hyperthermia include
failure to perceive heat; failure to recognize the need to exit spa; unawareness of impending hazard; fatal
damage in pregnant women; physical inability to exit the spa; and unconsciousness resulting in the danger
of drowning.
WARNING23: Prolonged immersion in a spa may be injurious to your health.
CAUTION1:
To avoid damage to the pump, the spa must never be operated unless the spa is filled with
water.
CAUTION2:
Immediately leave spa if uncomfortable or sleepy.
CAUTION3:
Place only on surface that can withstand the floor loading requirement of your spa.
CAUTION4:
The spa should not be setup or left out in temperature lower than 4°C (40°F).
CAUTION5:
Never add water to chemicals. Always add chemicals to water to avoid strong fumes or violent reactions that
may result in hazardous chemical spray.
SAVE THESE INSTRUCTIONS
SPECIFICATIONS
Please refer to the specification plate on the side of the spa.
INSTALLATION INSTRUCTION
A Ensure to check all parts are present:
B
a.
Spa pool
b.
PU cover with foil and zipper
c.
Inflation hose
d.
Filter cartridge
e.
Filter cartridge cover
f.
Repair kit
a
d
b
e
c
f
Site requirements:
WARNING1:
The floor has to be capable of supporting the expected load.
WARNING2:
An adequate drainage system has to be provided to deal with overflow water.
IMPORTANT: Because of the combined weight of the spa, water, and users, it is extremely important that the base
where the spa is installed is smooth, flat, level and capable of uniformly supporting this weight for the
entire time the spa is installed. If the spa is placed on a surface which does not meet these requirements,
any damage caused by improper support will void the warranty. It is the responsibility of the spa owner
to ensure the integrity of the site at all times.
a) Indoors installation:
Be aware of special requirements if you install the spa indoors.
1. The floor must be able to withstand the capacity of the spa. The floor should be a non-slip, level surface.
2. Proper drainage is essential for indoor spa installation. When building a new room for the spa it is
recommended that a floor drain be installed.
3. Humidity is a natural side effect with spa installation. Determine the effects of airborne moisture on
exposed wood, paper, etc. in the proposed location. To minimize these effects it is best to provide plenty of
ventilation to the selected area. An architect can help determine if more ventilation is needed.
NOTE: Do not install the spa on carpet or other material that can be damaged by moisture.
b) Outdoors installation:
1. No matter where you install the spa, it is important you have a solid support foundation. If you are installing
the spa outdoors, ensure there are no sharp objects that could damage it and that the location is level so
the spa sits stably and properly.
2. During filling, emptying or when in use, water may spill out of the spa. Therefore the spa should be
installed near a ground drain.
3. Do not leave the spa’s surface exposed to direct sunlight for long periods of time.
C
RCD test
WARNING1: Insert the GFCI plug into a residual current device (RCD) protected power receptacle only.
WARNING2: Before inserting the plug into a power receptacle, make sure the current rate of the power receptacle and
the fixed wiring are suitable for the spa.
Contact a qualified electrician if you can not verify.
1. Plug GFCI into power outlet, indicator should turn on.
2. Press TEST button, indicator should turn off.
3. Press RESET button again for use.
WARNING3: Do not use if above test fails.
1
2
3
D
Assembly
1. Unfold the spa from the packaging. Spread the spa and cover. Make sure both are right side up.
1
2. Open the air outlet on the spa. Screw one end of inflation hose onto it.
3. Open the air valve on the spa. Connect the other end of inflation hose into the valve.
3
2
4. As previously outlined, test spa’s GFCI plug.
5. Inflate the spa tub by pressing the “BUBBLE” button ONLY!
WARNING DO NOT PRESS THE HEATER
BOTTON, THIS WILL DAMAGE THE HEATER ELEMENT AND VOID YOUR WARRANTY.
4
5
When the spa is properly inflated, press the “BUBBLE” button to shut off the bubble function.
Attention1: Do not over inflate. Over inflation will cause the spa to distort and split the seams. Over inflating your
spa will void your warranty.
Attention2: If you want inflation when the spa has filled water, you must turn on the bubble function for 2-3 minutes
first, and then operate according to step 2-5 above.
Attention3: VERY IMPORTANT: After inflating your spa, disconnect your power plug before filling it with water to
avoid accidentally turning the heater on and damaging the heater element, which will void your warranty.
6. Remove the inflation hose and screw the valve tight.
7. Remove the inflation hose from the air outlet and screw the nut tight.
8. Screw the filter cartridge onto the water inlet on the spa wall by turning it clockwise.
9. Fill the spa using a garden hose to the water level printed on the spa wall.
10. Place the cover onto the spa, fasten the zipper.
9
8
10
OPERATION
A You must ensure the water in the spa matches the water line printed on the spa wall. Never dry-run the HEATER as
such type of operation will void the warranty.
B
Control panel
1. “BUBBLE” button: Activates bubbling system.
2. “FILTER” button: Activates filter system.
3. “HEATER” button: Activates heating and filtering system at the
same
time.
4. “TEMP” button: Set and show set temperature.
5. “ ▲ ” button: Higher temperature.
6. “ ▼ ” button: Lower temperature.
7. LED Display: Once powered-up, the LED displays the current
temperature automatically.
C
water
Figure
j
Note
1. Temperature adjustment button: Increase “▲ ” and decrease“▼ ”.
Pressing the temperature increase or temperature decrease buttons will cause the LED to flash. When it is flashing,
you can enter the desired temperature setting. If you hold these buttons down the values will rapidly increase or
decrease.
The new and desired temperature setting will remain on the LED display for 5 seconds to confirm the new value.
2. The set point temperature defaults to 40°C (104°F).
3. Temperature adjustment ranges from 20°C (68°F) to 40°C (104°F).
4. Water filtration button: This button turns the filter pump on and off. The light of the water filtration button displays
green when the filtration system is activated.
5. Heat button: Use this button to activate the heating system. The heater does not stop heating the spa until the
current water temperature reaches set temperature.
After the current water temperature drops 2°C below the set point temperature the heating system will restart.
When the light of the heat button displays green, the heating system is activated.
Heating system is capable of increasing approximately 1.0°C (2.0°F) per hour.
6. If the heating system is activated the filtration system will automatically start. This is normal.
After turning off the heating system the filtration system will stop working. This is normal.
But if pressing “FILTER” on before pressing “HEATER” on, only once pressing “HEATER” button can switch off
heating function only.
7. Bubble button: Press this button to activate the massage system which has a 30-minute auto shut off for 10 minutes
feature.
The light of bubble button displays green when activated.
Warning:
.
DO NOT LEAVE THE SPA HEATER OR FILTER RUNNING FOR MORE THAN 48 HOURS AT A TIME
RECOMMENDED HEATING FOR EVENING USE: SWITCH SPA ON IN THE MORNING OR 5 to 8
HOURS BEFORE USE, AND SWITCH OFF AFTER USE. LEAVING YOUR SPA ON FOR MORE THAN
48 HOURS WILL VOID YOUR WARRANTY.
Inflate the spa tub by pressing the “BUBBLE” button ONLY! WARNING DO NOT PRESS THE HEATER
BOTTON THIS WILL DAMAGE THE HEATER ELEMENT AND WILL VOID YOUR WARRANTY.
ONLY USE Lithium Based Chlorine, 11 grams per 1000 litres as a daily dose. Any other Chlorine
Base will Damage your spa and void your warranty!
MAINTAINING
A Maintaining water
1. Clean your filter cartridge after every 72- 120 hours of use. The filter cartridge should be replaced at least once a
month depending on use.
2. Change water every few days or use appropriate pool chemicals. All spas require the use of pool chemicals. Please
consult your local pool supply retailer for more information about chemical maintenance. Pay close attention to the
chemical manufacturer’s instructions. Spa damage resulting from misuse of chemicals and mismanagement of spa
water is not covered by the warranty.
a. Water balances. We recommend maintaining your water PH between 7.2 and 7.8, total alkalinity between 80
and 120ppm and free chlorine between 3 to 5ppm.
Purchase a test kit to test your water chemistry before each use of the spa, no less than once per week. LOW
PH WILL CAUSE DAMAGE TO THE SPA AND PUMP. Damage resulting from chemical imbalance is not
covered by the warranty.
b. Water sanitation is the responsibility of the spa owner, achieved through the regular and periodic (daily, if
necessary) addition of an approved sanitizer. The sanitizer will chemically control the bacteria and viruses
present in the fill water or introduced during use of the spa.
B
Cleaning the filter cartridge
1. Make sure to unplug the power pack from the electrical receptacle before the following actions.
2. Unscrew the filter cartridge by turning counterclockwise.
3. Remove the filter cartridge cover.
2
3
4. The filter cartridge can be rinsed off with a garden hose and reused. However, if the filter cartridge remains soiled
and discolored the filter cartridge should be replaced.
5. Put on the filter cartridge cover and place the filter cartridge to water inlet by turning it clockwise.
4
C
5
Drainage
1. Make sure to unplug the power pack from the electrical receptacle.
2. Open the outlet in the outer wall of the spa. Screw one end of inflation hose into it.
3. When there is no water in the spa, you must put on the bubble function 2-3 minutes by pressing the “BUBBLE”
button to drain the water in the air pipeline.
4. When drainage finished, remove the inflation hose and screw the nut tight.
D
Cleaning the spa
Detergent residues and dissolved solids from bathing suits and chemicals will gradually accumulate in the spa’s water.
To clean the spa, use soap and water then rinse.
Note: do not use hard brushes or abrasive cleaners.
REPAIR AND STORAGE
1. Spa repair
If the spa is torn or punctured use the provided repair patch. Dry the area to be repaired. Apply the glue in the
accessory bag to the repair patch and then attach it onto the damaged area. Smooth the surface to remove any air
bubbles. A secure unnoticeable repair can usually be made.
2. Spa storage
Make sure all water is drained from the spa and control box. This is essential to extend the life of the spa. We
recommend the use of a wet/dry vacuum to blow out or suck up water from the spa pipes and pump lines.
Remove the filter cartridge.
It is recommended you store the spa in its original package in a warm dry place.
Note: Plastic becomes brittle and susceptible to breakage when exposed to subzero temperatures. Freezing can
severely damage the spa. Improper winterization of your spa may void your warranty.
When Deflating undo the valve body by turning it anti-clockwise
TROUBLE SHOOTING
Here are some helpful tips to help you to diagnose and rectify some common sources of trouble.
Problems
Probable causes
---Power failure
---GFCI tripped
---GFCI broken
Solutions
---Check power source
---Reset GFCI/check if the home fixed wiring too thin to
afford 1500W
---Call for service if it does not reset.
---Unplug the air pump. After the air pump has cooled,
---Air pump is too tot
insert the plug and press the bubble button to
Bubble system ---30minute auto shut off
does not
activate.
feature activated
operate
---Something is wrong with ---Press the bubble button to reactivate.
--- Call for service if it does not reset.
the power box
---Temperature set too low
---Set to a higher temperature (20-40°C).
Heating system ---Dirty filter cartridge
---Clean/replace the filter cartridge in time.
does not
---Improper water levels
---Add water to specified levels.
operate
---Heating element failed
--- Call for service.
Power pack
does not
operate
Filtering
system does
not operate
Spa leakage
---Dirty filter cartridge
---Clean/replace the filter cartridge in time.
---Something is wrong with --- Call for service if it does not reset.
the power box
---Spa is torn or punctured
---Use provided repair patch
---Insufficient filtering time
---Increase filtration time.
---Dirty filter cartridge
---Clean/replace the filter cartridge.
Water not clean
---Improper
water ---Refer to the chemical manufacturer’s instructions.
maintenance
DISPOSAL
1. The marking indicates that this product shall not be disposed with the general household waste. Please contact your
local community about collection points or ask your dealer.
2. This product contains valuable materials that can be recycled and contribute to a sustainable environment.
LIMITED WARRANTY—TERMS & CONDITIONS
This warranty extends to the original purchaser only. The warranty period commences on the original purchase date
through 6—12 months according to the different parts. The warranty is not transferable to subsequent purchasers.
This warranty is subject to the limitations and exclusions listed below.
The spa tube is covered for 6 months manufacturing fault on seams only. Warranty does not cover general wear or
punctures.
12 months warranty on all electrical parts if used correctly according to these instructions.
If spa is returned, diagnostic tests will be performed to validate that the spa has been used correctly according to the
instructions. Our computer printout from your spa computer, will indicate if the spa has been run continuously for over 48
hours, thus voiding the warranty.
Obligations of purchaser
Freight to and from our repair center for warranty claims is the responsibility of the purchaser.
Limitations and exclusions
The warranty is a limited warranty. It covers the spa pool itself for the period stated. This warranty negates or limits
all other warranties implied or expressed, except for those, which can not be negated or limited by law of the state in
which the product is used. The manufacturer does not authorize or permit any party, including its agents, distributors
or dealers to assume for it any other obligations or liability. In no event will the manufacturer be liable for any claim for
damages arising from the use or loss of use, installation, or repair of the spa pool including, but not limited to freight
damage, punctures, cuts in vinyl, water and/or sewage costs, freeze damage, or water damage to surrounding areas,
rooms, furnishings or landscaping. The purchaser is responsible for providing adequate access to all areas
surrounding the spa so that service may be properly performed. Product specifications are subject to change without
notice.
Acts invalidating warranty
This warranty is void if the spa pool has been altered, misused, abused or has been repaired by an unauthorized
person, or is not installed according to the factory instructions. Other acts that will void the warranty are operating the
spa without water or improper water level, use of an extension cord, improper chemical maintenance, burying the spa
below ground level, damage from ice or freezing, low voltage or excess voltage. This warranty gives you specific legal
rights. Specifications are subject to be changed without notice.
“WARNING”
IMPORTANT: PLEASE READ SPA INSTRUCTIONS AND USE THE
SPA ACCORDINGLY!
DO NOT LEAVE THE SPA HEATER OR FILTER RUNNING FOR
MORE THAN 48 HOURS AT A TIME.
RECOMMENDED HEATING FOR EVENING USE: SWITCH SPA ON
IN THE MORNING OR 5 to 8 HOURS BEFORE USE, AND SWITCH
OFF AFTER USE.
Inflating the spa tub by pressing the “BUBBLE” button ONLY!
“WARNING DO NOT PRESS THE HEATER BOTTON THIS WILL
“DAMAGE THE HEATER”
ONLY USE Lithium Based Chlorine 11 grams per 1000 litres as a
daily dose any other Chlorine Base will Damage your spa!
TM
For accessories and spare parts, contact Aqua Spas Australia
Aqua Spas
[email protected]
Ph: 0412 344 465
Or visit www.aquaspas.com.au