1
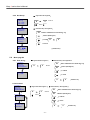
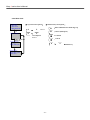
Warp 3
User’s Manual
2008.07
copyright@2008
Warp 3 series User’s Manual
Table of Contents
1
About WARP3 SERIES
2
Features
2.1 Characteristics
2.2 Support Functions
3
Operation window
4
User’s Menu
4.1 For fingerprint verify user
4.2 For Password verify user
4.3 For Card verify user
4.4 For Fingerprint + Password verify user
4.5 For Fingerprint or Password verify user
5
Administrator Manu
5.1 Menu Page #1
5.1.1 User REG: Register a new user
5.1.2 User DEL: Delete a registered user
5.1.3 User Set: Set user’s limit in WARP3 SERIES
5.1.4 User Closed: Close user’s limit in WARP3 SERIES
5.2 Menu Page#2
5.2.1 Time
5.2.1.1 Set Time:Set time of WARP3 SERIES
5.2.1.2 Set Date:Set date of WARP3 SERIES
5.2.1.3 Set Day:Set week of WARP3 SERIES
5.2.2 Secure Level: Set system security level
5.2.3 Manager P/W: Change system password
5.2.4 IP Address: Set IP address of WARP3 SERIES
5.3 Menu Page #3
5.3.1 User DEL: Delete all registered users
5.3.2 Log DEL: Delete all logs
5.3.3 IP Config: Restore IP address
5.3.4 All Group Period Delete: Delete all group period we set before
5.4 Menu Page #4
5.4.1 Users&Log: Display total registered users and logs
5.4.2 Init Card: Format TM card to EM card
5.4.3 Write Card: Registered user ID to TM card
5.4.4 BF20/485 Reader: Display the status of Out/Input and BF-20 controller
6
Specifications
7
Appendix
7.1 Notes
7.2 External connector specifications
-1-
Warp 3 series User’s Manual
1
About WARP3 SERIES
WARP3 SERIES is developed to manage entrance security, work place time and attendance, over-work
time verification and other situation requiring the presence of the authorized personnel. Our fingerprint ID
technology bypasses problems of existing security solutions such as security cards and keypad locks.
WARP3 SERIES supports various I/O protocols. Within 1 Card Reader, 128 X 64 pixel LCD screen, 10 push
buttons, 6 function keys, and 1 buzzer. These equipments make WARP3 SERIES user-friendly.
2
Features
2.1
Characteristics
z
Fingerprint identification enhances security
Existing security measures such as security cards system and keypad locks are prone to breach by
unauthorized persons through card-duplication or disclosure of set security code. Fingerprint ID system
can truly restrict security access only to those authorized persons.
z
Reliable fingerprint ID algorithm
Our in-company developed fingerprint ID algorithm has minimized False Rejection Rate and False
Acceptance Rate.
z
Entrance security, time and attendance, over-time management and other applications
Fingerprint ID system allows for entrance security, work place time and attendance, over-time work. Also,
situations that require the presence of the authorized persons at a secured point can take advantage of
our fingerprint ID system.
z
Special function keys may be configured to time and attendance and entrance access
management
40 programmable function keys can be used to manage time and attendance. One WARP3 SERIES can
be adapted to manage many different kinds of work involving site security control and time and
attendance.
z
Low cost of system maintenance
Existing IC cards require new issuance of cards with addition of new users and lost of cards. This
becomes unnecessary with fingerprint ID system. System maintenance can be lowered to negligible levels
when compared to other solutions.
z
Use of stand-alone modules and working in conjunction with an ACU
WARP3 SERIES entrance control system may be used as stand-alone units to control entrance traffic or in
multiple module configurations Utilizing Weigand/RS485 protocol to contain with an ACU. Also, direct
connection to a PC is possible via TCP/IP or RS485 protocol when software library bundled. Because
WARP3 SERIES content RTC and log management capabilities (up to 32,700 records), entrance security
and other event management are possible without an ACU.
Besides, WARP3 SERIES involves clock on time and record ability (32,700 logs at most), so it can be
used to entrance security or other stand-alone modules.
z
Expandable and Convenience
WARP3 SERIES has Http Server inside, and that makes you revise the setting on line, download data,
manage employees and maintain the system conveniently.
-2-
Warp 3 series User’s Manual
2.2
Support functions
2.2.1 User management
¾ Register a user, provide 4 type of register (1.Fingerprint 2.Password 3.RFID
4.Fingerprint+Password)
¾ Support 32 designations and departments for set
¾ Manager can depend on the real supply situation for the limit period of employee one by one
¾ Manage the entrance security and time by group
¾ The status of employee can activate or deactivate
¾ Supply employee’s data, you can check every employee’s number, name, status and the way of
identification.
¾ Delete a user or all users
2.2.2 System management
¾ Http server inside can use IE to revise the data and manage user on line
¾ System setting has two security level includes account and password to avoid the setting status
revised by a bad intention
¾ Set terminal ID, title on LCD, description, fingerprint security level, maintenance time, card ID
display format
¾ Set communication status on the internet, such as IP Address, Gateway, DNS, Port Number,
Host Name and DDNS.
¾ System clock setup: you can setup clock immediately by your hand or connect to the time
server to revise everyday
¾ Support 40 IN/OUT trigger setup
¾ Backup and restore the user’s data directly
¾ Import all user’s list directly on the internet
2.2.3 Door mode
¾ 64 time set, 64 time zone setup, 32 group list, 32 holiday setup
¾ You can aimed at some entrance/exit setup location, relay trigger, lock release time zone, exit
button time zone, anti pass back level, lock release time and door open delay time by connect
to door lock controller or elevator controller
¾ You can define some entrance/exit, floor, parking area and attendance control by system
¾ Door status on line
¾ Configure and read door mode (normal/ forced open) by real situation
2.2.4 Log
¾ Access log: user or employee can query their access log by any computer
¾ Query by user ID, terminal ID, department, function key and time zone
¾ Query daily first in/last out for separate user
¾ Export the IN/OUT log (TXT or XLS) directly on line
¾ You can use software program to download the log instantly
2.2.5 Authentication
¾ WARP3 SERIES supply 5 authentication ways (1. fingerprint 2. RFID 3. password 4.
fingerprint+ password 5. fingerprint or password)
¾ Door access setup finger+ pin time zone, card+ pin time zone
2.2.6 Real time event
¾ Display user I.D. Name on LCD at authentication time
¾ Display fingerprint status grade on LCD at authentication time and supply to fingerprint file
2.2.7 Auxiliary function
¾ Exit button
¾ Relay out (lock driver)
-3-
Warp 3 series User’s Manual
3
Operation window
Operation window
Ymatrix
THU
01 Jan
01:52
ID:
Press F1 twice
Press #
Place finger
Processing …
Enter password:
1:N Verification
Manager login
Enter ID + #
Enter ID + #
YMatrix
THU
01 Jan
01:52
ID:No Reg Use
Input unregistered ID
Place Card
Directly
Place finger
Processing …
ID: 11647520
1:1 Verification
fingerprint
☞ Function key description:
:Enter Administrator Mode
F1
Function key for Time & Attendance
User password:
XXXXXXXXXX
F2 :Function key for Time & Attendance
1:1 Verification
password
F3
:Delete (Backspace)
Function key for Time & Attendance
YMatrix
THU
01 Jan
01:52
ID:No Reg Use
# :Confirm
Input unregistered ID
* :Cancel
~
9
Verify success
Card ID Error
User Denied
F4 :Function key for Time & Attendance
0
Name:Eric
Illegal card
Place finger
Processing …
Asking fingerprint
verify
Enter password:
XXXXXX
:Number key
Asking password
verify
-4-
Warp 3 series User’s Manual
4
User’s Menu
4.1
For fingerprint verify user
YMatrix.
THU
01 Jan
01:52
ID:
1:1 Verify
Place card directly
1:N Verify
Press #
Place finger
Processing …
Legal Card
Illegal Card
Success
ID:
YMatrix
THU
01 Jan
01:52
ID:xxxxxxxxxx
Registered ID
Fail
Name: Eric
Card ID Error
User Denied
1:1 Verify
Enter ID + # or F4
Unregistered ID
Place finger
Processing …
Identify Failed
User Denied
11647520
☞ Operation description:
Method 1:1:1 verify , 950 users for Warp3G and
5000 users for Warp3
Place sensor card on the coil directly
Place finger for verify
YMatrix
THU
01 Jan
01:52
ID:No Reg User
☞ Function key description:
:Enter Administrator Mode
F1
Function key for Time & Attendance
Method 2:1:N verify
F2 :Function key for Time & Attendance
Place finger for verify
F3
Method 3:1:1 verify
:Delete (Backspace)
Function key for Time & Attendance
F4 :Function key for Time & Attendance
0
#
~
9
# :Confirm
Enter ID
* :Cancel
F4 Press # or F4
Place finger for verify
0
Note:1. If you use function key please press function
key first
2. If you want to show name on LCD then you
must register Name to WARP 3 SERIES by
-5-
~
9
:Number key
Warp 3 series User’s Manual
4.2
For password verify user (1:1 verify)
YMatrix
THU
01 Jan
01:52
ID:
1:1 Verify
Place card directly
1:1 Verify
Enter ID + # or F4
YMatrix.
Unregistered ID
THU
01 Jan
01:52
ID:xxxxxxxxxx
Illegal Card
Card ID Error
User Denied
Legal Card
YMatrix
THU
01 Jan
01:52
ID:No Reg User
Registered ID
User password:
XXXXXXXXXX
Correct
Error
Name: Eric
ID:
Enter password:
XXXXXXXXXX
Password Error
User Denied
11647520
☞ Operation description:
1:1 verify,max. 950 users for Warp3G and
5000 users for Warp3
Method 1:
0
#
0
~
9
☞ Function key description:
F1
Enter ID
F2 :Function key for Time & Attendance
F4 Press # or F4
~
9
F3
# :Confirm
* :Cancel
Method 2:
Place sensor card on the coil directly
0
~
:Delete (Backspace)
Function key for Time & Attendance
F4 :Function key for Time & Attendance
Enter password
6~10 digit
# Press #
0
:Enter Administrator Mode
Function key for Time & Attendance
9
Enter password
6~10 digit
# Press #
Note:1. If you use function key please press function
key first
2. If you want to show name on LCD then you
must register Name to Warp 3 Series by
software
-6-
~
9
:Number key
Warp 3 series User’s Manual
4.3
For card verify user (1:N verify)
YMatrix
THU
01 Jan
01:52
ID:
1:N verify
Place sensor card
on the coil directly
Illegal card
Legal card
Name: Eric
ID:
Card ID Error
User Denied
11647520
☞ Operation description:
1:N verify,max. 950 users for Warp3G and 5000
for Warp3
Place sensor card on the coil directly
Note:1. If you use function key please press function
key first
2. If you want to show name on LCD then you
must register Name to Warp 3 Series by
☞ Function key description:
F1
:Enter Administrator Mode
Function key for Time & Attendance
F2 :Function key for Time & Attendance
F3
:Delete (Backspace)
Function key for Time & Attendance
F4 :Function key for Time & Attendance
# :Confirm
* :Cancel
0
-7-
~
9
:Number key
Warp 3 series User’s Manual
4.4
For fingerprint + password verify user
YMatrix.
THU
01 Jan
01:52
ID:
1:1 Verify
Place card directly
Legal Card
Illegal Card
Place finger
Processing …
Fail
User password:
XXXXXXXXXX
Place finger
Processing …
Identify Failed
User Denied
Correct
Name: Eric
11647520
~
9
Method 3:1:1 verify,max. 950 users for Warp3G
and 5000 users for Warp3
0
~
F4
9
Enter ID
Press # or F4
Place finger for verify
0
~
9
Enter password
6~10 digit
# Press #
# Press #
Place finger for verify
9
YMatrix
THU
01 Jan
01:52
ID:No Reg User
#
Enter password
6~10 digit
Method 2:1:N verify,less than 100 users
~
Unregistered ID
Enter password:
XXXXXXXXXX
Password Error
User Denied
# Press #
0
YMatrix
THU
01 Jan
01:52
ID:xxxxxxxxxx
Error
☞ Operation description:
Method 1:1:1 verify,max. 950 users for Warp3G
and 5000 users for Warp3
Place sensor card on the coil directly
Place finger for verify
0
Registered ID
Success
Card ID Error
User Denied
ID:
1:1 verify
Enter ID + #
1:N Verify
Press #
Note:1. If you use function key please press function
key first
2. If you want to show name on LCD then you
must register Name to Warp3 Series by
software
Enter password
6~10 digit
# Press #
-8-
Warp 3 series User’s Manual
☞ Function key description:
F1
:Enter Administrator Mode
Function key for Time & Attendance
F2 :Function key for Time & Attendance
F3
:Delete (Backspace)
Function key for Time & Attendance
F4 :Function key for Time & Attendance
# :Confirm
* :Cancel
0
4.5
~
9
:Number key
Fingerprint or Password verify user
Operation is same as 4.1、 4.2 and the priority is Password > Fingerprint (for sensor card 1:1 verify).
Enter “ID + #”will run fingerprint verify‚“ID + F4”will run password verify.
-9-
Warp 3 series User’s Manual
5
Administrator Menu
Administrator menu allows new user registration and deletion, and system configuration. Press “F1” twice to
enter。
YMatrix
THU
01 Jan
01:52
ID:
Press F1 twice
Enter password:
XXXXXX
Correct
1. User
2. Settings
3. Reset
4. Misc.
Error
Enter password:
XXXXXX
Password Error
☞ Function key description:
☞ Operation description:
F1
Press F1 twice
F1 :Enter Administrator Mode/Page Up
0
~
F2 :Page Down
#
0
F1
*
9
Enter 6 digit password
default value is 111111
Press #
~
9
F3 :Delete (Backspace)
F4 :No use
Press 1~4 to select
F2 Press F1/F2 to Page Up/Page Down
# :Confirm
Press * to exit
* :Cancel
0
- 10 -
~
9
:Number key
Warp 3 series User’s Manual
5.1
Menu page #1
1. Add User
2. Delete User
3.Activate User
4.Deactivate User
5.1.1 User REG: register a new user
5.1.1.1 Fingerprint verify user
#
1
Present card …
Or Input id:
xxxxxxxxxx
User already Reg
Present card …
Or Input id:
xxxxxxxxxx
Registered
Unregistered
Reg Finger ?
YES(#)/NO(*)
*
#
Present finger
Processing…
Reg Failed
Present finger
Processing…
Fail
FP Score
Reg Password ?
YES(#)/NO(*)
Reg Success
Reg Password ?
YES(#)/NO(*)
*
Reg Other Finger
YES(#)/NO(*)
*
98
Success
#
Present finger
Processing…
FP Score
85
Success
☞ Function key description:
☞ Operation description:
F1
F2 Press F1/F2 to find User REG
F1 :Enter Administrator Mode/Page Up
0
~
9
Press 1
F2 :Page Down
0
~
9
Enter ID or Place
sensor card on the coil
F3 :Delete (Backspace)
# Press #
F4 :No use
# Press # to register fingerprint
# :Confirm
Place finger on the sensor to enroll fingerprint
* :Cancel
# Press # to enroll second fingerprint
0
Place finger on fingerprint sensor
* Press ﹡to cancel password register
- 11 -
~
9
:Number key
Warp 3 series User’s Manual
5.1.1.2 Password verify user
1. Add User
2. Delete User
3.Activate User
4.Deactivate User
*
1
Present card …
Or Input id:
xxxxxxxxxx
User already Reg
Present card …
Or Input id:
xxxxxxxxxx
Registered
Unregistered
#
Reg Finger ?
YES(#)/NO(*)
*
Reg Password ?
YES(#)/NO(*)
#
User password:
xxxxxxxxxx
Enter password + #
User password:
xxxxxxxxxx
Reg Success
☞ Operation description:
F1
☞ Function key description:
F2 Press F1/F2 to find User REG
0
~
9
Press 1
0
~
9
Enter ID or Place
sensor card on the coil
F1 :Enter Administrator Mode/Page Up
F2 :Page Down
F3 :Delete (Backspace)
#
# Press #
F4 :No use
* Press *to cancel fingerprint register
# :Confirm
# Press # to register password
* :Cancel
0
~
9
Enter password
6~10 digit
0
# Press #
- 12 -
~
9
:Number key
Warp 3 series User’s Manual
5.1.1.3 Card verify user
1. Add User
2. Delete User
3.Activate User
4.Deactivate User
*
1
Present card …
Or Input id:
xxxxxxxxxx
User already Reg
Present card …
Or Input id:
Registered xxxxxxxxxx
Unregistered
Reg Finger ?
YES(#)/NO(*)
#
*
Reg Password ?
YES(#)/NO(*)
*
Only Reg User ?
YES(#)/NO(*)
#
Only Reg User ?
YES(#)/NO(*)
Reg Success
☞ Function key description:
☞ Operation description:
F1
0
F2 Press F1/F2 to find User REG
~
9
F1 :Enter Administrator Mode/Page Up
Press 1
F2 :Page Down
Place sensor card on the coil
F3 :Delete (Backspace)
* Press *to cancel fingerprint register
F4 :No use
* Press *to cancel password register
# :Confirm
# Press # to confirm
* :Cancel
Note:After register success please modify open
mode to card first , see 5.1.3
0
- 13 -
~
9
:Number key
Warp 3 series User’s Manual
5.1.1.4 Fingerprint + Password verify user
1. Add User
2. Delete User
3.Activate User
4.Deactivate User
1
Present card …
Or Input id:
xxxxxxxxxx
User already Reg
Present card …
Or Input id:
Registered xxxxxxxxxx
Unregistered
Reg Finger ?
YES(#)/NO(*)
#
Present finger
Processing…
Reg Password ?
YES(#)/NO(*)
User Password:
*
Fail
Reg Other Finger
YES(#)/NO(*)
FP Score
98
Success
#
Present finger
Processing…
Reg Failed
#
Enter password + #
Present finger
Processing…
User Password:
Fail
Reg Success
Success
FP Score
85
☞ Operation description:
F1
☞ Function key description:
F2 Press F1/F2 to find User REG
F1 :Enter Administrator Mode/Page Up
0
~
9
Press 1
F2 :Page Down
0
~
9
Enter ID or Place
sensor card on the coil
F3 :Delete (Backspace)
# Press #
F4 :No use
# Press # to register fingerprint
# :Confirm
Place finger on the sensor to enroll fingerprint
#
* :Cancel
Press # to enroll second fingerprint
0
Place finger on fingerprint sensor
# Press # to register password
0
~
9
Enter password
6~10 digit
# Press #
- 14 -
~
9
:Number key
Warp 3 series User’s Manual
5.1.2 User Del: Del One User
1. Add User
2. Delete User
3.Activate User
4.Deactivate User
2
Present card …
Or Input id:
xxxxxxxxxx
Unregistered
Registered
Present card …
Or Input id:
Xxxxxxxxxx
Unreged User
☞ Operation description:
Present card …
Or Input id:
xxxxxxxxxx
Del Success
☞ Function key description:
F1 :Enter Administrator Mode/Page Up
0
0
~
~
9
Press 2
9
Enter ID or Place
sensor card on the coil
# Press #
F3
:Delete (Backspace)
#
:Confirm
*
:Cancel
0
- 15 -
~
9
:Number key
Warp 3 series User’s Manual
5.1.3 User Set: Set user’s verify type
☞ Operation description:
1. Add User
2. Delete User
3.Activate User
4.Deactivate User
0
~
9
Press 3
0
~
9
Enter ID or Place
sensor card on the coil
# Press #
3
Present card …
Or Input id:
xxxxxxxxxx
☞ Function key description:
Registered
Unregistered
Present card …
Or Input id:
xxxxxxxxxx
Present card …
Or Input id:
xxxxxxxxxx
Unreged User
F1 :Enter Administrator Mode/Page Up
#
F3
:Delete (Backspace)
#
:Confirm
*
:Cancel
Status:
0
Access
~
9
:Number key
5.1.4 User Closed: Closed user’s verify type
☞ Operation description:
1. Add User
2. Delete User
3.Activate User
4.Deactivate User
0
~
9
Press 4
0
~
9
Enter ID or Place
sensor card on the coil
# Press #
3
Present card …
Or Input id:
xxxxxxxxxx
Registered
Present card …
Or Input id:
xxxxxxxxxx
Unregistered
Present card …
Or Input id:
xxxxxxxxxx
Unreged User
☞ Function key description:
F1 :Enter Administrator Mode/Page Up
F3
:Delete (Backspace)
#
:Confirm
*
:Cancel
#
Status:
Closed
0
- 16 -
~
9
:Number key
Warp 3 series User’s Manual
5.2
Menu page #2
5.2.1 Time: Set time、date and week of Warp3 series
1. Date&Time
2. Security Level
3. Password
4. IP Config
1
*
Input Time
HHMMSS
#
*
Input Date
YYMMDD
*
Input Day
X
#
☞ Function key description:
☞ Operation description:
F1 :Enter Administrator Mode/Page Up
F3
:Delete (Backspace)
#
:Confirm
*
:Cancel
0
~
9
~
0
9
Press 1
Set Time
0
#
~
9
Enter time HHMMSS
9
Enter date YYMMDD
9
Enter week 1~7
Press #
Set Date
0
:Number key
#
~
Press #
Set Day
0
#
- 17 -
~
Press #
Warp 3 series User’s Manual
5.2.2 Secure Level: Set system security level (for Warp3G only)
1
2
3
4
5
Low
High
High security level will decrease FAR (false acceptance rate) while increasing FRR (false rejection
rate). Oppositely, lower security level will increase FAR while decreasing FRR。
☞ Operation description:
1. Date&Time
2. Security Level
3. Password
4. IP Config
2
Security level
X
(1 – 5)
Current level
2
0
~
9
Press 3
0
~
9
Enter level 1~5
#
Press #
☞ Function key description:
#
F1 :Enter Administrator Mode/Page Up
Set Success
F3
:Delete (Backspace)
#
:Confirm
*
:Cancel
0
~
5.2.3 Manager P/W: Change system password
1. Date&Time
2. Security Level
3. Password
4. IP Config
9
:Number key
☞ Operation description:
0
~
9
Press 3
0
~
9
Enter 6 digit password
9
Enter 6 digit password
#
3
0
Input New P/W
XXXXXX
#
Press #
~
Press #
☞ Function key description:
Input P/W Again
XXXXXX
Match
Input P/W Again
XXXXXX
P/W Set Success
F1 :Enter Administrator Mode/Page Up
Mismatch
Input P/W Again
XXXXXX
Input P/W Error
F3
:Delete (Backspace)
#
:Confirm
*
:Cancel
0
- 18 -
~
9
:Number key
Warp 3 series User’s Manual
5.2.4
IP Config: Set IP data of Warp3 series
☞ Operation description:
1. Date&Time
2. Security Level
3. Password
4. IP Config
4
~
9
Press 3
0
~
9
Enter IP、Subnet mask、
Gateway
#
IP: 192168000012
SM: 255255255000
GW: 192168000001
IP:
Press #
☞ Function key description:
F1 :Enter Administrator Mode/Page Up
#
CHIYU Tech.
THU
01 Jan
01:52
ID:
Note:The format of IP、subnet mask and gateway are as follow
If you want to set IP as 192.168.0.12 then enter
192168000012
If you want to set subnet mask as 255.255.255.0 then
enter 255255255000
If you want to set gateway as 192.168.0.1 then enter
192168000001
5.3
0
F3
:Delete (Backspace)
#
:Confirm
*
:Cancel
0
9
~
:Number key
Menu page #3
5.3.1 Del Users: Delete all users
1. Del Users
2. Del Logs
3. IP Config
4. Del Group
1
Del Users
Are You Sure ?
YES(#)/NO(*)
☞ Operation description:
0
#
~
Press 1
9
Press #
☞ Function key description:
F1 :Enter Administrator Mode/Page Up
#
Del Users
Are You Sure ?
YES(#)/NO(*)
Deleting …
Del Users
Are You Sure ?
YES(#)/NO(*)
Del Success
F3
:Delete (Backspace)
#
:Confirm
*
:Cancel
0
- 19 -
~
9
:Number key
Warp 3 series User’s Manual
5.3.2 Del Logs: Delete all logs
1. Del Users
2. Del Logs
3. IP Config
4. Del Group
2
Del Logs
Are You Sure ?
YES(#)/NO(*)
☞ Operation description:
0
#
Press 2
9
Press #
☞ Function key description:
#
F1 :Enter Administrator Mode/Page Up
Del Logs
Are You Sure ?
YES(#)/NO(*)
Deleting …
Del Logs
Are You Sure ?
YES(#)/NO(*)
Del Success
~
0
F3
:Delete (Backspace)
#
:Confirm
*
:Cancel
~
9
:Number key
5.3.3 IP Config: Reset IP
1. Del Users
2. Del Logs
3. IP Config
4. Del Group
☞ Operation description:
0
#
3
Reset IP Config
Are You Sure ?
YES(#)/NO(*)
~
Press 3
9
Press #
☞ Function key description:
F1 :Enter Administrator Mode/Page Up
#
Please wait….
CHIYU Tech.
THU
01 Jan
01:52
ID:
F3
:Delete (Backspace)
#
:Confirm
*
:Cancel
0
- 20 -
~
9
:Number key
Warp 3 series User’s Manual
5.3.4 Del Group
☞ Operation description:
1. Del Users
2. Del Logs
3. IP Config
4. Del Group
~
0
#
4
Press 4
9
Press #
☞ Function key description:
Del GP/TZ/HD
Are You Sure ?
YES(#)/NO(*)
F1 :Enter Administrator Mode/Page Up
#
Del GP/TZ/HD
Are You Sure ?
YES(#)/NO(*)
Del Success
F3
:Delete (Backspace)
#
:Confirm 0
*
:Cancel
CHIYU Tech.
THU
01 Jan
01:52
ID:
5.4
~
9
:Number key
Menu page #4
☞ Operation description:
5.4.1 User & Log
1. User&Log
2. Init Card
3. Write Card
4. BF20/485 Reader
☞ Function key description:
F1 :Enter Administrator Mode/Page Up
0
~
9
Press 1
F3
:Delete (Backspace)
#
:Confirm
*
:Cancel
0
~
1
User: 00000
Log: 00000
:Number key
9
5.4.2 Init Card
☞ Operation description: ☞ Function key description:
1. User&Log
2. Init Card
3. Write Card
4. BF20/485 Reader
F1 :Enter Administrator Mode/Page Up
0
2
#
Present Card.
Push# Init Card
~
9
Press 2
Press #
#
Init Success
Init Other Card
YES(#)/NO(*)
F3
:Delete (Backspace)
#
:Confirm
*
:Cancel
0
#
- 21 -
~
9
:Number key
Warp 3 series User’s Manual
5.4.3 Write Card
☞ Operation description:
1. User&Log
2. Init Card
3. Write Card
4. BF20/485 Reader
☞ Function key description:
F1 :Enter Administrator Mode/Page Up
0
3
Input Card IP
0
~
~
9
Press 3
F3
:Delete (Backspace)
#
:Confirm
*
:Cancel
9
After Input ID
Press #
After Input ID
Press #
Input Card IP
********
Place TM Card
0
Write Success
Write Other Card
YES(#)/NO(*)
#
- 22 -
~
9
:Number key
Warp 3 series User’s Manual
6
Specifications
6.1
Module Features
¾ Main board
¾ Keyboard and LCD Module
¾ Finger sensor module
¾ Build-In Card Reader
6.2
Power Supply
6.2.1 Voltage
¾ +9V to +30V DC
6.2.2 Current
¾ Current power consumption: 300Ma, 12V
¾ Maximum power consumption: 500Ma, 12V
6.3
Environment
6.3.1 Temperature and humidity
¾ Operating temperature: 0 to 55
¾ Storage temperature: -20 to 85
¾ Operating humidity: 0% to 95%
¾ Storage humidity: 0% to 95%
6.3.2 Immunity to electro static discharge
¾ Serial port 15kv ESD
¾ Ethernet port 1.5kv
6.4
Communication
¾ 1 RJ-45 port(10/100M)
¾ 1 RS-232 port
¾ 1 RS-485 port
¾ Meet RS232C、RS485 specifications
6.5
Drivers
¾ 1Relay Out (COM, NO, NC)
6.6
Capacity
¾ 950 persons with 2 fingerprints/1 card/1 password per person.
6.7
Log entry memory
¾ 32,700 log entries total.
- 23 -
Warp 3 series User’s Manual
6.8
Size(yet to be set)
¾ WARP3 SERIES: 130 mm(H) X 143 mm(W) X 48 mm(D)
6.9
Weight
¾ 470g
6.10 Authentication time
¾
Average : shorter than 2 second.
6.11 False Rejection Rate (FAR)
¾
Configurable from 0.1% - 0.000001%
6.12 Equal Error Rate (EER)
¾
Less than 0.1%
6.13 Fingerprint data size
¾
352 Byte
6.14 Input
¾
10 number keys + 6 function keys
6.15 Display
¾
¾
7
1 Buzzer
1 LCD: 128 X 64 pixels, 2LED
Appendix
7.1
Note
The first thing when you install Warp3 Series
¾ Please change the system password first. Warp3 Series’s password is fixed at “111111” initially.
It makes a security problem.
Please do these when you have the problem for verification.
¾ Cleaning your finger first, then do it again.
¾ Don’t move your finger when you put your finger on the Warp3G’s sensor.
Please do these when Warp3 has out of function.
¾ Power off and power on again, so initialize Warp3. After initializing Warp3, if it has same status
still, please calls on our service center.
- 24 -
Warp 3 series User’s Manual
7.2
External connector
- 25 -
Warp 3 series User’s Manual
- 26 -