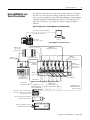
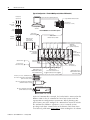
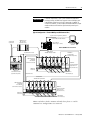
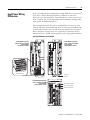
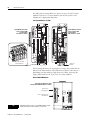
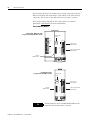
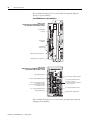
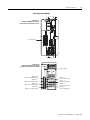
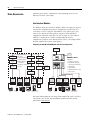
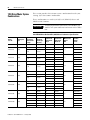
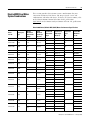
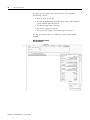
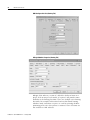
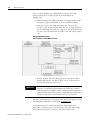
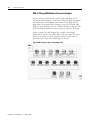
1
Technical Data
1394 Drive Conversions
Catalog Numbers
1394-SJT05-A, 1394-SJT10-A, 1394-SJT22-A,
1394-SJT05-C, 1394-SJT10-C, 1394-SJT22-C,
1394-SJT05-T, 1394-SJT10-T, 1394-SJT22-T,
1394C-SJT05-A, 1394C-SJT10-A, 1394C-SJT22-A,
1394C-SJT05-C, 1394C-SJT10-C, 1394C-SJT22-C,
1394C-SJT05-T, 1394C-SJT10-T, 1394C-SJT22-T,
1394C-SJT05-D, 1394C-SJT10-D, 1394C-SJT22-D,
1394C-SJT05-L, 1394C-SJT10-L
Topic
Page
About This Publication
2
About Converting From 1394 Drives
2
Kinetix 6000 Multi-axis Servo Drive Systems
9
Logix Controller Platforms
12
1394 to Kinetix 6000 Drive Conversions
13
Catalog Number Explanations
14
Mounting Dimension Differences
18
Kinetix 6000 Drive Modules
20
Input Power Wiring Differences
25
Motor Power Wiring Differences
27
Motor Feedback and I/O Wiring Differences
29
Power Specifications
37
Drive Accessories
44
Motor/Drive Cable Compatibility
47
1394 Drive/Motor System Combinations
50
Kinetix 6000 Drive/Motor System Combinations
55
Converting Your GML Software to RSLogix 5000 Software
59
GML and RSLogix 5000 Software Programming Reference
146
Additional Resources
151
2
1394 Drive Conversions
About This Publication
This publication provides a migration path for converting your 1394
multi-axis drive system to a Kinetix 6000 multi-axis drive system.
Included are checklists describing the differences between the drive
families and specific mounting and wiring information for determining
the impact on panel space and cable lengths. Also included are drive
specifications, drive/motor system performance specifications, and
GML to RSLogix 5000 programming software conversion examples.
This publication does not include the conversion of 9-Series, CNC
system modules (catalog numbers 1394-SJTxx-E).
ATTENTION
While executing the migration, a risk assessment should be
conducted to make sure that all task-hazard combinations have been
identified and addressed. The risk assessment may require additional
circuitry to reduce the risk to an acceptable level.
Additional Resources, on page 151, contains publication numbers for
the Kinetix Motion Control Selection Guide, Motion Analyzer CD, and
drive manuals you will need to complete your 1394 drive conversion.
About Converting From 1394
Drives
For each 1394 control feature, you can find a suitable solution with
Kinetix 6000 multi-axis servo drives, ControlLogix or CompactLogix
controller platforms, and RSLogix 5000 programming software.
Checklist for All 1394 System Conversions
This table provides a checklist of common considerations when
migrating from any 1394 system module to Kinetix 6000 drives.
1394 Drive Feature/Function
Page
Kinetix 6000 Conversion
Page
N/A
You can configure the Kinetix 6000 IAM module in RSLogix 5000 software
as a common-bus master or common-bus follower drive based on system
needs for regeneration or configuration requirements. When planning your
panel layout, the common-bus master must be configured to include the
common-bus follower capacitance since it controls system precharge and
shunt control.
11
Kinetix 6000 drives have similar requirements for input power and you may
be able to reuse some of your 1394 input power components.
40
The Line Interface Module (LIM) includes many of the input power
components that you will need for your Kinetix 6000 system and provides
3-phase input power, control power, auxiliary power, and 24V dc power for
motor brakes.
44
DC Common Bus Capability
The 1394 DC Link Module (DCLM) provides
additional load leveling and energy storage
(capacitance) for 1394 systems. The module
can be used alone or linked to a second 1394
system with the DCLM module using the
DC Link cable.
Typical Input Power Components
•
•
•
•
324…528V ac, 50/60 Hz, 3-phase input
24V ac control power supply
Disconnect, fuse block, main contactor
24V dc power supply for motor brakes
and motor thermal contacts
Publication 1394-TD004A-EN-P — January 2008
37
√
1394 Drive Conversions
1394 Drive Feature/Function
Page
Kinetix 6000 Conversion
Page
3
√
Customer-supplied External 24V dc Power Supply for Motor Brakes
• On GMC and analog systems, the brake
connections are made on the bottom of each
axis module (TB1 and TB2).
27
• On SERCOS interface systems, the brake
connections are made on the relay outputs
connector on the system module.
30
The Kinetix 6000 IAM and AM (inverter) modules also require 24V dc input
for motor brakes. However, the Motor Brake (BC) connector on each IAM
and AM module also provide programmable motor brake relay outputs and
supply an MOV device for arc suppression.
28
The Kinetix 6000 IAM and AM modules each have their own dedicated I/O
(IOD) connector for terminating the individual I/O points for each axis. Each
IOD connector requires a low-profile connector kit (catalog number
2090-K6CK-D26M).
32
The Kinetix 6000 IAM module provides the Contactor Enable (CED)
connector for the same purpose. Wiring the contactor enable relay into
your safety control string is required.
32
I/O Terminations
• GMC system modules have an input wiring
board (TB1 and TB2) where the I/O for up to
four axes terminate.
29
• SERCOS interface system modules have four
8-pin connectors where the I/O for up to four
axes terminate.
30
Relay Outputs to Protect Drive Electronics
• On GMC system modules the Drive OK relay
output is on the input wiring board (TB2).
29
• On SERCOS system modules the Drive OK
relay output is on the relay outputs connector. 30
• On Analog system modules the Contactor
Enable relay output is on the input wiring
board (TB2).
31
Digital Input and Registration Input Power Supplies
• The GMC system modules require an external
5V dc or 24V dc supply for the registration
inputs and 24V dc for digital inputs.
33
• The SERCOS system modules require an
external 24V dc for the two registration inputs
and 24V dc for the four digital inputs.
36
The Kinetix 6000 has an internal 24V dc power supply on each IAM/AM
module dedicated for use by the enable, home, and overtravel digital
inputs, and two registration inputs.
33
36
Hardware Enable Inputs
• The GMC system modules provide only one
System Enable input (TB1 or TB2).
33
• Each 8-pin I/O connector on the SERCOS
interface system module has its own
Hardware Enable input.
36
The Kinetix 6000 IAM and AM modules each have their own Hardware
Enable input on the I/O (IOD) connector. Each IOD connector requires a
low-profile connector kit (catalog number 2090-K6CK-D26M).
33
36
Servo Motor Compatibility
Bulletin 1326AB (resolver) servo motors
47
Bulletin 1326AS (resolver) servo motors
48
Bulletin 1326AB (M2L/S2L) servo motors
47
MP-Series (catalog numbers MPL-BxxxxM/S)
servo motors with high-resolution feedback
MP-Series (catalog numbers MPL-BxxxxR) servo
motors with resolver feedback
49
You can continue to use the Bulletin 1326AB or 1326AS (resolver) servo
motors and the same motor power and feedback cables. However, when
migrating to Kinetix 6000 drives you need the low-profile connector kit
(catalog number 2090-K6CK-D15MF) for each of these motors. This kit
includes noise filters for the thermal switch connections that replace the
filter circuitry between TB1 and TB2 on the bottom of each 1394 (series C)
axis module.
You can continue to use the MP-Series (Bulletin MPL) or 1326AB (M2L/S2L)
servo motors. However, when migrating to Kinetix 6000 drives you need to
replace the feedback cable for MPL-BxxxxM/S and 1326AB (M2L/S2L)
motors. You also need one low-profile connector kit (catalog number
2090-K6CK-D15M) for each of these motors.
47
48
47
49
Publication 1394-TD004A-EN-P — January 2008
4
1394 Drive Conversions
GMC Systems
The 1394 GMC System provides all the functionality of the IMC S Class
Compact Motion Controller and power conversion within the 1394
system module. The 1394x-SJTxx-C (standard GMC) system module
supports four axis modules and provides four channels of auxiliary
encoder input. The 1394C-SJTxx-L (standard GMC) module provides
the same functionality as the 1394x-SJTxx-C module, but supports
only one axis module and provides two channels of auxiliary encoder
input.
The 1394x-SJTxx-T (GMC Turbo) system module provides more GML
application program memory and executes the programs faster. The
1394x-SJTxx-T module offers 64 K of memory with a 32-bit processor
while the 1394x-SJTxx-C module offers 32 K of program memory with
a 16-bit processor. The 1394x-SJTxx-T module also includes a direct,
high speed link to the SLC controller rack that simplifies the
programming required to transfer data between the 1394x-SJTxx-T
module and the SLC controller.
Both systems are completely programmed and commissioned using
GML (Graphical Motion Control Language) software, offer
Allen-Bradley DH-485, RS-232, and RS-422 as standard
communication, and have Remote I/O (RIO) and AxisLink available as
communication options.
GMC Turbo Example Systems
ALEC
SLC 500 Controller
AxisLink
RIO
PanelView HMI
845H
Encoder
AxisLink
DH-485
1394x-SJTxx-T
System Module
SLC 5/03, 5/04, or 5/05
Controller
1394x-SJTxx-T
System Module
DANGER
RISK OF ELECTRICAL SHOCK. HIGH VOLTAGE MAY
EXIST UP TO FIVE MINUTES AFTER REMOVING POWER.
1746-C7 or
1746-C9 Cable
Bulletin 1326AB, 1326AS, or
Bulletin MPL Resolver Motors
DANGER
RISK OF ELECTRICAL SHOCK. HIGH VOLTAGE MAY
EXIST UP TO FIVE MINUTES AFTER REMOVING POWER.
Bulletin 1326AB, 1326AS, or
Bulletin MPL Resolver Motors
GML Software
RS-232/RS-422
Reset
Axis 0
Axis 1
2
1
Axis 1
A
B
4
3
2
1
5
4
3
2
1
8
7
6
5
10
9
8
7
6
A
Control
Switches
Axis 0
Digital Inputs
Analog Outputs
Analog Inputs
Encoder Configuration
B
Configuration Encoder Power
A
Flex I/O
Switches
5
4
3
2
1
4
3
2
1
5
Control
Digital Outputs
SSI
B
10
9
8
7
6
8
7
6
SSI
A
B
AEC
Flex I/O
4100-AEC
Publication 1394-TD004A-EN-P — January 2008
842A
Encoder
1394 Drive Conversions
5
Standard GMC Example Systems
SLC 500 Controller
ALEC
AxisLink
RIO
845H
Encoder
AxisLink
PanelView HMI
1394x-SJTxx-L
System Module
1394x-SJTxx-C
System Module
DH-485
DANGER
RISK OF ELECTRICAL SHOCK. HIGH VOLTAGE MAY
EXIST UP TO FIVE MINUTES AFTER REMOVING POWER.
Bulletin 1326AB, 1326AS, or
Bulletin MPL Resolver Motors
DANGER
RISK OF ELECTRICAL SHOCK. HIGH VOLTAGE MAY
EXIST UP TO FIVE MINUTES AFTER REMOVING POWER.
Bulletin 1326AB, 1326AS, or
Bulletin MPL Resolver Motors
GML Software
845H Encoder
RS-232/RS-422
Flex I/O
Reset
Axis 0
Axis 1
Axis 1
A
B
4
3
2
1
5
4
3
2
1
8
7
6
5
10
9
8
7
6
A
Control
Switches
Axis 0
2
1
Encoder Configuration
Digital Inputs
Analog Outputs
Analog Inputs
Switches
B
Configuration Encoder Power
A
Control
5
4
3
2
1
4
3
2
1
5
SSI
B
10
9
8
7
6
8
7
6
SSI
A
Digital Outputs
842A
Encoder
B
AEC
Flex I/O
4100-AEC
Publication 1394-TD004A-EN-P — January 2008
6
1394 Drive Conversions
This table provides a checklist of considerations when migrating from
a GMC or GMC Turbo system module. This includes catalog numbers
1394x-SJTxx-C, 1394C-SJTxx-L and 1394x-SJTxx-T.
Checklist for 1394 GMC Conversions
1394 GMC Feature/Function
The 1394 GMC motion controller system uses GML
software for motion programming.
GML software is a sequential-based programming
language. Therefore, when two axis are synchronized this
way they are moved or executed at the same time.
Page
Kinetix 6000 Conversion
59
The Kinetix 6000 drives are configured and programmed using
RSLogix 5000 software and communicate over the SERCOS fiber-optic
network through a ControlLogix, CompactLogix, or SoftLogix SERCOS
interface module/PCI card.
59
RSLogix 5000 software is a scan-based language, the performance or
execution is not immediate, instead it is based on the Motion Group
Coarse Update Rate (CUR). A general rule of thumb is to expect execution
no longer than 2x the CUR. In most instances of machine performance, this
will not be noticeable.
Remote I/O (RIO) adapter or DH-485 serial port.
• Used to handshake PLC-5 I/O with data bit or block data
transfer to and from the 1394 GMC system module.
• Used to interface to an HMI terminal.
62
The 1394 GMC Turbo motion controller system uses the SLC
or backplane interface to transfer I/O data bits/words.
63
DH-485 serial port.
62
RS-232/RS-422 serial ports used for multi-drop
communication to different 1394 GMC motion controllers.
72
The RIO and DH-485 features are replaced by a Logix module and RSLogix
5000 software, which uses one program to manage I/O, process data, and
command motion instructions.
The existing PLC-5 and HMI terminal/screens can be reused, but the
interface to Logix needs to be retrofitted to accommodate the new
controller platform.
The SLC interface is replaced by a Logix module and RSLogix 5000
software, which uses one program to manage I/O, processing, and motion
instructions.
The Kinetix 6000 does not have a serial port. All configuration of the drives
and motion programming is done in the RSLogix 5000 software.
72
AxisLink is not required since you can have multiple Kinetix 6000 power
rails with up to 32 axes per motion group, per processor. Axes can be
gearaed to one another in the same motion group or different processor
motion groups.
73
The Kinetix 6000 drive does not support flexible inputs such as Flex I/O.
However, the Logix platforms have various input and output modules to
replace a Flex I/O block. The existing Flex I/O blocks can be used with a
network configuration (such as ethernet) to tie into the Logix platform.
Drive Interface Module (DIM) is used to control an external
±10V velocity or torque control drive input. The drive must
also produce an AQB quadrature encoder output signal for
closed loop feedback to the 1394 GMC system.
79
The Kinetix 6000 drive does not support an analog input, nor can it control
an analog input type drive. The 1756-M02AE (AQB feedback) or
1756-M02AS (SSI feedback) analog modules support control of up to two
±10V velocity or torque control drive inputs.
Bulletin 4100-AEC, 4100-TEC, or 4100-REC modules.
125
The Bulletin 4100 modules are not required. A multi-turn Stegmann
encoder can be interfaced directly to the Auxiliary Feedback (AF) connector
on the Kinetix 6000 IAM/AM modules.
AxisLink with an ALEC module to link multiple motion
controllers to provide real-time axis coordination between
axes in a distributed 1394 GMC multi-axis system.
Flex I/O modules for local I/O used in the GML code for
machine control.
Publication 1394-TD004A-EN-P — January 2008
√
1394 Drive Conversions
7
Analog Servo System
The 1394 Analog servo system (catalog numbers 1394x-SJTxx-A)
provides a traditional ±10V dc analog interface. The 1394 Analog
system supports up to four axes and can be used as a velocity or
torque control system. It is commissioned with the Bulletin 1201 HIM
module which provides access to auto-tuning and start-up prompting.
The 1394 Analog system also provides a SCANport interface as a
standard feature.
Analog Servo System
SLC 500 Controller
RIO
PanelView HMI
1394x-SJTxx-A
System Module
Bulletin 1203 HIM Module
DH-485
IMC S Class Compact,
ControlLogix Controller, or
other customer-supplied
motion controller.
GML Software
RS-232/RS-422
DANGER
RISK OF ELECTRICAL SHOCK. HIGH VOLTAGE MAY
EXIST UP TO FIVE MINUTES AFTER REMOVING POWER.
Bulletin 1326AB, 1326AS, or
Bulletin MPL Resolver Motors
SCANport
Optional Bulletin 1201
HIM module or other
remote SCANport
interface device.
Digital Outputs
Digital Inputs
Optional Bulletin 1203
Communication Module
Analog Outputs
Analog Inputs
Flex I/O
To RIO, Serial, DeviceNet,
or SLC device.
The Kinetix 6000 drives and Logix platforms provide position,
velocity, or torque loop control using RSLogix 5000 software. Based
on existing machine needs, select appropriate Logix controller,
SERCOS module, and Kinetix 6000 drive combination.
Publication 1394-TD004A-EN-P — January 2008
8
1394 Drive Conversions
SERCOS System
The 1394 SERCOS system module (catalog numbers 1394C-SJTxx-D) is
a digital servo drive system with a fiber-optic digital network interface.
The 1394 SERCOS system is configured using either ControlLogix,
CompactLogix, or SoftLogix controller platforms and RSLogix 5000
software.
SERCOS System
Logix Controller Programming Network
Logix SERCOS interface Module
1394C-SJTxx-D
System Module
SERCOS System Module
Logix Platform
(ControlLogix is shown)
RSLogix 5000 Software
DANGER
RISK OF ELECTRICAL SHOCK. HIGH VOLTAGE MAY
EXIST UP TO FIVE MINUTES AFTER REMOVING POWER.
SERCOS Ring
Bulletin 1326AB, 1326AS, or MP-Series (Bulletin MPL) Motors
with resolver-based or absolute high-resolution feedback.
SERCOS System Module
1394C-SJTxx-D
System Module
DANGER
RISK OF ELECTRICAL SHOCK. HIGH VOLTAGE MAY
EXIST UP TO FIVE MINUTES AFTER REMOVING POWER.
SERCOS Ring
SERCOS Ring
Bulletin 1326AB, 1326AS, or MP-Series (Bulletin MPL) Motors
with resolver-based or absolute high-resolution feedback.
Publication 1394-TD004A-EN-P — January 2008
1394 Drive Conversions
Kinetix 6000 Multi-axis
Servo Drive Systems
9
The Kinetix 6000 multi-axis servo drives provide powerful simplicity
to handle even the most demanding application. The Kinetix 6000
drive system is configured using either ControlLogix or CompactLogix
controller platforms and RSLogix 5000 software. The Kinetix 6000
multi-axis servo drives are part of the Kinetix Integrated Motion
solution.
Typical Configuration - Kinetix 6000 System (with LIM module)
Logix Controller Programming Network
Logix SERCOS interface Module
SERCOS interfaceTM
CP
OK
Logix Platform
(ControlLogix is shown)
RSLogix 5000
Software
Kinetix 6000 Multi-axis Servo Drive System
Tx (rear)
Rx (front)
2090-SCxxx-x
SERCOS Fiber-optic Cable
2090-XXLF-xxxx
AC Line Filter
(required for CE)
Three-Phase
Input Power
2094-BSP2
Shunt Module
(optional component)
115/230V Control Power
2094-xCxx-Mxx-S
Integrated
Axis Module
2094-PRF
Slot Filler Module
(required to fill
any unused slots)
MAIN VAC
2094-PRSx
Power Rail
2094-xMxx-S
Axis Modules (5)
2094-xLxxS
Line Interface Module
(optional component)
To Input Sensors
and Control String
I/O Connections
2090-XXNFxx-Sxx or
2090-CFBM6DF-CBAAxx
Motor Feedback Cable
2090-K6CK-Dxxx
Low Profile Connector Kits for
I/O, Motor Feedback, and Aux Feedback
2090-XXNPxx-xxSxx or
2090-CPxM6DF-16AAxx
Motor Power Cable
MP-Series, TL-Series, 1326AB (M2L/S2L),
and F-Series Rotary Motors and Actuators
(MPL-xxxx motors shown)
MP-Series Integrated Linear Actuators
(MPAI-xxxx actuators shown)
MP-Series Integrated Linear Stages
(MPAS-x9xxx ballscrew shown)
Publication 1394-TD004A-EN-P — January 2008
10
1394 Drive Conversions
Typical Configuration - Kinetix 6000 System (without LIM module)
Three-phase
Input Power
Logix Controller Programming Network
Logix SERCOS interface Module
Logix Platform
(ControlLogix is shown)
Line
Disconnect
Device
RSLogix 5000
Software
Input
Fusing
Kinetix 6000 Multi-axis Servo Drive System
Single-phase
Control Power
Magnetic
Contactor
2090-SCxxx-x
SERCOS Fiber-optic Cable
2090-XXLF-xxxx
AC Line Filter
(required for CE)
2094-BSP2
Shunt Module
(optional component)
2094-xCxx-Mxx-S
Integrated
Axis Module
I/O Connections
2094-PRF
Slot Filler Module
(required to fill
any unused slots)
2094-PRSx
Power Rail
To Input Sensors
and Control String
2094-xMxx-S
Axis Modules (5)
2090-XXNFxx-Sxx or
2090-CFBM6DF-CBAAxx
Motor Feedback Cable
2090-K6CK-Dxxx
Low Profile Connector Kits for
I/O, Motor Feedback, and Aux Feedback
2090-XXNPxx-xxSxx or
2090-CPxM6DF-16AAxx
Motor Power Cable
MP-Series, TL-Series, 1326AB (M2L/S2L),
and F-Series Rotary Motors and Actuators
(MPL-xxxx motors shown)
MP-Series Integrated Linear Actuators
(MPAI-xxxx actuators shown)
MP-Series Integrated Linear Stages
(MPAS-x9xx ballscrew shown)
In the DC Common Bus example, the leader IAM is connected to the
follower IAM via the dc common bus based on system needs for
regeneration or configuration requirements. When planning your
panel layout, you must configure the common-bus master to include
the common-bus follower capacitance, since it controls system
precharge and shunt control. Refer to the Kinetix 6000 Servo Drive
User Manual, publication 2094-UM001, when making this calculation.
Publication 1394-TD004A-EN-P — January 2008
1394 Drive Conversions
11
If total bus capacitance of your system exceeds the leader IAM
pre-charge rating, the IAM seven-segment status will display error
code E90 (pre-charge time-out fault) if input power is applied. To
correct this condition, you must replace the leader IAM with a larger
module or decrease the total bus capacitance by removing axis
modules.
IMPORTANT
Typical Configuration - Kinetix 6000 System (DC Common Bus)
Logix Controller Programming Network
Logix SERCOS interface Module
Three-phase
Input Power
2090-XXLF-xxxx
AC Line Filter
(required for CE)
SERCOS interface
CP
OK
Logix Platform
(ControlLogix is shown)
Tx (rear)
Rx (front)
115/230V Control Power
Kinetix 6000 Multi-axis Servo Drive
2090-SCxxx-x
SERCOS Fiber-optic Cable
2094-BSP2
Shunt Module
(optional component)
2094-xCxx-Mxx-S
Integrated
Axis Module
Common Bus Leader
2094-xLxxS
Line Interface Module
(optional component)
RSLogix 5000
Software
2094-PRF
Slot Filler Module
(required to fill
any unused slots)
2094-PRSx
Power Rail
2094-xMxx-S
Axis Modules (5)
DC Common Bus
2090-SCxxx-x
SERCOS Fiber-optic Cable
2094-xCxx-Mxx-S
Integrated
Axis Module
Common Bus Follower
2094-PRF
Slot Filler Module
(required to fill
any unused slots)
2094-PRSx
Power Rail
2094-xMxx-S
Axis Modules (5)
Motors and other details common to both three-phase ac and dc
common-bus configurations are removed.
Publication 1394-TD004A-EN-P — January 2008
12
1394 Drive Conversions
Logix Controller Platforms
ControlLogix and CompactLogix controller platforms include SERCOS
modules for interfacing with the Kinetix 6000 servo drives.
ControlLogix Controller Platform
The ControlLogix platform is a modular system capable of handling
your most intensive applications. Modules are inserted into slots on
the ControlLogix chassis.
The ControlLogix SERCOS modules available for your motion control
application include:
• 1756-M03SE, 1756-M08SE, and 1756-M16SE SERCOS interface
modules that can accommodate up to 3, 8, and 16 axes,
respectively.
• 1756-L60M03SE combination controller and SERCOS interface
module that can accommodate up to 3 axes.
For more information regarding the ControlLogix platform, refer to the
ControlLogix Selection Guide, publication 1756-SG001.
CompactLogix Controller Platform
The CompactLogix platform is a modular system that provides
cost-effective control for smaller applications. Modules snap together
side-by-side on a DIN rail.
The CompactLogix SERCOS module available for your motion control
application is the 1768-M04SE SERCOS interface module and
accommodates up to 4 axes. Each 1768-L45 CompactLogix system can
hold one or two SERCOS modules for up to 8 real, 4 auxiliary, and 6
virtual axes.
For more information regarding the CompactLogix platform, refer to
the CompactLogix Selection Guide, publication 1769-SG001.
SoftLogix Controller Platform
A simple SoftLogix system can consist of a single, standalone
computer and its networked devices. For more robust systems, use
I/O in multiple platforms distributed over multiple I/O links. These
devices all reside on a virtual backplane displayed on your computer.
Publication 1394-TD004A-EN-P — January 2008
1394 Drive Conversions
13
The SoftLogix products available for your motion control application
include:
• 1784-PM16SE SERCOS interface PCI card.
• 1784-PM02AE analog servo PCI card.
For more information regarding the SoftLogix platform, refer to the
SoftLogix5800 Selection Guide, publication 1789-SG001.
1394 to Kinetix 6000 Drive
Conversions
Use these tables as a starting point for your 1394 to Kinetix 6000 drive
conversion.
1394 System Module to Kinetix 6000 IAM Conversions
1394 System
Module
Cat. No.
1394 Drives
Kinetix 6000 Drives
Kinetix 6000 IAM
Cat. No.
Continuous Output
Current
A dc
Continuous Output
Power
kW
--->
2094-BC01-M01-S
10.0
6.0
10.0
--->
2094-BC02-M02-S
24.0
15.0
22.0
--->
2094-BC04-M03-S
43.0
27.6
Continuous Output
Current
A dc
Continuous Output
Power
kW
1394x-SJT05
7.36
5.0
1394x-SJT10
14.7
1394x-SJT22
33.8
1394 Axis Module to Kinetix 6000 AM Conversions
1394 Axis
Module
Cat. No.
1394 Drives
Kinetix 6000 Drives
Kinetix 6000 AM
Cat. No.
Continuous Output
Current
A rms
Continuous Output
Power
kW
--->
2094-BMP5-S
2.80
1.8
--->
2094-BM01-S
6.10
3.9
Continuous Output
Current
A rms
Continuous Output
Power
kW
1394x-AM03
3.0
2.0
1394x-AM04
4.5
3.0
--->
2094-BM01-S
6.10
3.9
1394x-AM07
7.5
5.0
--->
2094-BM02-S
10.3
6.6
1394x-AM50
23.3
15.6
--->
2094-BM03-S
21.2
13.5
1394x-AM75
35.0
23.8
--->
2094-BM05-S
34.6
22.0
Publication 1394-TD004A-EN-P — January 2008
14
1394 Drive Conversions
Catalog Number
Explanations
Catalog numbers consist of various characters, each of which
identifies a specific version or option for that component. Use these
configuration charts to understand the 1394 and Kinetix 6000 drive
catalog numbers.
Catalog Numbers for 1394 Drives
1394 System Modules
1394 x - S J T xx -x -xx
GMC Options
RL = With RIO and AxisLink (applies to GMC system modules)
Factory Installed Options
A = ±10V dc analog input (HIM not included)
C = IMC S Class (GMC) integrated motion controller (1)
(supports four axis and four auxiliary encoder inputs)
D = SERCOS network interface (5)
L = IMC S Class (GMC) integrated motion controller (2) (3)
(supports one axis and two auxiliary encoder inputs)
T = IMC S Class (GMC Turbo) integrated motion controller (1)
Power Rating
05 = 5 kW
10 = 10 kW
22 = 22 kW
Input Phase
T = Three-phase
Input Voltage
J = 360…480V ac, 50/60 Hz
Type
S = System Module
Series
C = Series C (4) or series D (5) enhancements
Blank = Series A or B
Bulletin Number
Publication 1394-TD004A-EN-P — January 2008
(1)
The standard GMC and GMC Turbo system modules are identical except that the GMC Turbo (catalog number
1394x-SJTxx-T) offers a SLC backplane interface with 64 K of memory with a 32-bit processor while the
standard GMC (catalog number 1394x-SJTxx-C) offers 32 K of program memory with a 16-bit processor without
the SLC interface.
(2)
The GMC system module (catalog number 1394C-SJTxx-L) is functionally the same as the standard GMC
system module (catalog number 1394x-SJTxx-C) except it supports one axis and provides two auxiliary encoder
inputs.
(3)
The GMC system module (catalog number 1394C-SJTxx-L) is only available in 5 and 10 kW system modules.
(4)
Series C system modules include Smart Power, improved terminations, and EMI filtering.
(5)
Series D system modules include faster SERCOS communication and ring rates.
1394 Drive Conversions
15
1394 Axis Modules
1394 x - AM xx -xx
Heat Sink Options
IH = Inside cabinet heatsink (1394C-AM50-IH and 1394C-AM75-IH only)
Blank = 1394x-AM03, 1394x-AM04, 1394x-AM07 (inside cabinet), and
1394-AM50 and 1394-AM75 (through-cabinet) heatsink
Output Power (kW) Ratings
03 = 2 kW
04 = 3 kW
07 = 5 kW
50 = 15.6 kW
75 = 23.8 kW
Type
AM = Servo amplifier module
Series
C = Series C enhancements (1)
Blank = without series C enhancements
Bulletin Number
(1)
Series C axis modules have improved terminations and EMI filtering.
1394 Series Change
Series C system modules (catalog numbers 1394C-SJTxx-x) and axis
modules (catalog numbers 1394C-AMxx and 1394C-AMxx-IH) include
features not available on series A and B modules (catalog numbers
1394-SJTxx-x and 1394-AMxx).
System Module Features
Features
Series C and D
Series A and B
Connector (plug-in) input power termination
Yes
No
Cable Clamp (strain relief, shield bond)
Yes
No
EMI filter (24V input power, registration)
Yes
No
Smart Power (Soft Start, power monitor)
Yes
22 kW systems only
Features
Series C
Series A and B
Cable Clamp (strain relief, shield bond)
Yes
No
EMI filter (motor brake and thermal circuit)
Yes
No
Axis Module Features
Publication 1394-TD004A-EN-P — January 2008
16
1394 Drive Conversions
To determine the series designator, check the series field on the
Allen-Bradley label attached to your system, axis, and shunt modules.
The series designator is located as shown in the example below.
Allen-Bradley Label
ALLEN-BRADLEY
Shunt Module Example
R
BULLETIN 1394 300W SHUNT MODULE
CAT.
PART
SER.
INPUT DC
INPUT AC
FOR FUSE REPLACEMENT USE:
BUSSMAN CAT. NO.
1394 Digital Servo Controller
300W Shunt Module
ALLEN-BRADLEY
Series Field
R
BULLETIN 1394 300W SHUNT MODULE
CAT.
PART
SER.
INPUT DC
INPUT AC
FOR FUSE REPLACEMENT USE:
BUSSMAN CAT. NO.
FOR USE WITH 1394-SJT22-X SYSTEM MODULE
FOR USE WITH 1394-SJT22-X SYSTEM MODULE
Series Catalog Numbers for 1394 Drive Modules
1394 Modules
Module Functionality
Series D
Analog
GMC
System modules
N/A
GMC Turbo
GMC (1.5 axis)
SERCOS interface
1394C-SJTxx-D
Inverter (no heatsink)
Axis modules
Inverter (external heatsink)
N/A
Inverter (internal heatsink)
Series C
Series A and B
1394C-SJTxx-A
1394-SJTxx-A
1394C-SJTxx-C
1394-SJTxx-C
1394C-SJTxx-T
1394-SJTxx-T
1394C-SJTxx-L
N/A
1394C-SJTxx-D
N/A
1394C-AM03, 1394C-AM04
and 1394C-AM07
1394-AM03, 1394-AM04
and 1394-AM07
1394C-AM50 and
1394C-AM75
1394-AM50 and
1394-AM75
1394C-AM50-IH and
1394C-AM75-IH
N/A
Catalog Numbers for Kinetix 6000 Drives
Kinetix 6000 IAM Module Catalog Numbers
2094 - x C xx - M xx - x
Safety Feature
S = Safe-off
Inverter Current Rating (peak of sine)
P5 = 4 A (460V input voltage)
01 = 9 A (460V input voltage)
02 = 15 A (460V input voltage)
03 = 30 A 460V input voltage)
05 = 49 A (460V input voltage)
Inverter (Axis Module)
Converter Power Rating
01 = 6 kW (460V input voltage)
02 = 15 kW (460V input voltage)
04 = 28 kW (460V input voltage)
07 = 45 kW (460V input voltage)
Converter
Input Voltage
A = 230V ac, 50/60 Hz
B = 460V ac, 50/60 Hz
Bulletin Number
Publication 1394-TD004A-EN-P — January 2008
1394 Drive Conversions
17
Kinetix 6000 AM Module Catalog Numbers
2094 - x M xx - x
Safety Feature
S = Safe-off
Inverter Current Rating (peak of sine)
P5 = 4 A (460V input voltage)
01 = 9 A (460V input voltage)
02 = 15 A (460V input voltage)
03 = 30 A 460V input voltage)
05 = 49 A (460V input voltage)
Module Input Voltage
AM = 230V ac, 50/60 Hz
BM = 460V ac, 50/60 Hz
Bulletin Number
Kinetix 6000 SM Module Catalog Numbers
2094 - BSP2
Input Voltage/kW Rating
BSP2 = 230/460V input voltage, 200 W
Bulletin Number
Kinetix 6000 Slot Filler Module Catalog Numbers
2094 - PRF
Power Rail Filler
Bulletin Number
Kinetix 6000 Power Rail Catalog Numbers
2094 - PRS x
Module Capacity
1 = IAM and no additional modules
2 = IAM and up to 1 additional module
3 = IAM and up to 2 additional modules
4 = IAM and up to 3 additional modules
5 = IAM and up to 4 additional modules
6 = IAM and up to 5 additional modules
7 = IAM and up to 6 additional modules
8 = IAM and up to 7 additional modules
Power Rail
PRS = Power Rail (Slim),
available in 1, 2, 3, 4, 5, 6, 7, and 8 axis capacity
Bulletin Number
Publication 1394-TD004A-EN-P — January 2008
18
1394 Drive Conversions
Mounting Dimension
Differences
These drawings illustrate the mounting differences between the 1394
drive systems and the Kinetix 6000 drive systems with Bulletin 2094
power rails.
1394 Multi-axis System Dimensions
421
(16.6)
27
(1.1)
(1) (2)
75
(2.9)
150
(5.9)
75
(2.9)
50
50
(2.0) (2.0)
Dimensions are in mm and (in.)
21
(0.8)
280
(11.0)
1394x-SJT22-x
System Modules
350
(13.8)
400
(15.7)
Status
Feedback Cable Clamps
1394C-SJT22-x
System Modules (series C and D only)
Mounting Hole Detail
8.0 (0.3)
1394x-SJT05-x and
1394x-SJT10-x
System Modules
8.0 (0.3)
10
(0.4)
16 (0.6)
12
(0.5)
All slots accept M6 or
1/4-20 mounting screws
67
(2.7)
57
(2.3)
Feedback Cable Clamps
1394C-SJT05-x and 1394C-SJT10-x
System Modules (series C and D only)
(3)
385
(15.2)
280
(11.0)
1394x-AMxx-xx
Axis Modules
65 (2.6)
Heat sink
width (3)
(3)
338
(13.3)
(1)
This dimension only applies to GMC Turbo (catalog number
1394x-SJTxx-T) system modules.
(2)
1394x-SJTxx-T system modules, require an additional
101.6 mm (4.0 in.) of clearance to the left of the system
module to allow for connecting the SLC interface cable
(catalog number 1747-C7 or 1747-C9).
(3)
These dimensions only apply to 1394x-AM50 and
1394x-AM75 axis modules.
Publication 1394-TD004A-EN-P — January 2008
105
(4.1)
(3)
Motor Power Cable Clamp
1394C-AMxx-xx (series C)
Axis Modules
40 1394C-AM03,
(1.6) 1394C-AM04,
1394C-AM07
44 1394C-AM50-xx,
(1.7) 1394C-AM75-xx
1394 Drive Conversions
19
Kinetix 6000 Multi-axis System Dimensions
Dimensions are in mm and (in.)
436
(17.2)
281
(11.0)
318
(12.5)
Typical Kinetix 6000
460V Four-axis System
(six-axis power rail)
256
(10.1)
Power rail not visible
behind drive modules.
196
(7.7)
477
(18.8)
70
(2.8)
70
(2.8)
141
(5.5)
IAM (double-wide) Module
AM (double-wide) Module
AM (single-wide) Modules
(catalog number 2094-BC07-M05-S)
(catalog number 2094-BM03-S)
(catalog number 2094-BM01-S)
A
Kinetix 6000 System Dimensions
B
8.9
(0.35)
241
(9.5)
460V IAM and AM Modules
Dimension A
mm (in.)
Dimension B
mm (in.)
272 (10.7)
249 (9.8)
Low-profile Connector Kits
Cat. No.
2090-K6CK-D15M
2090-K6CK-D15MF
2090-K6CK-Dxxxx
Low-profile Connector Kit
Connector
Designator
MF
Connector Type
Motor feedback
Motor feedback with filter
2090-K6CK-D15F
AF
Auxiliary feedback
2090-K6CK-D26M
IOD
I/O
Power Rail
Publication 1394-TD004A-EN-P — January 2008
20
1394 Drive Conversions
Kinetix 6000 Drive Modules
This section contains selection information and mounting dimensions
for the Bulletin 2094 power rail, shunt module, and slot filler modules.
Kinetix 6000 Power Rail Specifications
The Kinetix 6000 IAM, AM, SM, and slot-filler modules hang on the
Bulletin 2094 power rail, which comes in sizes from 1…8 axes.
IAM, AM, and SM Module Slot Requirements
Converter
Slot Used
Converter
Slot Used
Inverter
Slots Used
Inverter
Slots Used
AM Cat. No.
2094-BC01-MP5-S
1
2094-BMP5-S
1
2094-BC01-M01-S
1
2094-BM01-S
1
1
2094-BM02-S
2094-BC04-M03-S
2
2094-BM03-S
2
2094-BC07-M05-S
2
2094-BM05-S
2
IAM Cat. No.
2094-BC02-M02-S
460V
1
SM Cat. No.
2094-BSP2
460V 0
Converter
Slot Used
230/
0
460V
1
Inverter
Slots Used
1
2094-BC04-M03-S and 2094-BC07-M05-S IAM modules, and
2094-BM03-S and 2094-BM05-S AM modules are double-wide modules
that require two inverter slots on the power rail.
The leftmost slot on each power rail is the converter slot and only
used by the IAM. All other slots are inverter slots and are used by the
IAM, AM, or SM. The power rail catalog number indicates the number
of available inverter slots.
For example, the Bulletin 2094-PRS1 power rail contains one inverter
slot. This limits the use of this power rail to systems requiring only
one axis (inverter slot). Similarly, the Bulletin 2094-PRS8 power rail
contains eight inverter slots. This limits the use of this power rail to
systems requiring up to eight axes (inverter slots).
When selecting a power rail, determine the number of inverter slots
required by all rail-mounted modules and choose a power rail with
that minimum number of inverter slots.
IMPORTANT
Publication 1394-TD004A-EN-P — January 2008
If you select a power rail with slots exceeding the minimum required
for your system, you must install a slot filler module (catalog number
2094-PRF) in each unused slot.
1394 Drive Conversions
21
Power Rail Slot Examples
2094-PRS1
Power Rail
Converter Slot
Inverter Slot (1)
2094-PRS8
Power Rail
Converter Slot
Inverter Slots (1-8)
2094-PRS1 (Slim) Power Rail Dimensions
22.9
(0.90)
Dimensions are in mm (in.)
241.3
(9.5)
134.6
(5.3)
88.9
(3.5)
Ø 7.95
(O.313) TYP.
25.4
(1.0)
25.4
(1.0)
190.5
(7.5)
69.9
(2.75)
Ø 15.88
(O.625) TYP.
12.4
(0.49)
Publication 1394-TD004A-EN-P — January 2008
22
1394 Drive Conversions
2094-PRS2, 2094-PRS3, 2094-PRS4, 2094-PRS5, 2094-PRS6, 2094-PRS7, and
2094-PRS8 (Slim) Power Rail Dimensions
A
22.9
(0.90)
B
C
241.3
(9.5)
Dimensions are in mm (in.)
Ø 7.95
(O.313) TYP.
25.4
(1.0)
25.4
(1.0)
190.5
(7.5)
Ø 15.88
(O.625) TYP.
Publication 1394-TD004A-EN-P — January 2008
Dimension A
mm (in.)
12.4
(0.49)
Dimension B
mm (in.)
Dimension C
mm (in.)
205.7 (8.10)
124.5 (4.90)
N/A
3 axis power rail
276.9 (10.90)
195.6 (7.70)
N/A
2094-PRS4
4 axis power rail
348.0 (13.70)
266.7 (10.50)
N/A
2094-PRS5
5 axis power rail
419.1 (16.50)
337.8 (13.30)
195.6 (7.70)
2094-PRS6
6 axis power rail
490.2 (19.30)
408.9 (16.10)
195.6 (7.70)
2094-PRS7
7 axis power rail
561.3 (22.10)
480.1 (18.90)
266.7 (10.50)
2094-PRS8
8 axis power rail
632.5 (24.90)
551.2 (21.70)
266.7 (10.50)
Cat. No.
Description
2094-PRS1
Refer to figure on page 21.
2094-PRS2
2 axis power rail
2094-PRS3
1394 Drive Conversions
23
Kinetix 6000 Shunt Module Specifications
The Kinetix 6000 shunt module (SM) (catalog number 2094-BSP2)
provides an additional 200 W of shunt capacity to the drive system
and is where connections to an external shunt module are made.
For Bulletin 1394 external shunt module catalog numbers, refer to
External Shunt Modules on page 46.
SM Module Power Specifications
Specifications
Kinetix 6000 Drives
Shunt Module
Cat. No.
2094-BCxx-Mxx-S
2094-BSP2
Drive
Voltage
V ac
230
Peak
Resistance
Power
W
kW
28.75
460
Peak
Current
A
5.7
14
22.5
28
Continuous
Capacitance
Power
μF
W
200
470
Fuse
Replacement
N/A
(no internal fuse)
For tables with the Kinetix 6000 shunt module in combination with an
IAM module internal shunt (when present) and the various external
passive shunt resistors available for the Kinetix 6000 drive systems,
refer to the Kinetix Motion Control Selection Guide, publication
GMC-SG001. Use these tables to determine the shunt module
combination you need based on the requirements of your application.
2094-BSP2 Shunt Module Dimensions
249
(9.8)
20
(0.8)
263
(10.3)
Dimensions are in mm (in.)
123
(4.8)
20
(0.8)
70
(2.76)
43
(1.7)
281
(11.0)
2094-BSP2 Shunt Module
Power
Rail
256
(10.1)
Modules are shown mounted to the power rail and the dimensions
reflect that.
Publication 1394-TD004A-EN-P — January 2008
24
1394 Drive Conversions
Kinetix 6000 Slot Filler Module Specifications
The Kinetix 6000 slot filler module (catalog number 2094-PRF) fills
empty slots on the power rail. Empty power rail slots provide a
convenient means of adding a future AM or SM module.
IMPORTANT
Power rail slots not occupied by an IAM, AM, or SM module, must
have a slot filler module installed.
2094-PRF Slot Filler Module Dimensions
75
2.9
Dimensions are in mm (in.)
56
2.2
70
2.76
206
8.2
Power Rail
Modules are shown mounted to the power rail and the dimensions
reflect that.
Publication 1394-TD004A-EN-P — January 2008
1394 Drive Conversions
Input Power Wiring
Differences
25
These drawings illustrate input power wiring differences between the
1394 drives and the Kinetix 6000 drives. Differences also exist
between 1394 system modules, depending on the series (series A and
B, or C and D), but are not dependant on functionality (analog, GMC,
GMC Turbo, or SERCOS interface).
This example illustrates the power wiring differences between 1394
series A and B system modules and series C and D system modules for
5 and 10 kW systems. Series A and B system modules have terminal
blocks for power wiring which was replaced by connectors on the
bottom of series C and D system modules and a single-point bond bar.
1394 System Modules (5 and 10 kW)
System Module, Front View
Series A and B (5 and 10 kW)
(catalog number
1394-SJT05-C is shown)
1394 Digital Servo Controller
SERCOS interfaceTM
!
System Module, Front View
Series C and D (5 and 10 kW)
(catalog number
1394C-SJT05-D is shown)
MORE THAN ONE
DISCONNECT SWITCH
MAY BE REQUIRED TO
DE-ENERGIZE THE
EQUIPMENT BEFORE
SERVICE.
RELAY OUTPUTS
1
DANGER
RISK OF ELECTRICAL SHOCK.
System Module
DRIVE SYSTEM OK
!
OUTPUT 3
DANGER
OUTPUT 2
ELECTRICAL SHOCK HAZARD
FROM ENERGY STROAGE
CAPACITORS.
OUTPUT 1
10
VERIFY LOW VOLTAGE
DISCHARGE BEFORE
SERVICING.
OUTPUT 0
AXIS 3
Enable3
1
5
Reg3_1
SEE INSTRUCTIONAL MANUAL.
Pos_Otrav3
Neg_Otrav3
Home3
- Analog_Out_1
- Analog_Out_2
- Analog_Out_3
- Analog_Out_4
- Common
- N/C
- N/C
- N/C
- N/C
I/O_Com
Reg3_Com
4
8
Reg3_2
AXIS 2
Enable2
1
5
4
8
Reg2_1
Pos_Otrav2
Neg_Otrav2
Home2
I/O_Com
Reg2_Com
Reg2_2
AXIS 1
5
4
8
Reg1_1
Pos_Otrav1
Neg_Otrav1
4 5
2 3
Home1
I/O_Com
Reg1_Com
Reg1_2
6 7
1
80 1
Enable1
AXIS 0
Enable0
1
5
Home0
I/O_Com
4
8
Reg0_2
AXIS 1
AXIS 2
AXIS 3
RELAY OUTPUTS
Reg0_1
Pos_Otrav0
Neg_Otrav0
Reg0_Com
AXIS 0
- SERCOS
Receive
- SERCOS
Transmit
Input, Logic, and Shunt
Power Connections
ON
1
2
3
OFF
U V W PE
W1 W2
System Module, Bottom View
Series C and D (5 and 10 kW)
(catalog number
1394C-SJT05-D is shown)
COL INT DC+
Single Point
Bond Bar
Shunt Power Connector
Logic Power Connector
Input Power Connector
Publication 1394-TD004A-EN-P — January 2008
26
1394 Drive Conversions
The only power wiring difference between series A and B system
modules and series C system modules for 22 kW systems is the
addition of a single-point bond bar.
1394 System Modules (22 kW)
1394 Digital Servo Controller
Remote I/O
SERCOS interfaceTM
System Module
RELAY OUTPUTS
Control
Status
1
0
1
2
System Module, Front View
Series A and B (22 kW)
(catalog number
1394-SJT22-T is shown)
DRIVE SYSTEM OK
System Module, Front View
Series C and D (22 kW)
(catalog number
1394C-SJT22-D is shown)
OUTPUT 3
OUTPUT 2
OUTPUT 1
AxisLink &
RS422 Multi Drop
Control Address
10
OUTPUT 0
AXIS 3
Enable3
1
5
4
8
Home3
Reg3_1
Pos_Otrav3
Neg_Otrav3
Reg3_Com
I/O_Com
Reg3_2
AXIS 2
Enable2
1
5
Home2
Reg2_1
Control
Init
I/O_Com
4
8
Reg2_2
AXIS 1
5
4
8
Home1
Reg1_1
Pos_Otrav1
Neg_Otrav1
Reg1_Com
I/O_Com
4 5
6 7
1
2 3
Enable1
80 1
Control
Reset
Pos_Otrav2
Neg_Otrav2
Reg2_Com
Reg1_2
AXIS 0
Enable0
1
5
Home0
Neg_Otrav0
I/O_Com
Reg0_Com
Reg0_1
AxisLink
Status
Pos_Otrav0
4
8
Reg0_2
Serial
Port
Config.
DH-485
(J2)
DH-485
(J1)
Application
Program Lock
ON
3
OFF
1
2
Input, Logic, and Shunt
Power Connections
Single Point
Bond Bar
This drawing illustrates the input power wiring connections for the
Kinetix 6000 IAM modules. The Bulletin 2094 power rail features a
grounding stud for making a high-frequency bond, replacing the
single-point bond bar on 1394 series C system modules.
Kinetix 6000 IAM Modules
Integrated Axis Module, Top View
(catalog number 2094-BC01-MP5-S is shown)
CTRL 2
1 2 3
DCDC+
4 5 6
L3
L2
L1
Although the physical size of some IAM modules may be
larger, the location of the connectors is the same.
Publication 1394-TD004A-EN-P — January 2008
CONT ENCONT EN+
U
1 2 3 4
W
V
MBRK -
1 2 3 4 5 6
1 2
TIP
CTRL 1
1 2 3 4 5 6 7 8 9
DC Bus / AC Input Power
(IPD) Connector
1 2
Control Power
(CPD) Connector
MBRK +
COM
PWR
DBRK DBRK +
RX
TX
DPI
BAUD
RATE
1394 Drive Conversions
These drawings illustrate motor power wiring differences between the
1394 drives and the Kinetix 6000 drives.
This drawing illustrates the motor power wiring for 1394 axis
modules. series C axis modules included filters in the motor brake and
thermal circuits, series A and B axis modules did not.
1394 Axis Modules
U1
V1
W1
PE1
PE2
PE3
1394x-AMxx-xx
Axis Module, Front View
(catalog number 1394C-AM03 is shown)
Motor Power
Connections
TB1
TB2
1
Motor Brake and
Thermal Connections
4
1394x-AMxx-xx
Axis Module, Bottom View
(catalog number 1394C-AM03 is shown)
1
Motor Power
Cable Clamp
(series C axis modules only)
4
Motor Power Wiring
Differences
27
TIP
Although the physical size of the 1394-AM50-xx and 1394-AM75-xx
modules may be larger, the location of the connectors is the same.
Publication 1394-TD004A-EN-P — January 2008
28
1394 Drive Conversions
This drawing illustrates the motor power wiring connections for the
Kinetix 6000 IAM and AM modules. Also shown is the Safe-off (SO)
connector. This feature is not offered on the 1394 drive systems.
Refer to the Kinetix Safe-off Feature Safety Reference Manual,
publication GMC-RM002, for more information.
Kinetix 6000 Drive Modules
Integrated Axis Module, Top View
(catalog number 2094-BC01-MP5 is shown)
Cable Shield
Clamp
1 2
CTRL 2
1 2 3
DCDC+
4 5 6
L3
Safe-off
(SO) Connector
MBRK MBRK +
COM
PWR
DBRK DBRK +
RX
TX
V
U
TIP
Publication 1394-TD004A-EN-P — January 2008
MBRK -
Motor Power
(MP) Connector
1 2 3 4 5 6
1 2 3 4 5 6 7 8 9
RX
1 2 3 4
Cable Shield
Clamp
W
Safe-off
(SO) Connector
Motor/Resistive Brake
(BC) Connector
BAUD
RATE
DPI
Axis Module, Top View
(catalog number 2094-BMP5 is shown)
Motor Power
(MP) Connector
1 2 3 4 5 6
1 2
CONT ENCONT EN+
1 2 3 4 5 6 7 8 9
L2
L1
W
V
U
1 2 3 4
CTRL 1
MBRK +
COM
PWR
DBRK DBRK +
TX
Motor/Resistive Brake
(BC) Connector
BAUD
RATE
Although the physical size of some IAM and AM modules may be
larger, the location of the connectors is the same.
1394 Drive Conversions
Motor Feedback and I/O
Wiring Differences
29
These drawings illustrate motor feedback and I/O wiring differences
between the 1394 drives and the Kinetix 6000 drives. Differences also
exist between 1394 system modules, depending on functionality
(analog, GMC, GMC Turbo, or SERCOS interface).
This example illustrates the I/O and feedback wiring for GMC system
modules.
1394 GMC System Modules
Remote I/O (2)
Connectors
Remote I/O
Control
Status
0
1
2
1394x-SJTxx-C-xx, 1394x-SJTxx-T-xx, 1394x-SJTxx-L-xx
GMC System Modules, Front View
(catalog number 1394x-SJT22-T-RL is shown)
AxisLink &
RS422 Multi Drop
Control Address
SLC IN
(GMC Turbo system only)
Control
Reset
Control
Init
SLC OUT
(GMC Turbo system only)
GMC Input Wiring Board
AxisLink
Status
Serial
Port
Config.
DH-485
(J1)
Application
Program Lock
DH-485
(J2)
DH-485 (2)
Connectors
1394x-SJTxx-C-xx, 1394x-SJTxx-T-xx, 1394x-SJTxx-L-xx
GMC System Modules, Bottom View
(catalog number 1394C-SJT05-T-RL is shown)
AxisLink
Connector
RS-232 and RS-422 Connectors
Flex I/O
Connector
RS-232, RS-422, and DH-485 Connectors
Axis 0 (J3) Auxiliary Encoder Input
Axis 0 (J5) Resolver Feedback Input
Axis 1 (J4) Auxiliary Encoder Input
Axis 1 (J6) Resolver Feedback Input (3)
Axis 2 (J5) Auxiliary Encoder Input (2)
Axis 2 (J7) Resolver Feedback Input (3)
Axis 3 (J10) Auxiliary Encoder Input (2)
Axis 3 (J10) Resolver Feedback Input (3)
Cable Clamp Grounding Bracket (1)
(series C system modules only)
Feedback Cable Clamp (1)
(series C system modules only)
(1)
Grounding bracket and cable clamps are only present on series C system modules.
(2)
Only two auxiliary encoder inputs are present on the 1394C-SJTxx-L system modules.
(3)
Only one resolver feedback input is present on the 1394C-SJTxx-L system modules.
Publication 1394-TD004A-EN-P — January 2008
30
1394 Drive Conversions
This example illustrates the I/O and feedback wiring for SERCOS
interface system modules.
1394 SERCOS Interface System Modules
1394C-SJTxx-D
SERCOS interface System Modules, Front View
(catalog number 1394C-SJT05-D is shown)
1394 Digital Servo Controller
!
MORE THAN ONE
DISCONNECT SWITCH
MAY BE REQUIRED TO
DE-ENERGIZE THE
EQUIPMENT BEFORE
SERVICE.
System Module
RELAY OUTPUTS
1
DANGER
RISK OF ELECTRICAL SHOCK.
SERCOS interface
DRIVE SYSTEM OK
!
OUTPUT 3
DANGER
OUTPUT 2
ELECTRICAL SHOCK HAZARD
FROM ENERGY STROAGE
CAPACITORS.
OUTPUT 1
10
VERIFY LOW VOLTAGE
DISCHARGE BEFORE
SERVICING.
OUTPUT 0
AXIS 3
Enable3
Analog Outputs
Connector
1
5
Home3
Reg3_1
SEE INSTRUCTIONAL MANUAL.
Pos_Otrav3
Neg_Otrav3
Reg3_Com
- Analog_Out_1
- Analog_Out_2
- Analog_Out_3
- Analog_Out_4
- Common
- N/C
- N/C
- N/C
- N/C
I/O_Com
4
8
Reg3_2
AXIS 2
Enable2
1
5
4
8
Home2
Reg2_1
Pos_Otrav2
Neg_Otrav2
I/O_Com
Reg2_Com
Reg2_2
AXIS 1
5
4
8
Reg1_1
Pos_Otrav1
Neg_Otrav1
4 5
2 3
Reg1_Com
I/O_Com
Reg1_2
6 7
1
Home1
80 1
Enable1
AXIS 0
Enable0
1
5
Home0
Neg_Otrav0
Reg0_Com
8
Reg0_2
AXIS 1
- SERCOS
Receive
AXIS 0
Discrete Input
Connectors (4)
AXIS 2
AXIS 3
Relay Outputs
Connector
I/O_Com
4
RELAY OUTPUTS
Reg0_1
Pos_Otrav0
SERCOS Receive (Rx) Connector
- SERCOS
Transmit
ON
1
2
3
OFF
SERCOS Transmit (Tx) Connector
1394C-SJTxx-D
SERCOS interface System Modules, Bottom View
(catalog number 1394C-SJT05-D is shown)
DPI/SCANport Connector
Axis 1 Auxiliary Feedback Connector
Axis 0 Auxiliary Feedback Connector
Axis 3 Motor Feedback Connector
(in four axis system) or
Axis 2 Auxiliary Feedback Connector
(in three axis system)
Axis 1 Motor Feedback Connector
Axis 2 Motor Feedback Connector
(in four axis system) or
Axis 3 Auxiliary Feedback Connector
(in two axis system)
Axis 0 Motor Feedback Connector
Feedback Cable Clamps)
Cable Clamp Grounding Bracket
This example illustrates the I/O and feedback wiring connectors for
Analog system modules.
Publication 1394-TD004A-EN-P — January 2008
1394 Drive Conversions
31
1394 Analog System Modules
1394x-SJTxx-A
Analog System Modules, Front View
(catalog number 1394-SJT22-A is shown)
TB1
TB2
Input Wiring Board
1394x-SJTxx-A
Analog System Module, Bottom View
(catalog number 1394-SJT22-A is shown)
SCANport Adapter
AQB0 (Axis 0)
AQB Encoder Feedback Output
AQB1 (Axis 1)
AQB Encoder Feedback Output
FB0 (Axis 0)
Resolver Feedback Input
AQB2 (Axis 2)
AQB Encoder Feedback Output
FB1 (Axis 1)
Resolver Feedback Input
FB2 (Axis 2)
Resolver Feedback Input
AQB3 (Axis 3)
AQB Encoder Feedback Output
FB3 (Axis 3)
Resolver Feedback Input
Publication 1394-TD004A-EN-P — January 2008
32
1394 Drive Conversions
These examples illustrate the I/O and feedback connectors for the
Kinetix 6000 IAM and AM modules.
Kinetix 6000 IAM/AM Modules
Axis Module, Top View
Integrated Axis Module, Top View
1 2
CONT EN-
Contactor Enable (CED) Connector
CONT EN+
RX
TX
DPI
BAUD
RATE
SERCOS Transmit (Tx) Connector
DPI Connector (present on IAM module only)
SERCOS Receive (Rx) Connector
Axis Module, Front View
Integrated Axis Module, Front View
26-pin
I/O Connector
Pin 26
Pin 18
Pin 9
15-pin
Motor Feedback Connector
Pin 10
Pin 5
Pin 15
Pin 19
Pin 1
Pin 10
Pin 11
Pin 6
Pin 1
15-pin
Auxiliary Feedback Connector
Pin 6
Pin 11
Pin 1
Pin 15
Pin 5
Pin 10
I/O (IOD) Connector
Motor Feedback (MF) Connector
Auxiliary Feedback (AF) Connector
Low-profile Connector Kits
Cat. No.
2090-K6CK-D15M
2090-K6CK-D15MF
Publication 1394-TD004A-EN-P — January 2008
Connector
Designator
MF
Connector Type
Motor feedback
Motor feedback with filter
2090-K6CK-D15F
AF
Auxiliary feedback
2090-K6CK-D26M
IOD
I/O
1394 Drive Conversions
33
Converting 1394 GMC I/O and Feedback Wiring
These tables list the I/O and feedback wiring differences between
1394 GMC system modules (catalog numbers 1394x-SJTxx-C,
1394C-SJTxx-L, 1394x-SJTxx-T) and Kinetix 6000 IAM/AM modules.
TIP
Use 2090-K6CK-D26M low-profile connector kits for wiring I/O and
feedback connections to the IOD connector.
Converting 1394 GMC Input Wiring to Kinetix 6000 Drive
1394 TB1/TB2
I/O Connector
Description
Signal Name
TB1-1
TB2-1
System enable input on 1394
system module
SYS ENABLE
TB1-4 (axis 0)
TB2-4 (axis 1)
TB1-10 (axis 2)
TB2-10 (axis 3)
Home switch
TB1-5 (axis 0)
TB2-5 (axis 1)
TB1-11 (axis 2)
TB2-11 (axis 3)
TB1-6 (axis 0)
TB2-6 (axis 1)
TB1-12 (axis 2)
TB2-12 (axis 3)
Kinetix 6000
I/O Connector
Description
Signal Name
--->
IOD-2
Hardware enable input on
each IAM/AM module
ENABLE
HOMEx
--->
IOD-5
Home switch input
HOME
POS_OTRAVx
--->
IOD-8
Positive/negative overtravel
limit switch
OT+
Positive/negative overtravel
limit switch
NEG_OTRAVx
--->
IOD-11
24V INPUT
COMMON
--->
IOD-3, 6, 9, 12
Common for inputs
+24V_COM
Customer-supplied 24V digital input power
IO_24V
--->
IOD-1, 4, 7, 10
24V digital input power
+24V_PWR
Customer-supplied 24V registration power
REG_24V
--->
IOD-13, 16
24V registration power
REG_24V
TB1-17…18 (axis 0)
TB2-17…18 (axis 1)
TB1-21…22 (axis 2)
TB2-21…22 (axis 3)
+24V dc registration input
REG1x
--->
IOD-14
High speed registration 1
input
REG1
TB1-16 (axis 0)
TB2-16 (axis 1)
TB1-20 (axis 2)
TB2-20 (axis 3)
+5V dc registration input (1)
REG2x
--->
IOD-17
High speed registration 2
input
REG2
TB1-18 (axis 0)
TB2-18 (axis 1)
TB1-22 (axis 2)
TB2-22 (axis 3)
Registration common
REG_COMx
--->
IOD-15
Common for registration
REG_COM
TB1-7 (axis 0)
TB2-7 (axis 1)
TB1-13 (axis 2)
TB2-13 (axis 3)
Thermal switch input
THERM FLTx
--->
MF-11
Motor thermal switch
(normally-closed)
TS
TB2-24…25
Drive OK relay
DRIVE OK
--->
CED-1…2
Contactor enable relay
CONT EN+
CONT EN-
TB1-2, 8, 14
TB2-2, 8, 14
(1)
Input common
OT-
The Kinetix 6000 drive does not support 5V dc registration inputs. REG1 (IOD-14) and REG2 (IOD-17) are 24V dc registration inputs.
Publication 1394-TD004A-EN-P — January 2008
34
1394 Drive Conversions
Converting 1394 GMC Resolver Feedback to Kinetix 6000 Drive
GMC System
1326AB-Bxxxx-21 or
Module Connector 1326AS-Bxxxx-21 Motors
Signal
Jx-4
Sine differential input (+)
S2
Jx-9
Sine differential input (-)
Jx-3
Kinetix 6000
MF Connector
1326AB-Bxxxx-21 or
1326AS-Bxxxx-21 Motors
Signal
--->
MF-1
Sine differential input (+)
S2
S4
--->
MF-2
Sine differential input (-)
S4
Cosine differential input (+)
S1
--->
MF-3
Cosine differential input (+)
S1
Jx-8
Cosine differential input (-)
S3
--->
MF-4
Cosine differential input (-)
S3
Jx-1
Resolver excitation
R1
--->
MF-5
Resolver excitation
R1
Jx-6
Resolver excitation
R2
--->
MF-10
Resolver excitation
R2
TS+
--->
MF-16
TB1-7 (axis 0)
TB2-7 (axis 1)
TB1-13 (axis 2)
TB2-13 (axis 3)
Motor thermal switch
Shield Clamp
Overall Shield
(1)
TS-
--->
MF-17
Overall Shield
--->
Shield Clamp
TS+
Motor thermal switch
(1)
Overall Shield
TSOverall Shield
When using Bulletin 1326AB or 1326AS (resolver-based) motors, use 2090-K6CK-D15MF low-profile connector kits.
Converting 1394 Analog I/O and Feedback Wiring
These tables list the I/O and feedback wiring differences between
1394 Analog system modules (catalog numbers 1394x-SJTxx-A) and
Kinetix 6000 IAM/AM modules.
Converting 1394 Analog Input Wiring to Kinetix 6000 Drive
Analog System
Description
Module Connector
Signal
Kinetix 6000
MF Connector
Description
Signal
TB1-7, TB1-14
TB2-7, TB2-14
Hardware enable input on
1394 system module
ENABLE
IOD-2
Hardware enable input on each
IAM/AM module
ENABLE
TB2-16, TB2-17
Contactor enable
CONTACTOR EN
CED-1…2
Contactor enable relay
CONT EN+
CONT EN-
TB2-18, TB2-19
Drive OK relay
DROK
Not used
TIP
The other 1394 Analog I/O connections become transparent due to
additional Kinetix 6000 drive functionality.
Converting 1394 Analog Resolver Feedback to Kinetix 6000 Drive
Analog System
1326AB-Bxxxx-21 or
Module Connector 1326AS-Bxxxx-21 Motors
Signal
FBx-4
Sine differential input (+)
S2
FBx-9
Sine differential input (-)
FBx-3
Kinetix 6000
MF Connector
1326AB-Bxxxx-21 or
1326AS-Bxxxx-21 Motors
Signal
--->
MF-1
Sine differential input (+)
S2
S4
--->
MF-2
Sine differential input (-)
S4
Cosine differential input (+)
S1
--->
MF-3
Cosine differential input (+)
S1
FBx-8
Cosine differential input (-)
S3
--->
MF-4
Cosine differential input (-)
S3
FBx-1
Resolver excitation
R1
--->
MF-5
Resolver excitation
R1
FBx-6
Resolver excitation
R2
--->
MF-10
Resolver excitation
R2
Publication 1394-TD004A-EN-P — January 2008
1394 Drive Conversions
35
Converting 1394 SERCOS I/O and Feedback Wiring
These tables list the I/O and feedback wiring differences between
1394 SERCOS system modules (catalog numbers 1394C-SJTxx-D), and
Kinetix 6000 IAM/AM modules.
Use 2090-K6CK-D26M low-profile connector kits for wiring I/O and
Feedback connections to the IOD connector.
TIP
Converting 1394 SERCOS Discrete Inputs to Kinetix 6000 Drive
1394 Discrete
Input
Connectors
Axis x
Description
Signal Name
Pin-1
Hardware enable
ENABLEx
Pin-2
Home switch input
Pin-5
Kinetix 6000
I/O Connector
Description
Signal Name
--->
IOD-2
Hardware enable input
ENABLE
HOMEx
--->
IOD-5
Home switch input
HOME
Positive overtravel limit switch
POS_OTRAVx
--->
IOD-8
Positive overtravel limit switch
OT+
Pin-6
Negative overtravel limit switch
NEG_OTRAVx
--->
IOD-11
Negative overtravel limit switch
OT-
Pin-7
I/O Common
IO_COMx
--->
IOD-3, 6, 9, 12
Common
+24V_COM
Customer-supplied 24V digital input power
IO_24Vx
--->
IOD-1, 4, 7, 10
24V digital input power
+24V_PWR
Customer-supplied 24V registration power
REG_24Vx
--->
IOD-13, 16
24V registration power
REG_24V
Pin-4
High speed registration 1 input
REGx_1
--->
IOD-14
High speed registration 1 input
REG1
Pin-8
High speed registration 2 input
REGx_2
--->
IOD-17
High speed registration 2 input
REG2
Pin-3
Registration common
REGx_COMx
--->
IOD-15, 18
Common for registration
REG_COM
Converting 1394 SERCOS Relay Outputs to Kinetix 6000 Drive
1394 Relay
Output
Connector
1
2
3
4
5
6
7
8
9
10
Description
Signal Name
Drive OK relay.
DRIVE OK
Motor brake connections on axis
module (axis 3).
OUTPUT 3
Motor brake connections on axis
module (axis 2).
OUTPUT 2
Motor brake connections on axis
module (axis 1).
OUTPUT 1
Motor brake connections on axis
module (axis 0).
OUTPUT 0
Kinetix 6000
I/O Connector
--->
CED-1
--->
CED-2
--->
BC-5
--->
BC-6
--->
BC-5
--->
BC-6
--->
BC-5
--->
BC-6
--->
BC-5
--->
BC-6
Description
Contactor enable relay.
Signal Name
CONT ENCONT EN+
Motor brake connections on AM
module (axis 4).
MBRK+
Motor brake connections on AM
module (axis 3).
MBRK+
Motor brake connections on AM
module (axis 2).
MBRK+
Motor brake connections on AM
module (axis 1).
MBRK+
MBRK-
MBRK-
MBRK-
MBRK-
Publication 1394-TD004A-EN-P — January 2008
36
1394 Drive Conversions
Converting 1394 SERCOS High-resolution Feedback to Kinetix 6000 Drive
1394 System
MPL-Bxxx-M/S or
Module Connector 1326AB-Bxxx-M2L/S2L Motors
Signal
Kinetix 6000
MF Connector
MPL-Bxxx-M/S or
1326AB-Bxxx-M2L/S2L Motors
Signal
1
Sine differential input (+)
SINE+
--->
MF-1
Sine differential input (+)
SINE+
2
Sine differential input (-)
SINE-
--->
MF-2
Sine differential input (-)
SINE-
3
Cosine differential input (+)
COS+
--->
MF-3
Cosine differential input (+)
COS+
4
Cosine differential input (-)
COS-
--->
MF-4
Cosine differential input (-)
COS-
5
Common
ECOM
--->
MF-6
Common
ECOMM
6
Encoder power (+9V)
EPWR_9VM --->
MF-7
Encoder power (+9V)
EPWR_9VM
8
Hiperface data channel
DATA+
--->
MF-5
Hiperface data channel
DATA+
9
Hiperface data channel
DATA-
--->
MF-10
Hiperface data channel
DATA-
12
Motor thermal switch input (+)
TS+
--->
MF-11
Motor thermal switch (1)
TS
13
Motor thermal switch input (-)
TS-
(1)
Internal to cable N/A
COMMON
When using these high-resolution feedback motors, use 2090-K6CK-D15M low-profile connector kits.
Converting 1394 SERCOS Resolver Feedback to Kinetix 6000 Drive
1394 System
MPL-Bxxxx-R Motors
Module Connector
Signal
Kinetix 6000
MF Connector
MPL-Bxxxx-R 460V Motors
Signal
1
Sine differential input (+)
S2
--->
MF-1
Sine differential input (+)
S2
2
Sine differential input (-)
3
Cosine differential input (+)
S4
--->
MF-2
Sine differential input (-)
S4
S1
--->
MF-3
Cosine differential input (+)
S1
4
Cosine differential input (-)
S3
--->
MF-4
Cosine differential input (-)
S3
10
11
Resolver excitation
R1
--->
MF-5
Resolver excitation
R1
Resolver excitation
R2
--->
MF-10
Resolver excitation
R2
12
Motor thermal switch input (+)
TS+
--->
MF-11
13
Motor thermal switch input (-)
TS-
--->
MF-6
1394 System
1326AB-Bxxxx-21 or
Module Connector 1326AS-Bxxxx-21 Motors
Signal
1
Sine differential input (+)
S2
2
Sine differential input (-)
3
Motor thermal switch (1)
TS+
TS-
Kinetix 6000
MF Connector
1326AB-Bxxxx-21 or
1326AS-Bxxxx-21 Motors
Signal
--->
MF-1
Sine differential input (+)
S2
S4
--->
MF-2
Sine differential input (-)
S4
Cosine differential input (+)
S1
--->
MF-3
Cosine differential input (+)
S1
4
Cosine differential input (-)
S3
--->
MF-4
Cosine differential input (-)
S3
10
Resolver excitation
R1
--->
MF-5
Resolver excitation
R1
11
Resolver excitation
R2
--->
MF-10
Resolver excitation
R2
12
Motor thermal switch input (+)
TS+
--->
MF-16
13
Motor thermal switch input (-)
TS-
--->
MF-17
Motor thermal switch (2)
(1)
When using Bulletin MPL-Bxxxx-R (resolver-based) motors, use 2090-K6CK-D15M low-profile connector kits.
(2)
When using Bulletin 1326AB or 1326AS (resolver-based) motors, use 2090-K6CK-D15MF low-profile connector kits.
Publication 1394-TD004A-EN-P — January 2008
TS+
TS-
1394 Drive Conversions
Power Specifications
37
This section provides power specifications for the 1394 and
Kinetix 6000 drive modules.
Power Specifications for 1394 Drives
1394 System Module Power Specifications
Value
Attribute
1394x-SJT05 (1) (2)
1394x-SJT10 (1) (2)
1394x-SJT22 (1)
Rated AC input voltage
324…528V ac, 50/60 Hz 3-phase
324…528V ac, 50/60 Hz 3-phase
324…528V ac, 50/60 Hz 3-phase
AC input current (Arms)
6.5 A
13.0 A
28.6 A
Peak inrush current (2) (3) (4)
975 A
1300 A
697 A < 1 µs
8A
8A
8A
(series A and B)
Peak inrush current (3)
(series C and D)
Line loss ride through
20 ms
20 ms
20 ms
Nominal bus output voltage
530/680V dc
530/680V dc
530/680V dc
Continuous power output
4/5 kW
8/10 kW
17/22 kW
Peak power output (5)
28 kW
28 kW
136 kW
Efficiency
99%
99%
98%
Weight (series A and B)
11 kg (24.25 lb)
11 kg (24.25 lb)
12.7 kg (28.0 lb)
Weight (series C and D)
10.68 kg (23.5 lb)
10.68 kg (23.5 lb)
12.9 kg (28.5 lb)
Continuous current output (Adc)
7.36 A
14.73 A
33.8 A
Intermittent current output (Adc)
15.0 A
29.46 A
200 A
Capacitance
(series A and B)
220 µF
330 µF
660 µF
Capacitance
(series C and D)
220 µF
345 µF
660 µF
Inductance
1000 µH
750 µH
500 µH
Internal shunt resistor
200 W continuous, 40,000 W peak (two second maximum on time)
No internal shunt resistor
(1)
The standard GMC and GMC Turbo system modules are identical except that the GMC Turbo (catalog number 1394x-SJTxx-T) offers a SLC backplane interface and 64K of
memory with a 32-bit processor while the standard GMC (catalog number 1394x-SJTxx-C) offers 32K of program memory with a 16-bit processor without the SLC interface.
(2)
The standard GMC (catalog number 1394C-SJTxx-L) is functionally the same as catalog number 1394x-SJTxx-C, except it only supports one axis and provides two auxiliary
encoder inputs.
(3)
5 and 10 kW (series C and D) system modules and all 22 kW system modules are limited to four contactor cycles per minute. 5 and 10 kW (series A and B) system modules
are limited to an average of four contactor cycles per hour.
(4)
Peak inrush current for
5 and 10 kW systems
(Series A and B)
=
( line voltage x 1.1 x
(
Lsystem
(Csystem + Caxes)
2 )
Where: L = Inductance
C = Capacitance
)
Peak inrush current for 22 kW (all series) and 5 and 10 kW (series C and D) systems is limited by an internal 80 ohm resistor. 8 A peak inrush current for all series C and D
system modules will experience no more than a 40 A peak loss (less 1 ms).
(5)
The Peak Power Output rating for 5 and 10 kW (series A and B) is based on the thermal limits of the modules. The Peak Power Output rating for 22 kW (all Series) and 5 and
10 kW (series C and D) is based on a current limit of 105% of two times the rated Continuous Current Output for 600 ms or the rated Peak Power Output for a duration equal
to the equivalent watt-seconds.
Publication 1394-TD004A-EN-P — January 2008
38
1394 Drive Conversions
1394 Axis Module Specifications
Value
Attribute
1394x-AM03
1394x-AM04
1394x-AM07
1394x-AM50
and 1394C-AM50-IH
1394x-AM75
and 1394C-AM75-IH
Speed regulation (1)
0…0.05% of base speed with 100% torque disturbance
Static gain
(rms A/mV) (1)
1.28
2.6
4.9
22.8
22.8
Peak current
limit adjust
200%
200%
200%
143%
143%
Modulation
frequency
5 kHz ±10%
5 kHz ±10%
5 kHz ±10%
5 kHz ±10%
5 kHz ±10%
Drift
0.03 rpm/ °C
0.03 rpm/ °C
0.03 rpm/ °C
0.03 rpm/ °C
0.03 rpm/ °C
Nominal input
voltage
530/680V dc
530/680V dc
530/680V dc
530/680V dc
530/680V dc
Continuous current
(rms)
3.0 A
4.5 A
7.5 A
23.3 A
35.0 A
Peak current
(rms - 1 second)
6.0 A
9.0 A
15.0 A
33.2 A
50.0 A
Continuous
power out 360/460V
nominal
1.6/2 kW
2.4/3 kW
4/5 kW
11.34/15.6 kW
17.8/23.8 kW
Efficiency
98%
98%
98%
98%
98%
7 kg (15.44 lb)
(1394-AM50 module)
7 kg (15.44 lb)
(1394-AM75 module)
6.73 kg (14.8 lb)
(1394-AM50-IH module)
6.73 kg (14.8 lb)
(1394-AM75-IH module)
465 µF
660 µF
Weight
5 kg (11.02 lb)
5 kg (11.02 lb)
5 kg (11.02 lb)
Capacitance
110 µF
110 µF
220 µF
(1)
When used with the controller in the (catalog number 1394x-SJTxx-x) system module.
1394 Fuse Specifications
1394 System Module
Cat. No.
Series
Bussmann
Fuse Description
Rating
1394-SJT05 systems
Series A and B
FRS-R-20 or equivalent
600V ac, 20 A
1394C-SJT05 systems
Series C and D
KTK-R-20 or equivalent
600V ac, 20 A
LPJ-SP 20 or equivalent
600V ac, 20 A
1394-SJT10 systems
Series A and B
FRS-R-30 or equivalent
600V ac, 30 A
1394C-SJT10 systems
Series C and D
KTK-R-30 or equivalent
600V ac, 30 A
LPJ-SP 30 or equivalent
600V ac, 30 A
FRS-R-35 or equivalent
600V ac, 35 A
1394x-SJT22 systems
LPS-RK-SP 40 or equivalent 600V ac, 40 A
LPJ-SP 45 or equivalent
Publication 1394-TD004A-EN-P — January 2008
600V ac, 45 A
1394 Drive Conversions
39
1394 Contactor (M1) Specifications
1394 System Module
Cat. No.
Series
Allen-Bradley
Contactor Description
Rating
1394-SJT05 and 1394-SJT10
Series A and B
100-C43x10 (ac coil)
100-C43Zx10 (dc coil)
600V ac, 43 A
1394C-SJT05 and 1394C-SJT10
Series C and D
100-C23x10 (ac coil)
100-C23Zx10 (dc coil)
600V ac, 23 A
100-C37x10 (ac coil)
100-C37Zx10 (dc coil)
600V ac, 37 A
1394x-SJT22
IMPORTANT
Use the power dissipation figures shown below to calculate
cumulative system heat dissipation to ensure that the ambient
temperature inside the enclosure does not exceed 50 °C
(122 °F). To calculate total power dissipation, add the dissipation of
the system module to the dissipation of the axis modules.
1394 System Power Dissipation Specifications
Usage as % of Rated Power Output
(watts)
1394 Drive Module
Cat. No.
20%
40%
60%
80%
100%
1394x-SJT05-x
66
70
73
77
80
1394x-SJT10-x
70
77
84
81
98
1394x-SJT22-x
100
150
200
250
300
1394x-AM03
24
30
36
42
48
1394x-AM04
27
36
45
54
63
1394x-AM07
33
48
63
78
93
1394-AM50 (1)and 1394-AM50-IH (2)
56
95
139
183
227
1394-AM75 (1) and 1394-AM75-IH (2)
85
145
212
279
346
1394-AM50 (inside the cabinet) (1)
18
18
18
18
18
System Modules
Axis Modules
(1)
38
77
138
165
209
1394-AM75 (inside the cabinet) (1)
18
18
18
18
18
1394-AM75 (outside the cabinet) (1)
67
127
194
261
324
1394-AM50 (outside the cabinet)
(1)
The 1394-AM50 and 1394-AM75 axis modules are designed to mount with the rear heat sink extended outside the customer-supplied enclosure. If the modules are
mounted entirely inside the customer-supplied enclosure, the full power dissipation is inside the cabinet (the sum of the inside/outside columns).
(2)
The 1394-AM50-IH and 1394-AM75-IH axis modules are designed to mount entirely inside the customer-supplied enclosure.
Publication 1394-TD004A-EN-P — January 2008
40
1394 Drive Conversions
Power Specifications for Kinetix 6000 Drives
IAM (460V) Modules Power Specifications
Attribute
Value
2094-BC01-MP5-S 2094-BC01-M01-S
2094-BC02-M02-S
2094-BC04-M03-S
2094-BC07-M05-S
24 A
20 A
44 A
34 A
71 A
56 A
24 A
43 A
71 A
AC input voltage
324…528V rms three-phase (360…480V nom)
AC input frequency
47…63 Hz
Main ac input current (1)
Nom (rms)
Max inrush (0-pk)
10 A
10 A
DC input voltage (common bus follower)
458…747V dc
DC input current (common bus follower)
10 A
Control power ac input voltage
95…264V rms single-phase (230V nom)
Control power ac input current
Nom (@ 220/230V ac) rms
Nom (@ 110/115V ac) rms
Max inrush (0-pk)
3A
6A
25 A
Nominal bus output voltage
650V dc
Line loss ride through
20 ms
Continuous output current
to bus (Adc)
10 A
24 A
43 A
71 A
Intermittent output current
to bus (Adc) (2)
20 A
48 A
86 A
142 A
Bus overvoltage
825V dc
Bus undervoltage
275V dc
Internal shunt
Continuous power
Peak power
50 W
5600 W
200 W
22,300 W
Internal shunt resistor
115 Ω
28.75 Ω
Shunt on
805V dc
Shunt off
755V dc
Continuous power output to bus
6 kW
15 kW
27.6 kW
45 kW
Peak power output
12 kW
30 kW
55.2 kW
90 kW
Efficiency
95%
Converter inductance
250 μH
125 μH
75 μH
Converter capacitance
110 μF
940 μF
1410 μF
220 μF
(1)
All 2094-xCxx integrated axis modules are limited to 2 contactor cycles per minute (with up to 4 axis modules), or 1 contactor cycle per minute (with 5 to 8 axis modules).
(2)
Intermittent output current duration equals 250 ms.
Publication 1394-TD004A-EN-P — January 2008
1394 Drive Conversions
41
Control Power Current Requirements
Modules on
Power Rail
110/115V ac
Input
A
220/230V ac
Input
A
Input VA
VA
Modules on
Power Rail
110/115V ac
Input
A
220/230V ac
Input
A
Input VA
VA
IAM only
0.75
0.35
150
IAM, 4 AM
3.75
1.70
450
IAM, 1 AM
1.50
0.70
200
IAM, 5 AM
4.50
2.0
550
IAM, 2 AM
2.25
1.0
275
IAM, 6 AM
5.25
2.40
650
IAM, 3 AM
3.0
1.35
350
IAM, 7 AM
6.0
3.0
750
These specifications apply to the axis module specified in the column
heading by catalog number and the same axis module (inverter
section) that resides within an integrated axis module.
AM (inverter) 460V Module Power Specifications
Value
Attribute
2094-BMP5-S
2094-BM01-S
(2094-BC01-MP5-S) (2094-BC01-M01-S)
2094-BM02-S
(2094-BC02-M02-S)
2094-BM03-S
(2094-BC04-M03-S)
2094-BM05-S
(2094-BC07-M05-S)
34.6 A
Bandwidth (1)
Velocity loop
Current loop
500 Hz
1300 Hz
PWM frequency
8 kHz
Input voltage (nom)
650V dc
Continuous current (rms)
2.8 A
6.1 A
10.3 A
21.2 A
Continuous current (sine)
0-pk
4.0 A
8.6 A
14.6 A
30.0 A
Peak current (rms) (2)
4.2 A
9.2 A
15.5 A
31.8 A
51.9 A
Peak current (0-pk) (2)
5.9 A
12.9 A
21.8 A
45.0 A
73.4 A
Continuous power out (nom)
1.8 kW
3.9 kW
6.6 kW
13.5 kW
22.0 kW
Internal shunt
Continuous power
Peak power
50 W
5600 W
200 W
22,300 W
Internal shunt resistor
115 Ω
28.75 Ω
Shunt on
805V dc
Shunt off
755V dc
Efficiency
97%
Capacitance
75 μF
150 μF
270 μF
840 μF
1175 μF
Capacitive energy absorption
10 J
19 J
35 J
108 J
152 J
4 kHz
(1)
Bandwidth values vary based on tuning parameters and mechanical components.
(2)
Peak current duration equals 2.5 s.
48.9 A
Publication 1394-TD004A-EN-P — January 2008
42
1394 Drive Conversions
Use class CC, J, L, or R fuses, with current rating as indicated in the
table below. The following fuse examples and Allen-Bradley circuit
breakers are recommended for use with IAM modules
(2094-BCxx-Mxx-S) when a LIM module is not used.
IMPORTANT
LIM modules (catalog numbers 2094-ALxxS, 2094-BLxxS, and
2094-XL75S-Cx) provide branch circuit protection to the IAM module.
Follow all applicable NEC and local codes.
Kinetix 6000 Fuse Specifications
Kinetix 6000
IAM Module
Cat. No.
2094-AC05-MP5-S
VAC Input Power
Bussmann
Fuse
Control Input Power
Allen-Bradley
Circuit Breaker (1)
KTK-R-20 (20 A) 1492-CB3H300
140M-F8E-C16
2094-AC09-M02-S
KTK-R-30 (30 A) 1492-CB3H400
140M-F8E-C20
2094-AC16-M03-S
LPJ-45SP (45 A) N/A
140U-H6C3-C50
2094-AC32-M05-S
LPJ-80SP (80 A) N/A
140U-H6C3-C90
KTK-R-20 (20 A) 1492-CB3H300
140M-F8E-C32
2094-BC02-M02-S
KTK-R-30 (30 A) 1492-CB3H400
140M-F8E-C45
2094-BC04-M03-S
LPJ-45SP (45 A)
2094-BC07-M05-S
LPJ-80SP (80 A)
2094-AC05-M01-S
2094-BC01-MP5-S
2094-BC01-M01-S
(1)
N/A
Bussmann
Fuse
DC Common Bus Fuse
Allen-Bradley
Bussmann
Circuit Breaker (1) Fuse
Ferraz
Shawmut Fuse
N/A
A50P20-1
FWH-35B
A50P35-4
FWH-60B
A50P60-4
FWH-125B
A50P125-4
N/A
A100P20-1
FWJ-40A
A100P40-1
140U-H6C3-C50
FWJ-70A
A100P70-1
140U-H6C3-C90
FWJ-125A
A100P125-1
1492-CB2H060
1492-SP2D200
FNQ-R-10 (10 A)
1492-CB2H060
When using Bulletin 1492 circuit protection devices, the maximum short circuit current available from the source is limited to 5000 A.
ATTENTION
Bulletin 1492 and 140M circuit breakers should not be used on the
output of an ac drive as an isolating disconnect switch or motor
overload device. These devices are designed to operate on sine wave
voltage and the drive’s PWM waveform does not allow it to operate
properly. As a result, damage to the device occurs.
Kinetix 6000 Contactor Ratings
460V IAM Module
Cat. No.
Allen-Bradley
Contactor Description (1)
Rating
2094-BC01-MP5-S
100-C23x10 (ac coil)
100-C23Zx10 (dc coil)
600V ac, 23 A
2094-BC02-M02-S
100-C37x10 (ac coil)
100-C37Zx10 (dc coil)
600V ac, 37 A
2094-BC04-M03-S
100-C60x10 (ac coil)
100-C60Zx10 (dc coil)
600V ac, 60 A
2094-BC07-M05-S
100-C72x10 (ac coil)
100-C72Zx10 (dc coil)
600V ac, 72 A
2094-BC01-M01-S
(1)
Publication 1394-TD004A-EN-P — January 2008
Recommended Allen-Bradley contactors for IAM modules for systems without a LIM module.
1394 Drive Conversions
43
Power Dissipation Specifications
Kinetix 6000 Drive Module
Cat. No.
Usage as % of Rated Power Output
(watts)
20%
40%
60%
80%
100%
15
20
25
30
35
2094-BC02-M02-S
20
30
40
50
60
2094-BC04-M03-S
22
43
65
86
108
2094-BC07-M05-S
44
77
111
144
177
Integrated Axis Module (IAM Converter) (1)
2094-BC01-MP5-S
2094-BC01-M01-S
Integrated Axis Module (IAM Inverter) or Axis Module (AM) (1)
2094-BC01-MP5-S or 2094-BMP5-S
75.7
80.9
86
92
98
2094-BC01-M01-S or 2094-BM01-S
95
120
145
170
195
2094-BC02-M02-S or 2094-BM02-S
98
126
154
182
210
2094-BC04-M03-S or 2094-BM03-S
95
132
171
212
256
2094-BC07-M05-S or 2094-BM05-S
118
182
251
326
406
68
121
174
227
280
Shunt Module (SM)
2094-BSP2
(1)
Internal shunt power is not included in the calculations and must be added based on utilization.
Publication 1394-TD004A-EN-P — January 2008
44
1394 Drive Conversions
Drive Accessories
Consider these power components when planning your 1394 to
Kinetix 6000 drive conversion.
Line Interface Modules
The Bulletin 2094 Line Interface Module (LIM) is designed to replace
many of the common input power components required for your
servo drive system. Using the LIM module saves panel space and
reduces the amount of wiring when compared with individual
components mounted separately. In this example, the 2094-BLxxS
module is compared to a similar configuration of discrete
components. Auxiliary and control power (230V) is developed from
the LIM module three-phase input power.
Comparing the 2094-BLxxS LIM Module with Discrete Components
Three-phase
Line Input (460V)
Three-phase
Line Input (460V)
Circuit Breaker
(CB3)
Three-phase
Single Stage,
Line Filter
24V dc
Power Supply
Components require
more time for:
Fuse Block
Contactor
Control and
Status I/O
Disconnect
• Panel Layout/Design
• Making 100 Wire
Terminations
• Compact, Cost-effective
Circuit Breaker
(CB1)
460V to 230V
Transformer
• Mounting 9+ Components
• Testing
Line Interface Module
(2094-BLxxS)
MAIN VAC
• Sizing the System
Circuit Breaker
(CB2)
Safety Contactor
• Reduced Labor for Design,
Panel Layout, and Mounting
Contactor
Control and
Status I/O
• Extra Filtering
• Safety Contactor
• 230V Auxiliary/Control Power
• Factory Tested
Single-phase
Single Stage,
Line Filter (230V)
Auxiliary
Power Output
(24V dc) to:
Motor Brake
other
I/O
Power Output
(24V dc) to:
Sensors
PLC
other
Auxiliary
Power Output
(230V) to:
PLC
HMI Terminal
other
Control
Power Output
to Drive
(230V ac)
Three-phase
Power Output
to Drive
(460V ac)
Auxiliary
Power Output
(24V dc) to:
Motor Brake
other
AC Line
Filter
I/O
Power Output
(24V dc) to:
Sensors
PLC
other
Auxiliary
Power Output
(230V) to:
PLC
HMI Terminal
other
Control
Power Output
to Drive
(230V ac)
Three-phase
Power Output
to Drive
(460V ac)
AC Line
Filter
SERCOS interfaceTM
SERCOS interfaceTM
CP
CP
OK
OK
Tx (rear)
Tx (rear)
Rx (front)
Rx (front)
MP-Series
Motor
Photoelectric
Sensors
ControlLogix
Chassis
PanelView Plus Kinetix 6000 IAM, or
Terminal
Kinetix 7000 Drive
MP-Series
Motor
Photoelectric
Sensors
ControlLogix
Chassis
PanelView Plus Kinetix 6000 IAM, or
Terminal
Kinetix 7000 Drive
For more information on selecting a LIM module for your 1394 drive
conversion, refer to the Kinetix Motion Control Selection Guide,
publication GMC-SG001.
Publication 1394-TD004A-EN-P — January 2008
1394 Drive Conversions
45
AC Line Filters
An ac line filter is required for meeting CE requirements.
1394 AC Line Filters
1394 System Module
Cat. No.
AC Line Filter
Cat. No.
1394x-SJT05
2090-UXLF-HV323
1394x-SJT10
2090-XXLF-X330B
1394x-SJT22
2090-XXLF-375
Line filters used with your 1394 drive may perform adequately with
your Kinetix 6000 conversion drive to suppress electrical noise,
however, Kinetix 6000 drives were tested for CE compliance using the
Bulletin 2090 filters as listed in this table.
Kinetix 6000 AC Line Filters
Kinetix 6000 IAM
Cat. No.
AC Line Filter
Cat. No.
2094-BC01-MP5-S
2094-BC01-M01-S
2090-XXLF-X330B
2094-BC02-M02-S
2094-BC04-M03-S
2090-XXLF-375B
2094-BC07-M05-S
2090-XXLF-3100
For more information on selecting an ac line filter for your 1394 drive
conversion, refer to the Kinetix Motion Control Selection Guide,
publication GMC-SG001.
Publication 1394-TD004A-EN-P — January 2008
46
1394 Drive Conversions
External Shunt Modules
Select one of these Bulletin 1394 passive shunt modules when your
Kinetix 6000 drive application exceeds the capacity of the internal
(IAM/AM module) shunt resistor.
1394 External Shunt Modules
1394 System Module (1)
Cat. No.
Shunt Module
Cat. No.
1394x-SJT05 and 1394x-SJT10
1394-SR10A
1394-SR9A
1394-SR9AF
1394x-SJT22
1394-SR36A
1394-SR36AF
(1)
The 1394x-SJT05 and 1394x-SJT10 system modules contain a
200 W internal shunt resistor. The 1394x-SJT22 system module
requires an external shunt.
Kinetix 6000 External Shunt Modules
Kinetix 6000 IAM Module
Cat. No.
Shunt Module (1)
Cat. No.
1394-SR9A
1394-SR9AF
2094-BCxx-Mxx-S
1394-SR36A
1394-SR36AF
(1)
These external passive shunt modules wire to the Kinetix 6000
(rail-mounted) shunt module (catalog number 2094-BSP2).
Shunt Power Example
1394x-SJT22-x
System Module
Shunt Module
ALLEN-BRADLEY
1394-SR9AF
External Shunt Module
900 W Capacity
R
BULLETIN 1394 300W SHUNT MODULE
CAT.
PART
SER.
INPUT DC
INPUT AC
FOR FUSE REPLACEMENT USE:
BUSSMAN CAT. NO.
FOR USE WITH 1394-SJT22-X SYSTEM MODULE
Shunt Module
1394-SR9AF
External Shunt Module
900 W Capacity
DANGER
RISK OF ELECTRICAL SHOCK. HIGH VOLTAGE MAY
EXIST UP TO FIVE MINUTES AFTER REMOVING POWER.
ALLEN-BRADLEY
R
BULLETIN 1394 300W SHUNT MODULE
CAT.
PART
SER.
INPUT DC
INPUT AC
FOR FUSE REPLACEMENT USE:
BUSSMAN CAT. NO.
FOR USE WITH 1394-SJT22-X SYSTEM MODULE
1394 Shunt Power Example
900 W Continuous Shunt Power
SM (2094-BSP2) 200 W Shunt Module
AM (2094-BM01-SM) 50 W Internal Shunt
AM (2094-BM02-SM) 50 W Internal Shunt
AM (2094-BM02-SM) 50 W Internal Shunt
IAM (2094-BC02-M02) 50 W Internal Shunt
Kinetix 6000 Shunt Power Example
900 W Continuous Shunt Power
(rail-mounted shunt and internal shunts are disabled when external shunt is present)
For more information on selecting an external shunt module for your
1394 drive conversion, refer to the Kinetix Motion Control Selection
Guide, publication GMC-SG001.
Publication 1394-TD004A-EN-P — January 2008
1394 Drive Conversions
Motor/Drive Cable
Compatibility
47
This section provides motor/drive cable compatibility information for
your 1394 drive conversion.
1326AB Motors
Motor Cat. No.
Drive Compatibility
2094-BCxx-Mxx-S or 2094-BMxx-S
1326AB-Bxxxxx-M2L/S2L
1394C-SJTxx-D
1326AB-Bxxxxx-21
2094-BCxx-Mxx-S or 2094-BMxx-S
1394x-SJTxx-A
1394x-SJTxx-C
1394C-SJTxx-D
1394C-SJTxx-L
1394x-SJTxx-T
Feedback Type
Motor Feedback Cables
Multi-turn High Resolution Absolute
or
Single-turn High Resolution
Encoder Feedback
2090-XXNFMP-Sxx (flying lead) (1) or
2090-UXNFBMP-Sxx (premolded connector)
Resolver
1326-CCUx-x-xxx (2)
2090-CDNFDMP-Sxx (1)
(1)
Use low-profile connector kit (catalog number 2090-K6CK-D15M) or panel-mounted breakout components on drive end. Refer to Kinetix Motion Control Selection Guide,
publication GMC-SG001, for more information.
(2)
Use low-profile connector kit (catalog number 2090-K6CK-D15MF) on drive end. Refer to Kinetix Motion Control Selection Guide, publication GMC-SG001, for more
information.
1326AB (460V) M2L/S2L Motors
1326AB-B410G, 1326AB-B410J, 1326AB-B420E, 1326AB-B420H, 1326AB-B430E, 1326AB-B430G
1326AB-B515E, 1326AB-B515G, 1326AB-B520E, 1326AB-B520F, and 1326AB-B530E
Motor Power Cables
2090-XXNPMP-16Sxx
1326AB-B720E
2090-XXNPMP-14Sxx
1326AB-B720F, 1326AB-B730E, 1326AB-B740C, and 1326AB-B740E
2090-XXNPMP-10Sxx
1326AB (460V) Resolver Motors
Motor Power Cables
1326AB-B410G, 1326AB-B410J, 1326AB-B420E, 1326AB-B420H, 1326AB-B430E, 1326AB-B430G
1326AB-B515E, 1326AB-B515G, 1326AB-B520E, 1326AB-B520F, and 1326AB-B530E
1326-CPB1x-x-xxx
1326AB-B720E, 1326AB-B720F, 1326AB-B730E, 1326AB-B740C, and 1326AB-B740E
1326-CPC1x-x-xxx
1326AB (460V) Motors
Motor Brake Cables
All 1326AB-Bxxxx-M2L/S2L motors
2090-UXNBMP-18Sxx
All 1326AB-Bxxxx-21 motors
Separate brake cable not required. Brake
wires are included with power cable.
Publication 1394-TD004A-EN-P — January 2008
48
1394 Drive Conversions
1326AS Motors
Motor Cat. No.
Drive Compatibility
Feedback Type
Motor Feedback Cables
1326AS-Bxxxxx-21
2094-BCxx-Mxx-S or 2094-BMxx-S
1394x-SJTxx-A
1394x-SJTxx-C
1394C-SJTxx-D
1394C-SJTxx-L
1394x-SJTxx-T
Resolver
1326-CCUx-x-xxx (1)
(1)
Use low-profile connector kit (catalog number 2090-K6CK-D15MF) on drive end. Refer to Kinetix Motion Control Selection Guide, publication GMC-SG001, for more
information.
1326AS (460V) Resolver Motors
1326AS-B310H and 1326AS-B330H
1326AS-B420G, 1326AS-B440G, and 1326AS-B460F
1326AS-B630F, 1326AS-B660E, and 1326AS-B690E
1326AS-B840E and 1326AS-B860C
Motor Power Cables
1326-CPB1x-x-xxx
1326-CPC1x-x-xxx
1326AS (460V) Motors
Motor Brake Cables
All 1326AS-Bxxxx-21 motors
Separate brake cable not required. Brake
wires are included with power cable.
Publication 1394-TD004A-EN-P — January 2008
1394 Drive Conversions
49
MP-Series Low Inertia Motors
Motor Cat. No.
Drive Compatibility
Feedback Type
2094-BCxx-Mxx-S or 2094-BMxx-S
Multi-turn High Resolution Absolute
or
Single-turn High Resolution
Encoder Feedback
MPL-BxxxxM/S
1394C-SJTxx-D
MPL-BxxxxV/E
2094-BCxx-Mxx-S or 2094-BMxx-S
MPL-BxxxxR
2094-BCxx-Mxx-S or 2094-BMxx-S
1394x-SJTxx-A
1394x-SJTxx-C
1394C-SJTxx-D
1394C-SJTxx-L
1394x-SJTxx-T
(1)
Resolver
Motor Feedback Cables
2090-XXNFMP-Sxx (flying lead) (1) or
2090-UXNFBMP-Sxx (premolded connector)
2090-CDNFDMP-Sxx (flying lead) (1)
2090-XXNFMF-Sxx (flying lead) (1)
2090-CDNFDMP-Sxx (flying lead) (1)
Use low-profile connector kit (catalog number 2090-K6CK-D15M) or panel-mounted breakout components on drive end. Refer to Kinetix Motion Control Selection Guide,
publication GMC-SG001, for more information.
MP-Series (460V) Low Inertia Motors
Motor Power Cables
MPL-B15xx and MPL-B2xx
2090-XXNPMF-16Sxx
MPL-B310P, MPL-B320P, and MPL-B330P
MPL-B420P and MPL-B430P
2090-XXNPMP-16Sxx
MPL-B4520P, MPL-B4530F, MPL-B4530K, MPL-B4540F, MPL-B4560F, and MPL-B520K
MPL-B540K, MPL-B560F, and MPL-B580F
2090-XXNPMP-14Sxx
MPL-B580J
2090-XXNPMP-10Sxx
MPL-B640F, MPL-B660F, MPL-B680D, and MPL-B680F
MPL-B860D, MPL-B880C, and MPL-B880D
2090-XXNPMP-8Sxx
MPL-B960B, MPL-B960C, MPL-B980B, and MPL-B980C
MPL-B960D and MPL-B980D
2090-MCNPMP-6Sxx
MP-Series (460V) Low Inertia Motors
Motor Brake Cables
All MPL-Bxxxx motors (that require a brake cable)
2090-UXNBMP-18Sxx
Publication 1394-TD004A-EN-P — January 2008
50
1394 Drive Conversions
1394 Drive/Motor System
Combinations
This section provides drive/motor system combination data for your
existing 1394 drive/motor combination.
These combinations are with 1394C-SJTxx-D (SERCOS) drives and
MPL-BxxxxM/S motors.
IMPORTANT
To achieve the performance specifications in the table below, your
1394C-SJTxx-D system module must have firmware revision 1.058 or
later.
1394 SERCOS Drives/Bulletin MPL (460V) Motors Performance Specifications
Motor
Cat. No.
Max Speed
rpm
System
Continuous
Stall Current
A 0-pk
System
Continuous
Stall Torque
Nm (lb-in)
System Peak
Stall Current
A 0-pk
System Peak
Stall Torque
Nm (lb-in)
Motor Rated
Output
kW
1394 Axis
Module
Cat. No.
MPL-B310P
5000
2.40
1.58 (14)
7.1
3.60 (32)
0.72
1394C-AM03
4.24
2.77 (24)
8.5
5.0 (44)
4.50
2.94 (26)
12.7
7.10 (63)
13
7.30 (65)
1394C-AM07
4.24
2.91 (26)
8.5
5.62 (50)
1394C-AM03
6.10
4.18 (37)
12.7
8.40 (74)
17
11.1 (98)
1394C-AM07
4.24
3.14 (28)
8.5
5.62 (50)
1394C-AM03
12.7
8.39 (74)
21.2
12.7 (112)
23
13.5 (119)
1394C-AM50
1394C-AM03
MPL-B320P
MPL-B330P
MPL-B420P
MPL-B430P
MPL-B4520P
MPL-B4530F
MPL-B4530K
5000
5000
5000
5000
5000
3000
4000
6.40
4.74 (42)
1394C-AM03
1.3
1.7
1.9
1394C-AM04
1394C-AM04
1394C-AM04
1394C-AM07
4.24
3.02 (27)
8.5
5.90 (52)
6.40
4.56 (40)
12.7
8.70 (77)
9.20
6.55 (58)
21.2
14.0 (124)
31
19.8 (175)
1394C-AM50
4.24
3.04 (27)
8.50
4.78 (42)
1394C-AM03
6.40
4.59 (41)
12.70
7.14 (63)
8.50
6.10 (54)
21.00
11.8 (104)
24.00
13.5 (119)
1394C-AM50
4.24
4.90 (44)
8.5
9.20 (81)
1394C-AM03
6.40
7.40 (65)
12.7
13.3 (118)
7.10
8.36 (74)
21.0
20.3 (180)
1394C-AM07
4.24
3.22 (28)
8.5
6.20 (55)
1394C-AM03
6.40
4.80 (42)
12.7
9.10 (80)
10.60
8.06 (71
21.2
14.6 (129)
11.00
8.36 (74
31.0
20.3 (180)
Publication 1394-TD004A-EN-P — January 2008
2.4
2.5
2.2
2.6
1394C-AM04
1394C-AM07
1394C-AM04
1394C-AM07
1394C-AM04
1394C-AM04
1394C-AM07
1394C-AM50
1394 Drive Conversions
Motor
Cat. No.
MPL-B4540F
Max Speed
rpm
3000
MPL-B4560F
3000
MPL-B520K
4000
MPL-B540D
2000
MPL-B540K
4000
System
Continuous
Stall Current
A 0-pk
System
Continuous
Stall Torque
Nm (lb-in)
System Peak
Stall Current
A 0-pk
System Peak
Stall Torque
Nm (lb-in)
4.24
4.75 (42)
8.5
9.30 (82)
6.40
7.17 (63)
12.7
13.8 (122)
9.10
10.20 (90)
21.2
22.4 (198)
26.0
27.1 (240)
10.6
12.6 (111)
21.2
22.7 (200)
10.6
9.86 (87)
21.2
16.5 (146)
11.5
10.7 (95)
33.0
23.2 (205)
10.5
19.4 (172)
21.2
37.9 (335)
10.6
10.3 (89)
21.2
17.2 (152)
20.5
19.4 (172)
46.9
38.0 (336)
60.0
48.6 (430)
46.9
51.2 (453)
68.0
67.8 (600)
46.9
52.8 (467)
70.7
72.4 (640)
46.9
45.6 (403)
70.7
65.2 (577)
46.9
52.1 (462)
65.0
72.3 (640)
Motor Rated
Output
kW
51
1394 Axis
Module
Cat. No.
1394C-AM03
3.0
1394C-AM04
1394C-AM07
1394C-AM50
3.2
3.5
3.4
1394C-AM07
1394C-AM07
1394C-AM50
1394C-AM07
1394C-AM07
5.4
1394C-AM50
1394C-AM75
5.5
1394C-AM50
MPL-B560F
3000
20.6
26.8 (237)
MPL-B580F
3000
26.0
34.0 (301)
MPL-B580J
3800
32.0
34.0 (301)
MPL-B640F
3000
32.1
36.7 (325)
MPL-B660F
3000
33.0
41.1 (364)
46.9
56.2 (497)
38.5
48.0 (425)
70.7
84.7 (750)
MPL-B680D
2000
33.0
60.9 (539)
46.9
82.4 (729)
34.0
62.8 (556)
70.7
120 (1062)
MPL-B680F
3000
33.0
41.2 (365)
46.9
56.2 (497)
48.0
60.0 (531)
70.7
84.7 (750)
MPL-B860D
2000
45.3
79.6 (704)
70.7
116 (1028)
12.5
1394C-AM75
MPL-B880C
1500
45.3
104 (920)
70.7
152 (1344)
12.6
1394C-AM75
MPL-B960B
1200
42.5
130 (1150)
70.7
195 (1724)
12.7
1394C-AM75
MPL-B960C
1500
41.5
102 (902)
70.7
142 (1256)
13.5
1394C-AM75
MPL-B980B
1000
40.0
163 (1441)
70.7
229 (2025)
15.2
1394C-AM75
MPL-B980C
1500
47.5
104 (920)
70.7
151 (1335)
13.5
1394C-AM75
7.16
7.9
6.11
6.15
9.3
7.5
1394C-AM75
1394C-AM50
1394C-AM75
1394C-AM50
1394C-AM75
1394C-AM50
1394C-AM75
1394C-AM50
1394C-AM75
1394C-AM50
1394C-AM75
1394C-AM50
1394C-AM75
Performance specification data and curves reflect nominal system performance of a typical system with motor at 40 °C (104 °F) and drive at 50 °C (122 °F) ambient and rated
line voltage. For additional information on ambient and line conditions, refer to the Motion Analyzer CD, publication PST-SG003.
Publication 1394-TD004A-EN-P — January 2008
52
1394 Drive Conversions
These combinations are with 1394x-SJTxx-A, 1394x-SJTxx-C,
1394x-SJTxx-L, and 1394x-SJTxx-T, non-SERCOS drives, and
MPL-BxxxxR (resolver) motors.
1394 Non-SERCOS Drives/Bulletin MPL (460V) Motors Performance Specifications
Motor
Cat. No.
Max Speed
rpm
System
Continuous
Stall Current
A 0-pk
System
Continuous
Stall Torque
Nm (lb-in)
System Peak
Stall Current
A 0-pk
System Peak
Stall Torque
Nm (lb-in)
Motor Rated
Output
kW
1394 Axis
Module
Cat. No.
MPL-B310P
5000
2.40
1.58 (14)
4.30
2.48 (21.95)
0.72
1394x-AM03
MPL-B320P
5000
4.24
2.77 (24.52)
4.50
2.94 (26.02)
7.10
4.52 (40)
1.3
MPL-B330P
5000
4.24
2.91 (25.71)
8.50
5.62 (49.77)
6.10
4.18 (36.99)
9.90
6.55 (57.97)
4.24
3.14 (27.79)
8.50
5.62 (49.71)
6.40
4.74 (41.95)
12.70
8.39 (74.27)
13.00
8.59 (76.02)
1394x-AM07
4.24
3.02 (26.72)
8.50
5.90 (52.22)
1394x-AM03
6.40
4.56 (40.33)
12.70
8.82 (78.02)
9.20
6.55 (57.97)
17.00
11.80 (104.43)
1394x-AM07
4.24
3.04 (26.93)
8.50
4.78 (42.31)
1394x-AM03
6.40
4.59 (40.65)
12.70
7.14 (63.22)
8.50
6.10 (53.99)
21.00
11.81 (104.54)
24.00
13.50 (119.48)
1394x-AM50
4.24
4.99 (44.18)
8.50
8.32 (73.64)
1394x-AM03
6.40
7.54 (66.69)
12.70
12.43 (110.03)
7.10
8.36 (73.99)
19.00
18.60 (164.61)
1394x-AM07
4.24
3.22 (28.52)
8.50
5.86 (51.82)
1394x-AM03
6.40
4.86 (43.05)
12.70
8.75 (77.43)
10.60
8.06 (71.30)
21.00
14.47 (128.03)
11.00
8.36 (73.99)
27.00
18.60 (164.61)
1394x-AM50
4.24
4.75 (42.06)
8.50
8.76 (77.51)
1394x-AM03
6.40
7.17 (63.49)
12.70
13.09 (115.82)
9.10
10.20 (90.27)
21.00
21.64 (191.51)
23.00
23.70 (209.75)
26.0
34.0 (301)
70.7
72.4 (640)
MPL-B420P
MPL-B430P
MPL-B4520P
MPL-B4530F
MPL-B4530K
MPL-B4540F
MPL-B580F
5000
5000
5000
3000
4000
3000
3000
1.7
1394x-AM03
1394x-AM04
1394x-AM03
1394x-AM04
1394x-AM03
1.9
2.4
2.5
2.2
2.6
3.0
1394x-AM04
1394x-AM04
1394x-AM04
1394x-AM07
1394x-AM04
1394x-AM04
1394x-AM07
1394x-AM04
1394x-AM07
1394x-AM50
7.16
1394x-AM75
Performance specification data and curves reflect nominal system performance of a typical system with motor at 40 °C (104 °F) and drive at 50 °C (122 °F) ambient and rated
line voltage. For additional information on ambient and line conditions, refer to the Motion Analyzer CD, publication PST-SG003.
Publication 1394-TD004A-EN-P — January 2008
1394 Drive Conversions
53
1394 Drives/1326AB (460V) Motors Performance Specifications
Motor
Cat. No.
Max Speed
rpm
System
Continuous
Stall Current
A rms
System
Continuous
Stall Torque
Nm (lb-in)
1326AB-B410G
5000
2.45
2.7 (24)
3.0
2.3 (21)
3.48
2.7 (24)
2.84
5.0 (44)
3.0
1326AB-B410J
1326AB-B420E
1326AB-B420H
1326AB-B430E
1326AB-B430G
1326AB-B515E
1326AB-B515G
1326AB-B520E
7250
3000
6000
3000
5000
3000
5000
3000
System Peak
Stall Current
A rms
System Peak
Stall Torque
Nm (lb-in)
6.0
6.6 (58)
7.32
8.1 (72)
6.0
4.7 (42)
9.0
7.0 (62)
10.4
8.1 (72)
6.0
10.6 (94)
8.0
14.9 (132)
2.8 (25)
6.0
5.6 (50)
4.5
4.2 (37)
9.0
8.4 (74)
5.46
5.1 (45)
15.0
14.0 (124)
1394x-AM07
3.0
5.1 (45)
6.0
10.1 (89)
1394x-AM03
3.9
6.6 (58)
9.0
15.2 (135)
11.6
19.7 (174)
4.5
5.2 (46)
9.0
10.3 (92)
5.6
6.4 (57)
15.0
17.2 (153)
4.5
7.7 (68)
9.0
15.4 (136)
6.1
10.4 (92)
15.0
25.6 (226)
18.3
31.2 (276)
7.5
7.9 (70)
15
15.8 (140)
9.5
10.4 (92)
28.5
31.2 (276)
4.5
8.8 (78)
9.0
17.7 (157)
6.7
13.0 (115)
15.0
29.4 (260)
20.1
39.0 (345)
7.5
11.2 (99)
15.0
22.4 (198)
8.8
13.1 (116)
26.4
39.3 (348)
7.5
14.2 (126)
15.0
28.4 (251)
9.5
18.0 (160)
28.5
54.2 (480)
33.2
58.5 (518)
50.0
88.1 (780)
33.2
38 (336)
50
56 (495)
33.2
56.8 (502)
50.0
85.4 (756)
1326AB-B520F
3500
1326AB-B530E
3000
1326AB-B720E
3500
17.5
30.9 (273)
1326AB-B720F
5000
27.5
31.8 (282)
1326AB-B730E
3350
22.8
39.0 (345)
Motor Rated
Output
kW
1.0
1394 Axis
Module
Cat. No.
1394x-AM03
1394x-AM04
1394x-AM03
1.4
1394x-AM04
1394x-AM07
1.1
1394x-AM03
1394x-AM04
1394x-AM03
2.2
1.4
1394x-AM04
1394x-AM04
1394x-AM07
2.3
1394x-AM04
1394x-AM07
1394x-AM04
2.3
1394x-AM07
1394x-AM50
2.9
1394x-AM07
1394x-AM50
1394x-AM04
2.9
1394x-AM07
1394x-AM50
2.9
4.2
6.8
11.7
9.6
1394x-AM07
1394x-AM50
1394x-AM07
1394x-AM50
1394x-AM50
1394x-AM75
1394x-AM50
1394x-AM75
1394x-AM50
1394x-AM75
Publication 1394-TD004A-EN-P — January 2008
54
1394 Drive Conversions
Motor
Cat. No.
Max Speed
rpm
System
Continuous
Stall Current
A rms
System
Continuous
Stall Torque
Nm (lb-in)
1326AB-B740C
2200
20.9
53.0 (469)
1326AB-B740E
3400
23.33
32.0
System Peak
Stall Current
A rms
System Peak
Stall Torque
Nm (lb-in)
33.2
84.2 (745)
50.0
126.8 (1122)
37.0 (327)
33.2
52.6 (465)
50.8 (450)
50.0
79.4 (702)
Motor Rated
Output
kW
8.7
12.7
1394 Axis
Module
Cat. No.
1394x-AM50
1394x-AM75
1394x-AM50
1394x-AM75
Performance specification data and curves reflect nominal system performance of a typical system with motor at 40 °C (104 °F) and drive at 50 °C (122 °F) ambient and rated
line voltage. For additional information on ambient and line conditions, refer to the Motion Analyzer CD, publication PST-SG003.
1394 Drives/1326AS (460V) Motors Performance Specifications
Motor
Cat. No.
Maximum
Speed
rpm
System
Continuous
Stall Current
Amps (rms)
System
Continuous
Torque
Nm (lb-in)
System Peak
Stall Current
Amps (rms)
System Peak
Stall Torque
Nm (lb-in)
Motor Rated
Output
kW
1394 Axis
Module
Cat. No.
1326AS-B310H
6200
0.8
0.7 (6.1)
2.4
2.1 (18)
0.3
1394x-AM03
1326AS-B330H
6500
2.1
2.1 (18)
6.0
5.6 (50)
0.9
6.0
7.3 (65)
7.8
9.6 (84)
9.0
10.5 (93)
15.0
17.6 (156)
16.2
19.0 (168)
1394x-AM50
9.0
13.1 (116)
1394x-AM04
15.0
21.9 (194)
18.6
27.1 (240)
1326AS-B420G
1326AS-B440G
1326AS-B460F
5250
5250
4300
2.6
3.2 (28)
4.5
5.3 (47)
5.4
6.4 (56)
4.5
6.6 (58)
6.2
9.0 (80)
7.5
10.3 (91)
15.0
20.6 (182)
7.8
10.7 (95)
18.5
25.4 (225)
7.5
13.7 (121)
15.0
27.3 (242)
11.8
21.5 (190)
29.8
54.2 (480)
33.2
63.6 (563)
41.3
79.1 (700)
33.2
59.0 (522)
39.5
70.0 (620)
33.2
93.0 (823)
44.4
124.0 (1100)
1326AS-B630F
4500
1326AS-B660E
3000
1326AS-B690E
3000
19.0
36.4 (322)
1326AS-B840E
3000
21.2
37.6 (333)
1326AS-B860C
2000
17.6
49.3 (436)
1394x-AM03
1394x-AM04
1394x-AM03
1.2
1394x-AM04
1394x-AM07
1394x-AM04
2.0
2.8
1394x-AM07
1394x-AM07
1394x-AM50
2.4
3.4
5.0
4.7
6.0
1394x-AM07
1394x-AM50
1394x-AM07
1394x-AM50
1394x-AM50
1394x-AM75
1394x-AM50
1394x-AM75
1394x-AM50
1394x-AM75
Performance specification data and curves reflect nominal system performance of a typical system with motor at 40 °C (104 °F) and drive at 50 °C (122 °F) ambient and rated
line voltage. For additional information on ambient and line conditions, refer to the Motion Analyzer CD, publication PST-SG003.
Publication 1394-TD004A-EN-P — January 2008
1394 Drive Conversions
Kinetix 6000 Drive/Motor
System Combinations
55
This section provides drive/motor system combinations for your
conversion to Kinetix 6000 drives. For torque/speed curves and
combinations with other MP-Series, TL-Series, or F-Series motors, refer
to the Kinetix Motion Control Selection Guide, publication
GMC-SG001 or the Motion Analyzer/Motion Selector CD, publication
PST-SG003.
Kinetix 6000 Drives/Bulletin MPL (460V) Motors Performance Specifications
Motor
Cat. No.
Max Speed
rpm
System
Continuous
Stall Current
A 0-pk
System
Continuous
Stall Torque
Nm (lb-in)
System Peak
Stall Current
A 0-pk
System Peak
Stall Torque
Nm (lb-in)
Motor Rated
Output
kW
Kinetix 6000
460V Drives
Cat. No.
MPL-B1510V
8000
0.95
0.26 (2.3)
3.10
0.77 (6.8)
0.16
2094-BMP5
MPL-B1520U
7000
1.80
0.49 (4.3)
5.90
1.53 (13.3)
6.10
1.58 (13.9)
MPL-B1530U
7000
2.0
0.90 (8.0)
5.90
2.34 (20.7)
7.20
2.82 (24.9)
MPL-B210V
8000
1.75
0.55 (4.9)
5.80
1.52 (13.4)
MPL-B220T
6000
3.30
1.61 (14.2)
5.90
2.50 (21.3)
11.3
4.74 (41.9)
MPL-B230P
5000
2.60
2.10 (18.6)
5.90
4.30 (38.0)
11.3
8.20 (73.0)
MPL-B310P
5000
2.4
1.6 (14)
5.90
3.2 (28)
7.10
3.6 (32)
MPL-B320P
5000
4.0
2.70 (24)
5.90
3.9 (34)
4.5
3.10 (27)
13.0
7.5 (66)
MPL-B330P
5000
6.1
4.18 (37)
13.0
8.0 (71)
19.0
11.1 (98)
13.0
8.7 (77)
21.8
13.4 (118)
22.0
13.5 (119)
2094-BM03
13.0
8.8 (78)
2094-BM01
21.8
14.4 (127)
32.0
19.8 (175)
2094-BM03
13.0
8.1 (72)
2094-BM01
21.8
12.4 (110)
25.0
13.75 (121)
13.0
13.9 (123)
21.0
20.3 (180)
13.0
9.9 (87)
21.8
15.5 (137)
31.0
20.3 (179)
MPL-B420P
MPL-B430P
MPL-B4520P
MPL-B4530F
MPL-B4530K
5000
5000
5000
3000
4000
6.3
4.74 (42)
8.6
6.11 (54)
9.2
6.55 (58)
8.1
5.64 (50)
6.7
8.36 (74)
8.6
7.16 (63)
9.9
8.25 (73)
0.27
0.39
0.37
0.62
0.86
0.77
1.4
1.7
2094-BMP5
2094-BM01
2094-BMP5
2094-BM01
2094-BMP5
2094-BMP5
2094-BM01
2094-BMP5
2094-BM01
2094-BMP5
2094-BM01
2094-BMP5
2094-BM01
2094-BM01
2094-BM02
2094-BM01
1.9
2.2
2.1
2094-BM02
2094-BM02
2094-BM02
2094-BM03
2.1
2094-BM01
2094-BM02
2094-BM01
2.5
2094-BM02
2094-BM03
Publication 1394-TD004A-EN-P — January 2008
56
1394 Drive Conversions
Motor
Cat. No.
MPL-B4540F
MPL-B4560F
MPL-B520K
MPL-B540D
Max Speed
rpm
3000
3000
4000
2000
System
Continuous
Stall Current
A 0-pk
System
Continuous
Stall Torque
Nm (lb-in)
System Peak
Stall Current
A 0-pk
System Peak
Stall Torque
Nm (lb-in)
8.6
9.75 (86)
13.0
13.5 (119)
9.1
10.20 (90)
21.8
21.4 (189)
29.0
27.1 (240)
2094-BM03
8.6
10.1 (89)
13.0
14.7 (130)
2094-BM01
11.8
14.0 (124)
21.8
23.3 (206)
36.0
34.4 (304)
8.6
8.09 (71)
13.0
10.9 (96)
11.5
10.7 (95)
21.8
17.0 (150)
33.0
23.2 (205)
8.6
15.8 (140)
13.0
23.6 (208)
10.5
19.4 (172)
21.8
38.8 (343)
23.0
41.0 (362)
45.0
38.1 (337)
60.0
48.6 (430)
45.0
49.3 (436)
68.0
67.7 (599)
45.0
51.0 (451)
73.4
74.3 (657)
Motor Rated
Output
kW
Kinetix 6000
460V Drives
Cat. No.
2094-BM01
2.6
3.1
2094-BM02
2094-BM02
2094-BM03
2.3
3.1
2094-BM01
2094-BM02
2094-BM03
2094-BM01
3.4
2094-BM02
2094-BM03
5.0
2094-BM03
MPL-B540K
4000
20.4
19.4 (171)
MPL-B560F
3000
20.9
26.7 (236)
MPL-B580F
3000
26.1
34.0 (300)
MPL-B580J
3800
30.0
31.8 (281)
45.0
43.7 (386)
32.0
33.9 (299)
73.4
66.6 (589)
MPL-B640F
3000
30.0
34.2 (302)
45.0
50.8 (449)
32.0
36.7 (324)
65.0
72.7 (643)
MPL-B660F
3000
38.5
47.9 (423)
73.4
81.0 (716)
4.5
2094-BM05
MPL-B680D
2000
34.0
62.8 (555)
73.4
124 (1098)
9.3
2094-BM05
MPL-B680F
3000
47.9
59.7 (528)
73.4
85.4 (755)
4.2
2094-BM05
MPL-B860D
2000
47.3
83.2 (736)
73.4
120 (1065)
13.3
2094-BM05
MPL-B880C
1500
47.5
109 (965)
73.4
157 (1387)
12.7
2094-BM05
MPL-B880D
2000
48.9
79.9 (706)
73.4
114 (1011)
12.7
2094-BM05
MPL-B960B
1200
42.5
130 (1150)
73.4
190 (1684)
9.8
2094-BM05
MPL-B960C
1500
48.9
110 (975)
73.4
146 (1296)
13.0
2094-BM05
MPL-B960D
2000
48.9
86 (760)
73.4
131 (1158)
15.0
2094-BM05
MPL-B980B
1000
40.0
162 (1440)
73.4
235 (2077)
9.7
2094-BM05
MPL-B980C
1500
48.9
112 (996)
73.4
157 (1387)
15.3
2094-BM05
MPL-B980D
2000
48.9
97 (858)
73.4
147 (1300)
18.6
2094-BM05
5.5
7.2
8.4
5.6
2094-BM05
2094-BM03
2094-BM05
2094-BM03
2094-BM05
2094-BM03
2094-BM05
2094-BM03
2094-BM05
Performance specification data and curves reflect nominal system performance of a typical system with motor at 40 °C (104 °F) and drive at 50 °C (122 °F) ambient and rated
line voltage. For additional information on ambient and line conditions, refer to the Motion Analyzer CD, publication PST-SG003.
Publication 1394-TD004A-EN-P — January 2008
1394 Drive Conversions
57
Kinetix 6000 Drives/1326AB (460V) Motors Performance Specifications
Motor
Cat. No.
Max Speed
rpm
System
Continuous
Stall Current
A 0-pk
System
Continuous
Stall Torque
Nm (lb-in)
1326AB-B410G
5000
3.4
2.7 (24)
1326AB-B410J
7250
4.9
2.7 (24)
1326AB-B420E
3000
4.0
5.0 (44)
1326AB-B420H
6000
7.7
5.1 (45)
1326AB-B430E
3000
5.5
6.6 (58)
1326AB-B430G
5000
7.9
6.4 (57)
1326AB-B515E
1326AB-B515G
1326AB-B520E
1326AB-B520F
1326AB-B530E
1326AB-B720E
3000
5000
3000
3500
3000
3500
1326AB-B720F
5000
1326AB-B730E
3400
8.7
10.4 (92)
System Peak
Stall Current
A 0-pk
System Peak
Stall Torque
Nm (lb-in)
5.9
4.6 (41)
10.3
8.1 (72)
13.0
7.2 (64)
14.6
8.1 (72)
5.9
7.8 (70)
11.3
14.9 (132)
13.0
8.6 (76)
21.1
14.0 (124)
13.0
15.6 (138)
16.4
19.7 (174)
13.0
10.5 (93)
21.1
17.2 (152)
13.0
15.6 (138)
21.8
26.1 (231)
26.0
31.1 (275)
13.0
9.9 (88)
2.5
2094-BM01
21.8
16.6 (147)
3.4
2094-BM02
41.0
31.4 (278)
4.0
2094-BM03
13.0
17.8 (157)
1.3
2094-BM01
21.8
29.9 (264)
1.7
2094-BM02
28.4
39.0 (345)
2.3
2094-BM03
13.0
13.7 (121)
2.2
2094-BM01
21.8
23.0 (203)
2.7
2094-BM02
37.3
39.3 (347)
3.1
2094-BM03
13.0
17.5 (155)
2.2
2094-BM01
21.8
29.3 (259)
40.0
54.0 (477)
21.8
27.0 (239)
2.0
2094-BM02
45.0
55.6 (492)
4.7
2094-BM03
70.7
87.7 (775)
6.0
2094-BM05
Motor Rated
Output
kW
1.0
1.4
8.7
6.6 (58)
13.6
10.4 (92)
8.7
12.0 (106)
9.5
13 (115)
8.7
9.1 (81)
12.4
13.1 (116)
8.7
11.7 (103)
13.4
18.0 (160)
14.6
18.0 (159)
24.8
30.7 (271)
30.0
23.9 (211)
45.0
36.0 (318)
39.5
31.7 (280)
70.7
56.7 (501)
30.0
36.1 (319)
40.0
54.2 (479)
32.3
38.9 (344)
70.7
85.3 (754)
1.1
2.1
1.5
2.3
Kinetix 6000
460V Drives
Cat. No.
2094-BMP5
2094-BM01
2094-BM01
2094-BM02
2094-BMP5
2094-BM01
2094-BM01
2094-BM02
2094-BM01
2094-BM02
2094-BM01
2094-BM02
2094-BM01
2.0
2094-BM02
2094-BM03
3.4
10.1
9.3
2094-BM02
2094-BM03
2094-BM03
2094-BM05
2094-BM03
2094-BM05
Publication 1394-TD004A-EN-P — January 2008
58
1394 Drive Conversions
Motor
Cat. No.
1326AB-B740C
1326AB-B740E
Max Speed
rpm
2200
3400
System
Continuous
Stall Current
A 0-pk
System
Continuous
Stall Torque
Nm (lb-in)
System Peak
Stall Current
A 0-pk
System Peak
Stall Torque
Nm (lb-in)
Motor Rated
Output
kW
Kinetix 6000
460V Drives
Cat. No.
14.6
26.1 (231)
21.8
39.0 (345)
5.2
2094-BM02
29.7
53.2 (470)
40.0
80.6 (713)
70.7
127 (1123)
30.0
33.5 (296)
45.0
50.4 (446)
45.3
50.8 (449)
70.7
79.3 (701)
6.5
11.3
2094-BM03
2094-BM05
2094-BM03
2094-BM05
Performance specification data and curves reflect nominal system performance of a typical system with motor at 40 °C (104 °F) and drive at 50 °C (122 °F) ambient and rated
line voltage. For additional information on ambient and line conditions, refer to the Motion Analyzer CD, publication PST-SG003.
Kinetix 6000 Drives/1326AS (460V) Motors Performance Specifications
Motor
Cat. No.
Maximum
Speed
rpm
System
Continuous
Stall Current
Amps (rms)
System
Continuous
Torque
Nm (lb-in)
System Peak
Stall Current
Amps (rms)
System Peak
Stall Torque
Nm (lb-in)
Motor Rated
Output
kW
Kinetix 6000
460V Drives
Cat. No.
1326AS-B310H
6200
0.8
0.70 (6.1)
2.4
2.10 (18)
0.3
2094-BMP5
1326AS-B330H
6500
2.1
2.10 (18)
6.0
5.60 (50)
0.9
2094-BM01
1326AS-B420G
5250
2.6
3.20 (28)
7.8
9.60 (84)
1.2
2094-BM01
1326AS-B440G
5250
5.4
6.40 (56)
16.2
19.0 (168)
2.0
2094-BM03
1326AS-B460F
4300
6.2
9.0 (80)
18.6
27.1 (240)
2.8
2094-BM03
1326AS-B630F
4500
7.8
10.7 (95)
18.5
25.4 (225)
2.4
2094-BM03
1326AS-B660E
3000
11.8
21.5 (190)
29.8
54.2 (480)
3.4
2094-BM05
1326AS-B690E
3000
19.0
36.4 (322)
41.3
79.1 (700)
5.0
2094-BM05
1326AS-B840E
3000
21.2
37.6 (333)
39.5
70.0 (620)
4.7
2094-BM05
1326AS-B860C
2000
17.6
49.3 (436)
44.4
124 (1100)
6.0
2094-BM05
Performance specification data and curves reflect nominal system performance of a typical system with motor at 40 °C (104 °F) and drive at 50 °C (122 °F) ambient and rated
line voltage. For additional information on ambient and line conditions, refer to the Motion Analyzer CD, publication PST-SG003.
Publication 1394-TD004A-EN-P — January 2008
1394 Drive Conversions
Converting Your GML
Software to RSLogix 5000
Software
59
The 1394 (GMC and GMC Turbo) motion controllers use Graphical
Motion Language (GML) software for motion control programming.
This programming conversion is based on the use of GML
Commander software.
GML Commander software uses RS-232 serial networking to download
and monitor GML Commander driven application programs to the
1394 GMC or GMC Turbo motion controller. The Kinetix 6000 servo
drives use a Logix controller platform, a Logix SERCOS interface
motion module, RSLogix 5000 software, and communication is over a
fiber-optic network.
This section covers points to consider when converting from GML
software to RSLogix 5000 software.
Topic
Page
Introduction
59
GML Software Overview
60
RSLogix 5000 Software Overview
60
1394 Communication Platforms
61
Flex I/O
73
Comparing GML and RSLogix 5000 Programming Software
75
REC, AEC, TEC, and ALEC Module Conversion
125
GML to RSLogix 5000 Software Conversion Example
128
GML and RSLogix 5000 Software Programming Reference
146
Introduction
In general, there is an equivalent RSLogix 5000 motion instruction or
application code for each GML function block. While not all
instruction data entry is the same, there are ways to convert a function
in GML software to a similar RSLogix 5000 software motion
instruction.
You can double-click each function block in the GML diagram to view
or edit the configuration and connect the function blocks in the order
that you want them to execute. With RSLogix 5000 software, you
typically program the motion instructions in ladder logic and
sequence the program by the way you interlock the rungs of logic.
Also, the ladder logic instructions are configured on the same screen
as the screen used to enter and edit your ladder logic code.
You can trace the program flow when troubleshooting a GML
program. Use state logic programming style to troubleshoot
RSLogix 5000 programming code. Both programs use motion direct
Publication 1394-TD004A-EN-P — January 2008
60
1394 Drive Conversions
commands for simple motion instruction execution outside of the
main program.
GML code is sequential functions executed task-based on the
requirement in the application. Therefore, GML code is best emulated
in RSLogix 5000 software by using Sequential Function Chart (SFC)
programming. However, because ladder diagrams are the industry
standard in PLC programming and similar functions, this manual
focuses on converting your GML Commander program to an
RSLogix 5000 program using ladder diagrams. Also, ladder diagrams
are scan-based programs and are not executed or handled exactly like
a GML Commander program in the 1394 motion controller. Many of
those sequence-versus-scan differences are explained in Comparing
GML and RSLogix 5000 Programming Software beginning on page 75.
GML Software Overview
The standard GMC (catalog numbers 1394x-SJTxx-C and
1394C-SJTxx-L) and GMC Turbo (catalog number 1394x-SJTxx-T)
motion control systems use GML software. GML is a sequential,
flow-chart oriented approach to motion control programming. GML
Commander software is the emulation of many years of improvement
in the GML software family and is used in this transition process.
When using GML software, you create a diagram of your application
solution by placing function blocks representing actions on the screen
and connecting them in the proper order to achieve the sequence of
operations needed for your application. You enter motion and process
details later using a fill-in-the-blank approach. Once completed, you
translate the diagram into a script in the native language of the motion
controller and download the script to the motion controller via serial
communication.
For a complete list of the GML function blocks and a description of
their use, refer to the GML Commander Reference Manual, publication
GMLC-5.2.
RSLogix 5000 Software Overview
RSLogix 5000 Enterprise Series software is designed to work with the
Rockwell Automation ControlLogix, CompactLogix, FlexLogix,
SoftLogix5800, and DriveLogix controller platforms. With
RSLogix 5000 software, you need only one software package for
sequential, process, drive, and motion control programming.
Publication 1394-TD004A-EN-P — January 2008
1394 Drive Conversions
61
• RSLogix 5000 software offers an easy-to-use, IEC 61131-3
compliant interface, symbolic programming with structures and
arrays, and a comprehensive instruction set that serves many
types of applications.
• RSLogix 5000 software supports relay ladder diagrams,
structured text, function block diagrams, and sequential function
charts for developing application programs.
• Each motion instruction works on one or more axes.
• Each instruction needs a unique motion control tag. The tag uses
the MOTION_INSTRUCTION data type. The tag stores the status
information for the instruction.
• Additionally, RSLogix 5000 software provides support for the S88
equipment phase-state model for batch and machine control
applications via the (optional) PhaseManager feature.
For a complete list of RSLogix 5000 motion instructions and a
description of their use, refer to the Logix5000 Controllers Motion
Instructions Reference Manual, publication 1756-RM007.
1394 Communication Platforms
The 1394 standard GMC system modules support the use of
Remote I/O (RIO), Axislink, DH-485, RS-422, and RS-232 serial
devices. Additionally, GMC Turbo system modules provides an SLC
interface for I/O bit/word file transfer between the 1394 system
running GML software and the SLC controller running RSLogix 500
software.
Complex applications, such as line shaft (multiple-axis coordination)
capability, require interfacing to the HMI terminal, programmable
logic controller (PLC), or other 1394 GMC system modules. GML
Commander software and the 1394 motion controller use these
networks for proper data flow to and from each device. The
handshaking between the 1394 motion controller and the PLC module
is required for proper application flow.
RSLogix 5000 software contains both the sequential process and
motion instructions in one language. Using the Logix controller
system, you eliminate the handshaking from one program controlling
sequential logic, and the other handling the motion control
instructions. You have to determine where your machine I/O is
coming from, how to structure it into the Logix backplane, and to
associate the various motion functions. In addition, use of an HMI
terminal ties directly to the Logix backplane such that machine status,
machine recipe, and other functions can tie into various required
motion functions.
Publication 1394-TD004A-EN-P — January 2008
62
1394 Drive Conversions
Remote I/O
Remote I/O (RIO) is used from the PLC-5 or SLC module to the 1394
GMC system module for handshaking PLC I/O with data bit or block
transfer to and from the 1394 motion control system. This is no longer
required as the Logix controller uses one program to do both I/O,
processing, and motion instructions.
RIO is also used as an interface to the HMI terminal. Your existing
HMI terminal can be reused as well as the screens, but the interface to
Logix needs to be retrofitted to accommodate the new platform.
There are four RIO Pallete interface instructions in GML software that
are transparent when you use RSLogix 5000 software. The function of
RIO is embedded in the RSLogix 5000 software code with sequential
and motion instructions in the same rung of logic.
RIO Pallete Interface Instructions
DH-485 Serial Communication
DH-485 serial communication is standard on GMC system modules
and can be used in ways similar to RIO. The DH-485 serial ports use
DH-485 value blocks or SLC message instructions to send/receive
information from/to an HMI terminal. Either the existing HMI terminal
could be used with the Logix controller or new networks and code
created.
There are four DH-485 Pallete interface instructions in GML software
that are transparent when you use RSLogix 5000 software. The
function of DH-485 communication is embedded in the RSLogix 5000
software code with sequential and motion instructions in the same
rung of logic.
DH-485 Pallete Interface Instructions
Publication 1394-TD004A-EN-P — January 2008
1394 Drive Conversions
63
Turbo SLC I/O Bit/Word File Transfer
SLC interface or backplane interface is only compatible with the 1394
GMC Turbo system module. With this option the SLC controller views
the 1394 motion controller as a four slot SLC rack with the same
backplane communication. The I/O data bits and words move back
and forth in the RSLogix 500 and GML Commander software programs
to turn on a servo or read back motor position, for example.
RSLogix 5000 software does not require this handshaking as it is one
program that handles both logic and motion in one rung/routine.
There are three SLC Pallete interface instructions in GML Commander
software that are transparent when you use RSLogix 5000 software.
These instructions are for the SLC module status.
SLC Pallete Interface Instructions
SLC Turbo Example
Typically, the use of handshaking, whether RIO, DH-485, or Turbo
Backplane, required the accessing of the other software to transfer
data bits to start and stop a process from the HMI terminal, or to send
position data from the motion controller back to the programmable
controller, for example.
In this instance, the use of the SLC backplane and 1394 GMC Turbo
system module provided dedicated I/O from the SLC RSLogix 500
software to and from the GML motion programming software.
Publication 1394-TD004A-EN-P — January 2008
64
1394 Drive Conversions
An accumulator machine using motion control uses the following
GML code to manually override an automatic condition with the use
of an external switch/HMI terminal input. This external input is
written through RSLogix 500 code (SLC) and then through data
transfer using the 1394 GMC Turbo system module. The input can jog
the accumulator slide forward or reverse.
In this rung of the RSLogix 500 program, you can determine if the axis
should be in manual or automatic mode.
RSLogix 500 Code Showing I/O Handshaking in GML Software
The code in rung 0002 indicates that if SLC input B13:0/15
(Automatic-Mode-Enabled bit) is off, the system is in manual mode.
So, the accumulator can be jogged forward or reverse with an input.
With the use of the 1394 GMC Turbo system, you are allowed 40 I/O
data high-speed transfer. In this example, if the SLC input bit B13:0/4
is true, a SLC output bit O14:7 (which equals jog_c_fwd in GML
programming) is triggered in the SLC module that corresponded to a
SLC input bit in the 1394 GMC Turbo system module. In this case, the
accumulator (called axis C) jogs forward at a floating point data value
from the SLC module to 1394 GMC Turbo system module until the
input is removed. Conversely, if the SLC input bit B13:0/15 (which
equals jog_c_rev GML programming) is true, the accumulator will
reverse jog.
Publication 1394-TD004A-EN-P — January 2008
1394 Drive Conversions
65
In GML Commander software, the conditions of jogging the
accumulator are tied into the input blocks. If the jog_c_fwd is true,
you jog forward. If the jog_c_fwd is false you go to another input
block. If the jog_c_rev is true, you jog reverse. If at that time the
jog_c_rev is false, you stop jogging and end the routine.
This SLC input bit is transferred over the Bulletin 1746 SLC Backplane
as the 1394 GMC Turbo system acts like a four-slot SLC rack. There is
handshaking between the RSLogix 500 and GML software in order for
this to actually occur.
GML Commander Input Blocks (using RSLogix 500 input)
Publication 1394-TD004A-EN-P — January 2008
66
1394 Drive Conversions
Because the accumulator jogging speed and direction could be
changed using an HMI terminal or the PLC, it is written as a variable.
In this example, the manual forward or reverse jog of the accumulator
is written with a few motion instructions in GML software.
GML Commander Move Block Variable (using RSLogix 500 variable for speed)
The JogAxis, of the accumulator properties, are the fill-in-the-blank
folders within the GML motion instruction. Speed, jog_speed_c, is a
variable. Use of the SLC module to 1394 GMC Turbo also allowed I/O
floating point numbers to be sent along the I/O bits. The number of
floats varied based on the number of I/O bits sent.
RSLogix 500 Copy File (sending to GML variable speed)
The jog_speed_c variable is the accumulator jog speed. Jog_speed_c
is entered in the PanelView terminal and networked to the SLC
controller platform. This input to the SLC controller is transmitted to
the 1394 motion controller (shown above in rung 0010), and becomes
an input variable for both the forward and reverse jog blocks.
Publication 1394-TD004A-EN-P — January 2008
1394 Drive Conversions
TIP
67
Many of the existing GML software settings for speed, acceleration,
and deceleration could be used in the transition to RSLogix 5000
software and motion instructions.
The final part of the GML Commander routine is to stop the forward
or reverse jog, based on the sequence of inputs. In this example, if
neither the Jog Slide Fwd input or the Jog Slide Rev input is energized,
the program sequence leads to the Stop Axis0 Jog (or axis c).
GML Commander Code (Stop Command)
In summary, the SLC module generated an input from a switch or HMI
terminal that triggered an output to the 1394 GMC system module to
put the accumulator axis in a manual mode. Then, based on the need
to jog the accumulator forward or reverse, the SLC module sent bit
and floating point information to the GMC system module to complete
these actions. When the actions were complete, the jog was stopped.
Publication 1394-TD004A-EN-P — January 2008
68
1394 Drive Conversions
RSLogix 5000 Software Example
You can use RSLogix 5000 software and state logic to perform the
same functions with one software package and several rungs of ladder
logic. Use of interlocking tags, local to the software, complete the
accumulator jog. State logic provides for the evaluation of where the
program may be faulting or improperly functioning.
In rung 0, the interlocks are in place of the servo status to make sure
the jog function is ready and that manual mode is enabled.
RSLogix 5000 Code (Rung 0)
Enable Manual Mode
Publication 1394-TD004A-EN-P — January 2008
1394 Drive Conversions
69
In rung 1, the axis jogs forward based on these five program
interlocking criterion.
• Manual mode is selected.
• The ServoOKToJog tag (an output from rung 0 indicating this
axis is enabled and not faulted).
• The forward jog input is given.
• The reverse jog input is not true.
• The servo axis Positive Overtravel input is not true.
The jog speed depends on a variable that comes from an HMI
terminal.
RSLogix 5000 Code (Rung 1)
Jog Axis Forward
Publication 1394-TD004A-EN-P — January 2008
70
1394 Drive Conversions
In rung 2, the axis jogs reverse based on these five program
interlocking criterion.
• Manual mode is selected.
• The ServoOKToJog tag (an output from rung 0 indicating this
axis is enabled and not faulted).
• The forward jog input is not true.
• The reverse jog input is given.
• The servo axis Negative Overtravel input is not true.
The jog speed depends on a variable that comes from an HMI
terminal.
RSLogix 5000 Code (Rung 2)
Jog Axis Reverse
Publication 1394-TD004A-EN-P — January 2008
1394 Drive Conversions
71
In rung 3, the axis stops jogging based on these four program
interlocking criterion.
•
•
•
•
Manual mode is selected.
The forward jog input is not true.
The reverse jog input is not true.
One of the jog process bits (forward or reverse) is set indicating
that the accumulator is jogging in one direction.
Rung 3 latches a Command Stop bit that is tied to rung 4 and contains
the actual Motion Axis Stop command.
RSLogix 5000 Code (Rung 3)
Latch Stop Bit
In rung 4, the ServoCMD bit goes true and the Motion Axis Stop
occurs. Finally, the ServoCMD bit is unlatched, so the next jog (for
example) can occur.
RSLogix 5000 Code (Rung 4)
Stop Axis Jog
In summary, the handshaking from the sequence programming
(RSLogix 500) and the GML is eliminated. All of the inputs and outputs
and motion instructions are in one (RSLogix 5000) software.
Publication 1394-TD004A-EN-P — January 2008
72
1394 Drive Conversions
AxisLink
AxisLink with an ALEC module uses an external encoder or one of the
1394 GMC system encoder emulations to link multiple motion
controllers to provide real-time axis coordination between axes in a
distributed 1394 GMC multi-axis system.
Each Logix processor can support up to 32 axes in a motion group.
• You can coordinate axes within the same motion group.
• You can have more than one processor in certain Logix
configurations, providing additional axes, based on performance
needs.
AxisLink Pallete Interface Instructions
RS-422 and RS-232 Serial Communication
RS-422 is a multi-drop serial communication network that can be used
from one 1394 GMC system module to another 1394 GMC system
module.
RS-232 is a common communication network used between the 1394
GMC controller and the personal computer containing GML
Commander software.
There are nine RS-232 and RS-422 Pallete interface instructions. These
instructions provide keying of information being sent back and forth
through these two serial networks. Many of these functions are now
handled in the RSLogix 5000 software from use of tag accessibility,
Get System Value (GSV), Set System Value (SSV), Message (MSG), and
ASCII instructions.
RS-232 and RS-422 Pallete Interface Instructions
Publication 1394-TD004A-EN-P — January 2008
1394 Drive Conversions
73
Flex I/O
The 1394 GMC system accepts up to eight Flex I/O modules into a
dedicated Flex I/O connector on the system module. These are
flexible inputs that look like local I/O and can be used in the GML
software code for varying types of machine control.
In this example, the GML input block turns on a servo motor with the
Flex I/O input named Turn_Servo_On. This input is likely wired from
an external switch (not shown here).
GML Input Block Using Flex I/O Input
1394 GMC Compatible Flex I/O Blocks
Bulletin 1794 Flex I/O Blocks
Bulletin 1794 Flex I/O Blocks
Cat. No.
Function
Cat. No.
Function
1794-IB16
Discrete Input
1794-OA8
Discrete AC Output
1794-OB16
Discrete Output
1794-IB10XOB6
Discrete Combo
1794-IE8
Analog Input
1794-OW8
Relay Output
1794-OE4
Analog Output
1794-IF41
Isolated Analog Input
1794-IE4XOE2
Analog Combo
1794-IA8
Discrete AC Input
1794-OB16P
Discrete Output
To reuse the Flex I/O connections that are already in the system
requires using the proper network interface block and then rewriting
internal RSLogix 5000 software code to access the Flex I/O blocks. In
this example, the Bulletin 1794-AENT adapter module communicates
via ethernet between the Flex I/O modules and ControlLogix
controller.
Publication 1394-TD004A-EN-P — January 2008
74
1394 Drive Conversions
Flex I/O Networked via EtherNet/IP to Logix Controller
The Kinetix 6000 drive has a limited number of dedicated inputs.
However, ControlLogix and CompactLogix controller platforms have
various I/O modules that replace Flex I/O modules and interface to
the motion instructions through RSLogix 5000 software.
If you decide to convert to Logix I/O modules, go to
http://www.ab.com/e-tools and follow the appropriate links for
programmable controllers and distributed I/O selection tools. The tool
is designed to help you determine which ControlLogix or
CompactLogix I/O modules you need.
Publication 1394-TD004A-EN-P — January 2008
1394 Drive Conversions
75
Comparing GML and RSLogix 5000 Programming Software
Many of the function blocks in GML software are similar, in function,
to the motion instructions used in RSLogix 5000 software. This section
explains the similarities and differences between them, and points out
how the Logix instructions or code usage corresponds to each of the
GML function blocks.
Sample MSO Instruction Using RSLogix 5000 Software
The Feedback block in GML software is used to turn on the selected
drive enable output, which enables feedback loop processing.
GML Feedback Block
However, another function block is needed to tell the program that
the axis is ready to be moved. The On Axis block can be used two
ways.
• Wait-For-Axis or the input to pause the program
• If-Axis or input to trigger program flow
GML On Axis Block
RSLogix 5000 software uses the Motion Servo On (MSO) motion
instruction to activate the servo amplifier and to activate the servo axis
control loop. The actual tags associated with the Axis_Servo_Drive
axis type can be used for interlocking the program to make sure a
move command is not initiated until the Axis Feedback block is on.
No other instruction is required.
The MSO block is used in ladder diagrams (or structured text) and
used on an Axis_Servo_Drive for use on a SERCOS Network.
Publication 1394-TD004A-EN-P — January 2008
76
1394 Drive Conversions
RSLogix 5000 MSO Instruction
Axis ? is the name of the axis to perform the function on. Axes are
configured in your RSLogix 5000 software program.
Motion control ? is the structure used to access instruction status
parameters. The motion control tag indicates the health of the motion
instruction. Use it to determine if the instruction was executed or for
interlocking other program instructions.
Mnemonic tags associate each motion instruction. In this example,
there are three tags.
EN is the Enable bit. This bit is set when the rung makes a
false-to-true transition and remains set until the servo message
transaction is completed and the rung goes false.
DN is the Done bit. The DN bit is set when the axis’ servo action has
been successfully enabled and the drive enable status bit has been set.
After the DN bit is set, BrakeReleaseDelayTime expires and the
ServoActionStatus bit is set. The ServoActionStatus bit can be used as
part of the interlocking before a move occurs.
ER is the Error bit. The ER bit is set to indicate that the instruction
detected an error.
RSLogix 5000 Code Example
Using Interlocking Before MAM Instruction Executes
ServoActionStatus must
be true before MAM
instruction is executed.
Publication 1394-TD004A-EN-P — January 2008
1394 Drive Conversions
77
Control Options/Axis Setup
The Control Options dialog in GML software determines how the 1394
GMC system module is configured. These are the available options:
•
•
•
•
•
•
•
•
Communication network interfaces
Application options for running the program
Number of servo axes on the system module
Operator interface port
Flex I/O
Smart Power for shunt and dc common bus
SLC and Turbo I/O data
AxisLink node addresses
In this example, the 1394 GMC Turbo system module is setup to use
AxisLink and the SLC interface.
GML Commander Control Options
RSLogix 5000 software uses the Controller Organizer to setup the
specific processor used, the Coordinated System Time Master, the
Motion Group with up to 32 axes per group, and finally the I/O
Configuration including the SERCOS network and the Kinetix 6000
IAM and AM modules in that network.
Publication 1394-TD004A-EN-P — January 2008
78
1394 Drive Conversions
RSLogix 5000 Controller Organizer
Axis Setup in GML software and Axis Properties in RSLogix 5000 both
provide a way to configure axes for their intended use.
This example shows the Axis Setup dialog (General tab) in GML
software.
GML Commander Axis Setup (General)
This example shows the Axis Properties dialog (General tab) in
RSLogix 5000 software.
RSLogix 5000 Axis Properties (General Tab)
Publication 1394-TD004A-EN-P — January 2008
1394 Drive Conversions
79
Axis Setup Summary Comparing GML and RSLogix 5000 Software
GML Software
Setup Tab
Axis Setup Description in GML Software
Axis Setup Conversion in RSLogix 5000 Software
General
The General tab is used to setup Axis Type and Position Mode. It
is also used to configure the Drive Interface Module (DIM).
Use the General tab to configure the Axis Type, Motion Group
and Axis Module that the axis is associated with. Use the
Conversion tab to configure the position mode (rotary or
linear). The 1394 DIM module is not used or supported in
RSLogix 5000 software.
Units
The Position Units tab is used to setup the actual type of
position units in addition to position, velocity, accel, and decel
display format.
Use the Units tab to set the position units. Display of
position/velocity/accel/decel are set in the Axis_Servo_Drive
tag structure.
Feedback
The Feedback tab is used to setup the transducer type,
indicating motor resolver or other, as the position feedback. It
also sets the conversion and external conversion constants and
unwind data, if rotary. If using a Master position axis, you could
use an encoder filter for the position signals sent to slave type
axis.
Use the Motor Feedback tab to verify the feedback type (field
is filled when motor catalog number is known) and to set
cycles/rev, interpolation factor, and feedback resolution. The
Conversion tab is used to set position mode, conversion
constant, and unwind data.
Positioning
The Positioning tab sets the default Move and Jog Profiles. It
also sets the Position Lock Tolerance, the Backlash
Compensation, if a linear axis were used, and the average
velocity timebase.
The default Axis Move and Jog Profiles are set when using
the specific MAM and MAJ instructions. Position Lock
Tolerance is set in the Limits tab. Backlash compensation is
set in the Offset tab and average velocity timebase is set in
the Units tab.
Homing
The Homing tab is used to configure an active or passive home.
The absolute MV is used to configure an external absolute
resolver/encoder interface for absolute positioning.
The Homing tab lets you configure a similar homing
sequence. However, the addition of Immediate, Absolute, and
Torque Level are added. The Immediate sequence must be
used with the Absolute mode setting when the drive is
disabled. The Absolute Reference Bit lets the axis retain
position (within 4096 revs) while all power is down.
Overtravel
The Overtravel tab is used to configure hard and soft travel
limits. If the hard overtravel limit is used, it is wired into the
GMC System Module.
Use the Limits tab to configure hard and soft travel limits.
These physical inputs are wired to the Kinetix 6000 drive I/O
(IOD) connector.
Motor/Drive
The Motor/Drive tab is used to select the motor catalog number,
configure the motor velocity and torque limits, and configure the
motor thermal circuitry.
Use the Drive/Motor tab to select the motor, amplifier, and
the loop configuration. Use the Limits tab to set the
continuous/peak torque values for your drive/motor
combination. The Dynamics tab is used to set the maximum
application speed and accel, decel, and jerk values (an
autotune will automatically set the dynamics tab values).
Fault Action
The Fault Action tab is used to configure the system to Disable
Drive, Stop Motion, or Status Only when a fault occurs.
Use the Fault Actions tab to configure the system to Disable
Drive, Stop Motion, Status Only, or Shutdown when a fault
occurs.
Hookups
The Hookups tab configures the transducer polarity and control
output polarity. The actual test is available when the personal
computer and GML software is online with the applicable 1394
GMC System Module.
Use the Hookup tab to initiate a marker, feedback or test
command test.
Tune
The Tune Servo action will optimize both Gains
(position/velocity) and Dynamics (speed, accel/decel). You must
be in online mode to configure. GML software automatically sets
the Gains and Dynamics tabs after a successful tune.
The Logix Tune tab configures the Gains and Dynamics tabs. It
also populates the Output tab with load to motor mismatch
values and other variables. Tuning values developed in GML
software are not an exact match to those in RSLogix 5000
software. However, you can use the GML settings as a
starting point for the next system.
Gains
The Gains tab is populated from the Tune Servo action. Position
and Velocity loop and Velocity Feedforward gains are also
configured in this tab.
The Logix Gains tab similarly provides access to the system
gains. Acceleration Feedforward is also included in Logix.
Dynamics
The Dynamics tab is populated from the Tune Servo action.
Maximum speed, acceleration/deceleration, and Error Tolerance
parameters are set.
The Dynamics tab parameters are set by the Tune action and
similarly provides access to the maximum speed, acceleration
and deceleration parameters. Maximum jerk is added in the
version 16 release. The Tune action also sets the Position
Error Tolerance parameter, listed on the Limits tab.
Publication 1394-TD004A-EN-P — January 2008
80
1394 Drive Conversions
Enable/Disable Axis
The Feedback block is used in GML software to enable and disable
the axis. In RSLogix 5000 software a separate motion instruction is
used to enable or disable the axis. The MSO instruction is used to
enable the axis and the MSF instruction is used to disable the axis.
To convert from GML to RSLogix 5000 software, the appropriate
instruction needs to be added to the ladder diagram and the axis tag
name needs to be added in the axis parameter of the motion
instruction.
GML Feedback Block and RSLogix 5000 MSO/MSF Instruction
Publication 1394-TD004A-EN-P — January 2008
1394 Drive Conversions
81
The MSO block in RSLogix 5000 software works with the brake
disengage time to set a servo action status bit that can be used to
interlock any other rungs with commanded motion. In this way no
motion is commanded to overdrive the brake.
RSLogix 5000 Code Example
Servo Action Status Bit is True Before MAM Instruction Executes
ServoActionStatus must
be true before MAM
instruction is executed.
The MSF command works with the brake engage time to apply
full-rated torque while the brake engages. After this time elapses, the
servo IGBT circuits are disabled and de-energizes the servo action
status bit.
The brake engage/disengage times are set in the Fault Actions/
Custom Stop Action Attributes dialog of the Axis Properties tab.
RSLogix 5000 Axis Properties (Limits Tab/Custom Stop Action Attributes)
Publication 1394-TD004A-EN-P — January 2008
82
1394 Drive Conversions
Move Axis
The Move Axis block is used in GML software to initiate a move on
the axis. In RSLogix 5000 software a Motion Axis Move (MAM)
instruction is used to initiate a move. The same move types are
available on both types of instructions. If the Wait for Completion box
is checked on a GML function block, you use the PC bit from the
motion control tag in your ladder logic program to determine when
the move is complete and interlock the next step in your sequence.
GML Move Axis Block and RSLogix 5000 MAM Instruction
Comparing Axis Move Parameters
GML Software
Parameter
RSLogix 5000 Software
Parameter
GML Software
Parameter
RSLogix 5000 Software
Parameter
Axis
Axis
Decel
Decel Rate
Move
Move Type
Decel Units
Decel Units
Position
Position
Override Profile
Profile
Speed
Speed
Merge
Merge Enable
Speed Units
Speed Units
Wait for Completion
N/A
Accel
Accel Rate
Accel Units
Accel Units
Synchronize with next
Move Axis
N/A
Wait for Completion is used in GMC systems to cause the motion
controller to halt the current task until the execution of the current
move block finished. RSLogix 5000 software is a scan-based
programming system. The MAM instruction contains bits that you can
use for program execution control, for example, the PC (process
complete) bit.
Publication 1394-TD004A-EN-P — January 2008
1394 Drive Conversions
83
In this example the MAM instruction is executed and when the PC bit
is complete, the output turns on.
RSLogix 5000 Code Example
Using the MAM PC Bit to Set Output
Synchronize-with-next-Move-Axis is used in GML software to run
another Move Axis block on another axis simultaneously in the
motion control task. In the RSLogix 5000 MAM instruction, this
function is not available.
The best way to synchronize two axis moves in RSLogix 5000 software
is to use the Motion Coordinated Linear Move (MCLM) instruction. In
the example below, a coordinated time system is set up in
RSLogix 5000 to coordinate Axis 0 and Axis 1. Once setup, a home
position is established at a zero reference position. The attached
MCLM instruction simultaneously moves Axis 0 to an absolute position
of 10 and Axis 1 to an absolute position of -10.
IMPORTANT
GML software is a sequential-based programming language.
Therefore, when two axis are synchronized this way they are moved
or executed at the same time. Since RSLogix 5000 software is a
scan-based language, the performance or execution is not immediate,
instead it is based on the Motion Group Coarse Update Rate (CUR). A
general rule of thumb is to expect execution no longer than 2x the
CUR. In most instances of machine performance, this will not be
noticeable.
Publication 1394-TD004A-EN-P — January 2008
84
1394 Drive Conversions
RSLogix 5000 Code Example
MCLM Instruction with Absolute Move
Jog Axis
The Jog Axis function block and the MAJ instruction in the
RSLogix 5000 software are used to jog the axis. Both instructions have
the option of determining the direction and speed of the jog. The
GML function block has a drop down menu selecting direction. The
RSLogix 5000 MAJ motion instruction requires that you enter a
numeric value into the Direction parameter, with the value of the
parameter determining the direction of the jog.
GML Jog Axis Block and RSLogix 5000 MAJ Instruction
Publication 1394-TD004A-EN-P — January 2008
1394 Drive Conversions
85
Comparing Jog Axis Parameters
GML Software
Parameter
RSLogix 5000 Software
Parameter
GML Software
Parameter
RSLogix 5000 Software
Parameter
Axis
Axis
Decel
Decel Rate
Direction
Direction
Decel Units
Decel Units
Speed
Speed
Override Profile
Profile
Speed Units
Speed Units
Merge from CAM or Gear
Merge Enable
Accel
Accel Rate
Accel Units
Accel Units
Synchronize with next Jog
Axis
N/A
Synchronize-with-next-Jog-Axis is used in GML to run another Jog
Axis block on another axis simultaneously in the motion control task.
In the RSLogix 5000 MAJ instruction, this function is not available.
However, if you would like two axes to jog at the same time, create a
virtual axis and have both axes geared to the virtual such that they jog
at the same time that the virtual axis is jogged. If you want one axis to
jog at a different speed than the other, simply set the gear ratio
different.
IMPORTANT
GML software is a sequential-based programming language.
Therefore, when two axis are synchronized this way they are moved
or executed at the same time. Since RSLogix 5000 software is a
scan-based language, the performance or execution is not immediate,
instead it is based on the Motion Group Coarse Update Rate (CUR). A
general rule of thumb is to expect execution no longer than 2x the
CUR. In most instances of machine performance, this will not be
noticeable.
Publication 1394-TD004A-EN-P — January 2008
86
1394 Drive Conversions
RSLogix 5000 Code Example
Using Virtual Axis to Jog Two Axes at the Same Time
Publication 1394-TD004A-EN-P — January 2008
1394 Drive Conversions
87
Gear Axis
The Gear Axis function block and the MAG instruction are used to
enable a fixed ratio between two axes. Both instructions let you
determine the master and slave axis. The same options for direction of
the slave axis in relationship to the master are available in either
software. Both instructions let you enter the gear ratio in either a fixed
number of position units on the slave for one position unit of
movement on the master, or as a ratio of feedback counts on the slave
for a fixed number of feedback counts on the master.
GML Gear Axis Block and RSLogix 5000 MAG Instruction
Comparing Gear Axis Parameters
GML Software Parameter
RSLogix 5000 Software
Parameter
Slave Axis
Slave Axis
Master Axis
Master Axis
Direction
Direction
Slave To
Master Reference
Set Ratio
Ratio Format
Slave/Master Ratio
Ratio/Slave/Master Counts
Ramp to Master Speed
Clutch
Accel Rate
Accel Rate/Accel Units
Synchronize with next Gear Axis N/A
Synchronize-with-next-Gear-Axis lets you run another Gear Axis block
on another axis simultaneously in the motion control task. This
initiates electronic gearing on multiple axes, simultaneously.
Publication 1394-TD004A-EN-P — January 2008
88
1394 Drive Conversions
Use simple code interaction and locking to achieve this in
RSLogix 5000 software. In the previous jog example, using parallel
MAG commands along with making sure the MAG instructions are in
IP is basically emulating the GML function in RSLogix 5000 software.
Since your axes are not moving when you initiate the gear
instructions, they act essentially the same as having them synchronize
with the next gear function.
RSLogix 5000 Code Example Using MAG Instruction
Two Separate Axes Follow a Master Virtual Axis
Publication 1394-TD004A-EN-P — January 2008
1394 Drive Conversions
89
Reset Fault
The Reset Fault block and the MAFR instruction are used to reset
faults on an axis. The main functional difference between the two is
that the GML function block has some additional features when
compared to the Logix motion instruction. With the GML function
block you can choose to clear all faults on an axis at once or reset
each fault individually depending on the configuration of the block.
You also have the option of resetting the 1394 drive through the fault
reset block.
The MAFR/MASR instructions only provide the ability to reset any and
all active faults on the axis at the same time. However, with
RSLogix 5000 software, you can access the Axis_Servo_Drive tag and
evaluate a fault condition and monitor it through an HMI terminal, for
example, to indicate that a MAFR or MASR should be issued.
GML Reset Fault Block and RSLogix 5000 MAFR Instruction
The MAFR instruction can clear an axis specific fault, for example
Position Error fault (E19). The MASR instruction can clear, when
corrected, an axis shutdown condition, for example Drive Overvoltage
fault (E10).
RSLogix 5000 MASR Instruction
Publication 1394-TD004A-EN-P — January 2008
90
1394 Drive Conversions
Stop Motion
The Stop Motion function block and MAS instruction are used to bring
the axis to a controlled stop. Both instructions give you the option of
stopping all motion on an axis or stopping a particular type of motion
such as a jog, move, gear, home, or cam. The MAS instruction lets you
set a deceleration rate by setting the Change Decel parameter to Yes
and then putting the desired rate of deceleration and the units of the
deceleration in the subsequent parameters. If the Change Decel
parameter is set to No, the deceleration limit, set in the Axis Properties
dialog, Dynamics tab, is used. The percent of maximum is also a
percent of maximum deceleration. You can also find this in the Axis
Properties dialog, Dynamics tab.
GML Stop Motion Block and RSLogix 5000 MAS Instruction
Comparing Stop Motion Parameters
Publication 1394-TD004A-EN-P — January 2008
GML Software
Parameter
RSLogix 5000 Software
Parameter
Mode
Stop Type
Axis
Axis
Decel
Decel
1394 Drive Conversions
91
Home Axis
The Home Axis function block and the MAH instruction are used to
home an axis and define the actual position of the axis upon
completion of the procedure. Both instructions execute the homing
procedure as configured in the axis properties dialog of the axis.
GML Home Axis Block and RSLogix 5000 MAH Instruction
You can review the configuration of the homing procedure in GML
software by clicking the Configure/Axis Use/AXISx (the axis whose
homing configuration you wish to review).
GML Configure Options
Publication 1394-TD004A-EN-P — January 2008
92
1394 Drive Conversions
GML Configure Axis Use (Homing Tab)
RSLogix 5000 Axis Properties (Homing Tab)
RSLogix 5000 software, version 16, added the ability to home to a
torque level or torque level-marker, if required, and provides more
flexibility in the homing functions. There are multiple active homing
directions, for example bi-directional and uni-directional homing.
Absolute mode, immediate sequence is used for retaining absolute
positioning of an axis when power is removed. These functions are
not available in GML software.
Publication 1394-TD004A-EN-P — January 2008
1394 Drive Conversions
93
Change Dynamics
The Change Dynamics function block and the MCD instruction are
used to change speed, accelerations, and decelerations for existing
move and jog functions.
GML Change Dynamics Block and RSLogix 5000 MCD Instruction
Comparing Change Dynamics Parameters
GML Software
Parameter
RSLogix 5000 Software Parameter
Axis
Axis
For Current
Motion Type
Speed
Change Speed/Speed Units
Accel
Change Accel/Accel Rate/Accel Units
Decel
Change Decel/Decel Rate/Decel Units
Publication 1394-TD004A-EN-P — January 2008
94
1394 Drive Conversions
Redefine Position
The Redefine Position function block and the MRP instruction are
used to set the actual or command position of the selected axis to the
commanded absolute position.
GML Redefine Position Block and RSLogix 5000 MRP Instruction
Comparing Redefine Position Parameters
GML Software
Parameter
RSLogix 5000 Software
Parameter
Axis
Axis
Mode
Type
Position
Position Select
New Position
Position
Synchronize with next block
N/A
In GML software, the Synchronize-with-next-block function lets you
simultaneously redefine the position of multiple axes. The MRP
instruction in RSLogix 5000 software does not have this specific
function, but has software code with parallel MRP instructions that
you can use to closely simulate this function. Refer to the
RSLogix 5000 code example on page 95, for an example.
For more information and cautions for the use of the MRP instruction,
refer to the Logix5000 Controllers Motion Instructions Reference
Manual, publication 1756-RM007. For example, use absolute mode
only if the selected axis is stationary.
Publication 1394-TD004A-EN-P — January 2008
1394 Drive Conversions
95
RSLogix 5000 Code Example
Using the MRP Instruction for Two Axis Position Definition
On Axis, If Axis Fault, and Show Axis Status
The On Axis, If Axis Fault, and Show Axis Status function blocks
program the drive to proceed/not proceed if an axis status is known.
GML On Axis Block
Wait for Axis is used to determine the axis status and program flow. If
Axis is used to move to the next GML function block, if that specific
axis status is true. GML software is a sequential-based language so it
can hold a task until this actual Axis status is true. RSLogix 5000
software is scan-based so it is not possible to stop the scan, but it is
Publication 1394-TD004A-EN-P — January 2008
96
1394 Drive Conversions
possible to use AFI instructions to make the rung always false or to
use interlocking of code to determine if a next step should happen or
not.
When using RSLogix 5000 software, an AXIS_SERVO_DRIVE
instruction is created for every axis on the SERCOS ring. The tag
structure automatically creates many associated tags that give the
status of the axis, for example, if the drive is enabled or if the drive
has faulted.
It is possible to use the tags associated with the Axis_Servo_Drive
structure to direct program execution with simple code. For example,
Examine On (XIO) or Examine Off (XIC) instructions along with the
Axis_Servo_Drive structure allows program flow based on axis status.
In this ladder diagram, a User Defined Tag (UDT) is created for a
Servo Status. If the Servo is OK, this XIO closes. If the Axis is enabled,
the next XIO closes. If the mode is changed from automatic to
manual, the next XIO closes. If all three are true, the ServoOkToJog
output turns on and work wherever it is referenced. The first two XIO
tags are referenced to the servo axis through the AXIS_SERVO_DRIVE
tag structure.
RSLogix 5000 Code Example
Using Tags for Axis Status
Control Settings, Motion Settings, Show Axis Position
The Control Settings, Motion Settings, and Show Axis Position function
blocks, and the SSV/GSV instructions let you program the drive to
change or adjust power-up or working control values, for example,
maximum axis speed and acceleration. They are also used to send
axis position or registration data, for example, to the HMI terminal.
Publication 1394-TD004A-EN-P — January 2008
1394 Drive Conversions
97
GML Control Settings Block
In RSLogix 5000 software, Set System Value (SSV) instruction is used to
adjust an axis property or configuration, for example, an
Axis_Servo_Drive acceleration limit. The Get System Value (GSV)
instruction is used to view an axis property or configuration on an
HMI terminal or somewhere else in the program.
IMPORTANT
Use Set System Value (SSV) instructions sparingly. If many are
needed, stagger them in rungs (with state logic) and wait for the
AXIS_SERVO_DRIVE configuration update in process to be off before
executing another SSV instruction.
RSLogix 5000 SSV and GSV Instructions
Comparing Control Settings Parameters
GML Software
Parameter
RSLogix 5000 Software
Parameter
Type
Class Name
Value
Dest
State
Attribute Name
Tag
Dest
Publication 1394-TD004A-EN-P — January 2008
98
1394 Drive Conversions
Input, Show Input Status, Output
The Input, Show Input Status, and Output function blocks, and the Bit
Control instructions let you program the drive to control program flow
with a dedicated, configured, or miscellaneous input. They are also
used for turning on a general purpose, SLC, RIO, AxisLink, or Flex I/O
discrete output.
GML Input Block (configured)
TIP
A marker state, dedicated input, as used in GML software is not
available in RSLogix 5000 software.
GML Input Block (dedicated)
Publication 1394-TD004A-EN-P — January 2008
1394 Drive Conversions
99
This is the first rung of the state logic machine. This rung waits for the
input from the Cycle Start PB, then moves a 5 into the sequence
variable to move to the next step in the Cycle_Start_PB sequence.
RSLogix 5000 Code Example
Using BIT Control
You can use the BIT expressions such as Examine On (XIO), or
Examine Off (XIC), for inputs used in the program flow. You can use
OTE Output Energized, as an output to be energized based on
program sequence.
RSLogix 5000 Code Example
MAM Instruction PC Bit Turns Output On
The Input function block is similar to BIT Control in RSLogix 5000
software. However, it should be noted that the input in GML software
can interrupt and hold the program until the input is active or not. In
RSLogix 5000 software this is purely a scan based type of input and
how it reacts is determined by the program.
In addition, the Show Program Status block is used in GML software
to show the task or program being run. It also indicates a runtime
fault. Use the State Logix code in between the EQU and the MOV
block. This makes sure you that if the program were to fault or not
flow properly, you can identify within a specific rung where the error
occurred.
Publication 1394-TD004A-EN-P — January 2008
100
1394 Drive Conversions
On Expression and Equation
The On Expression and Equation function blocks, and the
Compare/Compute/Math instruction folders let you program the drive
to configure a mathematical expression or assign a value, for example,
to a variable or cam profile points.
GML Equation Block
The Compare instruction folder lets you create a Compare-to-a-Value
using, for example, NEQ or EQU instructions. Use the Compute/Math
folder to use ADD or similar math functions.
RSLogix 5000 ADD and NEQ Instructions
Publication 1394-TD004A-EN-P — January 2008
1394 Drive Conversions
101
On Timeout and Set Timer
You can use the On Timeout and Set Timer function blocks, and the
Timer/Counter folders as countdown timers. The On Timeout and Set
Timer function blocks are used to pause the GML software program
until the time has elapsed by checking the Wait for Timeout block.
GML Set Timer Block
RSLogix 5000 software uses a TON instruction to duplicate this step
and monitor the DN bit of the timer to determine when the timer has
timed out before moving on to the next step in the sequence.
In this code example, the Delay_Timer.DN tag completes and the
ladder diagram moves to the Cut_to_Length_Sequence value of 90.
RSLogix 5000 Code Example
TON Instructions
Publication 1394-TD004A-EN-P — January 2008
102
1394 Drive Conversions
Change Gain
The Change Gain function block in GML software lets you change the
axis gains at any point in the program without affecting the power-up
values.
GML Change Gain Block
In RSLogix 5000 software, the Set System Value (SSV) instruction is
best to adjust an axis property like, for example, a tuning function.
RSLogix 5000 SSV Instruction
Publication 1394-TD004A-EN-P — January 2008
1394 Drive Conversions
103
Direct Drive Control
The Direct Drive Control function block in GML software is not
applicable to conversion with the Kinetix 6000 drive. In RSLogix 5000
software the MDO instruction is used, most likely, in an analog
application with the 1756-M02AE or 1756-M02AS motion module.
GML Direct Drive Control Block
Native Code
The Native Code function block lets you write base ICODE
instructions in GML software. This is not applicable in RSLogix 5000
software.
GML Native Code Block
Publication 1394-TD004A-EN-P — January 2008
104
1394 Drive Conversions
Call Module
The Call Module function block in GML software lets you call and
execute for an external module that is a subroutine for the existing
GML program.
GML Call Module Block
Use the Program Control Folder in RSLogix 5000 software to move to
another part of the program. For example, the Jump To Subroutine
(JSR) instruction can be used to jump to a subroutine in the program.
The Add On Instruction (AOI) in RSLogix 5000 software is used to
create your own subroutine for instructions. For example, it is
possible to create an AOI routine for fault reset, enabling, and homing
an axis. This eliminates having to create the ladder code but it can
make troubleshooting the program a bit more difficult.
The RSLogix 5000 software rung below is used with an AOI
instruction. When Chk Battery is requested, the rung executes the AOI
instruction, which checks the TL-Series motor (with high-resolution
feedback) backup battery that maintains absolute position. Either the
battery is low (minimum level), completely discharged, or not
connected properly.
RSLogix 5000 Code Example
AOI Instruction
Publication 1394-TD004A-EN-P — January 2008
1394 Drive Conversions
105
Build Table, Configure CAM, and Time Lock CAM
GML software uses the Build Table, Configure CAM and Time Lock
CAM function blocks to perform a Time Master to slave position type
function.
RSLogix 5000 software uses the MCCP and MATC instructions to build
a variable or standard Time-based Cam that performs the same
function.
GML Build Table/Configure Cam/Time Lock CAM Blocks
To properly execute a Time Lock Cam function block in GML
software, the Build Table and Configure Cam function blocks are used
to set up and execute the Cam function. The Build Table function
block sets up the cam points based on the master time versus slave
time profile. The Build Table block can also be setup as a variable
array used in GML software. The Configure Cam block typically sets
up the reference for the Time Lock Cam function. Use the Time Lock
Cam block to set up a non-linear motion profile for a slave axis with
respect to a time base and then execute the specific Time Lock Cam in
the required program area.
RSLogix 5000 software combines these three blocks into one MATC
instruction. If the cam profile is not specifically known, is in a data
table, or may change during the process due to the HMI terminal or
other interface, the MCCP makes these calculations, creates the cam
profile, and works with the MATC instruction to execute the function.
Publication 1394-TD004A-EN-P — January 2008
106
1394 Drive Conversions
RSLogix 5000 MCCP/MATC Instructions
Comparing Build Table Parameters
GML Software Parameter
RSLogix 5000 Software Parameter MCCP
Type
Cam Profile exclusive
Row Offset
N/A
Columns Master Time
Cam
Master Position
N/A
Slave Profile
Cam
Axes Master
Slave
Table
N/A
Cam Profile exclusive
Cam
Comparing Configure CAM Parameters
GML Software Parameter
RSLogix 5000 Software Parameter MATC
Slave Axis
Axis
Cam Type
MATC exclusive instruction
Cam Start Point
Tag array, set in Cam profile
Cam End Point
Tag array, set in Cam profile
Perform Profile
Execution Mode
Comparing Time Lock CAM Parameters
GML Software Parameter
RSLogix 5000 Software Parameter MATC
Slave Axis
Axis
Direction
Direction
Merge from Jog
N/A
Synchronize with next TCAM
N/A
Scale Profile
Publication 1394-TD004A-EN-P — January 2008
Total Time
Time Scaling
Total Distance
Distance Scaling
1394 Drive Conversions
107
The Merge-from-Job and synchronize-with-next-TCAM parameters are
not supported in the MATC instruction.
The most effective way of blending or moving into an MATC
instruction is to create an initial MATC instruction moving the slave
per unit of time at one speed and then using a pending MATC
instruction to smoothly move the slave to another profile.
The most effective way of having multiple axes follow a master time
schedule is to use a virtual axis and MAPC instruction to command the
slave axis to the master axis such that the profile can emulate a
time-versus-slave position profile. Or, perhaps use of the MCLM and
MCCM functions for coordination of multiple axes.
Build Table, Configure CAM, Position Lock CAM
Use the Build Table, Configure CAM, and Position Lock CAM function
blocks, and the MCCP/MAPC instructions to build position cam
profiles and arrays of user variables. Construct a table of values by
entering a value or expression for each item in the table or by copying
points from a spreadsheet.
GML Build Table/Configure CAM/Position Lock CAM Blocks
Publication 1394-TD004A-EN-P — January 2008
108
1394 Drive Conversions
To properly execute a Position Lock Cam function block in GML
software, the Build Table and Configure Cam function blocks are used
to set up and execute the Cam function. The Build Table function
block sets up the cam points based on the master position versus
slave profile. The Build Table block can also be setup as a variable
array to be used in GML software. The Configure Cam block typically
sets up the reference for the Position Lock Cam. The Position Lock
Cam lets you set up a non-linear motion profile for a slave axis with
respect to a physical, encoder only, virtual, or imaginary axis.
RSLogix 5000 software combines these three blocks into one MAPC
instruction. If the cam profile is not specifically known, is in a data
table, or may change during the process due to the HMI terminal or
other interface, the MCCP makes these calculations, creates the cam
profile, and works with the MAPC instruction to execute the function.
RSLogix 5000 MCCP/MAPC Instructions
Comparing Build Table Parameters
GML Software
Parameter
RSLogix 5000 Software
Parameter MCCP
Type
Cam Profile exclusive
Row Offset
N/A
Columns Master Time
N/A
Master Position
Cam
Slave Profile
Cam
Axes Master
Slave
Table
Publication 1394-TD004A-EN-P — January 2008
In MAPC instruction
Cam Profile exclusive
Cam
1394 Drive Conversions
109
Comparing Configure CAM Parameters
GML Software
Parameter
RSLogix 5000 Software
Parameter MAPC
Slave Axis
Slave Axis
Cam Type
MAPC exclusive instruction
Cam Start Point
Tag array, set in Cam profile
Cam End Point
Tag array, set in Cam profile
Perform Profile
Execution Mode
Auto Correction
N/A
Comparing Position Lock CAM Parameters
GML Software Parameter
RSLogix 5000 Software
Parameter MAPC
Slave Axis
Slave Axis
Master Axis
Master Axis
Slave To
Master Reference
Direction
Direction
Master Reference Direction
Master Lock Position
Uni-directional Only
Master Direction
Synchronize with next Pcam
N/A
Scale Profile
Total Master Distance
Master Scaling
Total Slave Distance
Slave Scaling
Auto Correction and Synchronize with next Pcam functions are not
available in RSLogix 5000 (MAPC/MCCP) instructions.
In GML software, the Auto Correction parameter, in conjunction with
Auto Registration, is used to continuously re-synchronize position-lock
cam master and slave axes to registration marks. Continuous
re-synchronization is necessary when an axis slips or if the material,
upon which the registration marks are printed, is not consistent. Auto
Correction is not standard in the MAPC instruction. Code needs to be
written in RSLogix 5000 software to emulate such a function.
The Synchronize-with-next-Pcam parameter lets you synchronize two
Position Lock Cam profiles so that they start at the same time. This is
beneficial in using two different slave axes cammed to the same
master. In RSLogix 5000 software, this can be accomplished by
initializing two MAPC instructions that are slaved to a master virtual
axis (refer to the example on page 110). You can move the virtual axis
using an MAJ or MAM instruction and both corresponding slave axes
will start at the same time (based on the configuration).
Publication 1394-TD004A-EN-P — January 2008
110
1394 Drive Conversions
RSLogix 5000 Code Example
Using MAPC Instructions to Synchronize Two Slave Axes
Publication 1394-TD004A-EN-P — January 2008
1394 Drive Conversions
111
Interpolate Axes
This GML block lets you use a group of two or more axes in a
specified absolute/incremental distance, along a linear, circular, or
helical path at a specific speed/accel/decel rate using a given motion
profile. The types listed are linear, radius arc, intermediate arc, and
helical.
GML Interpolate Axes Block
In RSLogix 5000 software, the MCLM and MCCM instruction can
simulate the linear and radius/intermediate arc, but cannot make the
helical interpolation moves.
Publication 1394-TD004A-EN-P — January 2008
112
1394 Drive Conversions
RSLogix 5000 MCLM/MCCM Instructions
Comparing Interpolate Axes Parameters
GML Software Parameter
RSLogix 5000 Software Parameter
MCLM or MCCM
Type
Either MCLM or MCMM instruction
Interpolator
N/A
Profile
Profile
Mode
Move type
Time
N/A
Number of axes
X axis destination
Position axis 0
Y axis destination
Position axis 1
Merge from previous segment
Blend function
Wait for completion
N/A
Speed
Speed
Accel/Decel
Accel rate, decel rate
There are four functions or items to discuss in the transition of the
GML Interpolator to the RSLogix 5000 instruction set.
First, GML software has the ability to use two interpolators to execute
two separate interpolated moves at the same time. There are no
limitations to the number of interpolations that may be executing at
one time. However, the use of complex motion instructions can affect
Publication 1394-TD004A-EN-P — January 2008
1394 Drive Conversions
113
the processor execution time. Too many motion executions at one
time can lead to SERCOS ring drops or other functional issues.
Second, GML software supports helical interpolation. RSLogix 5000
software MCCM and MCLM motion instructions do not have this
specific embedded function.
The proposed program code would be to use a virtual axis as the
master and have Axis Y, Axis X and Axis Z all position cammed to it.
Axis X and Axis Y would be setup to execute a circularly profile. Axis
Z will then be a linear profile. Therefore, when you move or jog the
virtual axis, all three axis perform a coordinated, helical movement.
Third, merge from previous segment. A MCLM or MCCM instruction
does not have a motion checkbox for merging from a previous MCLM
or MCCM instruction.
To blend from one MCLM to the next, use this approach or fine tune it
to your application.
RSLogix 5000 Code Example for Blended Instructions
Publication 1394-TD004A-EN-P — January 2008
114
1394 Drive Conversions
RSLogix 5000 Code Example for Blended Instructions (continued)
When an instruction completes, it is removed from the queue and
there is space for another instruction to enter the queue. Both bits
always have the same value because you can queue only one pending
instruction at a time. If the application requires several instructions to
be executed in sequence, the bits are set using these parameters.
Fourth, a Wait for Completion routine in a MCCM or MCLM instruction
is not supported in RSLogix 5000 software.
Use the PC bit of the MCLM or MCCM instruction in the application
code before an instruction you want to execute. This way, the specific
MCCM/MCLM instruction must complete before the next instruction
can occur.
Publication 1394-TD004A-EN-P — January 2008
1394 Drive Conversions
115
Watch Position and On Watch
GML software uses the Watch Control and On Watch blocks to:
• arm a Watch Position event to occur when the selected axis
reaches the setpoint position. The Wait for Tripped selection in
this block or the On Watch block can be used to pause a specific
task until the event occurs. Otherwise, the On Watch block can
be used for proper program flow if the event occurs or not.
• disarm a previously armed Watch Position event that has not yet
occurred.
• arm a Registration event to store the actual positions of all
physical and virtual axes on the specified edge of a dedicated,
high-speed registration input.
• disarm a Registration event, which has not yet occurred.
• enable a Watch Position event to occur in response to a setpoint
position event.
• enable a Dedicated or Configured input event to occur in
response to a setpoint position event.
• disarm an event or action enabled by a previous Watch Control
block, which has not yet occurred.
Watch Control Block and Motion Axis Watch (MAW) Instruction
Publication 1394-TD004A-EN-P — January 2008
116
1394 Drive Conversions
Comparing Motion Axis Watch Parameters
GML Software Parameter
RSLogix 5000 Software Parameter MAW
Axis
Axis
Move from <
setpoint to ≥
setpoint
Trigger condition - Forward
Move from >
setpoint to ≤
setpoint
Trigger condition - Reverse
Setpoint Position
Position
Wait for Tripped
N/A
RSLogix 5000 software uses the MAW instruction to arm the axis to
watch for the axis to reach a certain position and the MDW instruction
to disarm a watch position that is armed but has not occurred yet.
You can use the On Watch block with the Watch Control block for a
position event and either handle program flow after the event occurs
or halt the program flow as it waits for the event to occur. The Wait
for Tripped function lets the Watch block be used to pause the
existing motion task (not the other tasks) and wait for the event to
occur. Either function could be used, but not both for the same event.
The MAW motion instruction in RSLogix 5000 software does not
provide the capability of pausing the ladder scan and, if in a
continuous task, is not a prioritized task. Use an Event task for a MAW
instruction for optimum application usage.
IMPORTANT
GML software is a sequential-based programming language. Since RSLogix 5000 software is a
scan-based language, the performance or execution of a watch or registration event is not immediate,
instead it is based on the Motion Group Coarse Update Rate (CUR). A general rule of thumb is to expect
execution no longer than 2x the CUR. In most instances of machine performance, this is not noticeable.
RSLogix 5000 New Task Event for Motion Axis Watch
Publication 1394-TD004A-EN-P — January 2008
1394 Drive Conversions
117
A watch point also lets you execute specific application code when a
motion axis reaches a specific location. However, a watch point is a
software-based position that serves as the trigger for the event.
RSLogix 5000 Watch Point Event
Watch Control Block and Motion Axis Registration (MAR) Instruction
Publication 1394-TD004A-EN-P — January 2008
118
1394 Drive Conversions
Comparing Watch Control Parameters
GML Software Parameter
RSLogix 5000 Software Parameter
MAR
Axis
Axis
Off to on transition
Trigger condition - positive edge
On to off transition
Trigger condition - negative edge
Either transition
N/A
Use window
Windowed registration
Minimum position
Min. Position
Maximum position
Max. Position
Auto rearm input
N/A
Wait for completion
N/A
The Watch Control function block does not require you to designate
which input you are using for registration. Each 1394 axis module has
a dedicated 5V dc registration input and 24V dc registration input on
the 1394 system module. However, you can only use one of them for
each axis. Each Kinetix 6000 drive module has two dedicated 24V dc
registration inputs for each axis.
You can use the On Watch block with the Watch Control block for a
registration event and either handle program flow after the event
occurs or halt the program flow as it waits for the event to occur. The
Wait for Tripped function lets the Watch block be used to pause the
existing motion task (not the other tasks) and wait for the event to
occur. Either function could be used, but not both for the same event.
Publication 1394-TD004A-EN-P — January 2008
1394 Drive Conversions
119
RSLogix 5000 software uses the MAR instruction to arm the axis to
watch for a registration event and the MDR instruction to disarm a
registration event that is armed but has not occurred yet. The MAR
and MDR instructions have a parameter called Input Number to
designate which of the two inputs a particular motion instruction is
accessing.
The MAR motion instruction in RSLogix 5000 software does not
provide the capability of pausing the ladder scan and, if in a
continuous task, is not a prioritized task. Use an Event task for a MAR
instruction to prioritize the event scheduling in RSLogix 5000 software.
RSLogix 5000 New Task Event for Axis Registration
A registration input lets you execute specific application code when a
motion axis reaches a specific location. A physical device determines
the location and triggers the task.
RSLogix 5000 Registration Input Event
Publication 1394-TD004A-EN-P — January 2008
120
1394 Drive Conversions
There are three Motion Axis Registration functions in the GML
software blocks that are not specific to the MAR blocks in
RSLogix 5000.
• Either transition. The MAR instruction can trigger positive edge
or negative edge and not both, as in the GML Watch Block.
• Auto-rearm input. The MAR instruction does not have this
specific re-arm of the function. However, it is recommended to
use the following code. Note the rung must change from false to
true to re-arm (dependant on the ladder scan and coarse update
rate).
RSLogix 5000 Code Example
Executing Auto-rearm of MAR Instruction
• Wait for Tripped. The Wait for Tripped selection in the Watch
Position block or the On Watch block can be used to pause a
specific task until the event occurs.
IMPORTANT
GML software is a sequential-based programming language. Since RSLogix 5000
software is a scan-based language, the performance or execution of a watch or
registration event is not immediate, instead it is based on the Motion Group Coarse
Update Rate (CUR). A general rule of thumb is to expect execution no longer than 2x
the CUR. In most instances of machine performance, this is not noticeable.
For more information on event-based tasks, refer to Using Event Tasks
with Logix5000 Controllers, publication LOGIX-WP003.
The performance of a similar Axis Watch or Registration in the
Logix 5000 architecture may vary from that in the GML code simply
due to processor speed, scan times, and coarse update rate.
Publication 1394-TD004A-EN-P — January 2008
1394 Drive Conversions
121
On Task and Task Control
The On Task and Task Control function blocks are used in GML
software for task control. You can have up to ten motion tasks
executing at one time and you may, for example, have tasks waiting
for an event or other block to execute.
GML On Task Block
GML Task Control Block
You can have 32 tasks operating in the Logix5000 Architecture. You
can use periodic or event driven tasks with up to 15 prioritization
schedules. There are also Program Control blocks in the RSLogix 5000
instructions, such as Jump to a Subroutine (JSR) or Return from
Subroutine (RET), to help with program flow.
Publication 1394-TD004A-EN-P — January 2008
122
1394 Drive Conversions
End Program and Restart Program
The End Program and Restart Program function blocks are used in
GML software to end or start a program at any point in the program.
Restart Program also lets you begin the program after some fault
routine or determination of an anomaly in the GML program.
GML End Program Block
GML Restart Program Block
In RSLogix 5000 software, the Master Control Relay (MCR) instruction
is a mandatory hard-wired relay that can be de-energized by any
series-connected emergency stop switch. When used in pairs, the MCR
instruction creates a program zone that can disable all rungs with MCR
instructions. To restart, use state logic to determine where in the
program the actual sequence stopped.
New Module
The New Module function block is used to create a subroutine of
motion instructions that are used for program maintenance or for
external use in the Call Module function at some point in the program.
GML New Module Block
The creation of a task, program, or routine replaces this function
based on the need in RSLogix 5000 software code.
Publication 1394-TD004A-EN-P — January 2008
1394 Drive Conversions
123
Output CAM
You can configure up to 48 output cam profiles for Flex I/O, RIO
discrete, SLC, or general purpose outputs. These output cam profiles
turn on or off at specific axis positions. This block is used to enable or
disable the output cam function.
GML Output CAM Block
In RSLogix 5000 software, the Output Cam objects in the MAOC
instruction handle the Motion Planner Object Cam functionality. Each
Output Cam object is responsible for one output which consists of 32
output bits. Each single output bit can be programmed separately with
an Output Cam profile and compensated for position offset and time
delay.
RSLogix 5000 MAOC/MDOC Instructions
Publication 1394-TD004A-EN-P — January 2008
124
1394 Drive Conversions
Comparing Output CAM Parameters
GML Software Parameter
RSLogix 5000 Software
Parameter MAOC
Type
MAOC (enable) or MDOC (disable)
Axis
Axis
Cam #
Execution Target
Position
Position Reference
Start of Window
Cam Start Position
End of Window
Cam End Position
Actuation Delay
Output Compensation
Tag Explorer
Execution Target
Analog Offset
This GML function block lets the position controller use an external
analog input for a scaled position offset to be added to the
commanded position output. This analog input is secured through
Flex I/O Analog Input modules (catalog numbers 1794-IE8 or
1794-IE4XOE2).
GML Analog Offset Block
The Kinetix 6000 drive cannot accept a direct analog offset into the
position command. You can bring an analog input into the Logix
controller and assign a periodic task to monitor the input and act on
that task, but it is not at a servo rate update. If this function is
important, use the Kinetix 7000 drive, which has an analog input on
the 26-pin IOD connector. You must configure the analog input with
real-time attributes and scaling changes are possible with an MSG
instruction. RSLogix 5000 (version 16 or later) software is required.
Publication 1394-TD004A-EN-P — January 2008
1394 Drive Conversions
125
REC, AEC, TEC, and ALEC Module Conversion
The REC, AEC and TEC converters provide various types of auxiliary
feedback input to the 1394 system module. The ALEC converter
provides encoder input over AxisLink communication to the 1394
GMC system module for axis coordination.
The GML software setup for REC, AEC, and TEC modules is done in
the Axis Setup Options dialog. If the motor being used is the physical
axis (velocity feedback), an incremental encoder, REC, AEC, or TEC is
the position feedback or what is called dual-loop configuration. If
Master Axis or Feedback Only is selected, the incremental encoder
(REC, AEC, or TEC) is the position feedback.
Either way, the feedback from these devices is brought in on the 1394
system module (GMC or GMC Turbo) 12 pin, auxiliary axis
termination.
GML Axis Feedback Setup
REC Converters
The REC device is a Resolver to Encoder Converter (catalog numbers
REC-4096 and REC). Catalog number REC superseded REC-4096.
The REC module converts a single or dual (Master/Vernier) resolver
input signal to an AQuadB quadrature encoder output signal. The
AQuadB quadrature output signal can be directly connected to the
1394 GMC system module. The REC module also has two resolver
input channels.
Publication 1394-TD004A-EN-P — January 2008
126
1394 Drive Conversions
The Kinetix 6000 drive supports transmitter style resolver feedback,
but only with specific performance parameters as found on Bulletin
1326AB-Bxxxx-21, 1326AS-Bxxxx-21, and MPL-BxxxxR (resolver)
motors. Use of 2090-K6CK-D15MF low-profile connector kit is
required to make drive connections from 1326AB/AS motors.
For a smoother migration to Kinetix 6000 drives, move to an absolute
feedback device embedded in standard Rockwell Automation
products such as the MP-Series low-inertia motors (catalog number
MPL-B330P-M, for example) with absolute feedback capability.
IMPORTANT
Due to compatibility issues, do not terminate the REC converted
encoder signal at the auxiliary feedback (AF) connector on the
Kinetix 6000 drive module.
Refer to the REC Resolver-to-Encoder Converter Installation and Setup
Manual, publication 999-126, for more information.
AEC Converters
The AEC device is an Absolute Encoder to Encoder Converter (catalog
numbers AEC-216 and AEC). Catalog number AEC superseded
AEC-216.
The AEC module receives the absolute position data sent by the SSI
transducer and changes it to an incremental quadrature signal for the
1394 GMC system module. The Kinetix 6000 drive modules do not
support SSI type feedback. SSI devices are clock driven devices and
are not compatible with the Kinetix 6000 drive feedback input. You
can, however, utilize an SSI type input to the ControlLogix analog
module (catalog number 1756-M02AS).
For a smoother migration to Kinetix 6000 drives, move to an absolute
feedback device embedded in standard Rockwell Automation
products such as MP-Series low-inertia motors (catalog number
MPL-B330P-M, for example) with absolute feedback capability.
IMPORTANT
Due to compatibility issues, do not terminate the AEC converted
encoder signal at the auxiliary feedback (AF) connector on the
Kinetix 6000 drive module.
Refer to the AEC Absolute Encoder Converter Installation and Setup
Manual, publication 4100-5.2, for more information.
Publication 1394-TD004A-EN-P — January 2008
1394 Drive Conversions
127
TEC Converters
The TEC device is a Transducer (Temposonics linear scale) to Encoder
Converter (catalog number TEC-242).
The TEC-242 module lets you use Temposonics non-contacting
magneto-strictive feedback transducers with the 1394 GMC system
module. This module provides two complete channels of
Temposonics-to-encoder format signal conversion and two complete
channels of voltage-to-current conversion for directly driving
hydraulic servo valves from ±10V output motion controllers.
The Kinetix 6000 drive modules do not support Temposonic
feedback. If the existing system uses a 1394 analog system module
and hydraulic valve control, your conversion should include the
ControlLogix analog servo module (catalog number 1756-HYD02) for
hydraulic valve control and Temposonics feedback. You can terminate
a feedback-only axis or Temposonic feedback on the analog module.
IMPORTANT
Due to compatibility issues, do not terminate the TEC converted
encoder signal at the auxiliary feedback (AF) connector on the
Kinetix 6000 drive module.
Refer to the TEC-242 Transducer to Encoder Converter Installation and
Setup Manual, publication 999-059, for more information.
ALEC Module
The ALEC module is a single-axis AxisLink Encoder Converter which
interfaces a single incremental encoder to the 1394 GMC system
module via AxisLink communication. It provides a master encoder
input for 1394 GMC systems without the need to sacrifice a full servo
axis for use as a master encoder input.
The ALEC module is not compatible with Kinetix 6000 drives or the
Logix platforms. However, Kinetix 6000 drives are governed by
SERCOS interface communication and you can utilize up to 32 axes
per Logix controller.
For example, if a 5V differential line-drive type encoder is connected
to an ALEC module and terminated on the 1394 GMC system module,
you can rewire from the encoder directly to the Kinetix 6000 drive
auxiliary feedback (AF) connector and configure the axis as Feedback
Only. Make sure the master encoder feedback specifications are listed
as compatible in the Kinetix 6000 User Manual, publication
2094-UM001.
Refer to the ALEC AxisLink Encoder Converter Installation and Setup
Manual, publication 4100-5.3, for more information.
Publication 1394-TD004A-EN-P — January 2008
128
1394 Drive Conversions
GML to RSLogix 5000 Software Conversion Example
Because of the sequential nature of the GML block diagram, the
conversion of the program can be done using state logic to program
the ladder logic in the RSLogix 5000 software. State logic lets the
programmer sequentially move through a sequence of ladder logic
rungs by incrementing a value in a variable and then using the value
of that variable to determine which step in the sequence to initiate.
In this example, the GML diagram for a simple cut to length
application is converted to ladder logic using state logic. The value
stored in the variable Cut_To_Length_Sequence_Step is used to
determine which step in the ladder logic to execute.
Typical GML Diagram for Cut to Length Application
Publication 1394-TD004A-EN-P — January 2008
1394 Drive Conversions
129
The first block in the GML diagram is an Input block configured to
wait for a Flex I/O input to turn on indicating that the input has been
pressed.
GML Input Block
In ladder logic the first step of the sequence starts with the
Cut_to_Length_Sequence_Step equal to zero. When the
Cycle_Start_PB is pressed a value of 5 is placed into the sequence step
variable to move to the next step.
RSLogix 5000 Code Example
Use of State Logic and Cycle Start Input
Publication 1394-TD004A-EN-P — January 2008
130
1394 Drive Conversions
The next two blocks in the diagram are Feedback blocks. In this
example the blocks are used to turn feedback on or enable both Axis0
and Axis1.
GML Feedback Block
In ladder logic, when the sequence step variable equals 5, an MSO
instruction is used to enable Axis0. A value of 10 is also moved into
the sequence step variable to move on to the next step, which checks
to make sure that the axis does enable by examining the
Axis0.ServoActionStatus bit. When this bit equals 1, the axis is enabled
and ready for motion commands. When the bit equals 0 the axis is
disabled. Once the axis is enabled, a 15 is placed into the sequence
variable to move on to the next step.
RSLogix 5000 Code Example
Enable Axis_0 and Check Servo Action Status Bit
Publication 1394-TD004A-EN-P — January 2008
1394 Drive Conversions
131
The next step in the sequence is to enable Axis1. The same procedure
is followed for Axis 1 as Axis0. When the sequence variable equals 15
an MSO instruction is executed on Axis 1, the sequence variable is
incriminated to a value of 20, and the Axis1.ServoActionStatus bit is
examined to make sure the axis is enabled. Once enabled, a 25 is
placed into the sequence variable to move to the next step.
RSLogix 5000 Code Example
Enable Axis_1 and Check Servo Action Status Bit
Publication 1394-TD004A-EN-P — January 2008
132
1394 Drive Conversions
The next GML function block in the sequence waits for another
Flex I/O input (Move Feed Axis to Position), to turn on indicating that
the material is in the correct position to begin the cutting process.
GML Input Block Used to Find Out if Product is In Position
The ladder logic duplicates this step when the sequence step counter
is equal to 25 by examining the input Move_Feed_Axis_To_Position
and placing a 30 into the sequence variable when the input turns on.
The address of this input is determined by the physical connection of
the input to the ControlLogix system.
RSLogix 5000 Code Example
Checks Position Input
Publication 1394-TD004A-EN-P — January 2008
1394 Drive Conversions
133
The next two function blocks in the GML diagram redefine the actual
position of Axis0 and Axis1 to be equal to zero.
GML Redefine Position Block
The ladder logic redefines the position of Axis0 and Axis1 to be zero
in the next two rungs using an MRP instruction. In this example, the
DN bit of the motion instruction is used to increment the sequence
variable once the MRP instructions have completed.
RSLogix 5000 Code Example
MRP Instruction for Axis_0 and Axis_1
Publication 1394-TD004A-EN-P — January 2008
134
1394 Drive Conversions
In the GML block diagram, once the two axes are redefined to be at
zero, a jog is started on Axis0 to begin feeding material into the cutter.
GML Jog Axis Block
In ladder logic, once the sequence variable is equal to 40, an MAJ
instruction starts a jog on Axis0. The IP or In Process bit of the motion
instruction is used to verify that the jog has started before a 45 is
placed into the sequence variable to move on to the next step in the
sequence.
RSLogix 5000 Code Example
MAJ Instruction for Axis_0
Publication 1394-TD004A-EN-P — January 2008
1394 Drive Conversions
135
Once the jog has started, the net function block in the GML diagram
arms a watch position on Axis0. The watch block looks for Axis0 to
reach a position of 10 going in the positive direction. With the
Wait-for-Tripped box checked on the Watch Position configuration tab
of the function block, the diagram pauses until the block completes.
GML Watch Control Block
Publication 1394-TD004A-EN-P — January 2008
136
1394 Drive Conversions
RSLogix 5000 software performs this step using the MAW motion
instruction. The instruction is configured to watch for Axis0 to reach a
position of 10, moving in the forward direction, just as the Watch
Position GML function block did. Since the MAW motion instruction
does not have the ability to hold the program scan until Axis0 reaches
the correct position, two rungs are needed to duplicate the operation
of the function block. The first rung arms the watch position and uses
both the IP from the motion instruction as well as the
Axis0.WatchEventArmedStatus status bit, from the axis tag structure, to
make sure that the watch is active before incrementing to the next
rung.
RSLogix 5000 Code Example
MAW Instruction for Axis_0
Once the watch is active, the pause on the GML diagram is duplicated
by monitoring the PC bit from the motion instruction and the
Axis0.WatchEventStatus status bit from the axis tag structure. When
these bits turn on, Axis0 has reached the desired position moving in
the correct direction as configured in the motion instruction. The next
step in the sequence is initiated by moving a 55 into the sequence
step variable.
RSLogix 5000 Code Example
Monitors Event to Complete
Publication 1394-TD004A-EN-P — January 2008
1394 Drive Conversions
137
Upon completing the watch position GML function block the next
step in the sequence is to gear Axis1 to Axis0. In the this example
function block, Axis0 is the master axis and Axis1 is the slave axis.
Axis1 follows the actual position of Axis0 and runs in the same
direction as Axis0. With the Set Ratio parameter set to Real, the gear
ratio is configured for two position units of motion on the slave axis
for every one position unit move on the master.
TIP
Depending on the application, it may be beneficial to use the Ramp to
Master Speed function to let the slave axis smoothly move to the
master axis speed.
GML Gear Axes Block
In RSLogix 5000 software the ladder logic to enable gearing uses the
MAG instruction. The instruction is configured the same as before,
with Axis0 as the master and Axis1 as the slave.
The direction of the slave axis is determined by the value of the
Direction parameter. A value of 1 indicates that the slave axis runs in
the opposite direction as the master. A value of 0 indicates that the
slave runs in the same direction as the master.
The gear ratio units are determined by the Ratio Format parameter. If
Ratio Format is set to Real, then the gear ratio is in position units of
the master and slave axes. The desired number of position units of
motion on the slave for every one position unit of motion on the
master is entered in the Ratio parameter. Values entered into the Slave
Counts and Master Counts parameters are ignored. If the Ratio
parameter is set to Fractional Slave Master Counts, then the gear ratio
units are in feedback counts of the slave and master axis.
Publication 1394-TD004A-EN-P — January 2008
138
1394 Drive Conversions
In this case the actual number of feedback counts of slave motion for
a defined number of master encoder counts is entered in on the Slave
Counts and Master Counts parameters and any value in the Ratio
parameter is ignored. Once gearing is enabled, a 60 is placed into the
sequence step variable to index to the next step.
TIP
For smoother slave axis ramp to master axis speed, use the clutch
function in the MAG instruction.
RSLogix 5000 Code Example
MAG Instruction Used to Gear Axis_1 to Axis_0
Once the gear is active, the next function block in the GML diagram
arms a watch position on Axis0. The watch block waits for Axis0 to
reach a position of 50, going in the positive direction. With the
Wait-for-Tripped box checked on the Watch Position configuration tab
of the function block, the diagram pauses at this block until the block
completes.
Publication 1394-TD004A-EN-P — January 2008
1394 Drive Conversions
139
GML Watch Control Block
RSLogix software performs this step using the MAW motion
instruction. The instruction is configured to watch for Axis0 to reach a
position of 50, moving in the forward direction, just as the Watch
Position function block did. Since the MAW motion instruction does
not have the ability to hold the program scan until Axis0 reaches the
correct position, two rungs are needed to duplicate the operation of
the function block. The first rung arms the watch position and uses
both the IP from the motion instruction as well as the
Axis0.WatchEventArmedStatus status bit from the axis tag structure to
make sure that the watch is active before incrementing to the next
rung.
Publication 1394-TD004A-EN-P — January 2008
140
1394 Drive Conversions
RSLogix 5000 Code Example
MAW Instructions to Watch Axis_0 Position
Once the watch is active, the pause on the GML diagram is duplicated
by monitoring the PC bit from the motion instruction and the
Axis0.WatchEventStatus status bit from the axis tag structure. When
these bits turn on, Axis0 has reached the desired position moving in
the correct direction as configured in the motion instruction. The next
step in the sequence is initiated by moving a 55 into the sequence
step variable.
RSLogix 5000 Code Example
Checks Position Input
Publication 1394-TD004A-EN-P — January 2008
1394 Drive Conversions
141
Upon completing the watch position GML function block, the next
step in the sequence is to disable the gear relationship between Axis1
to Axis 0. This is done using the Disable Gearing function block. This
block is configured to disable the gearing but not stop Axis1, the slave
axis. By checking Continue Jog at last Master Speed, the gearing
between the two axes stops, but Axis1 continues to jog at whatever
the current geared speed of Axis1 is at the time the block is executed.
The motion on Axis0 is unaffected by this instruction.
GML Disable Gearing Block
In RSLogix 5000 software this step is accomplished using the MAJ
instruction with merging enabled. Merging lets the instruction cancel
any other active motion on the selected axis and blend or merge into
a jog. The programmer has the option of selecting a new speed or
continuing at the current speed by selecting either Current or
Programmed in the Merge Speed parameter. If Current is selected,
then any value entered into the Speed parameter is ignored.
RSLogix 5000 Code Example
MAJ Instruction Used to Merge Axis_1 to Current Speed
Publication 1394-TD004A-EN-P — January 2008
142
1394 Drive Conversions
The next two blocks in the GML diagram bring both axes to a
controlled stop using a user configurable deceleration rate. By
checking the Continue Jog at last Master Speed box on the Disable
Gear function block, the Disable Gear function block does not stop
Axis0. If the box is checked, the Disable Gear function block stops
Axis0 at the maximum deceleration rate of the axis.
GML Stop Motion Block
RSLogix 5000 software stops both axes using two MAS instructions
with the Stop Type parameter set to Jog. With the Change Decel
parameter set to Yes, the Decel Rate Parameter and the Decel Units
determine the deceleration rate of the axis.
RSLogix 5000 Code Example
MAS Instruction Used to Stop Jog Function
Publication 1394-TD004A-EN-P — January 2008
1394 Drive Conversions
143
The next block in the GML diagram provides a slight delay before the
next step is executed. The Wait for Timeout box is checked causing
the GML diagram to pause in this block until the timer completes.
GML Set Timer Block
RSLogix 5000 software uses a TON instruction to duplicate this step
and monitors the DN bit of the timer to determine when the timer has
timed out before moving on to the next step in the sequence. All timer
preset values are entered into the instruction using a time base of
milliseconds (ms).
RSLogix 5000 Code Example of TON Instruction
Publication 1394-TD004A-EN-P — January 2008
144
1394 Drive Conversions
Finally, after the two axes have stopped and the timer times-out, the
axes are disabled using two Feedback function blocks configured to
turn the feedback off. The GML diagram also restarts at the beginning
of the diagram by looping from the output connection of the
Feedback Off Axis1 block back to the input connection of the Cycle
Start PB block, and the entire sequence repeats on the next off-to-on
transition of the Cycle Start PB block.
GML Feedback Block
Publication 1394-TD004A-EN-P — January 2008
1394 Drive Conversions
145
RSLogix 5000 software duplicates these steps by using two MSF
instructions. After each instruction, the Axis0.ServoActionStatus and
Axis1.ServoActionStatus bits are examined to make sure that the
feedback for the axis is disabled before moving on to the next step.
For the sequence to loop back and restart on the next off-to-on
transition of the Cycle Start PB, the last rung has a 0 placed in the
Cut_to_Length_Sequence step, which returns the state logic to the first
step in the sequence.
RSLogix 5000 Code Example
MSF Instruction Used to Disable Axis_0 and Axis_1 Servo Loops
Publication 1394-TD004A-EN-P — January 2008
146
1394 Drive Conversions
GML and RSLogix 5000
Software Programming
Reference
GML Function Block
Use this table as a reference to see how the GML function blocks and
RSLogix 5000 motion instructions compare.
Page
Description
80
This function block directly and
immediately affects the appropriate
drive enable output and feedback loop
processing.
RSLogix 5000
Motion Instruction
Description
--->
MSO
The Motion Servo On (MSO) instruction
is used to enable the axis.
--->
MSF
The Motion Servo Off (MSF) instruction
is used to disable the axis.
82
This function block moves the servo axis
to a specified absolute position or
incremental distance.
--->
MAM
The Motion Axis Move (MAM)
instruction initiates a move for a
specified axis.
84
This function block continuously moves a
servo axis in a specified direction at a
specified speed.
--->
MAJ
The Motion Axis Jog (MAJ) instruction
initiates a jog for a specified axis.
87
This function block enables electronic
gearing between two axes at a specified
ratio.
--->
MAG
The Motion Axis Gear (MAG) instruction
provides electronic gearing between two
specified axes in a specified direction at
a specified ratio.
89
This function block clears all axis faults
or a specified fault on a specified axis. It
can also reset the 1394 drive.
--->
MAFR or MASR
The Motion Axis Fault Reset (MAFR)
instruction clears all motion faults for a
specified axis.
The Motion Axis Shutdown Reset
(MASR) instruction can clear, when
corrected, an axis shutdown condition.
90
This function block stops all motion or a
specified type of motion on the selected
axis. It can also be used to Kill Control.
--->
MAS
The Motion Axis Stop (MAS) instruction
initiates a controlled stop of any motion
process on a specified axis.
91
This function block performs the homing
operation and redefines the actual
position of the selected axis.
--->
MAH
The Motion Axis Home (MAH) instruction
is used to home the specified axis.
93
This function block makes on-the-fly
servo axis changes for speed,
accelerations, and decelerations.
--->
MCD
The Motion Change Dynamics (MCD)
instruction is used to change speed,
acceleration rate or deceleration rate of
the move/jog profile in process.
Publication 1394-TD004A-EN-P — January 2008
1394 Drive Conversions
GML Function Block
Page
Description
94
This function block sets the actual or
command position of the selected axis to
the commanded absolute position.
95
The On Axis, Show Axis Status, and If
Axis Fault function blocks program the
drive to proceed/not proceed if an axis is
faulted.
96
The Control Settings, Motion Settings,
and Show Axis Position function blocks
let you program the drive to change or
adjust power-up or working control
values such as maximum axis speed,
acceleration. They are also used to send
axis position, or registration data, for
example, to the HMI terminal.
147
RSLogix 5000
Motion Instruction
Description
--->
MRP
The Motion Redefine Position (MRP)
instruction is used to change the
command or actual position of an axis.
--->
AXIS_SERVO_DRIVE
The AXIS_SERVO_DRIVE tag structure
contains axis attributes that can be used
for program direction.
SSV/GSV
The Set System Value (SSV) instruction
programs the drive to change or adjust
power-up or working control values such
as maximum axis speed and
acceleration.
The Get System Values (GSV) instruction
is used to access specific axis or
program data.
IMPORTANT Use Set System Value
(SSV) instructions sparingly. If many are
needed, stagger them in rungs (with
state logic) and wait for the
AXIS_SERVO_DRIVE configuration
update in process to be off before
executing another SSV instruction.
--->
Publication 1394-TD004A-EN-P — January 2008
148
1394 Drive Conversions
GML Function Block
RSLogix 5000
Motion Instruction
Description
--->
BIT Control
(RSLogix 5000 folder
which contains
various instructions)
BIT control instructions enable program
flow based on program tag status, for
example the AXIS_SERVO_DRIVE servo
action status bit.
100
The Expression and Equation function
blocks, and the EQU instructions let you
program the drive to configure a
mathematical expression or assign a
value, for example, to a variable or cam
profile points.
--->
Compare and
Compute/Math
folder
Instructions in these folders compare
values in the program and direct program
flow. The Compare/Math folder creates
mathematical expressions using program
data for proper program flow.
101
The Timeout and Set Timer function
blocks are countdown timers, used to
pause the GML software program until
the time has elapsed by checking the
Wait for Timeout block.
--->
Time/Counter folder
Instructions in these folders are used to
pause the program until the time has
elapsed.
102
The Change Gain function block in GML
software lets you change the axis gains
at any point in the program without
affecting the power-up values.
--->
SSV
The Set System Value (SSV) instruction
is used to set available axis properties,
for example control loop gains.
103
The Direct Drive Control function block
directly sets the servo output of the
selected physical axis to the commanded
voltage, current, or percent of maximum.
The maximum settings are either 10V or
150 mA.
--->
MDO
The Motion Direct Drive On (MDO)
instruction is used in analog applications
with the 1756-M02AE or 1756-M02AS
modules only.
103
The Native Code function block lets you
write base ICODE instructions in GML
software.
--->
N/A
N/A
Page
Description
98
The Input, Show Input Status, and Output
function blocks let you program the drive
to control program flow with a
dedicated, configured, or miscellaneous
input. They are also used for turning on a
general purpose, SLC, RIO, AxisLink, or
Flex I/O discrete output.
Publication 1394-TD004A-EN-P — January 2008
1394 Drive Conversions
GML Function Block
Page
104
Description
The Call Module function block in GML
software lets you call and execute for an
external module that is a subroutine for
the existing GML program.
--->
The Build Table function block sets up
the cam points based on the master time
versus slave time profile. The Build Table
block can also be setup as a variable
array used in GML software.
--->
149
RSLogix 5000
Motion Instruction
Description
AOI or Program
Control folder
The Add On Instruction (AOI) is used to
create your own subroutine for
instructions. For example, it is possible
to create an AOI routine for fault reset,
enabling, and homing an axis. This
eliminates having to create the ladder
code but it can make troubleshooting the
program a bit more difficult.
The Program Control block can also be
used to jump to another routine.
MCCP
The MCCP instruction calculates the
CAM profile based on master versus
slave profile.
The Configure Cam function block
typically sets up the reference for the
Time Lock Cam function.
--->
The Time Lock Cam function block sets
up a non-linear motion profile for a slave
axis with respect to a time base and then
execute the specific Time Lock Cam in
the required program area.
--->
MATC
The MATC instruction executes master
time versus slave position profile.
107
The Position Lock Cam function block
sets up a non-linear motion profile for a
slave axis with respect to a physical,
encoder only, virtual, or imaginary axis.
--->
MAPC
The MAPC instruction executes master
position versus slave position profile.
111
Use the Interpolate Axes function block
to move a group of two or more servo
axes:
• to a specified absolute position or by
a specified incremental distance.
• along a specified linear, circular, or
helical path.
• at a specified speed.
• at a specified rate of acceleration and
deceleration.
• using a selected motion profile.
--->
MCLM/MCCM
Use the MCLM instruction to start a
single or multi-dimensional linear
coordinated move for the specified axes
within a Cartesian coordinate system.
You can define the new position as
either absolute or incremental.
Use the MCCM instruction to initiate a
two or three dimensional circular
coordinated move for the specified axes
within the Cartesian coordinate system.
New position is defined as either an
absolute or incremental position.
RSLogix 5000 software cannot make
helical interpolation moves.
--->
MAW
The Motion Axis Watch (MAW)
instruction is used to arm motion module
watch position event checking for the
specified axis
--->
MAR
The Motion Arm, Registration (MAR)
instruction is used to arm servo module
registration event checking for the
specified axis
105
115
This function block arms an axis to watch
for either a specific position to be
reached or a registration event to occur.
Publication 1394-TD004A-EN-P — January 2008
150
1394 Drive Conversions
GML Function Block
RSLogix 5000
Motion Instruction
Description
Periodic or
Event-based tasks
You can create a Periodic or Event-based
task from the RSLogix 5000 software
organizer.
--->
MCR
The Master Control Relay (MCR)
instruction is a mandatory hard-wired
relay that can be de-energized by any
series-connected emergency stop
switch. Whenever the MCR is
de-energized, its contacts open to
de-energize all application I/O devices.
--->
Periodic or
Event-based Tasks
There is one continuous task that has the
lowest program priority. You can create a
maximum of 32 periodic or event tasks to
schedule programs with 15 different
priority levels.
--->
MAOC
The Motion Arm Output Cam objects in
the MAOC instruction handle the Motion
Planner Object Cam functionality. Each
Output Cam object is responsible for one
output which consists of 32 output bits.
Each single output bit can be
programmed separately with an Output
Cam profile and compensated for
position offset and time delay.
124
The Analog Offset function block lets the
motion controller use an analog input to
generate a scaled position offset and
add that offset to the command position
of the selected servo axis.
--->
No instruction in
AXIS_SERVO_DRIVE
for the Kinetix 7000
drive.
The Kinetix 7000 drive provides an
analog input to adjust the position loop,
but RSLogix 5000 (version 16 or later)
software is required.
141
The Disable Gearing function block is
used to immediately stop the electronic
gearing motion of the selected axis with
no deceleration.
--->
MAS
The Motion Axis Stop (MAS) instruction
is used to initiate a controlled stop of any
motion process on the designated axis.
Page
Description
121
The On Task and Task Control function
blocks are used in GML software for task
control. You can have up to ten motion
tasks executing at one time and you may,
for example, have tasks waiting for an
event or other block to execute.
122
The End Program and Restart Program
function blocks are used in GML
software to end or start a program at any
point in the program. Restart Program
also lets you begin the program after
some fault routine or determination of an
anomaly in the GML program.
122
The New Module function block is used
to create a subroutine of motion
instructions that are used for program
maintenance or for external use in the
Call Module function at some point in
the program.
123
The Output CAM function block is used
to enable or disable the output cam
function. Up to 48 output cam profiles
can be configured for Flex I/O, RIO
discrete, SLC, or general purpose
outputs. These output cam profiles turn
on or off at specific axis positions.
Publication 1394-TD004A-EN-P — January 2008
--->
1394 Drive Conversions
Additional Resources
151
These documents contain additional information concerning related
Rockwell Automation products.
Resource
Description
Kinetix 6000 Multi-axis Servo Drives User Manual,
publication 2094-UM001
Information for mounting, wiring, setup with RSLogix 5000 software, applying
power, and troubleshooting information with appendices to support firmware
upgrades and common bus applications.
1394 SERCOS interface Multi-axis Motion Control System
Installation Manual, publication 1394-IN002
Information for mounting and wiring the 1394 SERCOS servo drive.
1394 SERCOS interface Multi-axis Motion Control System
Integration Manual, publication 1394-IN024
Information for configuring, troubleshooting, and setup with RSLogix 5000
software for the 1394 SERCOS servo drive
1394 Digital AC Multi-axis Motion Control System User Manual,
publication 1394-5.0
Information for mounting, wiring, setup, applying power, and troubleshooting the
1394 GMC, GMC Turbo, and Analog drive systems.
1394 Digital AC Multi-axis Motion Control System Document Update,
publication 1394-DU005
New or updated information to use in conjunction with the 1394 user manual,
publication 1394-5.0.
Kinetix Motion Control Selection Guide, publication GMC-SG001
A description and specifications for the 2094 family including motors and motor
accessories.
Motion Analyzer CD, publication PST-SG003
Drive and motor sizing with application analysis software.
Fiber-optic Cable Installation and Handling Instructions,
publication 2090-IN010
Information for proper handling, installing, testing, and troubleshooting fiber-optic
cables.
System Design for Control of Electrical Noise Reference Manual,
publication GMC-RM001
EMC Noise Management DVD, publication GMC-SP004
Information, examples, and techniques designed to minimize system failures
caused by electrical noise.
Motion Modules in Logix5000 Control Systems User Manual,
publication LOGIX-UM002
Information for configuring and troubleshooting your ControlLogix and
CompactLogix SERCOS interface modules.
SoftLogix Motion Card Setup and Configuration Manual,
publication 1784-UM003
Information for configuring and troubleshooting your SoftLogix PCI card.
ControlLogix Controllers User Manual, publication 1756-UM001
Information for installing, configuring, programming, and operating a ControlLogix
system.
ControlLogix Motion Module Programming Manual,
publication 1756-RM086
More detailed information on the use of ControlLogix motion features and
application examples.
Logix5000 Controllers Motion Instructions Reference Manual,
publication 1756-RM007
The instructions needed to program a motion application using RSLogix 5000
software.
GML Commander Reference Manual, publication GMLC-5.2
The instructions needed to program a motion application using GML Commander
software.
Rockwell Automation Configuration and Selection Tools,
website http://ab.com/e-tools
Online product selection and system configuration tools, including AutoCAD (DXF)
drawings.
Rockwell Automation Product Certification website,
http://www.ab.com
For declarations of conformity (DoC) currently available from Rockwell
Automation.
National Electrical Code, published by the National Fire Protection
Association of Boston, MA
An article on wire sizes and types for grounding electrical equipment.
Allen-Bradley Industrial Automation Glossary, publication AG-7.1
A glossary of industrial automation terms and abbreviations.
You can view or download publications at
http://literature.rockwellautomation.com. To order paper copies of
technical documentation, contact your local Rockwell Automation
distributor or sales representative.
Publication 1394-TD004A-EN-P — January 2008
Rockwell Automation Support
Rockwell Automation provides technical information on the Web to assist you in using its products. At
http://support.rockwellautomation.com, you can find technical manuals, a knowledge base of FAQs,
technical and application notes, sample code and links to software service packs, and a MySupport feature
that you can customize to make the best use of these tools.
For an additional level of technical phone support for installation, configuration, and troubleshooting, we
offer TechConnect support programs. For more information, contact your local distributor or Rockwell
Automation representative, or visit http://support.rockwellautomation.com.
Installation Assistance
If you experience a problem within the first 24 hours of installation, please review the information that's
contained in this manual. You can also contact a special Customer Support number for initial help in
getting your product up and running.
United States
1.440.646.3434
Monday – Friday, 8 a.m. – 5 p.m. EST
Outside United States
Please contact your local Rockwell Automation representative for any technical support issues.
New Product Satisfaction Return
Rockwell Automation tests all of its products to ensure that they are fully operational when shipped from
the manufacturing facility. However, if your product is not functioning and needs to be returned, follow
these procedures.
United States
Contact your distributor. You must provide a Customer Support case number (see phone number above to
obtain one) to your distributor in order to complete the return process.
Outside United States
Please contact your local Rockwell Automation representative for the return procedure.
Allen-Bradley, CompactLogix, ControlLogix, DriveLogix, Flex I/O, FlexLogix, GML, IMC, IMC S Class, Kinetix, MP-Series, PanelView, PLC-5, SLC, Rockwell Automation,
RSLogix 500, RSLogix 5000, SCANport, SoftLogix, SynchLink, TL-Series, and TechConnect are trademarks of Rockwell Automation, Inc.
Trademarks not belonging to Rockwell Automation are property of their respective companies.
Publication 1394-TD004A-EN-P — January 2008
Copyright © 2008 Rockwell Automation, Inc. All rights reserved. Printed in the U.S.A.