1
iSecurity Installation
Guide
Publish Date: 05/31/2010
Copyright Notice
2
© Copyright Raz-Lee Security Inc. All rights reserved.
This document is provided by Raz-Lee Security for information purposes only.
Raz-Lee Security© is a registered trademark of Raz-Lee Security Inc. Action, System Control, User Management, Assessment, Firewall, FileScope, Screen, Password, Audit, Capture, View, Visualizer, Anti-Virus, AP-Journal © are trademarks of Raz-Lee Security Inc.
Other brand and product names are trademarks or registered trademarks of the respective
holders. Microsoft Windows© is a registered trademark of the Microsoft Corporation.
Adobe Acrobat© is a registered trademark of Adobe Systems Incorporated. Information in
this document is subject to change without any prior notice.
The software described in this document is provided under Raz-Lee’s license agreement.
This document may be used only in accordance with the terms of the license agreement. The
software may be used only with accordance with the license agreement purchased by the
user. No part of this document may be reproduced or retransmitted in any form or by any
means, whether electronically or mechanically, including, but not limited to: photocopying,
recording, or information recording and retrieval systems, without written permission given
by Raz-Lee Security Inc.
Visit our web site at www.razlee.com.
Record your product authorization code here.
Computer Model
Serial Number
Authorization Code
12 Englewood Ave., Nanuet, New York 10954 Tel: 1-888-RAZLEE4, Fax: 1-419-781-5851
About This Manual
2
Who Should
Read This Book
This user guide is intended for all System i system administrators and in particular for
security administrators responsible for the implementation and management of security on
System i systems.
Terminology
This manual attempts to adhere to standard IBM iSeries (System i) terminology and
conventions whenever possible. However, deviations from IBM standards are employed in
certain circumstances in order to enhance clarity or when standard IBM terminology
conflicts with generally accepted industry conventions.
Documentation
Overview
Raz-Lee takes customer satisfaction seriously. Therefore, our products are designed for ease
of use. The documentation package includes a variety of materials to get you up to speed
with this software quickly and effectively.
Printed Materials
This user guide is the only printed documentation necessary for understanding this product.
It is available in user-friendly PDF format and may be displayed or printed using Adobe
Acrobat Reader version 4.0 or higher. Acrobat Reader is included on the product CD-ROM.
This manual contains concise explanations of the various product features as well as stepby-step instructions for using and configuring the product.
Online Help
PC based online help is also available in JavaHelp format. Click the Help button from your
Firewall menubar.
Typography
Conventions
This document is intended to be printed by the end user and viewed online using a variety of
different PC platforms. Accordingly, it was written using standard Windows TrueType fonts
that are installed on virtually all systems. You do not need to install any special fonts in
order to view or print this document.
Body text appears in 10-point Times New Roman.
Menu options, field names, and function key names appear in Arial Bold.
OS/400 commands, system values, data strings, etc. appear in Bold Italic.
Key combinations are separated by a dash, for example: Shift-Tab.
Referrals to chapters or procedures appear in Times New Roman Italic.
Overview
Installing iSecurity Products
Overview
All iSecurity modules are available on CD-ROM from your Raz-Lee distributor. In
addition, you may download all modules directly from the Raz-Lee website at
www.razlee.com.
These installation instructions are applicable for one or any combination of iSecurity
modules, and are relevant for the following versions:
iSecurity Part/Version
Modules Included
iSecurity Part 1 Version 15.0 +
Firewall, Screen, Password
NOTE: The Firewall module can be
installed on OS 4.1 and up.
iSecurity Part 2 Version 11.0 +
Action, Audit, Central Admin.
iSecurity Part 3 Version 3.0 +
View
iSecurity Part 4 Version 7.0 +
AP-Journal
NOTE: The AP-Journal module can be
install from 5.2 .
iSecurity Part 5 Version 5.0 +
Anti-Virus
NOTE: The Anti-Virus module can be
install from 5.2 . Fully functional from 5.3,
due to IBM OS400 restrictions.
In addition, only a security administrator
with auditing privileges should work with
Anti-Virus.
iSecurity Part 6 Version 16.0 +
FileScope
iSecurity Part 7 Version 2.0 +
Capture
iSecurity Part 8 Version 3.0 +
Authority on Demand
NOTE: Depending on the power of the iSeries machine on which iSecurity is
being installed, a new install of iSecurity modules can take between 5 and
15 minutes elapsed time per installed module.
NOTE: Upgrading iSecurity modules can take between 10 - 60 minutes elapsed
time per installed module.
iSecurity Modules Installation Guide
4
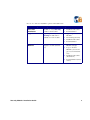
Choose one of the two installation options in the table below:
Installation Option
Description
Steps
First-Time
Installation
Installation of any iSecurity
module for the first time
Installation Procedure
Post-Installation
Upgrade
Upgrading an already-installed
iSecurity module with no
installation of new modules
Upgrading the Native
Modules
Deactivating iSecurity
Installation Procedure
Post-Installation
Upgrading the Native
Modules (Origin)
Copy to Another
Machine (save in Origin; restore in Destination)
Installation Procedure
(Destination)
Post-Installation (Destination)
Copy to Another
Machine
iSecurity Modules Installation Guide
Moving from one machine
(Origin) to another (Destination)
5
First Time Installation
When this is the first time a produc is installaed on this machine, follow one of these installation methods:
1. CD Installation:
Load the CD sent by your Distributor into the Power i and run the installation menu.
Benefit: Local native installation, directly from the Power i.
2. Virtual Device:
Remote execution of the installation menu from a PC, based upon file of type ISO.
Benefit: Native style installation that doesn’t require physically inserting the CD into the
Power i. Can be done from a shared folder as well. Requires PC connection to Power i.
3. PC Installation:
Load the CD sent by your Distributor into a PC, an HTML menu will prompt automatically.
Benefit: Install from any PC without having to insert the CD directly into the Power i.
Allows access to all the documentation. Requires PC connection to Power i.
4. Installation over the web:
Request and download installation files for a specific product(s) from Raz-Lee Security
website.
Benefit: The installation files of the latest version are easily accessible and always available, no need to wait for the CD to arrive. Allows access to all the relevant documentation.
Requires PC connection to Power i.
1. CD
Installation
Native Version
1. Sign on as QSECOFR or another user with Security Officer authority.
2. Load the CD-ROM into the appropriate drive on the iSeries.
3. Enter the LODRUN OPT01 command. Substitute another drive name for OPT01
as appropriate.
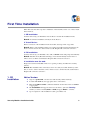
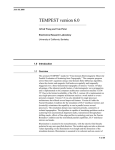
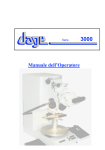
4. The Installation menu appears after a few moments. Select the iSecurity
module you want to install (enter 1 = load) and press Enter to continue.
5. Upon completion of the installation routine, press F3 to exit.
iSecurity Modules Installation Guide
6
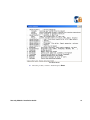
Installation Menu
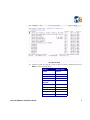
6. Start the program by typing the correct module code in the command line and press
Enter (see the following table).
iSecurity Modules Installation Guide
Module
Module Code
Action
STRACT
Anti-Virus
STRAV
AP-Journal
STRJR
Audit
STRAUD
Authority on
Demand
STRAOD
Capture
STRCPT
FileScope
STRFS
Firewall
STRFW
Password
STRPWD
Screen
STRSCN
7
2. Virtual Device
Module
Module Code
View
STRVIEW
7. To enter the module authorization codes select option 81. System
Configuration > F22 and enter the code in the Authority Code field as needed.
GUI Version
You must install the native iSeries versions prior to installing the GUI versions.
1. Enter the installation CD into your PC.
2. Click on Firewall at the left navigation bar.
3. Click on the GUI installation file and follow any further directions.
2. Virtual
Device
The RLCD is a user-friendly alternate solution for remote execution of LODRUN. The
savefile contains the RLCD program which can be used to execute the same installation
menu without use of LODRUN the CD drive.
1. Restore the RLCD file to QGPL/RLCD
2. Transfer the unzipped RLCD.iso file to your PC (or a shared folder)
3. Upload it via FTP in binary mode to your Power i IFS directory, for example /tmp/
rlcd (create it before by: MKDIR '/tmp/rlcd')
4. In this example the command is: CALL QGPL/RLCD ('/tmp/rlcd/RLCD.iso') The
required parameter is the full iso file name. the installtion menu will appear in a
short time.
Installing from a shared folder
1. When installing from a shared folder, check the PC IP by: Start ->Run -> cmd ->
OK -> ipconfig.
The IP in this example will be 192.168.0.7.
2. On the Power i command line, type:
MD '/QNTC/192.168.0.7'
WRKLNK '/QNTC/192.168.0.7' - This gives you a list of your PC shared folders. SharedDocs will always be there. If RLCD.iso is under your Shared Documents, then the file name will be: /QNTC/1.1.1.151/SharedDocs/RLCD.iso
In this example the command is:
CALL QGPL/RLCD ('/QNTC/1.1.1.151/SharedDocs/RLCD.iso')
iSecurity Modules Installation Guide
8
The installation menu will appear but not shortly, since it has to copy the iso file on the network.
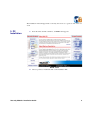
3. PC
Installation
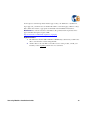
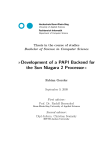
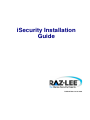
1. Insert the CD to the PC’s CD drive, an HTML menu appears
HTML Menu
2. Select a product to install and click on the installation link.
iSecurity Modules Installation Guide
9
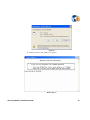
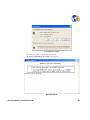
3. PC Installation
Setup.exe
3. Run the Setup.exe. The CMD screen appears.
Run Setup.exe
iSecurity Modules Installation Guide
10
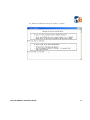
4. Follow the instructions and press any key to continue.
iSecurity Modules Installation Guide
11
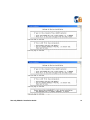
3. PC Installation
5. The modules menu appears
iSecurity Modules Installation Guide
12
Products Menu
6. Select the product you want to install and press Enter.
iSecurity Modules Installation Guide
13
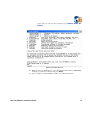
3. PC Installation
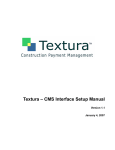
Enter System Parameters
7. Enter the host system IP address, a user name with Security Officer (*SECOFR)
authority, a password for this user and press Enter.
8. Upon completion of the installation routine, close the DOS window.
iSecurity Modules Installation Guide
14
4. Installation
over the Web
“Over the Web” installation is a service offered to our distributors as an additional, faster
way to allow their prospects and customers to install the latest products that appear on our
website. No need to download the modules, simply use what is already on our web.
Create a new user
A new customer should fill in the New User form in URL:
http://www.razlee.com/downloads/create_new_user.php – New User
iSecurity Modules Installation Guide
15
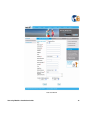
4. Installation over the Web
New User Form
iSecurity Modules Installation Guide
16
NOTE: New customers should be instructed to type a Referral's Name field so the
request will be assigned to you.
NOTE: To receive a Referral Name, please contact [email protected]
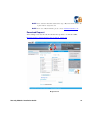
Download Request
After creating a new user, the customer should select products to download at URL:
http://www.razlee.com/downloads/product_download_request.php
Request form
iSecurity Modules Installation Guide
17
4. Installation over the Web
Your request to download products must be approved by your distributor or by Raz-Lee.
Upon approval, you will receive an email with a link to a download page (valid for 7 days)
that contains the software, appropriate documentation and installation instructions.
Distributor: To view the customer’s information, the products he/she requested, and to
approve/decline the request, login to URL:
http://www.razlee.com/distributors/partners_login.php
Important notes:
1. The link in the email is ONLY VALID for SEVEN days; afterwards you will not be
able to download the software using the link.
2. At times there is an extra link for an earlier version of the product, consult your
iSecurity contact regarding which version to download.
iSecurity Modules Installation Guide
18
Customer Download Page
1. Click on a product to download and install, the file download screen appears.
iSecurity Modules Installation Guide
19
4. Installation over the Web
web installation zip file
2. Save the zip file to a local disc and extract it
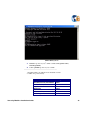
3. Run the SETUP.BAT. The CMD screen appears.
Run SETUP.BAT
iSecurity Modules Installation Guide
20
iSecurity Modules Installation Guide
21
4. Installation over the Web
4. Follow the instructions and press any key to continue. The modules menu appears.
Products Menu
5. Select the product that you want to install and press Enter.
NOTE: The following modules are included in the iSecurity/Part2 - Base: Audit,
Action, System Control, Native Object Security, Replication,
Central Admin, Syslog
NOTE: For Firewall, Screen, Password you must first install the recent iSecurity/Part2 - Base (also known as Audit). The need is for installation only
and no additional licensing is required.
NOTE: For Authority On Demand, in order to use capabilities such as SYSLOG you must first install the recent iSecurity/Part2 - Base (also known as
Audit). The need is for installation only and no additional licensing is
required. To use extended logging capability you may need installation
iSecurity Modules Installation Guide
22
and licensing for other iSecurity modules such as Capture, Audit, APJournal.
Enter System Parameters
6. Enter the host system IP address, a user name with Security Officer (*SECOFR)
authority, a password for this user and press Enter.
7. Upon completion of the installation routine, close the DOS window.
iSecurity Modules Installation Guide
23
Overview
Upgrading the iSecurity Products
Overview
Read the following carefully before attempting any module upgrade.
Before upgrading any iSecurity modules, the iSecurity module must be
deactivated. Only then, the product upgrade can be performed.
In some cases there might be a request for an internal password during installation
(CD installation only).
Upon successful installation, you will need to re-activate the iSecurity modules
installed on the system. Refer to section “Post Installation Procedure”.
Make sure to get an authorization code from your distributor.
Check for object locks on the module:
Module
Object Lock
Firewall, Screen, Password
WRKOBJLCK SMZ8 *LIB
WRKOBJLCK SMZTMPA*LIB
Audit, Action, Central Admin. WRKOBJLCK SMZ4 *LIB
WRKOBJLCK SMZ4DTA *LIB
WRKOBJLCK SMZTMPA *LIB
Capture
WRKOBJLCK SMZC *LIB
WRKOBJLCK SMZCDTA*LIB
Anti-Virus
WRKOBJLCK SMZV *LIB
WRKOBJLCK SMZVDTA *LIB
AP-Journal
WRKOBJLCK SMZJ *LIB
WRKOBJLCK SMZJDTA *LIB
View
WRKOBJLCK SMZ5 *LIB
WRKOBJLCK SMZ5DTA *LIB
Authority on Demand
WRKOBJLCK SMZO *LIB
WRKOBJLCK SMZODTA *LIB
FileScope
WRKOBJLCK SMZ1 *LIB,
WRKOBJLCK SMZ1DTA *LIB
During the upgrade Program Libraries SMZx are created again on every installation. They
are created on the system ASP.
Data Libraries SMZxDTA SMTTMPx are NOT created again.
iSecurity Modules Installation Guide
24
Deactivating
iSecurity
Firewall
1. Enter STRFW into the command line to start Firewall.
2. From the main menu, select option 81 -> 1-General defenitions and check flag
“Enable Super Speed Processing”.
If Enable Super Speed Processing = ‘Y’, set the flag to ‘N’and IPL and
continue this procedure.
If Enable Super Speed Processing = ‘N’, continue with the process of the
following steps.
3. From the main menu select option 1. Activation and Server Setting > 21.
Suspend Activity (before upgrade) from the Activation and Server
Setting menu. After pressing Enter, the system will work for a couple of
minutes, and will display a message saying “Firewall suspended at 01.01.01
10:10:10. Use *RESUME to re-activate”.
4. The Special Instructions screen appears. You will be asked if you want to
restart the FTP and File-Server. If you keep the default “NO” (N), those servers’
protection will be activated after IPL. If you change it to “YES” (Y), those servers
will restart immediately. If the restart is successful, the protection will be activated
on those servers immediately.
5. Press Enter again and F3 to return to the main menu.
6. Firewall is now deactivated; access to the machine is not being controlled.
Screen
1. Enter STRSCN from the command line to start Screen.
2. Select 41. Activation from the Screen main menu. The Activation screen
appears.
3. Select 5. Work With Active Monitor Jobs to check if the subsystem
ZGUARD is active.
4. If active, press F3 and then deactivate product by selecting 2. De-activate
Screen Now from the Activation screen.
Password
NOTE: Skip this procedure if Firewall has already been deactivated.
1. Enter STRPWD from the command line to start Password.
2. Select 1. Activate Password Validation from the Password main menu. The
Modify Server Security screen appears.
3. Type 2 in the Enable validity checking field and press Enter. Leave all other
parameters as is.
iSecurity Modules Installation Guide
25
Deactivating iSecurity
Audit/Action
1. Enter STRAUD from the command line to start Audit.
2. To deactivate both Audit and Action simultaneously, select 2. Activate Real Time Detection > 5. Work With Active Jobs from the Audit main screen to
check if the subsystem ZAUDIT is active.
3. If active, press F3 and then de-activate product by selecting 2. De-activate RealTime Detection from the Activation screen.
Capture
1. Enter STRCPT from the command line to start Capture.
2. Select 11. Activation from the Capture main screen.
3. Select 5. Work With Active Monitor Jobs to check if the subsystem
ZCAPTURE is active.
4. If active, press F3 and then de-activate product by selecting 2. De-activate
Capture Now from the Activation screen.
Anti-Virus
NOTE: Installable from OS 5.2. The required disk space after installation is 40MB
(recommended 60MB).
1. Enter STRAV from the command line to start Anti-Virus.
2. Select 11. IFS Viruses, Worms and Trojans from the Anti-Virus main
screen.
3. Select 1. Activation > 5. Work with Active Jobs to check if the subsystem
ZANTIVIRUS is active.
4. If active, press F3 and then de-activate product by selecting 2. De-activate RealTime Detection from the Activation screen.
AP-Journal
NOTE: Installable from OS 5.2. The required disk space after installation is 40MB
(recommended 60MB).
1. Enter STRJR from the command line to start AP-Journal.
2. Select option 11. Business Analysis and BizAlerts Applications based
on Containers from the main menu
3. Select 1. Collection to Containers > 5. Work with Active Jobs to check if
the subsystem ZJOURNAL is active.
iSecurity Modules Installation Guide
26
4. If active, press F3 and then de-activate product by selecting 2. De-activate RealTime Journal Collection from the Collection to Containers screen.
Authority on Demand
NOTE: Installable from OS 5.2. The required disk space after installation is 40MB
(recommended 60MB).
1. Enter STRAOD from the command line to start Authority on Demand.
2. Select 11. Activation from the Authority on Demand main screen.
3. Select 1. Activation > 5. Work with Active Jobs to check if the subsystem
ZAUTH is active.
4. If active, press F3 and then de-activate product by selecting 2. De-activate
Authority on Demand Now from the Activation screen.
View
NOTE: Installable from OS 4.1. Full functionality, from OS 4.5 (automatic trapping of ADDLIBLE, CHGLIBL, OVRDBF). If you want to use the support to prevent even *ALLOBJ users from accessing the non secured
version of the file – you need OS 5.3 or higher.
1. Select option 72. Remove *LIBL and OVRDBF Detection from View main
menu.
2. Select option 74. Remove Job Initiation Setup
3. Select option 78. Remove Security for *ALLOBJ users
FileScope
No deactivation is necessary.
iSecurity Modules Installation Guide
27
Deactivating iSecurity
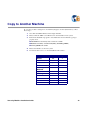
Copy to Another Machine
To copy the product’s setting from one machine (Origin) to another (Destination), follow
these steps:
1. Save ALL the SMZ* libraries in the Origin machine.
2. Restore ALL the SMZ* saved libraries into the Destination new system.
3. Perform the installation program so that Authorities and Command copying is
properly done:
ADDLIBLE for the library that contains the *SAVF
RSTOBJ xxI SMZy *SAVF SAVF(SMZy) RSTLIB(QTEMP)
CALL QTEMP/xxI *SAVF
4. Restore the libraries to the new system
5. To activate after restore, see “Post-Installation Procedures”
Module
xx
y
Action
AU
4
Anti-Virus
AV
J
AP-Journal
JR
5
Audit
AU
4
Authority on
Demand
OD
O
Capture
CA
C
FileScope
FS
1
Firewall
GR
8
Password
GR
8
Screen
GR
8
VIEW
V
View
iSecurity Modules Installation Guide
28
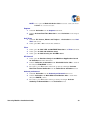
Post-Installation Procedures
After upgrading, reactivate the upgraded module:
Firewall
1. Select 1. Activation and Server Setting from the Firewall main menu.
2. Select option 22. Resume Activity (after upgrade) from the Activation and
Server Setting menu. The system will resume the Firewall settings and activity
for a couple of minutes, and the following message will promped: “Firewall
operation resumed based on setting of 01/01/01 10:10:10.”
3. Select option 1. Work with Servers and press Enter to confirm.
NOTE: After Resume Activity and Server Security make sure all the definitions are at place as preior to the Suspand Activity action.
4. The Special Instructions screen may appears. You will be asked if you want to
restart the FTP and File-Server. If you keep the default “NO” (N), those servers’
protection will be activated after IPL. If you change it to “YES” (Y), those servers
will restart immediately. If the restart is successful, the protection will be activated
on those servers immediately.
5. If the previous screens were confirmed, Firewall is now activated; access to the
machine is being controlled by Firewall
Screen
1. Select 41. Activation from the Screen main menu
2. Select 1. Activate Screen Now from the Activation screen and press Enter.
Password
There is no need to reactivate Password if Firewall has already been reactivated.
1. Select 1. Activate Password Validation from the Password main menu.
2. In the Modify Server Security screen, type 2 in the Enable validity
checking field and press Enter. Leave all other parameters unchanged.
Audit/Action
Activating Audit automatically activates both Action and Capture.
1. Select 2. Activate Real-Time Detection from the Audit main menu.
2. Select 1. Activate Real-Time Detection from the Activation screen and press
Enter.
iSecurity Modules Installation Guide
29
Deactivating iSecurity
NOTE: Select option 5. Work with Active Jobs and ensure all the jobs under
ZAUDIT are activated as before.
Capture
1. Select 11. Activation from the Capture main menu.
2. Select 1. Activate Real-Time Detection from the Activation screen and press
Enter.
Anti-Virus
1. Select 11. IFS Viruses, Worms and Trojans > 1. Activation from the AntiVirus main screen.
2. Select options 41 or 42 to refresh virus definitions.
View
1. Select option 71. Add *LIBL and OVRDBF Detection from View main menu.
2. Select option 73. Add Job Initiation Setup
3. Select option 77. Add Security for *ALLOBJ users
AP-Journal
1. Select option 11. Business Analysis and BizAlerts Applications based
on Containers from the main menu
2. Select 1. Collection to Containers > 5. Work with Active Jobs to check if
the subsystem ZJOURNAL is active.
3. If not active, press F3 and then activate the product by selecting 1. Activate
Real-Time Journal Collection from the Collection to Containers screen.
Authority on Demand
1. Select 11. Activation from the Authority on Demand main screen.
2. Select 1. Activation > 5. Work With Active Monitor Jobs to check if the
subsystem ZAUTH is active.
3. If not active, press F3 and then activate product by selecting 1. Activate
Authority on Demand Now from the Activation screen.
iSecurity Modules Installation Guide
30
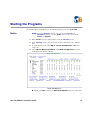
Starting the Programs
For both the native and GUI versions, the default iSecurity password is QSECOFR.
Native
NOTE: Activating Firewall automatically activates both Screen and
Password, whereas activating Audit automatically activates both
Action and Capture.
1. Enter STRSEC into the command line to reach the iSecurity screen.
2. In the iSecurity screen, enter the correct module command into the command
line.
3. To enter authority code, select Opt 81. System Configuration > F22, and
enter code.
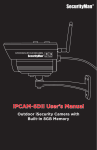
4. Select Opt 82. Maintenance Menu > 11. Work with Operators from the
main menu, and edit user authority.
Work with Operators
Enter 1 in the Opt column in the Work with Operators screen to select users.
iSecurity Modules Installation Guide
31
GUI
From the Modify Operators screen, set authorities by module (1 = *USE, 9 =
*FULL).
If an organization prefers to have all its internal user passwords defaulted to *BLANK, a
data area should be created through this command:
CRTDTAARA SMZTMPC/DFTPWD *CHAR 10
GUI
Go to Start/Programs/iSecurity and enter a code.
iSecurity Modules Installation Guide
32
Uninstalling iSecurity
In the unlikely event that you need to uninstall iSecurity perform the following steps in
order.
The uninstallation procedure removes ALL iSecurity modules. You cannot
uninstall individual modules. DO NOT uninstall iSecurity if you wish to continue to use
these other modules. If you do not wish to use the functionality of an individual module,
simply disable that module according to the instructions in the User Manual for that module.
The remaining modules will continue to function normally.
It is recommended that you back up all product libraries in use (i.e. SMZ4, SMZ8, etc.)
prior to uninstalling the products. Proceed to the following steps.
1. Deactivate all iSecurity products.
2. Choose 82. Maintenance Menu > 91. Uninstall Product from the main
menu.
3. Follow the instructions on the screen. You will be automatically signed off while a
batch job completes the uninstallation process.
4. Wait a few minutes and then sign on as QSECOFR or another user with similar
authority.
5. Enter the command DLTUSRPRF SECURITY1P OWNOBJOPT(*DLT).
6. Enter the following commands:
Product
Uninstallation Command
Firewall, Screen, Password
DLTLIB SMZ8
Audit, Action, Central
Admin.
DLTLIB SMZ4
Capture
DLTLIB SMZC
Anti-Virus
DLTLIB SMZV
AP-Journal
DLTLIB SMZJ
View
DLTLIB SMZ5
Authority on Demand
DLTLIB SMZO
FileScope
DLTLIB SMZ1
iSecurity Modules Installation Guide
33
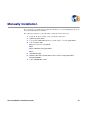
GUI
Manually Installation
If you encounter a problem with executing the installation, you can install/upgrade the product by manually transfer the A2P file.
The following example is for iSecurity Part 1: Firewall, Screen, Password.
1. Unzip the zip file isecurity1_setup_n.n.zip file to PC folder.
2. CRTSAVF QGPL/SMZ8
3. Copy the file GSRISCPF.A2P from your PC folder to save file QGPL/SMZ8
4. in the AS/400 by FTP:
ftp nnn.nnn.nn.nnn (AS/400 IP)
bin
put GSRISCPF.A2P QGPL/SMZ8
quit
5. ADDLIBLE QGPL
6. RSTOBJ OBJ(GRI) SAVLIB(SMZ8) DEV(*SAVF) SAVF(QGPL/SMZ8)
RSTLIB(QTEMP)
7. CALL QTEMP/GRI *SAVF
iSecurity Modules Installation Guide
34
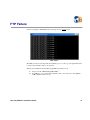
FTP Failure
If after executing the SETUP.BAT, the following message repeats itself:
FTP Failure
The FTP connection is blocked and the installation process cannot go through the Firewall
1
to transfer the installation file to the System i.
Transfer the installation file manually using FTP and in binary mode
2
1. Create save file: CRTSAVF (QGPL/<LIB> )
2. Use FTP protocol to transfer the installation file to the created save file (QGPL/
<LIB>) (PUT in binary mode):
iSecurity Modules Installation Guide
35
GUI
FTP in Binary mode
3
3. RSTOBJ <product object> <LIB> *SAVF SAVF(QGPL/<LIB>)
RSTLIB(QTEMP)
4. CALL QTEMP/<product object> *SAVF
----------------------------------------------------------------1. Installation File: the A2P file in the installation folder
2. <LIB>: the product library
Product
Library
Firewall, Screen, Password
SMZ8
Audit, Action, Central Admin. SMZ4
iSecurity Modules Installation Guide
Capture
SMZC
Anti-Virus
SMZV
AP-Journal
SMZJ
Authority on Demand
SMZO
36
Product
Library
View
SMZ5
FileScope
SMZ1
CodeScope
SMZ6
CpuScope
SMZ3
DiskScope
SMZD
FileScope Tools
SMZ2
MsgScope
SMZM
OptiScope
SMZ9
WideScope
SMZ7
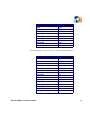
3. <Product Object>: the first two letters of the product installation file + i
Product
Object
Firewall, Screen, Password
GSI
Audit, Action, Central Admin. AUI
iSecurity Modules Installation Guide
Capture
CAI
Anti-Virus
AVI
AP-Journal
JRI
Authority on Demand
ADI
View
VWI
FileScope
FSI
CodeScope
CSI
CpuScope
CPI
DiskScope
DSI
FileScope Tools
TLI
MsgScope
MGI
OptiScope
OSI
WideScope
WSI
37
GUI
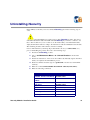
How often should we backup iSecurity files?
All iSecurity libraries start with SM* and in most cases with SMZ*
It is recommended to save all the libraries whose names are four char long or end with SYS
(the program libraries) once after every installation or applying of PTF.
It is also recommended to save all the other libraries once a day.
Backups should be done for the data libraries with SAVACT(*LIB)
In option 81, there is an exit to setup a backup program, that will save portions of data that
are about to be deleted due to the data retention definition.
iSecurity Modules Installation Guide
38
What changes in the system at product installation / use
During
installation
System values QALWOBJRST Allow object restore option (Intermediate change)
During
installation or
use
Firewall
System values QRMTSIGN, QPWDVLDPGM
Network attributesDDMACC, PCSACC
Registration facility entries (see manual)
Screen
System valueQINACTITV
Password
System valuesQPWDEXPITV, QPWDLMTAJC, QPWDLMTCHR, QPWDLMTREP
QPWDMAXLEN, QPWDMINLEN, QPWDPOSDIF, QPWDRQDDGT
QPWDRQDDIF, QPWDVLDPGM, QPWDLMTREP, QMAXSIGN
QMAXSGNACN, QDSPSGNINF, QLMTDEVSSN, QLMTSECOFR
Audit
System valuesQAUDCTL, QAUDLVL, QAUDLVL2
Action
---
iSecurity Modules Installation Guide
39
General
Capture
---
Anti-Virus
System valuesQSCANFSCTL
Registration facilityQIBM_QP0L_SCAN_OPEN, QIBM_QP0L_SCAN_CLOSE
AP-Journal
---
General
Libraries
All product libraries start with SMZ
Subsystems
The product creates and uses subsystems, which start with the character Z.
To enable auto start of some jobs at system start up, some Auto Start Jobs are added.
To enable activation of control function at job entry, some Routing Entries are modified
QGPL
*CMD type objects (very small objects) are copied
RL#QCMD might be added
Scheduled
Entries start with AU@, GS#, GS@ , AV#, JR#
iSecurity Modules Installation Guide
40
Thank you for using iSecurity products.
If you have any questions or problems, please contact:
Email:
[email protected]
[email protected]
Telephone:
Raz-Lee New York
Tel: 1-888-RAZLEE-4
Tel: 1-888-RAZLEE-2
Raz-Lee Israel
Tel: +972-9-9588860
iSecurity Modules Installation Guide
41