1
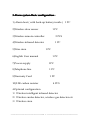
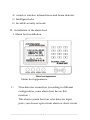
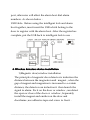
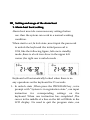
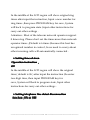
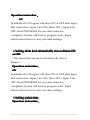
Table of Contents
І. Summary
1. Basic function of the alarm
host ......................................... 2
2. Main technical
specification................................................2
3. Alarm system basic
configuration ............................................3
4. Optional
configuration ....................................................3
П.Structure and installation of the alarm host
1.Installation of the alarm
host ...................................................4
1.1 Cable detector connection ..........................................4
1.2 Telephone line and power cord
connection ........................................5
2.wireless detector installation ..........................................6
Ш、Setting and usage of the alarm host
1. The basic setting of the alarm host ........7
-----------------------------------------------------
1
------------------------------------------------
2. Coding between main host and wireless
detector .................................... 14
3. Coding between main host and intelligent
lock........................................ 14
4 .To arm the alarm host ........................................... 14
5. Trigger to alarm ............................................ 15
6. Alarm center operation..................................................
16
7. Remote control operation..............................................
17
8. System reset ........ ......................................... 17
9. Setting and usage of the wireless
siren .................................. 18
І. Summary
-----------------------------------------------------
2
------------------------------------------------
Thank you for purchasing our alarm system ,in
order to enable you to use this products correctly and
quickly ,please read this manual carefully before to use .
Our alarm system belong to a new generation of
intelligent alarm system ,has made a dramatic
improvement on the basis of the previous alarm system
according to the users’ complaints .Contrast as
follows :
1)The battery of Original infrared detector can only
use 6-12 months ;now the new infrared detector battery
can use for 3 years at the most .
2).When the original detector has low battery ,the
owner do not know initiative; now the new infrared
detector can dial the owner number to inform when there
is a low battery ,and through the voice message to inform
which detector need to change the battery in time .
3).The original infrared detector is signal trigger
alarm; new infrared detector adopts human behavior
identification ,make sure it’s human then
alarm ,effectively reduce the misstatement happens .
4).The original wireless alarm system without timing
arm or disarm function ,New alarm host have added this
function .
-----------------------------------------------------
3
------------------------------------------------
5)The original alarm host only support small wire
siren ;New alarm host support small wire siren ,626 big
siren and wireless siren .
6).Real Time clock ,the system will not lose the time
setting when electricity has off
7)Remote control number identification ,only the
owner can control from remote .
.Detailed basic function of the alarm host
1.Detailed
1.Big LCD screen display ,Can display the
date ,time ,alarm zone , alarm type and other
informations.
2. Keyboard operation ,easy and applicable .
3.Voice prompt function ,arm ,disarm or keyboard
programming has voice prompt.
4.Password operation ,Make sure the system is
safe .
5.Can connect with our company receiving alarm
platform ,achieve networking management .
6.Can presetting 3 groups of alarm phone number
and 2 groups of alarm center number ,3 groups of
long-range control numbers .2 groups of detector
low battery prompt numbers .
-----------------------------------------------------
4
------------------------------------------------
7.Can control the alarm host arm ,disarm ,listen in
by calling the alarm host number .
8) Has voice prompt function when alarming or
operating from long distance .
9).Alarm host has the priority to make alarm phone
calls when the telephone is being using And telephone
line fault detection function .
10)Using the learning code to add wireless
detector ,easy to register .
11)Wireless detector has low power prompt
function .
12)Wire detector support open circuit alarm and
short-circuit alarm .
13)Wire detector malfunction has prompt function .
14)Alarm host has build-in siren and wireless
transmitter module (optional ),also support
external wire or wireless siren (optional )
15)Arm or disarm with alarm tone
16.Anti-tamper function .
17.Auto arm and disarm function .
18.Build in battery ,Automatic switching when
power off .
19.Can query recently 20 PCS history
-----------------------------------------------------
5
------------------------------------------------
2.Technical Parameters :
1)
Power supply :DC9V(300mAh)
2) Backup battery : 7.2V(1.2V x6 ) Ni-MH
rechargeable battery
3) Work current :
Daily duties :《20mA, alarm
communication 《300mA(Build-in siren ,Open
the wireless siren)
4)
Wireless frequency: Receive 315MHz( emission 433
MHz)
5)
Wireless encoding :ASK
6)
Wireless receive sensitivity: -105dBm@12dB SINAD
7) Wireless zone number :95
8)
Wire zone number : 4
9) alarm numbers : 7 group (Include 2 groups of
center number ,3 groups of alarm number , 2
groups of detector low battery prompt numbers )
10) External alarm volume : ≥110dBspl
10) 11) Working temperature : -15℃~ +55℃ Relative
humidity ≤90%
-----------------------------------------------------
6
------------------------------------------------
3.Alarm system Basic configuration :
1) Alarm host ( with back-up battery inside ) 1 PC
2)Wireless door sensor
1 PC
3)Wireless remote controller
2 PCS
4)Wireless infrared detector
1 PC
5)Wire siren
1 PC
6)English User manual
1 PC
7)Power supply
1PC
8)Telephone line
1 PC
9)Warranty Card
1 PC
10)2.2K carbon resister
4 PCS
4.Optional configuration
1)Wireless intelligent infrared detector
2)Wireless smoke detector ,wireless gas detector etc
3)Wireless siren
-----------------------------------------------------
7
------------------------------------------------
4)wired or wireless infrared fence and beam detector
5)Intelligent locks
6)Invisible security network
П.Installation of the alarm host
1. Alarm host installation
Alarm host appearance
1)
Wire detector connection (according to different
configuration ,some alarm host has no this
function )
This alarm system has four wire detector input
ports ,can choose open circuit alarm or short-circuit
-----------------------------------------------------
8
------------------------------------------------
alarm ,wire detector trigger alarm in away arm or
home arm mode ; in disarm state ,when the
detector has malfunction ,the alarm host can’t
enter into arm state ,the screen will flash with
corresponding zone number ,prompt the user must
solve the malfunction first ,then get into arm state .
Wire port order as below :
From right to left :+12V,GND ,Siren ,+ Siren ,Input
1 ,GND ,Input 2 , GND ,Input 3 ,GND ,Input 4 ,GND
Example shown ,A is close state ( open-circuit alarm )
detector connection ,end of line resistor series connection
with signal line ;B is open state (closed circuit / short
-----------------------------------------------------
9
------------------------------------------------
circuit ) detector connection ,end of line resistor parallel
connection with detector output port .
Note : 1. Using wire detector ,must turn the
corresponding switch to ON state ( switch
which is next to the alarm host wire
port ),please do not switch to OFF state
Attention : ON and OFF are not switch
identification ,but the circuit board
identification .
2. The siren output port can connect with the 626 siren
which sell in the market ,but have to pay attention
to the positive and negative lines ,The wireless
siren is optional
3. +12V power output can provide power for wire
detector (need configure with 12/500ma DC )
2)
Telephone line and power connection
There are two telephone line interface on the telephone
host ,the top one is incoming line port ,another one is out
line port ,incoming line port connect with outside
telephone lines ,out line port connect with telephone
Attention : if the telephone connect with the network
MODEM ,then the MODEM must connect with outlet
-----------------------------------------------------
10
------------------------------------------------
port ,otherwise will affect the alarm host dial alarm
numbers .As shown below :
USB Hole:Before using the intelligent lock and alarm
host together ,must insert the USB which belong to the
door to register with the alarm host. After the register has
complete ,put the USB back to intelligent lock to use .
4. Wireless detectors device installation
1)Magnetic door/window installation
The principle of magnetic door detector is induction the
distance between the magnetron and magnet , when the
gap of magnet and magnetron is increased to a certain
distance, the detector can induction it .then launch the
signal to alarm. Fix it on the door or window ,can detect
the open or close of the door or window ,Separately
install the magnet and emitter on the door and
doorframe ,use adhesive tape and screw to fixe it .
-----------------------------------------------------
11
------------------------------------------------
The door detector has low power voice prompt
function ,belong to new generation detectors .
Infrared detector installation
2)
2)Infrared
Passive infrared detector using infrared
wavelengths to sense the temperature change to make
sure the human activities. Detection range from 5 to 8 M,
detection angle is level 110,vertical 60.Fix the infrared on
the wall ,2-2.2 meters away from the ground ,adjust the
angle ,face the area which need to detect .
Attention: Infrared detector has installed
appropriate or not ,directly affect the accuracy of the
alarm .Please inquiry the supply before install ,in order to
avoid misstatement and omission .
The infrared detector using intelligent discriminant
way ,can effectively prevent misstatement ,also has low
power alarm and anti-tamper function ,belong to new
generation detectors.
Wireless remote controller usage
3)Wireless
The remote controller has four buttons:
Away arm button ,Home arm button
button
,Panic button
,Disarm
。
1)Press AWAY ARM button , Alarm host with voice
prompt “away armed “,Execute delay arm, ”away
-----------------------------------------------------
12
------------------------------------------------
indicator light flashing for 30 seconds ,then light
on ,Enter arm state.
2)Press AWAY ARM button + PANIC BUTTON
,
enter into arm state ,away indicator light on.
3)Press HOME ARM button
,Voice prompt “home
armed”, Execute delay arm,“home” indicator
light flash for 30 seconds ,then the light on .enter into
home arm state .
4)Press HOME ARM button
+ PANIC BUTTON
,
Enter inter arm state immediately ,home indicator
light on .
5)When press the PANIC BUTTON
,no matter
what state the alarm host in ,arm or disarm ,the
alarm host will alarm. the alarm indicator light will
on at the same time .
6)Press DISARM button
will disarm the alarm
host ,immediately terminate ongoing alarm
operation .
Attention : In home arm state ,the detector in “home”
mode when registered , will alarm ; in “away” mode
when registered , will not alarm .
In away arm state , no matter in home or away mode
when registered ,the detectors will alarm .
-----------------------------------------------------
13
------------------------------------------------
Setting and usage of the alarm host
Ш、Setting
1. Alarm host basic setting
Alarm host must do some necessary settings before
use .then the system can work in a normal working
condition .
When start to set ,In lock state ,must input the password
to unlock the keyboard .the initial password is
1234 ,like the following figure ,left one is standby
mode ,there is a lock icon show in the upper left
corner ,the right one is unlock mode .
Keyboard will automatically locked when there is no
any operations on the keyboard for 15 seconds.
1、In unlock state ,When press the PROGRAM key ,voice
prompt with “System is in registration state “,can input
instruction for corresponding settings on the
keyboard .When one instruction has completed ,The
cursor in the middle of a line on the left will blink in the
LCD display .No need to quit the program state ,can
-----------------------------------------------------
14
------------------------------------------------
move to next instruction setting .If do not want to save
during setting ,or setting has completed ,Directly press
“BACK ‘ key to quit the setting state .Voice prompt with
“System is quitting registration state “when quit .
Example : when setting telephone number ,LCD
display ,as follow ,upper left corner is serial
Numbers ,telephone number is in the middle .
Detailed instructions and setting as follows :
Attention: All instructions must operate in
(Attention:
programming state )
� Setting alarm center number
(This number will automatically dial when there is an
alarm ,to inform alarm center, if the user didn’t connect
with the networking system platform, please do not set
this number ,otherwise will continuously to call this
number, affect the speed of user to dial the other
numbers .
-----------------------------------------------------
15
------------------------------------------------
Operation instruction :
01#
The upper right number will flashing after input this
instruction , Input 1 # or 2 # ,input telephone
number ,Press PROGRAM key to save after input has
completed .System will back to grogram state .Input other
instructions to carry out other settings .
Description : 1 # or 2 # means the first alarm center
number or the second alarm center number .
� Setting user alarm number
(Alarm host will automatically dial this number to
inform the user when there is an alarm)
Operation instruction :
02#
The upper right number will flashing after input this
instruction , input 1 # ,2 # or 3 # ,then input telephone
numbers ,Press PROGRAM key to save after input has
completed ,System will back to program state ,Input other
instructions to carry out other settings .
Description : 1 # ,2 # or 3 # means the first ,the second and
the third telephone numbers .
� Setting detector low battery prompt numbers
-----------------------------------------------------
16
------------------------------------------------
(In the case when the detectors have low battery ,alarm
host will automatically dial the number to inform the
user )
Operation instruction :
02#
The upper right number will flashing after input this
instruction , input 5 # or 6 # ,then input telephone
numbers ,Press PROGRAM key to save ,the system will
back to program state ,Input other instructions to carry
out other settings .
Description : 5 # or 6 # means the first and the second
detector low battery prompt telephone numbers .
� Setting remote unlock ( remote control ) number
(This number use for when the user is not at home,
remote control this alarm host or unlock the intelligent
lock .the telephone which connect to the alarm host must
has calls display function, Only setted alarm phone
number can control ,other number can’t not control
Operation instruction :
03#
The upper right series number flashing after input this
instruction ,input 1 # 2 # or 3 # ,then input the telephone
-----------------------------------------------------
17
------------------------------------------------
number ,Press PROGRAM key to save after input has
completed ,System will back to program state ,Input other
instruction to carry out other settings
Description : 1 # ,2 # or 3 # mean the first ,the second ,or
the third unlock number .
Telephone remote control functions : 1 for arm, 2 for
disarm, 5 for listen in ,6 for unlcok
� Delete or change of the phone number
numberss .
When need delete or change the alarm center
number ,user phone number and remote control unlock
number ,operation instruction is same like setting
instruction :
As follow :
The numbers will flashing when input the
corresponding instruction ,If the phone number has
already setted ,The number will show in the middle of
the LCD zone ,Press * will delete ,then press PROGRAM
to save ; Then press BACK key to quit .If only need to
change the number ,Then input a new number after
delete or directly input the new number .
� Setting system password
-----------------------------------------------------
18
------------------------------------------------
Operation instruction :
05#
LCD will display original 4 digit password ( default 1234 )
after input the instruction .Re-enter 4 digit
password ,Press the PROGRAM key to save after input
has completed ,System will back to program state ,Input
other instructions can carry out other settings .
� Setting user ID ( Host ID or User ID )
(Alarm host connect with alarm center ,When send
alarm information to alarm center , need identify the user
code ,or host ID ,user ID)
Operation instruction :
07#
LCD will display 4 digit user code ( default 0001 ) after
input the instruction .Re-enter 4 digit code ,press
PROGRAM key for save after input has
completed ,System will back to program state ,Input other
instruction for carry out other setting .
� Setting remote control answering ring times
Operation instruction :
08#
-----------------------------------------------------
19
------------------------------------------------
In the middle of the LCD region will show original ring
times after input the instruction ,Input a new number for
ring times ,then press PROGRAM key for save ,System
will back to program state ,Input other instructions for
carry out other settings .
Attention : Most of the telecom network operator support
8 times ring .Please don’t set the times more than network
operator times ,(Default is 6 times ,Because this host has
recognized number to control ,So no need to worry about
other incoming calls will automatically connected .
� Setting time of siren
Operation instruction :
09#
In the middle of the LCD region will show the original
time ( default is 06 ) after input the instruction ,Re-enter
two digit time ,then input PROGRAM key for
save ,System will back to program state ,Input other
instructions for carry out other settings .
� Setting telephone line detect disconnection
function ,ON or OFF
-----------------------------------------------------
20
------------------------------------------------
( This function on ,when the telephone line is off or line
has failed, the upper left of the LCD will show
Failure ,the siren will make sound at the same time )
Operation instruction :
10#
In the middle of the LCD region will show ON or
OFF after input this instruction .Input 1 for on (show
on ) ,Input 0 for off ,Press PROGRAM key for save after
input has completed ,System will back to program
state ,Input other instructions for carry out other
settings .
� Setting siren ON or OFF when there is a emergency
alarm
(This function can set the siren ON or OFF ,when use the
panic button or remote controller for emergency alarm)
Operation instruction :
11#
In the middle of the LCD region will how ON or OFF
(Default is ON ) after input this instruction ,Input 1 for
ON ( Show ON ) ,Input 0 for OFF , Press PROGRAM key
for save after input has completed ,System will back to
-----------------------------------------------------
21
------------------------------------------------
program state ,Input other instructions for carry out other
settings .
� Setting siren with voice prompt ON or OFF when
use remote controller to arm or disarm .
(This function can set for remote controller to am or
disarm ,the voice prompt ON or OFF )
Operation instruction :
12#
In middle of LCD region will show ON or OFF after input
this instruction ,input 1 for ON ( Show ON ) ,Input 0 for
OFF .Press PROGRAM for save after enter has
completed ,System will back to program state , Input
other instructions for carry out other settings .
Attention : When open the voice prompt ,alarm host
which has build-in or wire connected siren , will have no
voice prompt ,Only wireless siren has voice prompt .
� Setting wireless siren function ON or OFF
(On the premise that the alarm host work with our
factory wireless siren ,Can control the wireless siren ON
or OFF by this setting .
-----------------------------------------------------
22
------------------------------------------------
Operation instruction :
13#
In middle of LCD region will show ON or OFF after input
this instruction ,input 1 for ON ( Show ON ) ,Input 0 for
OFF .Press PROGRAM for save after enter has
completed ,System will back to program state , Input
other instructions for carry out other settings .
� Setting alarm host automatically arm or disarm ON
or OFF
(This alarm host can set to automatically arm or
disarm )
Operation instruction :
14#
In middle of LCD region will show ON or OFF after input
this instruction ,input 1 for ON ( Show ON ) ,Input 0 for
OFF .Press PROGRAM for save after enter has
completed ,System will back to program state , Input
other instructions for carry out other settings .
� Setting system time
Operation instruction :
-----------------------------------------------------
23
------------------------------------------------
15#
After input this instruction ,month will flashing, after
input the month ,date will flashing ,complete the time
setting according to the cursor move order , the seconds
can’t change . Press PROGRAM for save after enter has
completed , System will back to program state , Input
other instructions for carry out other settings .(The alarm
host has build-in lithium battery ,when the alarm
electricity has off ,the system will keep setting history ,no
need reset after re-boot )
� Setting alarm host auto arm time .
Operation instruction :
16#
Time will flash after input this instruction ,In turn
enter the new time ,seconds can’t set , Press PROGRAM
for save after enter has completed ,System will back to
program state , Input other instructions for carry out other
settings .When the auto arm function has open ,When the
time has reached the setting time ,the alarm host will
automatically enter into arm state.
� Setting alarm host auto arm time .
Operation instruction :
-----------------------------------------------------
24
------------------------------------------------
17#
Time will flash after input this instruction ,In turn
enter the new time ,seconds can’t set , Press PROGRAM
for save after enter has completed ,System will back to
program state , Input other instructions for carry out other
settings .When the auto arm function has open ,When the
time has reached the setting time ,the alarm host will
automatically enter into disarm state.
� Unlock test instruction
Operation instruction :
18#
Alarm host will enter into unlock state after input
this instruction, Press BACK key to exit program state .
� Wireless siren code instruction
Operation instruction :
19#
The alarm host will launch the wireless alarm
signal to register after input this instruction .Press BACK
key to exit program state .
� Query History
-----------------------------------------------------
25
------------------------------------------------
Operation instruction :
04#
After input this instruction , can press * or # key to
query latest 20 PCS system records .As shown below :
This alarm content says : Third times alarm ,Zone
35 ,Alarm type is intrude ,Alarm time is at 16:27 :34 PM on
December 28th .
In addition ,arm or disarm operations will also be
recorded ,Arm records has no zone number and alarm
type ,the home arm or away arm indicator lights will be
on at the same time .If away arm indicator lights
on ,means away arm record ;Disarm record has no zone
number and alarm type .the home arm or away arm
indicator light will not on at the same time .
2. The learning code of wireless detector and remote
controller
-----------------------------------------------------
26
------------------------------------------------
In standby mode , by pressing the top of the host coding
key for learning code to wireless remote controller and
wireless detectors .
First time to code : Press the CODE key for 2-3
2、First
seconds ,the alarm host will voice prompt “System is in
registration state “,The zone on the LCD display will
show “ 01 “ ,Can change the zone by press the number
on the panel .Press “HOME ARM “ or AWAY ARM “to
choose alarm type .then trigger the detector to
alarm .The alarm host will voice prompt “Registered
complete “ after receive the signal from the detectors or
remote controllers .Then if press the “BACK “ key or
“CODE “ key ,means exit the code state .If need code
other detectors ,no need to exit ,according to the above
method directly input the zone number ,then choose the
alarm type to learning code ,until the code is
completed ,then press the “BACK “key or “CODE “key
to exit the code state .
Add detectors code : If need add detectors or remote
controllers ,and do not want to delete the exiting detectors
or remote controllers code ,can add code by learning
code .as follows :
First click the CODE key ,then press it again for 2-3
seconds ,the alarm host will voice prompt “System is in
registration state “,Then use the first time code way to
choose zone and alarm type to learning code .
-----------------------------------------------------
27
------------------------------------------------
Clear the code : System need initialization to clear the
code
Attention : In HOME ARM state ,the detector will alarm
when choosed the HOME type to code .In AWAY type
when code ,will not alarm .
In AWAY ARM ,no matter in HOME or AWAY type
when code ,the detectors will alarm .
3. The learning code of intelligent lock and alarm host
(In the premise of work with intelligent lock )
This alarm host can work with our intelligent
lock ,Before use ,need code the host and intelligent
lock .As follows :
Remove the USB key which for receiving from intelligent
lock .Insert the USB hole on the left of the alarm
host ,USB key indicator light will flash quickly ,the
indicator light will on after the code has completed ,take
down the USB key ,then inset back to the intelligent lock .
Attention : this operation no need press the CODE
key ,Only insert the lock USB key to alarm USB hole to
code ,A alarm system can only work with one intelligent
lock .
-----------------------------------------------------
28
------------------------------------------------
4. ARM alarm host ( AWAY ARM and HOME ARM
mode )
Method one :
ARM by host panel
A
AWAY ARM : Input system password ,then press
“AWAY ARM ”,host will voice prompt “AWAY ARM
“,”AWAY “indicator light will flash ,After 30
seconds ,the light will on ,means system has enter into
away arm state
HOME ARM : Input system password ,then press
“HOME ARM” key ,host will voice prompt “HOME
ARM ”,”HOME” indicator light will flash ,After 30
seconds the light will on .means system has enter into
home arm state
Method two :
ARM by wireless remote controller (Please refer to
the former “usage of wireless remote controller )
Method three :
ARM by phone from remote
Using remote control ,the host must has remote control
telephone numbers (remote unlock ) ,totally three
-----------------------------------------------------
29
------------------------------------------------
groups ,The phone must has calls display function at the
same time .
3、
As follows : using presetting remote control mobile
phone or telephone numbers to call the telephone
which connect to the alarm host .when it has reached
the setting ring times ,alarm host will automatically
connect ,Input the password when there is a voice
prompt ask to input password .and end up with “ *
“ key .There is voice prompt when the password is
correct , “Press 1 for arm; Press 2 for disarm ; Press 5
for listen in ; press 6 for unlock ;please press # for
dismiss the alarm ; Hang up to quit “If password is
wrong ,voice prompt with “Password is not correct,
please input again “ .When the Password is
correct ,Enter 1 for arm the host ,enter 2 to disarm the
host .
Attention : In HOME ARM state ,the detector will alarm
when choosed the HOME type to code .In AWAY type
when code ,will not alarm .
In AWAY ARM ,no matter in HOME or AWAY type
when code ,the detectors will alarm .
5 Alarm trigger action
Method one :
-----------------------------------------------------
30
------------------------------------------------
In ARM state ,alarm host will trigger alarm by all kind
of detectors .
Method two :
In any state , belong to emergency alarm detector type
will trigger to alarm (such as smoke detector ,gas
detector ,panic button and so on )
Method three :
In any state , Press the emergency button on the
wireless remote controller will trigger to alarm (already
registered with the alarm host )
Method four :
In any state ,the lock which work with the alarm
host ,has forced to open ,will alarm .Display screen will
show as follow :
Handset icon means it is dialing alarm phone number ,
the digits in the middle means the phone number being
called ,the date in the left corner means alarm type .
-----------------------------------------------------
31
------------------------------------------------
6.. Alarm operation :
1) Alarm call setting
When the alarm host is alarming , it will dial the setting
alarm phone number in order ,when the alarm call has
been connected ,The alarm host will play the voice
prompt ,and inform the alarm type .User can input the
corresponding number to operation .(there is 6 voice
prompt ,but press 6 will not unlock )
Press “1 “ for arm
Press “2 “ for disarm
Press “5 “ for listen in
Press “# “ for hang up , end up this alarm ,means
dismiss this alarm .But the host state will not change .
Do not enter any numbers and directly hang up ,
Alarm host will dial next alarm phone number
Attention : When connected to the alarm host ,If no
any operations for 30 seconds ,the alarm host will hang
up automatically ,and dial the next alarm phone
number .
2)
Disarm by remote controller
Press the disarm button on the remote controller
when dialing the alarm phone number , will
terminate the current alarm operation .
-----------------------------------------------------
32
------------------------------------------------
3)
Disarm by alarm panel .
Input the password to unlock the keyboard ,Then
press the “BACK/DISARM” key , mean disarm .
4) Alarm timeout ,automatically exit .
If the alarm host has dialed all of the alarm phone
numbers for 5 times in a row , still no effective alarm
or disarm ,The alarm host will not dial any alarm
phone number ,exit the alarm and enter the standby
mode .
7.. Remote control (remote unlock) function operation
Using the phone number which has used or setting
for remote control (remote unlock ), to dial the connected
phone ,alarm host will connect automatically ,phone
display screen will show the incoming call number ,the
alarm host will voice prompt to enter the password and
doing corresponding operations ,Users have to enter the
password first ,then end up with * ,enter into function
setting operation after the password is correct .Pressing
the follow keys can do the corresponding operations :
1
ARM;
2
DISARM;
-----------------------------------------------------
33
------------------------------------------------
5
LISEN IN ;
6
REMOTE CONTROL ,After the alarm host has
received the signal ,host will automatically unlock in 1
minute ;
Hang up after operation ,Exit
Attention : Doing the above operations ,If the host voice
prompt “wrong password .please input again “,should
re-enter the password again .
8..System reset :
When need to restore the system to factory
settings ,can use the system reset function ,reset as
follow :
1、 Turn off the alarm host first ,then press the
“PROGRAM” key to start , Release the key when the
host buzzer make “beep”beep”beep” tone for three
times ,Press again ,then the host will voice prompt
“System Initialization complete “,means reset
complete .Special note : Please do not use the system
reset function in no special circumstances .otherwise all
of the parameters will reset to factory setting .
9.. Wireless siren learning code and usage
-----------------------------------------------------
34
------------------------------------------------
1) Learning code between the wireless siren and
alarm host
First , the host in the program state ,please input
19# instruction to launch wireless signal ,
Plug in the wireless siren power supply ,One
“beep “ sound means the wireless siren is ready to
work ,then plug off the power supply ,then plug
in again ,at this time ,siren with no any
sound ,plug off the power supply then plug in
again ,then the wireless siren will make
“beep,beep ,beep “prompt sound ,this mean siren
register complete ,Simple steps as follows :
Power on (beep)---power off then power on (no
beep)---power off then power on (beep ,beep beep)
code successfully ,Every step time interval is 1-2
seconds .
2)
Wireless siren usage
When the siren has registered complete ,power
on ,the siren will make “beep beep “two sound when arm
or disarm the alarm host ,when alarm host alarming ,the
siren will make a continuous sound .
-----------------------------------------------------
35
------------------------------------------------
Thanks for reading our manual ,any questions
please contact our after-sales service .
-----------------------------------------------------
36
------------------------------------------------