1
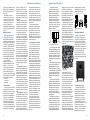
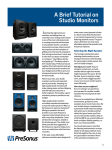
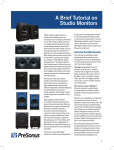
A Brief Tutorial on
Studio Monitors
A Brief Tutorial
on Selecting and
Configuring Studio
Monitors
Selecting the right reference
monitors and setting them up
correctly in your mixing environment
is one of the most critical elements
in creating mixes that will translate
to any speaker system. Just about
anyone who has ever mixed a record
has experienced the frustration of
getting a mix that sounds amazing in
their mixing environment, only to pop
it onto their car stereo and wonder in
confusion “where did the lead guitar
go?” The likely culprit is their studio
setup. PreSonus has put together this
brief tutorial to help you pick out the
best studio monitors for your budget
and set them up in your mixing
environment so that you get the best
results.
1. Selecting the
right monitors
Next to your ears, your studio
monitors are the most important
part of your studio. Investing in a
high-quality studio monitors will
make mixing easier and less fatiguing
and will help you to become a
better engineer. Fortunately, a good
monitoring setup is possible on any
budget.
High-quality studio monitors
accurately reproduce frequencies
across the audio spectrum. Why is a
flat frequency response important?
Mixing on speakers that don’t provide
an accurate frequency response
is like trying to drive a car with a
very dirty windshield. Colors will
have the wrong hue, details in the
landscape won’t be visible, and,
blind spots will be exaggerated. A
flat frequency response helps you to
more accurately hear what has been
recorded.
In the past, many affordable
reference monitors were designed to
make music more pleasant to listen
to, which meant that they boosted
or cut certain frequencies for a more
flattering aesthetic result. The good
news is that there are now many
affordable options that provide a flat
frequency response.
1.1. What speaker is right for you?
The first big consideration when
selecting studio monitors is your
mixing environment. Unfortunately,
for many project-studio owners, this
can’t be easily changed.
• How big is your room? If you’re
mixing in a small room, a studio
monitor with an eight-inch woofer
might overpower the space. On the
flip side, if you’re mixing in a large
room, you’ll want a bigger speaker
so you can run your monitor system
more efficiently.
• How close are your neighbors?
If you’re mixing in an apartment,
you may want to consider smaller
speakers that sound great at lower
volumes; or purchasing two pairs:
one pair for daytime mixing and
reference, and a smaller pair for
after hours. See Section 1.3 for more
information on the benefits of using
multiple pairs of speakers.
Once you’ve evaluated your
listening environment, go listen
to some speakers at your local
music store. Be sure to take along
a comprehensive assortment of
well-mixed recordings with which
you’re familiar and that reflect the
1
A Brief Tutorial on Studio Monitors
type of music you’ll mix on your new
monitor system. Keep in mind that
MP3s can sound brittle and harsh on
higher-fidelity speakers, so don’t use
compressed files.
The most important elements to
listen for are:
• Bass response. Is it tight and
controlled or boomy and poorly
defined? A well-designed studio
monitor will deliver punchy, musical
bass. If you can’t hear the note, just
“feel” it, it’s probably best to move on
to another option.
• Mid-frequency response. This
can be challenging to hear because
the notorious scooped “smiley face”
EQ that’s applied to nearly every
consumer speaker carves out the
mids, so you may not be used to
hearing them. A well-designed studio
monitor will have an even midrange.
This is important because vocals
and most instruments “live” in the
midrange. Make sure you can hear
the attack of the snare drum and that
the vocals and guitars are vibrant and
present.
•
•
•
• High-frequency response. Are
the cymbals and hi-hats crisp and
shimmery? Or do they have a brittle
edge? A well-designed studio monitor
will provide crisp high end without
harshness. You should also be able to
hear reverb tails and the “breath” in
the vocal.
• Stereo image. A well-designed
studio monitor will provide a wide
stereo image. Close your eyes. Can
you hear the pan placement of the
drums? Can you “hear the room” in
which the music was recorded? The
better the stereo imaging is on your
studio monitors, the easier it will be to
separate the components in your mix.
Finally, and most important, your
personal taste will always be the final
determining factor. There is no right
or wrong answer. You may love the top
end on a pair of studio monitors and
mix great records using them, while
someone else finds that same top end
harsh and edgy. Choose the monitors
that work best for your room, the
musical genres you’ll work in, and the
way you mix. Go with what your ears
tell you.
BOOST
harder bass to low
frequency
instruments (kick,
tom, bass)
guitar and snare
fullness
•
piano and horns
warmth
bass line clarity
(especially for softer
playback levels)
•
•
•
•
bass line clarity
and punch
•
•
•
fullness to low
frequency
instruments
(kick, tom, bass)
•
•
50 Hz
100 Hz
•
•
•
decrease bass
“boom” to increase
clarity in the mix
•
vocal fullness
•
hard hitting snare
and guitar
200 Hz
400 Hz
•
increase guitar clarity
lessen guitar “boom”
•
decrease muddiness in
vocals and mid-range
instruments
•
decrease long bass
overtones in cymbals
bass line clarity
and punch
•
800 Hz
1.5 kHz
•
decrease kick and
tom dullness
2
You should familiarize yourself
with a few terms before going studiomonitor shopping. These will help
you to better understand what type of
speaker will best suit your needs.
Driver. The driver is the part of the
speaker that produces sound waves.
The better the quality of the driver,
the better it will reproduce sound
waves and take the wear and tear a
busy mix engineer can dish out.
• High-frequency driver or
“tweeter.” This is the part of the
speaker that is responsible for
high- and upper mid-frequency
reproduction. High-quality drivers
are usually constructed of materials
like titanium, silk, aluminum, and
beryllium.
• Low frequency driver or “woofer.”
This driver produces the low-mid
and low frequencies. Because it is
responsible for producing larger
sound waves, a woofer requires a
higher-power amp than tweeters do.
High-quality low-frequency drivers
are usually made from very tough
vocal presence
kick & tom attack
more finger sound
on bass
•
piano and acoustic
guitar attack
•
brighter rock guitar
•
•
•
•
•
bass “pluck”
acoustic/electric
guitar attack
lower piano register
attack
vocal clarity
3 kHz
decrease dullness
in guitars
•
adds distance to
background
instruments
•
softens a “thin” guitar
decrease guitar
thinness
•
enhance background
vocal breathiness
•
lessen overly
bright guitar
overtones
•
disguise vocals and
guitars that are slightly
out of tune
•
brighten vocals,
acoustic guitar,
piano
•
harder cymbals
kick & tom attack
percussion attack
more finger sound on bass
•
•
sharpness to:
synths, rock guitars,
acoustic guitars, piano
•
reduce vocal dullness
5 kHz
•
CUT
1.2. Speaker basics
7 kHz
10 kHz
•
•
breathier vocals
brighten cymbals,
string instruments,
flutes
more realistic
samples and synths
A Brief Tutorial on Studio Monitors
and stiff materials, like Kevlar or glass
composite. While both materials are
able to withstand the abuse a woofer
High-frequency driver
Low-frequency driver
Acoustic port
takes, a glass-composite speaker
is lighter and more efficient and will
reproduce the same volume with less
power.
Note: In a two-way system, the
high- and low-frequency elements
share the responsibility for midfrequency reproduction. A three-way
system provides a separate driver
that is dedicated to mid-frequency
reproduction. While three-way studio
monitors aren’t as common as twoway systems in the studio monitor
world, they are not unheard of, so it’s
important to mention the difference.
• Coaxial speakers. A coaxial
speaker like the one used in the Sceptre™ S6 and S8 places the high-frequency driver in the center of, and on
the same axis as, the low-frequency
driver, which is similar to the way the
human ear works. Coaxial designs offer a symmetrical response both horizontally and vertically. This means a
wider “sweet spot” that is more consistent throughout the room. Properly
designed coaxial speakers can also
offer a seamless crossover transition because of their symmetrical
response.
15 kHz
vocals: reduce
“s” sound
vocals: reduce
“s” sound
Coaxial design
Because the high- and lowfrequency elements come from the
same point source, coaxial speakers
can offer an ultra-wide sweet spot,
more realistic and reliable transient
reproduction, and an amazing 3D
soundscape. However, to get the
benefits that a coaxial speaker can
theoretically provide, great care must
be taken to ensure that the phaseand time-alignment are accurate.
Copious amounts of DSP, such as
onboard each Sceptre studio monitor,
is required to run the alignment
algorithms and FIR filters needed for
optimal coaxial performance.
• Acoustic Port. Also known as
the Bass Reflex port, an acoustic
port redirect the inward pressure
produced by the movement of the
speakers outward. The backward
motion of the diaphragm pushes
sound waves out of the port and
boosts the overall sound level. Ported
speaker designs are much more
efficient because the power moving
the driver produces two sound waves
instead of one.
• Active vs. Passive. Active studio
monitors have onboard power
amplification that has been designed
to optimally power the drivers. This
takes the guesswork out of choosing
the right speaker/amp combination,
because engineering teams have
ensured an ideal match. Passive
studio monitors do not have an
onboard amp and require external
power. Some studio monitors, like
the Eris™ E4.5, have the power amps
for both speakers in one cabinet. In
general, a higher power rating (in
watts) will result in more headroom
and a stronger, cleaner output.
• Crossover. The crossover
separates the frequencies coming
into a speaker and distributes them
appropriately to the woofer and
tweeter. This helps the speaker run
more efficiently and reproduce the
frequency spectrum more reliably.
• Biamplification. A biamped
studio monitor has two amplifiers
inside: one dedicated to powering
the high-frequency driver and the
other dedicated to powering the
low-frequency driver. By separating
the frequencies before they hit
the amplifiers, a biamped system
removes one of the major sources
of intermodulation distortion. The
resulting sound is more open and
clear and less fatiguing.
1.3. One Pair or Two?
If your budget and your space
allow, it can be beneficial to check
your mixes on a second pair of
reference monitors with a different
“flavor.” When deciding to get two
sets of stereo monitors, choose
speakers that are different enough
from each other to get the result you
desire. For example, if your main
mix speakers are eight-inch coaxial
monitors, like the Sceptre S8, you
may also want to purchase a smaller
pair of traditional two-way monitors
like the Eris E5.
If you add a second or third pair
of monitors to your mixing rig,
you’ll also need to add some sort of
speaker-management system, like
the PreSonus Central Station Plus or
Monitor Station V2. These products
not only allow you to easily compare
your mix on different monitor pairs,
they also provide source switching
so that you can compare your mix to
another mix in the same genre. Some
speaker-management systems, like
those made by PreSonus, are also
designed to become the central
hub for your studio and will provide
extra headphone mixes and talkback
systems, so they’re well worth the
investment.
Central Station PLUS
Monitor Station V2
3
A Brief Tutorial on Studio Monitors
1.4. Subwoofers
Subwoofers have become common
in car and home stereo systems.
Because ultimately your mix is going
to played in someone’s car or through
their desktop computer system, you
should consider verifying the deep
bass content in your mix, especially if
Temblor
T10
the target listener for your mix
is going
want to hear and feel that extended
low end.
Adding a subwoofer to your system
will make the wiring and calibration
of your monitoring system a bit more
complex, but when carefully tuned
to the stereo full-range system, a
subwoofer will naturally extend the
low end without overshadowing
your full-range system. A properly
calibrated 2.1 system can improve
your mixing environment by
offloading much of the bassfrequency reproduction to the sub,
letting the woofers of the full-range
system focus on the low mids.
Power User Tip: Some subwoofers,
like the PreSonus Temblor T10,
let you momentarily bypass the
subwoofer and crossover, allowing
you to compare your mix with or
without the subwoofer engaged. This
is very important, as it lets you ensure
that the bass in your mix will work
equally well on stereo systems.
™
recording and mixing audio, careful
preparation will give you a better
result. Luckily, perfecting your mixing
environment only takes a little knowhow, planning, and time.
Positioning your monitors and
listening position is crucial to creating
an accurate mixing environment. The
first step is to pick the best possible
arrangement for your workstation and
speakers.
This section will take you through
a few best practices. Like all rules,
there are exceptions and variations.
When followed, these should provide
you with a good starting point for your
mixing environment. Once you have
that setup, feel free to make changes
as needed.
Set up your desk so that your
speakers will be away from walls and
corners.
Make sure that your speakers can
be placed away from walls. Eight to
twelve inches will be adequate to
prevent sound waves from hitting
the wall and reflecting back to you
in most environments. This might
not always be possible, and there
are some ways to mitigate cramped
mixing spaces. (We’ll get to those in
a minute; remember, these are just
best practices.)
8 - 12 inches
Minimum distance from walls
Temblor T10
2. Positioning your
full-range monitors
You’ve found the best studio
monitors for your budget and your
application. Now all you have to do it
plug them in, right?
Not exactly. Like everything in
4
An added bonus of putting some
distance between your speakers
and the walls is that it gives you easy
access to the back of your rig, which
is never a bad thing.
Avoid setting up in a corner; this
will help prevent the bass buildups
that naturally occur when two
reflective surfaces meet.
Vertical or horizontal?
Many studio monitors shouldn’t
be placed horizontally, as horizontal
placement can degrade the stereo
image, so it’s important to read the
monitors’ documentation. Some
monitors, like the PreSonus Eris E5
and E8, can be placed horizontally or
vertically. When orienting your studio
monitors horizontally, they should
form a mirror image of each other,
with the tweeters on the outside.
Whether or not the manufacturer
recommends horizontal or vertical
placement, you should always
feel free to experiment. You may
find that you prefer the way a
different orientation sounds in your
space, even if it’s not the one the
manufacturer recommends.
Your speakers should form
an equilateral triangle with your
listening position.
Whenever people talk about
listening to speaker systems, they
talk about the “sweet spot.” This is
the middle position between the two
sides of a stereo system where the
speakers overlap, and it is where
the stereo image will be the best.
Creating the sweet spot is relatively
easy. Simply angle, or “toe-in,” each
speaker so that the tweeters form an
equilateral triangle with your head—
that is, the speakers are the same
distance from each other as they are
from you.
Proper listening position
The high frequency driver should
be the same height as your ears.
High frequency content is much
more directional than low frequency
content. Because of this, you be
able to more accurately hear what is
happening if the high frequencies are
directed at your ear. Once you have
created the sweet spot, sit down and
make sure that your ears are level
with the center of tweeter.
Proper speaker height
Proper horizontal placement
60˚
A Brief Tutorial on Studio Monitors
60˚
provide more reliable low-frequency
intelligibility. In a rectangular room, it
is best to set up along one of the long
walls, especially in a smaller room.
This will minimize problems caused
by side wall reflections.
The speakers should be a different
distance from the back wall than
from the walls on either side.
Just like it’s not a good idea to set
up your mix position in a corner, it’s
not a good idea to create a corner
with your mix position. Make sure the
distance from the speaker to the wall
behind it is different than the distance
from the side wall closest to it. For
example, if your left speaker is six feet
from the wall to its left, it shouldn’t
also be six feet from the wall behind it.
In some cases, especially
with large speakers, placing
12 inches
the speakers vertically results
48 inches
48 inches
in the tweeter being aimed
too far above your ears. One
way to solve this is to simply
invert both monitor speakers
Different wall distances
so that the tweeters are on
the bottom. It may look unusual but it
Use the tools your monitors give
works.
you to overcome problems in your
Situate your mix position
room.
symmetrically.
Ideally, your mix space should
The center of a wall provides a
be large enough to allow you to set
more balanced listening position.
up your listening position well away
Place your speakers so that they are
from walls and corners. But this is
the same distance from the sides of
not always possible, especially if
the room. That is, if your left speaker
your mix environment also doubles
is six feet from the wall to the left and
as a bedroom, den, or family room.
two feet from the wall behind, your
Luckily, some studio monitors,
right speaker should be six feet from
like the PreSonus Eris and Sceptre
the wall to the right and two feet from
models, provide onboard controls to
the wall behind. By centering your
help mitigate this. (You’ll rarely find
mix position, your monitor system will
these features in low-priced monitors,
though.)
When a monitor is placed close
to a wall, or in a corner, the low
frequencies tend to be emphasized
more than if the monitor is far from
any room boundary; this effect is
called “boundary bass boost.” It is
typically most pronounced if the
monitor is in a corner and is less
pronounced (but still present) if the
monitor is near one wall.
Centered mix position
Acoustic Space controls, like
those on PreSonus studio monitors,
cut all frequencies below a specific
frequency by a fixed amount, which
can help with this problem. If you find
that your monitors sound “muddy,” or
if your mixes lack low end everywhere
but your mix environment, try these
controls.
If the monitors are close to the
corners of the room, start by setting
the Acoustic Space switch so that it
provides the most bass attenuation
(-6 dB for Sceptre S6 or S8; -4 dB for
Eris E4.5, E5, or E8). See Figure A.
If the monitors are close to the back
wall, try setting the Acoustic Space
switch to a setting that provides less
attenuation (-3 dB or -1.5 dB for
Sceptre; -2 dB for Eris). See
Figure B.
If the monitors are
positioned as described
earlier, so that they are far
away from any wall, there will
be no bass boost, so set the
switch to 0 dB.See Figure C.
Figure A
Figure B
Figure C
A Brief Tutorial on Studio Monitors
Monitor stands are worth the
investment
Placing your speakers directly
on your desk can limit their ability
to produce clear, balanced audio
because the sound waves coming
from them are bouncing off a hard,
reflective surface (your desktop)
before they reach your ears. Desktop
placement also puts most speakers
below ear level, which is not ideal.
Monitor stands can raise the speakers
closer to ear level and help prevent
early reflections from interfering with
your listening environment.
In addition to traditional monitor
stands, you can buy good desktop
isolation stands that help solve
these problems for tight mix
spaces. Whatever monitor stand
you purchase, be sure to follow the
best practices discussed earlier
when placing them in your mix
environment.
3. Calibrating your
full-range monitors
There are many methods for
calibrating studio monitors. Which
method is best for your studio
depends on the nature of your mix
environment, gear, clientele, and
audio mixes; if you wish to calibrate
your studio monitors using a different
method than the one described
here, we encourage you to do so.
The important thing is not the way
you calibrate your environment but
that your environment has been
calibrated—even if you only use
your ears, common sense, and your
favorite recording.
Nearly every calibration method
has one thing in common: test tones.
There are many different types of
test tones. The one we’ll discuss
here is full-bandwidth pink noise.
With full-bandwidth pink noise,
every frequency band is present at
exactly the same level, so it is ideal for
speaker calibration, room analysis,
and many other types of acoustic
measurements. Full-bandwidth pink
noise samples can be purchased
from your local electronics or
entertainment retailer or downloaded
from a variety of free Web sites.
Some DAW applications, including
PreSonus Studio One, feature a
tone-generator plug-in that offers a
wide range of test tones, including
pink noise. If you are using a DAW
for tracking and mixing, using it as a
After you have properly positioned
your studio monitors and listening
position, it is helpful to set all the
levels in your studio so that you are
optimizing every component. While
not essential, taking the time to
properly calibrate your speakers can
be very helpful in this respect and will
also give you a great starting point to
troubleshoot or fine-tune
your mixing environment.
The main purpose of
speaker calibration is to
ensure that a specific
metered audio level in
Studio One Tone Generator
your DAW or on your mixer
calibration source is ideal.
equals a predetermined SPL in your
When calibrating reference
studio environment. Depending upon
monitors in a studio, the acoustic
the method and reference levels used level or sound pressure level (SPL)
during calibration, proper calibration
should be measured from the mix
can help reduce unwanted noise,
position at seated ear height. There
minimize the risk of damage to your
are an assortment of great SPL
studio monitors and to your ears,
metering apps on the market for
maximize the reference capabilities
smartphones, and many are free! You
of different speaker types, and ensure can also find accurate SPL meters at
you hear the audio as accurately as
your favorite local electronics-supply
possible.
store.
6
The SPL meter should be held at
arm’s length, with the microphone
pointed at the center point between
the left and right speakers (where
your head will be), angled at 45
degrees to ensure an accurate
reading. If your SPL meter is also your
cell phone, make sure your finger or
cell phone case isn’t covering the
mic!
A Brief Tutorial on Studio Monitors
1. Connect the main outputs of
your audio source to your studio
monitors. The left output should be
connected to the speaker on your left.
The right output should be connected
to the speaker on your right.
Note: If you have any outboard
processors (EQs, limiter, etc.)
connected between the audio source
and your monitors, disconnect or
bypass them. If your audio source is a
mixer, make sure that is zeroed out.
your audio device’s user’s manual
or the manufacturer’s Web site for
more information on its levels and
adjustments. You should not hear the
pink noise. If you do, repeat step 2.
100 - 240 VAC 50-60Hz
On
Audio Source
INPUT
Hold SPL meter at arm’s length
MAX
XLR
When two or more monitoring
systems are calibrated using the
same method, each system should
generate the same acoustic level
when given the same input source.
The left and right monitors should be
calibrated independently to ensure
that each speaker is set to the same
level. Level calibration is especially
important when you have two or more
speaker pairs because there should
not be a change in loudness level
when switching between the different
sets of speaker.
3.1. 85 dB SPL
“Standard” Reference
This method relies on
technical data rather than
on subjective listening and is
consequently one of the most
common calibration standards. The
goal of this calibration method is
ensure that when the output meters
in your DAW or mixer register 0 dB,
the SPL in your mix position is 85 dB.
This section will take you through
the basics of “Standard” Reference
calibration. To calibrate your
speakers you will need an SPL meter
and some pink noise. If your monitor
system also includes a subwoofer,
you will find continued calibration
instructions in Section 5.2.
Linear
Linear
Linear
Linear
Linear
-1.5dB
+1dB
60Hz
-1.5dB
+1dB
60Hz
80Hz
-3dB
-1.5dB
80Hz
-1.5dB
-6dB
LEVEL
ACOUSTIC TUNING
Linear
-3dB
MIN
INPUT
ACOUSTIC TUNING
U
-4dB
U
MIN
MAX
-6dB
LEVEL
100Hz
XLR
TRS
ACOUSTIC
SPACE
HF DRIVER
ACOUSTIC
SPACE
HF DRIVER
100Hz
HP FILTER
TM
TM
Near Field Studio Monitor
Near Field Studio Monitor
S8
S8
WARNING: TO REDUCE THE RISK OF FIRE OR ELECTRIC
WARNING: TO REDUCE THE RISK OF FIRE OR ELECTRIC
SHOCK, DO NOT EXPOSE THIS EQUIPMENT TO RAIN OR
MOISTURE. DO NOT REMOVE COVER. NO USER SERVICEABLE
PARTS INSIDE. REFER SERVICING TO QUALIFIED PERSONNEL.
SHOCK, DO NOT EXPOSE THIS EQUIPMENT TO RAIN OR
MOISTURE. DO NOT REMOVE COVER. NO USER SERVICEABLE
PARTS INSIDE. REFER SERVICING TO QUALIFIED PERSONNEL.
AVIS:
AVIS:
RISQUE DE CHOC ELECTRIQUE — NE PAS OUVRIR
DESIGNED AND ENGINEERED IN BATON ROUGE, LA, USA • MANUFACTURED IN CHINA • PATENTS PENDING
“Sceptre” and “CoActual” IS A REGISTERED TRADEMARK OF PRESONUS AUDIO ELECTRONICS
RISQUE DE CHOC ELECTRIQUE — NE PAS OUVRIR
DESIGNED AND ENGINEERED IN BATON ROUGE, LA, USA • MANUFACTURED IN CHINA • PATENTS PENDING
“Sceptre” and “CoActual” IS A REGISTERED TRADEMARK OF PRESONUS AUDIO ELECTRONICS
SERIAL NUMBER
MANUFACTURING DATE
SERIAL NUMBER
-4dB
TRS
HP FILTER
7. Begin slowly increasing the
input sensitivity (volume) of your
left speaker until the acoustic level
of the test tone playing reaches 82
dB SPL. When both speakers play
simultaneously, the overall SPL will
increase by about +3 dB (85 dB).
MANUFACTURING DATE
INPUT
ACOUSTIC TUNING
Linear
Linear
Linear
-1.5dB
+1dB
60Hz
-3dB
-1.5dB
-6dB
-4dB
U
This device complies with Part 15 of the FCC Rules and ICES-003 for Canada. Operation is subjected to the
following two conditions: (1) this device may not cause harmful interference, and (2) this device must
accept any interference received, including interference that may cause undesired operation.
MIN
XLR
100Hz
TRS
ACOUSTIC
SPACE
MIN
80Hz
MAX
LEVEL
U
HF DRIVER
HP FILTER
MAX
LEVEL
POWER
POWER
100-120 V T2AL 60Hz
220-240V T1AL 50Hz
Left Studio Monitor
100-120 V T2AL 60Hz
220-240V T1AL 50Hz
Right Studio Monitor
2. Begin by turning the input
sensitivity of your studio monitors to
the lowest setting.
5. Play 20 Hz to 20 kHz fullbandwidth pink noise at 0 dB through
the outputs of your primary audio
source.
TM
8. Power down your left speaker.
9. Slowly increase the input
sensitivity (volume) of your right
speaker until the acoustic level of the
test tone playing reaches 82 dB SPL.
INPUT
INPUT
ACOUSTIC TUNING
U
Linear
Linear
Linear
-1.5dB
+1dB
60Hz
-3dB
-1.5dB
-6dB
-4dB
U
MIN
MAX
MIN
LEVEL
U
XLR
TRS
ACOUSTIC
SPACE
MIN
MAX
LEVEL
3. Turn the output of your audio
source (audio interface, mixer, or
speaker-management device) to its
lowest setting.
6. Turn up the outputs of your
primary audio source to their unity
gain setting. “Unity gain” is the setting
at which the signal level is neither
boosted nor attenuated. It is usually
marked by a “0” or a “U” on the audio
device’s level fader or knob. In many
digital interfaces and digital devices,
the device’s maximum level is also
its Unity Gain setting. Please consult
LEVEL
U
XLR
100Hz
TRS
ACOUSTIC
SPACE
MIN
80Hz
MAX
HF DRIVER
HP FILTER
MAX
LEVEL
TM
10. Stop the pink noise and turn
your left speaker back on. Play some
program music you are familiar with
through your speakers and sit down
in your mix position. You may need
7
A Brief Tutorial on Studio Monitors
to fine-tune your speaker placement
until the sound is balanced and you
have a nice wide sweet spot from
which to mix.
Note: If 85 dB is too loud for
your room, either because of noise
constraints or because the room is
too small, you can redo the above
calibration steps and dial in each
speaker to 79 dB instead. The
important thing is that both speakers
are set to the same SPL level, not the
level itself.
4. Room acoustics
Well-designed studio monitors
are engineered to reproduce an
input signal with extreme fidelity,
maintaining near-flat frequency and
phase response at all levels up to the
threshold of clipping. However, the
performance of any monitor will be
influenced by the acoustics of the
space in which they operate. Difficult
room acoustics, even with proper
speaker placement, can interfere
with achieving the highest fidelity
your monitoring system can provide.
In most home-studio
environments, the room is not
designed to maximize the listening
experience, so it’s necessary to
recognize and correct what that
space does to the sound in order
to optimize the monitor system’s
performance. In general, the following
physical features of a room can affect
a sound system’s performance:
• Room size
• Construction
• Reflectivity
4.1. Room Problems
• Size. The size of the room directly
impacts how well certain frequencies will be reproduced. For example,
if you measure a room diagonally,
you will discover how well that room
will be able to sustain low frequencies. This may seem odd until you
think about the physical length of
audio waves at various frequencies.
For example, a 50 Hz wave is about
22.6 feet long. (To calculate how long
an audio wave is, divide the speed
8
of sound—1,130 ft./second—by
the frequency. For a 50 Hz wave,
1,130/50 = 22.6 ft.) So a room that
is 45 feet on the diagonal is going to
regenerate low frequencies more effectively than a room that is 15 feet on
the diagonal.
When a room’s width or length
correlates directly to the length of a
waveform at a specific frequency,
a standing wave can occur where
the initial sound and the reflected
sound begin to reinforce each other.
Let’s say we have a long, narrow
room where the distance from one
side to the other is 22.6 feet. When
a 50 Hz wave bounces off the wall,
the reflective wave travels right back
along the same path and bounces
off the other wall, and the cycle
repeats. In a room such as this, 50
Hz reproduces very well—maybe
too well. So when you’re listening to
your mix in that room, it will appear to
have a heavy low end because the low
frequencies are being exaggerated by
the room acoustics. Since you hear
exaggerated lows, you’re likely to
compensate for them, and when the
mix is played elsewhere, it will lack
low end.
• Construction. Low-frequency
waves are powerful enough to cause
the walls, ceiling, and even the floor
to flex and move. This is called “diaphragmatic action,” and it dissipates
energy and strips away the low-end
definition. So if your room’s walls
and floor are made of solid brick and
concrete that don’t vibrate much, the
bass response is going to be much
more powerful than if you’re in a room
where the walls are normal sheet rock
construction and the floors are hardwood.
• Reflectivity. Another way a room
interacts with sound waves is through
reflectivity. Like most room anomalies, reflections can be good and bad.
Consider the effect of a cathedral’s
reflections on a choir or a piano.
This type of reverberation (reverb) is
quite desirable for recording but not
so much for mixing. If a speaker is
placed near a reflective surface (such
as a brick wall or window), the direct
sound coming from the speaker and
the reflected sound coming from the
wall can arrive at the listener’s ears
out of phase with each other, causing
cancellation and/or reinforcement. If
they’re 180 degrees out of phase with
respect to each other, they will cancel
each other out.
If you are setting up your mix
environment in a reverberant space,
position your speakers so that as
much sound as possible is focused
on middle of the room and steered
away from reflective surfaces. You
should also install acoustic treatment
to lessen the impact of reflections at
your listening position.
A Brief Tutorial on Studio Monitors
Acoustic foam is relatively
inexpensive, can be purchased
at your favorite music-equipment
retailer, and comes in different
thicknesses. Generally speaking,
2-inch foam will best reduce
frequencies above 500 Hz; 4-inch
foam can reduce frequencies all
the way down to 250 Hz. Whatever
the thickness, acoustic foam is easy
to attach to the wall using spray
adhesive or tack nails.
4.2. Dealing with Room Problems
Even the best room can use some
acoustic treatment. This can be as
simple as strategically positioning
couches, bookcases, and rugs. In
general, acoustic treatment falls
into two categories: materials that
absorb sound and materials that
diffuse sound. Placing the correct
type of acoustic treatment will reduce
unwanted reflections that can impair
the quality of your listening position.
• Absorption. Materials that absorb
sound will help to reduce reflections.
The best types of absorptive materials are generally dense and porous.
Heavy cloth, acoustic foam, pillows,
and fiberglass insulation are all examples of absorptive materials. This type
of acoustic treatment is best for reducing the mid- and high-frequency
energy bouncing around your room.
An easy trick to figure out whether
and where you need absorption in
your room is to sit down at your mix
position and clap loudly. If you hear
your clap reverberating around
your room, you’ll benefit from
some acoustic absorption. Take
a look around your room and look
for potential culprits that could be
reflecting the sound back at you. The
usual suspects are the walls around
you, including the wall behind your
studio monitors and the ceiling above
your head.
Acoustic foam in frames behind mix position
If you are in a space where you are
worried about damaging your walls,
you can purchase a shadow box at
your local arts and crafts store and
attach the foam to that instead. Once
the foam is attached to the frame,
you can hang it on your wall just like a
picture.
With your high and mid frequencies
tamed, you’ll need to tackle lowfrequency buildup. Uneven bass
response is a notorious problem in
project studios. Bass energy can build
up in corners and other boundary
points and make the bass response
in your mix position muddy and ill
defined.
Low-frequency energy behaves
very differently than high and mid
frequencies. Materials that absorb
high and mid frequencies may not
effectively absorb low-frequency
energy and vice versa. To add to
the problem, bass energy is not
directional, so it can build up pretty
much anywhere.
Bass traps are a special type of
acoustic absorption material that
reduces low-frequency resonance.
Placing bass traps in your room’s
corners and other boundaries (like
where the wall meets the floor or
ceiling) is usually adequate, but
if you’re handy and don’t want to
damage your walls, you can construct
a mobile bass trap by wrapping
layers of carpet and carpet padding
around a large frame or bookcase
and mounting castors on the bottom.
This will allow you to create a
custom mixing environment without
permanently altering your room
• Diffusion. In general, rooms that
are 10 x 10 feet or less will get great
results with some combination of
absorption material. If you are mixing in a larger space, you might want
to add some diffusers to deaden it.
Sound-wave diffusers are designed to
break up standing waves by reflecting
the waves at different angles. These
panels can be mounted to the wall or
ceiling as necessary and can get rid of
“flutter echo.”
putting your library on one or both
walls may eliminate the need for additional acoustic treatment.
Use your books as a diffuser wall
5. Adding a Subwoofer
Whether you add a subwoofer to
your existing monitoring system, or
you purchase a complete 2.1 system,
it’s a good idea to dial in your fullrange system first, especially if you’re
starting from scratch. This will make
it easier to identify and fix problems
before you get too many components
in the mix. Once you have your
full-range monitors placed and
calibrated and your room acoustics
tamed, adding a sub will be an easier
proposition.
Acoustic diffuser panel
With two parallel reflective
surfaces in a room, such as opposing
walls or the floor and ceiling, there is
always the possibility of successive,
repetitive reflections that are equally
spaced in time. Known as “flutter
echoes,” these reflections can
produce a perceived pitch or timbre
that colors what you’re mixing.
This can also reduce intelligibility.
Diffusors can break up flutter echoes
by reflecting the sound waves in
different directions so that the
repetitive reflections are eliminated.
Bookworms have a bit of an advantage with this type of acoustic
treatment, as bookcases filled with
books provide multiple absorbent,
different-shaped objects that break
up standing waves and flutter echoes.
So if the problem is two parallel walls,
Temblor T8
5.1. Subwoofer Placement
The goal of proper subwoofer
placement is to set up your system
so that your subwoofer acts as a
natural extension of your full-range
monitors without boosting the
overall bass response of your room
or exaggerating any one frequency
or frequency range. Because low
frequencies are not directional—that
is, humans cannot perceive the
direction from which low frequencies
are coming— you aren’t limited to
placing it facing the mix position.
9
A Brief Tutorial on Studio Monitors
A quick way to find the best
location for your subwoofer is to
temporarily place it in the mix
position and play some program
material that contains a lot of bass.
Move around the half of the room
where your full-range monitors are
positioned until you find the spot
where the bass sounds best. Again,
it’s important to remember that low
frequencies are not directional, so
placing the subwoofer beside you will
not be an issue. However, try to keep
your subwoofer on the same plane as
your full-range monitors. This will help
to minimize phase issues.
In general, you will want to avoid
placing your subwoofer too near
to reflective surfaces, like a wall or
in a corner, as this will exaggerate
the bass energy and make your
monitor system sound “boomy.” But
every room is different, and some
subwoofers perform just fine near a
wall, so use your ears rather than your
eyes.
Once you find the place in the
room where the bass sounds the
smoothest, place your subwoofer in
that spot, return to the mix position,
and listen again. You may need
to adjust the location; just keep
making small adjustment (a foot or
so at a time) until the bass response
sounds as even as possible. Don’t
locate your subwoofer where it will
exaggerate frequencies, as this will
have the opposite effect on your mix.
For example, if your system has a
bump around 100 Hz, what you hear
will not accurately reflect what is in
your mixes, so that massive kickdrum punch you hear in your mix
environment won’t be there when you
listen in your car.
5.2. Calibrating your
subwoofer level
Just as it is important to make
sure your full-range monitors are
calibrated to the same level, you
must ensure that your subwoofer
is calibrated to match the fullrange speakers. There is no need
10
to recalibrate your studio monitors
if you followed the 85 dB standard
reference described earlier. If you are
connecting your full-range system to
the outputs of your sub, rather than to
the outputs of your audio source, you
should recalibrate your full monitor
system.
1. Turn your subwoofer input level
to its lowest setting and power down
your full range monitors.
5.3. Setting the
crossover transition
0
GND
5. If your subwoofer has a variable
lowpass filter, set the filter to its
highest frequency. This will create an
overlap between your subwoofer’s
and your full-range system’s
frequency responses.
0
GND
0
2. Play 20 Hz to 20 kHz, fullbandwidth pink noise at 0 dB through
the outputs of your primary audio
source.
3. Turn up the outputs of your
primary audio source to their Unity
Gain setting.
A Brief Tutorial on Studio Monitors
GND
6. Turn your full-range monitors
back on, play program music
with a lot of bass in it through
your new 2.1 system, and
experiment with the polarity
switch on your subwoofer to see
which position provides the best bass
response at your mix position. Leave
the polarity switch in the position that
provided the loudest bass response.
This means that your subwoofer is in
phase with your full-range system.
Many full-range
monitors (like the
Eris and Sceptre
series) provide a
highpass filter for
bass management.
These highpass
filters are usually
not fully variable but
often a few different
frequency-cutoff
options will be available.
Some subwoofers (like the Temblor
T8 and T10) also provide a highpass
filter on the outputs for this purpose.
Depending on the system, leaving
frequency content below 60 to 120
Hz in your full-range monitors can
introduce destructive cancellation
and reinforcement with the highest
frequencies that are reproduced by
your subwoofer. Using a highpass
filter on your full-range monitors
will remove these frequencies and
help you to create a more seamless
crossover transition with your
subwoofer.
If your subwoofer, like the Temblor
series, provides a variable lowpass
filter, your job is made a little easier in
that you have more control over the
crossover point.
The first rule of thumb when dialing
in the crossover transition in your
2.1 system is to listen. Depending
on the frequency range of your fullrange monitors and your subwoofer,
you may not have to do much. For
example, if the lowest frequency
your full-range monitors can reliably
reproduce is between 70 and 80 Hz,
you may not have to do anything but
plug in your subwoofer. If, however,
your full-range monitors are accurate
below 60 Hz, you will most likely need
to use the following instructions to
configure your crossover network.
If your subwoofer provides a
variable lowpass filter:
1. Set the highpass filter for your
full-range monitors using either their
onboard controls or the highpass
filter on your subwoofer.
2. Set the lowpass filter on your
subwoofer to the same frequency. For
example, if you are engaging an 80
Hz highpass filter on your full range
monitors, set the variable lowpass
filter on your subwoofer to 80 Hz.
From this point you can
experiment with the lowpass filter
setting that provides the smoothest
crossover transition while listening
to your favorite music. Again, your
subwoofer should naturally extend
the low-frequency response of your
monitor system. You should not hear
any frequency boosts or cuts.
Once your system is properly
calibrated, listen to a wide variety of
your favorite music and mixes and
make any final adjustments. At the
end of the day, your ears are the best
tools you have in the studio.
0
4. Begin slowly increasing the
input sensitivity of your subwoofer
until the acoustic level of the test
tone reaches 79 dB SPL. Again, take
your SPL measurement holding your
meter at arm’s length at a 45-degree
downward angle, where your head
will be.
Note: If you set each full-range
model to a lower level than 82 dB,
you will want to do the same with
your subwoofer. For example, if you
set each full-range monitor to 79 dB,
reduce your subwoofer by -3 dB as
well (to 76 dB).
11
5" Kevlar
45W / 35W
4.5" Kevlar
LF Driver
2-way
© 2014 PreSonus Audio Electronics, All Rights Reserved.
AudioBox, CoActual, Eris, PreSonus, Sceptre, StudioLive, and
Temblor are trademarks or registered trademarks of PreSonus
Audio Electronics, Inc. Studio One is a registered trademark of
PreSonus Software Ltd.
2-way
1- Stereo ⅛"
2- Balanced ¼" TRS
2- Unbalanced RCA
⅛" Headphone out
Vinyl Laminated MDF
9.45" (241 mm)
x 6.42" (163 mm)
x 7.09" 180 mm)
6.5 lbs. (2.95 kg) ea
Inputs
Outputs
Cabinet
Dimensions (HxWxD)
Weight
105 dB
• Volume
• MF Control
• HF Control
• Low Cut
• Acoustic Space
102 dB
• Volume
• MF Control
• HF Control
• Low Cut
• Acoustic Space
100 dB
• Volume
• MF Control
• HF Control
• Low Cut
• Acoustic Space
Peak SPL
User Controls
53 Hz – 22 kHz
70 Hz – 20 kHz
10.2 lbs. (4.63 kg)
10.24" (260 mm)
x 7" (178 mm)
x 7.68" (195 mm)
Vinyl Laminated MDF
N/A
1- Balanced XLR
1- Balanced ¼" TRS
1- Unbalanced RCA
75W / 65W
22.2 lbs. (10.07 kg)
15.12" (384 mm)
x 9.84" (250 mm)
x 11.77" (299 mm)
Vinyl Laminated MDF
N/A
1- Balanced XLR
1- Balanced ¼" TRS
1- Unbalanced RCA
35 Hz – 22 kHz
2.2 kHz
Frequency Response
3 kHz
25W per speaker
2.8 kHz
Amplifier (LF /HF)
8" Kevlar
1" silk dome
™
Eris E8
Crossover Frequency
1" silk dome
2-way
1" silk dome
Type
™
Eris E5
HF Driver
™
Eris E4.5
2-way coaxial
2-way coaxial
18.8 lbs. (8.53 kg)
13.2" (335 mm)
x 9" (230 mm)
x 12.2" (310 mm)
Vinyl Laminated MDF
N/A
1- Balanced XLR
1- Balanced ¼" TRS
24.25 lbs. (11 kg)
15.75" (400 mm)
x 11.4" (290 mm)
x 13.3" (338 mm)
Vinyl Laminated MDF
N/A
1- Balanced XLR
1- Balanced ¼" TRS
116 dB
• Volume
• HF Control
• Low Cut
• Acoustic Space
109 dB
38 Hz – 23 kHz
2.4 kHz
90W/ 90W
8" glassreinforced paper
1" diaphragm
compression
™
Sceptre S8
• Volume
• HF Control
• Low Cut
• Acoustic Space
42 Hz – 23 kHz
2.2 kHz
90W / 90W
6.25" glassreinforced paper
1" diaphragm
compression
™
Sceptre S6
subwoofer
21.2 lbs. (9.6 kg)
11" (280 mm)
x 10.2" (260 mm)
x 12.6" (320 mm)
Vinyl Laminated MDF
2- Balanced ¼" TRS
(full range with 80 Hz
HPF option)
2- Unbalanced RCA
(full range with 80 Hz
HPF option)
2- Balanced ¼" TRS
2- Unbalanced RCA
• Volume
• Polarity
• Low Pass Filter
• High Pass FIlter
109 dB
30 Hz – 130 Hz
200W
8” glass composite
N/A
™
Temblor T8
subwoofer
39.46 lbs. (17.9 kg)
15.75" (400 mm)
x 12.6" (320 mm)
x 15.75" (400 mm)
Vinyl Laminated MDF
2- Balanced XLR
(full range with 80 Hz
HPF option)
2- Balanced ¼" TRS
(full range with 80 Hz
HPF option)
1- Balanced XLR
(Sub Out)
2- Balanced XLR
2- Balanced ¼" TRS
2- Unbalanced RCA
• Volume
• Polarity
• Low Pass Filter
• Ground Lift
• High Pass FIlter
• Footswitch Bypass
113 dB
20 Hz – 130 Hz
N/A
250W
10" glass composite
N/A
™
Temblor T10
6. Reference
Baton Rouge • USA • www.presonus.com


![ShowMan User Manual [PDF Format]](http://vs1.manualzilla.com/store/data/005637930_1-31cd6ced5af6c2a7a337ddd38fc92d65-150x150.png)