1
RAWTHERAPEE 3.0
User's Manual
INTRODUCTION
Welcome!
Welcome to RawTherapee 3.0, the powerful 32/64-bit open source raw converter for Windows,
MacOS and Linux! The RawTherapee project has been started in 2004 by the Hungarian
programmer Gábor Horváth. In January 2010 Gábor decided to open his source code under the
GNU General Public License, with the result that quite some talented developers from all over the
world joined the project. Based on the hard work of all of them, we're proud to present
RawTherapee 3.0! We hope you'll like it.
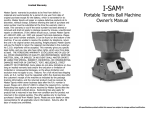
RawTherapee 3.0 - main screen
First run
The first time you start RawTherapee 3.0, you'll see quite some empty space on your screen. This is
because you first have to tell RawTherapee where your raw photos are stored. Use the file browser
on the left part of the screen to navigate to your photo directory containing these raws and doubleclick on it. Now RawTherapee will generate thumbnails of your photos in the central window. The
first time you do this, this can take some time, especially when your directory contains hundreds of
shots. The second time that you navigate to this directory, the thumbs will show up much faster, as
they are stored in a local cache on your hard disk. Use the zoom icons on top of the file browser to
make the thumbnails smaller or bigger.
RawTherapee 3.0 Users Manual - page 2/33
Processing your first raw
Now let's get to work! Put your mouse on a thumbnail and right-click on it. You'll see quite some
options, forget about those for the moment and choose Open. By default a new tab appears showing
your photo. In fact every time you open a raw, it will be displayed in a new tab.
Single tab mode
But because not everybody likes this behavior, RawTherapee can also be used in single tab mode,
where the thumbnails are shown in a film strip on top of the screen and where every raw opens in
the same tab. To activate this mode, click on the Preferences icon left under on the main window
and choose 'Single tab mode' under 'Workflow'. Use this Preferences window as well to select from
29 languages for the user interface or to choose another theme, with smaller or bigger fonts for
example.
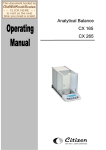
RawTherapee 3.0 - single tab mode
RawTherapee 3.0 - multiple tab mode
The screen
Take a moment to explore the screen (assuming it was opened in a new tab). In the middle is your
photo, on the right are the histogram and the toolbox, on the left is a navigator and under that the
history window. While editing all your actions (edits) are 'recorded' in this history window. By
clicking on the different entries, you can step back and forth through your work. Also note that just
under the histogram there's an entry called Postprocessing Profiles. This is an important concept in
RawTherapee. Every time you open a raw file in RawTherapee, a profile is applied. A profile is a
set of instructions regarding which demosaic algorithm to use to read in the raw data, whether a
sharpness filter has to be applied, if Auto exposure is on or off, etc. These profiles are simple text
files and it's easy to make your own. For clarity reasons: these profiles have nothing to do with
camera profiles or color profiles. Standard behavior is that RawTherapee opens raw files with the
Default profile, but you can change that if needed.
Save
The first thing one needs to know is how to process (or convert) a raw file and save it somewhere.
So play a little bit with the last three sliders in the Exposure section under the Exposure tab
(Brightness, Contrast and Saturation). When satisfied, you have several ways to save the file. First,
click on the little hard disk icon left under of the image window (it shows 'Save current image
Ctrl+S' when you hover the mouse over it). This works as a 'Save as' dialog, meaning you can select
the name and location for the output file, choose between jpg, tif or png (8-bit or 16-bit for the last
two), set compression ratio, etc. The last option in the Save dialog gives the choice between 'Save
RawTherapee 3.0 Users Manual - page 3/33
immediately' and 'Put in processing queue'. Use the proposed output name or give it a new name.
RawTherapee adds the extension automatically based on the chosen output format. Choose jpg,
quality 95, click 'Save immediately' and click OK. After a couple of seconds you'll find the resulting
file with the jpg extension in the directory you specified. Use an external image browser to check
the result. Although you can use RawTherapee for that, a specialized image browser will likely be
faster and handier. Don't forget that RawTherapee is designed as a raw converter, not as an image
browser!
Close
To close RawTherapee, click on the little close icon on top of the screen. It depends on your
window manager if this icon is located on the right or the left of your screen and if it's colored or
just shows a 'x'. There's no 'official' exit button.
Naming
If your original raw file was called DSC_1000.RAW, the processed file name will be DSC_1000.jpg
(or tif or png). There's an option in the Save window: 'Automatically add a suffix if the file already
exists'. When checked, you can make different versions of one raw, that will be saved as
DSC_1000.jpg, DSC_1000-1.jpg, DSC_1000-2.jpg, etc. The same applies when you send different
versions of the same raw to the Batch queue (see under). By the way, your original raw will never
be altered by RawTherapee.
PP3 files
If you have saved the above output file next to your raw, you might notice that there's a third file
called DSC_1000.jpg.pp3. This is a little text file that describes exactly what edits you made to your
photo. Just open it in an editor to see how it looks like. Whenever you re-open that raw in
RawTherapee, this file will be read and all the settings from the last session will be restored (the
profile displayed under Postprocessing Profiles will change to 'Last saved'). So you'll never have to
wonder what the sharpening settings were for a certain photo that you edited two weeks ago,
because everything is recorded in this pp3 profile. (To be more precise: nearly everything, as
ranking information is not stored in this file). By default this information is also saved to a cache on
your hard disk (here the ranking info is available indeed). In Preferences, tab Image processing, you
can disable the generating of these pp3 files. But why would you? These pp3's represent all the
work you did on a photo and everybody knows that this can be time-consuming. So keep your
work! You might even want to backup these files, together with the processed photos. In case that
you want to start a new edit session from scratch, simply select the default or neutral profile again.
8-bit and 16-bit
Note on output formats. Most if not all modern raw-capable cameras use 12- or 14-bit depth to
record the sensor data. This means that choosing an 8-bit output format, one looses some
information. Practically this is not a problem when the output file is the definitive one that will not
be processed anymore. If you plan to post-process that file, it is better to save it in a non-destructive
16-bit format. File sizes will be larger though.
Batch queue
The other way to save your work - and that most people likely will prefer - is to send your file to the
Batch Queue, also known as the Processing Queue. First have a look at the Batch Queue tab on top
RawTherapee 3.0 Users Manual - page 4/33
of the window (so click on it). There are a couple of things to note here. On the left you see
Start/Stop processing and Auto start. If Auto start is enabled (checked), every time a raw is sent to
the queue, processing will start immediately. Sometimes you won't want this, for example when you
use CPU-intensive edit tools; in that case RawTherapee may slow down when you try to edit
another raw file while processing the first one. Or you may want to edit a couple or lots of raws and
send them all together to the queue while you get another coffee. If Auto start is unchecked, you'll
have to activate the queue manually by clicking the Start processing button. Pause or cancel by
pressing Stop processing. Delete the content of the processing queue by right-clicking a thumbnail,
choose Select all, then Cancel job.
In the top middle of the Batch Queue tab you select the location for the converted files. You can
choose a 'hard' location by selecting Save to folder and navigate to the desired output folder. But
most users may choose 'Use template'. Put your mouse in the text field and you'll see some
examples of these templates popping up. To save a processed file next to the original raw file, use
the '%p1/%f' template (%p1 stands for current path, %f stands for current filename; the output file
will have current filename plus jpg extension when saved to jpg).
On the right side you can select the output format and quality/compression settings. Every raw sent
to this queue will use the settings specified here.
Now go back to the File Browser tab, open a raw, edit it and when done, click on the 'gear button'
that sits next to the hard disk button we used above (it says 'Add current image to processing queue,
Ctrl+Q' when hovering over). Now your raw will be placed in the batch queue and the Batch Queue
tab on top of the screen will show a [1], indicating that there's one file in the queue waiting to be
processed. Depending on if Auto start is checked or not, it will be processed immediately or later. If
Auto start is unchecked, you can even exit the program and restart it later: the batch queue will still
be there. The batch queue can even survive a occasional crash of RawTherapee, as the batch queue
info is written to disk in the background.
Send to editor
You can use the third icon left under (the little fox head) to process your raw in RawTherapee and
send it afterwards to an image editor like Gimp or Photoshop for further processing. Note that
RawTherapee produces 16-bit temporarily output files here, that Gimp is unable to handle. Gimp
will down-sample them to 8-bit ones. Specify in Preferences, tab General, to which editor
RawTherapee must send its files.
One more remark about the Batch queue. In the File Browser window with all the thumbnails, you'll
see the named gear button as well on the thumbnails. Some people make the thumbnails bigger by
clicking on the zoom button and edit them directly via the tools on the right side. When done, click
on that gear button and the file is sent to the batch queue as well. Although usable, it's of course
impossible to inspect fine details this way.
Another remark. In the File Browser you can select all the thumbnails by clicking Ctrl+A, then
right-click and say Put to processing queue. All the raws will be processed with the Default profile
and the output settings from the processing queue, unless otherwise instructed. You can also select a
serie of thumbnails, either by holding the control key and select them one by one with the mouse, or
- when you want to select dsc_1000.raw to dsc_1010.raw - by clicking on the first one, then hold
the Shift key while clicking on the last one.
In the next section we'll cover RawTherapee's toolbox.
RawTherapee 3.0 Users Manual - page 5/33
THE TOOLBOX
What are all those sliders in the toolbox on the right side for and what do they do exactly, you may
ask yourself? Well, they can do a lot, perhaps even more than you ever may want to! If you're new
to RawTherapee or new to raw processing in general, don't feel overwhelmed, as there's no need to
touch all those sliders to get decent results. In this section you'll find a brief description of what all
those tools are for, tab after tab.
General comment about some widgets
Panels
A panel is a foldable element and is also frequently called a 'Tool', or 'Section'. Right-clicking over
a panel's title opens it and close all other panels of the same tab. You'll learn to love this shortcut
when you'll consider the time you'll spend on folding sections manually...
Sliders
Each slider has three values in memory :
1. the current value, when you move the slider to any position
2. the 'default' value, the one that the programmer has set as default. It can be called back by
clicking on the 'Reset' button
3. the 'initial' value, which is the value of the profile used when the image was loaded in the
editor. It can be called back by Control-clicking on the 'Reset' button.
Warning: when using the mouse scroll wheel over a tab to scroll its content, you'll rapidly see a very
annoying behavior: when a slider (or combobox button) comes under the cursor while scrolling the
tab content, the slider get the focus automatically and the scroll wheel changes the slider's value!
Curve editors
Each curve editor has a button to select its type. It's a so-called 'Toggle' button, i.e. it will stay
pressed or stay released after each click on it. Toggling on/off the curve's button will respectively
display/hide its associated editor. This is very handy and saves a lot of space when handling groups
of curves (e.g. see the Lab curve editor).
The preview area
The preview is designed to show you the more realistic result possible but it still has to deal with
the result/performance balance. That's why some tools will only be computed and previewed at the
1:1 scale only. That's the case for e.g. the Sharpen tool: it doesn't really make sense to show such
fine details when your have a zoomed preview image.
RawTherapee 3.0 Users Manual - page 6/33
Exposure tab
Exposure panel
Auto Levels
Open a raw photo and be sure the
postprocessing profile under the histogram
shows 'default'. If not, click on that
dropdown box and choose default. As you
can see, the Auto Levels button seems to be
clicked on already and Exp. Comp.
(exposure compensation) will most likely
have a value other than zero. It is our default
profile that instructed RawTherapee to
activate these auto-levels. If you don't want
this, click on the two-arrow icon on the right
of the exposure compensation slider (it says
'Reset to default' when hovering the mouse
over) and the value will most likely get
lower but probably not zero.
This means that even without auto exposure,
RawTherapee still applies some correction
when opening a raw. If you want all the values in the Exposure section of the Exposure tab to be
zero, then you must choose the neutral profile in the dropdown menu. More experienced users
will use the neutral profile more often as a starting point, for starters or occasional users the
default profile is recommended.
Clip
Auto levels uses the clip value to adjust the exposure. This number defines the amount of
highlight pixels that may be clipped at the white point and the amount of shadow pixels that may
be clipped at the black point. Default value is 0,0010, maximum value is 0,9999. Higher values
increase the contrast.
Exposure Compensation
The values of the exposure compensation slider are ISO values. This means a value of +1.00
equals one stop of overexposure (+1 EV, exposure value; also known as +1 LV, light value)). If
you make two photos, one without correction (so EV = 0) and one underexposed by one stop
(EV = -1), you can get exact the same output in RawTherapee by setting exposure compensation
for the second photo to +1.00. Also take a look at the histogram while moving this slider.
Moving it to the right shifts the whole histogram to the right. This means this slider changes the
black point (on the very left of the histogram) and the white point (on the very right). This effect
is best seen by watching the Luminance channel only, so click on the R, G and B icons next to
the histogram to hide these.
Highlight recovery amount
The Highlight recovery amount slider (HR amount) can be used to compress the highlights in a
RawTherapee 3.0 Users Manual - page 7/33
photo, useful for 'dimming' (or burning) slightly overexposed areas. To see if your photo contains
overexposed areas, click on the white triangle icon on the top right of the image window.
Overexposed areas will show as black spots. (In case you exposed right, just add 1 EV to the
Exposure compensation slider in order to see how Highlight recovery works). By dragging the
HR amount slider to the right, the intensity of the highlights will decrease and the number of
black spots indicating overexposure, will decrease accordingly. A value of 100 is the maximum
compression here. Note that the HR amount slider only works when Exposure compensation is
greater than zero.
Highlight recovery threshold
The Highlight recovery threshold slider sets the point where the HR Amount slider starts
implementing compression. A value of 0 means the threshold is zero: data compression occurs
over the whole range of tonalities. 100 sets the threshold at one stop below the white point, so all
the compressed highlights are squeezed into the top stop. In practical terms, more highlights are
recovered when this slider is set to 0.
Note: as we'll see later, RawTherapee offers more ways to deal with blown highlights. Side-effect of
all these methods is that they also take away some of the brilliance of the photos, as they get more
'flat' or 'dull' as a result. So while occasionally very useful, one should not expect miracles here. To
create the best possible output, feed RawTherapee with the best possible input to start with - so
expose well on forehand!
Black
Next is the Black slider, use this to set the black point. See the left side of the histogram move
when you touch the slider. Values greater than 0 will make the image darker, negative values will
lighten up the shadow parts of the photo.
Shadow recovery
The Shadow recovery slider 'dampens' the effect of the Black slider, the maximum value of 100
gives a less dark image. This slider has only effect when the Black slider is set to another value
than 0. Practical use of the Shadow recovery slider is to fine-tune the shadow intensity of the
image.
Brightness
This slider applies a fixed tone curve to lift or lower the tonalities of the photo, resulting in a
more or less bright image. The same tone curve is applied separately to each R, G and B channel.
The black point and the white point keep their position.
Contrast
This slider increases or reduces the contrast of the photo. Technical explanation: it applies a
contrast curve centered at the average luminance level. Tonalities above the average are lifted
(lowered), while tonalities below the average are lowered (lifted). The same contrast curve is
applied separately to each R, G and B channel.
Saturation
This slider makes the photo less or more saturated. In more technical terms: it adjusts the
RawTherapee 3.0 Users Manual - page 8/33
saturation of the image by applying a multiplier to the Saturation level of pixels in HSV color
space. Set this slider to -100 to create a black and white image.
Note: the above three curves are also available under LAB Adjustments, which can be found at the
bottom of the Exposure tab. Although they do about the same, they give different results. More on
these differences in the LAB section below.
Tone Curve
Here you can construct your own tone curve. It works on all three R, G and B channels at the same
time (so you can't work on the R channel only). Three curve types are available, click on the 'v' icon
on the right to choose which one you want to use, and the editor will open itself.
Linear curve
Represents the unaltered (or linear) image, so without any tone curve applied.
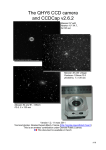
Custom curve
This is a classic type of curve, seen in many other
programs as well. The left part of the graph
represents the darker tones, the right part
represents the brighter tones of the photo. Click on
the curve to mark a point and drag it with the
mouse to change tonalities. Press and hold the
Control key to slow down the movement. Hold the
Shift key to snap the point to key elements
(displayed in red). Dragging the point down
makes the image darker, while pushing it up
makes it brighter. The dotted line you see now as
well, marks the linear or unaltered state of the
photo. Delete a point on the curve by dragging it
out of the editor area.
The upper right point represents the brightest
areas in the photo. Drag that point down, Custom curve
vertically, to make the highlights a bit less bright;
move it to the left, horizontally, to make bright areas more bright, perhaps at the cost of some
overexposure.
The point left under represents the darkest areas in the photo. Move it to the right, horizontally,
to make the photo darker, perhaps at the cost of some underexposure. Move it up, vertically, to
make the darks lighter.
Change the orientation of the line from left under and right up to left up and right under to
produce a negative image.
S-curve
A typical usage of the custom curve is to construct a so-called S-curve. Mark three points at the
'coordinates' (1,1), (2,2) and (3,3) respectively. Drag the point at (1,1) somewhat lower and the
point at (3,3) a bit higher. Your image will get more 'punch' this way. If you like the effect, you
can save the curve for later use. Click on the hard disk icon next to the graph and give it a name.
RawTherapee 3.0 Users Manual - page 9/33
Use the Open icon to apply this curve later to another opened raw file. Use the 'Reset curve to
linear' button to delete all the points you created and to reset the curve to neutral/linear. You can
use as many control point as you like.
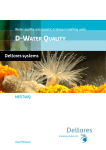
Parametric curve
This curve presents four sliders and three control
points. The sliders are used to control highlights, lights,
darks and shadows respectively (shadows mean deep
darks here). Move the mouse over the four sliders and
a dark area under the curve tells you which slider alters
what part of the curve. Move the highlight slider to the
left to make highlights less bright, move it to the right
to make them more bright. The lights slider moves the
lights but not the highlights in the same way as above.
As does the darks slider: moving it to the right lightens
the dark tones, moving it to the left darkens them. The
shadows slider works as the darks slider, but only on
the darkest parts of the photo. You can again construct
the above mentioned stylized S-curve, although the
parametric curve gives you less 'extreme' control over
the form of the curve. Don't think on forehand this is a
bad idea though! Note that using these sliders can have
a profound influence on the overall contrast of the
image.
Parametric curve
Use, if needed, the three control points under the curve.
They determine what point of the curve will be affected when moving the sliders. Moving the
middle control point to the right makes the image darker (the form of the curve changes again, as
does the dark area around the curve), moving it to the left makes the image brighter. Moving the
left control point to the right darkens the dark areas somewhat, moving it to the left lightens
them, again somewhat. Moving the right control point to the right makes the highlights brighter,
moving it to the left darkens the highlights.
Use the Reset to default buttons next to the sliders to reset individual sliders, use the same button
at the top of the tone curve section to reset all four sliders and the control points to linear (zero).
You cannot save a specific parametric curve.
Control cage
At first sight this curve type looks very much like the
custom curve, but there are some differences though. With
the custom curve, the curve touches all the control points.
This is not the case with the control cage curve. To see
this, click somewhere on the line and move the black point
1 cm (0.5 inch) to the left or the right. Now the curve
passes nearby the black point, but doesn't touch it.
Another difference is that control cage allows for a
straight section of the curve, while you can't do this with
the custom curve. The cage curve needs at least three
points for that (so five in total). Holding down the Shift
Control cage
RawTherapee 3.0 Users Manual - page 10/33
key while dragging a point will help you to easily create a straight line by snapping the point to
the line made by the previous and next point (displayed in red by the 'snap to' tool).
Now make a new point between the two most left ones and move it. As you can see, only the part
on the left side moves, not the rest of the curve. Delete a point on the curve by dragging it out of
the editor area.
You can use all three curve types if you like, but only the one that is selected in the dropdown menu
will be applied to the photo.
Highlight Reconstruction
Use this tool to try to restore blown-out
highlights. It attempts to restore clipped (blownout) channels in the raw data using nearby data
from unclipped channels, if present. Three
different methods are available :
Luminance Recovery
When selecting 'Luminance Recovery', recovered details - if any - will be gray.
Color Propagation
Color Propagation tries to restore the color information as well. Sometimes the last option
'guesses' the wrong colors, resulting in pink or magenta highlights.
CIELab
CIELab reduces the luminance channel and tries to restore colors afterwards. Note that 'Color
Propagation' needs a lot of calculations and is therefore slower.
Shadows/Highlights
Use this tool to independently influence the
highlights and the shadows of the image (yes,
another one!). Take care with the High quality
option, as this one is quite cpu-intensive.
Highlights
The Highlights slider makes the brightests parts
of the image less bright without touching the
darker tones. To make the effect stronger, use
higher values. A slider value of 100 will turn the
whites in light gray.
Tonal Width for Highlights
This slider controls the strength of the
Highlights slider. Higher values give a stronger
effect. A value of 100, combined with
RawTherapee 3.0 Users Manual - page 11/33
Highlights 100, turns the whites into middle gray (you probably won't want that...).
Shadows
This slider lifts the shadows and applies an effect that is sometimes called 'fill-light' (or 'fillflash') in other software. Higher values lighten the shadow areas more.
Tonal width for Shadows
Controls the strength of the Shadows slider. A maximum value of 100 gives strongest 'lift
shadows' effect.
Local Contrast
Local Contrast is adaptive contrast adjustment depending on contrast within a specified area. It
increases contrast in small areas while keeping the global contrast (which could be set with the
contrast sliders in Exposure or Lab). The resulting image will look more 'three-dimensional'.
This feature is very useful when you have a foggy image or took your picture through a window.
The effect can be very subtle. In fact it is the same as an unsharp mask with high radius and
small value. For optimal results the slider should be between 5 and 20.
Radius
The higher the Radius value, the stronger the effect of Local Contrast. Radius influences the
highlights and shadows as well: a higher value makes the whites more white and undoes the
effect of the Highlights slider to a certain extent. Same story when you only try to adapt the
shadows.
If you are bored, set the first four sliders to 100 and play with Local contrast to transform your
favorite raw processor into a cheap effect machine!
Lab Adjustments
Here we see again three sliders for brightness, contrast
and saturation. The difference with the earlier mentioned
sliders with the same name in the Exposure section is
that here the curves are applied in Lab color space, while
above they were applied to the RGB color model.
Simple explanation of the differences: LAB is made to
approximate human vision, while RGB is used to
describe the colors that were captured by the photo
sensor in your camera or that are displayed on your
monitor, etc. (see Wikipedia to learn more about this
complex topic).
Brightness
When using the Brightness slider in the Lab section, a
tone curve is applied to the L-channel (the L stands
for lightness) of the Lab color space. As with the
brightness slider in the Exposure section above, the black point and the white point do not move.
RawTherapee 3.0 Users Manual - page 12/33
Contrast
The contrast slider in Lab increases or decreases the contrast of the photo, again applied to the Lchannel. In developer's terms: this slider applies a contrast curve centered at the average
luminance level. Tonalities above the average are lifted (lowered), while tonalities below the
average are lowered (lifted).
Saturation
The Lab saturation slider increases or decreases the saturation of the image, by applying a
contrast curve to the a- and b-channels of Lab space. Set this slider to -100 to switch to black and
white.
Avoid color clipping
Prevents clipping of very saturated colors. Effect is best seen when saturation slider is set to
+100. Has no visible effect with moderate saturation values.
Enable saturation limiter
Limits the amount of saturation. When Saturation limit is set to 0, the saturation does not
increase with values greater than 0. A raw file processed with saturation +100 and the saturation
limiter set to 0, produces the same result as the same file processed with saturation 0.
Curves
Here you find again the same curve types as described in the Exposure section above. Use them
to manually adapt the lightness channel L and the two color channels a and b. When you are
working on a black and white image (Lab saturation = -100), you can use the color channels to
apply a 'toner'. Choose for example the Parametric curve in the b channel and set the Lights
slider to 5, 10 or 20 to make the image 'warmer'. Use the middle control point under the
histogram to fine tune the effect. If you want to apply the same tone to a couple of b&w photos,
you need to copy the current profile to the clipboard via the appropriate icon at the top of the
Exposure tab. Then go to the file browser, select the photos, right-click and say 'Paste profile'.
RGB versus Lab
Many people are wondering what the differences are between adjusting brightness, contrast and
saturation in RGB and in Lab. In general we can say that when using positive values for the
saturation slider in Lab space, the colors come out more 'fresh', while using the same amount of
saturation in RGB makes colors look 'warmer'. The difference between both brightness and contrast
sliders is harder to tell, because it is subtle. A brightness setting of +30 in the Exposure section (so
in RGB) produces an image that is overall a bit brighter than when using the same setting in Lab.
The colors in Lab are somewhat more saturated. The contrary is the case when using an Exposure
contrast of +45: now the colors are clearly warmer than a Lab contrast of +45. The contrast itself is
about the same with the two settings. Do not hesitate to use both sliders to adjust saturation and/or
contrast.
This applies as well when you set the saturation slider to -100 to produce a black and white image.
LabSat gives a more neutral image to start with, while ExpSat seems to apply a kind of red filter.
Just open a portrait and look how the lips turn white with ExpSat.
RawTherapee 3.0 Users Manual - page 13/33
Detail tab
Here you find the sharpening and noise reduction tools. Please note that the effects of some of the
filters here are only visible at 100%. Use the detail window (click on the + sign right under) to
inspect a part of the raw.
Sharpening
A big warning to start with! The Sharpening tool is computed BEFORE the Resize tool. So if you
set a resize value and were planning to adjust a post-resize sharpness, it will not be possible at the
moment. But if you resize your image by a factor of 0,5 for example, you might want to double
your sharpening radius value. Unfortunately, the Sharpening can't be previewed at scales lower than
1:1.
Sharpening in RawTherapee can be done with two methods: classical unsharp mask (USM) or with
the RL Deconvolution algorithm.
Unsharp Mask
Radius
The Radius determines the width of the sharpening halo.
Amount
The Amount parameter controls the strength of the
sharpening.
Threshold
The Threshold parameter is used to prevent the
sharpening of noise: if a pixel luminance differs only a bit
from its neighbors (the difference is less than the
threshold), then it is not sharpened. You can set the
threshold also to 0 but then everything will be sharpened
(even the noise). In general the quality of sharpening is
best if the sharpening radius is as small as possible. For 'normal' images (not too blurry) it should
be set between 0.8 and 2.
Sharpen Only Edges
If you activate Sharpen Only Edges the noise sharpening can be avoided completely. Two new
sliders appear as well.
Radius
The Radius is used for the noise detection. If the noise is low, a lower radius could be used and
vice versa. A higher radius slows down the image processing.
RawTherapee 3.0 Users Manual - page 14/33
Edge Tolerance
Edge Tolerance determines how much a pixel has to differ from its neighbor to be considered as
an edge and not as noise. It's very similar to the USM threshold parameter and has a high impact
on the visual quality. For low ISO (low noise) images use 1000 or less, for high ISO images use
2500-3000 or even more.
Halo Control
Halo Control is used to avoid halo effects around light objects when sharpening too aggressive.
When activated, a new slider appears.
Amount
When Amount is zero, Halo Control is off. At 100 it works at maximum, reducing the visual
impact of the USM filter. Default value when activated is 85.
RL Deconvolution
The second method is RL Deconvolution, named after the
makers of this algorithm, Richardson and Lucy. Here it is
assumed that there is Gaussian blur (like applying a
Gaussian filter) that might be produced by e.g. the lens or
motion. In reality the blur might come close to Gaussian
blur, but not exactly. Therefore some artifacts like halos
might occur when you try to remove the Gaussian blur.
Radius and Amount
You can define the Radius of the gaussian blur you want to
remove. When you set the Amount to 100 the gaussian blur will be removed completely, but as
this gives a harsh result a lower setting is recommended.
Damping and Iterations
The Damping is used to avoid sharpening of noise on smooth areas. As deconvolution cannot be
done perfectly at the first time several Iterations are necessary. How much is changed between
each iteration is defined by the Richardson-Lucy algorithm. The more iterations are used the
more perfectly the gaussian blur is removed. But with each iteration the speed decreases and the
danger of halo artifacts rises. Normally you don't want to remove the gaussian blur perfectly due
to personal visual taste and speed. The default settings should be fine most of the time.
Impulse Noise Reduction
Suppresses 'salt and pepper' noise. The slider adjusts the
threshold that must be exceeded for the suppression to be
applied.
RawTherapee 3.0 Users Manual - page 15/33
Noise Reduction
Luminance
Amount of noise reduction applied to the L channel of Lab color space.
Chrominance
Amount of noise reduction applied to the a,b channels of Lab color space.
Gamma
Noise reduction is carried out after the image is transformed to the indicated gamma. Lower
values weight the noise reduction to be stronger in shadows.
Defringe
Radius
Strong chromatic edges are suppressed by averaging over a
neighborhood of the specified radius.
Threshold
Sets a threshold for the application of defringing.
Contrast by Detail Levels
This filter decreases or increases the local contrast and thus
works in two directions: either it reduces noise by blurring the
image somewhat, or it enhances the sharpness impression. It
uses four sliders. Slider 0 (Finest) has a pixel radius of 1, sliders
1 to 3 have a pixel radius of approximately 2, 4 and 8 pixels.
Contrast +/- and Neutral
Use the Contrast- button to move all four sliders by preset
amounts to the left (noise reduction). Use the Contrast+
button to move all four sliders by preset amounts to the right
(sharpening). Use the Neutral button to reset all sliders to 0.
Feel free to move individual sliders as well, and inspect the
results in the detail window; you may want to zoom in to
200% or more to see better what this filter does. For high iso shots (1600+), try for example this.
Click twice on the Contrast- button and use USM sharpening with an amount of 80.
Threshold
The Threshold slider helps to suppress noise amplification when raised above zero.
RawTherapee 3.0 Users Manual - page 16/33
Color tab
White Balance
Method
White balance can be set in different ways: Camera, Auto and
Custom.
Camera
Takes the white balance used by the camera . If you shoot only in
raw (so no raw+jpg), put the white balance settings of your
camera on Auto. This gives in general good results.
Auto
Automatically corrects the white balance. Usually a bit cooler (more blue) than Auto.
Custom
Set your own color temperature and green tint by moving the two sliders and/or using the Spot
WB tool.
Spot WB
When you click on the Spot WB button (shortcut: W), the cursor changes into a pipette (when it
is on the photo). Click on a gray or white area to determine the correct white balance. You may
do this several times on different places in the photo. Use the Size drop-down box to change the
size of the pipette. This tool can be used as well inside a detail window. Right-click to cancel the
tool and to get the regular cursor back.
Temperature and Tint
Moving the Temperature slider to the left makes the image cooler (blueish), moving it to the
right makes it warmer (yellowish). Moving the Tint slider to the left makes the image purpleish,
moving it to the right greenish.
RawTherapee 3.0 Users Manual - page 17/33
Channel Mixer
This function is used for special effects, for color and black and white
alike. As you can see the Channel Mixer is divided into three sections: Red,
Green and Blue. Those sections represent the three available color output
channels in an RGB image (see section titles). All values shown here are
percentages.
The mixture of real current RGB values and the slider settings modify the
respective color value mentioned in the section title. If the other two colors
have no RGB values for this pixel, there will be no effect when you change
their sliders. The effects are hard to describe in words, so try for yourself.
HSV Equalizer
Use the HSV Equalizer (Hue, Saturation and Value) to
change selective colors, e.g. emphasize a blue sky by
making it somewhat darker or more saturated without
touching other colors. Very useful for correcting skin
tones as well. 'Incorrect' use may produce effects resembling the analogue cross-processing
technique. When used for black and white, be sure that the raw is desaturated by setting the Lab
Saturation slider on the Exposure tab to -100. The HSV Equalizer does not work when the raw file
is desaturated by setting Exposure Saturation on the Exposure tab to -100.
H(ue) button
The HSV Equalizer is of a so-called flat curve
type, that needs some explanation. So open a raw
file, click on the v-icon next to the H(ue) button
and choose 'Minima/Maxima control points'. You'll
see six dots on the horizontal line in the middle
and six vertical lines that crosses these dots. If you
look (very) well, you'll notice that those lines are
colored; from left to right: red, yellow, green, aqua,
blue and magenta. Now click on the very left dot
(cursor changes into a little hand) and move it
slightly upward and downward. Result: red colors
are quickly changing to green, blue and magenta
when the cursor is moved up, and to pink, blue and
green when moved down.
Notice the new horizontal line that appears when you start dragging a color point and see how its
color changes. In the example on the right we change the input color green (vertical line) to the
output color blue (horizontal line).
RawTherapee 3.0 Users Manual - page 18/33
When you click and drag a vertical line, the very first
movement will determine the kind of move: vertical
or horizontal (so take care of this first movement if
you want to have a predictable result). If you want to
move the point in both directions at the same time,
then click and drag the point itself. It's easy to see if a
point is on its neutral value (i.e. on the middle line)
because it's displayed in green color, like you can see
on the screenshot on the right. Using the 'snap to'
function by holding down the Shift key while moving
the point will help you in that task.
Other things to know about this flat field curve. The
very right vertical line equals the very left line (think
circle). You can see this by dragging the red line on
the left a bit to the left. Now the left point of the
graph is at the same position as the very right point.
You can delete points by dragging them out of the editor field. You can add points by clicking
somewhere on the curve. When you place the mouse on one of the points, you see a yellow and
blue indicator. Place the mouse on the yellow one and the cursor changes into a left arrow. Now
you can drag this point to the left, to change the slope of the curve. Ditto for the blue indicator.
To get an idea how this editor works, delete all but two colors (e.g. red and yellow) and move the
graph around, change its slope and see what happens to your photo.
Dragging all the color points to their maximal values (completely up) gives an image that is
about the same as when no points have been changed (ie. Linear). Same when all sliders are set
to their minimum positions (down).
Reset the Hue curve to linear (no changes) by clicking on the blue icon next to the V(alue)
button. To compare the effects of the Hue curve with linear: switch between 'Linear' and
'Minima/Maxima control points' in the drop-down menu next to this button. Or use the history
list on the left side of your screen.
S(aturation) button
Use the same flat curve editor to change the saturation of the different colors or to accentuate one
color. Dragging all sliders down desaturates the image to black and white. Moving the slider of a
single color up, re-introduces this color, and this color only.
V(alue) button
Here you can change the lightness value of a color, or its 'presence' (think 'volume'). Dragging
the slider down makes the color somewhat darker, dragging it up lighter.
You can save a curve for later use by clicking on the disk button. Note that only the actual
(shown) H, S or V curve is saved, not all three at once. So don't give your curve a name like
my_hsv, but my_hue, my_sat and my_val if you want to save all three channel curves.
RawTherapee 3.0 Users Manual - page 19/33
ICM panel
Input Profile
No Profile
Bypasses camera input color profile. Colors are closer to
camera raw data. Useful in exceptional cases where camera
records colors far outside conventional color gamuts.
Camera default
Use RawTherapee's default camera profile (taken from dcraw,
the underlying raw conversion engine made by Dave Coffin
that is used by many raw converters).
Custom
Specify a custom camera input profile stored on your
computer. When you activate this option there is another
option available: Profile applies Gamma. There are some
custom camera profiles available on the internet that have gamma correction already
implemented. To avoid that gamma correction is applied twice (by the camera profile itself and
RawTherapee), leading to strange colors, you should activate this option.
Save reference image for profiling
Clicking this button saves the linear image before the input profile is applied. This file can be
used for profiling i.e. creating a new camera profile.
Working Profile
Specify the working color space; this color space will be used for internal calculations, for
instance for calculating saturation, RGB brightness/contrast and tone curve adjustments.
Output Profile
Specify the output RGB color space; this color space will be used for image output and
embedded in metadata.
RawTherapee 3.0 Users Manual - page 20/33
Transform tab
Crop panel
Quite self-explaining. Use the Select crop button to drag a
crop with your mouse. Use the Shift key to move the crop
over the image. Resize a crop by placing the mouse on one of
the sides, cursor changes into a double arrow. Click inside of
the crop to show (temporarily) the whole image. Go to the
Preferences window, tab General, and click on Cut overlay
brush to change the color and/or transparency of the area
around the crop. Use Fix ratio to set the crop to a fixed size
like 3:2, 16:9, etc. 1:1 is for square crops. DIN means paper
sizes like A4 and A5, those have fixed width/height
proportions. You must tell RawTherapee if you want to have a
horizontal (landscape) or vertical (portrait) crop. Use Guide
types if you like. The DPI value informs about the print size
of the current crop (or the whole photo if there is no crop). For
prints up to 13x18 cm (5x7 inch), 300 dpi is a good choice,
bigger prints can have less pixels per inch.
Resize
Can be applied to a crop or the full image. Choose your
favorite method. Resize by Scale: use the slider to set scale.
Or specify width, height or bounding box (developers lingo
for width and height).
Warning: the Resize tool will not be previewed. This is a
limitation of the current RawTherapee's engine, but the output
image will of course be resized.
Lens / Geometry panel
(Screenshot on next page).
Auto Fill
When checked, the photo will be enlarged to an extent that no black borders are visible anymore.
Tip: to better understand what happens with the following tools, uncheck this option for the
moment.
Rotate
Rotate the image between -45 and +45 degrees. Use the Select Straight Line button to tell
RawTherapee what line has to be straight. Use the mouse to draw this line.
RawTherapee 3.0 Users Manual - page 21/33
Perspective
Horizontal
When your picture was taken while you were slightly off-center of the object, you can correct
this (within certain limits) with the horizontal slider.
Vertical
Very useful to correct 'falling lines', eg. when photographing
architecture.
Higher values for both sliders produce heavily distortion, so use with
care. Or don't care at all and have fun!
Distortion
Corrects lens distortion. A negative number corrects barrel distortion,
a positive value will correct pincushion distortion. You can place a
grid over the image by activating Crop (without cropping) and using
Guide Type 'Grid'. This may serve as a guide to correct lens
distortion.
Chromatic aberration
The chromatic aberration can corrected by using the two sliders Red
and Blue. Normally you won't see any C/A in the preview therefore it
is highly recommended to use the Image Details (I even suggest to
magnify to 200%) when you apply this kind of correction. As in other
software tools, this algorithm eliminates moderate chromatic aberration quite well. Do not expect
miracles with images having extremely high chromatic aberration.
Vignetting Correction
The difference between a cheap telelens and an expensive one is,
among others, that the first one likely will produce vignetting, while
the expensive lens will not or less. Vignetting means light fall-off in
the corners of the image, making them darker than the center. This
can easily be corrected with this tool.
Amount
Setting the Amount slider to a positive value brightens the four
edges of the images to correct the classical vignetting. Setting it to a negative value darkens
them.
Radius
Influences how much of the image beginning from the edges will be brightened or darkened.
Lower values: area of darkening is bigger; higher values: area of darkening is smaller.
RawTherapee 3.0 Users Manual - page 22/33
Strength
Amplifies the settings of the Amount and Radius sliders, to the level of an effect filter. Set
Amount to -100, Radius to 50 and move Strength from 1 to 100 to see how this works.
Center X
Moves the 'circle of correction' to the left or the right of the image. Use this to apply vignetting
correcting to a cropped photo or to darken an area on the left or the right that is a bit overexposed
(think flash).
Center Y
Moves the 'circle of correction' up or down over the image. Useful to 'burn' skies or lighten the
foreground.
RawTherapee 3.0 Users Manual - page 23/33
RAW tab
Demosaicing panel
Method
To display a raw file - any raw file made by any camera
brand - its data has to be 'demosaiced'. That's why opening
a raw file always takes a bit longer than opening a jpg or tif
file, where the data are already 'display-ready'.
RawTherapee offers several demosaic algorithms, each
with it's own characteristics. The differences between them
are often very subtle; one needs to zoom in to 300%, 400%
or even 500% to really see what's going on. The choice of a
certain algorithm influences the quality of very fine details
in the image and decides how well colored edges are
rendered, among others.
RawTherapee always uses the Fast algorithm to open the
image for editing (so to display). After this the selected
demosaic method is applied when the image is zoomed to 100% magnification or when the detail
window is opened. The selected method is also used for batch processing. It is not recommended
to select the Fast method for the final conversion, as it is a low-quality algorithm for display
purposes.
Amaze is the default demosaic method of RawTherapee, as it yields the best results for most
users. The Hphd method was the default method in earlier versions of RawTherapee and is still
quite capable. It is faster than Amaze. Eahd also comes from earlier versions of RawTherapee. It
is somewhat slower than other methods because it can only use one processor core. VNG-4 used
to be (in version 2.4) the preferred algorithm for Olympus cameras, as it eliminates certain
mazing artifacts that might be created by the other methods. In version 3 Olympus users might
prefer the Amaze method though. Completing the list are the Ahd and Dcb algorithms. Just try
what works best for you.
False color suppression steps
Sets the number of median filter passes applied to suppress demosaic artifacts when applying the
demosaicing algorithm. False colors (speckles) could be introduced during the demosaicing
phase where very fine detail is resolved. False color suppression is similar to color smoothing.
The luminance channel is not affected by this suppression.
Preprocessing panel
Line Noise Filter
This filters pattern noise. The slider sets the strength of the effect.
Green Equilibration
Some cameras (for example Olympus, Panasonic, Canon 7D) use slightly different green filters
RawTherapee 3.0 Users Manual - page 24/33
in the two green channels of the color filter array on the camera sensor. Green equilibration
suppresses interpolation artifacts that can result from using demosaic algorithms which assume
identical filter properties in the two green channels. The threshold sets the percentage difference
below which neighboring green values are equilibrated.
Apply Hot/Dead Pixel Filter
Suppresses hot and dead pixels by replacing them by a neighborhood average.
Exposure panel
Linear correction factor
Applies a linear exposure correction on the raw file before the
demosaic algorithm is used. This can be useful to deal with
difficult lightning situations that resulted in overexposed areas
in the raw. The value of this slider represents the multiplier of
the RGB channels. The correction factor is independent of
color space.
HL preserving corr. (EV)
Use this slider to preserve the highlights. The value here
represents an EV value, so the equivalent of a f-stop. When the
correction factor (the first slider) is positive, a high value for
the second slider makes highlights somewhat darker, thus
preserver them. On the contrary, when the first slider is
negative, a high value of the second slider makes the highlights
lighter. This slider only works when the Linear correction
factor slider has a value other than 1.0.
Dark Frame panel
Allows the user to specify a dark frame for long exposure noise subtraction, or to allow automatic
selection based on image ISO and exposure time.
Chromatic Aberration panel
Auto correction
If auto correction is checked and the Red/Blue sliders are set to zero, an automated detection and
correction of chromatic aberration is attempted.
Red and Blue
If the Red/Blue sliders are non-zero the given values are used to apply chromatic aberration
correction prior to demosaic, regardless of whether auto correction is checked or not.
RawTherapee 3.0 Users Manual - page 25/33
Metadata tab
Exif tab
Here you can control which EXIF metadata will be
contained in the saved (developed) image file. The EXIF
metadata is usually created by the camera itself and
implemented into the RAW image file. Basic EXIF
informations are directly visible. Extended EXIF
information and so-called makernotes are organized into a
tree. Click on the arrow at the very left of the desired
subtree and you'll see its contents. Makernotes are
informations varying between camera manufacturers and
even between camera models.
You can Remove, Keep, or Add/Edit EXIF metadata.
Manipulating metadata does not change the source file in
any way! If you want to restore a value you have changed
or removed by accident, simply press Reset. Reset All
works similar but is used for trees and works recursive,
which means that all values changed/removed in this
subtree are restored.
You can Add/Edit the following EXIF information: Artist,
Copyright, ImageDescription and Exif.UserComment. Only
the English names of the EXIF fields are displayed for easy
reference. They are not translated when you choose a
different GUI language.
Tip. If you want to add to every processed photo the Artist
field for example (so that every jpg contains your name), just do this. Open a raw (it will be opened
with the profile you use by default), go to the Exif tab, click Add/Edit, choose Author, fill in your
name and save this profile with a new name, like default-exif. Now open the Preferences window,
section Image processing, and say there that every raw has to be opened with this default-exif
profile.
IPTC tab
IPTC values belong also to the group of metadata, as they are integrated into the image files but do
not add any picture details (additional or different pixels) to the image. Basically the metadata
summarized as IPTC contains additional information about your image. As this information is saved
within the image file it cannot get lost. This eases the the workflow a lot as you don't have to care
about another file when e.g. backing up or sorting your images.
IPTC is usually used to describe the image in detail. There are a lot image database softwares that
use the (IPTC) information saved in images to e.g. fill their descriptive fields. For example you can
also use IPTC fields when you try to sell your images. Most online companies willing to sell your
images support IPTC tags when you upload your images to their databases, thus you have less
work. Adding e.g. keywords on your computer at home is much more comfortable than doing it
through the web browser. Multiple Keywords and Suppl. Categories can be added/removed using
RawTherapee 3.0 Users Manual - page 26/33
the plus and minus signs next to it.
The button Reset (under) resets the IPTC values to those saved in your current profile. There are
two more buttons, one copies your current IPTC setting to the clipboard. This is especially useful
when you you want to apply the same IPTC values to multiple images. The other one pastes the
formerly copied IPTC settings from the clipboard to your current image.
RawTherapee 3.0 Users Manual - page 27/33
PREFERENCES WINDOW
General tab
Workflow
Choose here between single tab or
multiple tabs mode. If you own a
second monitor, you can use that
one as well. A restart is required for
these options to take effect.
Default language
Select the language for the GUI out
of a list of thirty languages. English
(US) is the default ('mother')
language, translations are based on
that one. Again, a restart is required
to change the language of the GUI.
Default theme
Choose between several themes for the GUI, from light to dark. The effects are visible after a few
seconds, so no need to restart here.
Checking 'Use System Theme' might change the appearance of RawTherapee, although this
depends on the platform and the window manager in use. Just see if it works for you.
Cut overlay brush: this is the color of the area outside of a crop. By clicking on the colored button, a
new window appears where you can also set transparency. If set to 75, the cropped area is still
somewhat visible. Useful to move the crop around and to find the best composition (hold the Shift
key and move the crop with the mouse).
Choose the font of your liking here. With smaller fonts more tools can be displayed on the screen.
Clipping indication
When checked, the raw photo blinks at underexposed and overexposed areas. The both threshold
sliders determine at which values blinking begins.
Date format
Determines the date format of the thumbnails in the file browser window.
RawTherapee 3.0 Users Manual - page 28/33
External editor
When you send a raw from within RawTherapee to an external editor for further processing,
RawTherapee needs to know which program you want to use. If that's not the Gimp, you can
specify the path to your favorite photo editor here.
About
Shows information about the original author of RawTherapee and the current version, details of the
build, names of developers and other contributors and the license under which RawTherapee is
published: GPL 3.
Image Processing tab
Default image processing parameters
Specify which profile RawTherapee has to use when opening a raw and when opening a non-raw
photo. When you have made your own default profile, you can tell RawTherapee to always use that
one.
The profile for non-raw files like jpg or tif can probably best set to neutral. The neutral profile just
loads the photo as it is, without applying for example Auto exposure or sharpening.
Processing Profile Handling
Save processing parameters next to the input file. When checked, RawTherapee writes a pp3 file
with all the edits you made to your photo next to the input (raw) file. This represents your work (eg.
sharpening settings used) and can be reloaded later.
Save processing parameters to the cache. Instead of creating a pp3 file next to the raw, this option when checked - writes the pp3 to the cache. When you check the last option only, chances are that
you loose your work (the+ edits) when installing RawTherapee on a new pc for example. Feel free
to check both.
Dark Frame
Choose a dark frame on your hard disk for long exposure noise substraction.
File Browser tab
Image directory at startup
At the top you can define the Image directory at startup. It could be the RawTherapee Installation
directory, the Last visited directory, the Home directory, or you define an Other directory.
Next you can set some File Browser Options. This option defines whether you can see date and
time or EXIF information below the images in the file browser.
You can also define a list of parsed extensions, i.e. which files are recognized as images. Some
extensions are defined by default. Those can be deactivated by removing the checkmark in front of
it. If a desired extension is missing you can easily add it by using the plus button.
RawTherapee 3.0 Users Manual - page 29/33
At the bottom of that page there are several Cache options that influence the speed of
loading/generating the thumbnails. These options are quite self-explaining.
Color Management tab
Here you can define the directory where ICC profiles could be found. You should also define the
ICC profile of your monitor when you've done a calibration. If you don't do it, the displayed image
will be displayed with wrong colors.
You can also set the colorimetric intent which defines how the ICC profiles are used for translation
between gamuts or color spaces
Perceptual
If the color gamut of your image is higher than that one your device (monitor or printer) is able of
then it is compressed a bit to fit the gamut of your device as far as possible. This might result in an
image with reduced saturation, the hue is still kept. It might look a bit dull. But this is not really that
much visible as the color relations stay the same. This method is activated by default
(recommended)
Relative Colorimetric
The colors existing in the color gamuts of both your image and your device are kept and displayed
100% perfect. If the color does not exist within the color gamut of your device the nearest possible
value is taken. This might lead to some banding effects, especially visible in blue sky. The white
point will be corrected.
Saturation
Very similar to Perceptual, but here it is tried to keep the saturation and change the hue instead. This
is very useful for e.g. screenshots or similar. It could also be used when you do not care of some
possible color shift as long the image does not look dull.
Absolute Colorimetric
Similar to Relative Colorimetric. It tries to reproduce the exact colors recorded in the original scene.
The white point will not be corrected. It is normally used, when the gamuts of your image and your
device are nearly the same. For example for reproduction of specific colors like reproductions of
fabric or logo colors.
RawTherapee 3.0 Users Manual - page 30/33
Batch Processing Tab
The Batch processing is the capability of editing several images at the same time in the 'File
Browser' tab. That's why there's a tool editor on the right of it.
This is done by selecting more than one file by using the Shift or Control key in the File Browser,
then you can edit those images with the so-called 'Batch tool panel editor'. The way the sliders'
value is used to modify the image depends on the options set in this 'Batch Processing' tab.
When you select a single image, the sliders get the values of the processing parameters of that
specific image. These can be the values of the default profile or the values from your last edit
session of this photo. If your image is currently being edited in an Editor tab, the editors' values will
be reflected in realtime in the Batch tool panel editor, and vice versa, so take care of what you're
doing.
But if you select several images, the behavior of each sliders can be used in two different ways.
The 'Add' mode
The slider set to work in this mode will change its range and default value right after the image
selection, in order to add the value of the slider to the value of the according parameter of each
image.
For example, if you select two images by holding the Ctrl modifier key, one image that has an
'Exposure compensation' of -0,5 EV, and another one which has an Exposure compensation of
+1,0 EV, moving the slider up to 0,3 will result in setting a value of -0,2 EV for the first image
and +1,3 EV for the second one! This mode may also be understood as 'Relative mode'.
Using the 'Reset' button will move the slider to its default (zero) position, and will then bring
back the initial value of each images for this parameter.
The 'Set' mode
In this mode, the value of the slider will set 'as is' the value of the corresponding parameter.
If we use the same example as before, moving the slider up to 0,3 will result in setting a value of
0,3 EV for both images (one value for all images). This mode may also be understood as
'Absolute mode'.
Using the 'Reset' button will move the slider to its default position (different for each slider), and
will then reset this parameter for each image.
You can select the desired behavior for each slider in this tab. Please note that all sliders are not
listed, because they are supposed to work in SET mode only.
RawTherapee 3.0 Users Manual - page 31/33
SHORTCUTS
Following is a list with the keyboard shortcuts and some special mouse actions.
H
Hide left panel
I
Show/hide EXIF info overlay
B
Before/After view
N
Hand tool (standard); use this to navigate around a zoomed image or to move the frame that
defines where the detail window is
W
White balance
C
Crop tool
S
Select straight line (Rotate tool)
Ctrl-S
Save current image
Ctrl-Q
Add current imahe to processing queue
Ctrl-E
Edit current image in external editor
+ or =
Zoom in
- or _
Zoom out
1
Zoom to 100% (note: this is the 1 on the non-numerical keyboard, so on the left
F
Fit to screen
Ctrl-Z
Undo
Ctrl-Shift-Z
Redo
F11
Fullscreen
RawTherapee 3.0 Users Manual - page 32/33
Shift+drag crop
moves cropped area
Shift+drag a curve point
The point is snapped to key positions highlighted in red
Ctrl+drag a curve point
The point moves slowler than the mouse cursor. This is the way to have a finely tuned result.
Ctrl+click on a slider's reset button
The slider is set to the value of the initial profile, the one that has been used when the image
was loaded in the editor, or when the image has been selected in the batch editor.
Double-left-click on canvas outside photo
cycle canvas color (black / theme background color / white)
Right-click in the preview area
get back to default cursor (after having used the pipette for white balance or the straightening
tool).
Right-click over a tool's title (foldable section)
Open the section and closes all other ones.
Windows only
F5
Open result in default viewer. Uses current queue settings to determine output file path.
Ctrl-F5
Open Explorer in the raw directory and select current image
Shift-F5
Open Explorer in the queue output directory and select current image if already converted.
This users manual was written/compiled by Paul Matthijsse, with some additions by Jean-Christophe Frisch. Parts come
from the 2.4 manual, parts from remarks on RawTherapee's section on Googlecode and parts from the RawTherapee
forum. Published under the Creative Commons License. June 2011
RawTherapee 3.0 Users Manual - page 33/33